Refurbishment of my Maserati Mexico
Discussion


The picture shows the rear suspension area. I took the leaf spring apart, painted the pieces, and assembled the spring with new plastic strips. As can be seen, I made a patch panel for the rusted section behind the wheel opening. The stainless trim piece from around the opening was used as a guide to get the shape right. 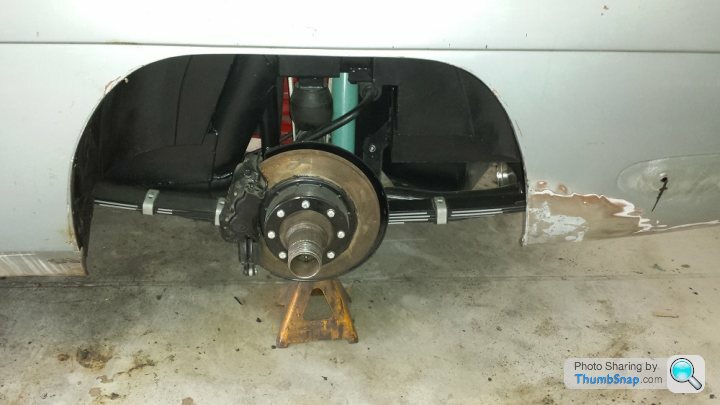
This is a view of the engine compartment. The underseal is gone and it looks much better (but it is dusty right now).
I probably should start a thread but most of the repair work has already been covered by the previous posts in this thread. I really wish I had known about it before I started...
My original request was advice on removing the lower A-arm shaft. A puller I made worked great on the right side, but the left will not move. I have thought about applying heat but about half of the shaft is inside a frame member where it cannot be heated. The other problem is that heat will probably destroy the existing rubber bushings which are still functional. I am trying to preserve the shaft and bushings so I do not get in a situation where the functionality of the suspension is destroyed yet the shaft still can't be removed. But maybe there is no choice but to take the risk.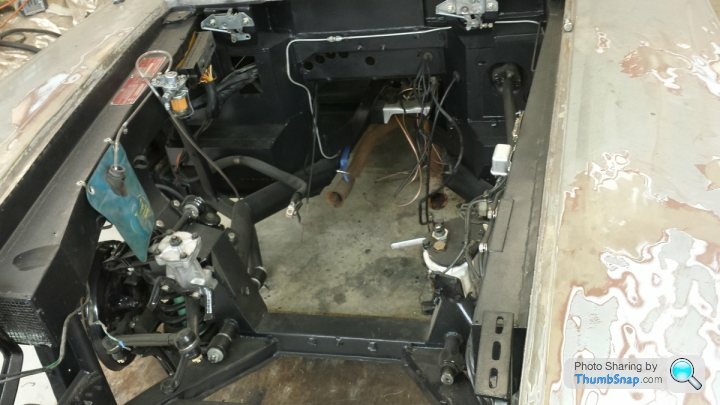
As an example of an image search, I needed one of the trim pieces that the covers the grab-handle fastening point. Using a word description, I found nothing. But an image search was successful. The image search started with “Maserati Mexico light”. It led to an image of an interior light similar to the Mexico light that was listed for several Ferrari and Maserati models. It was a recent post so I went to the associated web site and found that there was a collection of over 3000 items for sale. Using several search terms on the sale site nothing turned up, but I decided to go through images of the items anyway. Near the end (after nearly an hour) I found the trim piece. I do not remember what its description was, but I do know I never would have found it with a text search. I hope this suggestion will help others when they are looking for obscure parts.

I finally removed the jammed left suspension shaft using my puller on one end and a large air hammer on the other. (After it was started, the air hammer was no longer needed.) I covered the entire threaded end that was hammered on with a threaded piece that butted up against the thicker portion of the shaft, and I also made a threaded adapter for the puller to reduce the strain on the "pulled" end. With these pieces I was able to remove the shaft in a useable condition. However, I already purchased a new shaft so I will use that instead.
A big reason why the shaft was tight seems to be that the chassis tube that the shaft fits in is slightly bent. The new shaft fits easily until it has gone 3/4 through the tube, then it jams. This occurs no matter which end of the tube the shaft is inserted in or which end of the shaft goes in first. I noticed the same thing when I replaced the right shaft, but it was not as severe.
A big reason why the shaft was tight seems to be that the chassis tube that the shaft fits in is slightly bent. The new shaft fits easily until it has gone 3/4 through the tube, then it jams. This occurs no matter which end of the tube the shaft is inserted in or which end of the shaft goes in first. I noticed the same thing when I replaced the right shaft, but it was not as severe.
With the suspension bushes replaced I went on to refurbish the steering gear. This was already covered by another person earlier in this thread (sorry I could not locate the page) but it failed to mention what size seals were needed. The parts manual specifies a 25 x 32 mm o-ring to seal both the idler and steering box lower shafts. Since the steering box (at least) is a Jaguar part a non-metric o-ring should suffice, and by measuring the remains of the original o-ring it turns out that a 1 inch ID by 1 1/4 inch OD ring was used originally. The idler box had a slightly thinner o-ring (maybe it was a 25 by 32 mm ring) but the 1 inch by 1 1/4 inch ring worked fine there as well. The upper shaft seal on the steering box is a standard lip seal with a 3/4 inch ID and a 1 1/4 inch OD. As was found in the original posting, the idler box was dry but unworn, and the steering box still had some oil and also no signs of wear.
In terms of suspension bushes, I went with the original metal/rubber type. A Jaguar Mark ll polyurethane bushing set could have been fitted, but the since the original rubber bushes that I replaced were still serviceable, I saw no real advantage to using polyurethane. However, I am curious if anyone has tried the urethane bushes in any Maserati that uses the Jaguar front suspension parts.
In terms of suspension bushes, I went with the original metal/rubber type. A Jaguar Mark ll polyurethane bushing set could have been fitted, but the since the original rubber bushes that I replaced were still serviceable, I saw no real advantage to using polyurethane. However, I am curious if anyone has tried the urethane bushes in any Maserati that uses the Jaguar front suspension parts.
There was an earlier question about removing the steering wheel. I found that the bezel holding the horn push can just be pried off. The wheel itself is held to the shaft with a gland nut. Finding a spanner for this is nearly impossible, but I used a universal socket. This socket is filled with spring loaded pins that retract when pushed over a nut leaving "free" pins to grip the nut or fit in the slots of a gland nut. I have attached a picture of what I mean... 
Just to update this thread, took the Mexico to Fastlane 2016 at the weekend for a nice little run in the sun. Great day out all round and the car ran very well indeed. Now it needs a new MOT ready for some more summer use


Shamelessly borrowed photos but I didn't have my own camera with me....
Shamelessly borrowed photos but I didn't have my own camera with me....
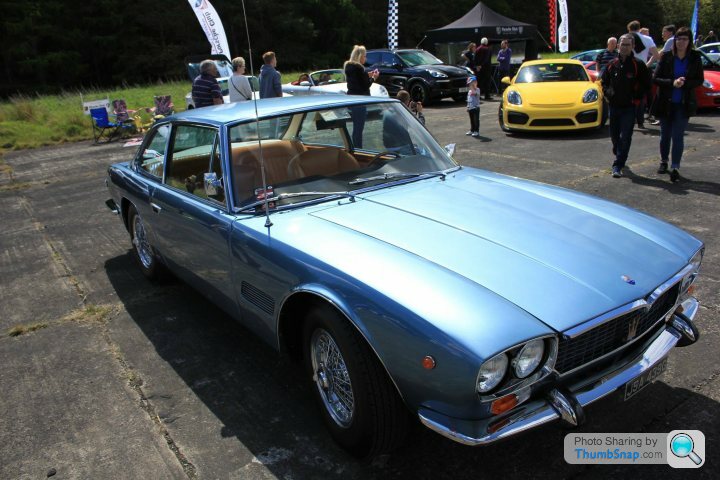
It is great seeing the Mexico out in the world, it is inspiration to finish mine...
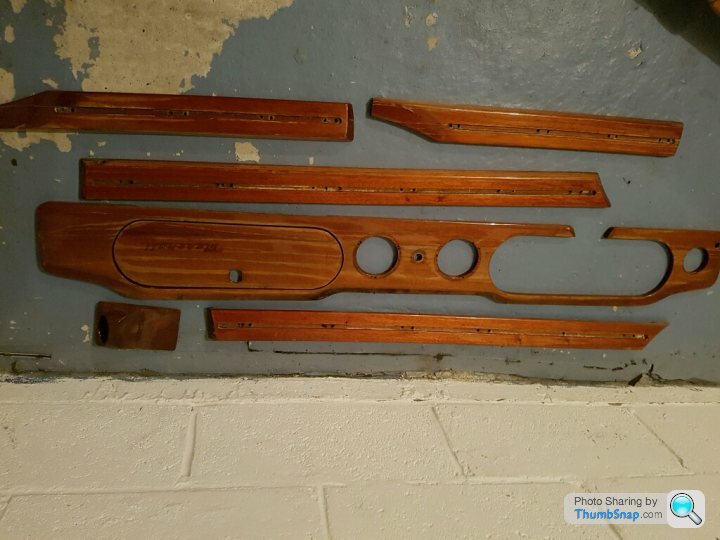
It might be of interest to know how to remove the wood fascia from the instrument panel. There are no fasteners, it is held in place by being trapped between the top dash panel and the lower trim/switch panel. The first steps are to remove the steering column and the items that go through the fascia itself; the clock and the choke cable. Next, start to remove the lower trim panel; there is a screw each side accessible only when the corresponding door is open, and some obvious screws on the bottom. The next step is to remove the switches and switch panel to access the bolts holding up the center section of the trim panel. The lighter is held in by a thumb wheel on the back and the ignition switch by the knurled trim piece. All of the toggle switches are easily loosened and pushed back out of the way. The control cables from the levers also need to be disconnected. The window switch is held in by spring tabs, two on the top and two on the bottom. A bent screwdriver can be used to push the tabs down and free the switch. The switch panel itself is held on by nuts on six studs fixed to the back of the plate. There are two studs on each end and two either side of the window switch. All are easily removed with a 6 mm socket once the switch gear is out of the way. There are two bolts at either end of the trim panel approximately at the ends of the switch area. There are two more bolts in the center area under the air vents. To reach the center nuts, the air vents must be removed, then access is easy (10 mm bolts). The trim piece can then be pulled down (it may stick due to the leather covering adhering to the instrument panel). With the trim piece removed, the fascia can be worked loose and removed. Note: the wood covering of the glove box door does not interfere with the fascia removal so it can be taken out either before or after the fascia is removed.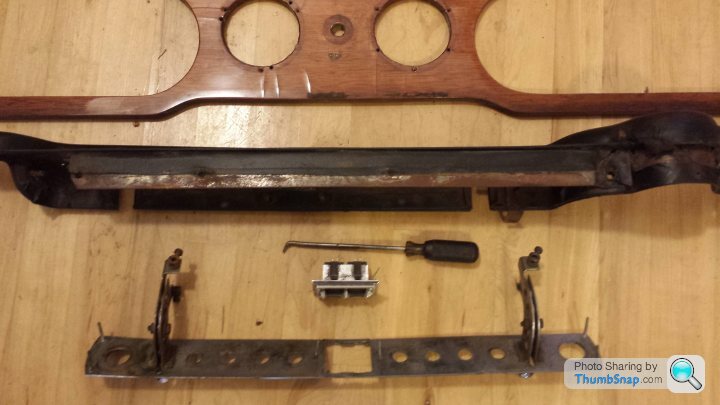
It might be of interest to know how to remove the wood fascia from the instrument panel. There are no fasteners, it is held in place by being trapped between the top dash panel and the lower trim/switch panel. The first steps are to remove the steering column and the items that go through the fascia itself; the clock and the choke cable. Next, start to remove the lower trim panel; there is a screw each side accessible only when the corresponding door is open, and some obvious screws on the bottom. The next step is to remove the switches and switch panel to access the bolts holding up the center section of the trim panel. The lighter is held in by a thumb wheel on the back and the ignition switch by the knurled trim piece. All of the toggle switches are easily loosened and pushed back out of the way. The control cables from the levers also need to be disconnected. The window switch is held in by spring tabs, two on the top and two on the bottom. A bent screwdriver can be used to push the tabs down and free the switch. The switch panel itself is held on by nuts on six studs fixed to the back of the plate. There are two studs on each end and two either side of the window switch. All are easily removed with a 6 mm socket once the switch gear is out of the way. There are two bolts at either end of the trim panel approximately at the ends of the switch area. There are two more bolts in the center area under the air vents. To reach the center nuts, the air vents must be removed, then access is easy (10 mm bolts). The trim piece can then be pulled down (it may stick due to the leather covering adhering to the instrument panel). With the trim piece removed, the fascia can be worked loose and removed. Note: the wood covering of the glove box door does not interfere with the fascia removal so it can be taken out either before or after the fascia is removed.
d.wilde said:
Thank you, it makes sense. AM112*512 was for sale in Australia in 2012. It's a post RHD conversion.
http://maserati.mexico.free.fr/registre/0512/0512....
Beautiful car Paul- a credit to you http://maserati.mexico.free.fr/registre/0512/0512....

Stumbled across this last night- is this the car above? I do realise that one is RHD and one LHD (apologies if already resolved/commented)
http://www.africanmusclecars.com/forum/viewtopic.p...
Paul;
Could you give some details on what it is like to drive your beautifully restored Mexico? I saw that you gave some brief driving impressions in page 21 of this thread but now that you have had more experience with it and I wonder if you have anything to add? For example, how are the brakes, steering effort, clutch feel, etc.? Is there any tendency to overheat in traffic? Also, did you get the AC to work, and if so, how effective is it?
I also noticed that you mentioned that the steering wheel seems too far away; does the steering wheel adjustment make any real difference in this?
Carsie said:
d.wilde said:
Thank you, it makes sense. AM112*512 was for sale in Australia in 2012. It's a post RHD conversion.
http://maserati.mexico.free.fr/registre/0512/0512....
Beautiful car Paul- a credit to you http://maserati.mexico.free.fr/registre/0512/0512....
Stumbled across this last night- is this the car above? I do realise that one is RHD and one LHD (apologies if already resolved/commented)
http://www.africanmusclecars.com/forum/viewtopic.p...
http://maserati.mexico.free.fr/registre/0320/0320....
morris traveler said:
Paul;
Could you give some details on what it is like to drive your beautifully restored Mexico? I saw that you gave some brief driving impressions in page 21 of this thread but now that you have had more experience with it and I wonder if you have anything to add? For example, how are the brakes, steering effort, clutch feel, etc.? Is there any tendency to overheat in traffic? Also, did you get the AC to work, and if so, how effective is it?
I also noticed that you mentioned that the steering wheel seems too far away; does the steering wheel adjustment make any real difference in this?
Another MOT passed with no advisories which is encouraging.Could you give some details on what it is like to drive your beautifully restored Mexico? I saw that you gave some brief driving impressions in page 21 of this thread but now that you have had more experience with it and I wonder if you have anything to add? For example, how are the brakes, steering effort, clutch feel, etc.? Is there any tendency to overheat in traffic? Also, did you get the AC to work, and if so, how effective is it?
I also noticed that you mentioned that the steering wheel seems too far away; does the steering wheel adjustment make any real difference in this?
Driving impressions... the best way to describe it is that it feels like a 1960's car. The seating position is a little awkward around town as it's quite a reach for the handbrake and the brakes are generally lousy compared to modern cars, but once out on the open road it is utterly effortless. At slow speed the brakes tend to grab and squeal which is embarrassing and I still can't get them to properly quieten down. I do think i'll have to get some anti-squeal shims made and give them a try.
The steering is heavy at parking speed but beautifully weighted at anything over 30mph, once the car is settled on a decent road it will cruise happily and anything between 50 and 100 without any fuss, in fact the faster it's going the more settled it feels. 5th gear makes for a very relaxing long distance drive between petrol stops.
The driving position is very 'long-arms, short-legs' so if the 'wheel was adjusted further away from the dash, it makes the handbrake even harder to reach. You just need to settle into driving with you're left foot on the left foot-rest, your right on the 'go' peddle and just let your knees drop either side of the steering wheel. So far it's been very comfortable but we're off to Le Mans Classic next month in it, 1,150 mile round trip so that'll test our stamina! It does ride beautifully so that will hopefully keep things nicely relaxed.
I've not got the AC working as I removed the AC radiator to allow some additional air-flow as it does run warm at times. Again on a run it's spot-on, but the needle does rise when stuck in traffic. The original electric fans both cut-in sequentially as they should but I wouldn't want to be stuck in traffic for hours in it on a hot day. I have taken off the large oil-water heat-exchanger unit and replaced the oil filter unit with a spin-off modern version so I'm hoping that this will allow the water to flow much better. It's a fully reversible conversion so if there is no change I can always go back to 'original'.
They're nice cars to work on aren't they, everything is nicely engineered but rest assured they are lovely things to drive in an 'old-car' way.
Thank you; that is the most detailed description of driving impressions I have seen and it is nice that you related it to modern conditions. Your upcoming drive to Le Mans will be a good test but that is, of course, the kind of driving the car was designed for. I hope you have an enjoyable trip. Also, it will be very interesting to learn how your replacement of the oil cooler/filter with just a filter works out. It seems like a reasonable modification.
I have found the Mexico remarkably easy to work on in the sense that everything is logically constructed; there are none of the hidden fasteners and puzzles that new cars seem to be plagued with. And you have reassured me that all the work I am doing on the car will someday be worth it.
I have found the Mexico remarkably easy to work on in the sense that everything is logically constructed; there are none of the hidden fasteners and puzzles that new cars seem to be plagued with. And you have reassured me that all the work I am doing on the car will someday be worth it.
Well we made it down from Newcastle to Le Mans for the classic and back without any drama.
Circa 1,200 miles and we even squeezed out 18 mpg on the run up from Portsmouth to Weatherby. Which I was very happy with.
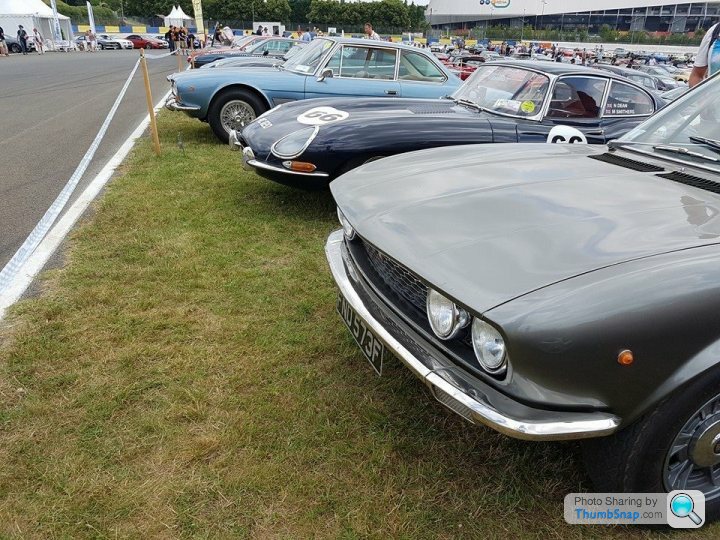
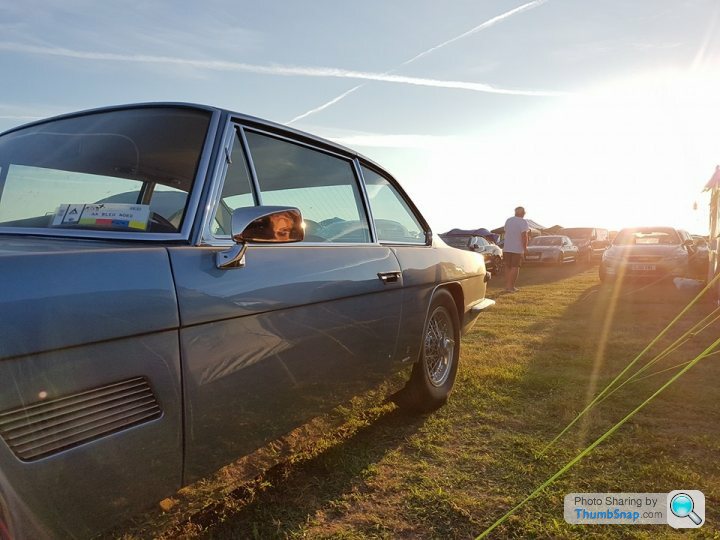
We lost the speedo drive on the way, and used several tanks of fuel and about 1 litre of oil. It was a very hot weekend and whilst it got hot in the traffic, it sooner cooled nicely once rolling again. Most importantly, it looked beautiful both amongst some lovely company on the Pistonheads stand, and on the campsite as the sun sets.

Circa 1,200 miles and we even squeezed out 18 mpg on the run up from Portsmouth to Weatherby. Which I was very happy with.
We lost the speedo drive on the way, and used several tanks of fuel and about 1 litre of oil. It was a very hot weekend and whilst it got hot in the traffic, it sooner cooled nicely once rolling again. Most importantly, it looked beautiful both amongst some lovely company on the Pistonheads stand, and on the campsite as the sun sets.

The Surveyor said:
MarkwG said:
Reckon I must have seen you on the M27 this morning, westbound past the Fareham junction around 8am? Only a fleeting glimpse as I was going the other way, but unmistakable (I think  )!
)!
Yep, that would have been us, heading into the holdups on the M3. Well spotted )!williamp said:
he was going to tell you about those hold ups, but then thought...nah..! biggrinpaperbag
So used to it, queues no longer register... 
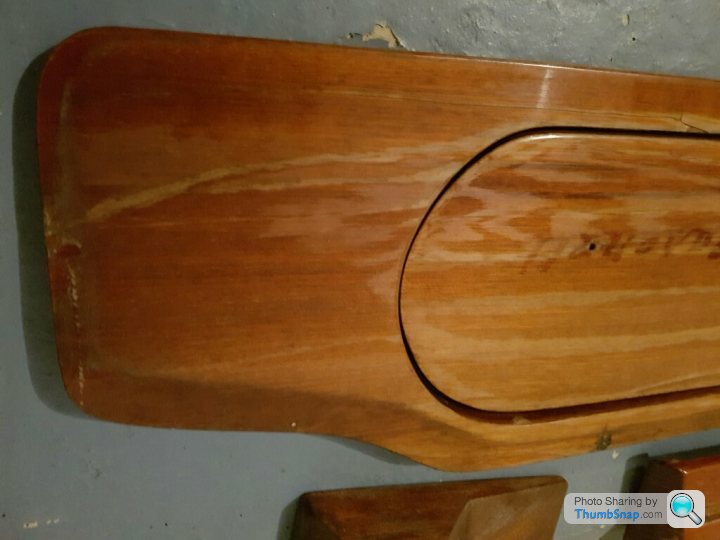
Just as a little update. The Mexico has been advertised for sale for a couple of months and whilst it has generated more interest than expected, no acceptable offers have come in so ive taken it off the market and i'm going to do some autumn refurb work. Some rechroming and get the sticky speedo refurbished and refinish the cracked lacqur on the woodwork.
The first task completed tonight is the removal of the dashboard. Proper PITA job...
The first task completed tonight is the removal of the dashboard. Proper PITA job...
Gassing Station | Classic Cars and Yesterday's Heroes | Top of Page | What's New | My Stuff