Discussion


Thinking of trying my hand at this.
Is this a good starting point?.
http://www.frost.co.uk/automotive-fillers-tools/st...
Is this a good starting point?.
http://www.frost.co.uk/automotive-fillers-tools/st...
yes, the starter kit is good and once you've got the knack lead loading is hugely rewarding. there are some good videos that may help on youtube too... http://www.youtube.com/results?search_query=lead+l...
Tell us how you go on, if you don't mind.
I'm getting to a point where I've got quite a bit of filling to do, and I think I'd like to lead load instead. But everyone I ask says that modern body fillers are so good that I'd be crazy to try it, and would get better and longer-lasting results with filler. Most of the areas are repairs, not joints that would have been lead-loaded in the first place.
I'm getting to a point where I've got quite a bit of filling to do, and I think I'd like to lead load instead. But everyone I ask says that modern body fillers are so good that I'd be crazy to try it, and would get better and longer-lasting results with filler. Most of the areas are repairs, not joints that would have been lead-loaded in the first place.
Well I've had a crack at it and found it's quite a satisfying thing to do. It takes a bit of getting used too, hardest part for me was getting the heat balance right. I kept burning the wooden paddles at first, but got the hang of moving the heat on to the solder, then moving it away again to spread the 'butter' about.
The Frosts kit is indeed very good, you get some solder paste for the tinning process, brushes to spread it, two Maple paddles to butter with, some Tallow for lubrication and good quality flexible file to smooth it off. A handy little book comes with it too, which is a bit out of date and very American, but the techniques are still the same.
First attempt I had was on a piece of scrap, but I found I didn't have an 'aim' so sort messed about and got every thing a bit hot.
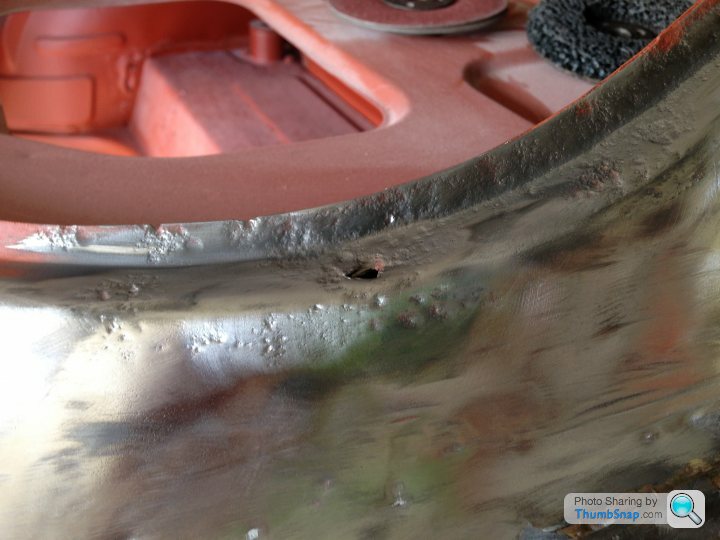
So I jumped straight in at the deep end and filled a hole in a wing (about 4mm wide), reasonably successfully. Then had a go at filling some other holes and rust pitting on a rear screen, this came out OK too. I'm not sure yet if I'm going to be using this process for final filling or if I will skim it with conventional plastic filler, but I'm much more confident that actual perforations will be properly dealt with using the Lead.
Here's a couple of before and afters.
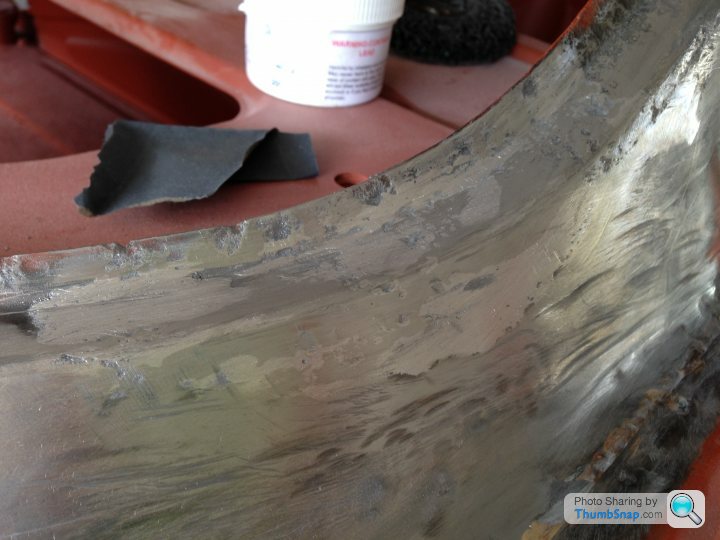
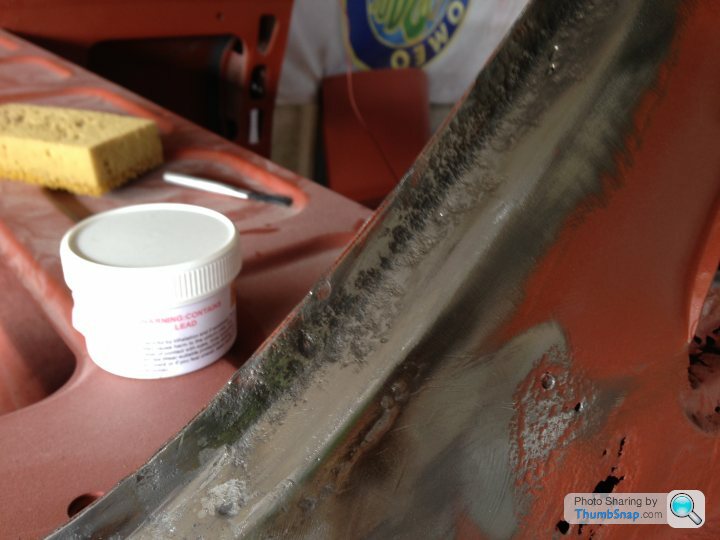

The Frosts kit is indeed very good, you get some solder paste for the tinning process, brushes to spread it, two Maple paddles to butter with, some Tallow for lubrication and good quality flexible file to smooth it off. A handy little book comes with it too, which is a bit out of date and very American, but the techniques are still the same.
First attempt I had was on a piece of scrap, but I found I didn't have an 'aim' so sort messed about and got every thing a bit hot.
So I jumped straight in at the deep end and filled a hole in a wing (about 4mm wide), reasonably successfully. Then had a go at filling some other holes and rust pitting on a rear screen, this came out OK too. I'm not sure yet if I'm going to be using this process for final filling or if I will skim it with conventional plastic filler, but I'm much more confident that actual perforations will be properly dealt with using the Lead.
Here's a couple of before and afters.
v8250 said:
Evo said:
Oldred_V8S said:
A bugger to do it on my TVR, looks worse than when I started.
Cat imagine it sticks too well to fibreglass  "
" 
Bit of a thread resurrection here.
18 months further down the line and I'm still restoring this Car!.
The lead loading also seems to have thrown up an awkward snag over time too. The area around the rear screen has been coated with a holding primer to stop it rusting but I'm finding that nasty brown deposits are coming out of the area I've filled with the solder.
I am aware of the reaction from the acid in the flux, and I'm sure it is the cause, but I have also neutralised it with baking soda.
I've sanded it off a few times now, retouching the primer, but it still keeps coming back. Not sure what to do now, I'm getting gradually closer to finishing the bodywork generally and I'd hate to find it ruining an expensive paint job.
Anybody any experience of this.
Anything on this video help....?
https://www.youtube.com/watch?v=87fuTnBS2bE
Gene Winfield has been leading for 60 odd years....
https://www.youtube.com/watch?v=87fuTnBS2bE
Gene Winfield has been leading for 60 odd years....
velocemitch said:
Bit of a thread resurrection here.
18 months further down the line and I'm still restoring this Car!.
The lead loading also seems to have thrown up an awkward snag over time too. The area around the rear screen has been coated with a holding primer to stop it rusting but I'm finding that nasty brown deposits are coming out of the area I've filled with the solder.
I am aware of the reaction from the acid in the flux, and I'm sure it is the cause, but I have also neutralised it with baking soda.
I've sanded it off a few times now, retouching the primer, but it still keeps coming back. Not sure what to do now, I'm getting gradually closer to finishing the bodywork generally and I'd hate to find it ruining an expensive paint job.
Anybody any experience of this.
Would that include this bit?18 months further down the line and I'm still restoring this Car!.
The lead loading also seems to have thrown up an awkward snag over time too. The area around the rear screen has been coated with a holding primer to stop it rusting but I'm finding that nasty brown deposits are coming out of the area I've filled with the solder.
I am aware of the reaction from the acid in the flux, and I'm sure it is the cause, but I have also neutralised it with baking soda.
I've sanded it off a few times now, retouching the primer, but it still keeps coming back. Not sure what to do now, I'm getting gradually closer to finishing the bodywork generally and I'd hate to find it ruining an expensive paint job.
Anybody any experience of this.
Problem there is that you're not just using the lead to improve the surface - you're filling a rust hole with it. Think of the lead as a better alternative to good ol' plastic padding. You wouldn't fill a rust hole with that and expect it to last, would you...? You need to cut the grot out and put new steel in, before using the lead to get the surface.
You'll be surprised just how well a MIG welder can hole fill with a bit of practice. Forgotten how many holes I filled on my three wheeler restoration, but a lot. None were rust holes, all were to mount something.
Although I too bought a lead loading kit, I never used it as with the MIG and an angle grinder, I fixed all the holes properly. Lead loading kit came with a tin of solder paint, which I have since found to be an unbeatable tinning device. Handy as the prop-shaft is soldered (yes really).
Although I too bought a lead loading kit, I never used it as with the MIG and an angle grinder, I fixed all the holes properly. Lead loading kit came with a tin of solder paint, which I have since found to be an unbeatable tinning device. Handy as the prop-shaft is soldered (yes really).
Slidingpillar said:
You'll be surprised just how well a MIG welder can hole fill with a bit of practice. Forgotten how many holes I filled on my three wheeler restoration, but a lot. None were rust holes, all were to mount something.
Sure. But that's not being filled with weld, and that's not a drilled hole...Slidingpillar said:
You'll be surprised just how well a MIG welder can hole fill with a bit of practice. Forgotten how many holes I filled on my three wheeler restoration, but a lot. None were rust holes, all were to mount something.
Although I too bought a lead loading kit, I never used it as with the MIG and an angle grinder, I fixed all the holes properly. Lead loading kit came with a tin of solder paint, which I have since found to be an unbeatable tinning device. Handy as the prop-shaft is soldered (yes really).
I think you have to be clear on something. Lead loading is NOT for filling rusty holes. It was used in days gone by as a filling medium between panels where the join is designed to be secret or hidden. As most older cars would tend to flex on bumps, particularly those with separate chassis, the lead will not crack or fall out; nor will it shrink like some plastic fillers do. It is absolutely vital however that the flux is totally neutralised before anything else is applied otherwise a reaction will occur and it can take years before it does, but it will ruin your expensive paint job.Although I too bought a lead loading kit, I never used it as with the MIG and an angle grinder, I fixed all the holes properly. Lead loading kit came with a tin of solder paint, which I have since found to be an unbeatable tinning device. Handy as the prop-shaft is soldered (yes really).
J
Gassing Station | Classic Cars and Yesterday's Heroes | Top of Page | What's New | My Stuff