Project Scimitar MV6
Discussion


I had it Mapped at Maynards and it seemed the engine was producing 262hp on their dyno, with 200 ft.lb at just 2000rpm and 250ft.lb higher up.
I'm still thinking about Nitrous, but the only purpose would be to try and beat Mr Capri, which I think it a bit of a silly as I could easily have him on a track day. I'm not sure yet, I guess it depend how I'm feeling when I next have a load of money burning a hole in my account.
The original plan was to supercharge it when all the teething problems are sorted. It is a lovely balance of performance and being useable at the moment so I'm still thinking it through.
A long overdue update.
I've done pretty much half my annual mileage in the car already!!! And the exhaust is doing my head in, Its not leaving the garage again till this is done! I'll be fitting a 1/4 wavelength resonator pipe to each side, with a sliding joint so it can be tuned to the right frequency then depending on the how that is I'm still thinking about pursuing the intercom route.
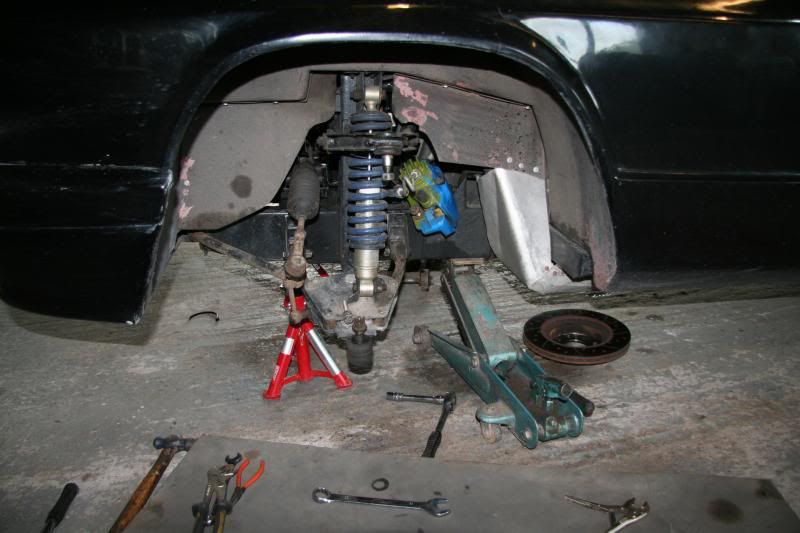
The other thing is bump steer, hands up who saw that coming after my new wishbones and uprights
Well I knew there was an issue from the start, you simply can't make a ball joint conversion without there being one. In a ball joint the steering axis and the axis through the end of the wishbone coincide and they do not in the trunion so I knew I would have to lengthen the track rods to take this into account. I've done all the calcs for this and found they need to be about 6mm longer each side. This is easily done with the steering arms being bolted to the uprights with great big spacers, simply turn the spacers down a bit
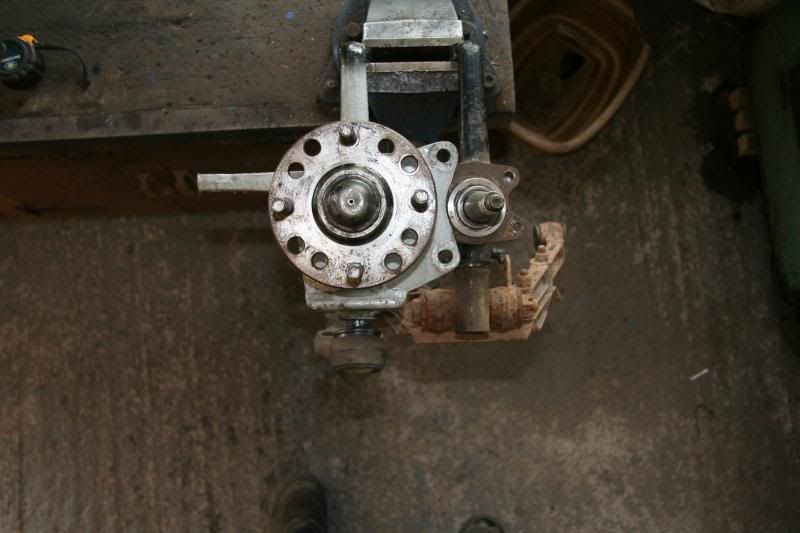
But what I hadn't though about was that I've make the upright about 45mm taller!!!!! The end of wishbone axis sits 45mm lower than in the original set up, compared to the top ball joint! This makes the 6mm track rod problem look like nothing. You can see this extra height in the following photos.
So after much calculating and trig and so on..... (and the race and rally source book, which is excellent for this sort of thing)
My options are......
More to come..
I've done pretty much half my annual mileage in the car already!!! And the exhaust is doing my head in, Its not leaving the garage again till this is done! I'll be fitting a 1/4 wavelength resonator pipe to each side, with a sliding joint so it can be tuned to the right frequency then depending on the how that is I'm still thinking about pursuing the intercom route.
The other thing is bump steer, hands up who saw that coming after my new wishbones and uprights
Well I knew there was an issue from the start, you simply can't make a ball joint conversion without there being one. In a ball joint the steering axis and the axis through the end of the wishbone coincide and they do not in the trunion so I knew I would have to lengthen the track rods to take this into account. I've done all the calcs for this and found they need to be about 6mm longer each side. This is easily done with the steering arms being bolted to the uprights with great big spacers, simply turn the spacers down a bit
But what I hadn't though about was that I've make the upright about 45mm taller!!!!! The end of wishbone axis sits 45mm lower than in the original set up, compared to the top ball joint! This makes the 6mm track rod problem look like nothing. You can see this extra height in the following photos.


So after much calculating and trig and so on..... (and the race and rally source book, which is excellent for this sort of thing)

My options are......
- Raise the rack by 16mm and move it back by 3mm and extend the track arms by 6mm
- Lower the track rod ends by 20mm and extend the track arms by 6mm
- shorten the uprights by as close to 45mm as possible and extend the track arms by 6mm
More to come..
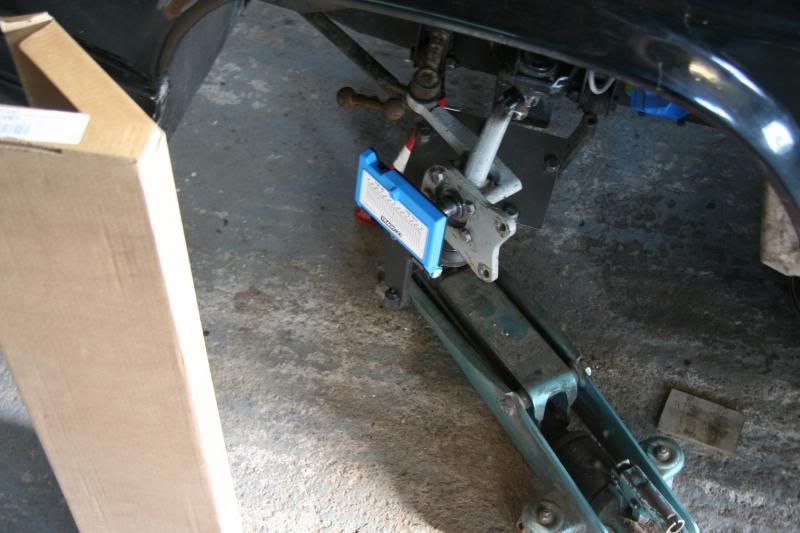
This afternoon has been an education. I'd done a lot of reading and trig to figure out what I needed to change about the suspension to get rid of the bump steer. I did it all on one side only so I could test both and see the results. The results from the left and right sides both looked the same 
I was just raising the suspension and watching it though, so I devised a more accurate way of measuring the bump steer. I used the laser from my tracking kit and attached it to the upright in various ways and marked off the path it followed through the suspension travel. I made sure the laser was always pointing perpendicular to the side of the car no matter what the steering angle was and put the target the same distance away each time etc.
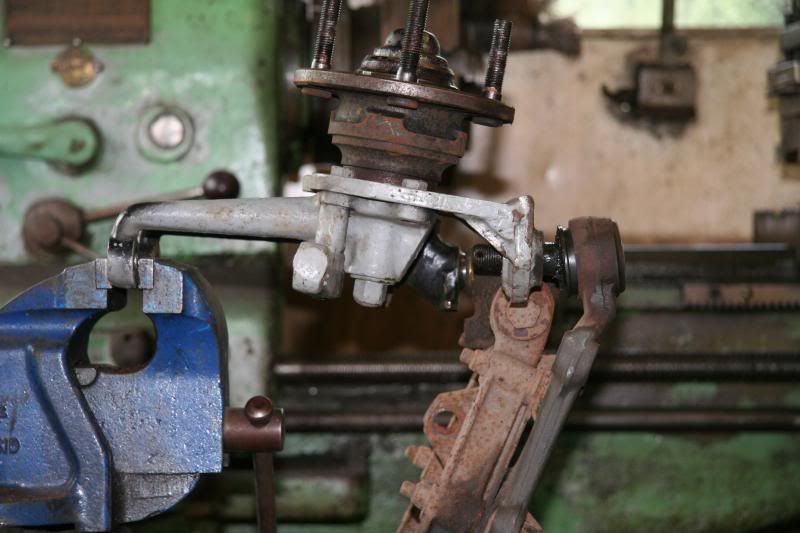
I've been messing about with it for hours and have finally figure out what is actually causing it to bump steer. I've lengthened the track arms by 6mm, not a bit of difference. shortened the upright from pivot to pivot by 45mm down to the normal 290mm ish, not a bit of difference, still lots of bump steer. I sat looking at it for hours then thought about adjusting the caster angle, that made a big difference and I managed to get the staight line you see in the last photo on the right.
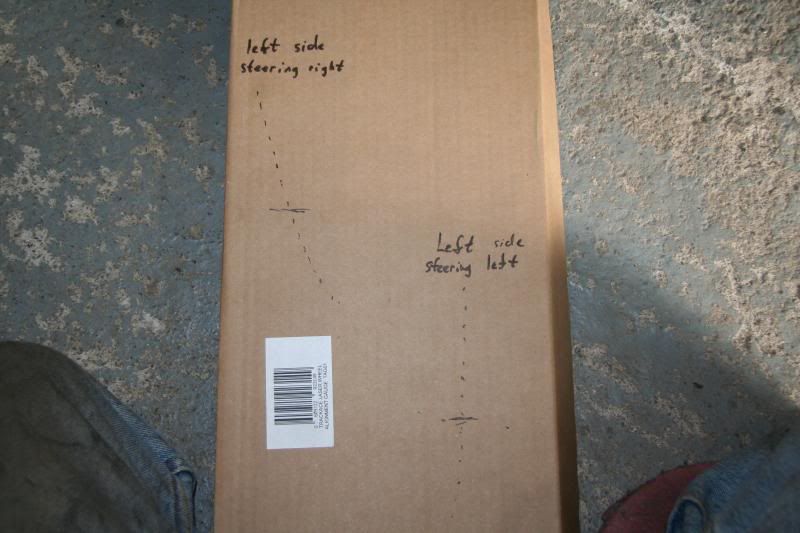
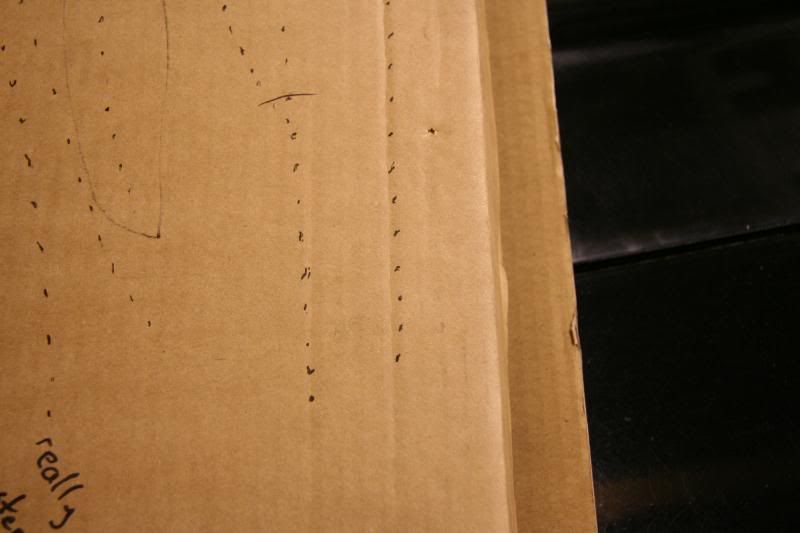
So it seems the issue of bump steer is very sensitve to changes in caster (resulting in changes in the height of the track rod end relative to the rack), and not very sensative to track arm length.
There is still lots to do in deciding the best place for everything, but I feel like I'm making a bit opf progress and might actually solve it now.
More to come
I was just raising the suspension and watching it though, so I devised a more accurate way of measuring the bump steer. I used the laser from my tracking kit and attached it to the upright in various ways and marked off the path it followed through the suspension travel. I made sure the laser was always pointing perpendicular to the side of the car no matter what the steering angle was and put the target the same distance away each time etc.
I've been messing about with it for hours and have finally figure out what is actually causing it to bump steer. I've lengthened the track arms by 6mm, not a bit of difference. shortened the upright from pivot to pivot by 45mm down to the normal 290mm ish, not a bit of difference, still lots of bump steer. I sat looking at it for hours then thought about adjusting the caster angle, that made a big difference and I managed to get the staight line you see in the last photo on the right.


So it seems the issue of bump steer is very sensitve to changes in caster (resulting in changes in the height of the track rod end relative to the rack), and not very sensative to track arm length.
There is still lots to do in deciding the best place for everything, but I feel like I'm making a bit opf progress and might actually solve it now.
More to come
Oh right some decent progress today
I tried making up some spacers on the lathe, but ruined the last good edge of the last carbide tip and ruined the thing I was making
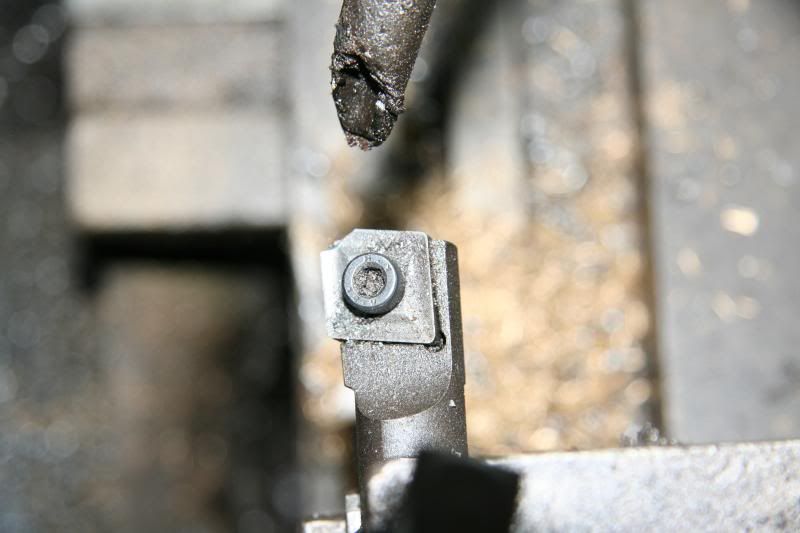
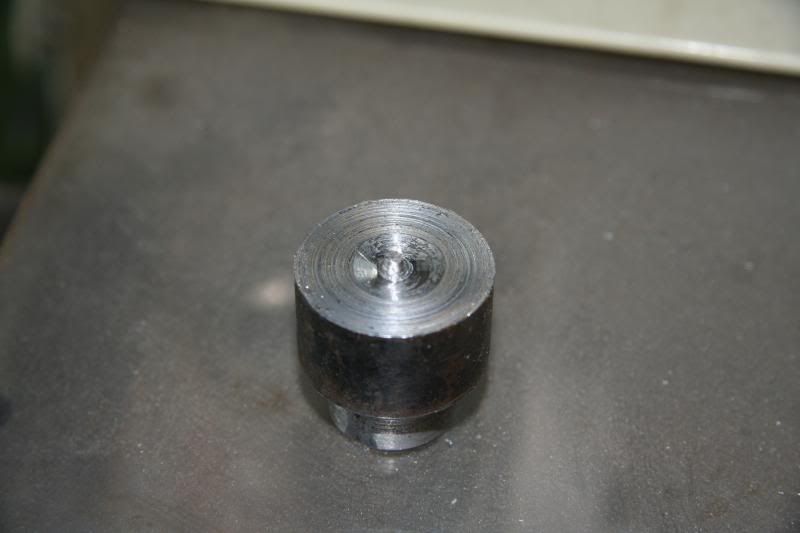
Then I asked someone at work to do it for me and he made some up really fast
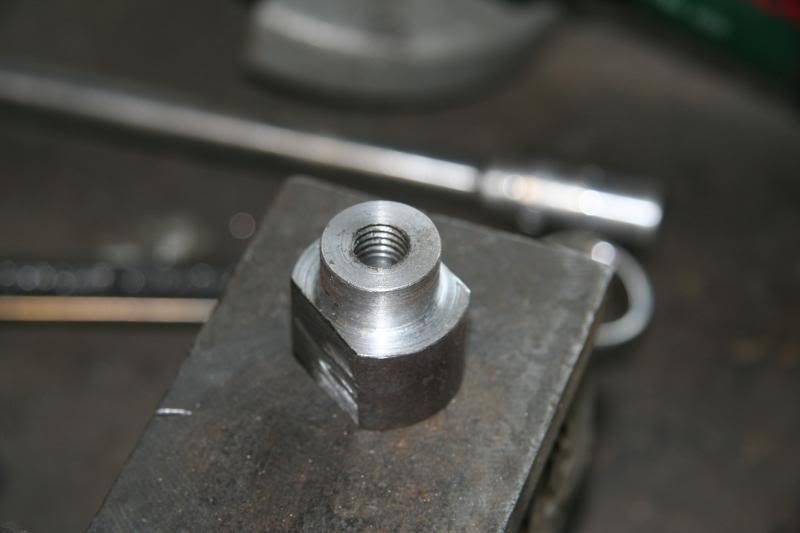
Hopefully you can see, there is a tapped hole in each side of the block, the tread in the steering arm has been drilled out so with the offset of the hols in the block the steering arm is up at an angle.
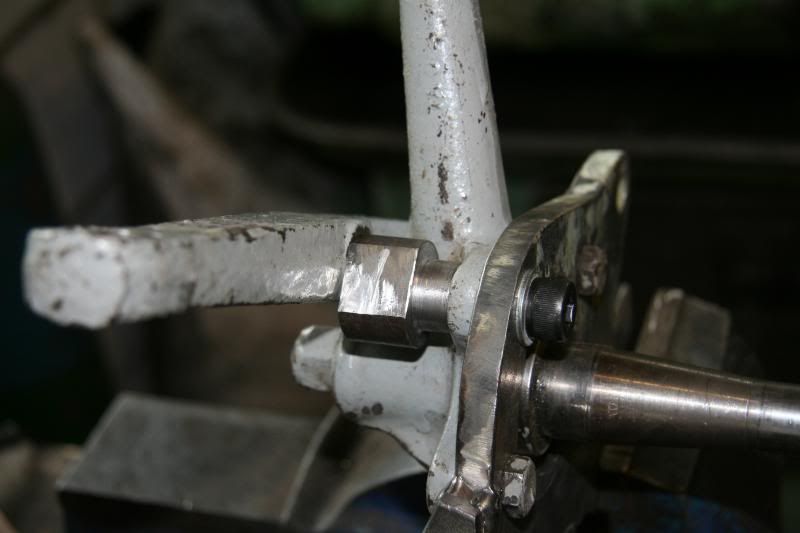
Now, the bump steer is gone I'm waiting with baited breath to see how it feels (the spring rates are still unchanged so could be well out), but hopefully it'll behave a bit better.
I'm hoping to get that lot painted up and properly fitted tomorrow.
More to come
some decent progress today I tried making up some spacers on the lathe, but ruined the last good edge of the last carbide tip and ruined the thing I was making


Then I asked someone at work to do it for me and he made some up really fast

Hopefully you can see, there is a tapped hole in each side of the block, the tread in the steering arm has been drilled out so with the offset of the hols in the block the steering arm is up at an angle.


Now, the bump steer is gone
I'm waiting with baited breath to see how it feels (the spring rates are still unchanged so could be well out), but hopefully it'll behave a bit better. I'm hoping to get that lot painted up and properly fitted tomorrow.
More to come
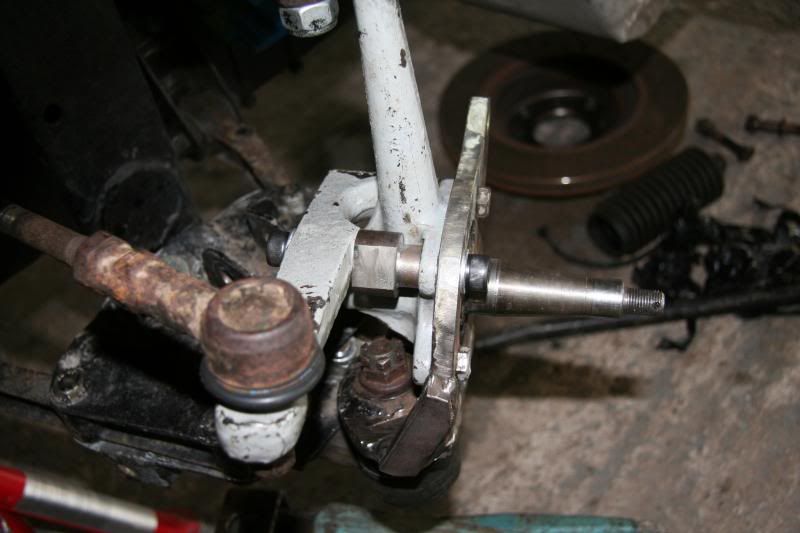
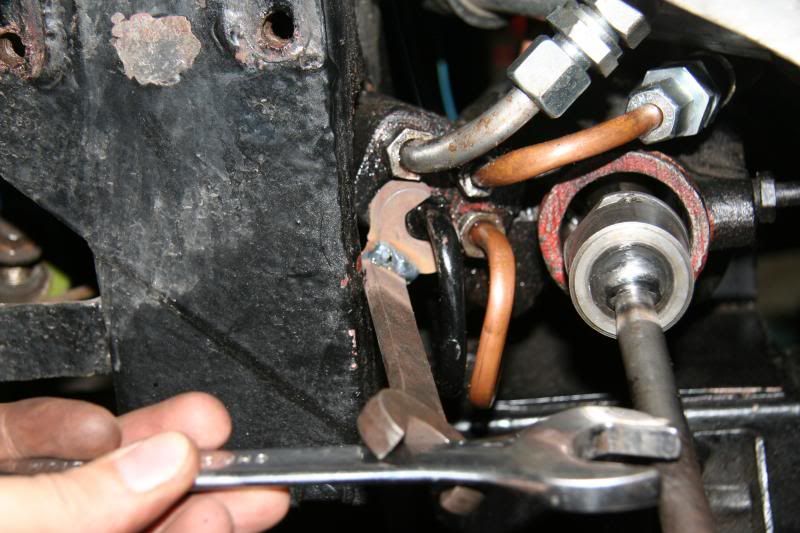
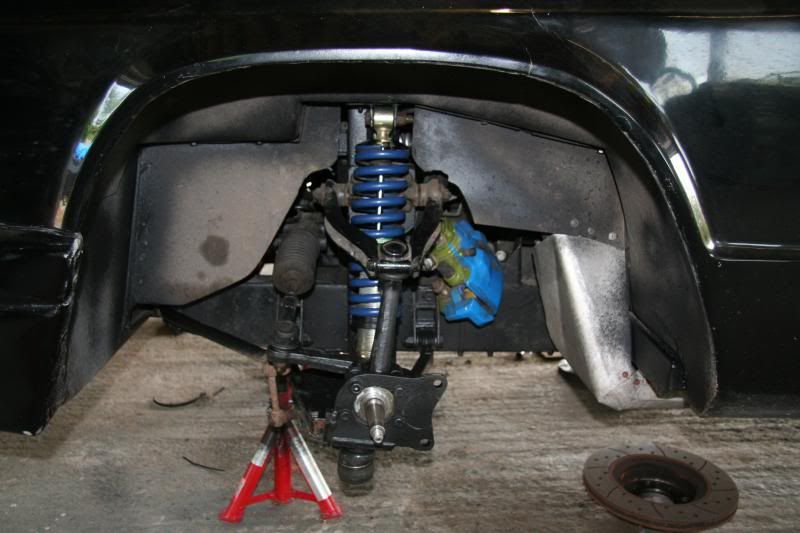
Today, I got it all ready for paint and put on lots of stone chip, but first I bent and welded a spanner to get at one of the PAS unions. They've all been nipped up so hopefully will stop leaking.
Its all back in place now.
Hopefully tomorrow I'll get it all tracked and.... camber'd! then start on the exhaust or intercom, depends what arrives first.
More to come

Its all back in place now.

Hopefully tomorrow I'll get it all tracked and.... camber'd! then start on the exhaust or intercom, depends what arrives first.
More to come
Got lots done today.
Got all the suspension back together, set ride height, checked camber, added a shim, checked camber, did tracking, set ride height again, checked tracking, made another adjustment, drove it, made another adjustment to tracking (to get steering wheel in right place) set (*******) ride height (again) checked camber (out on one side), (you've got to be joking) removed the (*******) shim. Its getting there, I've got to check the tracking again as the shim removal will have put it out. To give some kind of an explanation, I can't leave it "close" to what it should I have to get it completely right.
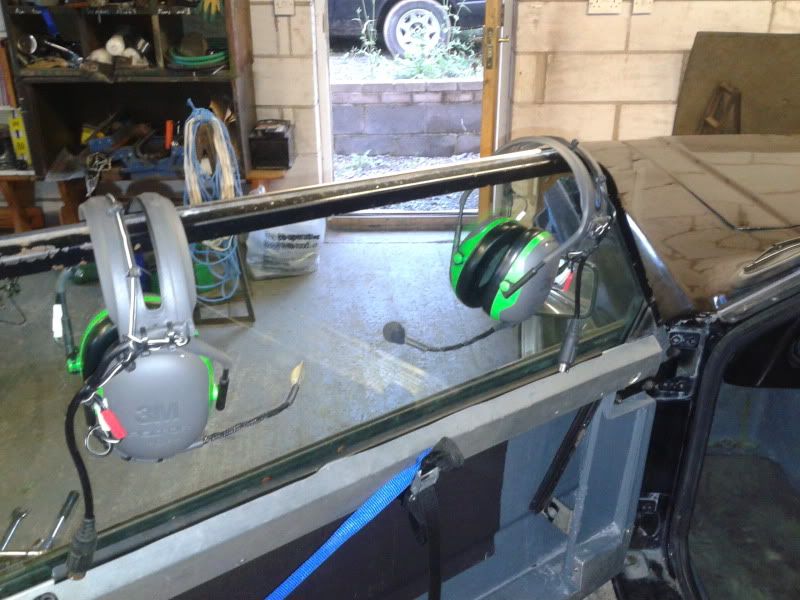
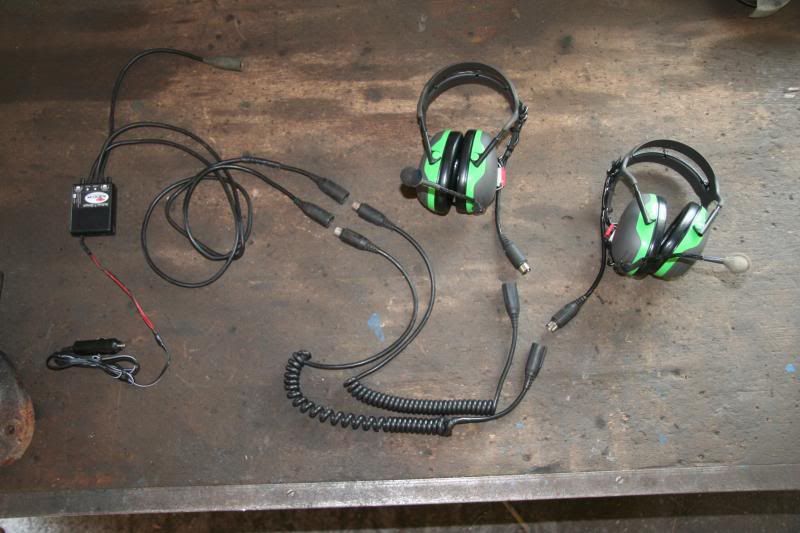
On another note, I got some cool bits through today, I got an Autocom Active-7-Smart as suggested by someone who has used one with a Caterham, and made up some ear defender type headsets. It works a treat, I'm pretty happy with them
I'm hopefully tackling the 2100rpm exhaust drone tomorrow.
More to come
Got all the suspension back together, set ride height, checked camber, added a shim, checked camber, did tracking, set ride height again, checked tracking, made another adjustment, drove it, made another adjustment to tracking (to get steering wheel in right place) set (*******) ride height (again) checked camber (out on one side), (you've got to be joking) removed the (*******) shim. Its getting there, I've got to check the tracking again as the shim removal will have put it out. To give some kind of an explanation, I can't leave it "close" to what it should I have to get it completely right.
On another note, I got some cool bits through today, I got an Autocom Active-7-Smart as suggested by someone who has used one with a Caterham, and made up some ear defender type headsets. It works a treat, I'm pretty happy with them


I'm hopefully tackling the 2100rpm exhaust drone tomorrow.
More to come
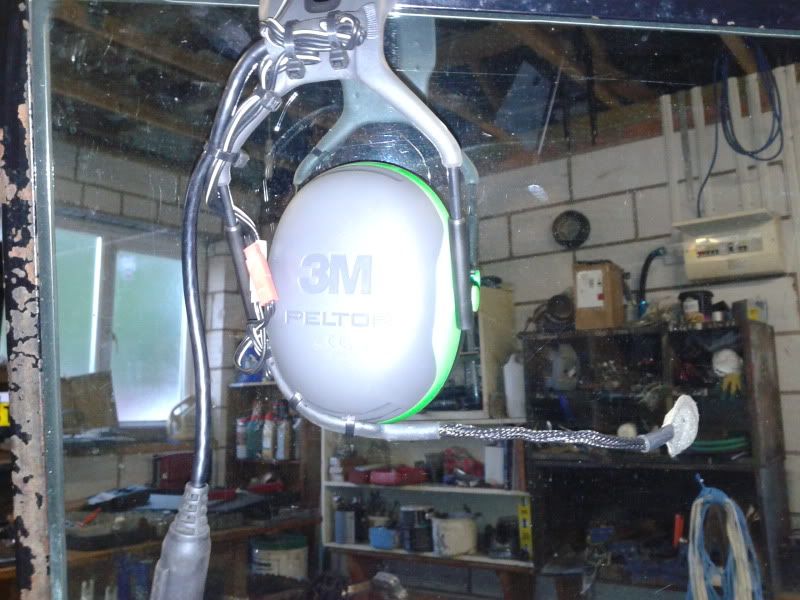
I thought I'd take a slightly better photo of the intercom thingy which is working well
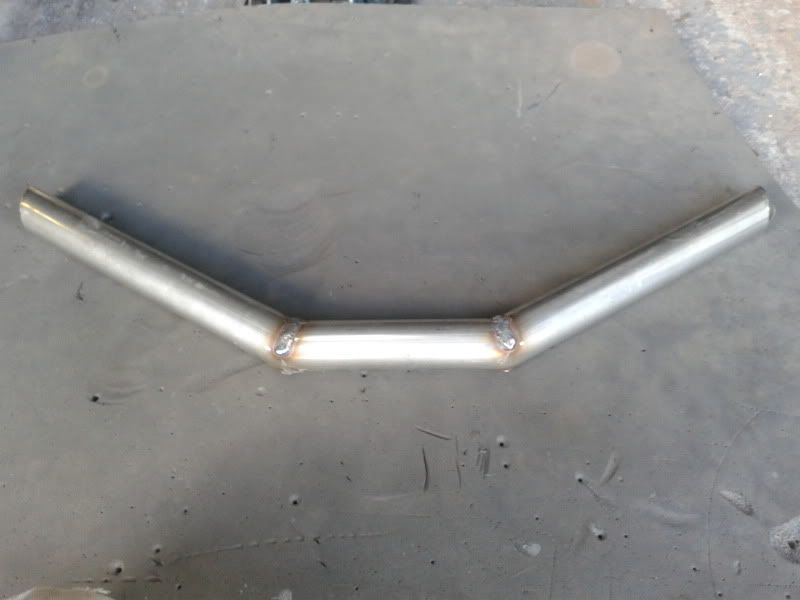
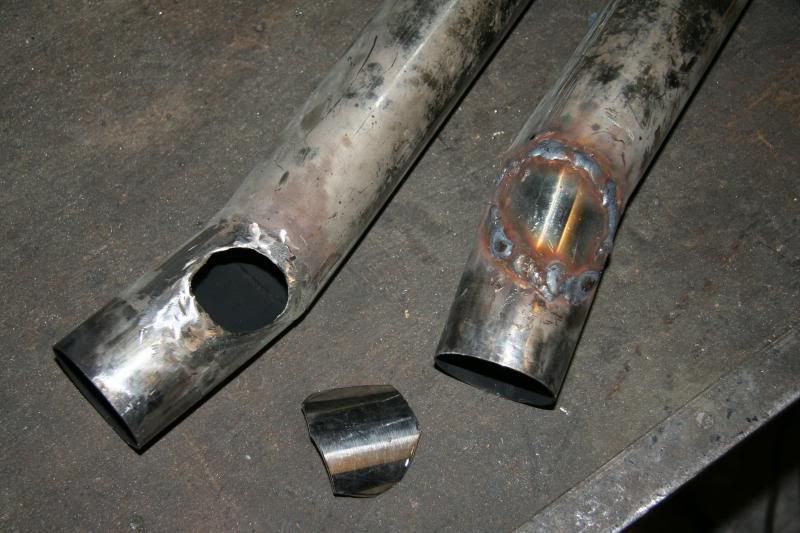
On the exhaust front, I thought I'd make a 1.4 wavelength resonator pipe for each side, but the materials came to quite a bit of money so being a skin flint, I thought I'd try a balance pipe. The theory being that the two pipes should be completely out of phase and perhaps have a cancelling effect (fingers crossed). Here are a few pics:
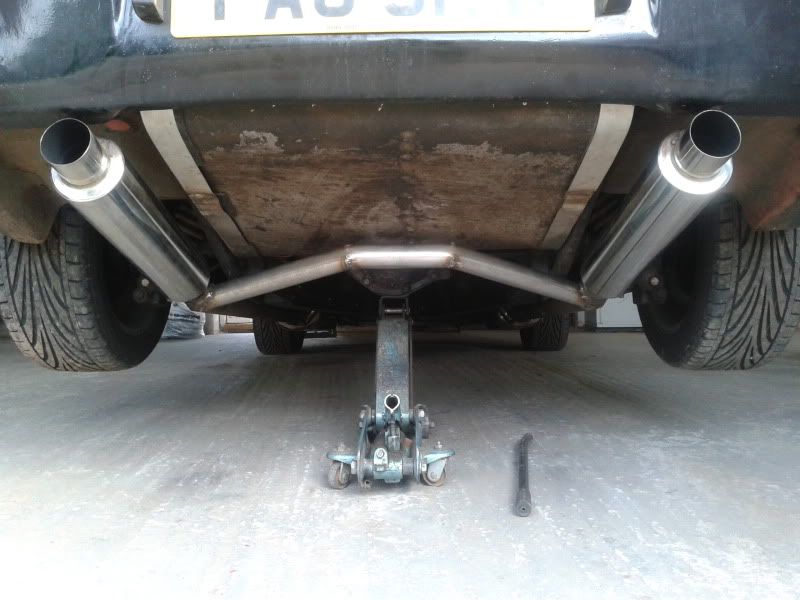
And guess what......
After all that work........
It made no difference, there is still a 2100 "Drone Zone" perhaps its 2% quieter or perhaps its in my head, or perhaps my hearing is gradually getting damaged. Either way, I'll be ripping back off and trying the more expensive 1/4 wavelength resonator pipe option soon
More to come

On the exhaust front, I thought I'd make a 1.4 wavelength resonator pipe for each side, but the materials came to quite a bit of money so being a skin flint, I thought I'd try a balance pipe. The theory being that the two pipes should be completely out of phase and perhaps have a cancelling effect (fingers crossed). Here are a few pics:


And guess what......
After all that work........
It made no difference, there is still a 2100 "Drone Zone" perhaps its 2% quieter or perhaps its in my head, or perhaps my hearing is gradually getting damaged. Either way, I'll be ripping back off and trying the more expensive 1/4 wavelength resonator pipe option soon
More to come
I completely forgot to say, the alterations to the front suspension have worked really well, I'm very pleased. The measured bump steer seems to completely agree with how the car feels. This has now highlighted the next weak link in the suspension.
The rear axle seems to spend a lot of time in the air when going over very rough patches of road, the back seems to step out a bit when on the power in a corner. I think this is a combination of things really and just needs correctly setting up. But it doesn't help that the axle is even heavier now, the disc conversion probably weighs more than the drums and the Quaife Differential definitely weighs quite a bit more than the open diff, on top of that the spring rates could be way out, calculating those is next on the list, and the I think I might have got the dampers turned up too much delaying the axles return to the road on rebound.
More to come on that lot.
I've experimented with side exit exhausts. I'm not mad keen on the look, but I think it looks alright if its done well. My thinking here was that it would alter the length of the pipes and therefore raise the natural frequency right up the rev range where it wouldn't be annoying in traffic. But there was no room for the second silencer, it was far to exposed and will hit speed bumps. I tried without it, but its ridiculously loud at all RPMs then. So I binned the idea and shall simply be living it for a while. After driving it round a little more with balance pipe on, I think it has made a difference, it wasn't just me hearing things, the resonance is a little less. I wonder now whether its to do with the natural frequency of the cab!!?!?
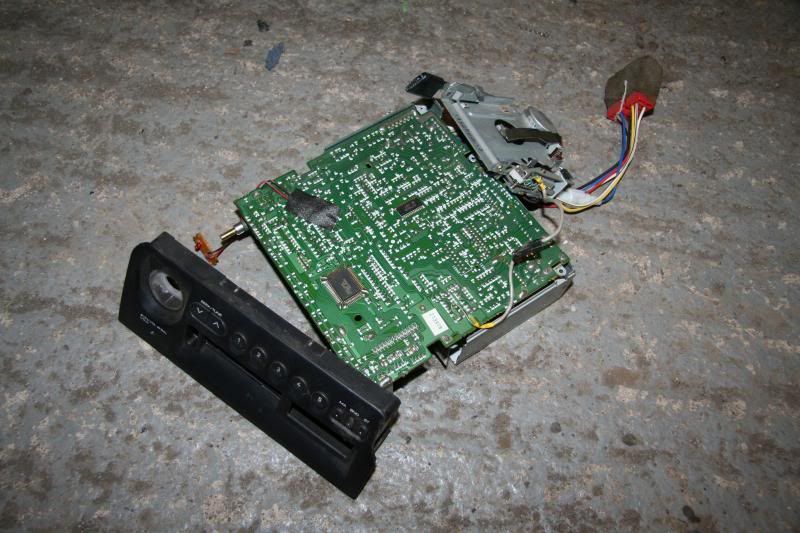
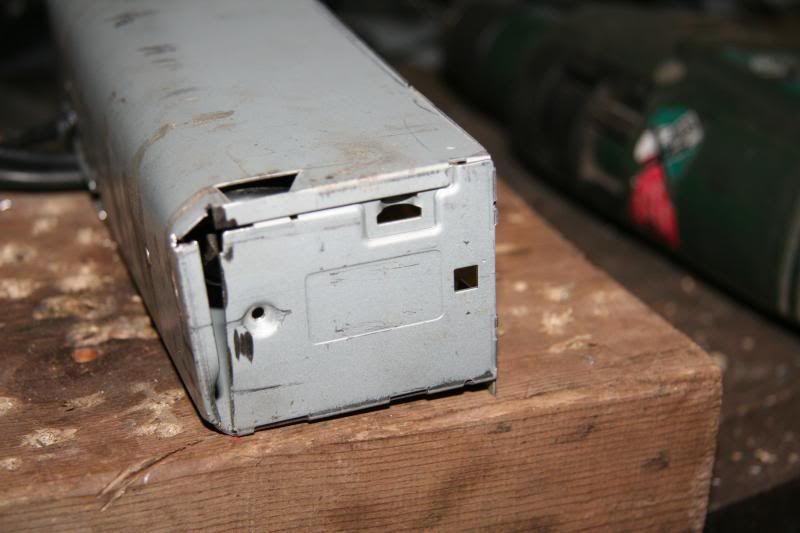
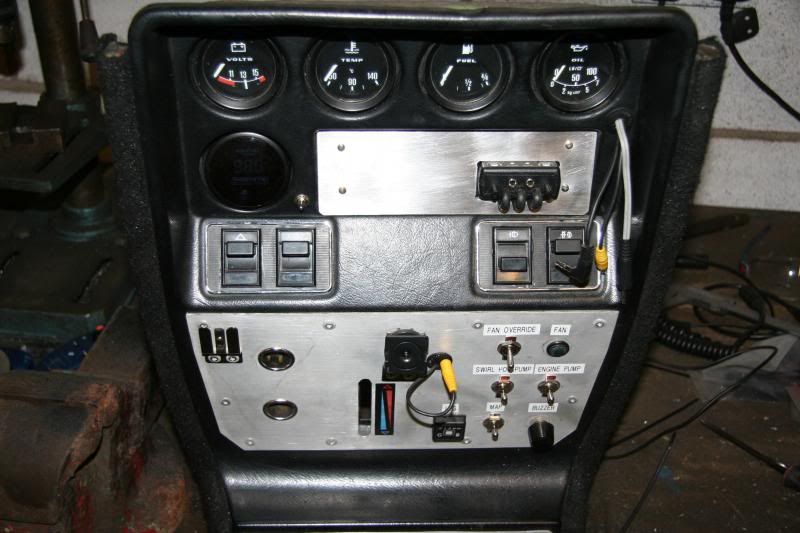
I got the Intercom into the dash yesterday, by recycling a Peugeot Stereo. I reduced the depth of the box, and put a new fascia on it as you can see in the pictures.

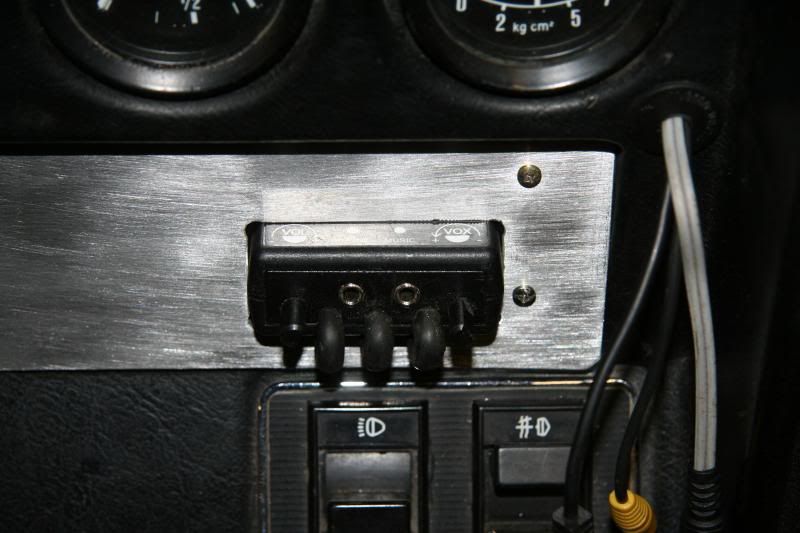
Its not perfect (but that's in keeping with the rest of the car )
I'm off down the garage to continue the road trip preparations.
More to come
I got the Intercom into the dash yesterday, by recycling a Peugeot Stereo. I reduced the depth of the box, and put a new fascia on it as you can see in the pictures.


Its not perfect (but that's in keeping with the rest of the car
)I'm off down the garage to continue the road trip preparations.
More to come
I've just had it weighed! I'm a little disappointed with the total but very pleased with the balance. With me on board the front end is supporting 660kg and rear 620kg. GIVING A TOTAL OF 1200kg (without the 80kg driver). I think I was expecting it to be a little less having lost the Essex engine, but I have put a load of LPG gear in it.
These number were with the gas tank empty and the petrol tank at about 1/4.
THIS MAKES THE BALANCE 51.6% front, not bad at all
Next thing is to use the bathroom scales and try to weigh the unsprung weight, then do some calculations and get the right springs
More to come
These number were with the gas tank empty and the petrol tank at about 1/4.
THIS MAKES THE BALANCE 51.6% front, not bad at all
Next thing is to use the bathroom scales and try to weigh the unsprung weight, then do some calculations and get the right springs
More to come
Hi Lozzzzz
Sorry it's taken me a while(!) to get in front of a computer that isn't nailed down for access to the www.
Nice to meet you and chat on Sunday at Curborough - unfortunately as an Official of the meeting I had to hang around in the paddock for 30 mins afterwards just in case, so didn't have a chance to take a look at your efforts up close in the flesh.
Good luck with sorting the details now - look forwards to seeing you out on track if you can. You've put a hell of a lot of effort into the Scimitar AND recording all the trials, tribulations and successes.
cheers
Tim (beige cap and sunnies, seemingly just hanging around at the finish line...!)
Tim, was nice to meet you too. I'm sorry I didn't hang around long, my dad had been there with me all day so I thought I'd best get back after Jim had a little blast.
It was a little frustrating in that there has never been so much interest in it, I'd really liked to have taken a few folk for a ride, next time perhaps
There is a fair bit to get through now, but I'm hoping it'll be pretty slick for next year.
It was a little frustrating in that there has never been so much interest in it, I'd really liked to have taken a few folk for a ride, next time perhaps
There is a fair bit to get through now, but I'm hoping it'll be pretty slick for next year.
Its been a while and I hope you're concentrating
Tonight I've removed the balance pipe I put in and I've welded up one of the holes. I'm pretty sure I'll be making up some silencers of my own now, I'll be looking at copying something like the design of the Flowmaster exhausts I think.
I've finally done the weighing of the un-sprung weight of the car. This was a little tricky even with the simple method of removing the springs and lowering the wheel onto the bathroom scales. The trouble was the friction in the bushes. So I weighed it on the way down then continued to lower the car, then raised it and took another reading on the way back up (the average of the values is the true unsprung weight plus a little extra for the spring). I did this a load of times and got a very interesting result.....
The front unsprung weight was (a massive) 87kg per side, and the rear was less!!!! at 73kg per side. I didn't see that coming (with a heavy beam axle on the rear).
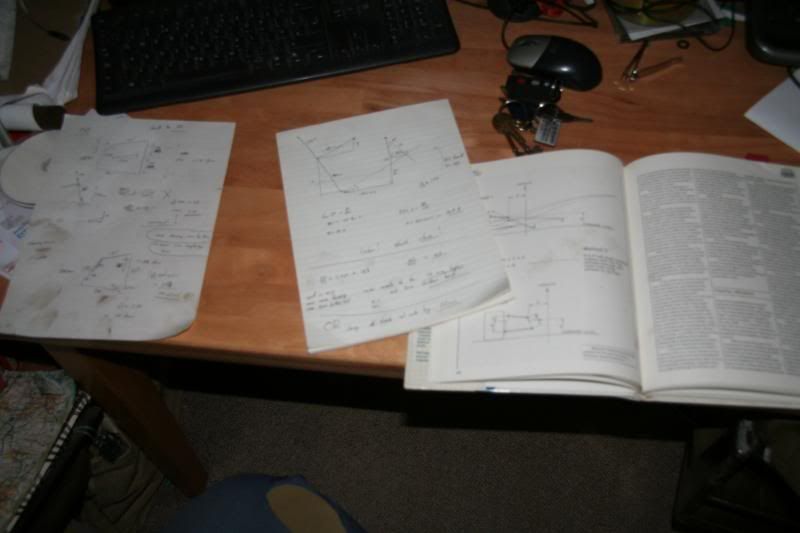
Now there are people who can build cars, and people who can drive them, then there are the rare skilled folk who can drive a car and can feel what alterations need making. I'm not one of them, so I was genuinely relieved to find there are some calculations you can do to get the spring rates in the ball part. Hence the all the weighing. The end goal is to find the natural frequency of the car front and back and bring these frequency figures close together. Here is the page I used from "The Race and Rally Source Book" Alan Staniforth: (If you're interested read between the red bits)
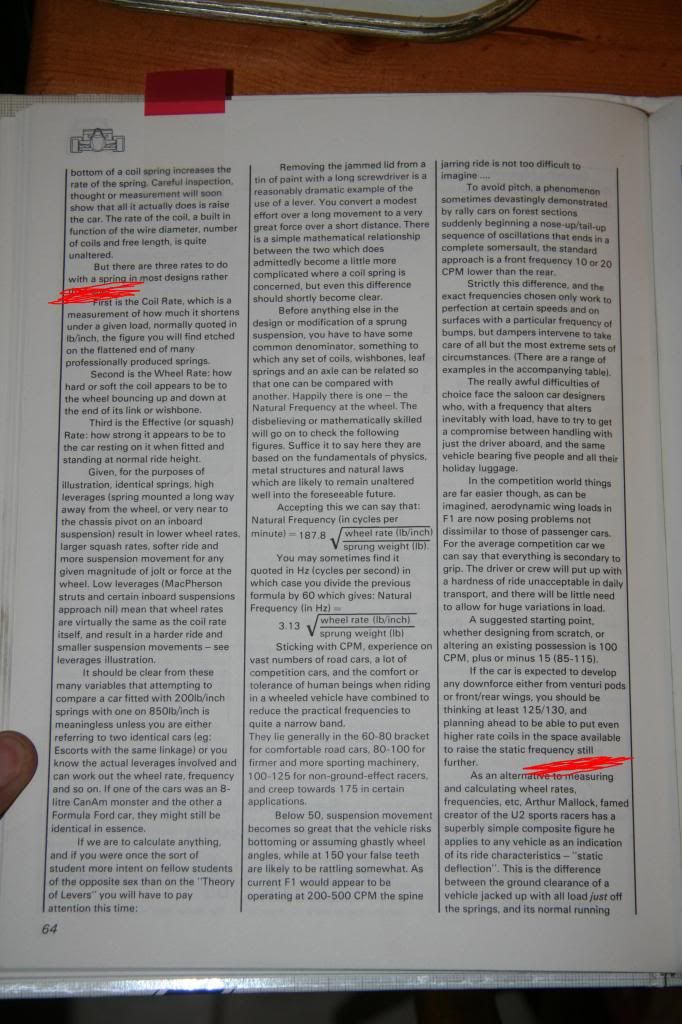
Now to cut a very long story reasonably short, you need to know
Axle wieghts
Unsprungs weights
to find the sprung weights of each corner of the car.
Then the coil spring rates
leverage ratios
leverage ratio ^2
Effective coil rates due to their angle on inclination (a little trigonometry)
to get the wheel ratio
then using the sprung weight and the wheel ratio, calculate the natural frequency.
Which is exactly what I did here:
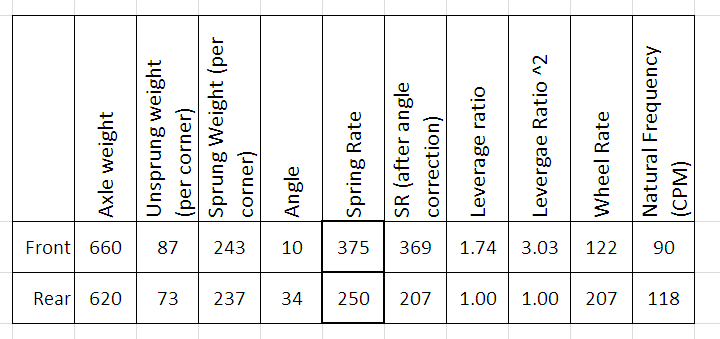
The book is a little old but basic physics doesn't change, it suggests that for a road car the natural frequency (in cycles per minute) should be between 60 and 80, then 80 - 100 for a sports car, 100 - 125 for race cars. With the front being between 10 and 20 less than the rear. You can see mine in the sheet above. I was expecting to have to get stronger springs for the rear, but it seems the opposite is true I need to strengthen up the front end to get the balance right (show's I'm not much good at "feeling" what a car needs )
The reason the front needs to be so much stronger on Scimitars is the fact that the wishbones weaken the effect of the springs by giving the wheels more leverage of the spring.
I've yet to decide which to buy but I'm thinking 450lb/in front and 225 rear to get the balance spot on.
Hope you took all that in
More to come.
Tonight I've removed the balance pipe I put in and I've welded up one of the holes. I'm pretty sure I'll be making up some silencers of my own now, I'll be looking at copying something like the design of the Flowmaster exhausts I think.

I've finally done the weighing of the un-sprung weight of the car. This was a little tricky even with the simple method of removing the springs and lowering the wheel onto the bathroom scales. The trouble was the friction in the bushes. So I weighed it on the way down then continued to lower the car, then raised it and took another reading on the way back up (the average of the values is the true unsprung weight plus a little extra for the spring). I did this a load of times and got a very interesting result.....
The front unsprung weight was (a massive) 87kg per side, and the rear was less!!!! at 73kg per side. I didn't see that coming (with a heavy beam axle on the rear).
Now there are people who can build cars, and people who can drive them, then there are the rare skilled folk who can drive a car and can feel what alterations need making. I'm not one of them, so I was genuinely relieved to find there are some calculations you can do to get the spring rates in the ball part. Hence the all the weighing. The end goal is to find the natural frequency of the car front and back and bring these frequency figures close together. Here is the page I used from "The Race and Rally Source Book" Alan Staniforth: (If you're interested read between the red bits)

Now to cut a very long story reasonably short, you need to know
Axle wieghts
Unsprungs weights
to find the sprung weights of each corner of the car.
Then the coil spring rates
leverage ratios
leverage ratio ^2
Effective coil rates due to their angle on inclination (a little trigonometry)
to get the wheel ratio
then using the sprung weight and the wheel ratio, calculate the natural frequency.
Which is exactly what I did here:

The book is a little old but basic physics doesn't change, it suggests that for a road car the natural frequency (in cycles per minute) should be between 60 and 80, then 80 - 100 for a sports car, 100 - 125 for race cars. With the front being between 10 and 20 less than the rear. You can see mine in the sheet above. I was expecting to have to get stronger springs for the rear, but it seems the opposite is true I need to strengthen up the front end to get the balance right (show's I'm not much good at "feeling" what a car needs
)The reason the front needs to be so much stronger on Scimitars is the fact that the wishbones weaken the effect of the springs by giving the wheels more leverage of the spring.
I've yet to decide which to buy but I'm thinking 450lb/in front and 225 rear to get the balance spot on.
Hope you took all that in
More to come.
Edited by lozzzzzz on Friday 30th August 22:06
Edited by lozzzzzz on Friday 30th August 22:08
Rodders, To be honest it doesn't feel that bad now, but I've not exactly pushed around the bends yet. I just hope I don't screw the handling up too badly
I faffed on this morning and this afternoon doing electric jobs, a diode here and a new bulb there and I put a new hose between the clutch reservoir and the master cylinder. This job has been dragging a little. I got the reservoir and a short length of hose from a civic 'great' I thought, 'OEM quality', 'this must be up to the handling DOT4' but after 6 months use its soaked through and turning the fluid black.
Brake fluid is nasty! it eats all sorts. My buddy is a materials engineer and had a theory that acetylene corrodes hoses in a similar way to brake fluid, so got some welding hose for his car...... it ate through it! Its lunches paintwork hoses even the OEM flexi hoses eventually.
I was nearly at the point of spending £18 on a new Honda part (£18 for 20cm of hose!!!!!). Then tried a hydraulics place. The chap behind the desk reckons the hose he gave me is good for petrol diesel, all kinds of oils and selection of other chemicals, so should be alright. He also gave me a section of nylon line with SS over braid, and they were both Gratis!. I've got with the fuel hose first as its the only one I had clips to fit.
If that fails I've give the nylon one a go.
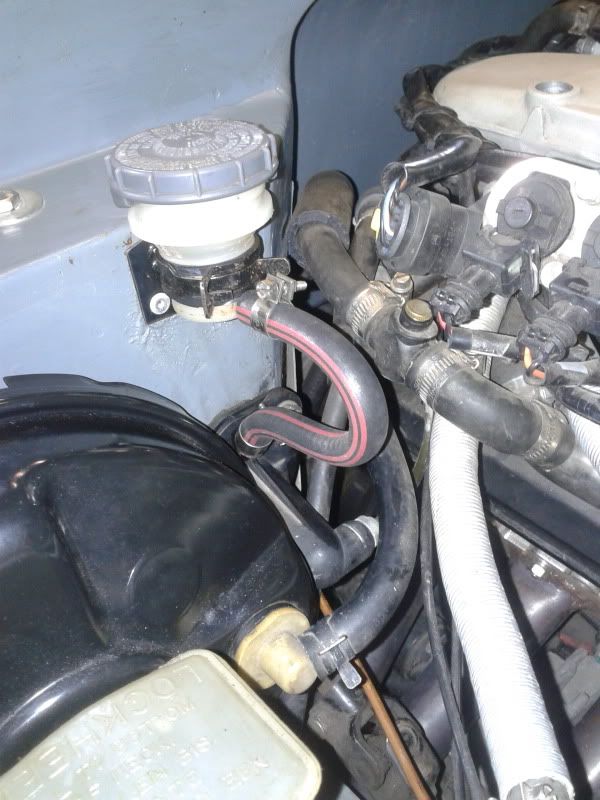
Boring story over
I've got lots of big jobs to do but I'm just scratching the surface at the moment for fear of the car not being road worthy for the photo shoot at the end of the month. When photos are taken and the car SORN for a while, then I can get stuck into the earth loops, and finishing preparations for the roll hoop to be made, then get some bucket seats and the last harness and it'll be ready for some track action
I'm thinking about dropping a cheeky little supercharger in there too
I might change the spring rates before the shoot, and I'm itching to get the exhausts changed as soon as they arrive.... Can't wait.


Did some work on the car, its been a while since I really got stuck in with some cutting welding and painting.
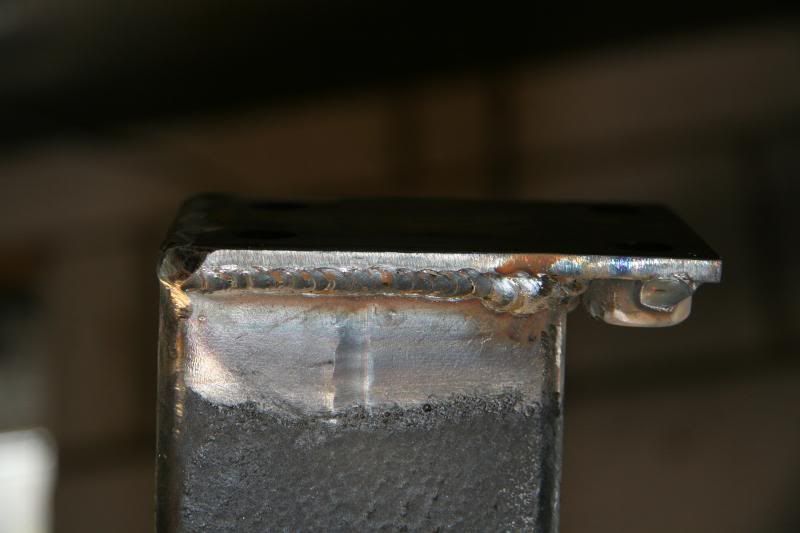
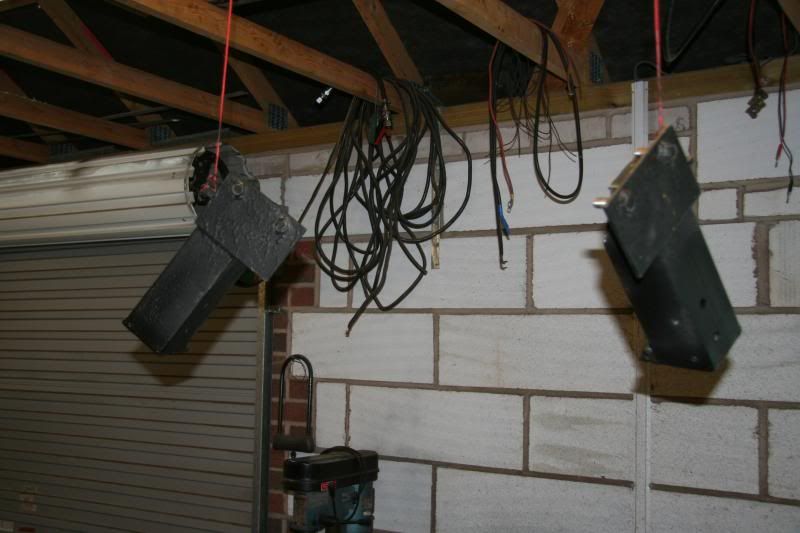
I decided to do a little more work on the roll hoop mounts. So I removed the large box section bits you can see in this old photo.
And I've added tops with captive nuts, and a base for the roll cage man to weld straight to reducing the work he has to do and hopefully the cost a little too. I'll do something similar for the base of the diagonal down bars too and the door bars.
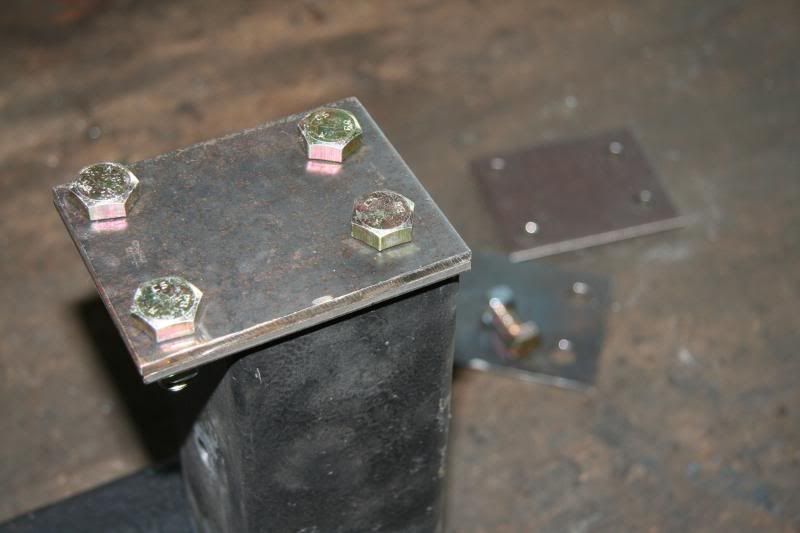
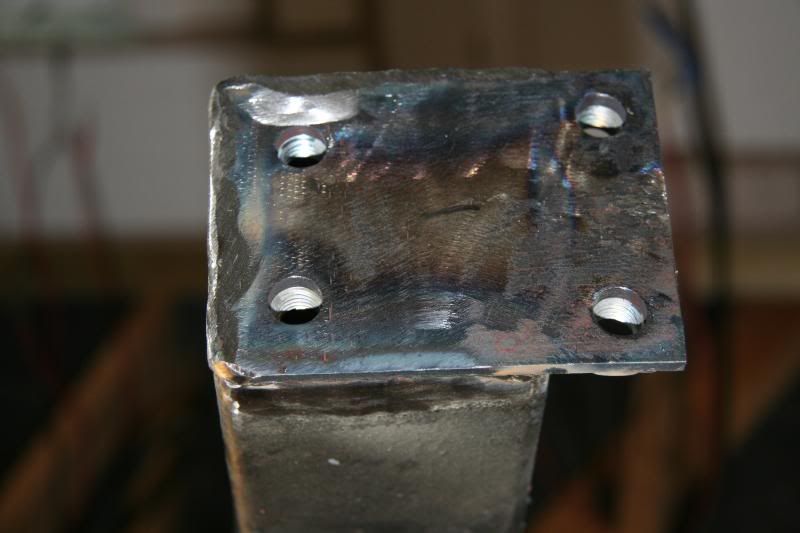
Now drying
More to come
I decided to do a little more work on the roll hoop mounts. So I removed the large box section bits you can see in this old photo.

And I've added tops with captive nuts, and a base for the roll cage man to weld straight to reducing the work he has to do and hopefully the cost a little too. I'll do something similar for the base of the diagonal down bars too and the door bars.


Now drying

More to come
Gassing Station | Scimitar | Top of Page | What's New | My Stuff