Fitting a 2Bular 'zorst (Janitor Guide)
See whole thread;
http://www.pistonheads.com/gassing/topic.asp?h=0&a...
Hello!
I've had my 111R SportsRacer from new since 1st March '06 and still more than delighted with it I have always known that subtle mods would be inevitable (but note the 'subtle' bit as I personally like to keep things pretty 'standard' if that's not a contradiction in terms given the start point!)
Anyway, I've lately been thinking that the car needs to sound a little more like it looks! (and a neighbour's comment of how he expected it to sound a lot more throaty has stayed with me from the moment he mentioned it! ) So given recent rave reviews and Joe’s ‘controlled’ fly-by vid, I opted for a 2bular 111R 7" x 18" box from Jim Valentine at www.2bular.com (not the Ultra for me yet though
  )
)
I know there are many other very worthy alternatives such as Lotus Stage 1 & 2, Larini, Janspeed and Milltek etc, but something about Jim's passion for his trade connected enough for me to part with cash somewhat earlier in my short ownership than I perhaps thought it would
I elected for DIY route as I'm rather handy and want ownership to include getting stuck in! Also, plenty of cash saved by not wheeling it off to Dealer for fitting. Maintaining my 'over-the-top fitting guide' form (see http://www.pistonheads.co.uk/gassing/topic.asp?h=0... for audio upgrade!) I took piccys whilst following Jim's DIY guide to fitting the system. This may well be of some use to someone in future - but of course of little inspiration to those who are never too 'far from the modding crowd'!
In compiling this guide, I've simply copy & pasted Jim's fitting guide and then added photos along the way to clarify. I've made additional notes & observations in italic
There is a before & after stationary video clip at the end also
2bular exhaust fitting instructions – 111R & Exige2
Tools you’ll need:
Socket set and ratchet ¼” drive preferred (I made good use of cordless drill / screwdriver with 8mm bolt head bit)
Allen keys, 4mm and 5mm (not sure when things changed but MY06 model has only 8mm & 13mm bolts, no allen key type head fittings)
Can of WD40
I also had some Aluminium Grease present for all bolt threads on reassembly
Allow yourself 2 hours to complete this task. It can be done quicker but take your time, work safe! Certainly another pair of hands is useful – especially when removing the Standard exhaust, which is quite heavy. When you’re removing it, its weight/bulk will be over your head and body – this is where the second pair of hands is safer
REMOVING THE FACTORY SILENCER:
1.To get the car up to a working height, I recommend using the standard size wheel ramps available at all auto stores. The Elise is a very easy car to reverse up these ramps. I used big old wooden blocks under wheels after trolley jacking in gear with handbrake on and front wheels chocked front and back! Not recommended, but I was happy enough
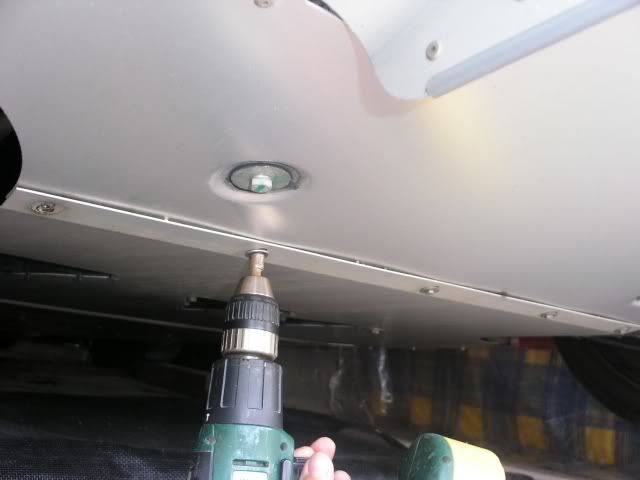
2.Remove the rear section of the diffuser to gain access to the exhaust system. Use an 8mm socket and ratchet to remove the 5 setscrews along the panel joint (almost in line with the rear wheel centreline):
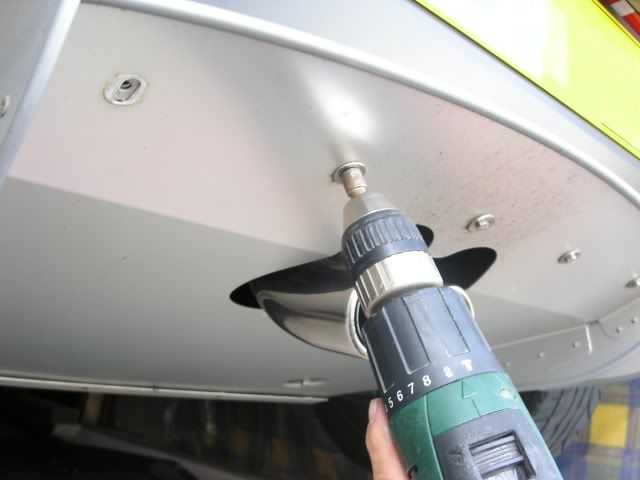
3. Go to the rear edge of the diffuser, below the number plate and remove the 3 5 on ’06 Model setscrews there with the 8mm socket:
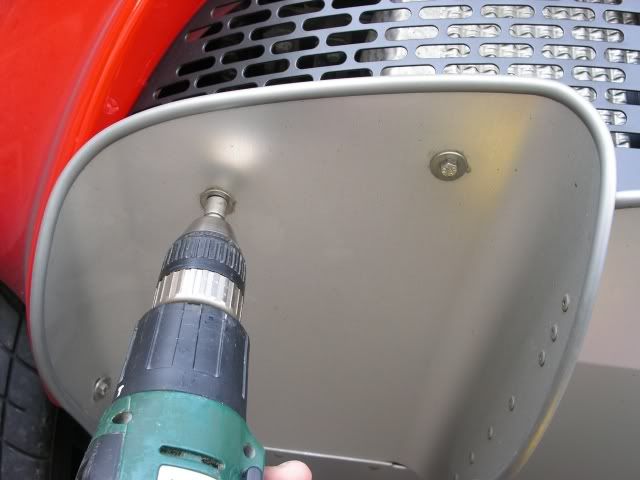
4. Remove the setscrews at the rear edge, one 2 on ’06 Model in either “tunnel” of the diffuser:
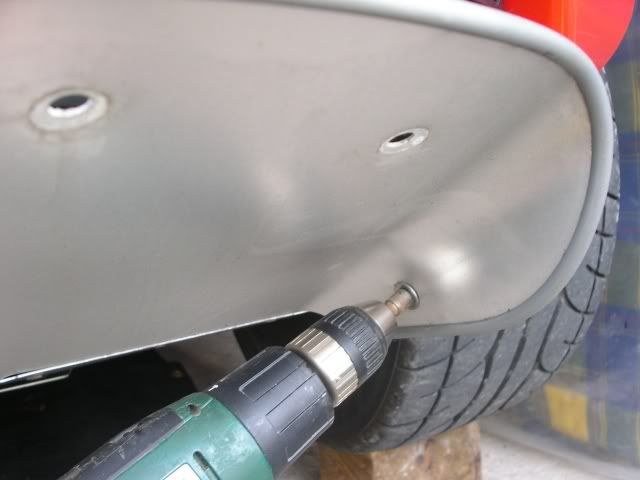
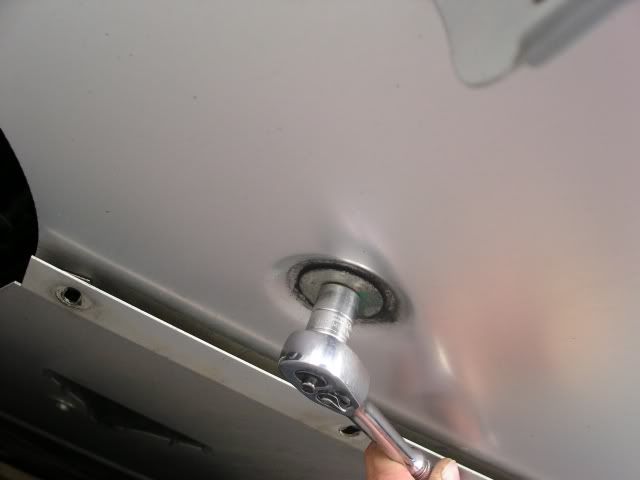
5. Look at the turned down edge of the tunnels, immediately behind each rear wheel. Remove the 2 dome-headed screws and nuts (one set each side) using the 4mm Allen key and a 10mm socket on the nuts 8mm bolts on ’06 Model:
6. Now the diffuser is held by the 2 large dome-headed Allen screws in the centre of the panel. Lie under the panel, supporting it with your shoulder and remove the screws using the 5mm Allen key:
7. Carefully move the diffuser forward, clear of your working area – do not scrape it along the ground!
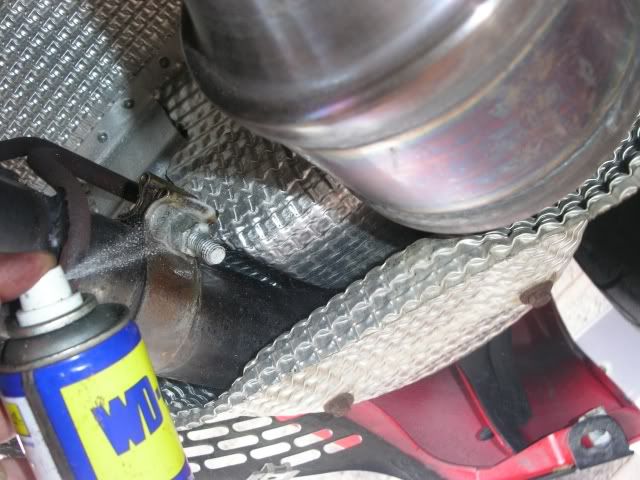
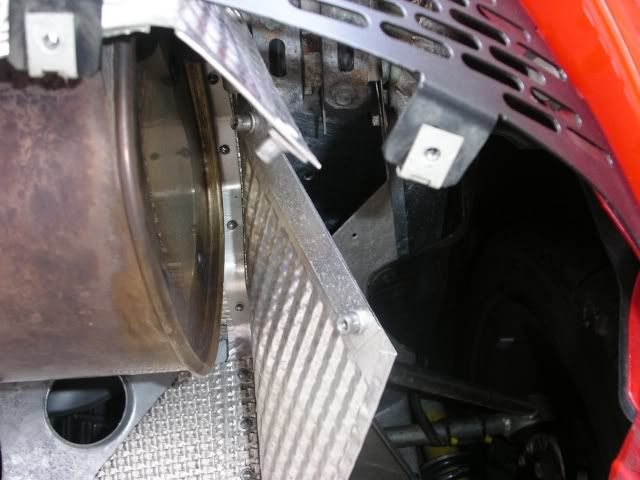
8. Look up to the exhaust mounts at either end of the silencer. Spray WD40 into the mounts and at the clamp area on the Cat pipe:
9. Loosen the exhaust clamp, using a 13mm socket. It’s welded to the pipe so won’t come off – just make sure it’s well loosened.
10. Look to the RHS heat-shield (looking from the rear of the car). Remove the small panel, 4 setscrews, using the 8mm socket:
Now get brutal and bend the heat-shield edges at this gap away from the silencer:
11. If you’re working on your own – this is where it gets sweaty!
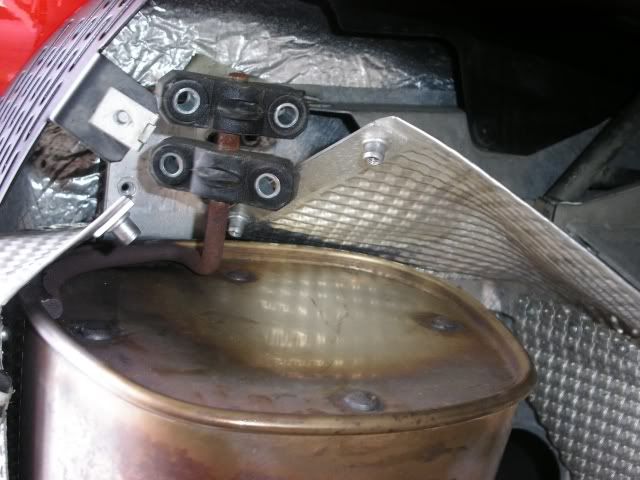
12. Remove both RHS exhaust mounts, supporting the silencer as the second mount comes away:
13. Now, you’re on your back; looking up, place a boot on the Cat pipe and begin pulling the silencer towards you – keep it level and don’t forget to brace against the Cat pipe. If you have a helper, he/she(!) can hold the Cat pipe and use a boot to push the silencer towards you – you just have to keep it level and make sure it doesn’t fall on you as it clears the Cat pipe. A twisting/pulling action is best. As my system was only 5 months & 4500 miles old, it all came away with relative ease
14. Place silencer in a dark corner of your garage. When/if you come to sell your car, remove the 2bular exhaust, sell it on e-bay and refit your factory silencer.
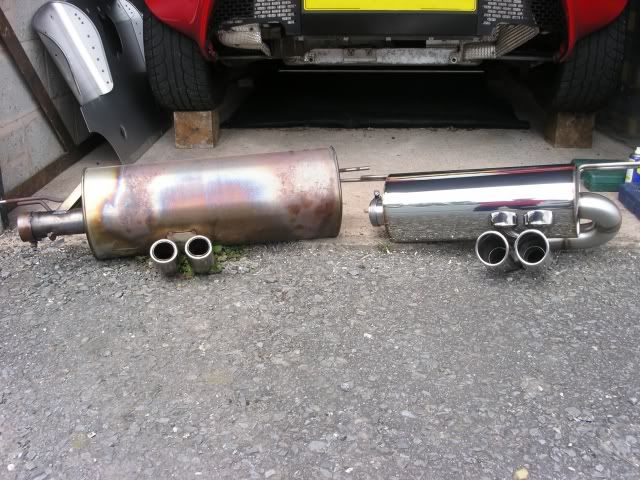
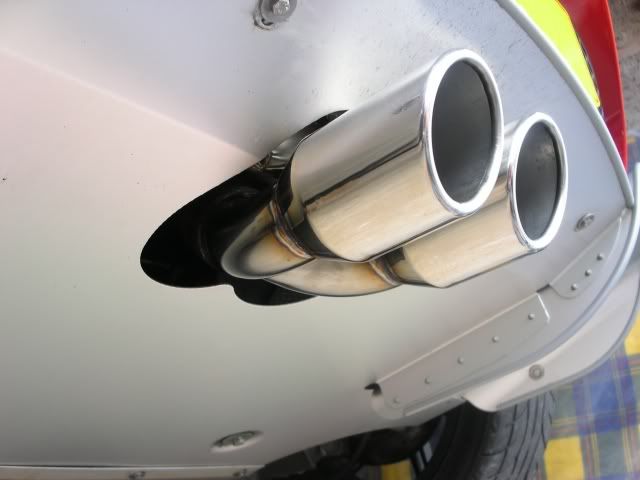
Side by side comparison of the two systems:
FITTING THE 111R & Exige2 2Bular SILENCER:
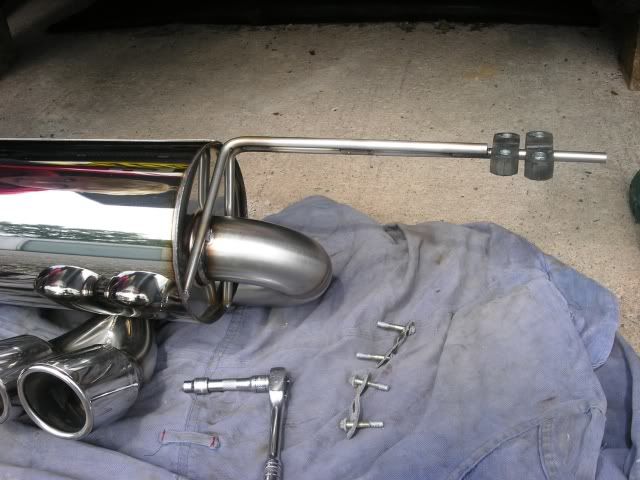
15. Slide the two RHS exhaust rubber mounts on to the RHS 2bular mounting bar. Note Aluminium Grease on bolt threads:
16. Spray some WD40 into the LHS exhaust mounts and on the Cat pipe.
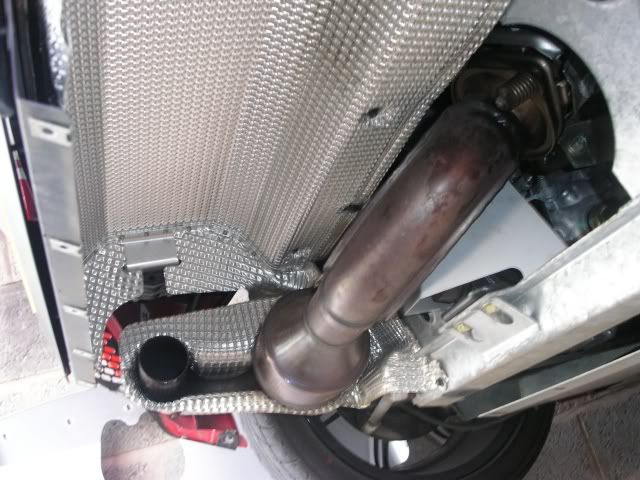
17. Line up your 2bular silencer with the Cat pipe and locate the bar-mount in the LHS exhaust mounting. Use one hand to hold the silencer, the other to guide the Cat pipe into the new exhaust. Push them together as far as you can:
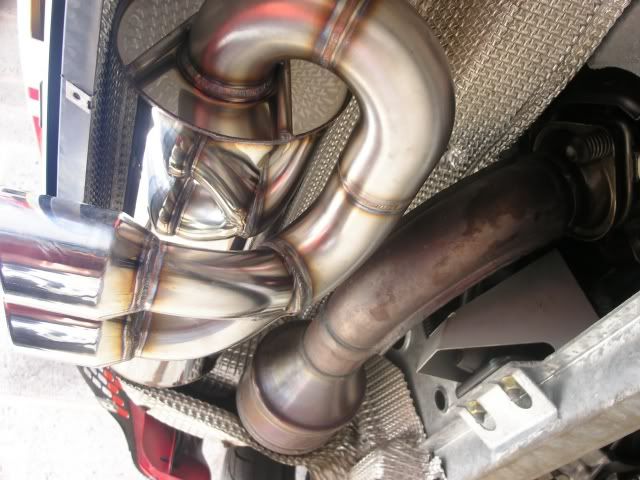
In the above picture, notice how the silencer is actually touching the heat-shield at the rear of the car. That is not by design of course and I’m not sure whether it’s as a result of other ’06 Model changes, but I eased the heat-shield away from the silencer and no vibration / rattles are present. Will need to monitor that situation however
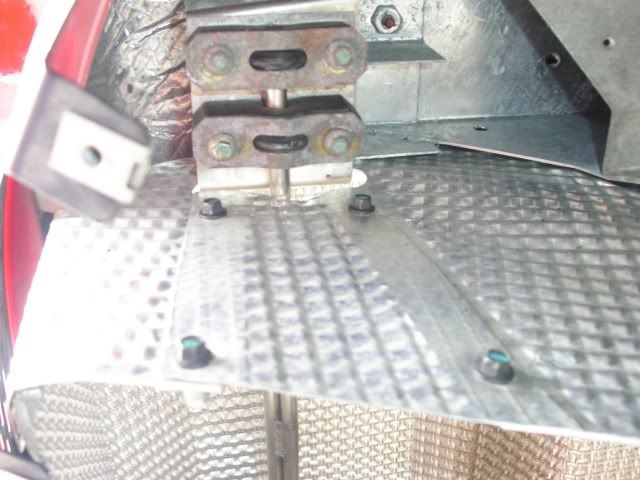
18. Screw the RHS exhaust mounts to the frame – don’t forget the small plates over the mounts. Refit the small closure panel:
19. I recommend swinging the silencer tailpipes as high as you can up to the number plate panel. This increases the clearance at the Y-piece as it comes down through the diffuser. There should be a 10mm gap between Tailpipe and the number plate panel. Look up through the Tailpipes and centre the threaded hole in the number plate panel in the gap between the pipes by puling/pushing on the silencer.
20. Clamp the silencer to the Cat Pipe. I recommend turning the screw sections away from the diffuser face, turn them forwards or up.
21. Test-fit the diffuser panel over the tailpipes, tilting it to clear them then swing it up to slide under the main diffuser panel. If you’re having a problem, you may have to turn the silencer slightly. Watch the clearance at the Y-piece and the small projecting diffuser lip – on some cars I’ve seen no gap, on others 6mm! If they’re touching, you may have to ease the lip down a fraction.
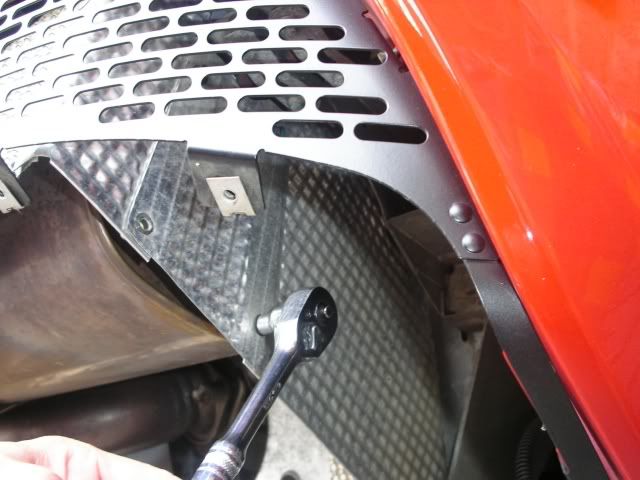
22. If everything’s looking good, screw in the two large dome-headed Allen screws holding the panel to the frame – do not tighten.
23. Locate the 5 setscrews along the panel join line - again do not tighten.
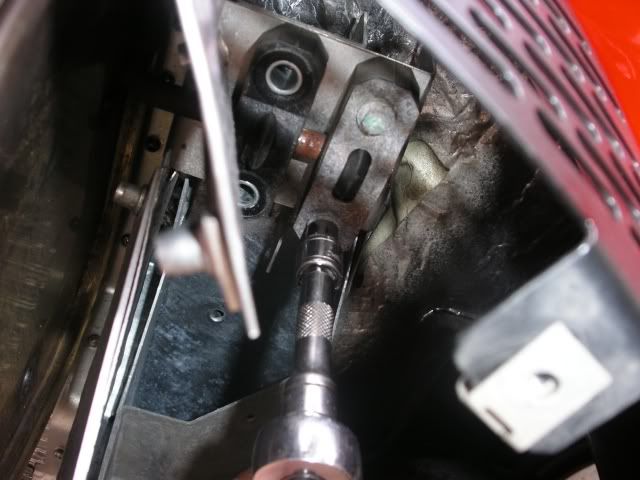
24. Go to the rear of the panel and locate the 3 setscrews below the number plate panel – the middle one can be awkward because of the Tailpipes, this where it’s better to use a ¼” drive extension bar – it’ll pass through the tailpipe gap. Do not tighten.
25. At the tunnel sections, pass the two dome-headed Allen screws through the panels/brackets and locate the nuts on them. Do not tighten.
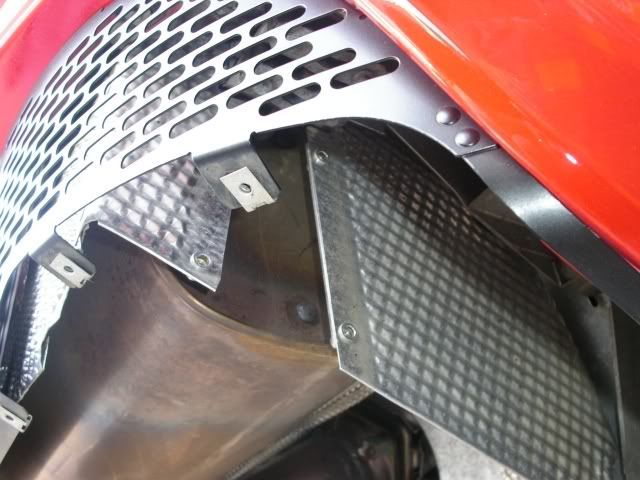
26. Go around the diffuser panel edges, push it up to make sure it will meet the number plate and grill panels. Check clearance again at Y-piece. If you’re happy tighten all the screws and Allen bolts. To further aid the heat-shield clearance problem, I ensured the rear panel was pulled away from the silencer when tightening diffuser bolts
27. Before taking car down off the ramps, start it up and just listen for any rattles.
28. The packing material in the silencer is stitched with lo-melt plastic thread and this will give off a burning smell which soon disappears.
The difference between standard...

...and 2Bular
Click http://www.youtube.com/watch?v=71OSpcUfov4 for 1.5mb video of Standard v 2Bular
And there you go! My initial thoughts..? Yep, done the trick very nicely! The pops & crackles are nice and to be honest, a little unexpected due standard cat etc
It can be kept suitably quiet with a restrained driving style, or noisy as you like with a healthy dose of right foot
Overall - lovely product that has certainly made the car sound a little more like it looks. Is it for everyone..? I dunno! What's your taste?
I would guess quite freely that the eBay one is crazy loud and would definitely make this lame in comparison. There are probably plenty of people who prefer other systems through personal taste... but if your considering this kind of a change, you could do much worse that's for sure

http://www.pistonheads.com/gassing/topic.asp?h=0&a...
Hello!
I've had my 111R SportsRacer from new since 1st March '06 and still more than delighted with it
I have always known that subtle mods would be inevitable (but note the 'subtle' bit as I personally like to keep things pretty 'standard' if that's not a contradiction in terms given the start point!)Anyway, I've lately been thinking that the car needs to sound a little more like it looks! (and a neighbour's comment of how he expected it to sound a lot more throaty has stayed with me from the moment he mentioned it!
) So given recent rave reviews and Joe’s ‘controlled’ fly-by vid, I opted for a 2bular 111R 7" x 18" box from Jim Valentine at www.2bular.com (not the Ultra for me yet though )I know there are many other very worthy alternatives such as Lotus Stage 1 & 2, Larini, Janspeed and Milltek etc, but something about Jim's passion for his trade connected enough for me to part with cash somewhat earlier in my short ownership than I perhaps thought it would
I elected for DIY route as I'm rather handy and want ownership to include getting stuck in! Also, plenty of cash saved by not wheeling it off to Dealer for fitting. Maintaining my 'over-the-top fitting guide' form (see http://www.pistonheads.co.uk/gassing/topic.asp?h=0... for audio upgrade!) I took piccys whilst following Jim's DIY guide to fitting the system. This may well be of some use to someone in future - but of course of little inspiration to those who are never too 'far from the modding crowd'!
In compiling this guide, I've simply copy & pasted Jim's fitting guide and then added photos along the way to clarify. I've made additional notes & observations in italic
There is a before & after stationary video clip at the end also
2bular exhaust fitting instructions – 111R & Exige2
Tools you’ll need:
Socket set and ratchet ¼” drive preferred (I made good use of cordless drill / screwdriver with 8mm bolt head bit)
Allen keys, 4mm and 5mm (not sure when things changed but MY06 model has only 8mm & 13mm bolts, no allen key type head fittings)
Can of WD40
I also had some Aluminium Grease present for all bolt threads on reassembly
Allow yourself 2 hours to complete this task. It can be done quicker but take your time, work safe! Certainly another pair of hands is useful – especially when removing the Standard exhaust, which is quite heavy. When you’re removing it, its weight/bulk will be over your head and body – this is where the second pair of hands is safer
REMOVING THE FACTORY SILENCER:
1.To get the car up to a working height, I recommend using the standard size wheel ramps available at all auto stores. The Elise is a very easy car to reverse up these ramps. I used big old wooden blocks under wheels after trolley jacking in gear with handbrake on and front wheels chocked front and back! Not recommended, but I was happy enough
2.Remove the rear section of the diffuser to gain access to the exhaust system. Use an 8mm socket and ratchet to remove the 5 setscrews along the panel joint (almost in line with the rear wheel centreline):
3. Go to the rear edge of the diffuser, below the number plate and remove the 3 5 on ’06 Model setscrews there with the 8mm socket:
4. Remove the setscrews at the rear edge, one 2 on ’06 Model in either “tunnel” of the diffuser:
5. Look at the turned down edge of the tunnels, immediately behind each rear wheel. Remove the 2 dome-headed screws and nuts (one set each side) using the 4mm Allen key and a 10mm socket on the nuts 8mm bolts on ’06 Model:
6. Now the diffuser is held by the 2 large dome-headed Allen screws in the centre of the panel. Lie under the panel, supporting it with your shoulder and remove the screws using the 5mm Allen key:
7. Carefully move the diffuser forward, clear of your working area – do not scrape it along the ground!
8. Look up to the exhaust mounts at either end of the silencer. Spray WD40 into the mounts and at the clamp area on the Cat pipe:
9. Loosen the exhaust clamp, using a 13mm socket. It’s welded to the pipe so won’t come off – just make sure it’s well loosened.
10. Look to the RHS heat-shield (looking from the rear of the car). Remove the small panel, 4 setscrews, using the 8mm socket:
Now get brutal and bend the heat-shield edges at this gap away from the silencer:
11. If you’re working on your own – this is where it gets sweaty!
12. Remove both RHS exhaust mounts, supporting the silencer as the second mount comes away:
13. Now, you’re on your back; looking up, place a boot on the Cat pipe and begin pulling the silencer towards you – keep it level and don’t forget to brace against the Cat pipe. If you have a helper, he/she(!) can hold the Cat pipe and use a boot to push the silencer towards you – you just have to keep it level and make sure it doesn’t fall on you as it clears the Cat pipe. A twisting/pulling action is best. As my system was only 5 months & 4500 miles old, it all came away with relative ease
14. Place silencer in a dark corner of your garage. When/if you come to sell your car, remove the 2bular exhaust, sell it on e-bay and refit your factory silencer.
Side by side comparison of the two systems:
FITTING THE 111R & Exige2 2Bular SILENCER:
15. Slide the two RHS exhaust rubber mounts on to the RHS 2bular mounting bar. Note Aluminium Grease on bolt threads:
16. Spray some WD40 into the LHS exhaust mounts and on the Cat pipe.
17. Line up your 2bular silencer with the Cat pipe and locate the bar-mount in the LHS exhaust mounting. Use one hand to hold the silencer, the other to guide the Cat pipe into the new exhaust. Push them together as far as you can:
In the above picture, notice how the silencer is actually touching the heat-shield at the rear of the car. That is not by design of course and I’m not sure whether it’s as a result of other ’06 Model changes, but I eased the heat-shield away from the silencer and no vibration / rattles are present. Will need to monitor that situation however
18. Screw the RHS exhaust mounts to the frame – don’t forget the small plates over the mounts. Refit the small closure panel:
19. I recommend swinging the silencer tailpipes as high as you can up to the number plate panel. This increases the clearance at the Y-piece as it comes down through the diffuser. There should be a 10mm gap between Tailpipe and the number plate panel. Look up through the Tailpipes and centre the threaded hole in the number plate panel in the gap between the pipes by puling/pushing on the silencer.
20. Clamp the silencer to the Cat Pipe. I recommend turning the screw sections away from the diffuser face, turn them forwards or up.
21. Test-fit the diffuser panel over the tailpipes, tilting it to clear them then swing it up to slide under the main diffuser panel. If you’re having a problem, you may have to turn the silencer slightly. Watch the clearance at the Y-piece and the small projecting diffuser lip – on some cars I’ve seen no gap, on others 6mm! If they’re touching, you may have to ease the lip down a fraction.
22. If everything’s looking good, screw in the two large dome-headed Allen screws holding the panel to the frame – do not tighten.
23. Locate the 5 setscrews along the panel join line - again do not tighten.
24. Go to the rear of the panel and locate the 3 setscrews below the number plate panel – the middle one can be awkward because of the Tailpipes, this where it’s better to use a ¼” drive extension bar – it’ll pass through the tailpipe gap. Do not tighten.
25. At the tunnel sections, pass the two dome-headed Allen screws through the panels/brackets and locate the nuts on them. Do not tighten.
26. Go around the diffuser panel edges, push it up to make sure it will meet the number plate and grill panels. Check clearance again at Y-piece. If you’re happy tighten all the screws and Allen bolts. To further aid the heat-shield clearance problem, I ensured the rear panel was pulled away from the silencer when tightening diffuser bolts
27. Before taking car down off the ramps, start it up and just listen for any rattles.
28. The packing material in the silencer is stitched with lo-melt plastic thread and this will give off a burning smell which soon disappears.
The difference between standard...
...and 2Bular
Click http://www.youtube.com/watch?v=71OSpcUfov4 for 1.5mb video of Standard v 2Bular
And there you go! My initial thoughts..? Yep, done the trick very nicely!
The pops & crackles are nice and to be honest, a little unexpected due standard cat etcIt can be kept suitably quiet with a restrained driving style, or noisy as you like with a healthy dose of right foot
Overall - lovely product that has certainly made the car sound a little more like it looks. Is it for everyone..? I dunno! What's your taste?
I would guess quite freely that the eBay one is crazy loud and would definitely make this lame in comparison. There are probably plenty of people who prefer other systems through personal taste... but if your considering this kind of a change, you could do much worse that's for sure