Rebuild Time....
Discussion


Absolutely! I'll unbox it this week for a sneak peek, although it will going on soon enough!
I've done a few more small jobs this morning.
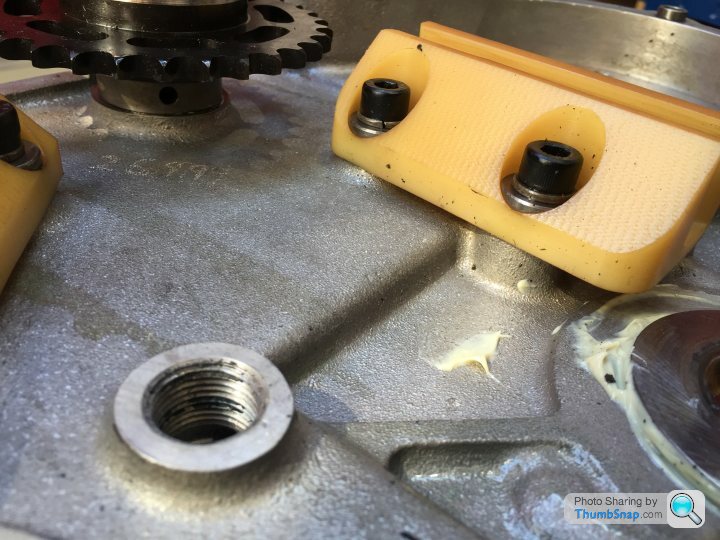
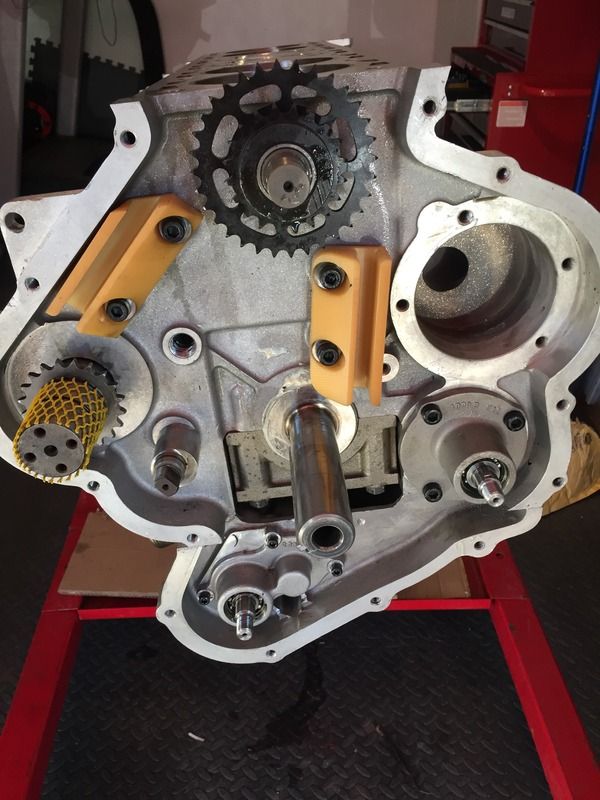
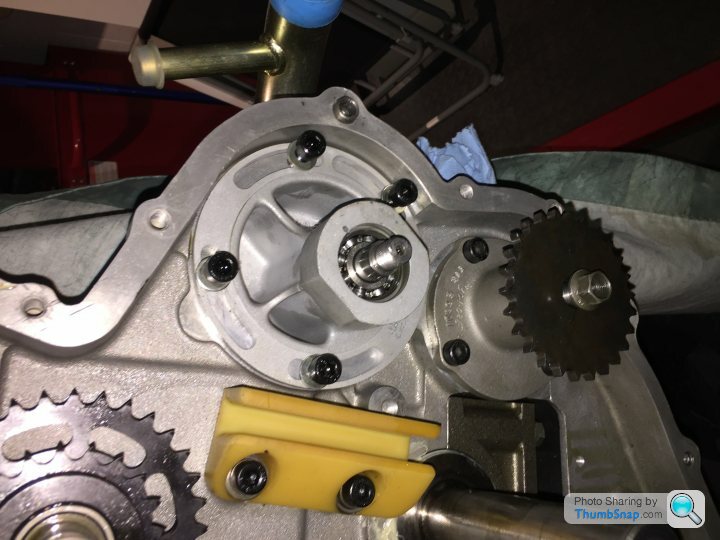
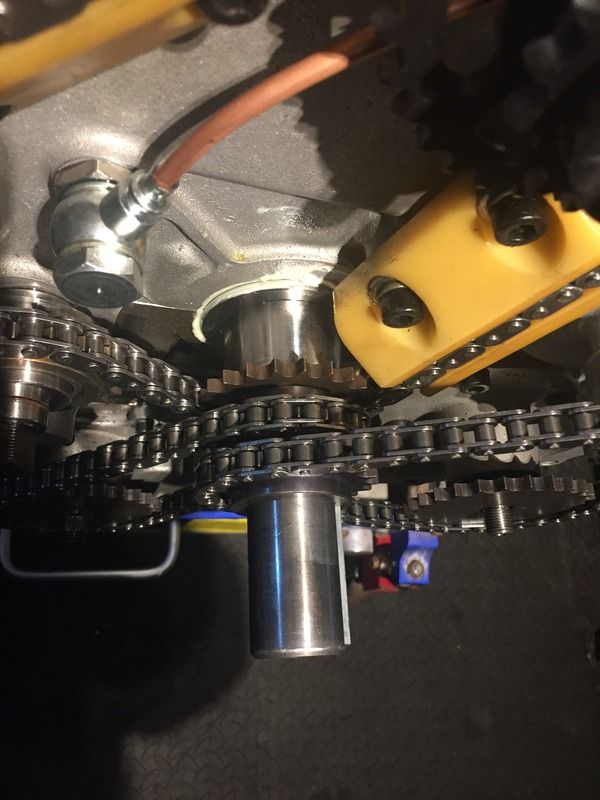
The half time shaft has been fitted, this is the simplex chain kit version with the twin oil-fed roller bearings. The shaft itself has been reshaped to take the new roller bearings and drilled for the oil feed then just slides into an aperture on the block. Then liberally lube both roller bearings, slide them inside the sprocket and that's it. This new arrangement is held in position with the use of a large washer and shim so when the timing cover is fitted it holds the roller bearings in position.
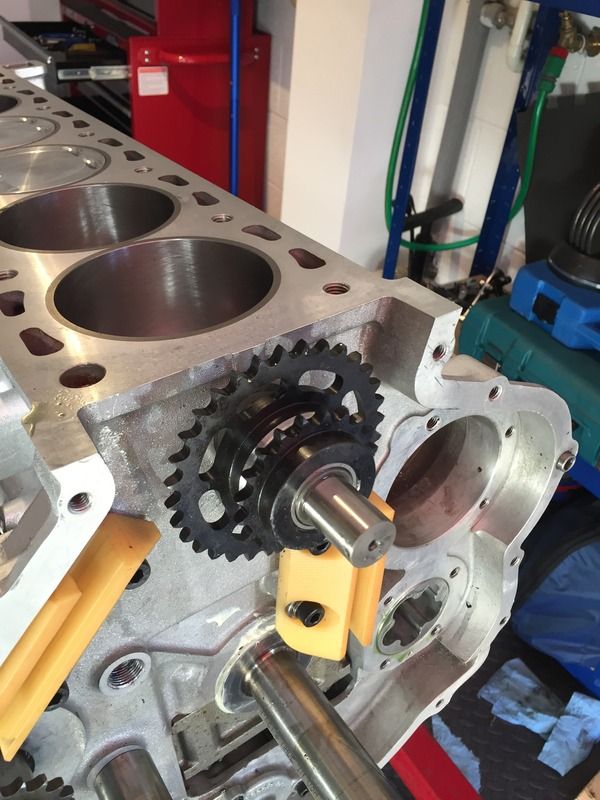
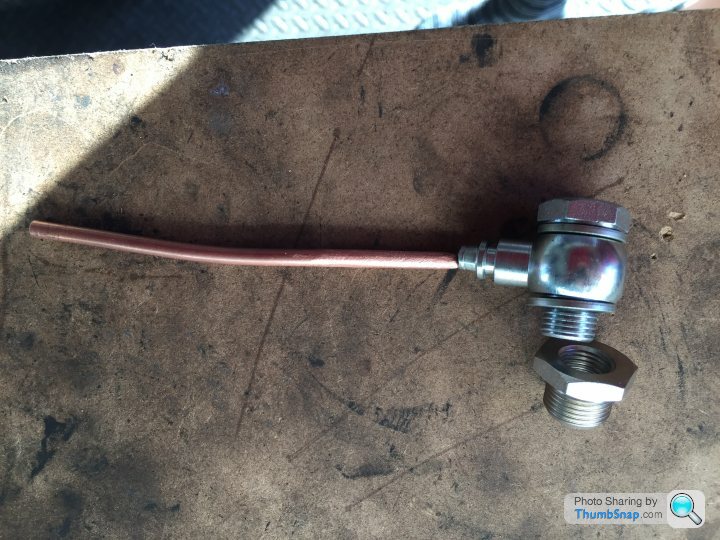
This new sprocket arrangement is oil fed from a new fitting on the oil gallery.
I'll have the new half time oil feed fitted this week, and then a refresh of the water pump bearings before install.
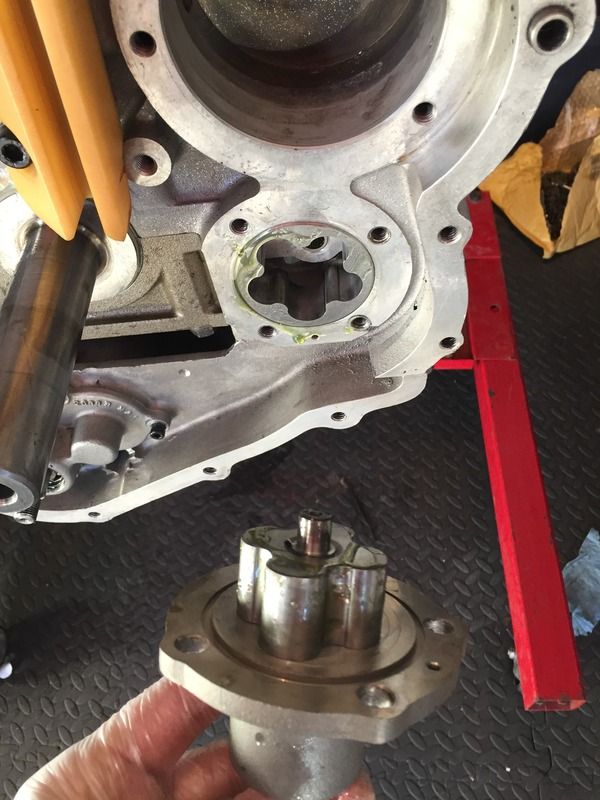
I also fitted the new rotors to the oil pump shafts, again liberally lubed up, fitted and torqued up.
I've done a few more small jobs this morning.
The half time shaft has been fitted, this is the simplex chain kit version with the twin oil-fed roller bearings. The shaft itself has been reshaped to take the new roller bearings and drilled for the oil feed then just slides into an aperture on the block. Then liberally lube both roller bearings, slide them inside the sprocket and that's it. This new arrangement is held in position with the use of a large washer and shim so when the timing cover is fitted it holds the roller bearings in position.

This new sprocket arrangement is oil fed from a new fitting on the oil gallery.
I'll have the new half time oil feed fitted this week, and then a refresh of the water pump bearings before install.
I also fitted the new rotors to the oil pump shafts, again liberally lubed up, fitted and torqued up.


Edited by Willfin on Saturday 11th February 23:09
I've done a couple of little items this morning to keep things ticking over.
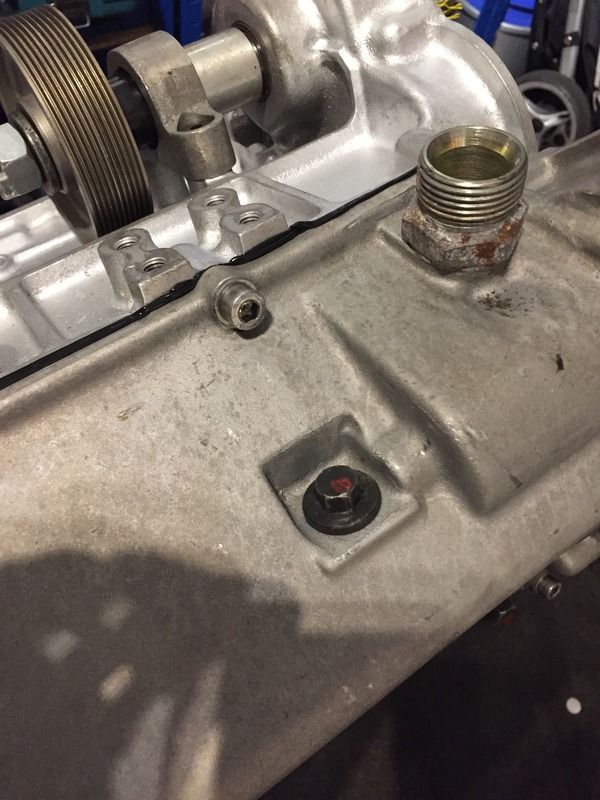
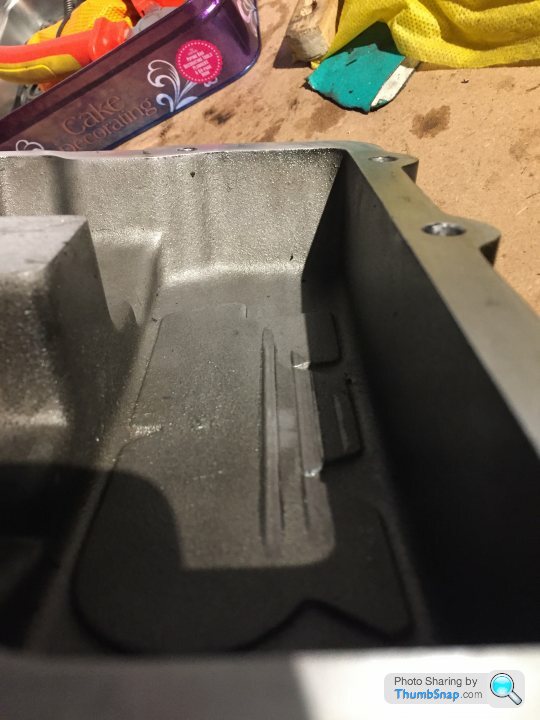
Sump plug install. There are actually two. One in the face of the sump, which is magnetic, then a large Allen key at the end which is a little lower down that I guess would drain more oil. Both now locked into place.
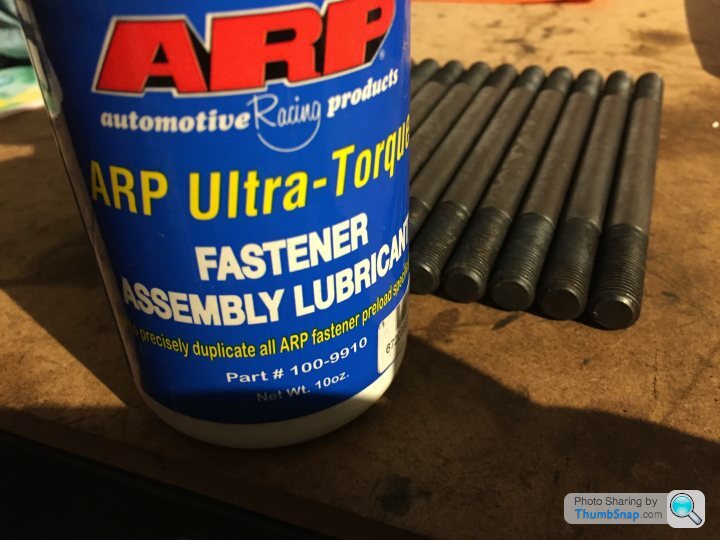
I've decided to use a head stud kit for my build instead of normal bolts. For the small extra cost I thought it worthwhile as all the big-power builds I've followed over the years have upgraded to studs. The main benefit appears to be torque efficiency and how the load is transferred through the fastener. There are loads of articles, one of which is here:
http://www.thomasnet.com/articles/hardware/head-st...
Anyhow, here are the head studs installed, using the recommended ARP fastener lube with block threads given a good clean beforehand.
The kit includes two longer studs for the head dowel inserts to ensure all the thread is utilised. The studs are just installed hand tight as long as they bottom out the thread.

I decided to unpack some of old parts from the engine as stripped by Dom at Powers, to see what went wrong in the first place. As you can see below, the big end bearing is completely wrecked, either just failure in itself or as a result of the additional load of an ovalled little end.
Also, as suspected, the original build had the "Indian Rods" installed from the factory. These rods can be identified by the simple tvr lettering cast into the rod, unlike the alternative "Linton" rods also installed at the factory which uses the actual TVR logo.
You would think the Indian rods were installed early doors but this doesn't appear the case, as the spare MY2000 block I have used the Linton rods, whereas my MY2002 block has Indian rods. Maybe they used Indian rods as time progressed to save money then realised the error of their ways and reverted back. Who knows! Not that con rod failure was as big an issue as the finger followers. If only they'd used quality parts from the start in lieu of all the engine testing they didn't do...
Sump plug install. There are actually two. One in the face of the sump, which is magnetic, then a large Allen key at the end which is a little lower down that I guess would drain more oil. Both now locked into place.


I've decided to use a head stud kit for my build instead of normal bolts. For the small extra cost I thought it worthwhile as all the big-power builds I've followed over the years have upgraded to studs. The main benefit appears to be torque efficiency and how the load is transferred through the fastener. There are loads of articles, one of which is here:
http://www.thomasnet.com/articles/hardware/head-st...
Anyhow, here are the head studs installed, using the recommended ARP fastener lube with block threads given a good clean beforehand.
The kit includes two longer studs for the head dowel inserts to ensure all the thread is utilised. The studs are just installed hand tight as long as they bottom out the thread.

I decided to unpack some of old parts from the engine as stripped by Dom at Powers, to see what went wrong in the first place. As you can see below, the big end bearing is completely wrecked, either just failure in itself or as a result of the additional load of an ovalled little end.
Also, as suspected, the original build had the "Indian Rods" installed from the factory. These rods can be identified by the simple tvr lettering cast into the rod, unlike the alternative "Linton" rods also installed at the factory which uses the actual TVR logo.
You would think the Indian rods were installed early doors but this doesn't appear the case, as the spare MY2000 block I have used the Linton rods, whereas my MY2002 block has Indian rods. Maybe they used Indian rods as time progressed to save money then realised the error of their ways and reverted back. Who knows! Not that con rod failure was as big an issue as the finger followers. If only they'd used quality parts from the start in lieu of all the engine testing they didn't do...
Edited by Willfin on Tuesday 31st January 10:33
I did replace the needle bearing in the block but didn't take a photo! I had the oil pump bearings replaced by a local garage as I don't have a press. Thanks for the advice on the oil pump, I'll take another look at that to make sure it's correctly aligned, although i think the body only fits into the block one way.
I also had a go at replacing the water pump bearings yesterday and made a right arse of it! lol It's quite tricky as the body isn't square and looks like it needs shimmed to align to a press. I duly had a go and cracked the housing! Luckily I had a spare which is now in the post to Powers to let someone with the experience of replacing the bearings carry out that work.
Why aren't replacement pumps just supplied with bearings fitted like any other marque......oh wait! To be fair I think it's because every item on the engine was designed to be made in house, spindles shafts, housings etc.
Edited by Willfin on Thursday 26th January 09:59
The hand tight is on the instructions from ARP, surprised me too, but the torque is for the nuts on the top really.
http://arpinstructions.com/instructions/114-4201.p...
I did tell Dom i was thinking about the FFF head, but its a like for like replacement for the original head so not anticipating any issues.
Ill unwrap the head and fit it on Sunday so pictures will arrive then!
http://arpinstructions.com/instructions/114-4201.p...
I did tell Dom i was thinking about the FFF head, but its a like for like replacement for the original head so not anticipating any issues.
Ill unwrap the head and fit it on Sunday so pictures will arrive then!
The pistons on my build are level with the deck block and the pistons are identical in size.
The stroke of the piston or overall diameter are irrelevant to the comp ratio. Its the shape of the top of the piston and the "void" in the cylinder head at TDC that determine the comp ratio. That and the thickness of the head gasket, and both of these are as original spec.
The additional air compressed by the larger cc is compressed into a slightly bigger void at TDC as the shape in the piston crown is bigger relative to the original piston diameter.
That's how I understand it anyway!
Edited by Willfin on Saturday 11th February 23:13
A little bit of light cleaning this last couple of days whilst waiting to get a full Sunday fitting the head etc.
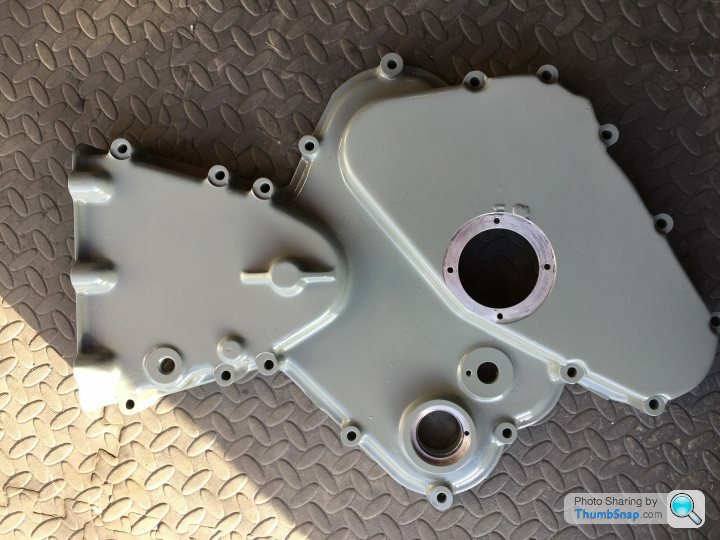
Took m4tti's advice and used an etch primer prior to final paint. Pleased with the outcome.
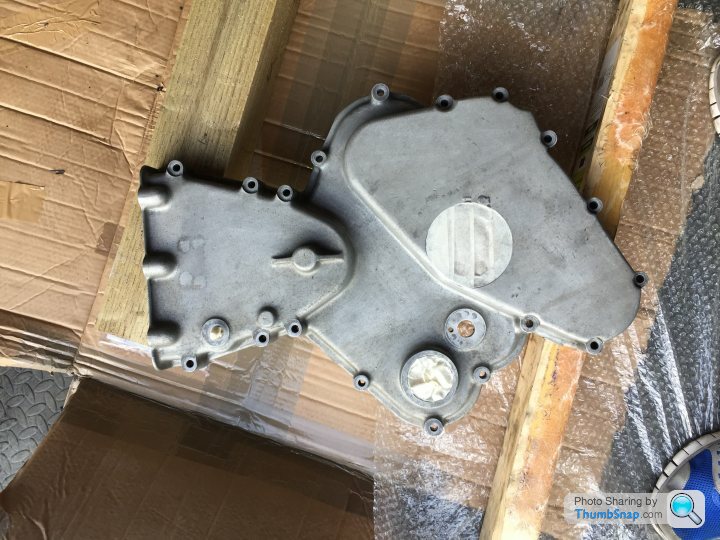
I decided to just clean up my original cam and plug covers as they were only recently painted. I noticed some scoring on the inside of the cover where the secondary timing chain has worn against it. Quite deep too! Hoping this doesn't happen with the simplex, and will put a nice thick gasket sealant bead to try to raise it up slightly on final assembly.
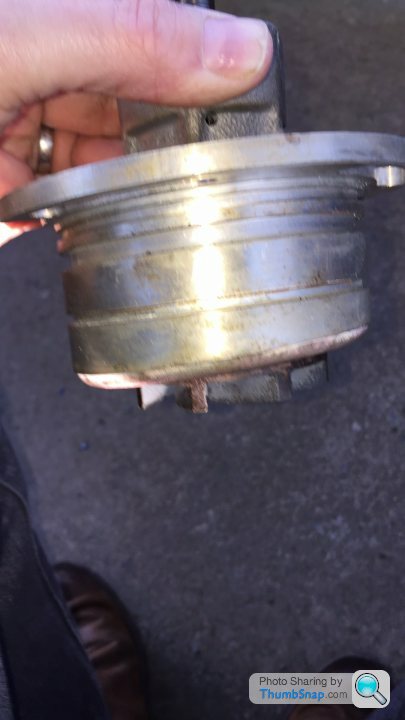
Then a parcel arrived from powers with the refurbished water pump. A couple of o-rings and a bit of lube later and it's slid into the block. The woodruff key is quite tight into the shaft so something to look at later on.
All ready for fitment of the cylinder head this weekend, although I need to put some extra support under the engine as I think a fully assembled engine hanging off 4 gearbox bolts into an alloy block is asking for trouble!
Took m4tti's advice and used an etch primer prior to final paint. Pleased with the outcome.
I decided to just clean up my original cam and plug covers as they were only recently painted. I noticed some scoring on the inside of the cover where the secondary timing chain has worn against it. Quite deep too! Hoping this doesn't happen with the simplex, and will put a nice thick gasket sealant bead to try to raise it up slightly on final assembly.
Then a parcel arrived from powers with the refurbished water pump. A couple of o-rings and a bit of lube later and it's slid into the block. The woodruff key is quite tight into the shaft so something to look at later on.
All ready for fitment of the cylinder head this weekend, although I need to put some extra support under the engine as I think a fully assembled engine hanging off 4 gearbox bolts into an alloy block is asking for trouble!
Edited by Willfin on Friday 27th January 16:04
J, I don't mind at all. Thanks for pointing out the missing gasket on the sump, I'll rectify that when fitting the chains.
I've double checked the oil pump and I'm happy it doesn't bind, seems to turn very freely, again good point made with it not being dowelled.
So I've got on with a few more jobs.....
Fitted the oil feed for the half time roller bearings, all tight and thread locked, certainly appears a much better bearing and lube system than standard.


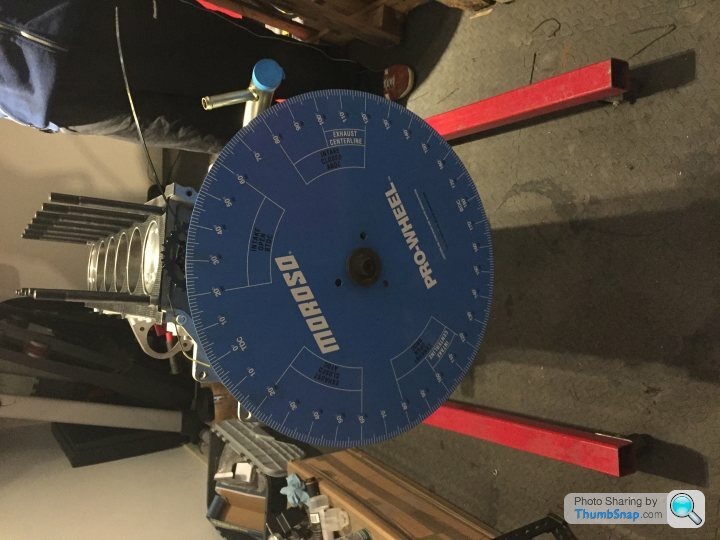
Next, and before fitting the head, i used a dial test indicator on piston number 6, to find Top Dead Centre. I managed to source a timing wheel from the states and a nice piece of coat hanger to reference from! So with the DTI, a point was noted when the piston started moving the dial, and then again when it it finally stopped registering on the dial. The exact midpoint between the two was noted as being TDC. The wheel was marked at zero and then double and treble checked before marking the other end of the crank. Happy.
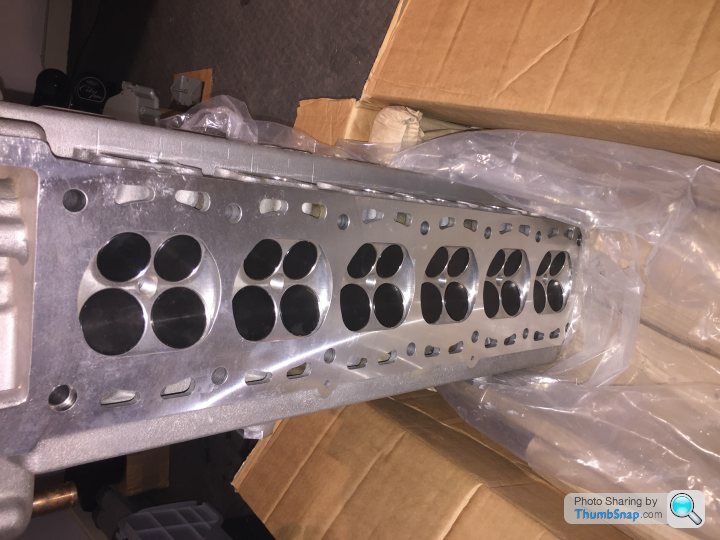
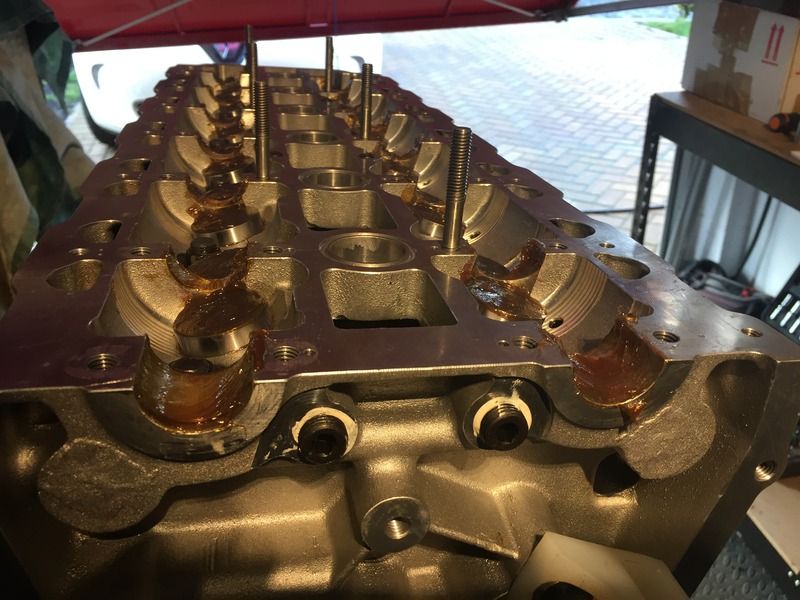
Then it was time to unpack the head, I must say it looks a very precise and well made piece of kit. The finish inside the ports is super smooth and well shaped.


The head was torqued down first to 40 lbs/ft and then 75 lbs/ft, which is a little less than when using head bolts. Then undo and re-torque tomorrow.
Next is to fit the cams and get it all chained and timed up!
I've double checked the oil pump and I'm happy it doesn't bind, seems to turn very freely, again good point made with it not being dowelled.
So I've got on with a few more jobs.....
Fitted the oil feed for the half time roller bearings, all tight and thread locked, certainly appears a much better bearing and lube system than standard.
Next, and before fitting the head, i used a dial test indicator on piston number 6, to find Top Dead Centre. I managed to source a timing wheel from the states and a nice piece of coat hanger to reference from! So with the DTI, a point was noted when the piston started moving the dial, and then again when it it finally stopped registering on the dial. The exact midpoint between the two was noted as being TDC. The wheel was marked at zero and then double and treble checked before marking the other end of the crank. Happy.
Then it was time to unpack the head, I must say it looks a very precise and well made piece of kit. The finish inside the ports is super smooth and well shaped.
The head was torqued down first to 40 lbs/ft and then 75 lbs/ft, which is a little less than when using head bolts. Then undo and re-torque tomorrow.
Next is to fit the cams and get it all chained and timed up!
Edited by Willfin on Tuesday 31st January 19:10
Yes I do like the look of how shiny it all looks too! I would also have thought they would have removed the RG reference, although they did also give me a RG cam cover badge.....which I won't be using.
Dom did blast it and paint, but not only that he stripped the whole block after having it sent down fully assembled from Hexham after being removed from my car. I can't thank Dom enough really, he's been superb in all of my dealings, as well as Andy Mosey his parts/store manager. Both top blokes. The head is just fresh out of the casting and isn't painted, so will deteriorate over time, like the block will really.
For the purpose of the run in, Dom has done a 4.3 chip for me, which will be fitted into my ECU by Hexham. The run in will only be generally part throttle and taking it easy, although I may well go to a local rolling road just to make sure its not running lean/rich. It probably wont run perfectly but will suffice for the run in. Once run in then it will get the new MBE fitted.
Yeah during assembly everything gets coated in engine build lube, very liberally! Ive also got a tub of special cam break in lube so ill be covering the cams, bearings and buckets with it. Once the oil circulates it just dissolves into it without a problem. Then an oil change after 500 miles, the first lot of oil being just mineral for break in. The guys at Hexham have started up many a new engine, and your right that it needs to sit at 2500rpm for 20mins, any water/oil leaks etc then the car must be switched off. I just want it in and running now, or even better, run in done and mbe fitted!
Been busy on it today finalising the head torque settings as it needed undone by 1/2 turn then redone to 75lbs after having been fully torqued up yesterday. Ive also now got all of the bottom half chains in place! Hoping to get it to Hexham for refitting next saturday so need to keep going!
Edited by Willfin on Tuesday 31st January 19:11
Yeah Matti, the taking out and putting back in was never on my radar, no fun in that!
Incognegro, Im sure you will love that engine package when you get the car back, Dom's machine work and attention to detail is second to none. That is one superb engine package, billet crank, forged pistons and rods and all the other uprated gubbons!
Ive just finished the assembly of the engine, just not had a chance to do an update. The engine has been collected and is being delivered for install at Hexham week after next. Roll on, very nervous!!
So since the last update, i completed the head torque up procedure, which involved undoing each nut one by one half a turn and then re-torquing back to 75lbs ft.
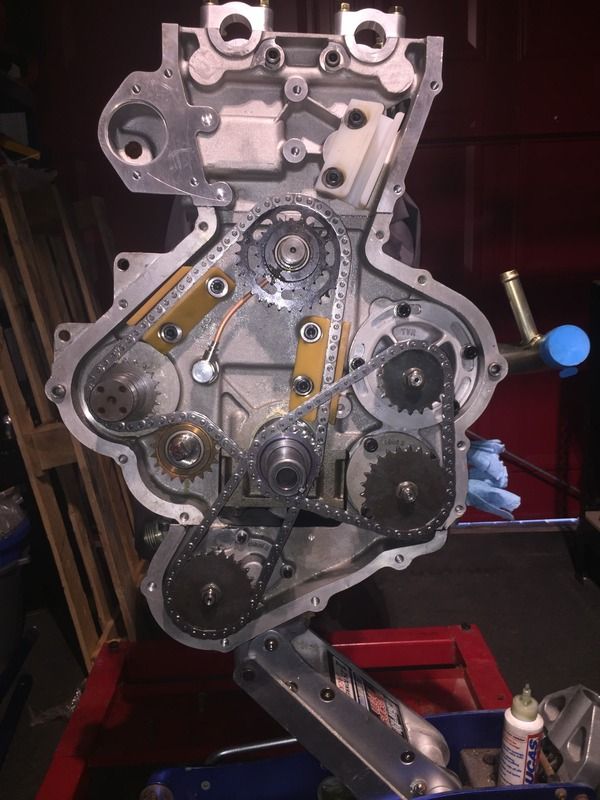
Then all the lower chains were assembled, tightened and pump nuts torqued. The scavenger pump is a strange one as it has no tensioning mechanism, so its as tight as it ends up once the sprocket is slid on, which wasn't easy with the sump on!!
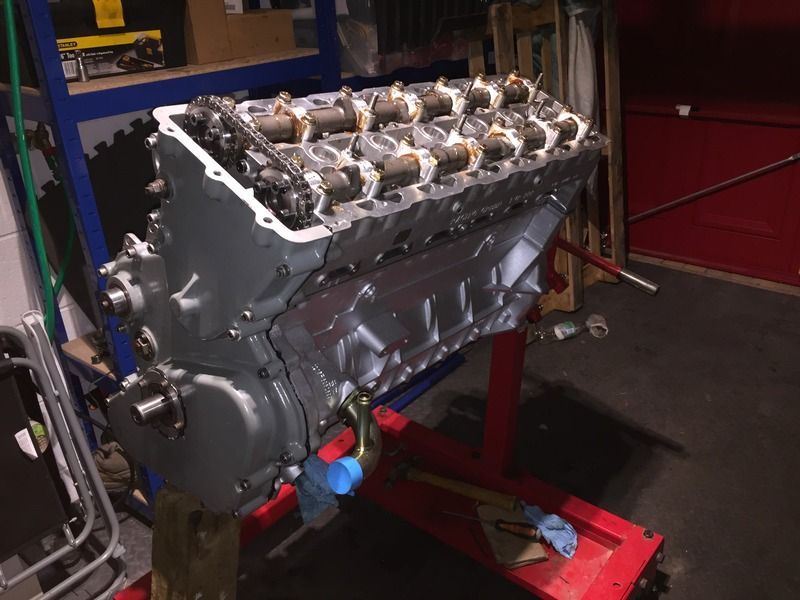
With all the lower chains on, it was time to do the cam install and timing. The new timing values for the FFF2 head are 115.5 inlet, and 107.5 exhaust. Firstly with the cams fitted and crank turned away from TDC to lower all the pistons, the cams were roughly fitted at TDC, which is pointing inwards about 120deg. So then turned crank back to TDC, and fitted the top timing chain.
Then to set the timing, my method was to use a dial test indicator on the follower to find the point of full lift and take note off the crank angle of that full lift position. Then slacken cam sprocket bolts and either advance or retard to get to the required values. This took a few goes and then a few more times to check. Reading a value on the DTI before and after full lift to find the centre, as there is a dwell point on the cam where its neither going up or down. Did this for inlet and then exhaust, always making sure the engine is being turned clockwise to keep the slack of the right side of the chain.
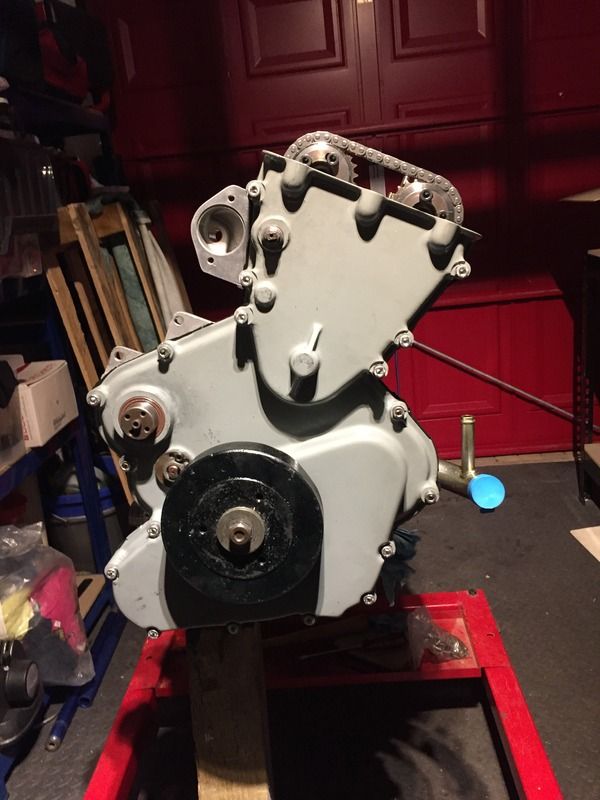
The with all that done, it was time to install the timing cover, damper and cam covers and all done! I foolishly didn't get a picture of it all done in my garage, oh well.
So heres a few of my final assembly pics, now waiting nervously for phone call from Hexham to say the engine is running and all is well, time will tell!!
Simplex chains and cogs.
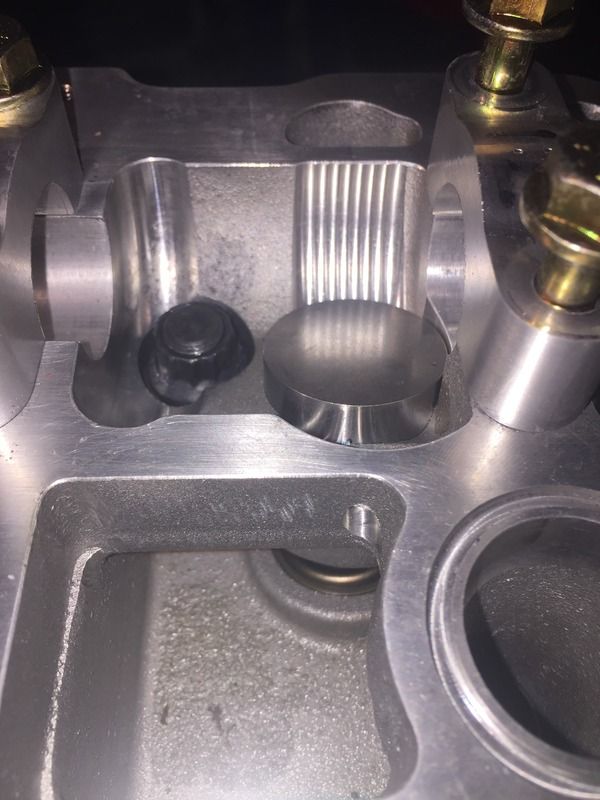
Simplicity of the head...cam bearing, bucket and head stud.
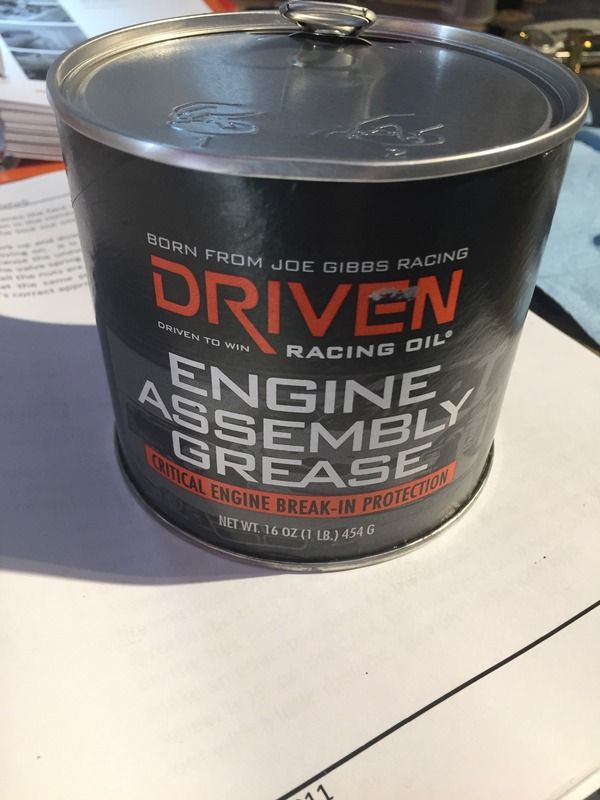
Everything liberally lubed up..
with this stuff.
And then all assembled and timed up...
Crankshaft damper on. So obvious how much of an afterthought this part is on the engine, doesn't align with the shape of the timing cover at all. When it was decided to be used TVR must have already placed and order for the original cover and just decided to drill it out and fit a little bracket and oil seal!
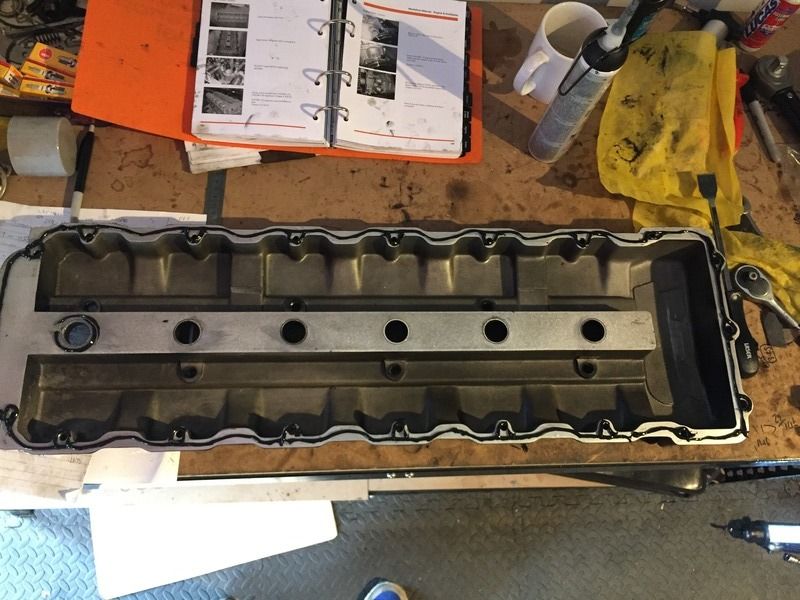
Cam cover sealed ready to go..
As you can see I used a Varley manual for reference throughout, be invaluable for all of the torque settings.
So the engine is now off for fitting week after next, needs a 4.3 chip & injectors fitted and a couple of other little jobs such as oil fittings, thermostat & crankshaft oil seal plate.
Its been great doing the engine so far, loved being in the garage playing with the tools just hope its all been worthwhile...watch this space!!
Incognegro, Im sure you will love that engine package when you get the car back, Dom's machine work and attention to detail is second to none. That is one superb engine package, billet crank, forged pistons and rods and all the other uprated gubbons!
Ive just finished the assembly of the engine, just not had a chance to do an update. The engine has been collected and is being delivered for install at Hexham week after next. Roll on, very nervous!!
So since the last update, i completed the head torque up procedure, which involved undoing each nut one by one half a turn and then re-torquing back to 75lbs ft.
Then all the lower chains were assembled, tightened and pump nuts torqued. The scavenger pump is a strange one as it has no tensioning mechanism, so its as tight as it ends up once the sprocket is slid on, which wasn't easy with the sump on!!
With all the lower chains on, it was time to do the cam install and timing. The new timing values for the FFF2 head are 115.5 inlet, and 107.5 exhaust. Firstly with the cams fitted and crank turned away from TDC to lower all the pistons, the cams were roughly fitted at TDC, which is pointing inwards about 120deg. So then turned crank back to TDC, and fitted the top timing chain.
Then to set the timing, my method was to use a dial test indicator on the follower to find the point of full lift and take note off the crank angle of that full lift position. Then slacken cam sprocket bolts and either advance or retard to get to the required values. This took a few goes and then a few more times to check. Reading a value on the DTI before and after full lift to find the centre, as there is a dwell point on the cam where its neither going up or down. Did this for inlet and then exhaust, always making sure the engine is being turned clockwise to keep the slack of the right side of the chain.
The with all that done, it was time to install the timing cover, damper and cam covers and all done! I foolishly didn't get a picture of it all done in my garage, oh well.
So heres a few of my final assembly pics, now waiting nervously for phone call from Hexham to say the engine is running and all is well, time will tell!!

Simplex chains and cogs.

Simplicity of the head...cam bearing, bucket and head stud.

Everything liberally lubed up..

with this stuff.

And then all assembled and timed up...

Crankshaft damper on. So obvious how much of an afterthought this part is on the engine, doesn't align with the shape of the timing cover at all. When it was decided to be used TVR must have already placed and order for the original cover and just decided to drill it out and fit a little bracket and oil seal!

Cam cover sealed ready to go..

As you can see I used a Varley manual for reference throughout, be invaluable for all of the torque settings.
So the engine is now off for fitting week after next, needs a 4.3 chip & injectors fitted and a couple of other little jobs such as oil fittings, thermostat & crankshaft oil seal plate.
Its been great doing the engine so far, loved being in the garage playing with the tools just hope its all been worthwhile...watch this space!!
Edited by Willfin on Friday 10th February 17:05
Thanks for the advice John.
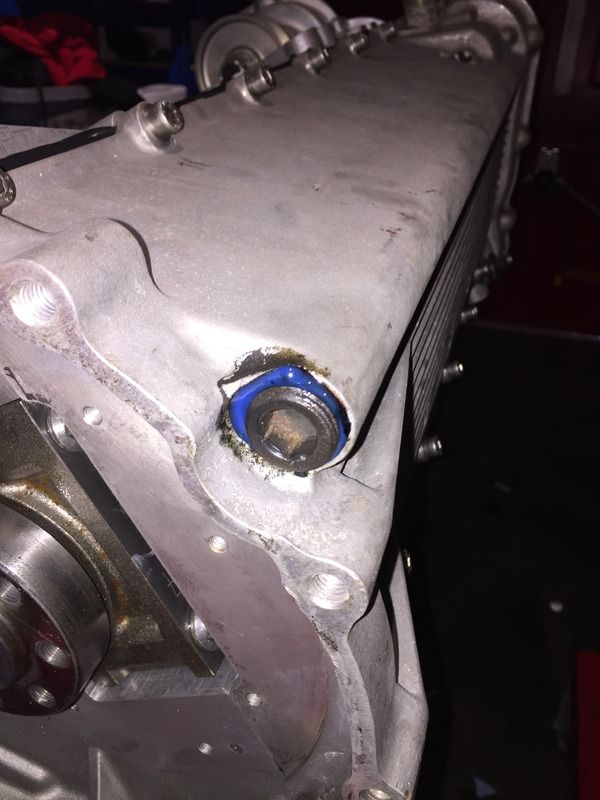
On the FFF head the sealant mating line followed right at the edge of the cover. Before being torqued up, that's the edge I checked and was happy to see a little sealant spilling out.
I've spoken with Hexham and more than happy that they will follow the advice on the cams. I looked into this a little further and having spoken to a few people I understand that a few specialists think it's an old wives tale and makes no difference!
Cheers guys
Edited by Willfin on Saturday 11th February 09:51

Cheers guys. A few little mistakes along the way but quickly sorted.
The speed 6 is really quite a simple engine, if you've done the C20LET engines in a vauxhall you can tackle a TVR no probs.
I did get the help from dom regarding the bottom end, but that work is simple enough, especially when you know the machine work is spot on from Dom.
The speed 6 is really quite a simple engine, if you've done the C20LET engines in a vauxhall you can tackle a TVR no probs.
I did get the help from dom regarding the bottom end, but that work is simple enough, especially when you know the machine work is spot on from Dom.
It was delivered a week gone last friday by a friend and they spent last week putting on ancillaries, clutch gearbox etc ready to lift in this week. Hexham had this week planned for its fitment following a discussion i had a few weeks ago, and i understand the engine was fitted to the car today. Should be all plumbed in, started and shakedown rest done eady for collection on friday/saturday.
Hope everything is going to plan!
Hope everything is going to plan!
Yes!
Apologies for the lack of updates, last minute holiday called, with a digital detox.
Cars now up and running, should get over to collect middle of next weekend (kids party this weekend) and start racking up the 1000 mile run in. Its got a new close ratio gear set too which also needs a bit of running in. Then it will be back at Hexham for oil changes then good to go!
Probably take me a month or so to get the miles on and then on the rollers for a remap tweak and see what kind of figures its getting, not that its the important part of the build. Just reliability and smoothness for me.
Cant wait to pick it up!
Car collected, in pristine condition after full valet at Hexham.
Successfully got 200mikes on it in 24hours, running well so far. Part throttle for now to get things bedded in, but couldn't resist letting it up to 5k revs, feels like it's ready to go nuts!
Next stop is box and engine oil changes at 800miles, couple of weeks hopefully!


Successfully got 200mikes on it in 24hours, running well so far. Part throttle for now to get things bedded in, but couldn't resist letting it up to 5k revs, feels like it's ready to go nuts!
Next stop is box and engine oil changes at 800miles, couple of weeks hopefully!
Edited by Willfin on Sunday 12th March 09:59
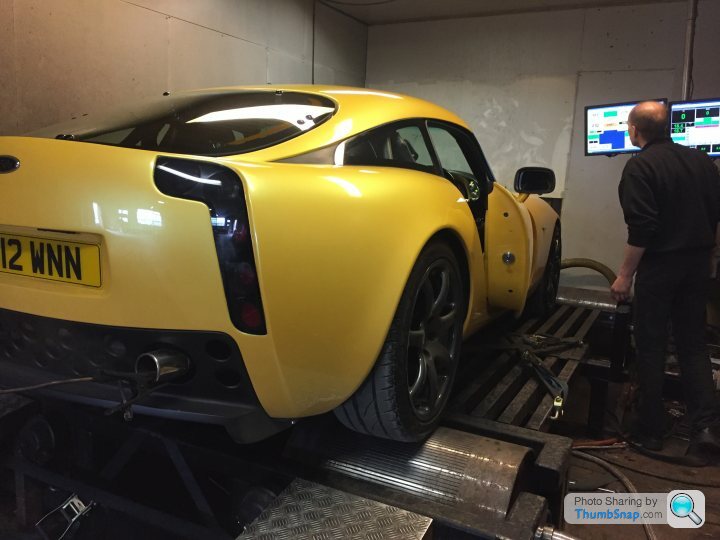
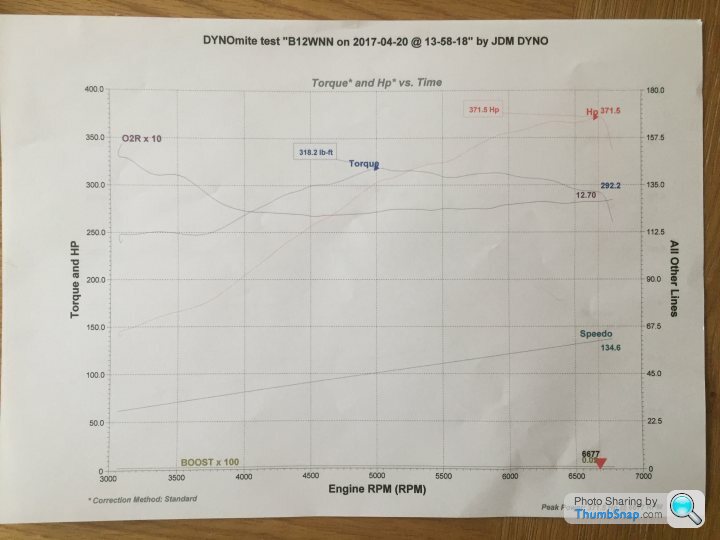
Well the cars had its first service and a power run on the rollers to make sure everything's working ok on the generic chip.
Came out with 372@6700 flywheel, 300 wbhp which is a little less than I'd thought it would be. We could have remapped by using an emulator and burning chips but I'm just going to run it safe until it's ready for uprated management which gives live mapping to change fuelling and ignition.
One thing that may be affecting is the cam timing, I had to increase the exhaust cam CLA to avoid the exhaust valves being struck by piston after tdc. Reason being is my blocks been skimmed a couple of times bad changed it to be on the safe side. I may revisit this if it's having a big effect on the top end.
Important thing was it's not running too rich or lean throughout and ready for a couple more thousand miles of run in, including higher revving for more enjoyment!
All in all, happy to have to strong and reliable speed 6 for once!
Edited by Willfin on Thursday 20th April 22:20
Gassing Station | Speed Six Engine | Top of Page | What's New | My Stuff