Steves tam project
Discussion


Don1 said:
Good luck on using the rear box - mine ended up getting so hot it melted the numberplate...
Don the trick with this not to let the rear box touch the cover plate that the no plate sits on I did this the First time I swapped my bean cans out for the standard box. When you put the box on you need a piece of wood placed across the back box ( when box is located on the pipes) to protect the box then drive it on by hitting the wood with a hammer. You don't need any exhaust paste it's a shrugged fit! Test fit the cover plate you and should have around 1" gap between the cover plate and the back box this will be enough to let the heat escape. And not transfer to the number plate. The cover plate/ no plate will still feel quit warm but it won't melt the digits on the no plate.HTH
Buzz
BuzzBillsberry said:
Don the trick with this not to let the rear box touch the cover plate that the no plate sits on I did this the First time I swapped my bean cans out for the standard box. When you put the box on you need a piece of wood placed across the back box ( when box is located on the pipes) to protect the box then drive it on by hitting the wood with a hammer. You don't need any exhaust paste it's a shrugged fit! Test fit the cover plate you and should have around 1" gap between the cover plate and the back box this will be enough to let the heat escape. And not transfer to the number plate. The cover plate/ no plate will still feel quit warm but it won't melt the digits on the no plate.
HTH
Buzz
We ended up changing the full system - trying to fit 6 litres of burnt air down a system designed for a 3.6 didn't really work too well.... HTH
Buzz

rhyspw said:
Looks like a good job, what heat reflective stuff did you use?
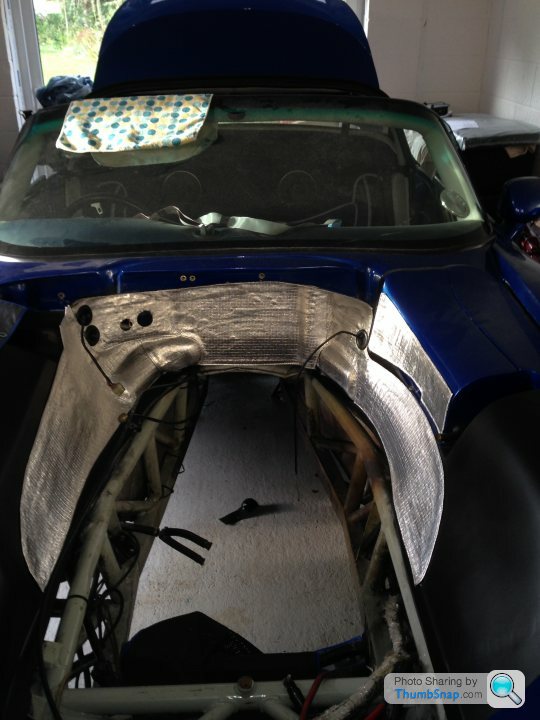
same type of stuff that was used on griff and chin. it has none of the wadding that is used on the t cars, so is likely less sound deadening, but what was on the car originally was a mess, fell off in chunks, absorbed water and was held on by ali tape.well, great news...the 6 speed gearbox fits...

whilst it is chunky, it fits the chassis with about as much clearance at the back as i had in the griff.
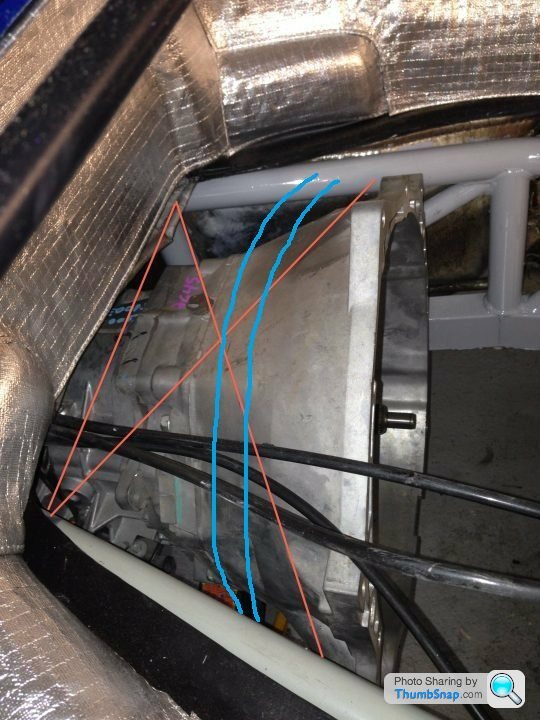
the bellhousing just fouls the chassis around the starter, though it is very thick, so might clearance the bell housing, or scollop the chassis bar to suit. it is sat about 5mm off centreline at the moment. I could pull the engine forward to clear, but i will test fit that next weekend to make sure its possible before i cut anything. as i am making the shifter mechanism to suit, ive some flexibility here to move the engine forward an inch if that makes packaging better, and given that the 6060 is heavier, and all the weight is at the back of the box, moving the engine/box forwards will not materially effect balance. (and f i was really concerned, I could relocate the battery to the back to offset).
as with the TKO, the rail above the gearbox prevents the box sitting high in the chassis, which means the sump will also sit low, and removing that cross bar will mean the engine and gearbox will sit a little higher. ive seen that in most t car conversions. plan though is to replace the brace, and weld supports back to the original pick up points, to strengthen that area more than stock.
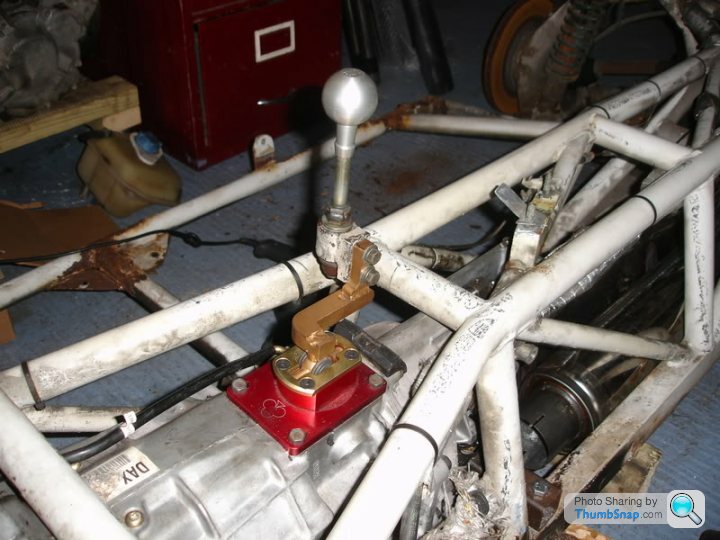
the shifter on the 6060 sticks out the back on a remote. I could replace that with the shifter i used on the griff, but that would foul a diagonal brace...time to design something thatll work here. at least there is some room ...

i have mulled over the "chassis out and refresh" vs repaint bits in situ, and as it looks likely that a few chassis tweeks are in order, have decided to just repaint the modified bits of the chassis as needed, till I am certain there are no other mods needed, which might present themselves as clearancing down the line after the car is on the road, so for now have treated RH chassis rails to a rub down and repaint with KB rust stuff....
i may well do the chassis out thing next year, but i dont want to do that only to find i'm taking a grinder to it again.
whilst it is chunky, it fits the chassis with about as much clearance at the back as i had in the griff.
the bellhousing just fouls the chassis around the starter, though it is very thick, so might clearance the bell housing, or scollop the chassis bar to suit. it is sat about 5mm off centreline at the moment. I could pull the engine forward to clear, but i will test fit that next weekend to make sure its possible before i cut anything. as i am making the shifter mechanism to suit, ive some flexibility here to move the engine forward an inch if that makes packaging better, and given that the 6060 is heavier, and all the weight is at the back of the box, moving the engine/box forwards will not materially effect balance. (and f i was really concerned, I could relocate the battery to the back to offset).
as with the TKO, the rail above the gearbox prevents the box sitting high in the chassis, which means the sump will also sit low, and removing that cross bar will mean the engine and gearbox will sit a little higher. ive seen that in most t car conversions. plan though is to replace the brace, and weld supports back to the original pick up points, to strengthen that area more than stock.
the shifter on the 6060 sticks out the back on a remote. I could replace that with the shifter i used on the griff, but that would foul a diagonal brace...time to design something thatll work here. at least there is some room ...
i have mulled over the "chassis out and refresh" vs repaint bits in situ, and as it looks likely that a few chassis tweeks are in order, have decided to just repaint the modified bits of the chassis as needed, till I am certain there are no other mods needed, which might present themselves as clearancing down the line after the car is on the road, so for now have treated RH chassis rails to a rub down and repaint with KB rust stuff....
i may well do the chassis out thing next year, but i dont want to do that only to find i'm taking a grinder to it again.
Edited by SteveSPG on Monday 21st October 11:23
Walford said:
If you can do a few chassis tweeks and get the 6 speed box in you will have a much better road car, i am running 3.73 diff 0.8 5th 0.62 6th
when you move the top tube its good to leave enuf clearance, so you can remove just the gearbox
what size exhausts will you be using?
i am planning (well thats a bit strong, perhaps thinking) that if i remove the top tube and replace it with one further forward infront of the bulkhead, but curved over the box/bellhousing. there is plenty of room there to put a couple of tubes slightly curved, with perhaps a diagonal curved bracing, but that may be overkill. but importantly you can get there to weld to the chassis without removing the body which is something i dont want to do right now. when you move the top tube its good to leave enuf clearance, so you can remove just the gearbox
what size exhausts will you be using?
i also considered welding threaded bosses into the cut tube ends where the cross brace is removed, and bolting a brace in sity using the bosses and some additional bosses a little further forwards. that makes the chassis welding pretty minimal. and also makes it possible to add stiffness to the chassis which can be removed for things like removing the engine/gearbox.Imagine an X shape over the bell housing...

in the griff, i cant get the bellhousing off when attached to the gearbox, so its split the gearbox from bellhousing, then remove box, then bell housing, then you can access clutch. in the t car i dont think the bellhousing will come out very easily at all from underneath, not enough room to pull it back free of the clutch..but i dont really know that im guessing.
I have seen some conversions with the top tube removed, and no replacement....but thats not for me.
the griff has 2.75 i believe...which is about right though it has little in the way of silencing.
Edited by SteveSPG on Monday 21st October 14:47
Edited by SteveSPG on Monday 21st October 14:52

flyingdutchie said:
Yep... the one with the better ratio's from a 2007 vxr.
is the shifter in a good location for you, it is quite far back in the t56. for the griff I opted to fit a mid shift kit into my t56 in the griff. the 6060 shifter is much easier in the griff as it comes up in about the right place.
flyingdutchie said:
I do not know Steve. I hope so. I start in the begining of december. When the t5 comes out, i wil know.
this is a t56 in a cerb. this is a mid shift conversion. there is not normally a shifter here. it means taking the back off the gearbox, cutting the shift rails and installing a new shift. it is easy to do at home. a shift kit costs about £300 from memory. i assume that your engine is mounted in a similair place to this though....it could be forward or backwards an inch or two.normally the shifter would sit way back under the handbrake.
a 6060 6 speed gearbox (which the casing externally is almost identical to a t56) does take a shifter in this location. this is what i now have in the griff
Edited by SteveSPG on Tuesday 22 October 16:33
Interesting info for me. 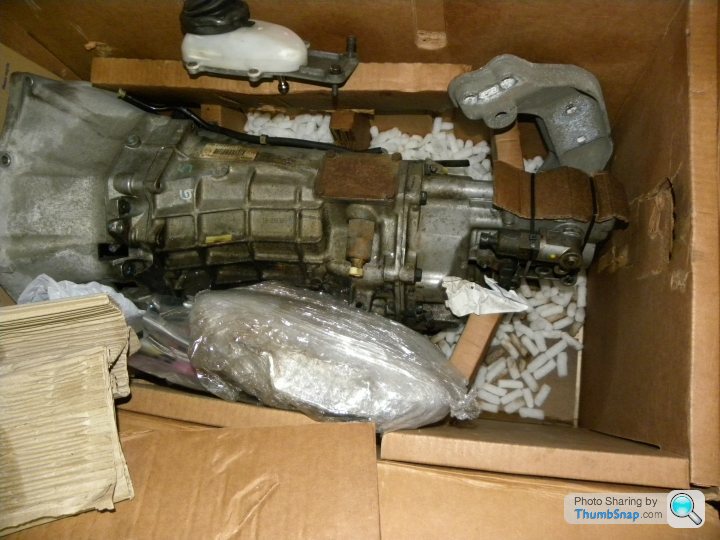
I found this info on the web:
http://www.customclassictrucks.com/techarticles/13...
So, with the mid-shift conversion the position should be around the same position as with the T5. Wil i have to order the midshifter with the offset or with the position in the center? Where can one order these kits. I saw one one ebay.com. It did not include the coverplate which has to go over the original shifterposition....Exoensive shifter....
Gassing Station | TVR Major Mods | Top of Page | What's New | My Stuff