Airfix Bf109 E4 1:72
Discussion


I'm guessing they are (in real life) mirror images of each other with no significant differences? If that is the case, that really is poor, as surely there is just a requirement to flip the artwork on the CAD screen, which also saves work.
I've stayed out of the Airfix versus A. N. Other arguments, mainly as some of the kits I build are far more expensive and far worse than anything seen here, but that just strikes me as bizarre from a design and produce point of view.
I've stayed out of the Airfix versus A. N. Other arguments, mainly as some of the kits I build are far more expensive and far worse than anything seen here, but that just strikes me as bizarre from a design and produce point of view.
Red Firecracker said:
I'm guessing they are (in real life) mirror images of each other with no significant differences? If that is the case, that really is poor, as surely there is just a requirement to flip the artwork on the CAD screen, which also saves work.
I've stayed out of the Airfix versus A. N. Other arguments, mainly as some of the kits I build are far more expensive and far worse than anything seen here, but that just strikes me as bizarre from a design and produce point of view.
Yes. I've stayed out of the Airfix versus A. N. Other arguments, mainly as some of the kits I build are far more expensive and far worse than anything seen here, but that just strikes me as bizarre from a design and produce point of view.
It's....inexplicable.
Zaxxon said:
Bet you can't wait to get started on your SE5A 
I still need to finish my Albatross wires and then I can crack on with the Brisfit.
Hannants had a stack of W-W models at their stand at Duxford last week.I still need to finish my Albatross wires and then I can crack on with the Brisfit.
Boy was I tempted!
I got the Airfix '109 from them instead. When it's finally done it will look good and remind me of a great day out.
dr_gn said:
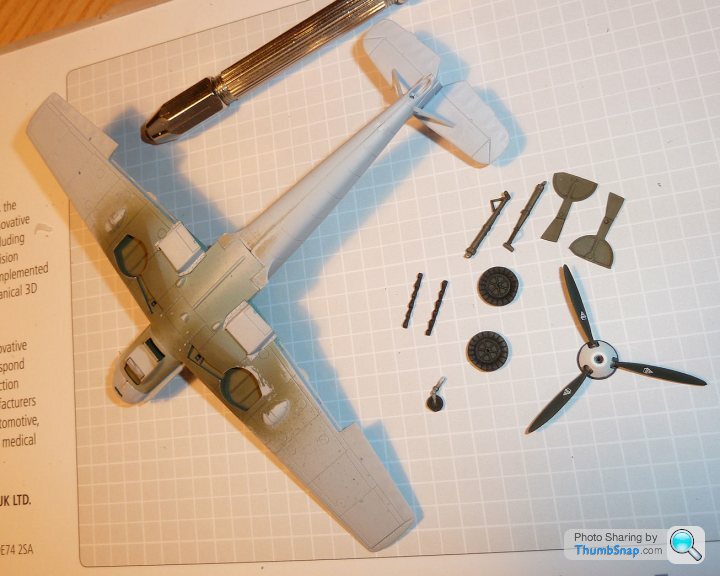
It's looking aircraft shaped now. Weathered the wheel wells, fitted the radiators, wings, tailplanes & lower engine cover, and detailled the tailwheel and part of the spinner assembly:
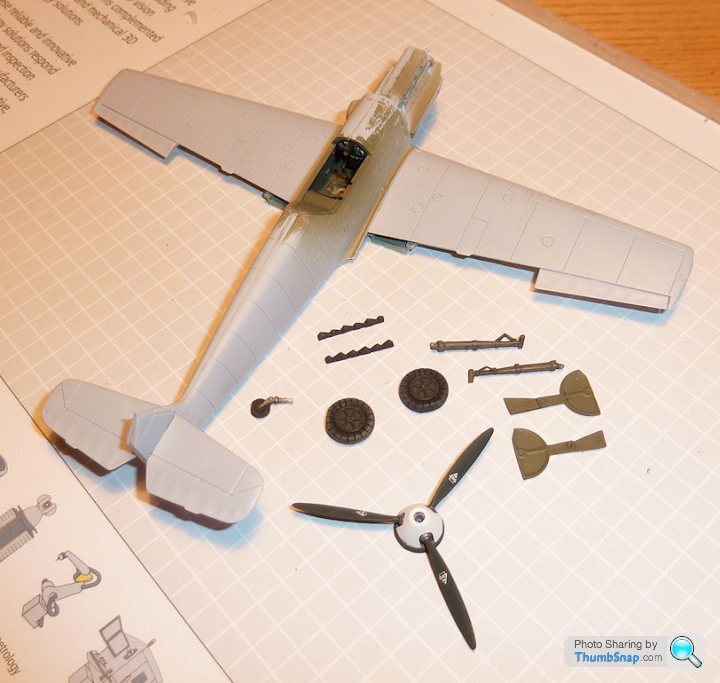
Will need some Mr.Surfacer 1200 on some joints, but nothing serious:
And then we take closer look at the underside and lo and behold, the tailplane strut holes are totally out side-to-side:
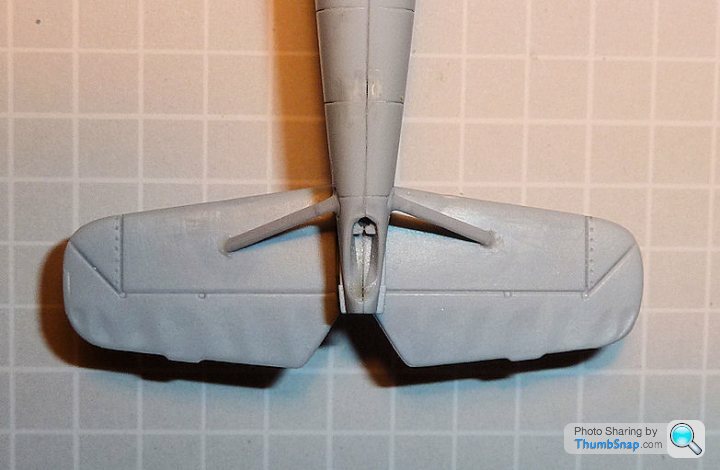
I'll not bother to comment.
Looks like there's a filled-in location hole just outboard and behind your port strut in that last pic? If it's too far outboard compared to the starboard tail, at least putting the top of the strut in line with the hole (i.e. further back) would stop the strut being angled further forward than the other side, as it is now.Will need some Mr.Surfacer 1200 on some joints, but nothing serious:
And then we take closer look at the underside and lo and behold, the tailplane strut holes are totally out side-to-side:
I'll not bother to comment.
16VJay said:
dr_gn said:
It's looking aircraft shaped now. Weathered the wheel wells, fitted the radiators, wings, tailplanes & lower engine cover, and detailled the tailwheel and part of the spinner assembly:
Will need some Mr.Surfacer 1200 on some joints, but nothing serious:
And then we take closer look at the underside and lo and behold, the tailplane strut holes are totally out side-to-side:
I'll not bother to comment.
Looks like there's a filled-in location hole just outboard and behind your port strut in that last pic? If it's too far outboard compared to the starboard tail, at least putting the top of the strut in line with the hole (i.e. further back) would stop the strut being angled further forward than the other side, as it is now.Will need some Mr.Surfacer 1200 on some joints, but nothing serious:
And then we take closer look at the underside and lo and behold, the tailplane strut holes are totally out side-to-side:
I'll not bother to comment.
Merlin28 said:
Any tips on applying decals for a beginner? I always seem to tear them or they don't go on where I want them.
Apply them to a glossy surface.Dunk them in water until they move around the paper easily - you can dip them and leave them on the side of a suacer still wet if you like, but don't force them.
Float them onto the model - damp the surface first with a paintbrush and keep damping it if you need to adjust them.
That's about it really. You can use a softener like Microsol if you like - this will help the decals to conform to highly curved surfaces or panel lines. It is a bit tricky to use at first though. Basically get the decal positioned then coat it with Microsol and leave it. See how you get on.
Finally, apply a varnish to help keep the decals from getting damaged.
Hope this helps.
dr_gn said:
Apply them to a glossy surface.
Dunk them in water until they move around the paper easily - you can dip them and leave them on the side of a suacer still wet if you like, but don't force them.
Float them onto the model - damp the surface first with a paintbrush and keep damping it if you need to adjust them.
That's about it really. You can use a softener like Microsol if you like - this will help the decals to conform to highly curved surfaces or panel lines. It is a bit tricky to use at first though. Basically get the decal positioned then coat it with Microsol and leave it. See how you get on.
Finally, apply a varnish to help keep the decals from getting damaged.
Hope this helps.
Thanks i will try this when i finally get round to doing my challenger tank and battle of britain model setDunk them in water until they move around the paper easily - you can dip them and leave them on the side of a suacer still wet if you like, but don't force them.
Float them onto the model - damp the surface first with a paintbrush and keep damping it if you need to adjust them.
That's about it really. You can use a softener like Microsol if you like - this will help the decals to conform to highly curved surfaces or panel lines. It is a bit tricky to use at first though. Basically get the decal positioned then coat it with Microsol and leave it. See how you get on.
Finally, apply a varnish to help keep the decals from getting damaged.
Hope this helps.
Regarding decals - the key is to be patient and gentle.
Some decals are more sensitive than others. The problem is that you won't know whether the decals are tough or brittle until the moment you start trying to apply them.
I usually slide the decal off the backing sheet using a brush, press them into place using kitchen paper and then apply Micro Set to the decal which should allow the decal to conform better to the surface. Most decals take Micro Set quite well but now and then you will find some that react badly to seting solutions. Again, it's not aklways obvious what the raction will be until you use the product.
Did I mention the front canopy doesn't fit? Can't get a picture because it's too transparent to show up. I can't think how to correct it; tried heat but it's too risky, tried springing it and holding with masking tape, but the canopy glue won't hold it. I'll have to live with it.
When I was correcting the tailplane struts I noticed something 'not quite right' with the wings. It's dihedral, or almost total lack of it:
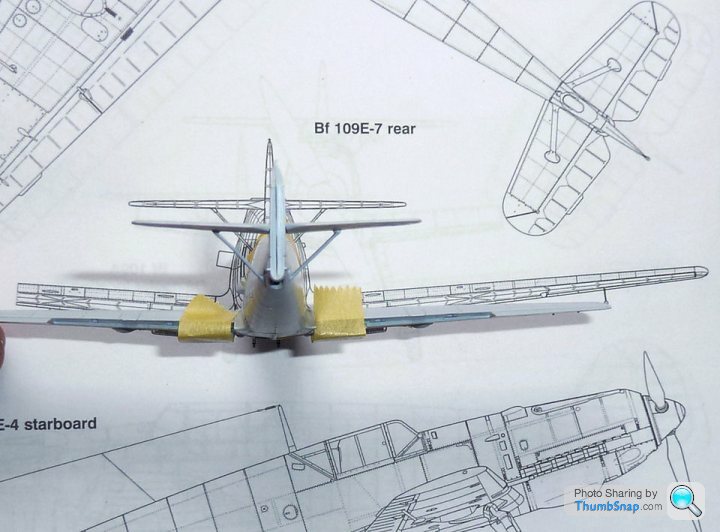
Can't correct that without major surgery on the wing roots and probably jigging them with masking tape. Too late now and TBH I couldn't have been bothered earlier in the build.
I'll finish it now I guess, but I've lost interest in it a bit. Going to have to scratchbuild the guns (difficult becasue of the flared ends) and aerial, all of which were broken or damaged during removal from the sprues.
Go here to see what the BM crowd think of my obsevations:
http://www.britmodeller.com/forums/index.php?showt...
Over 1000 views in less than 24 hours suggests that anything Airfix casues a lot of interest. Same with the Sunderland I built and posted there not so long ago.
Strange.
When I was correcting the tailplane struts I noticed something 'not quite right' with the wings. It's dihedral, or almost total lack of it:
Can't correct that without major surgery on the wing roots and probably jigging them with masking tape. Too late now and TBH I couldn't have been bothered earlier in the build.
I'll finish it now I guess, but I've lost interest in it a bit. Going to have to scratchbuild the guns (difficult becasue of the flared ends) and aerial, all of which were broken or damaged during removal from the sprues.
Go here to see what the BM crowd think of my obsevations:
http://www.britmodeller.com/forums/index.php?showt...
Over 1000 views in less than 24 hours suggests that anything Airfix casues a lot of interest. Same with the Sunderland I built and posted there not so long ago.
Strange.
I can't work out why Airfix can't get the same level of scale detail as Tamiya, Hasegawa, Eduard etc.
Most of these companies use CAD and CNC machines so fine detail should be within easy reach nowadays.
TBH i haven't built an Airfix model for years and i have seen the new tooling for the new 1/72 Spitfire. I wasn't liking the trench type detail.
I know cost has a lot to do with it but i still favor japanese kits even aftet the exchange rate.
Eric Mc said:
I'm following this build on the Nritmodeller forum as well and some of the comments are very interesting.
Eric - I can't find a build log of this from anyone on Britmodeller...strange since the kit got about 8 pages of praise when it was released. Nobody had actually built it. Have you seen the new Airfix Mustang? Same thing - almost universal praise based upon a single photograph which already clearly shows a fundamental error with the open canopy.It appears from the comments on the B.M. thread I linked to that there may well be two versions of the '109 kit in circulation. I simply cannot explain why some people have correct dihedral and accurate tailplane holes, where mine isn't.
People seem to be now suggesting that I either don't have the skills to built the model, or am deliberately making mistakes.
Airfix is an incredibly strong brand - it's amazing.
Funny, one poster on Britmodeller seems to be building it. Did you not see his post? He says he is not experiencing anything like the issues you are coming across.
You are either a very poor modeller (which is patently not the case) or you have bought a dud example - which would definitely imply quality control issues at Airfix.
I am tempted to start the example I bought a few weeks ago to see if your problems are generic to the kit or just "your problems".
You are either a very poor modeller (which is patently not the case) or you have bought a dud example - which would definitely imply quality control issues at Airfix.
I am tempted to start the example I bought a few weeks ago to see if your problems are generic to the kit or just "your problems".
Eric Mc said:
Funny, one poster on Britmodeller seems to be building it. Did you not see his post? He says he is not experiencing anything like the issues you are coming across.
You are either a very poor modeller (which is patently not the case) or you have bought a dud example - which would definitely imply quality control issues at Airfix.
I am tempted to start the example I bought a few weeks ago to see if your problems are generic to the kit or just "your problems".
Well, my initial post on BM asked if Airfix have a Quality Control Department...It does seem there are two versions of this kit, either they have multiple moulds or they have changed their only one.You are either a very poor modeller (which is patently not the case) or you have bought a dud example - which would definitely imply quality control issues at Airfix.
I am tempted to start the example I bought a few weeks ago to see if your problems are generic to the kit or just "your problems".
As I said, I can't find a build log for this kit (work in progress) anywhere on BM.
I've just finished one of these, with some added bits to make mine a tropical example, and i'm sorry i just didnt find any of these issues.
The instrument panel was oversize yes, but my wings fitted fine and it has the correct dihedral (spelling?) And frankly, i'm a terrible modeller!
I'm no Airfix fanboy, but the new Zero, P40, Swordfish (especially the Swordfish) and Lynxes are all worldclass. And good value.
I highly doubt there are two versions of this kit on the market already, i'm not sure what has gone on with yours!
Gassing Station | Scale Models | Top of Page | What's New | My Stuff