1:72 MPM Boulton Paul Defiant Mk.1
Discussion


dr_gn said:
I guess they were simply responding to:
"Air Ministry Specification F.9/35 required a two-seater day and night "turret fighter" capable of 290 mph at 15,000 ft." (Ref. Wikipedia)
If they were making turrets and aircraft, it would make sense that they'd be enthusiastic about a turret equipped fighter aircraft requirement.
And I wonder who lobbied the Air Ministry to put a turret equipped fighter into production?"Air Ministry Specification F.9/35 required a two-seater day and night "turret fighter" capable of 290 mph at 15,000 ft." (Ref. Wikipedia)
If they were making turrets and aircraft, it would make sense that they'd be enthusiastic about a turret equipped fighter aircraft requirement.
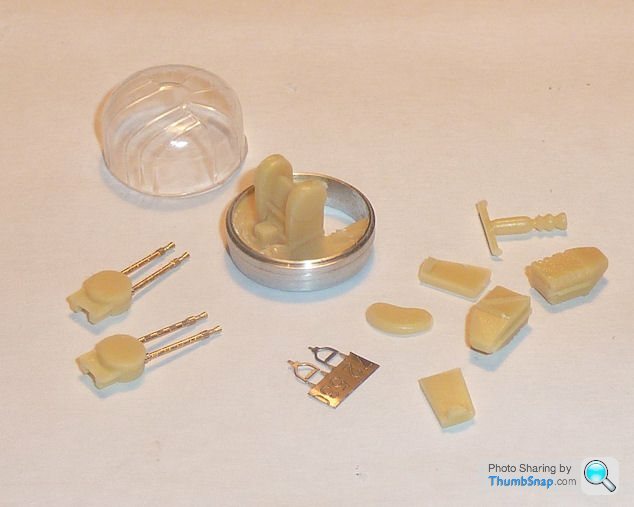
So here are the bits I've been waiting for. Master Model Brass gun barrels, compared with the resin and injection moulded kit versions. No prizes for guessing which ones I'll be using:
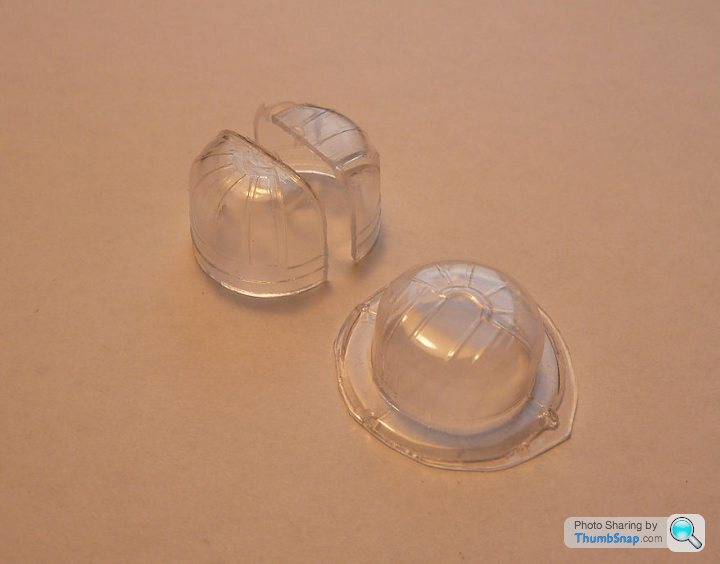
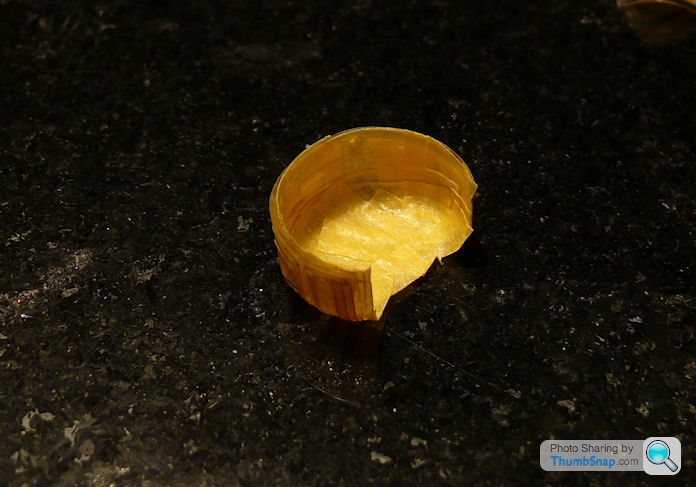
And the vacform turret glazing. Looking at it it's wrong, and the original is more correct in terms of dimensions:
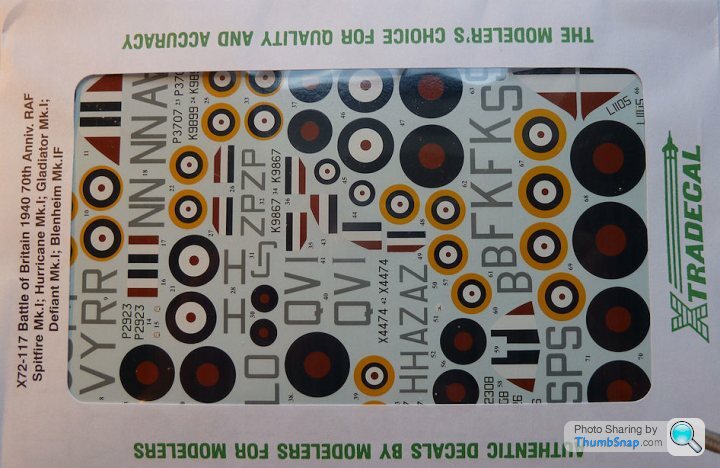
And some decent decals for a BoB version. I decided against all black in the end:
And the vacform turret glazing. Looking at it it's wrong, and the original is more correct in terms of dimensions:
And some decent decals for a BoB version. I decided against all black in the end:
Edited by dr_gn on Thursday 5th September 18:43
[quote=dr_gn]So here are the bits I've been waiting for. Master Model Brass gun barrels, compared with the resin and injection moulded kit versions. No prizes for guessing which ones I'll be using:
/quote]
Blimey, its amazing the level of detail you can get with those brass parts, especially considering how small those gun-barrels will be.
I've yet to ever try using etched or brass parts on a kit, how well do they glue to the plastic/resin?
/quote]Blimey, its amazing the level of detail you can get with those brass parts, especially considering how small those gun-barrels will be.
I've yet to ever try using etched or brass parts on a kit, how well do they glue to the plastic/resin?
Brigand said:
dr_gn said:
So here are the bits I've been waiting for. Master Model Brass gun barrels, compared with the resin and injection moulded kit versions. No prizes for guessing which ones I'll be using:
/quote]
Blimey, its amazing the level of detail you can get with those brass parts, especially considering how small those gun-barrels will be.
I've yet to ever try using etched or brass parts on a kit, how well do they glue to the plastic/resin?
/quote]Blimey, its amazing the level of detail you can get with those brass parts, especially considering how small those gun-barrels will be.
I've yet to ever try using etched or brass parts on a kit, how well do they glue to the plastic/resin?

Good value too at about £5 for 4 barrels. For bonding the barrels into the resin breeches I'll probably use Araldite, because the barrels need to be adjusted to be absolutely parallel to look right.
Regarding the etch or resin parts, as ever, success depends upon preparation. Resin parts tend to either replace kit parts as corrections or version changes, or replace details that are not so well defined in the original kit. A good example are the resin cockpit sides commonly available. First you must scrape and sand all the existing injection moulded detail away, then thin the fuselage to compensate for the resin panels. It can be a long job to get everything to fit properly. For large resin parts (like the cockpit sides) I use Araldite because it gives you chance to adjust position before setting. Sometimes filler is required around the periphery of the new resin to cover any gaps up. Resin is sometimes greasy from the moulding process, and I always abrade the faces that are to be bonded.
Photo etch is similar, although sometimes it needs folding and glueing before fitment. Lightly abrading the glued edges is a good way of keying the material. I use medium viscosity cyano for most etch, with PVA or even Klear for smaller, low stress pieces.
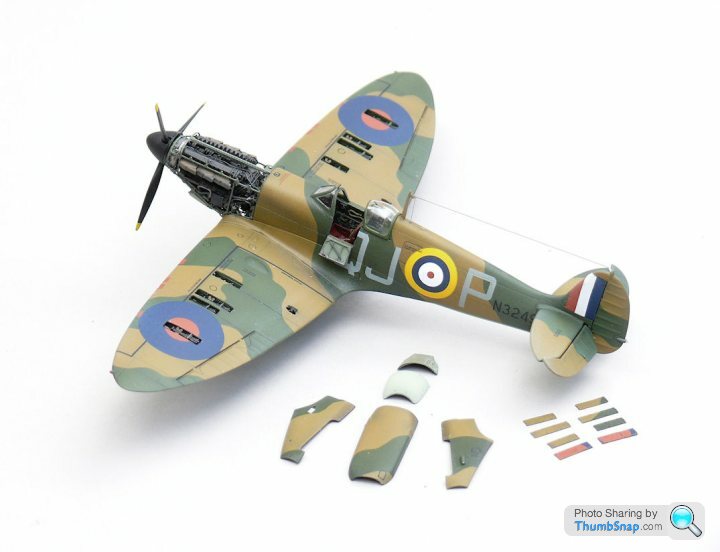
Resin and photo etch dramatically improve scale fidelity, but they are difficult to get right and you need to be totally confident in basic modellig techniques or else the model will probably look worse than if you'd built it OOB. This is my recently completed Tamiya 1:72 Spitfire. I added resin engine, cockpit and gun bays and there is plently of photo etch in there too. A lot of the original kit is sanded or cut away completely (like the entire nose section). It was a real job and a half to get everything fitting and looking right, but I think the effort was worth it:
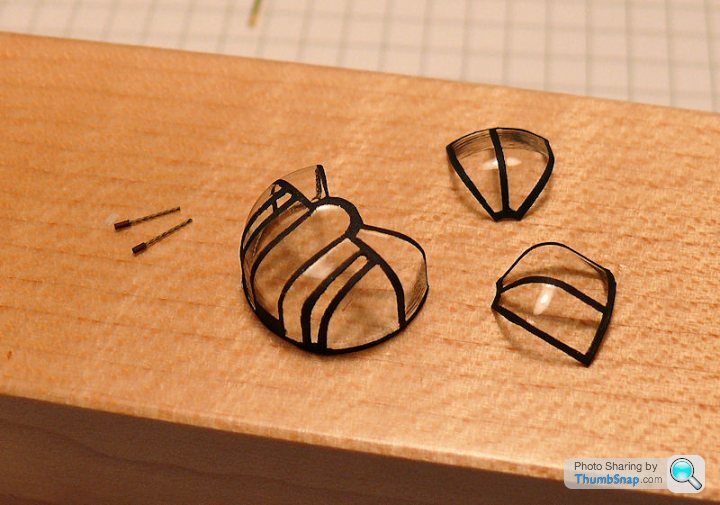
Not done much modelling recently, but decided to have a go at the Defiant turret. Taped the kit turret glazing together - no way that's going to look right - it's in two halves (which don't line up), it's too high, not very transparent and the rear fairing doesn't fit it :
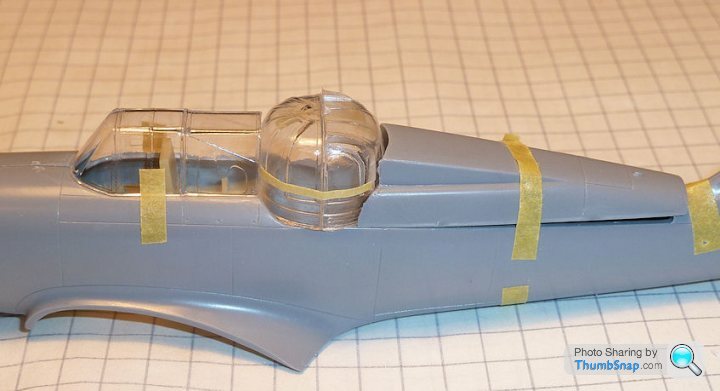
Apart form that it's fine....No problem I thought, I'll use the Falcon vacform one instead:
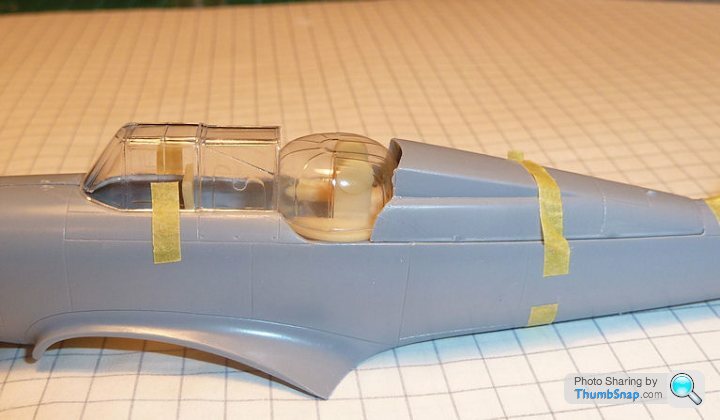
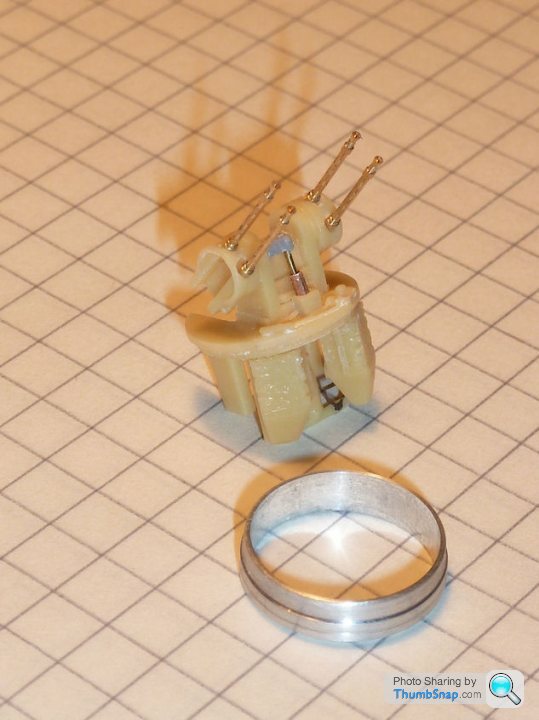
Much more transparent and better shape with no seams, but obviously too short, because unlike the original, the slew ring isn't included. In the end I though I'd simply make a slew ring out of aluminium on the lathe, and recess it to fit the vacform dome. I added a couple of circumferencial features while I was at it, and it's turned out quite well considering:
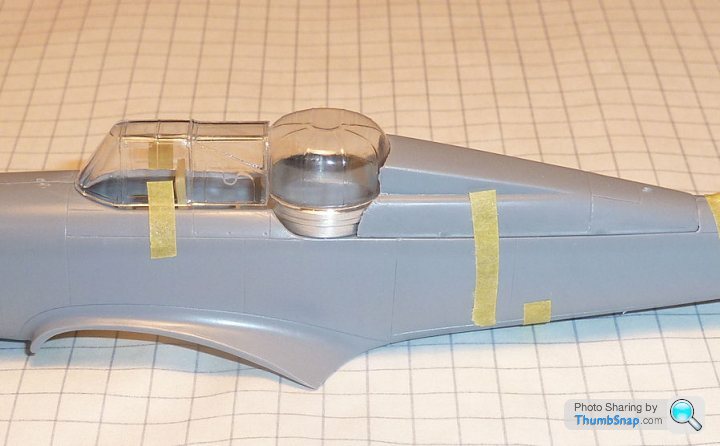
here it is without the dome fitted, and the rest of the turret components:
I'm going to try to model it with the rear doors open, to show some of the detail inside.
These short run kits are quite a challenge! They are enjoyable though, at least the Curtiss Hawk and this will certainly be unique models by the time i've finished them.
Apart form that it's fine....No problem I thought, I'll use the Falcon vacform one instead:
Much more transparent and better shape with no seams, but obviously too short, because unlike the original, the slew ring isn't included. In the end I though I'd simply make a slew ring out of aluminium on the lathe, and recess it to fit the vacform dome. I added a couple of circumferencial features while I was at it, and it's turned out quite well considering:
here it is without the dome fitted, and the rest of the turret components:
I'm going to try to model it with the rear doors open, to show some of the detail inside.
These short run kits are quite a challenge! They are enjoyable though, at least the Curtiss Hawk and this will certainly be unique models by the time i've finished them.
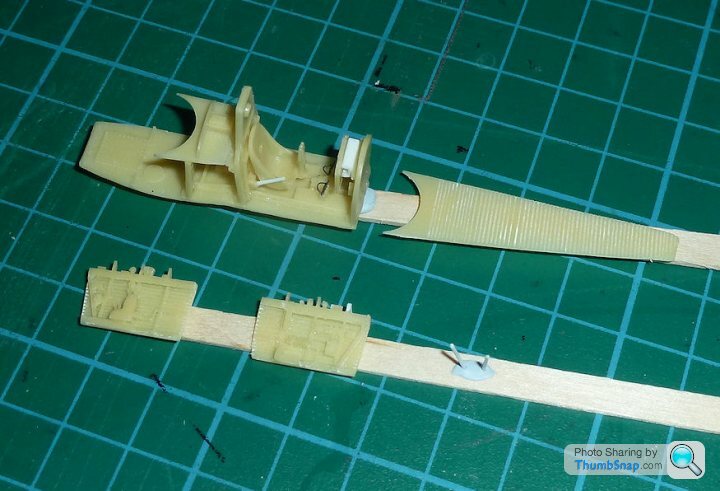
The resin cockpit is pretty much ready for painting now. Basically none of it fits, either to the fuselage or to the other resin bits of assembly. The cockpit sides had to be reduced in length, the instrument panel brought forward by around 3mm, the rear deck support trimmed in height being the main mods. I've also added a seat height adjuster and a couple of plastic rod braces to the back of the head armour (not fitted until the detail paiting is done). The resin rear deck is a bit of a strange addition since I think it's totally obscured by the rear fairing and turret. I'll paint it just in case.
Eric Mc said:
That's the "fun" of these short run kits I suppose.
Yup, I'm enjoying it really. You need plenty of reference pictures to get things right. I just noticed the instrument panel is still way too far back. According to the instructions it fits well under the windscreen , the reality is it fits much further towards the pilot (above the rudder pedals in my photo), with a bit sticking up behind the windscreen. Now I know why there aren't many completed examples of the MPM/Special Hobby Defiants and Curtiss Hawks online...
I really need to have a go at some of the MPM/Special Hobby kits in my stash.
The only true short run kit I have built so far is a Huma (what happened to them) Messerschmitt 209. It went together really well. But I think the construction was assisted by the fact that all the components were polystyrene - no resin, white/etched metal or any other materials.
I think it's the dissimilar materials and their different moulding and gluing processes that seem to cause a lot of the problems with short run models.
Eric Mc said:
I really need to have a go at some of the MPM/Special Hobby kits in my stash.
The only true short run kit I have built so far is a Huma (what happened to them) Messerschmitt 209. It went together really well. But I think the construction was assisted by the fact that all the components were polystyrene - no resin, white/etched metal or any other materials.
I think it's the dissimilar materials and their different moulding and gluing processes that seem to cause a lot of the problems with short run models.
This is the Hi-Tech version of the base kit (with added resin and etch etc), but all the plastic parts for building it as a full plastic model seem to be included also. In fact I'll be using the plastic dorsal fuselage section with the turret fairing in the up position. The resin version has the fairing down (which doesn't look like my idea of a Defiant).The only true short run kit I have built so far is a Huma (what happened to them) Messerschmitt 209. It went together really well. But I think the construction was assisted by the fact that all the components were polystyrene - no resin, white/etched metal or any other materials.
I think it's the dissimilar materials and their different moulding and gluing processes that seem to cause a lot of the problems with short run models.
It's a shame they didn't actually try building these kits themselves - they could easily have included a resin turret ring and a resin cowl for the Hawk and made them into kits that could be built fairly easily and accurately by modellers without access to a lathe / RP machines.
Eric Mc said:
I sometimes wonder if the inclusion of these "extras" are more of a marketing tool than a genuine effort to make the model "better" or "buildable"
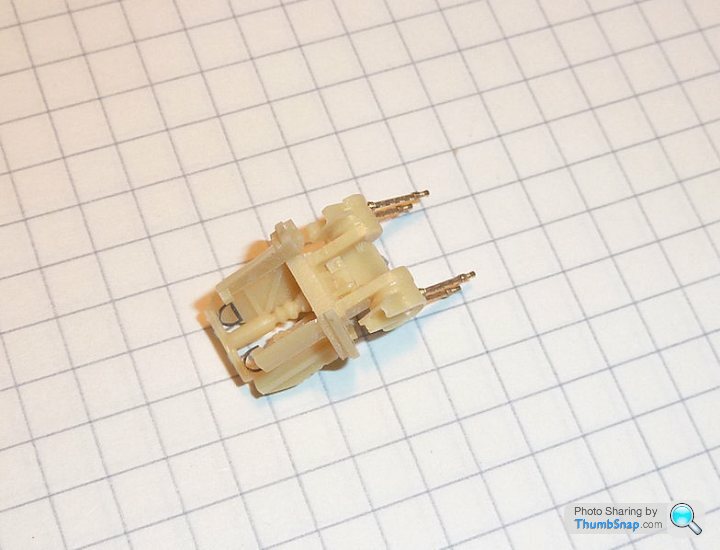
I hardly ever use all the parts from any aftermarket set - some are worse than the original. An extreme example was the 1970's 1:32 Bf109 seat. the original Matchbox one was a far better representation than the Eduard photo-etch version. You also have to consider whether the amount of modification required to get an aftermarket part to fit will end up making the model look worse that if the original had been left in place. An example of this is vacform canopies; if the mating contours are complex, the original injection moulded version will invariably be a far better fit than you could ever achieve by hand trimming a vacform one. With my recent Tamiya Spitfire I sacrificed the better scale representation of the vacform windscreen for the perfect fit of the less realistic but much thicker original.Did some work on the turret this evening. It's mostly resin (and of course my turned aluminium slew ring), but I've also fitted the brass barrels and p/e stirrups, and scratchbuilt the hydraulic elevation cylinder form copper tube/rod and a spare undercarriage torque link. Gun pairs are temporarily fitted with PVA ready for test fitting the vacform dome:
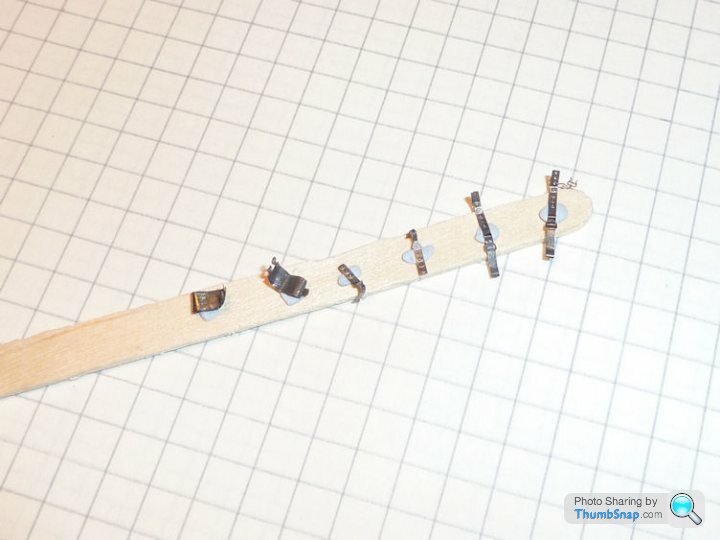
Also prepared the p/e pilots harness and lap straps for the gunner. I learned from my previous Spitfire build to pre-bend the belts before painting, otherwise the paint tends to flake off:
Also prepared the p/e pilots harness and lap straps for the gunner. I learned from my previous Spitfire build to pre-bend the belts before painting, otherwise the paint tends to flake off:
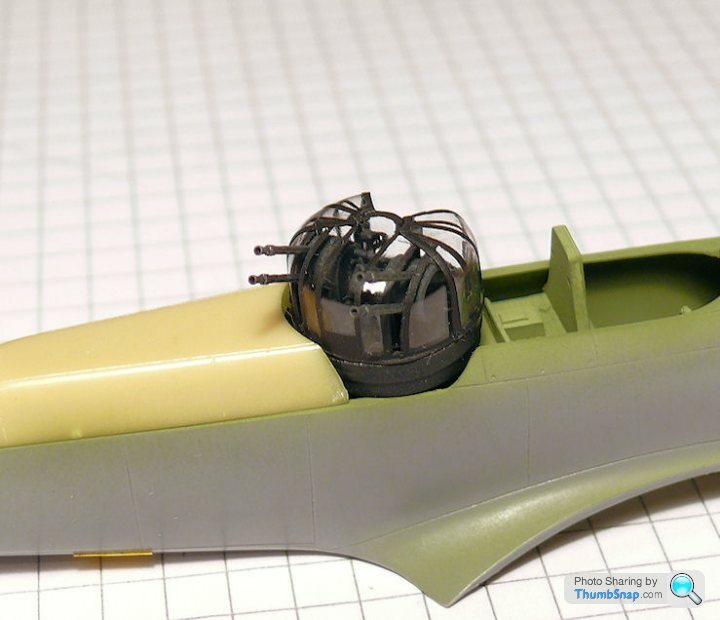
Opened up the clamshell doors on the turret (despite assurances that this is the same turret as a Halifax, it's not - the Halifax didn't have these doors and has a different number of glazed segments as a result).
Glued the guns in position, and posed the turret how it will be when finished. Everything finally seems to fit apart from the vacform transparency in front of the turret - it just needs a fraction shaving off the port edge:
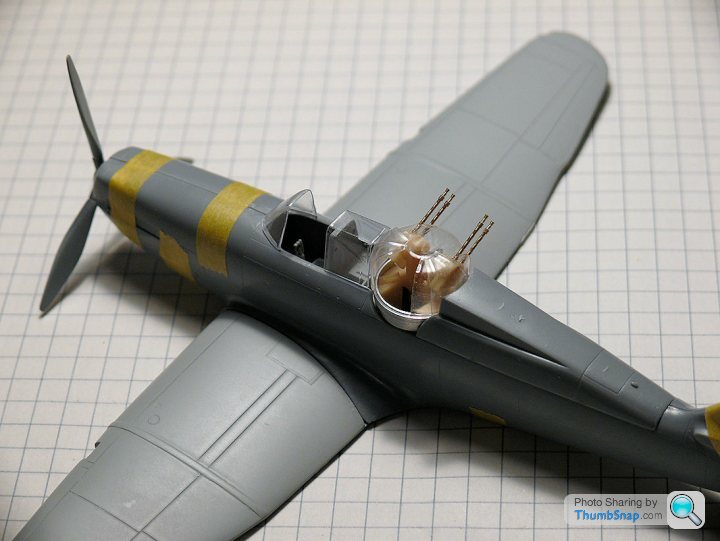
I was wondering whether this scenario could ever happen in reality ie the rear fairing 'up' with the turret turned. Apparently it is valid if you look at 3'23" in, on Bomberguy's video:
http://www.youtube.com/watch?v=ce9My4IKydo
Anyone any comments on this before I go any further? Ta.
Glued the guns in position, and posed the turret how it will be when finished. Everything finally seems to fit apart from the vacform transparency in front of the turret - it just needs a fraction shaving off the port edge:
I was wondering whether this scenario could ever happen in reality ie the rear fairing 'up' with the turret turned. Apparently it is valid if you look at 3'23" in, on Bomberguy's video:
http://www.youtube.com/watch?v=ce9My4IKydo
Anyone any comments on this before I go any further? Ta.
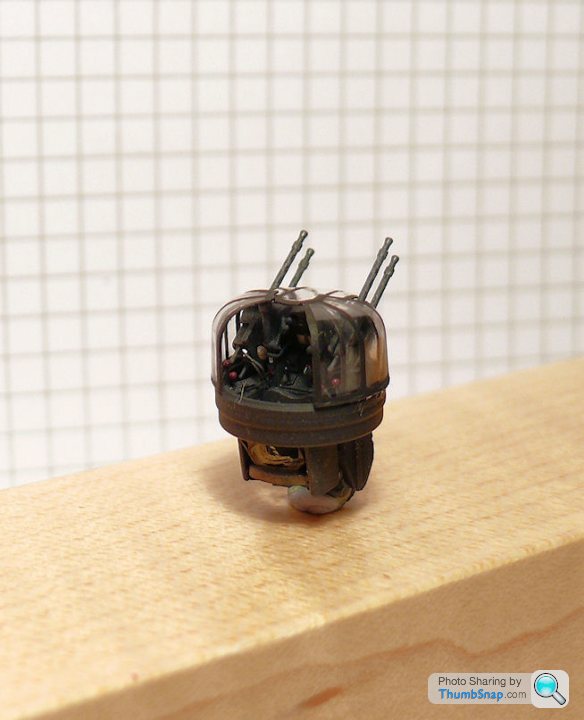
Here's a bit of progress on the turret. There are a few more bits to add, but that will do I think. Everything except the yellow resin is scratchbuilt or aftermarket (guns & canopy):


The more research I do on this aircraft, the more respect I have for the pilots and gunners who flew them.
The more research I do on this aircraft, the more respect I have for the pilots and gunners who flew them.
Eric Mc said:
It must have been awfully claustrophobic in that turret.
And did anybody ever successfully bale out of the turret?
I think they did. I e-mailed the Boulton Paul Association to see if they had any better details images of the turret than there are online. The archivist (also a keen modeller and IPMS member) sent me a ton of reference material and drawings (and other info). What I didn't realise was that there was another way out of the turret by moving it into the "guns forward" position, lifting the seat and kicking out an access panel in the rear fuselage. The gunner could then (in theory) drop out that way. Defiants apparently always took off and landed with the turret forward so that the gunner had a chance of getting out underneath in the event of the aircraft overturning. Looking at the drawings and photographs I still can't figure out how there was room to do that. This fuselage panel was also used for groundcrew to re-arm and empty the cartridge collector bags.And did anybody ever successfully bale out of the turret?
I think it is a fascinating aircraft.
So here's the finished turret test fitted:
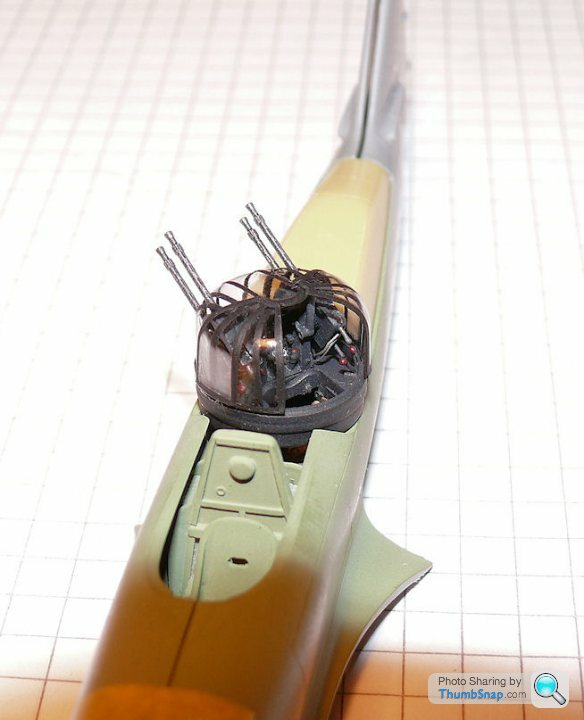
And as a complete unit:
Here it is without the glazing:
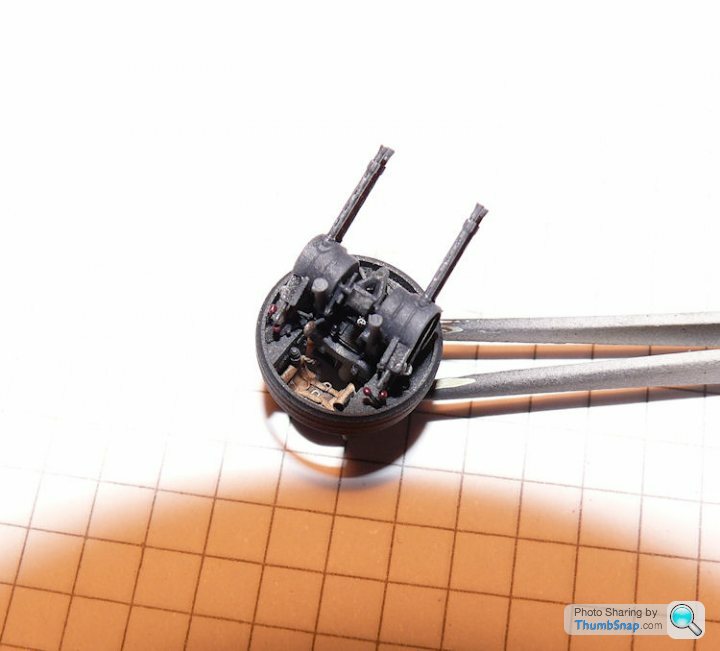
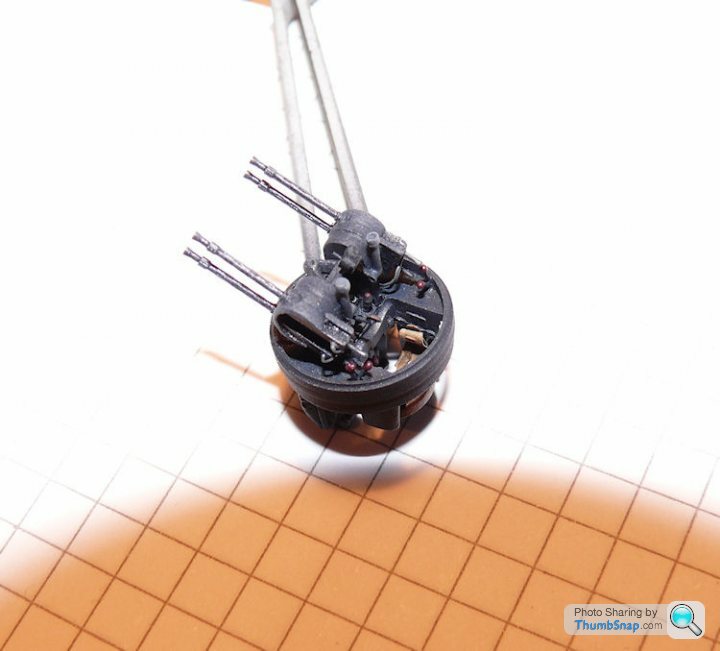
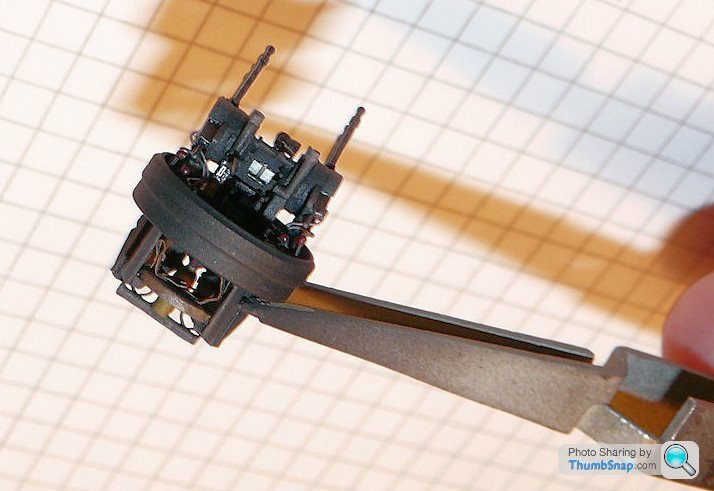
I went to town a bit on this becasue to me, a Defiant is all about the turret. As far as scratchbuilding goes, I've added the door knobs & gun control, decals for the air gauges and nameplate, gun wiring and rear extensions, hydraulic elevation piston & pipework, gunners notepad (& pencil!), Mk.IIIa gunsight and mechanism, front hinged table and brackets, turret lifting struts, stbd. electrical panels and the suit heating & radio pigtails. Also hacked the Falcon vacform canopy to have the doors open. ETA also gunners head-pad.
Since pretty much everything is "black" I've tried to use various shades, weathering and degrees of matt/satin to give some depth. I've also used some licence in colouring some of the knobs dark 'bakelite' red. the guns are brushed over with Tamiya powder "gunmetal" and "light gunmetal"
Quick 'how to' for masking for anyone interested (maskingis the only way to get a good effect in most scales):
1) Coat the canopy with Klear and allow to dry overnight. Then, using a new blade, cut narrow (<1mm) strips of Tamiya tape and lay them next to the moulded-in framing. Use the freshly cut edge to form the masked edge, then press the edges down with a toothpick:
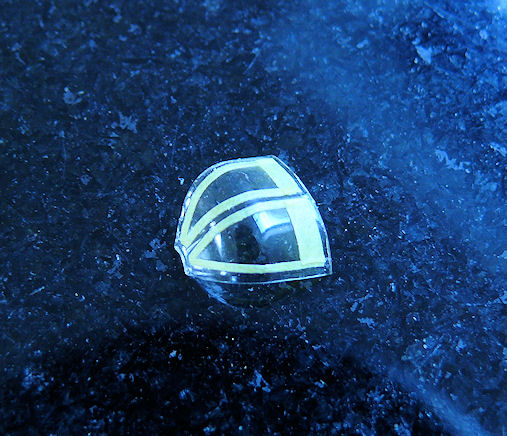
2) Infill the rest with a mosaic of tape. Using narrow strips of tape allows you to bend the tape along curved edges - to an extent:
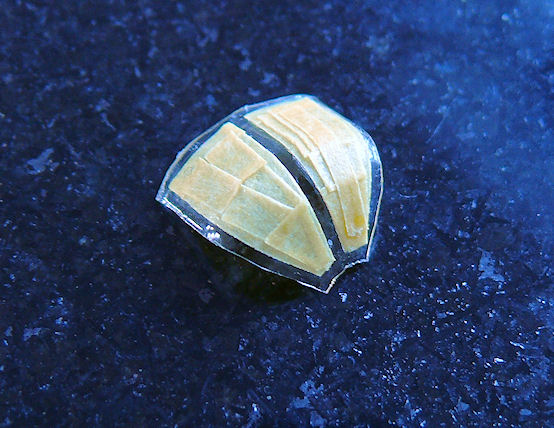
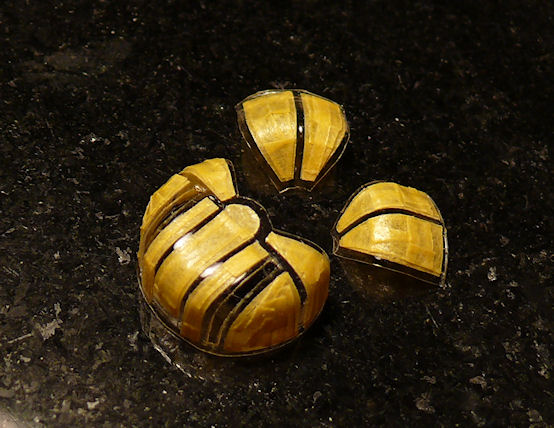
3) Cover the inside of the transparency with tape to prevent overspray:
4) Spray several coats using an airbrush with a fairly thick mix of paint, and use the airbrush to flash the paint off as you go (assuming you have a double action airbrush). These measures will help prevent paint creeping under the tape. Finally, remove the tape and have a well deserved cup of tea:
The wires in the photo are the pigtails for the gunners radio and suit heater connections. I made these out of twisted copper wire and brass tube.
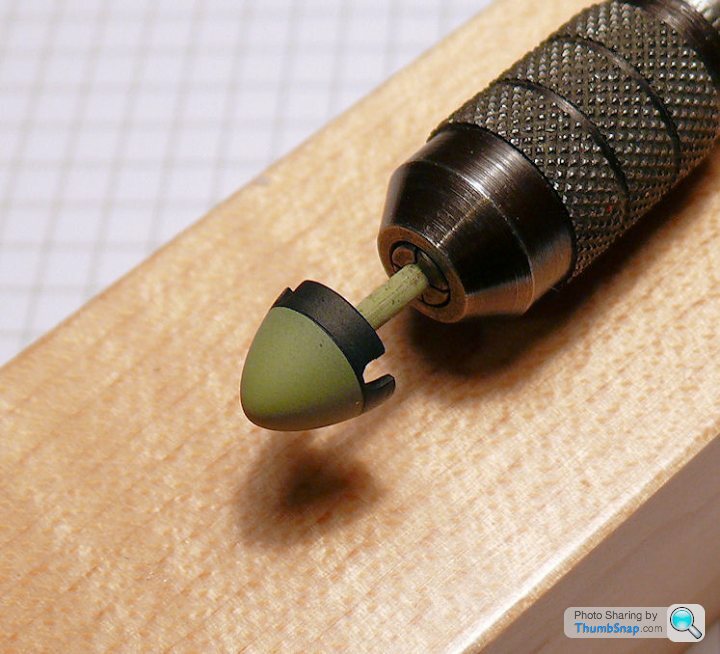
Finally tonight, painted the spinner. I find the best way to paint perfect demarcations on cones is to spin the in the lathe and brush paint the darker colour with a fine brush:
And as a complete unit:
Here it is without the glazing:
I went to town a bit on this becasue to me, a Defiant is all about the turret. As far as scratchbuilding goes, I've added the door knobs & gun control, decals for the air gauges and nameplate, gun wiring and rear extensions, hydraulic elevation piston & pipework, gunners notepad (& pencil!), Mk.IIIa gunsight and mechanism, front hinged table and brackets, turret lifting struts, stbd. electrical panels and the suit heating & radio pigtails. Also hacked the Falcon vacform canopy to have the doors open. ETA also gunners head-pad.
Since pretty much everything is "black" I've tried to use various shades, weathering and degrees of matt/satin to give some depth. I've also used some licence in colouring some of the knobs dark 'bakelite' red. the guns are brushed over with Tamiya powder "gunmetal" and "light gunmetal"
Quick 'how to' for masking for anyone interested (maskingis the only way to get a good effect in most scales):
1) Coat the canopy with Klear and allow to dry overnight. Then, using a new blade, cut narrow (<1mm) strips of Tamiya tape and lay them next to the moulded-in framing. Use the freshly cut edge to form the masked edge, then press the edges down with a toothpick:
2) Infill the rest with a mosaic of tape. Using narrow strips of tape allows you to bend the tape along curved edges - to an extent:
3) Cover the inside of the transparency with tape to prevent overspray:
4) Spray several coats using an airbrush with a fairly thick mix of paint, and use the airbrush to flash the paint off as you go (assuming you have a double action airbrush). These measures will help prevent paint creeping under the tape. Finally, remove the tape and have a well deserved cup of tea:
The wires in the photo are the pigtails for the gunners radio and suit heater connections. I made these out of twisted copper wire and brass tube.
Finally tonight, painted the spinner. I find the best way to paint perfect demarcations on cones is to spin the in the lathe and brush paint the darker colour with a fine brush:
Edited by dr_gn on Monday 7th October 00:08
Gassing Station | Scale Models | Top of Page | What's New | My Stuff