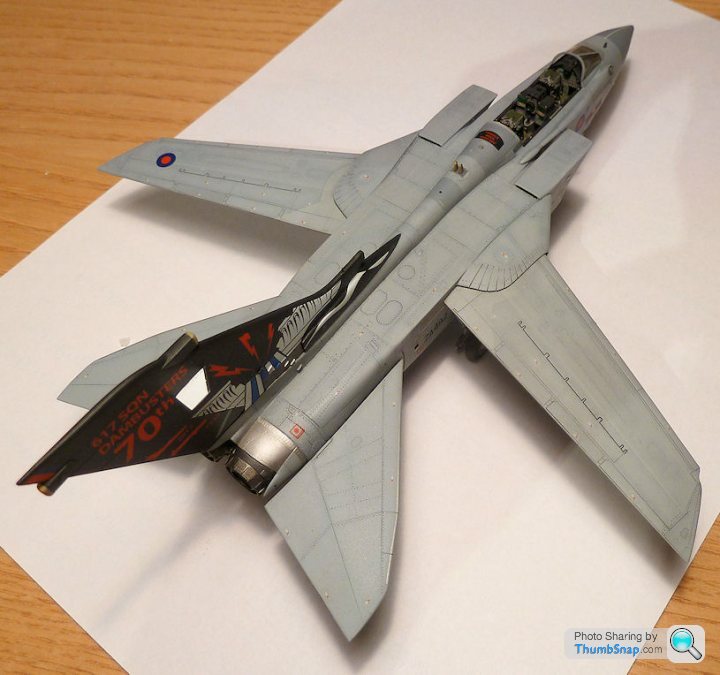
1:72 Tornado GR4, Dambusters70th Anniversary
Discussion


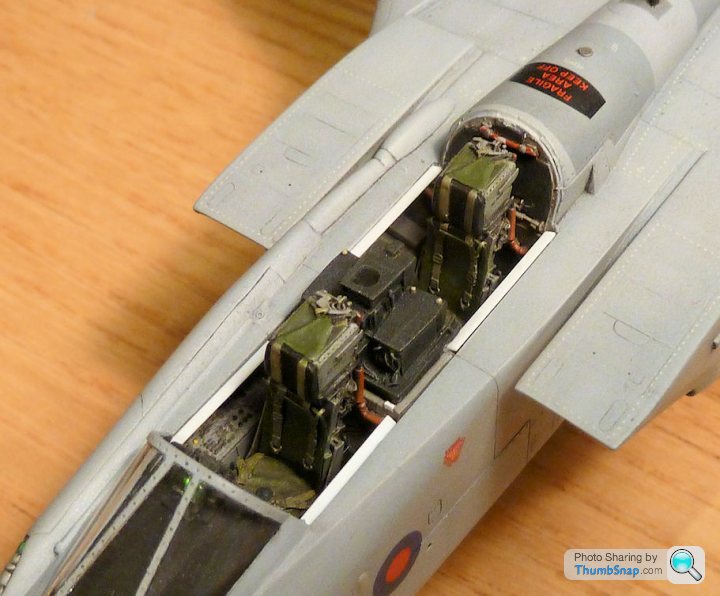
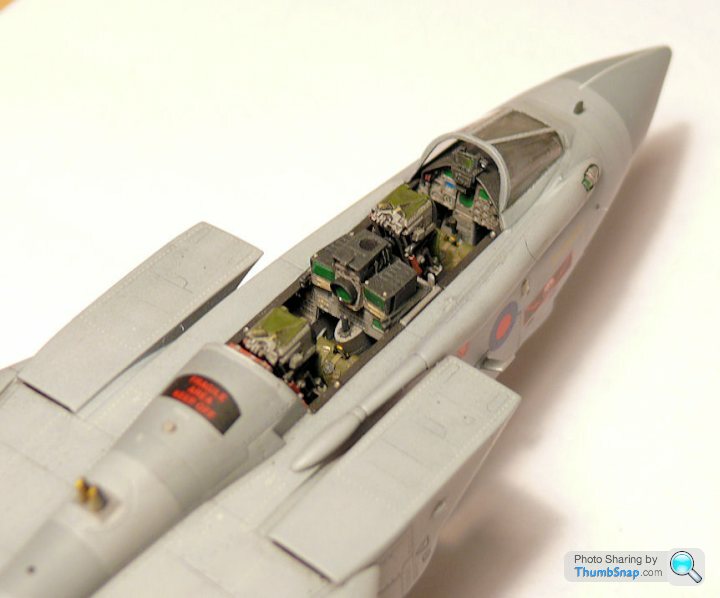
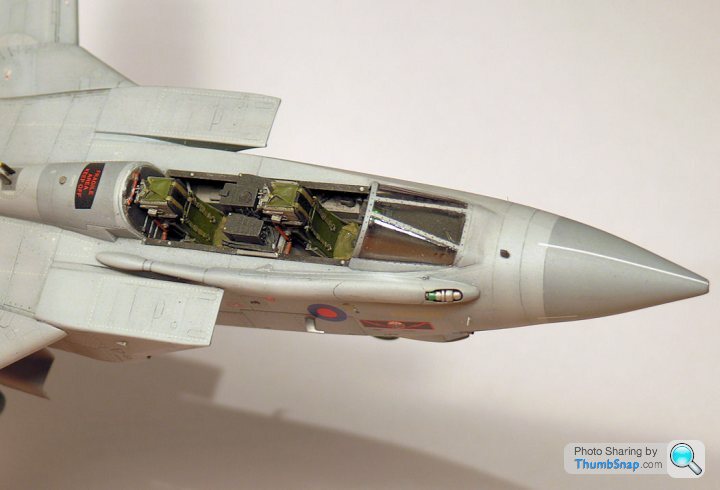
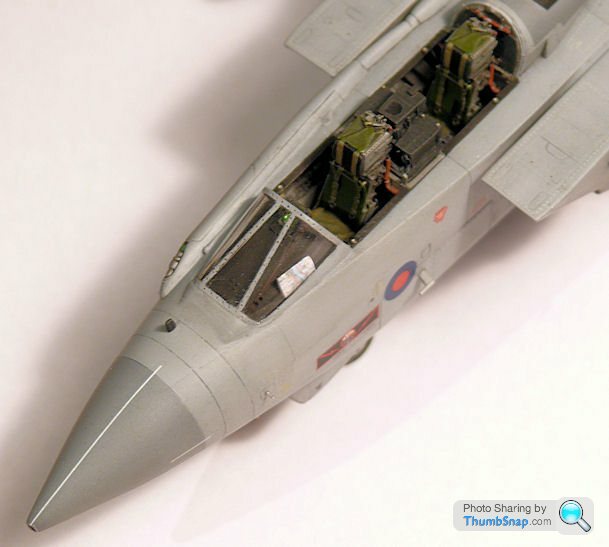
I thought the sides of the cockpit looked too wide, so I cut some plastic stirps and painted them scratched black, as they are is some photos I've got. Also added some features to represent the canopy locks on the new panels. Seats, navigators instrument panel and control column are also now fitted:
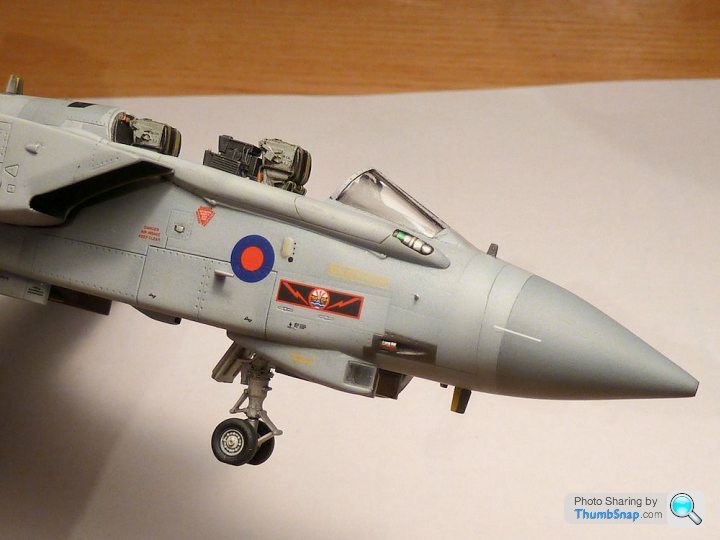
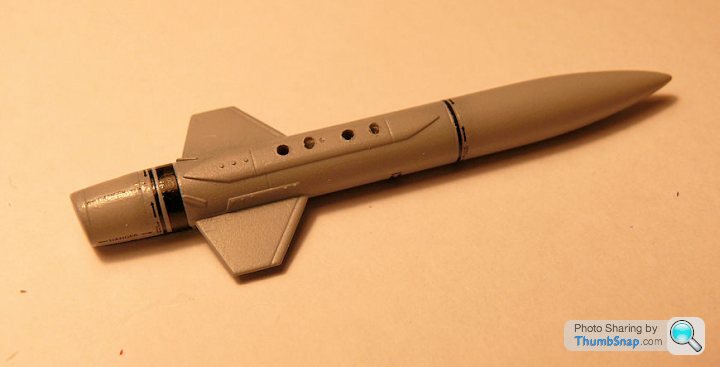
Fitted the scratchbuilt LRMTS window and pitot tubes, plus the Master Model AoA probes. Also made a small decal for the red stripe on the gun muzzle. Not sure what it's for, but it's on the real one:
Just need to fit the tanks and pods and that's as much as I can do until I source a good canopy.
Fitted the scratchbuilt LRMTS window and pitot tubes, plus the Master Model AoA probes. Also made a small decal for the red stripe on the gun muzzle. Not sure what it's for, but it's on the real one:
Just need to fit the tanks and pods and that's as much as I can do until I source a good canopy.
dr_gn said:
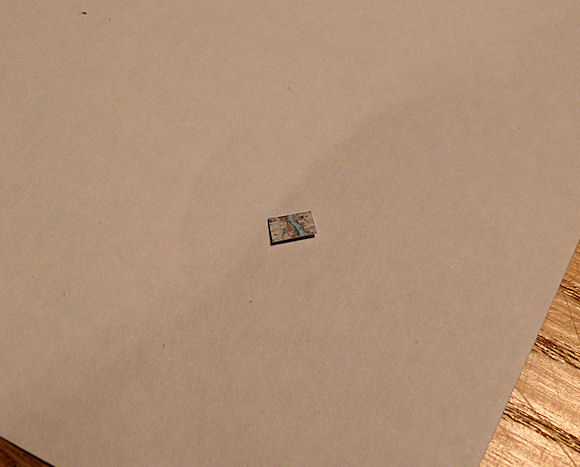
I thought the windscreen area could do with someting extra, so I printed a map and stuck it behind the windscreen (as in a few pics I've seen of the real thing):
...of course it's a map of Derwent/Ladybower reservoir, not that you an tell:
Amazing, I'd have thought the RAF would be able to afford a Garmin GPS even during these hard times ...of course it's a map of Derwent/Ladybower reservoir, not that you an tell:

What a
Well done dr_gn

HoHoHo said:
dr_gn said:
I thought the windscreen area could do with someting extra, so I printed a map and stuck it behind the windscreen (as in a few pics I've seen of the real thing):
...of course it's a map of Derwent/Ladybower reservoir, not that you an tell:
Amazing, I'd have thought the RAF would be able to afford a Garmin GPS even during these hard times ...of course it's a map of Derwent/Ladybower reservoir, not that you an tell:
What a
Well done dr_gn
ocd strikes again 
Look at it this way G, when you take it off to taper the nose a little more and finish it in a different colour (you will ) it CAN GO BACK where it was
Its really not that bad but now you point it out I see it
This is exactly why my own builds have stalled, all the things the kits I'm using get praised for are basically wrong
doh
Look at it this way G, when you take it off to taper the nose a little more and finish it in a different colour (you will
) it CAN GO BACK where it wasIts really not that bad but now you point it out I see it
This is exactly why my own builds have stalled, all the things the kits I'm using get praised for are basically wrong
doh
perdu said:
ocd strikes again
Look at it this way G, when you take it off to taper the nose a little more and finish it in a different colour (you will ) it CAN GO BACK where it was
Its really not that bad but now you point it out I see it
This is exactly why my own builds have stalled, all the things the kits I'm using get praised for are basically wrong
doh
No, I'll not bother reprofiling it, maybe just drill a new pair of mounting holes a few mm further forward from the originals.Look at it this way G, when you take it off to taper the nose a little more and finish it in a different colour (you will
) it CAN GO BACK where it wasIts really not that bad but now you point it out I see it
This is exactly why my own builds have stalled, all the things the kits I'm using get praised for are basically wrong
doh
Bosshogg76 said:
*Boring info alert* the tape was/ is there as secondary retention for the rivets underneath.
Yes, someone else mentioned it earlier in the thread:15peter20 said:
Doc, fyi - the green bit on the probe is actually tape wound around a frangible collar and is there to try and prevent any of the metal debris / rivets dropping off into the righthand donk in the event that the probe is snapped off. Looks great by the way!
I'm glad I painted it - seems to be quite a big deal for those in the know! I'd assumed it was a green anodised collar of some sort, but every day is a school day.The map under the screen is inspired!
Two quick questions regarding the Tornado if I may...
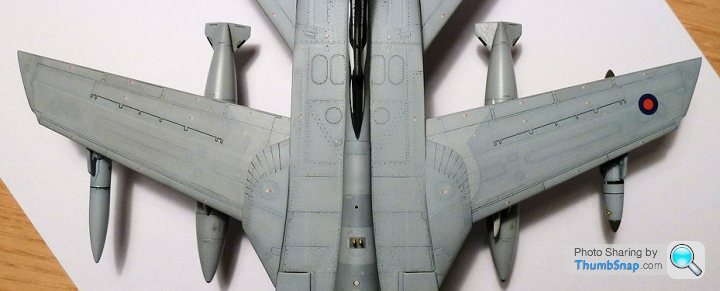
The pods/missiles (ordnance?) that are mounted beneath the wing presumably pivot as the wings sweep back so they continue to point forwards? Is this so?
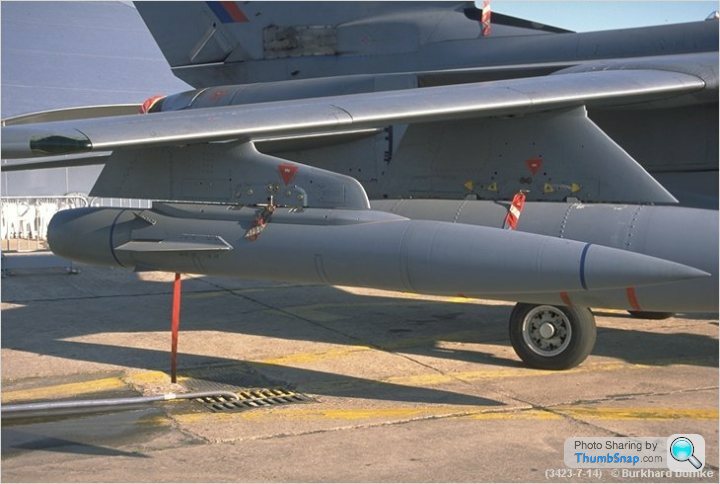
Secondly, on the picture of the underside I was struck by just how far forwards the undercarriage (?!) is. The pair of wheels seem to sit roughly half way down the aircraft. Given that I would assume the aircraft to be heavier at the back than the front (engine(s) v cockpit) I can't see how it is balanced! I trust it is though of course!
Two quick questions regarding the Tornado if I may...
The pods/missiles (ordnance?) that are mounted beneath the wing presumably pivot as the wings sweep back so they continue to point forwards? Is this so?
Secondly, on the picture of the underside I was struck by just how far forwards the undercarriage (?!) is. The pair of wheels seem to sit roughly half way down the aircraft. Given that I would assume the aircraft to be heavier at the back than the front (engine(s) v cockpit) I can't see how it is balanced! I trust it is though of course!

WhisperingWasp said:
The pods/missiles (ordnance?) that are mounted beneath the wing presumably pivot as the wings sweep back so they continue to point forwards? Is this so?
Secondly, on the picture of the underside I was struck by just how far forwards the undercarriage (?!) is. The pair of wheels seem to sit roughly half way down the aircraft. Given that I would assume the aircraft to be heavier at the back than the front (engine(s) v cockpit) I can't see how it is balanced! I trust it is though of course!
Not sure if you mean the model or in real life, but yes the pylons pivot as the wings move. When fitting pylons it was important to get the key way lined up as if you were rough as f**k, you could get them on cocked. Which was annoying.Secondly, on the picture of the underside I was struck by just how far forwards the undercarriage (?!) is. The pair of wheels seem to sit roughly half way down the aircraft. Given that I would assume the aircraft to be heavier at the back than the front (engine(s) v cockpit) I can't see how it is balanced! I trust it is though of course!
I spent 11 years on F3s which were a bit better balanced than the GR. An example of this was; to get us clearance to turn them in the HAS (hardened aircraft shelter) apron the jockeys would sweep the wings back so we wouldn't get HAS door wing tip interface. The couple of time i marshalled a GR after they'd had a bird strike. they weren't keen to sweep the wings back, for fear of sitting it on its arse. So I'd assume their CoG was a lot tighter than the F3
WhisperingWasp said:
The map under the screen is inspired!
Two quick questions regarding the Tornado if I may...
The pods/missiles (ordnance?) that are mounted beneath the wing presumably pivot as the wings sweep back so they continue to point forwards? Is this so?
Secondly, on the picture of the underside I was struck by just how far forwards the undercarriage (?!) is. The pair of wheels seem to sit roughly half way down the aircraft. Given that I would assume the aircraft to be heavier at the back than the front (engine(s) v cockpit) I can't see how it is balanced! I trust it is though of course!
Thanks. I think your questions have been answered by folks more knowlegable than me, but I agree that it does look a bit unbalanced. I guess the fuel tank is somewhere forward of the main gear as well as a lot of avionics equipment and the cannon, not to mention the wing pivot mechanism. I was worried it might need some weight in the nose to keep it down, but I guess all the resin and extra detail I've added has done the job.Two quick questions regarding the Tornado if I may...
The pods/missiles (ordnance?) that are mounted beneath the wing presumably pivot as the wings sweep back so they continue to point forwards? Is this so?
Secondly, on the picture of the underside I was struck by just how far forwards the undercarriage (?!) is. The pair of wheels seem to sit roughly half way down the aircraft. Given that I would assume the aircraft to be heavier at the back than the front (engine(s) v cockpit) I can't see how it is balanced! I trust it is though of course!
On mine, I guess the underwing stores are not ordnance; there are two 1500 litre fuel tanks, on the port wing a Skyshadow ECM (radar jamming) pod, and the stbd. wing has a BOZ-107 flare dispenser. Not sure if the latter were dummies on this aircraft for the flypast I saw, I'm sure someone on here will know.
Anyway, tonight I painted the various navigation lights, and also the landing lights. Sanded the original plastic parts down on these three items and added some clear "Little Lenses" which give a much more realistic appearance (total of 5 on this build now!) Plus I made a start on making some remove before flight tags. I'm not fitting all of them, just ont the stores, undercarriage and maybe the pitot tube on the nose::
And drilled a couple of new holes for teh BOZ-107 pod so that it sits in a better position:
Edited by dr_gn on Tuesday 3rd March 14:34

So the black decals on the pods looked a bit high contrast to me:

So I toned them down a bit (maybe not enough actually) by overspraying with base colour (4 parts Vallejo Light Grey : 1 part Vallejo White). Ended up applying a thin dark wash to bring out a bit of detail. Epoxied them to the pylons and finished the "remove before flight" tags. They will look OK when fitted:
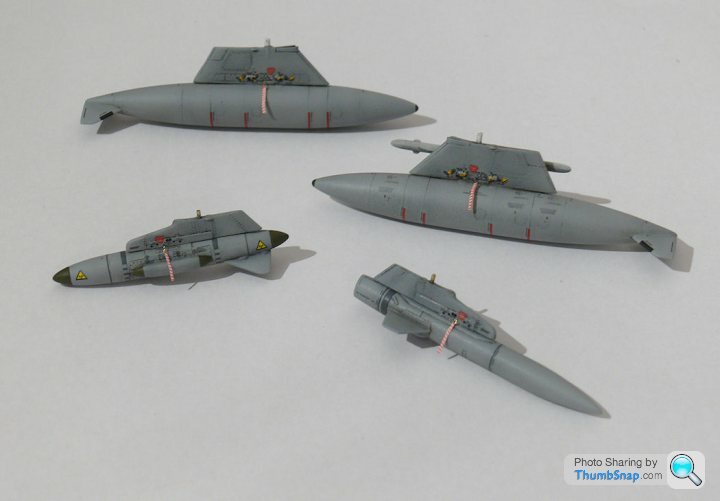
So I toned them down a bit (maybe not enough actually) by overspraying with base colour (4 parts Vallejo Light Grey : 1 part Vallejo White). Ended up applying a thin dark wash to bring out a bit of detail. Epoxied them to the pylons and finished the "remove before flight" tags. They will look OK when fitted:
Gassing Station | Scale Models | Top of Page | What's New | My Stuff