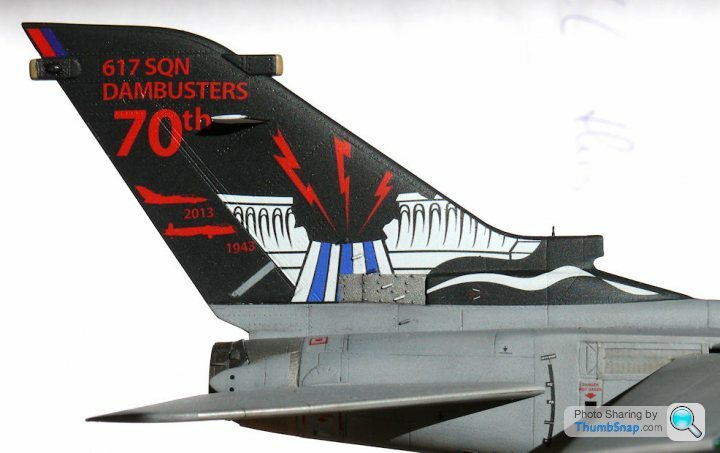
1:72 Tornado GR4, Dambusters70th Anniversary
Discussion


Absolutely loving seeing your build progress. The Tornado has been my favourite aircraft since I was at school and I attempted one or two airfix kits back in the day (with very limited success!) I find it fascinating to see the level of detail you are putting in and I'm truly in awe! Any ideas for the next project?!
24lemons said:
Absolutely loving seeing your build progress. The Tornado has been my favourite aircraft since I was at school and I attempted one or two airfix kits back in the day (with very limited success!) I find it fascinating to see the level of detail you are putting in and I'm truly in awe! Any ideas for the next project?!
Ta very much. I've made some daft errors with this one (as usual), so a few aspects could be better, but there you go.Next project will be something simple with no mods, mabe a Tamiya Mosquito or Eduard Hellcat.
dr_gn said:
Ta very much. I've made some daft errors with this one (as usual), so a few aspects could be better, but there you go.
Next project will be something simple with no mods, mabe a Tamiya Mosquito or Eduard Hellcat.
Daft errors? To me a daft error is glueing the missiles to your fingers! There was also this one time I forgot to check that the lid was secure on my pot of Humbrol black enamel paint. As I shook it, the inevitable happened and black paint went all over mum's cream carpet!Next project will be something simple with no mods, mabe a Tamiya Mosquito or Eduard Hellcat.
Keep up the good work and I look forward to seeing the finished article!
24lemons said:
Daft errors? To me a daft error is glueing the missiles to your fingers! There was also this one time I forgot to check that the lid was secure on my pot of Humbrol black enamel paint. As I shook it, the inevitable happened and black paint went all over mum's cream carpet!
Keep up the good work and I look forward to seeing the finished article!
Quite - too hard on yourself - once "forgot" about the bottle of open touch up paint on the slam panel, as I shut the bonnet on it...that took some clearing up Keep up the good work and I look forward to seeing the finished article!

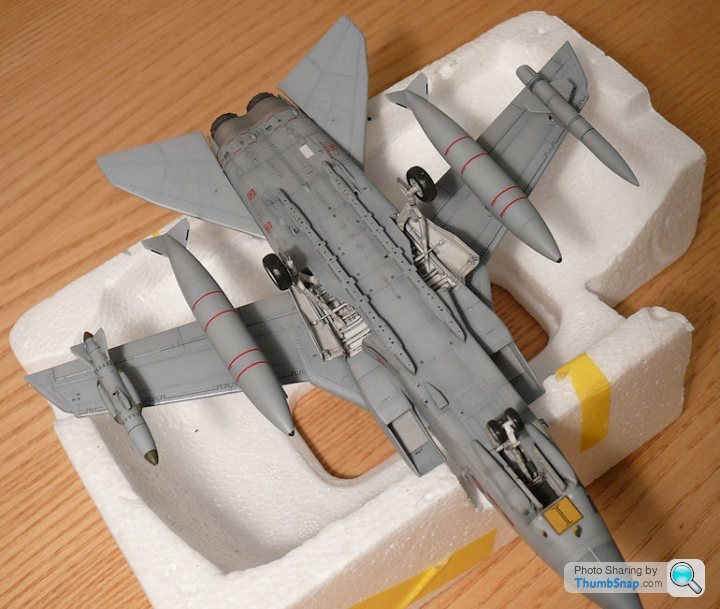
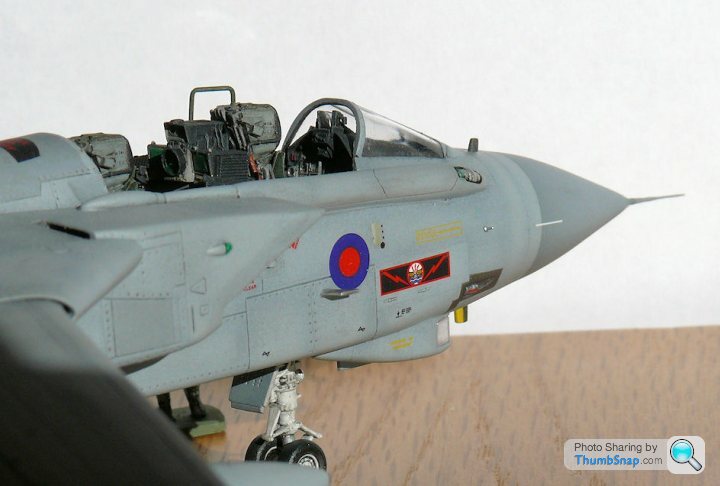
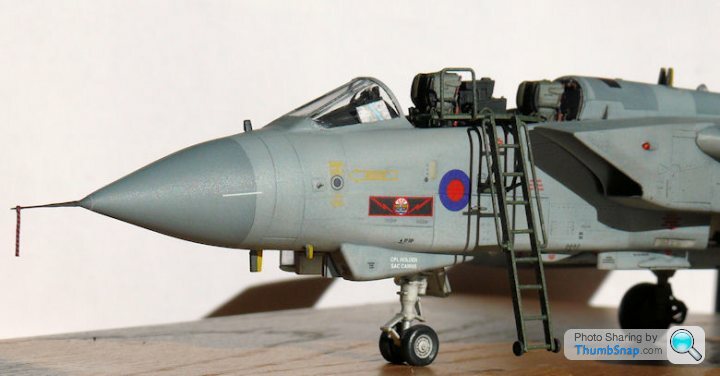
Pitot tube is on now, and the three nose decals I messed up (replaced by the kind folk on BM). I guess that prety much completes the main structure. Took some photos this afternoon; the camera combined with direct sunlight is a very harsh judge of a small scale model. All things considered I've got to be happy with it so far. Just the canopy to figure out now...
Edited by dr_gn on Sunday 8th March 16:00
Mutley said:
Doc, once again your build amazes, love the Tonka. I know there have been some moments with it, but the results have been worth the trouble.
Ta very much - yes, plenty of moments, most caused by me rather than the kit.Does anyone happen to have some photos of where the "remove before flight" tags fit on the undercarriage links? Presumably they are on some kind of locking pins on the retraction arms?

Nooo come back luv, it's not what it seems! Think of the kids!
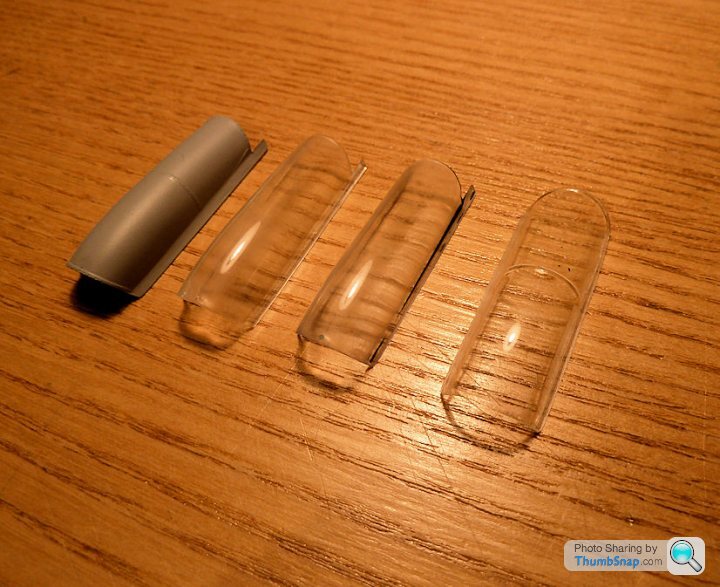
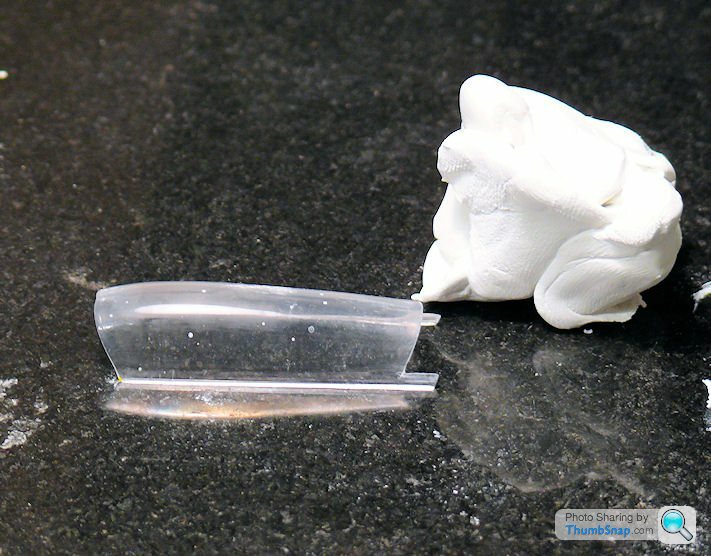
Planning for the worst, I've made a start on the canopy vacuum forming device. Here's the collection of canopies that will be used for the plugs, after covering them with Vaseline as a release agent:
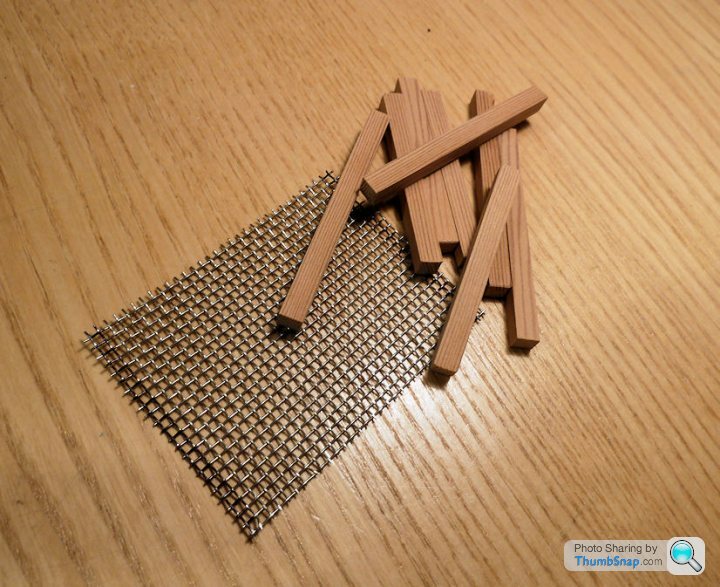
Then a few bits of scrap from the Garage-Mahal:
Resulted in this, based on an internet article, but with a few mods:
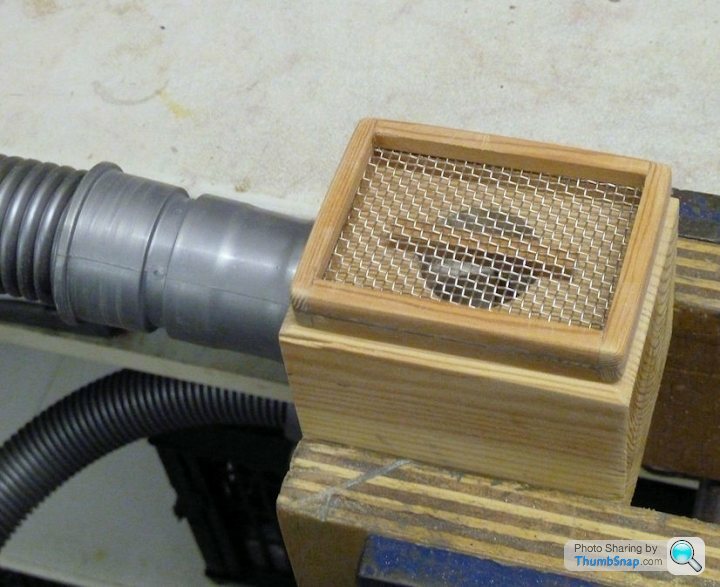
The idea is that the vacuum hose will evacuate the wooden box, the plug will sit on the mesh, and when some hot acetate or whatever is held over the raised edge, it will seal and get pulled down over the plug.
I have just about zero confidence in it producing anything like an acceptable canopy, but time (and no doubt a lot of bad language) will tell...
Interesting. Last time I did any hot moulding (many moons ago) I seem to recall that there was a requirement to clamp the hot material from the top to stop it all pulling in towards the centre and wrinkling. To use your last image as an example, the wooden frame atop the mesh would be above the hot material. Not saying this way is wrong, but very interested to see the results (it is of course a very common procedure to do). Of course, time may have dulled them memory and I didn't do a great deal of it.
Looking forward to the results.
Looking forward to the results.
Red Firecracker said:
Interesting. Last time I did any hot moulding (many moons ago) I seem to recall that there was a requirement to clamp the hot material from the top to stop it all pulling in towards the centre and wrinkling. To use your last image as an example, the wooden frame atop the mesh would be above the hot material. Not saying this way is wrong, but very interested to see the results (it is of course a very common procedure to do). Of course, time may have dulled them memory and I didn't do a great deal of it.
Looking forward to the results.
It's all a bit of an experiment based on this article and some comments over on Britmodeller:Looking forward to the results.
http://www.ipmsstockholm.org/magazine/2002/08/stuf...
So here we go, doing the unthinkable. Making a frikking canopy.
I knew it would take balls:
and yet more chemicals:

Not even sure this stuff will do the job, but it definitely works on ABS moulds for carbon fibre / epoxy resin.
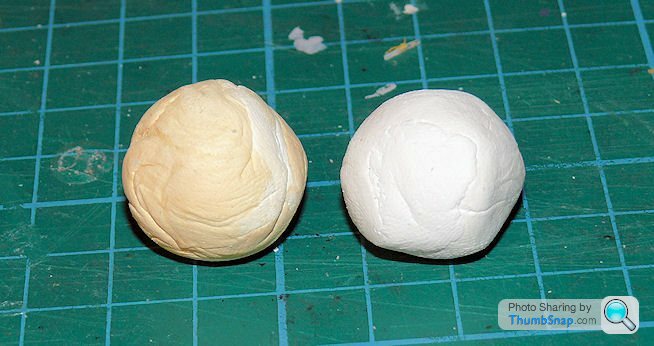
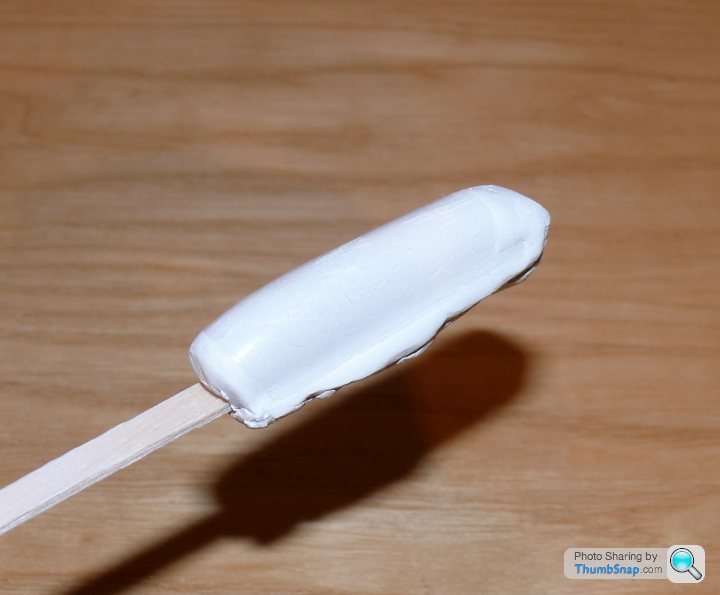
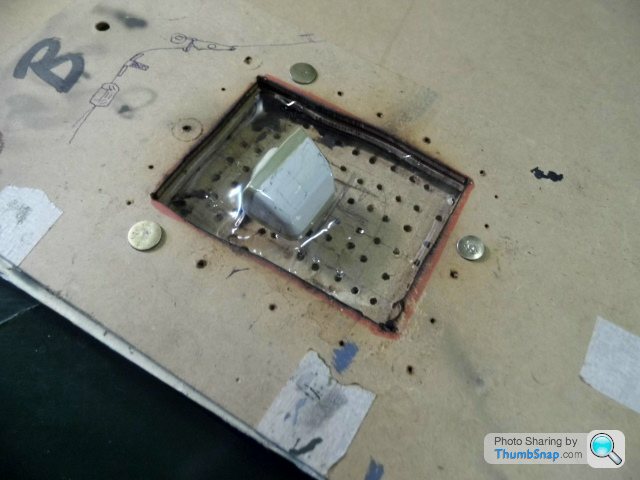
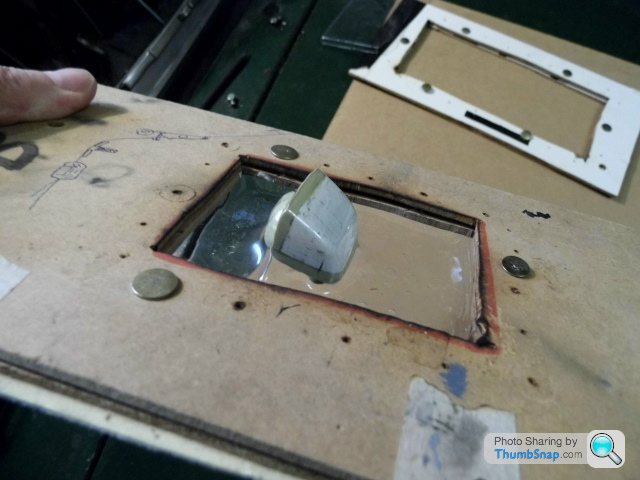
Milliput mixed ready to form the plug from one of the original canopies. It's one that I've sanded internally, so the moulded-in MDC has gone:
Currently setting. Removal will be interesting...no big deal really if I have to crack it.
Next job after removal will be to trim around the edges to give a smooth transition for the excess PET-G film to form around (5x 0.75mm and 5x 0.5mm sheets ordered off EBay today).
I also added an o-ring seal to the inlet pipe of what has been christened the "creature trap" by the kids.
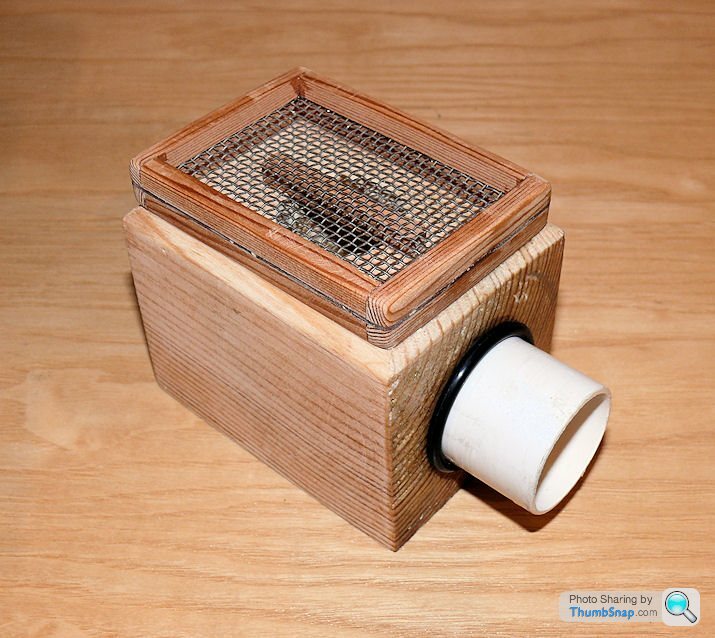
It seems to work fine on plastic sheet when connected to a Dyson.
I knew it would take balls:
and yet more chemicals:
Not even sure this stuff will do the job, but it definitely works on ABS moulds for carbon fibre / epoxy resin.
Milliput mixed ready to form the plug from one of the original canopies. It's one that I've sanded internally, so the moulded-in MDC has gone:
Currently setting. Removal will be interesting...no big deal really if I have to crack it.
Next job after removal will be to trim around the edges to give a smooth transition for the excess PET-G film to form around (5x 0.75mm and 5x 0.5mm sheets ordered off EBay today).
I also added an o-ring seal to the inlet pipe of what has been christened the "creature trap" by the kids.
It seems to work fine on plastic sheet when connected to a Dyson.
That will probably work nicely G, A friend of mine plugs his device right on top of his Dyson
He made it from several pieces of waste water plumbing attachments and a piece of sturdy mesh
I still use a 'retainer/holder' when I'm using my home made doodah
Two pieces of MDF with a big enough hole in them for canopies and held together with drawing pins so the plastic is held rather than letting it distort whilst reforming
In the background here is the larger set for moulding wings
I made this for use on my Sherpa (you guessed) then didnt use them
It is big enough for fuselage sized moulding any time I want to get on with one

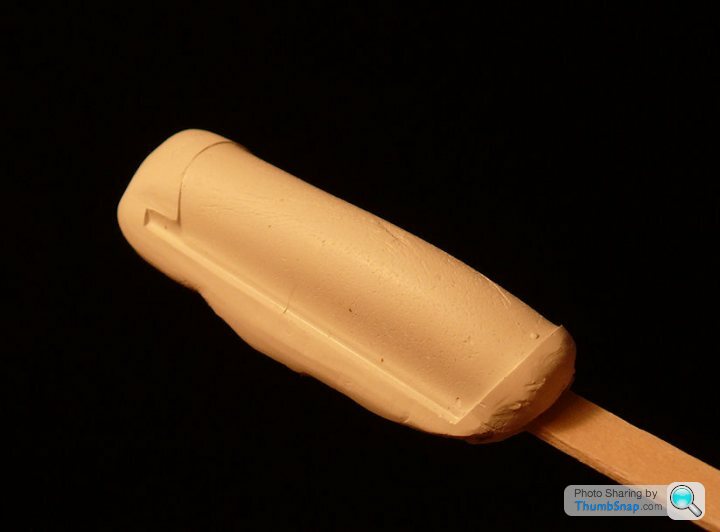
Milliput has worked well there.
I did this on a 1/8 scale Gloster Meteor I built (well it's awaiting paint - but I started it 6 years ago - children happened and r/c building stopped) like you using a home made vacuum box and the oven.
90% of the trial and error went in to getting the bottom 10% of the canopy to conform to the mould. You may already be planning to but I'd recommend filing/sanding the bottom of the mould sheer.
Gassing Station | Scale Models | Top of Page | What's New | My Stuff