P-51B Mustang "Old Crow" Academy 1:72
Discussion


Mutley said:
dr_gn said:
It's got a fair bit of lentgh to it too missus.
If you look from the side, the top is visible above the cockpit edge. If I was going to Duxford tomorrow for the airshow I could check, but the weather is rubbish so I won't be risking the 2 1/2 hour drive
Doc, am going to Duxford tomorrow, can't promise, but if you want any reference shots be happy to try for youIf you look from the side, the top is visible above the cockpit edge. If I was going to Duxford tomorrow for the airshow I could check, but the weather is rubbish so I won't be risking the 2 1/2 hour drive
Edited by dr_gn on Friday 23 May 23:00
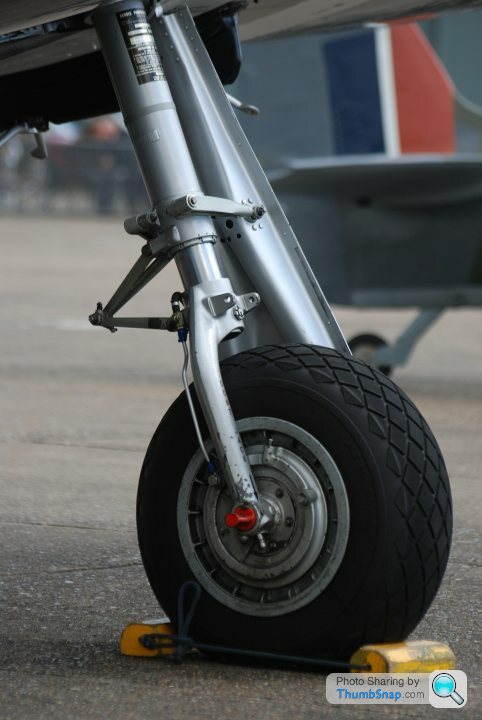
If you see a P51, a few pictures of the back of the undercarriage legs (specifically how the brake pipe is routed and where it fits into the wheel hub, and where it goes in the wheel well) that would be good. Also, what's visible looking from the back inside the ventral radiator duct when it's open (particularly in terms of colours). Cockpit shots are also always useful, most people take pictures looking towards the instrument panel, but looking back into the side of the seat area would be good (on a P-51B, I think it will be different for the D models).
If you ask one of the guys in the restoration hanger for a poke around they have been helpful in the past, but i guess if there are lots of people around they might not want to let you past the barrier.
I hope you have a great day - weather looks like it will be perfect. I will just have to look forward to Flying Legends. I was hoping to take the finished model down there for the pilot to sign the base (he is coming over again from the US for another mustang ride apparently), assuming it turns out well enough.
Thanks!
Not as detailed as you would want, I'm sure, but here's a picture of a Mustang getting a tail wheel change. The picture was taken at Goodwood where the Mustang was due to take part ion a flying display. However, it suffered a tailwheel tyre puncture and a replacement was taken from a Harvard.

We organised a tour of the museum and conservation hangar with David Lee. Here is an extract from his e-mail to me....
"I have well over 30 years experience of the museum, retiring as Deputy Director and Curator of Aircraft. David W Lee IEng, MRAeS. IWM Duxford Tour Organiser."
Please reply by email, davidwlee@aviationhistorian.co.uk or write to Kingfisher Cottage, Mill Road, Kedington, Suffolk CB9 7NN
David is obviously very enthusiastic and may try to help you with any photos you require. If you are going to Duxford on a quiet day it obviously makes access easier and they're likely to be more accomodating.
Mutley said:
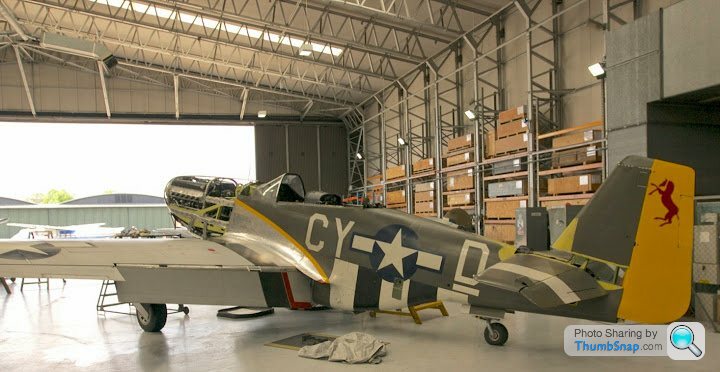
Duxford was a great day, shame you didn't come, managed to get these for you, was too many people around to get much, hope they're useful.
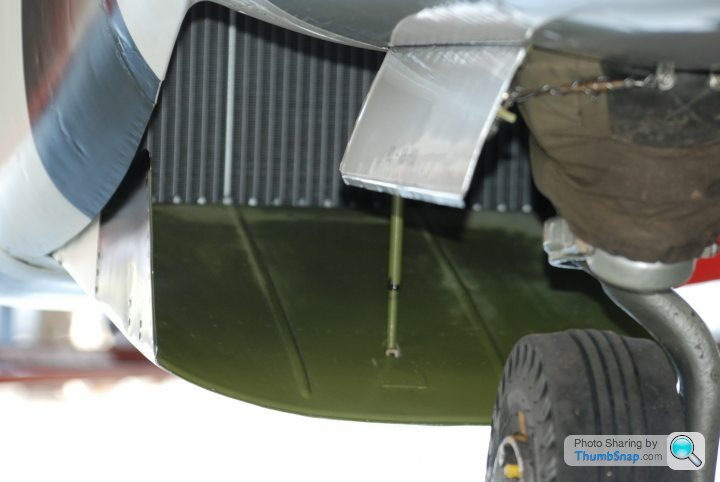
They're brilliant, thanks for taking the time to get them. Not sure now whether to model the radiator flap shut, since it looks like I should really have put a scratchbuilt matrix in there.Glad it was a good day, I'm looking forward to Flying Legends now.
Sorry for the late reply, I've been away on holiday the past week.
I got the majority of the filling done recently; it didn't need much. I did notice that it was a "see through" model in that if you look directly at it, you can see daylight through the nose and radiator intakes. I should have checked this before I joined the fuselage halves I suppose.
So with reference to Mutley's photo, I've made a radiator matrix out of an old SE.5a etch set, and added a couple of stiffeners. I've put some plastic strip brackets in the radiator outlet duct, and cut a piece of thin brass as a filler. When it's all assembled it blocks the daylight and the little that can be seen through the open radiator flap looks fine. I've also made an actuator rod out of some brass wire as per Mutley's photo. The duct filler just needs a bit of work when it's set and it'll be ready for paint. I also opened the other smaller duct opening up by drilling and finishing with a small file. Again this would have been easier before closing the fuselage:

So with reference to Mutley's photo, I've made a radiator matrix out of an old SE.5a etch set, and added a couple of stiffeners. I've put some plastic strip brackets in the radiator outlet duct, and cut a piece of thin brass as a filler. When it's all assembled it blocks the daylight and the little that can be seen through the open radiator flap looks fine. I've also made an actuator rod out of some brass wire as per Mutley's photo. The duct filler just needs a bit of work when it's set and it'll be ready for paint. I also opened the other smaller duct opening up by drilling and finishing with a small file. Again this would have been easier before closing the fuselage:
Eric Mc said:
Not as detailed as you would want, I'm sure, but here's a picture of a Mustang getting a tail wheel change. The picture was taken at Goodwood where the Mustang was due to take part ion a flying display. However, it suffered a tailwheel tyre puncture and a replacement was taken from a Harvard.
Just how long can they keep these magnificent aircraft flying ? Pretty much indefinitely as far as I can see. There are many specialists now who make replacement parts - often much better than the originals.
There are some limits - mainly with the large, more sophisticated aircraft. But common warbirds, such as Mustangs, Harvards, Spitfires and (increasingly) Hurricanes are destined to keep flying for years and years.
There are some limits - mainly with the large, more sophisticated aircraft. But common warbirds, such as Mustangs, Harvards, Spitfires and (increasingly) Hurricanes are destined to keep flying for years and years.
dr_gn said:
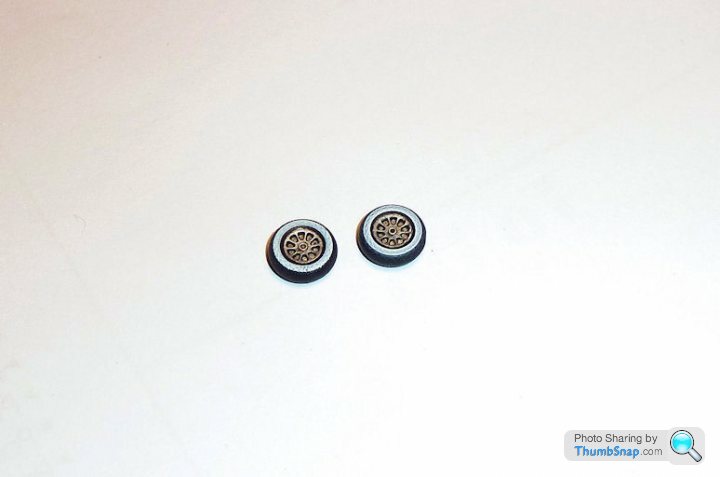
Had a go at the main wheel whitewalls tonight, they'll do, although the wheels themselves aren't quite identical. Still puzzling over how to paint the tailwheel:
I think the only way you're going to do that to your satisfaction is remove the wheel from the leg, source/create a new wheel, paint that then reattach to the leg. Or could you cut back the plastic from where it meets the tyre with a scalpel point, then carefully work/refine until you've got a presentable effect?
RichB said:
dr_gn said:
Had a go at the main wheel whitewalls tonight, they'll do, although the wheels themselves aren't quite identical. Still puzzling over how to paint the tailwheel:
Is it my PC screen or are the wheels gold effect in that image? Yertis said:
dr_gn said:
Had a go at the main wheel whitewalls tonight, they'll do, although the wheels themselves aren't quite identical. Still puzzling over how to paint the tailwheel:
I think the only way you're going to do that to your satisfaction is remove the wheel from the leg, source/create a new wheel, paint that then reattach to the leg. Or could you cut back the plastic from where it meets the tyre with a scalpel point, then carefully work/refine until you've got a presentable effect?Gassing Station | Scale Models | Top of Page | What's New | My Stuff