Tamiya 1:12 McLaren MP4/6 Rebuild/Upgrade
Discussion


EagleMoto4-2 said:
Just to add more to your reference material. Some shots of the McLaren they have at the National Motor Museum. This was taken with a Nikon DSLR so colour reproduction should be better than the Senna picture.
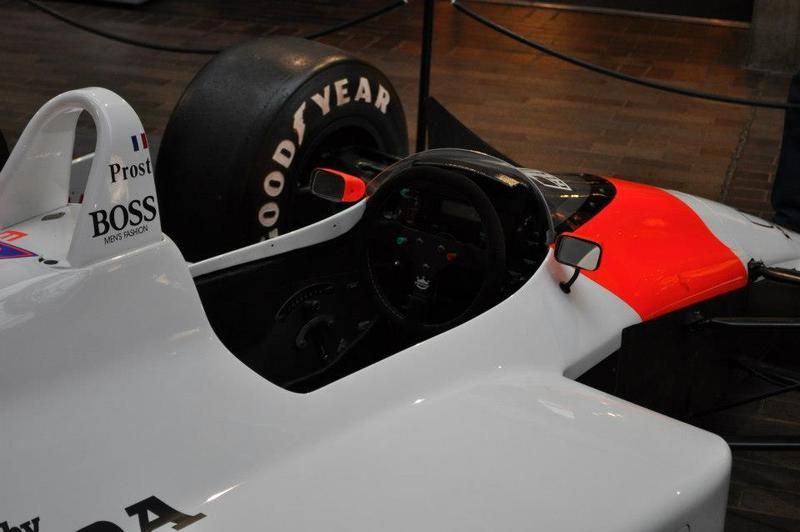
Thanks - it all helps. Not sure what's happened to the front demarcation lines on the red though...looks all wrong, almost like it's curved rather than a chevron.
dr_gn said:
Thanks - it all helps.
Not sure what's happened to the front demarcation lines on the red though...looks all wrong, almost like it's curved rather than a chevron.
I had never even noticed that until you had pointed it out. But yes, looks nothing like the typical Marlboro fag packet.Not sure what's happened to the front demarcation lines on the red though...looks all wrong, almost like it's curved rather than a chevron.
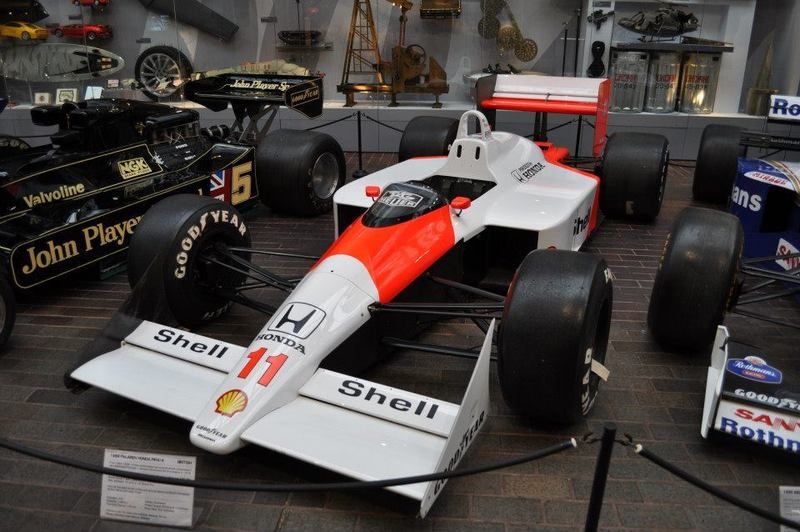
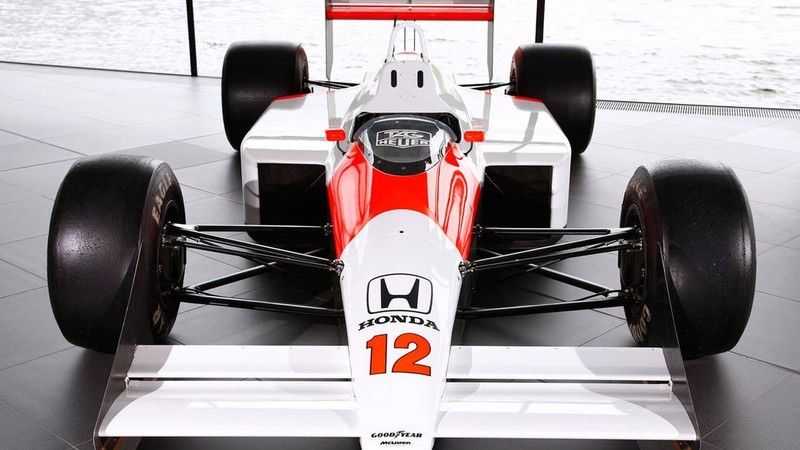
Well, out of curiosity I had a quick search and it seems the 1988 McLaren that they have at the factory also has the curved red area forward of the cockpit. I can only assume its not enough just to have the Marlboro decals removed, but to remove as much reference to the brand as possible.
EagleMoto4-2 said:
Well, out of curiosity I had a quick search and it seems the 1988 McLaren that they have at the factory also has the curved red area forward of the cockpit. I can only assume its not enough just to have the Marlboro decals removed, but to remove as much reference to the brand as possible.
And no Shell logo either.Sad really. Like they're changing history.
Anyway...I got the Zero RAL3024 and did a comparison test:
All primed with Tamiya White FSP.
First column is Mr. Paint White (there are TEN coats on there - about 1/3 bottle), and you can still clearly see my pencil notes under it. I actually got bored putting coat after coat on, so gave up. It's just horrible stuff, and not even a particularly clean white.
Second & third colums are Zero white.
Fourth column is Tamiya TS White.
Top row of red is Zero MP4
Second Row is Zero RAL3024
Third Row is Mr.Paint RAL3024. To get this depth of colour with a reasonable number of coats, I drained off pretty much half of the thinner from the settled-out paint before shaking. Went on OK after that.
All overcoated with three coats of Zero Clearcoat.
All are a terrible rough finish, as per the pre and post polish image posted previously.
It's not too clear from the image, but the Zero paints are identical as far as I can see. Why they don't simply put a RAL number on the McLaren paint and be done with it I don't know.
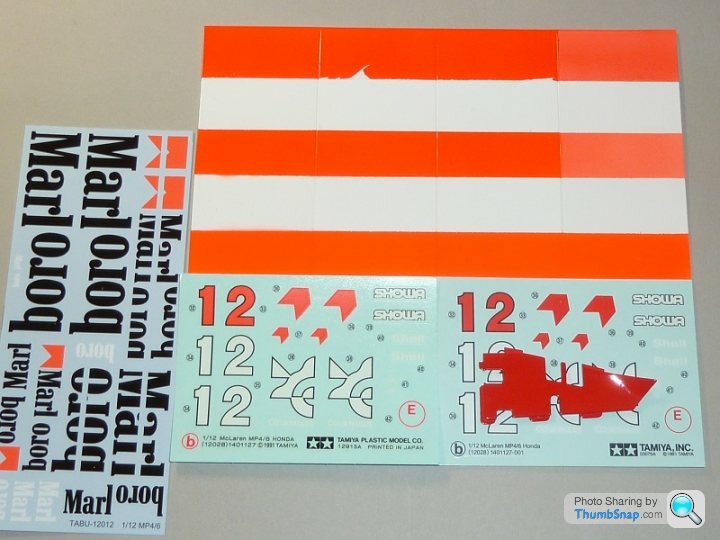
The Mr.Paint is more orange, and is far more flourescent than the Zero stuff. To my eyes it's pretty much spot on. The Zero paint just doesn't pop enough. As you can see it is however a good match for one set of Tamiya decals (excuse the flare on the image). The other set is a good match for Tamiya 'flourescent' red, even though it's not flourescent at all...The Tabu design decals don't match anything.
So..what to do? I honestly don't know what to do now.
Is Mr.Paint (apparently a fairly aggressive acrylic) compatible with Zero white and 2K clear coats?
Do I get some 2K clearcoat, if so where from? I don't fancy spending any more on Zero stuff. Will it be compatibe with Mr.Paint? I don't mind flatting paint, but what worries me is that I wont be able to easily flat details like the radiator outlets or the wing elements.
Do I go with Zero red even though I'm pretty certain it's wrong? Clearly one (or both!) of the RAL3024's has to be wrong.
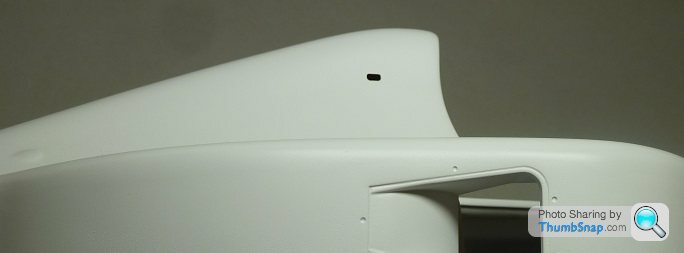
Final thing is the incredible re-appearing seam around the sidepds. I filled using cyano and Baking Soda, then flatted it all back and re-primed:
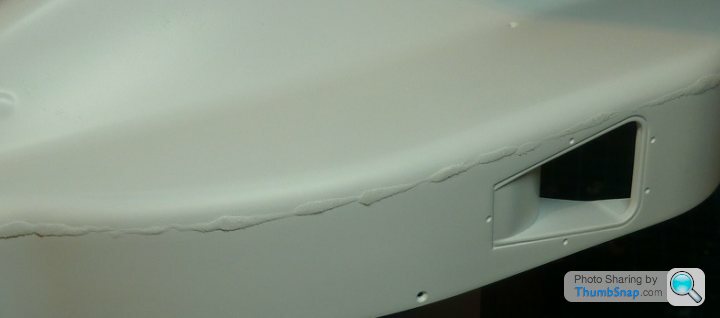
Just to make sure I'm not going insane, here's a pic to prove there really is no gap:
So currently it's re-primed. Again. As I said I really don't know what to do next. I've never known such a complicated paint process. I'm inclined to use Halfords appliance white applied through the airbrush, with Mr. Paint red, and halfords clear, but I know that it will end in disaster.
All primed with Tamiya White FSP.
First column is Mr. Paint White (there are TEN coats on there - about 1/3 bottle), and you can still clearly see my pencil notes under it. I actually got bored putting coat after coat on, so gave up. It's just horrible stuff, and not even a particularly clean white.
Second & third colums are Zero white.
Fourth column is Tamiya TS White.
Top row of red is Zero MP4
Second Row is Zero RAL3024
Third Row is Mr.Paint RAL3024. To get this depth of colour with a reasonable number of coats, I drained off pretty much half of the thinner from the settled-out paint before shaking. Went on OK after that.
All overcoated with three coats of Zero Clearcoat.
All are a terrible rough finish, as per the pre and post polish image posted previously.
It's not too clear from the image, but the Zero paints are identical as far as I can see. Why they don't simply put a RAL number on the McLaren paint and be done with it I don't know.
The Mr.Paint is more orange, and is far more flourescent than the Zero stuff. To my eyes it's pretty much spot on. The Zero paint just doesn't pop enough. As you can see it is however a good match for one set of Tamiya decals (excuse the flare on the image). The other set is a good match for Tamiya 'flourescent' red, even though it's not flourescent at all...The Tabu design decals don't match anything.
So..what to do? I honestly don't know what to do now.
Is Mr.Paint (apparently a fairly aggressive acrylic) compatible with Zero white and 2K clear coats?
Do I get some 2K clearcoat, if so where from? I don't fancy spending any more on Zero stuff. Will it be compatibe with Mr.Paint? I don't mind flatting paint, but what worries me is that I wont be able to easily flat details like the radiator outlets or the wing elements.
Do I go with Zero red even though I'm pretty certain it's wrong? Clearly one (or both!) of the RAL3024's has to be wrong.
Final thing is the incredible re-appearing seam around the sidepds. I filled using cyano and Baking Soda, then flatted it all back and re-primed:
Just to make sure I'm not going insane, here's a pic to prove there really is no gap:
So currently it's re-primed. Again. As I said I really don't know what to do next. I've never known such a complicated paint process. I'm inclined to use Halfords appliance white applied through the airbrush, with Mr. Paint red, and halfords clear, but I know that it will end in disaster.
So, once again, I've ditched Zero paints (this time for good) and gone with the advice of someone on the F1M forum. I went to a local car paint supplier, and got some of their "Inspire Lumo red", white, and some 2K clear. Much cheaper than the Zero stuff, and no delivery cost since they are 10 mins down the road. It's slightly thicker than the other airbrush ready paints I've tried, which is not a bad thing IMO:

I also got some plastic spoons from Morrisons to practice on. This is the first attempt, no flatting:
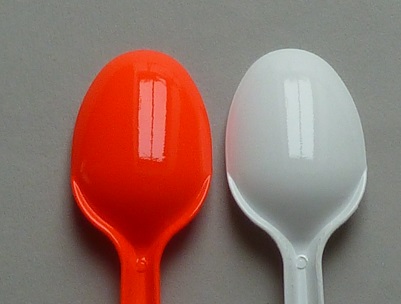
Not saying it's perfect yet, but infinitely better than all the rest so far.
And a colour comparison with the MRP RAL3024:
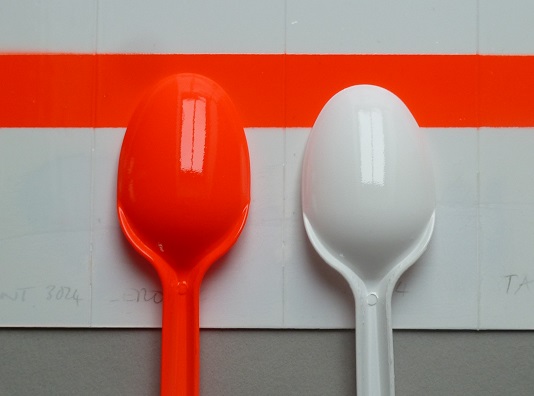
More orange on the photo than reality, but it's a very good match.
The body is now primed and flatted. Plan now is:
1) Apply and flat the base white.
2) Mask, apply and flat the Lumo Red.
3) Apply thin 2K clear coat.
4) Apply decals.
5) Apply thicker coat(s) of 2K clear.
Thanks to RedFirecracker for continued offline support!
I also got some plastic spoons from Morrisons to practice on. This is the first attempt, no flatting:
Not saying it's perfect yet, but infinitely better than all the rest so far.
And a colour comparison with the MRP RAL3024:
More orange on the photo than reality, but it's a very good match.
The body is now primed and flatted. Plan now is:
1) Apply and flat the base white.
2) Mask, apply and flat the Lumo Red.
3) Apply thin 2K clear coat.
4) Apply decals.
5) Apply thicker coat(s) of 2K clear.
Thanks to RedFirecracker for continued offline support!
Finally made some progress: I lightly flatted the white base coat, mainly due to a slight texture to the airbox side. I think due to spraying the sidepod side, and some overspray hitting it dry. Again, with reference to my spare shell, I once again masked the body:

And sprayed the red:

There isn't much of a built-up edge on the demarcation, but there is a very slight inconsistency to the top of the line. I think a couple of passes with worn #1500 should sort it.
This time the colour is bang-on to my recollection of what it was like.
And sprayed the red:
There isn't much of a built-up edge on the demarcation, but there is a very slight inconsistency to the top of the line. I think a couple of passes with worn #1500 should sort it.
This time the colour is bang-on to my recollection of what it was like.
Looking much better!
I don't want to sound patronising but please be very, very careful when using the 2k clear. Isocyanates are nasty stuff and I always cringe when I hear of people using 2k stuff on models at home, it should be left to pro bodyshops with the right extractions, where they can use air fed masks IMO.
I don't want to sound patronising but please be very, very careful when using the 2k clear. Isocyanates are nasty stuff and I always cringe when I hear of people using 2k stuff on models at home, it should be left to pro bodyshops with the right extractions, where they can use air fed masks IMO.
lufbramatt said:
Looking much better!
I don't want to sound patronising but please be very, very careful when using the 2k clear. Isocyanates are nasty stuff and I always cringe when I hear of people using 2k stuff on models at home, it should be left to pro bodyshops with the right extractions, where they can use air fed masks IMO.
I appreciate it. I'm wearing an organic filter mask, and using an extractor booth with triple filters. The garage door is left open for this stuf too.I don't want to sound patronising but please be very, very careful when using the 2k clear. Isocyanates are nasty stuff and I always cringe when I hear of people using 2k stuff on models at home, it should be left to pro bodyshops with the right extractions, where they can use air fed masks IMO.
I'll be honest I'm not using an air-fed mask, and I'm assuming that since I can't smell the stuff, I'm OK using it for this. It's a relatively small job, and three thin coats should finish it.
Skii said:
That looks like a good few hours very well spent.
I very much admire your persistence and determination to get it spot on.
Very nice indeed.
Thanks - you live and learn and all that. All I'm after is to look at it when finished and know that I couldn't realistically have done it better. Although it would be great, it doesn't have to be perfect by any means.I very much admire your persistence and determination to get it spot on.
Very nice indeed.
In fact, since this is a rebuild, and it has some sentimental value, I'm willing to live with a few small flaws (such as the left radiator insert isn't a consistent fit). Even though I've got a brand new unbuilt spare body...
Annoyingly, there was a tiny speck of dust on the sidepod demarcation line, which when removed by swiping over with a paper towel, has left a white dot. Looks massive although it's only about 0.5mm in diameter. I will try to dot it in with some red paint that's settled in the bottle. Hopefully it won't be too noticable.
lufbramatt said:
Have you tried going to a proper car paint supplier? I used to use one in Loughborough when I was at uni called T.R.I who were a car bodyshop supplier, they would mix paint up to whatever reference you wanted, either in a tin for spraying or they would put it in a spray can and were loads cheaper than all these specialist "model paint" suppliers, who are basically using the same kit just charging 10x as much for it in tiny bottles..
Yes, that's what I've done now, and as you said it's turned out on average to be about half the price ml/ml, and on top of that, no postage of course.Edited by lufbramatt on Monday 14th March 08:30
Thanks for all the helpful info Doc - I've got this coming with my collection of McLaren kits! To me the painting bodywork is the most daunting part, but this type of thread is incredibly helpful to those of us who last painted a car with a Humbrol pot and a 'craft' paint brush 35-odd years ago, and now aspire to a bit more!
Quick Zero paint question (as that is what I brought back to the States last time I was home) - can I use any clear coat/lacquer on top, or does it have to be their 2K?
Quick Zero paint question (as that is what I brought back to the States last time I was home) - can I use any clear coat/lacquer on top, or does it have to be their 2K?
caterhamnut said:
Thanks for all the helpful info Doc - I've got this coming with my collection of McLaren kits! To me the painting bodywork is the most daunting part, but this type of thread is incredibly helpful to those of us who last painted a car with a Humbrol pot and a 'craft' paint brush 35-odd years ago, and now aspire to a bit more!
Quick Zero paint question (as that is what I brought back to the States last time I was home) - can I use any clear coat/lacquer on top, or does it have to be their 2K?
I would definitely now only use 2K, assuming you're comfortable with the safety issues. If you mean does it have to be Zero 2K, I don't know, but I'd assume it doesn't.Quick Zero paint question (as that is what I brought back to the States last time I was home) - can I use any clear coat/lacquer on top, or does it have to be their 2K?
The single bottle stuff I tried to use seemed to soak into the base coats, and would need a lot of coats to get a decent finish. I think also that since the 2K cures slower, as a chemical reaction, as opposed to air drying, you're less likely to get issues with it drying too fast and overspray settling on a previously coated part of the car leaving a sandpaper or matt finish. It seems to me that the 2K is far more forgiving in some ways, not in others i.e. you need to be more careful about dust settling while curing, because it takes several hours.
If anyone wants the Zero McLaren Red/RAL3024 and White, and the 1K clear, let me know and you can have the lot for a nominal price plus postage. I think my mistake was not using the 2K clear, but whatever, that's me finished with Zero paints for good.
I've had a go at repairing the spot on the sidepod:

Dotted some red up to the masking tape - only needed 3 coats. Then very lightly wet-flatted the edges of all the red areas to take the raised edge off slightly:

Looks fine now:

Next job is the first coat of 2K clear to set the decals on.
Dotted some red up to the masking tape - only needed 3 coats. Then very lightly wet-flatted the edges of all the red areas to take the raised edge off slightly:
Looks fine now:
Next job is the first coat of 2K clear to set the decals on.

Gassing Station | Scale Models | Top of Page | What's New | My Stuff