Tamiya 1:12 McLaren MP4/6 Rebuild/Upgrade
Discussion


Composite Guru said:
dr_gn said:
Composite Guru said:
dr_gn said:
Had a trip to the Donington collection today. They didn't have an MP4/6, but did have a 4/5B and a 4/7, both of which had similar carbon types in the areas I'm interested in. Looks like the wing endplates are more textured than a visible weave:
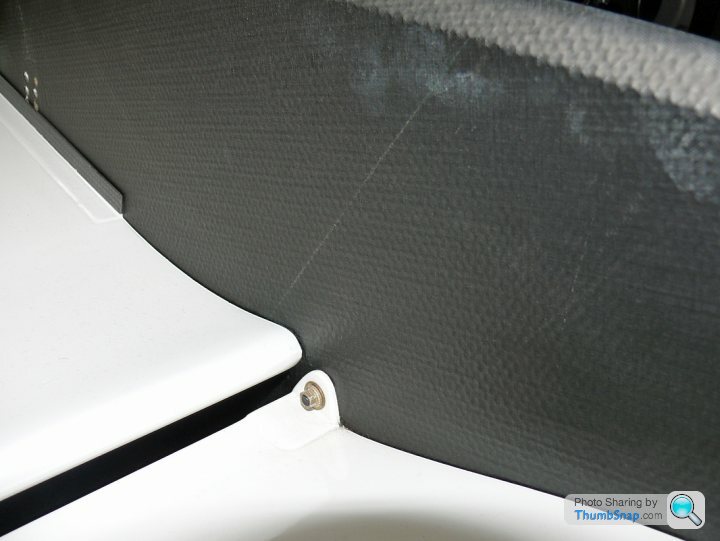
That's the effect of a couple of plies of carbon vacuumed over Nomex core. F1 parts still suffer with that nowadays but only on internal parts that aren't aero wetted surfaces. 
dr_gn said:
Composite Guru said:
dr_gn said:
Composite Guru said:
dr_gn said:
Had a trip to the Donington collection today. They didn't have an MP4/6, but did have a 4/5B and a 4/7, both of which had similar carbon types in the areas I'm interested in. Looks like the wing endplates are more textured than a visible weave:
That's the effect of a couple of plies of carbon vacuumed over Nomex core. F1 parts still suffer with that nowadays but only on internal parts that aren't aero wetted surfaces. I've only used half of the S27 kit on my RB6 as the other half is pretty useless. The flap hangers on the front wing are spot on on the plastic IMO, the PE ones aren't at all representative of the real thing so I wasn't prepared to butcher the plastic ones just to use them.
Hey there
Reading this with interest as I am doing the very same build but from the start - I have been through all the posts and am with you on the RAL - I have tried a whole bunch of different types , and suspected I was stuck with Zero too (I used to use Revell's RAL3024 which went on Satin but was fantastic when clearcoated)
Where can I ask did you get the Inspire stuff from and how much did you need?
Elipsys69 said:
Hey there
Reading this with interest as I am doing the very same build but from the start - I have been through all the posts and am with you on the RAL - I have tried a whole bunch of different types , and suspected I was stuck with Zero too (I used to use Revell's RAL3024 which went on Satin but was fantastic when clearcoated)
Where can I ask did you get the Inspire stuff from and how much did you need?
No problem; I got the paint from :Reading this with interest as I am doing the very same build but from the start - I have been through all the posts and am with you on the RAL - I have tried a whole bunch of different types , and suspected I was stuck with Zero too (I used to use Revell's RAL3024 which went on Satin but was fantastic when clearcoated)
Where can I ask did you get the Inspire stuff from and how much did you need?
Custom Paints,
Unit 3
Norfolk Bridge Court,
Warren Street,
Sheffield,
S4 7WT
UK
Tel. (0114) 2752187
http://www.specialistpaints.com/
For the entire process I used about 30 ml of red and 50 ml of white. I think they supply a minimum of 100 ml though.
It's worth saying that they state that the flourescence will fade after a few years (all flourescent paints will, in theory), which is fair enough. However, the person who told me about this stuff said his McLaren is still fine after many years of being on display. I guess it depends on the amount of UV it gets exposed to. I've put my completed body and wings in a shoe box in the airing cupboard as a precaution, so at least the fading process will be minimised until the model is finished!
BTW, have you decided on a strategy for which carbon decals to use and where? That's what's holding me up with this build (and my MP4/4).
Ta.
Thanks for the quick reply
I did see the guys website that you posted (I googled Inspire paints) but it seemed that the amounts you had were a lot smaller than the amounts they stated (Min 1litre) - No probs - I'll give them a call.
I really don't have a bunch of time to build this so it will be long and slow - but I have thought several things through quite thoroughly and I know that I am not going to be using a whole lot of CF decals - I just don't find that they look right in scale. The interior of the wing end plates I will scuff using some coarse paper in one direction and just paint. The pics posted here previously of those areas clearly show no weave but do show texture, so that's what I'll aim for.
Other areas which I will CF, I will be very careful about as I have seen some finished models with CF everywhere and if i'm honest it looks awful. I probably wont even use 1/12 th scale weave as to me it doesn't look right. Cars of that era weren't blinged with CF (suspension parts etc don't show a weave) - so anything I do add I will tone down. Primarily I will use it on the cockpit areas, vortex generators, and maybe some parts of the airbox. I have the Joe Honda manual and there aren't that many areas that you can actually see the weave - I think maybe the air scoops for the brakes do but that is about it. The tray that the velocity stacks sit on will certainly be painted, at least on mine!
I'll use the tissue paper method for the sidepods and maybe dress the top part with cf where they join the monocoque.
Havent decided if I will cut off the nose cone yet either - Cant bring myself to saw it off as the Top Studio kit suggests!
Chris
Elipsys69 said:
Thanks for the quick reply
I did see the guys website that you posted (I googled Inspire paints) but it seemed that the amounts you had were a lot smaller than the amounts they stated (Min 1litre) - No probs - I'll give them a call.
I really don't have a bunch of time to build this so it will be long and slow - but I have thought several things through quite thoroughly and I know that I am not going to be using a whole lot of CF decals - I just don't find that they look right in scale. The interior of the wing end plates I will scuff using some coarse paper in one direction and just paint. The pics posted here previously of those areas clearly show no weave but do show texture, so that's what I'll aim for.
Other areas which I will CF, I will be very careful about as I have seen some finished models with CF everywhere and if i'm honest it looks awful. I probably wont even use 1/12 th scale weave as to me it doesn't look right. Cars of that era weren't blinged with CF (suspension parts etc don't show a weave) - so anything I do add I will tone down. Primarily I will use it on the cockpit areas, vortex generators, and maybe some parts of the airbox. I have the Joe Honda manual and there aren't that many areas that you can actually see the weave - I think maybe the air scoops for the brakes do but that is about it. The tray that the velocity stacks sit on will certainly be painted, at least on mine!
I'll use the tissue paper method for the sidepods and maybe dress the top part with cf where they join the monocoque.
Havent decided if I will cut off the nose cone yet either - Cant bring myself to saw it off as the Top Studio kit suggests!
Chris
I posted some carbon decal scale comparisons, and 1:12 is nowhere near scale, at least for the commonly used twill weave stuff; 1:20 is more like it. I think the surfaces on the kit parts are already scored to represent the U/D carbon, if you look carefully.I did see the guys website that you posted (I googled Inspire paints) but it seemed that the amounts you had were a lot smaller than the amounts they stated (Min 1litre) - No probs - I'll give them a call.
I really don't have a bunch of time to build this so it will be long and slow - but I have thought several things through quite thoroughly and I know that I am not going to be using a whole lot of CF decals - I just don't find that they look right in scale. The interior of the wing end plates I will scuff using some coarse paper in one direction and just paint. The pics posted here previously of those areas clearly show no weave but do show texture, so that's what I'll aim for.
Other areas which I will CF, I will be very careful about as I have seen some finished models with CF everywhere and if i'm honest it looks awful. I probably wont even use 1/12 th scale weave as to me it doesn't look right. Cars of that era weren't blinged with CF (suspension parts etc don't show a weave) - so anything I do add I will tone down. Primarily I will use it on the cockpit areas, vortex generators, and maybe some parts of the airbox. I have the Joe Honda manual and there aren't that many areas that you can actually see the weave - I think maybe the air scoops for the brakes do but that is about it. The tray that the velocity stacks sit on will certainly be painted, at least on mine!
I'll use the tissue paper method for the sidepods and maybe dress the top part with cf where they join the monocoque.
Havent decided if I will cut off the nose cone yet either - Cant bring myself to saw it off as the Top Studio kit suggests!
Chris
I think with a bit of toning down the smaller decals will look ok.
"I think with a bit of toning down the smaller decals will look ok"
Agreed
I painted the gearbox and then the engine block but tried to use a very very dark grey. Didn't work and the result is all wrong (plus it came out glossy) so will have to strip that and start again - I have loads to do
Agreed
I painted the gearbox and then the engine block but tried to use a very very dark grey. Didn't work and the result is all wrong (plus it came out glossy) so will have to strip that and start again - I have loads to do
caterhamnut said:
Agree with all the above!
Certainly will use 1/20 CF and I am intrigued by the tissue paper effect for the quite-rough side pods.
I think it's tissue soaked with pva and applied to parts to give the rough outer surface typical of components made with an open mould. I doubt my ocd could live with the finish though, no matter how realistic.Certainly will use 1/20 CF and I am intrigued by the tissue paper effect for the quite-rough side pods.
Exactly
I use thinned white woodworking glue. I cut rough templates for the pods out of tissue paper and then paint a layer of the (very thin) glue to the part. I lay then tissue paper over the top and then soak it with more of the glue being careful not to move it (It will rip)
Leave it a day or so and trim the excess. Works a treat
Yep, that's the one - have seen it used, intrigued to try it (I meant)
Dr N - I know what you mean - I think I'd be trying to flatten and even it out so it looked smooth
I saw some pics recently where it had been used, and there was one 'fold' that really bothered me lol
With both the MP4/4 and 6 to do, there is a lot of CF figuring out to do!
Dr N - I know what you mean - I think I'd be trying to flatten and even it out so it looked smooth
I saw some pics recently where it had been used, and there was one 'fold' that really bothered me lol
With both the MP4/4 and 6 to do, there is a lot of CF figuring out to do!
caterhamnut said:
Yep, that's the one - have seen it used, intrigued to try it (I meant)
Dr N - I know what you mean - I think I'd be trying to flatten and even it out so it looked smooth
I saw some pics recently where it had been used, and there was one 'fold' that really bothered me lol
With both the MP4/4 and 6 to do, there is a lot of CF figuring out to do!
I've got the 1:20 top Studio set for the MP4/4, but again it's the carbon that's stopping me from making a start - the colour in my references is an odd shade of amber, and I can't figure out whether it's age that's done it, or whether it was always like that. I've got lots of pictures I took myself of these cars in the pits back in the day, and they don't look like that.Dr N - I know what you mean - I think I'd be trying to flatten and even it out so it looked smooth
I saw some pics recently where it had been used, and there was one 'fold' that really bothered me lol
With both the MP4/4 and 6 to do, there is a lot of CF figuring out to do!
Those carbon decals in 1:20 give me the shivers. I tried to use some SM ones on an MP4/5B and it looked superb... for about 6 months. and then every single one started to lift at the corners and made the car look like it had been out in the sun too long and was peeling
Maybe that's why I'm going to stay away from it on my 1/12th
Maybe that's why I'm going to stay away from it on my 1/12th
Elipsys69 said:
Those carbon decals in 1:20 give me the shivers. I tried to use some SM ones on an MP4/5B and it looked superb... for about 6 months. and then every single one started to lift at the corners and made the car look like it had been out in the sun too long and was peeling
Maybe that's why I'm going to stay away from it on my 1/12th
Did you not clear cote the model after putting them on? That should stop them from lifting. Maybe that's why I'm going to stay away from it on my 1/12th

Elipsys69 said:
Those carbon decals in 1:20 give me the shivers. I tried to use some SM ones on an MP4/5B and it looked superb... for about 6 months. and then every single one started to lift at the corners and made the car look like it had been out in the sun too long and was peeling
Maybe that's why I'm going to stay away from it on my 1/12th
Sounds like you might have dissolved too much adhesive off them when soaking in water. You could try brushing dilute pva into the lifted areas, pressing them down with a damp cloth, then applying a coat of microsol and some heat with a hairdryer. then brush the whole lot with Klear.Maybe that's why I'm going to stay away from it on my 1/12th
I used woodgrain decals on a recent aircraft model, and the had no residual adhesive once removed from the carrier film. With those you have to set them with pva or else they literally fall off the model when dry.
Dr_gn
The paint has arrived and I'm looking forward to giving it a go
On the other hand, I am stripping the engine and gearbox paint and am having some issues. The whole part was sprayed with Mr Color fine surface primer out of the can. The engine was sprayed with a zero color and the 'box with Tamiya enamels. The zero paint came off but the Tamiya stuff seems stubborn after 2 goes. I'm using modelstrip
I can't access some of the older posts (some of the pages refusing to load) - so did you use oven cleaner or brake fluid??
Am a little concerned as modelstrip has worked a treat in the past
Cheers
Elipsys69 said:
Dr_gn
The paint has arrived and I'm looking forward to giving it a go
On the other hand, I am stripping the engine and gearbox paint and am having some issues. The whole part was sprayed with Mr Color fine surface primer out of the can. The engine was sprayed with a zero color and the 'box with Tamiya enamels. The zero paint came off but the Tamiya stuff seems stubborn after 2 goes. I'm using modelstrip
I can't access some of the older posts (some of the pages refusing to load) - so did you use oven cleaner or brake fluid??
Am a little concerned as modelstrip has worked a treat in the past
Cheers
I used everything - including Modelstrip - in the end. The Tamiya primer in particular was very difficult to remove. I'd suggest getting some new brake fluid and leaving the parts immersing in it for a week. If no joy after that, wash in detergent and dry, and spray with Mr.Muscle and seal in a plastic bag for a week. The key is to stop these things drying out before they've had chance to work.The paint has arrived and I'm looking forward to giving it a go
On the other hand, I am stripping the engine and gearbox paint and am having some issues. The whole part was sprayed with Mr Color fine surface primer out of the can. The engine was sprayed with a zero color and the 'box with Tamiya enamels. The zero paint came off but the Tamiya stuff seems stubborn after 2 goes. I'm using modelstrip
I can't access some of the older posts (some of the pages refusing to load) - so did you use oven cleaner or brake fluid??
Am a little concerned as modelstrip has worked a treat in the past
Cheers
Try cleaning the strippers off with a toothbrush with cut-down bristles/detergent. I've also had some luck with a fibreglass pencil on intricate parts. If the parts still have traces of paint, prime them to see where you are - they always look far worse than they are when covered in patchy paint and stains.
If all else fails, just buy another kit - the cost of pristine parts will pale into insignificance compared with the amount of time, money and effort you'll expend on aftermarket parts and building materials to do it to a high standard.
...In my opinion!
Gassing Station | Scale Models | Top of Page | What's New | My Stuff