Model Railway - Digwell Junction
Discussion


Looking good 
You've made me retrieve my rolling stock and track from my parent's loft too, I see you've got a Western diesel as well.
Reckon I can get about a 9' x 5' layout in the shed so am following your progress with interest. Being a bit of a canal geek mine will definitely have a wharf area
You've made me retrieve my rolling stock and track from my parent's loft too, I see you've got a Western diesel as well.
Reckon I can get about a 9' x 5' layout in the shed so am following your progress with interest. Being a bit of a canal geek mine will definitely have a wharf area
Great progress so far. We used those Seep under baseboard point motors on a layout years ago, and found eventually they would destroy the mechanism on the points as they are quite fierce. I think the flexing of the tie bar would make the little spring pop out and the bits of rail that move would go floppy. Not sure if they have improved the design of the points at all as it was a few years ago, but it made the model railway unusable as points are a pain to replace once they have been ballasted in 
I think the key is making sure they are aligned really well at 90 degrees to the track so you don't put any sideways force on the tie bar.
I think the key is making sure they are aligned really well at 90 degrees to the track so you don't put any sideways force on the tie bar.
Edited by lufbramatt on Wednesday 19th August 09:08
lufbramatt said:
Great progress so far. We used those Seep under baseboard point motors on a layout years ago, and found eventually they would destroy the mechanism on the points as they are quite fierce. I think the flexing of the tie bar would make the little spring pop out and the bits of rail that move would go floppy. Not sure if they have improved the design of the points at all as it was a few years ago, but it made the model railway unusable as points are a pain to replace once they have been ballasted in
I think the key is making sure they are aligned really well at 90 degrees to the track so you don't put any sideways force on the tie bar.
Interesting to know... thanks for that - might go and check all the angles tonight.I think the key is making sure they are aligned really well at 90 degrees to the track so you don't put any sideways force on the tie bar.
Edited by lufbramatt on Wednesday 19th August 09:08
I have used a mixture of new points and some I salvaged from a layout I built when I was 10 (so those are quite old), so the older ones may suffer in this case.
One alternative to the Seep motors are these:
Tortoise Point Motor
They mimic real life point motors by slowly winding the point blades across. Bit expensive at £13 each though!
Tortoise Point Motor
They mimic real life point motors by slowly winding the point blades across. Bit expensive at £13 each though!

Only gradual progress on the layout recently, but have managed to get two jobs done that I have been looking forward to.
1 - The continuation of the hills and scenery around the layout
2 - The picture back scene
I am continuing with using Celotex insulation boards for forming the hills and scenery changes, which has been nice and easy to work with and allows for sanding down to get the contours I want. I will eventually put on the plaster on top when I am happy with the slopes and lines I want.
For the back scene I have used Gaugemaster photo back scenes, which I bought because I wanted a rolling hillside background. I am thinking Southern region around Wiltshire so wanted to represent the rolling hills of that region. Each one works well on their own...
A class 37 in front of the first back scene pulling a pullman special

And then the other back scene in front of the incline to the top level, with a (little out of era and location) class 4-sub
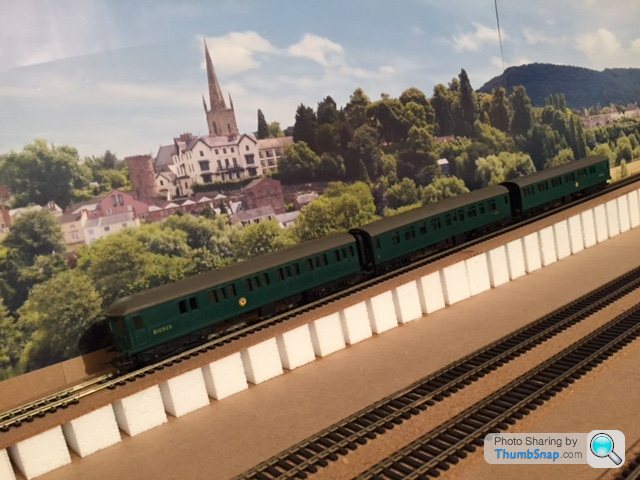
The issue I have with these back scenes is that they are from different seasons... now I do want to do late summer as my theme (harvest time in the fields etc), and if I combine the two in the overall view of the layout the colour difference is noticeable.
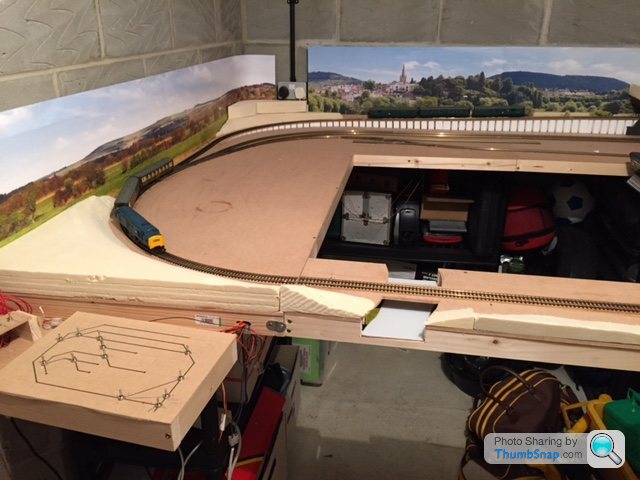
If I build up the hill at the transition point I might be able to get away with it and the difference of the two - or model two seasons in one layout, which could be fun... still undecided.
Hopefully now the kids are back in school and less hectic I can get some momentum up on this.
1 - The continuation of the hills and scenery around the layout
2 - The picture back scene
I am continuing with using Celotex insulation boards for forming the hills and scenery changes, which has been nice and easy to work with and allows for sanding down to get the contours I want. I will eventually put on the plaster on top when I am happy with the slopes and lines I want.
For the back scene I have used Gaugemaster photo back scenes, which I bought because I wanted a rolling hillside background. I am thinking Southern region around Wiltshire so wanted to represent the rolling hills of that region. Each one works well on their own...
A class 37 in front of the first back scene pulling a pullman special
And then the other back scene in front of the incline to the top level, with a (little out of era and location) class 4-sub
The issue I have with these back scenes is that they are from different seasons... now I do want to do late summer as my theme (harvest time in the fields etc), and if I combine the two in the overall view of the layout the colour difference is noticeable.
If I build up the hill at the transition point I might be able to get away with it and the difference of the two - or model two seasons in one layout, which could be fun... still undecided.
Hopefully now the kids are back in school and less hectic I can get some momentum up on this.
RacingPete said:
The issue I have with these back scenes is that they are from different seasons... now I do want to do late summer as my theme (harvest time in the fields etc), and if I combine the two in the overall view of the layout the colour difference is noticeable.
Here's a thought- any signmaker worth the name will have a BIG full colour printer that can print straight onto foamboard (and that comes in different thicknesses).Take the pictures you want (or get them) and get the signmaker to print them out onto foamboard that is sufficiently flexible to bend around whatever curve you want it to, whereupon it will be stiff enough to stand up on its own.
I had a picture 1.5mtrs by 1mtr done that way, and it still looks good after several years.
I'm looking into the 3% inclines also, what did you place on top is it hardboard or a thin plywood?
Looking good though.
from a ballast point of view I think I am going to go with a variety of different ones, at the railway I volunteer at there is a right mix of types and colours depending on patching/what was available etc (as per picture), but the finer ballast seems to be the best size.
Most model railways seem to be much better planned than 12":1ft thats for sure
pherlopolus said:
I'm looking into the 3% inclines also, what did you place on top is it hardboard or a thin plywood?
I actually went for 1/8" thick cork cut to size and glued down on top of the Woodland Scenic risers, which made it much easier to cut correctly to size and place on the track... also keeps the track underlay consistent.I am going to weather the ballast on my track, so I think the lighter shade makes it easier to do that.
RobinOakapple said:
Here's a thought- any signmaker worth the name will have a BIG full colour printer that can print straight onto foamboard (and that comes in different thicknesses).
Take the pictures you want (or get them) and get the signmaker to print them out onto foamboard that is sufficiently flexible to bend around whatever curve you want it to, whereupon it will be stiff enough to stand up on its own.
I had a picture 1.5mtrs by 1mtr done that way, and it still looks good after several years.
Good idea... though I have tried to take the panorama type shot required and it isn't as easy as I first thought... really needs to be several pictures merged together taken from different viewpoints along a road to make sure there isn't a curve in a hedge or fence.Take the pictures you want (or get them) and get the signmaker to print them out onto foamboard that is sufficiently flexible to bend around whatever curve you want it to, whereupon it will be stiff enough to stand up on its own.
I had a picture 1.5mtrs by 1mtr done that way, and it still looks good after several years.
If anyone has any picture resources though for doing this, that would be great.
RacingPete said:
I actually went for 1/8" thick cork cut to size and glued down on top of the Woodland Scenic risers, which made it much easier to cut correctly to size and place on the track... also keeps the track underlay consistent.
I am going to weather the ballast on my track, so I think the lighter shade makes it easier to do that.
ah cork, makes sense, less weight too.I am going to weather the ballast on my track, so I think the lighter shade makes it easier to do that.
I forgot about weathering, but that makes sense too
RacingPete said:
Good idea... though I have tried to take the panorama type shot required and it isn't as easy as I first thought... really needs to be several pictures merged together taken from different viewpoints along a road to make sure there isn't a curve in a hedge or fence.
If anyone has any picture resources though for doing this, that would be great.
Try this. Works well and is free.If anyone has any picture resources though for doing this, that would be great.
When ballasting, rather than use PVA which sets solid use Copydex in the same manner, pre wetting with water and a couple of drops of washing up liquid, mix Copydex 50/50 with water, drip on as per PVA. Takes about 4-5 days to finally go off but has the advantage you can pull up the track without wrecking it.
I have a similar airbrush compressor and would recommend Vallejo Air acrylics, they are already mixed for an airbrush and come in a handy dropper bottle. I run them at 15-25psi depending how and what I am painting.
This is track ballasted using Copydex and weathered using acrylics.
Regarding static grass, don't use it straight from the packet, the mixes are always wrong, best mix your own. I usually mix 60-70 per cent straw colour, the balance being mid-dark green.
This is from when I was first experimenting with different base colours for under the grass.
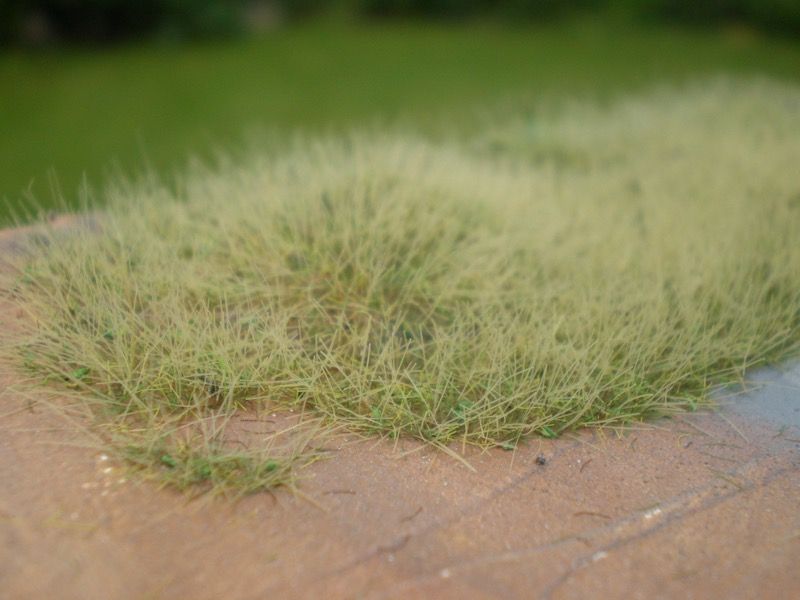
Martin
I have a similar airbrush compressor and would recommend Vallejo Air acrylics, they are already mixed for an airbrush and come in a handy dropper bottle. I run them at 15-25psi depending how and what I am painting.
This is track ballasted using Copydex and weathered using acrylics.

Regarding static grass, don't use it straight from the packet, the mixes are always wrong, best mix your own. I usually mix 60-70 per cent straw colour, the balance being mid-dark green.
This is from when I was first experimenting with different base colours for under the grass.

Martin
GreengiantPH said:
When ballasting, rather than use PVA which sets solid use Copydex in the same manner, pre wetting with water and a couple of drops of washing up liquid, mix Copydex 50/50 with water, drip on as per PVA. Takes about 4-5 days to finally go off but has the advantage you can pull up the track without wrecking it.
Interesting, I had not heard of doing that but makes sense. It sounds like a good idea, so trying to think of any downsides to doing this apart from the time to dry (which with my slow progress probably won't make that much difference).Does anyone have good sources for static grass?
I recommend these people:
http://green-scene.co.uk
Very helpful and where I got my latest static gun.
He regularly exhibits and demonstrates his products at model railway shows.
Also, if you have a lot of ballasting to do, check out his ballast spreader.
Martin
http://green-scene.co.uk
Very helpful and where I got my latest static gun.
He regularly exhibits and demonstrates his products at model railway shows.
Also, if you have a lot of ballasting to do, check out his ballast spreader.
Martin
With the nights drawing in and the summer trips out the way (plus the speed MysteryLemon is getting on with his Christmas Tree Project), I am going to start to step up the work on the railway.
The first job this week is to sort out the wiring on the removable section. I wasn't happy with having lots of wires underneath dangling, along with only using connector blocks between the baseboards so I have raided the computer equipment and grabbed some 24 pin connectors, and some 4 pin connectors.
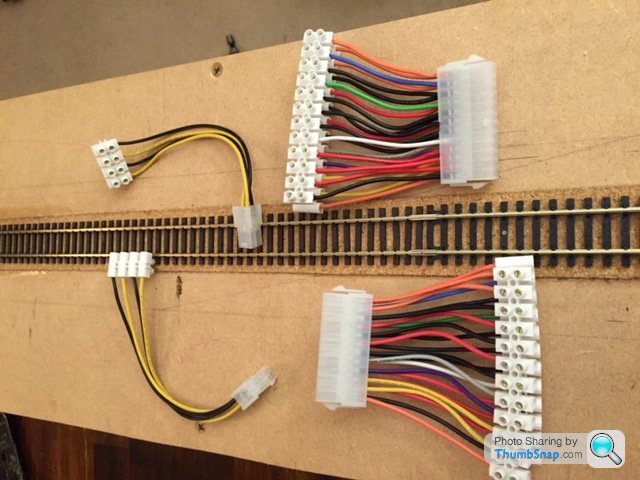
The plan is to use the 4 pins to carry the power to the fiddle yard and across the baseboard joins. Then using the 24 pin connector to connect up the point motors on the far side of the track. At the moment I only have 5 points on the far side, so this leaves room for a further 3 points to expand (which luckily is the amount I need to finish off the fiddle yard)
This has made the underneath a bit neater now and enables me to take the board upstairs (much to the pleasure of the wife) to start working on the scenery on this section.
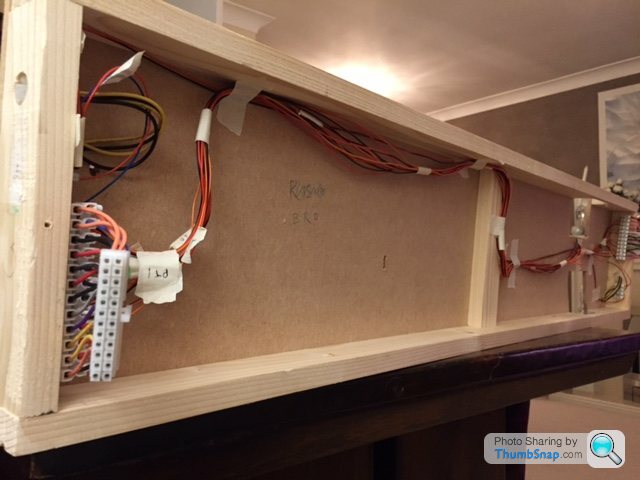
Bit of a dull wiring update... so hopefully have some scenery stuff next.
The first job this week is to sort out the wiring on the removable section. I wasn't happy with having lots of wires underneath dangling, along with only using connector blocks between the baseboards so I have raided the computer equipment and grabbed some 24 pin connectors, and some 4 pin connectors.
The plan is to use the 4 pins to carry the power to the fiddle yard and across the baseboard joins. Then using the 24 pin connector to connect up the point motors on the far side of the track. At the moment I only have 5 points on the far side, so this leaves room for a further 3 points to expand (which luckily is the amount I need to finish off the fiddle yard)
This has made the underneath a bit neater now and enables me to take the board upstairs (much to the pleasure of the wife) to start working on the scenery on this section.
Bit of a dull wiring update... so hopefully have some scenery stuff next.
Gassing Station | Scale Models | Top of Page | What's New | My Stuff