Painting tips required for Airfix Kits
Discussion


Hi
Please be gentle with me as I need to ask you pros one of possibly the most basic of questions when it comes to painting an Airfix kit.
I recieved a beginners Airfix Spitfire model kit (complete with paints) thanks to my works Secret Santa.
I haven't built a model kit since I was a child (approx 30-40 years ago) but was thilled with the gift and really enjoyed the build.
I have since build a few more since Christmas and am looking to build something a little more challenging in the next few months.
I have just picked up an unbuilt 1980s Harley Davidson kit from a local charity shop that I hope will fit the bill.
Given the kit is a few years old, I'm staggered by the quality of it especially when compared to a new Revel 911 I recently built. That kit fought me all the way...
Anyway, back to my question. With each of the kits I've built I have always started by painting the parts while they are still on the sprues.
This made sense to me as the sprues are easy to hold without painting my fingers and thumbs plus the painted parts didn't stick to whatever they were resting on while they dried.
Once I was happy with the parts I'd painted, I removed them from the sprues and glued them together as the instructions insisted. I would then return to touch up any areas I had cut from the sprues and/or had filed/sanded.
Is this how you pros paint your kits or do you remove all the parts from the sprues, file/prep them and then paint them? Or, do you paint the kit once it is built.
Apologies if this seems a real basis question but I have really been bitten by the modelling bug (after the Harley, a Renault 4 Van with Krafwerk "Tour De France" livery, me thinks... I can do the artwork, but I suspect I will be back for decal printing tips at some point) and I want to undo any bad habits I may have picked up already.
Thanks in advance.
I'm not a 'pro', but have built quite a few models over the years.
Assuming you're talking about smaller parts, then what you describe is a perfectly acceptable way of doing it, provided the parts are good quality, with no flash/seam lines/sink marks etc. If the parts need significant cleaning up then removing them from the runners is going to make this a lot easier. If on the other hand you're not too bothered about getting the parts looking perfect, then fine.
For things like fuselage halves, they often need filler along join lines, so pre-painting is not worth it since correcting the subsequent mess would take ages and look crap.
Remember to scrape the paint from the areas that need glueing.
If there's a sub-assembly with every part the same colour eg a cockpit/seat, then I'll assemble them before painting the whole lot, and rest it on the base (or any convenient unseen bit) to dry.
Personally, I use an airbrush for painting, and some parts I leave on the sprues (although not many), but the rest I remove, clean up and dry-fit to make sure that they fit. I then use lolly/cocktail sticks with blobs of blu-tac to hold them for painting. You can use self-locking forceps and reverse action tweezers too.
With Airfix kits particularly, dry-fitting is essential to make sure things will actually fit together, and also bear in mind that the sprue gates are usually thick, making removal of small parts such as guns, u/c legs and arials pretty difficult without damage. Personally I'd remove parts like this first, then paint.
You might want to read this thread too, especially regarding the starter kit paints:
http://www.pistonheads.com/gassing/topic.asp?h=0&a...
Thank you both so much for the tips, it hugely appreciated. Very true what you said about the tiny parts on the Airfix kits, the red arrow nose section snapped whilst removing it from the spree and when I showed my wife the tiny U shaped towing clamps that were to be fitted to the front of a tank, she said she'd seen bigger fluff...
I'm not quite ready to invest in an airbrush kit (though Father's Day is coming up...) but I'd not considered filling the joins on the parts. Looking at the kits I have built, they could all use a spot of filler, especially before I'd applied any paint.
Thanks also for adding the link, I will read on with interest.
BeastieBoy73 said:
Thank you both so much for the tips, it hugely appreciated. Very true what you said about the tiny parts on the Airfix kits, the red arrow nose section snapped whilst removing it from the spree and when I showed my wife the tiny U shaped towing clamps that were to be fitted to the front of a tank, she said she'd seen bigger fluff...
I'm not quite ready to invest in an airbrush kit (though Father's Day is coming up...) but I'd not considered filling the joins on the parts. Looking at the kits I have built, they could all use a spot of filler, especially before I'd applied any paint.
Thanks also for adding the link, I will read on with interest.
No problem.I'm not quite ready to invest in an airbrush kit (though Father's Day is coming up...) but I'd not considered filling the joins on the parts. Looking at the kits I have built, they could all use a spot of filler, especially before I'd applied any paint.
Thanks also for adding the link, I will read on with interest.
I'd wait until you have a few completed kits under your belt before getting an airbrush; they add several layers of complexity to the process.
For filler, I use this for a lot of the more obvious gaps:
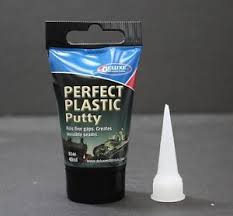
Pre-mixed, fine, and you can wipe away any excess with a damp cloth.
Dr_Gn has pretty much covered it.
You said about breaking parts off a sprue, worth getting a pair of side cutters for that. I use a pair from Maplins.
If parts are small and delicate I cut the main part away then cut the part off.
Some might say using primer is not essential but does help in showing any defects prior to painting. Halfords grey or white is good, not the yellow as this has filler too.
An airbrush is certainly the next step. Just for overall finish. Depending on what the subject is you can progress to tonal variation etc.
Spencer Polllard has just started a YouTube channel and has a blog here.https://thekitbox.wordpress.com/
The guy builds some top notch stuff.
Thanks again to you all for the additional tips... I work near a Maplins so can pop in and pick up some side cutters. Also near a Halfords to for primer. I tried some flat orange graffiti spray paint from halfords (brand escapes me) on the Revell 911 kit as a kind of Singer Tribute. Dried quite well.
I've just check out the Harley kit I picked up at the charity shop and it's by IMAI. Not a company I've heard of but the quality of the moulding and chrome looks excellent. The Revell 911 chrome parts you could barely work out. I've looked online and they seem to have built a lot of Thunderbirds TV show kits.
I've just check out the Harley kit I picked up at the charity shop and it's by IMAI. Not a company I've heard of but the quality of the moulding and chrome looks excellent. The Revell 911 chrome parts you could barely work out. I've looked online and they seem to have built a lot of Thunderbirds TV show kits.
Gassing Station | Scale Models | Top of Page | What's New | My Stuff