McLaren MP4/4 - 1/12 MFH
Discussion


Another WIP that I started a while ago - again, it may not move that quickly...
Another MFH kit of a classic car - I seem to have defaulted to Senna cars in my recent kit buying frenzy - or McLarens in general.
I have the Tamiya MP4/6 and this will compliment it nicely.
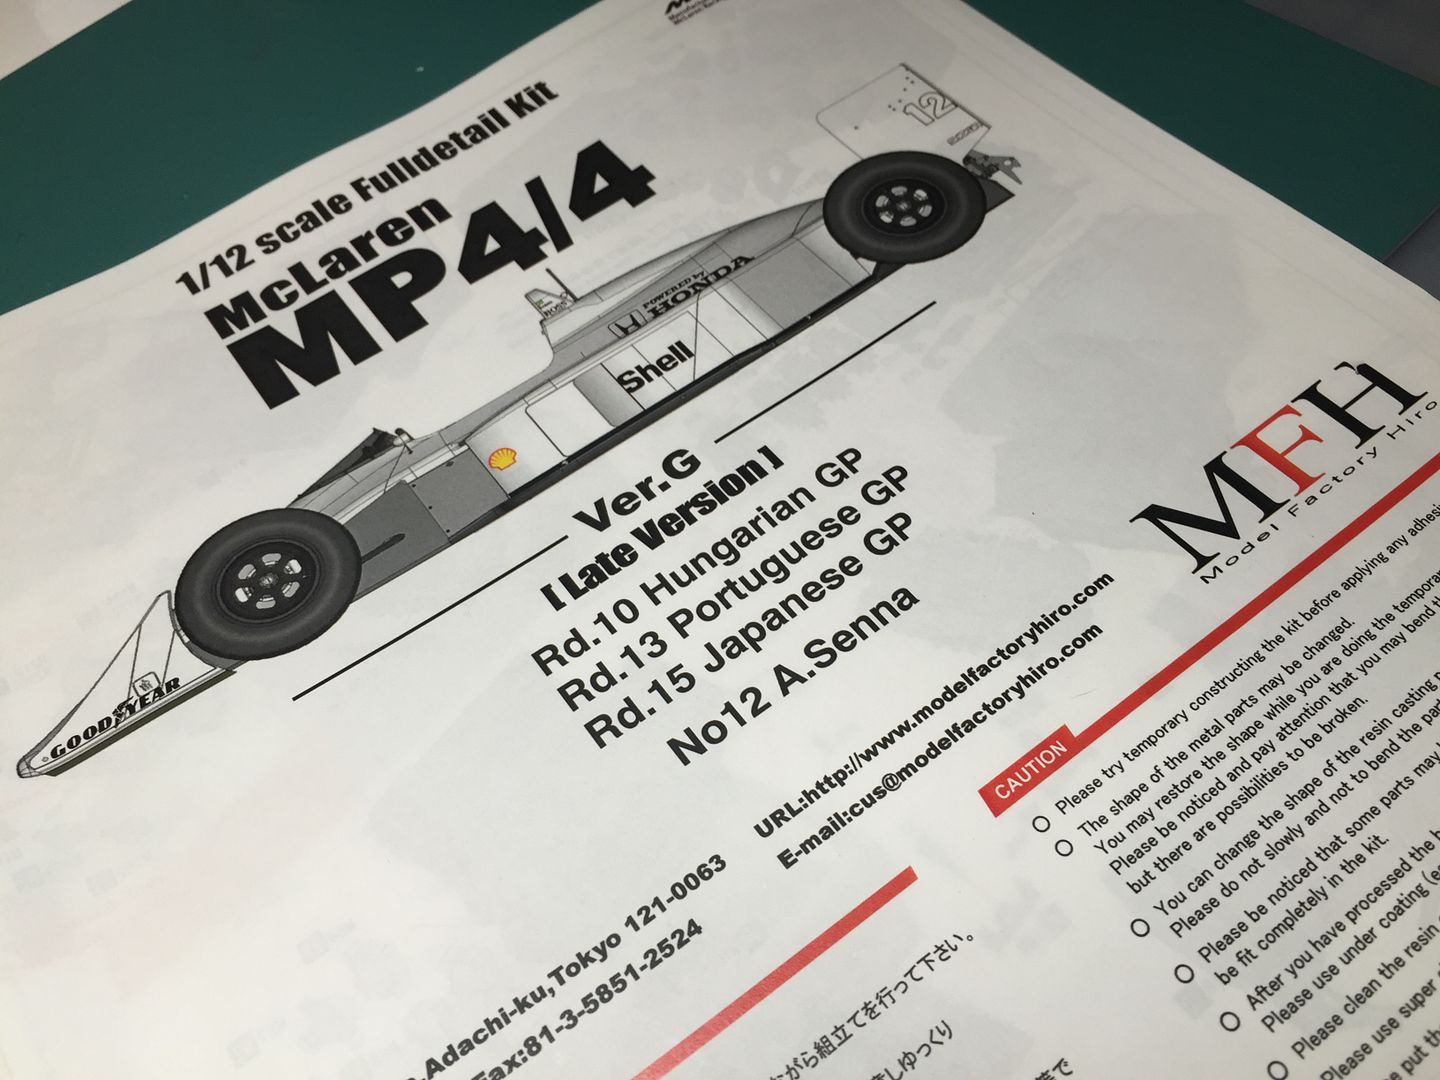
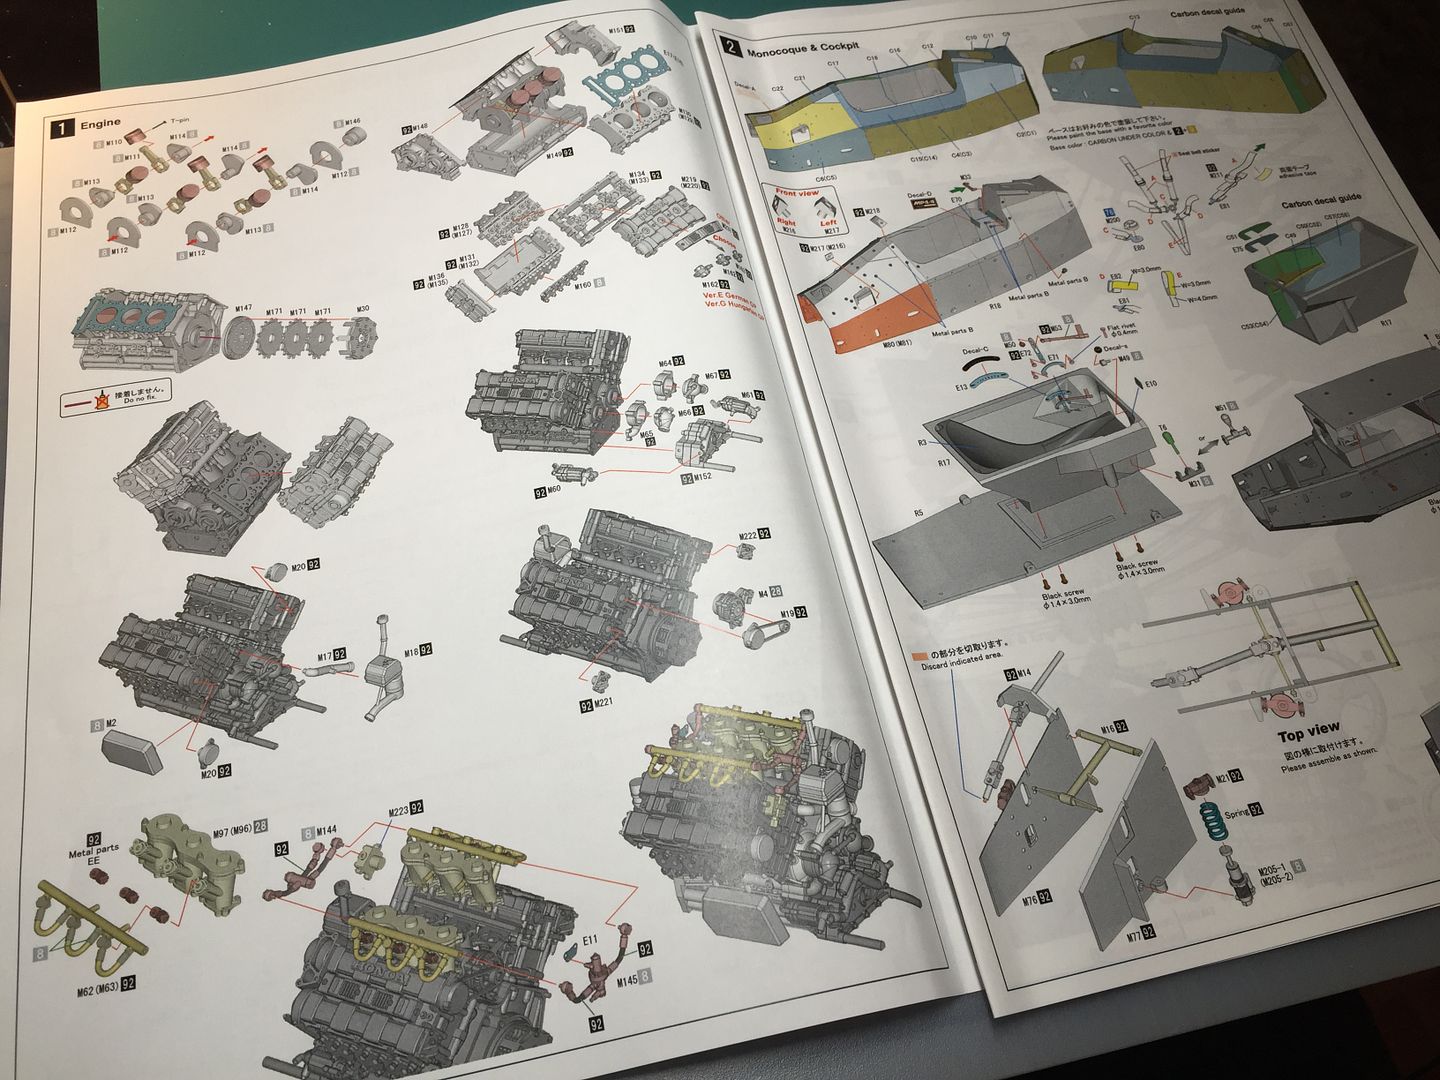
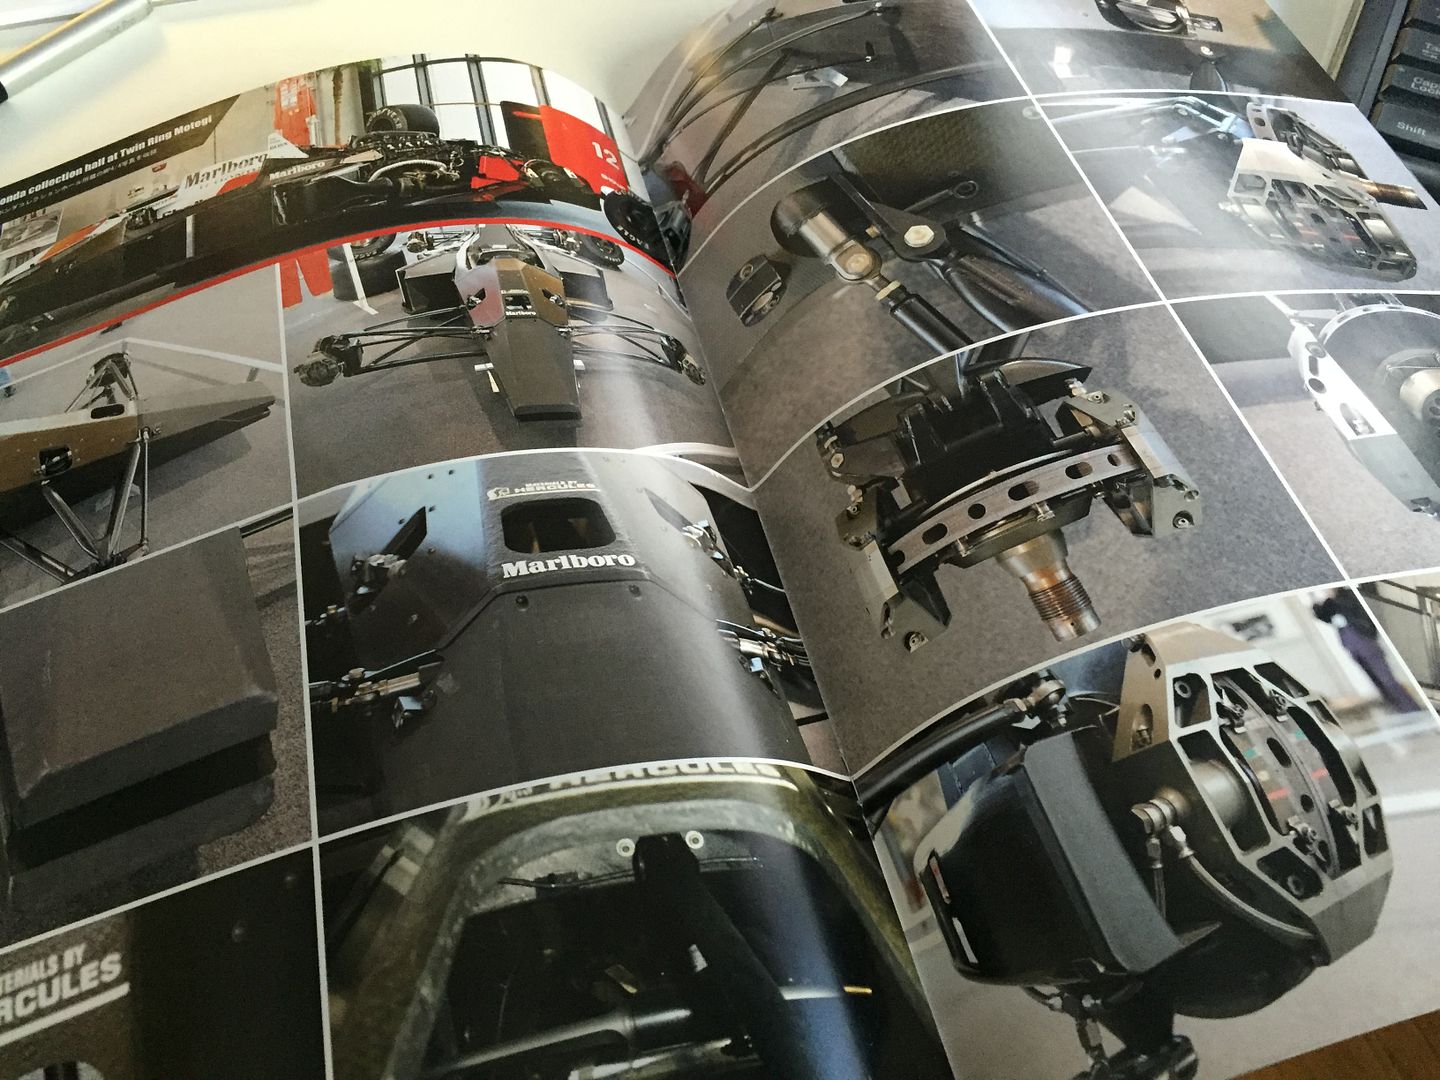
I also got this book as a reference, but there is so much on the internet as well. With these kits, you really have to decide how far you want to go in terms of building the kit 'OOB' or adding a lot of details. A common 'upgrade' is replacing the cast in nuts and bolts with actual fittings. I'll do this in some places...same with rivet details.
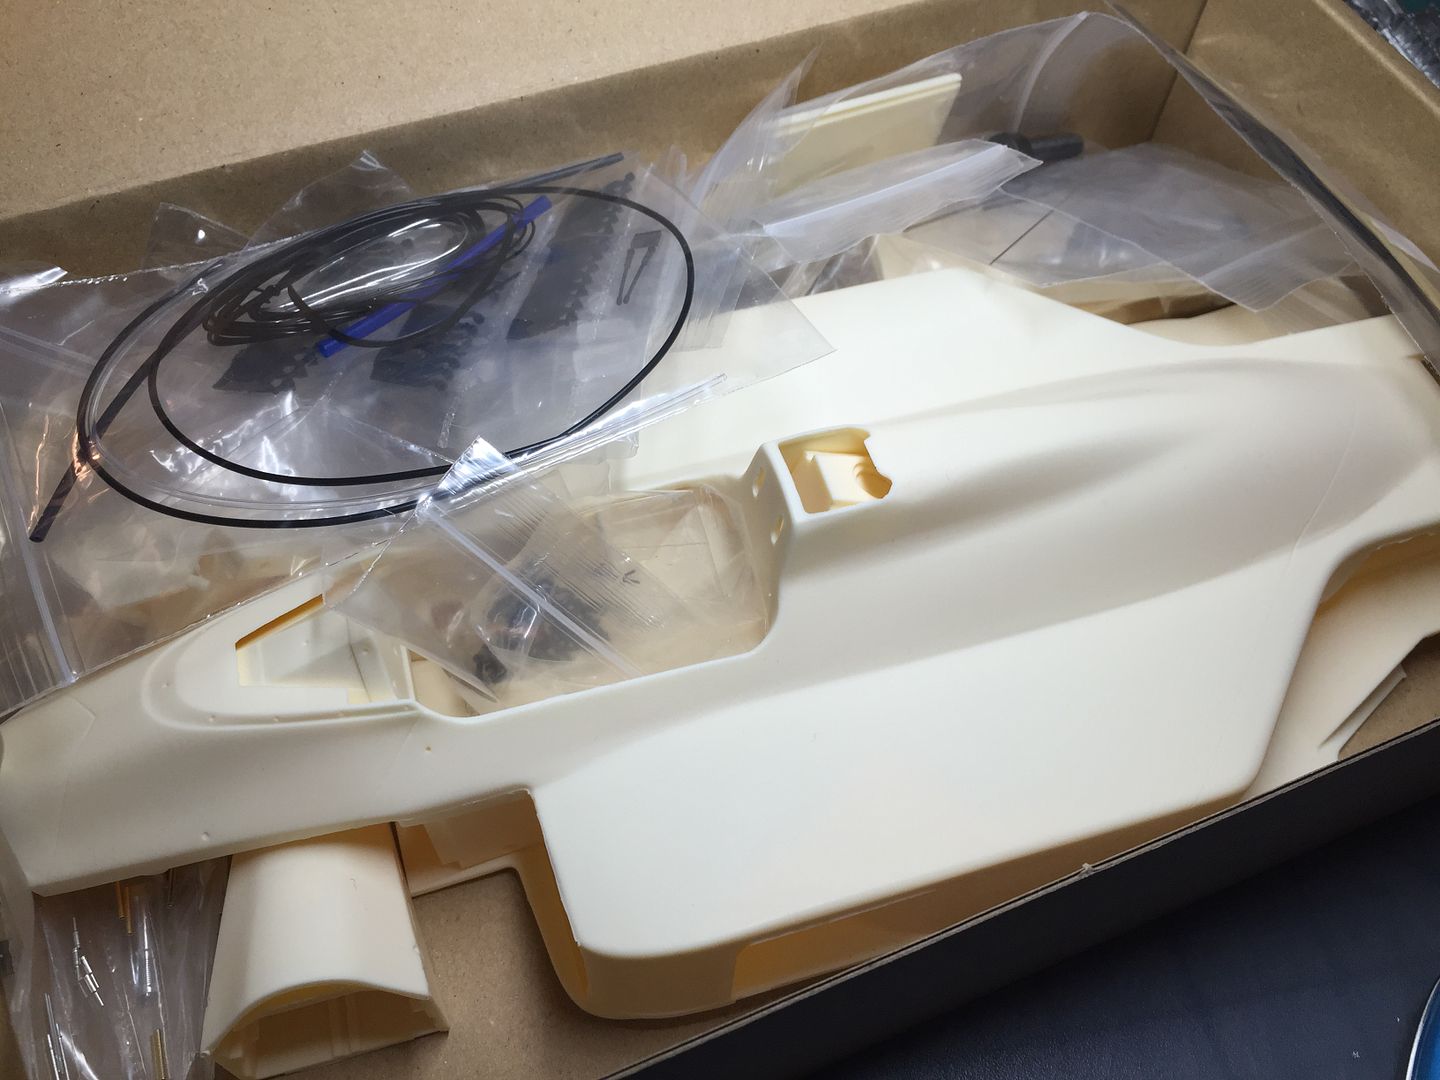
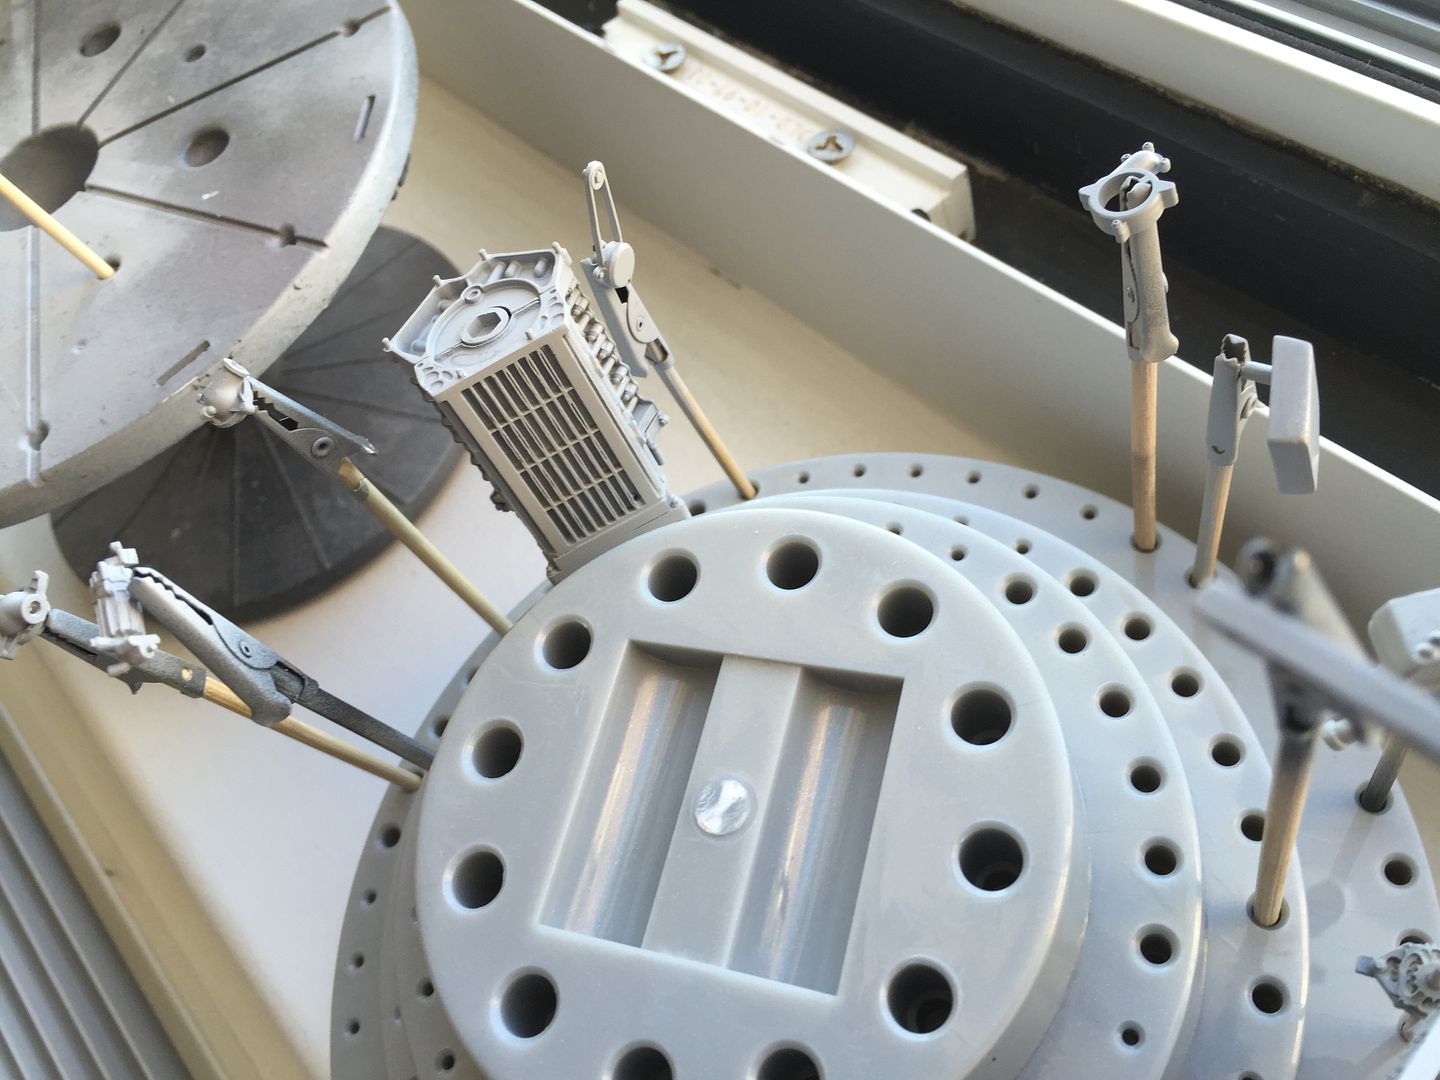
Box contents! We all understand the pleasure taken from first opening these boxes and seeing what is in there, the quality - what might be missing etc etc - MFH does not disappoint - BUT - I wish they packaged the soft metal parts better - they are thrown into small plastic bags and piled in the box, next to the internal box that contains the resin parts - it certainly does not protect the longer, thinner parts from getting bent out of shape - on something this expensive, I would expect more...
Having said that - I did have a part in another kit that was broken, as a result of being bent (a barge board on the MP4/23) - MFH sent a replacement part instantly...
FYI - I have bought these kits direct from MFH website...very good, very quick service.
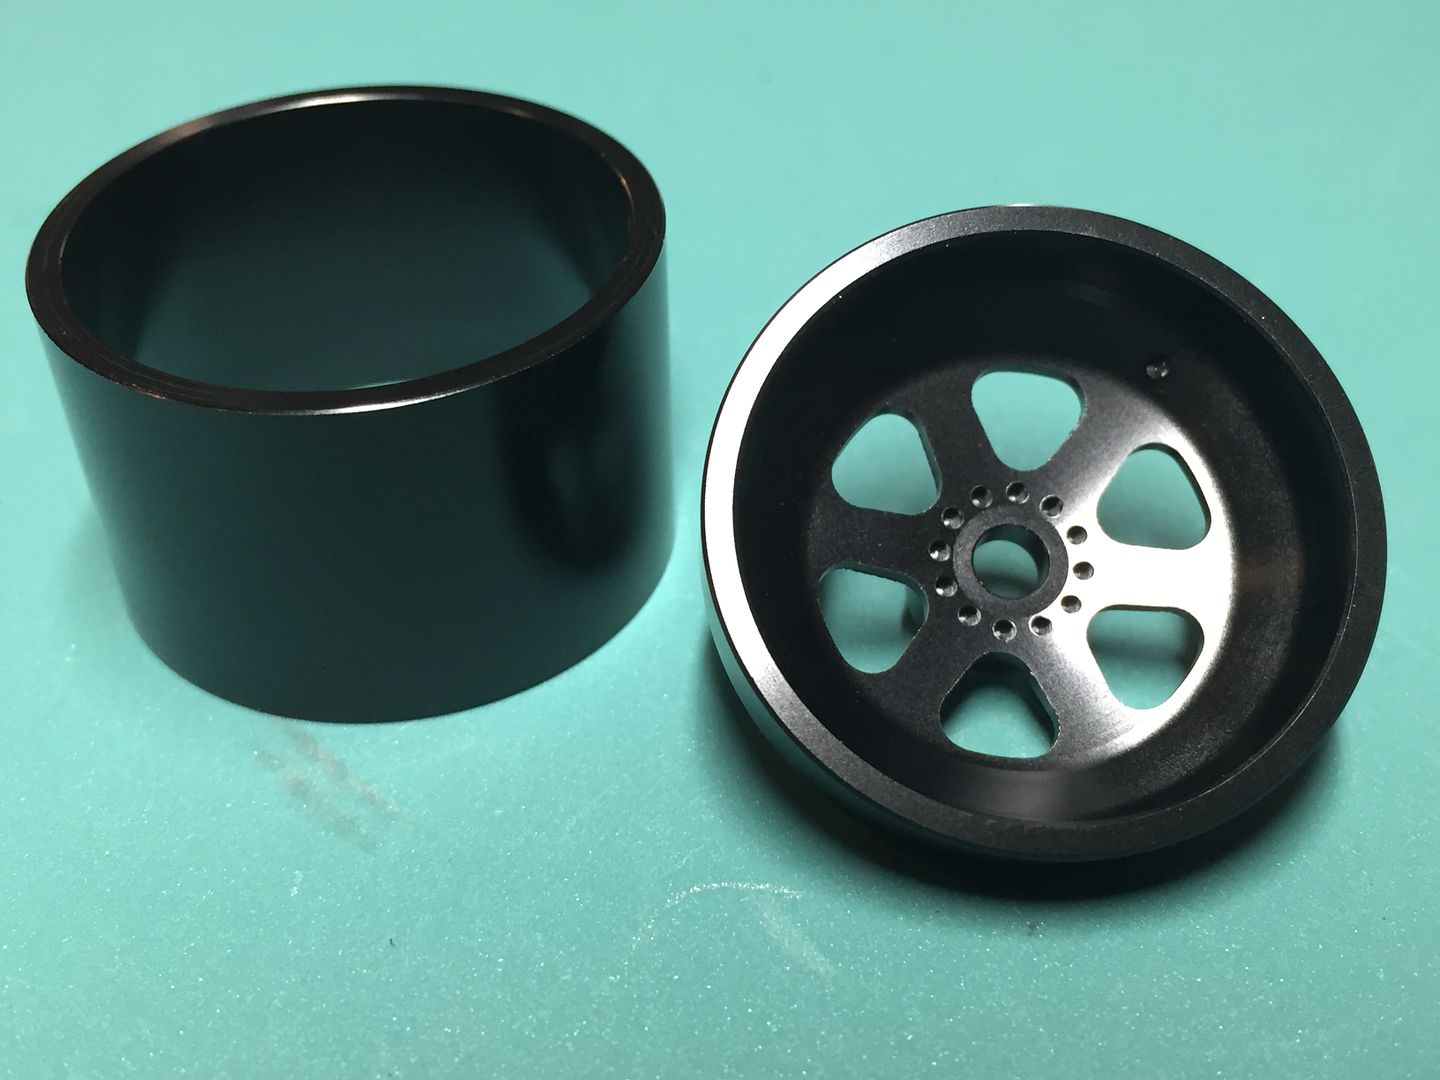
Anodized ali wheels...
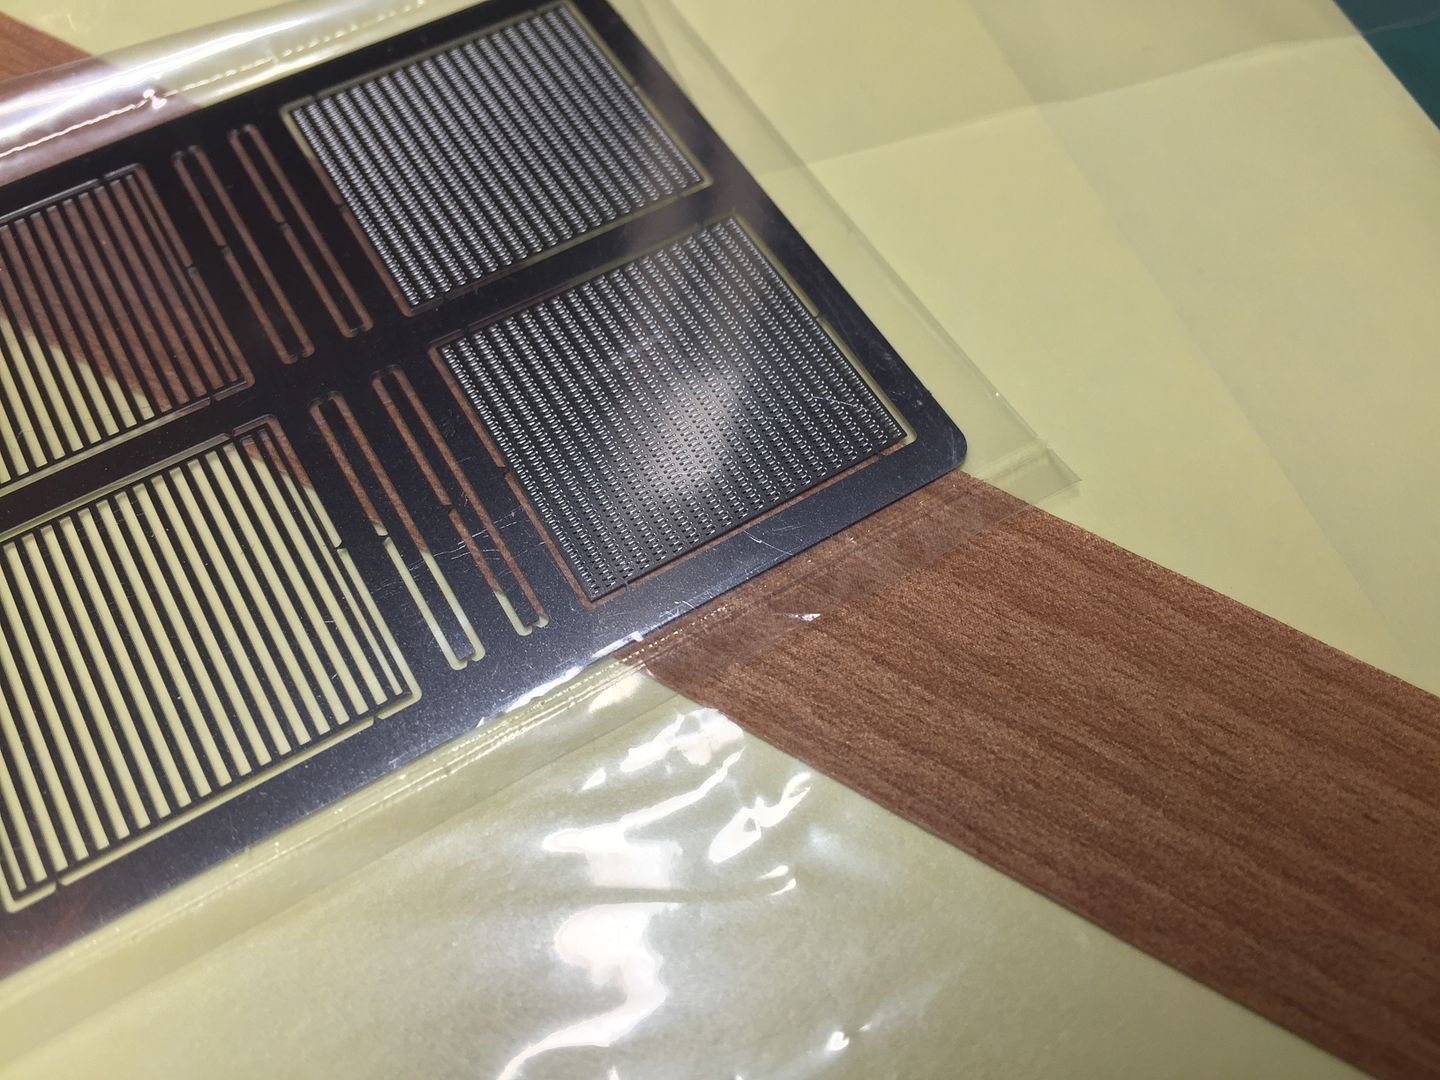
...wooden plank!
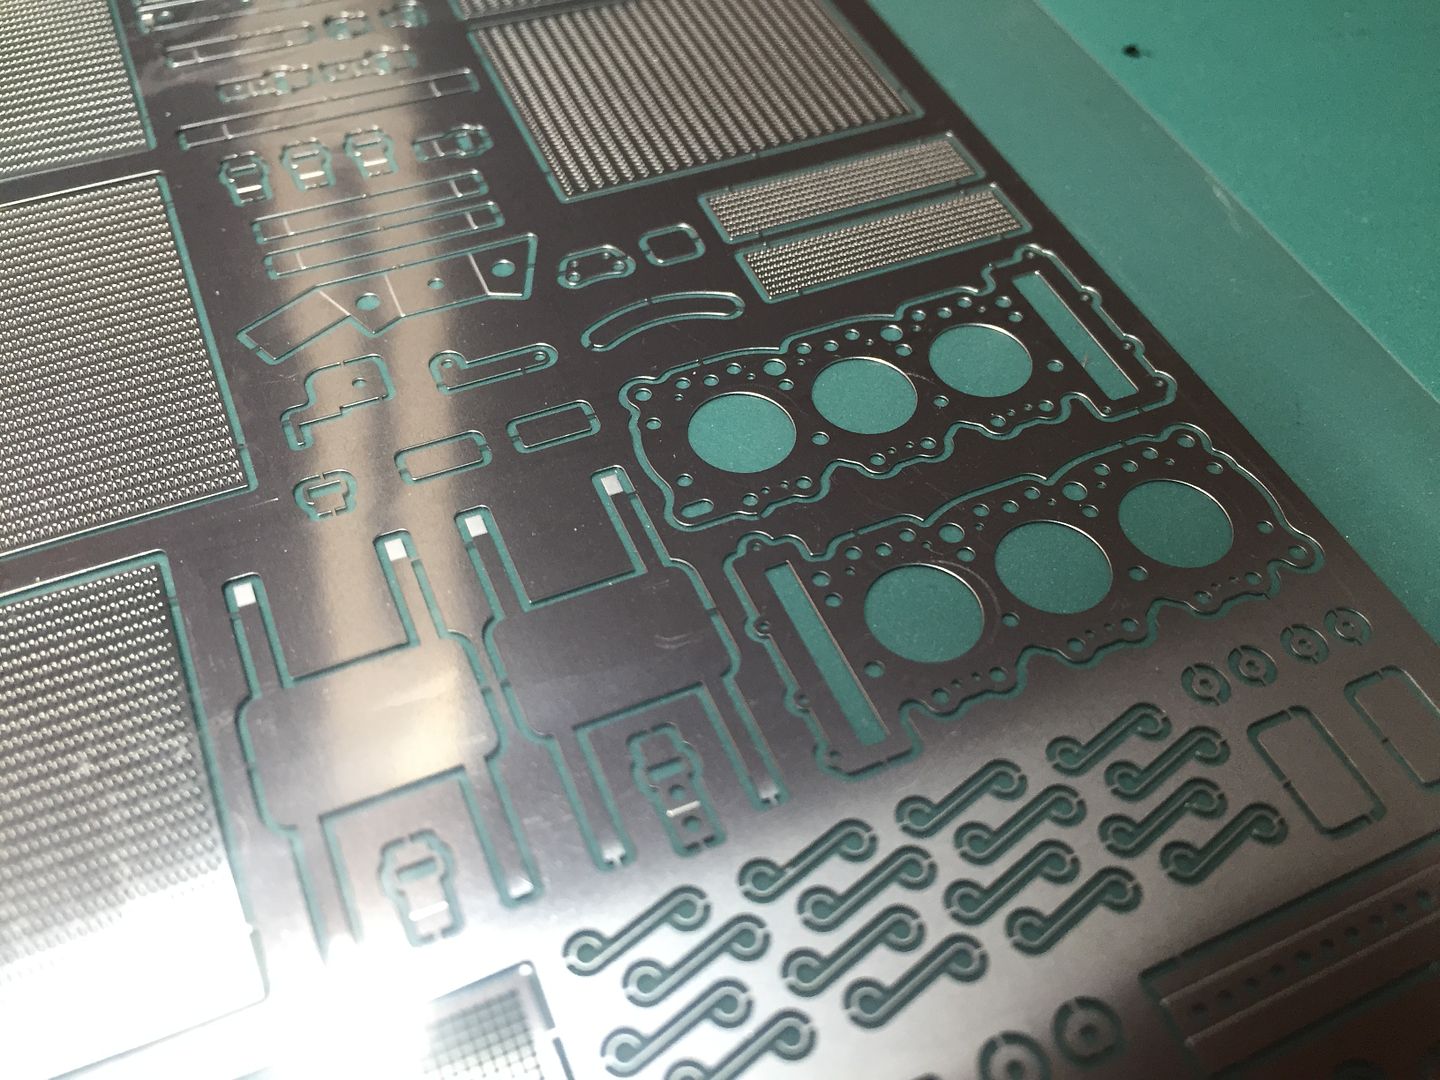
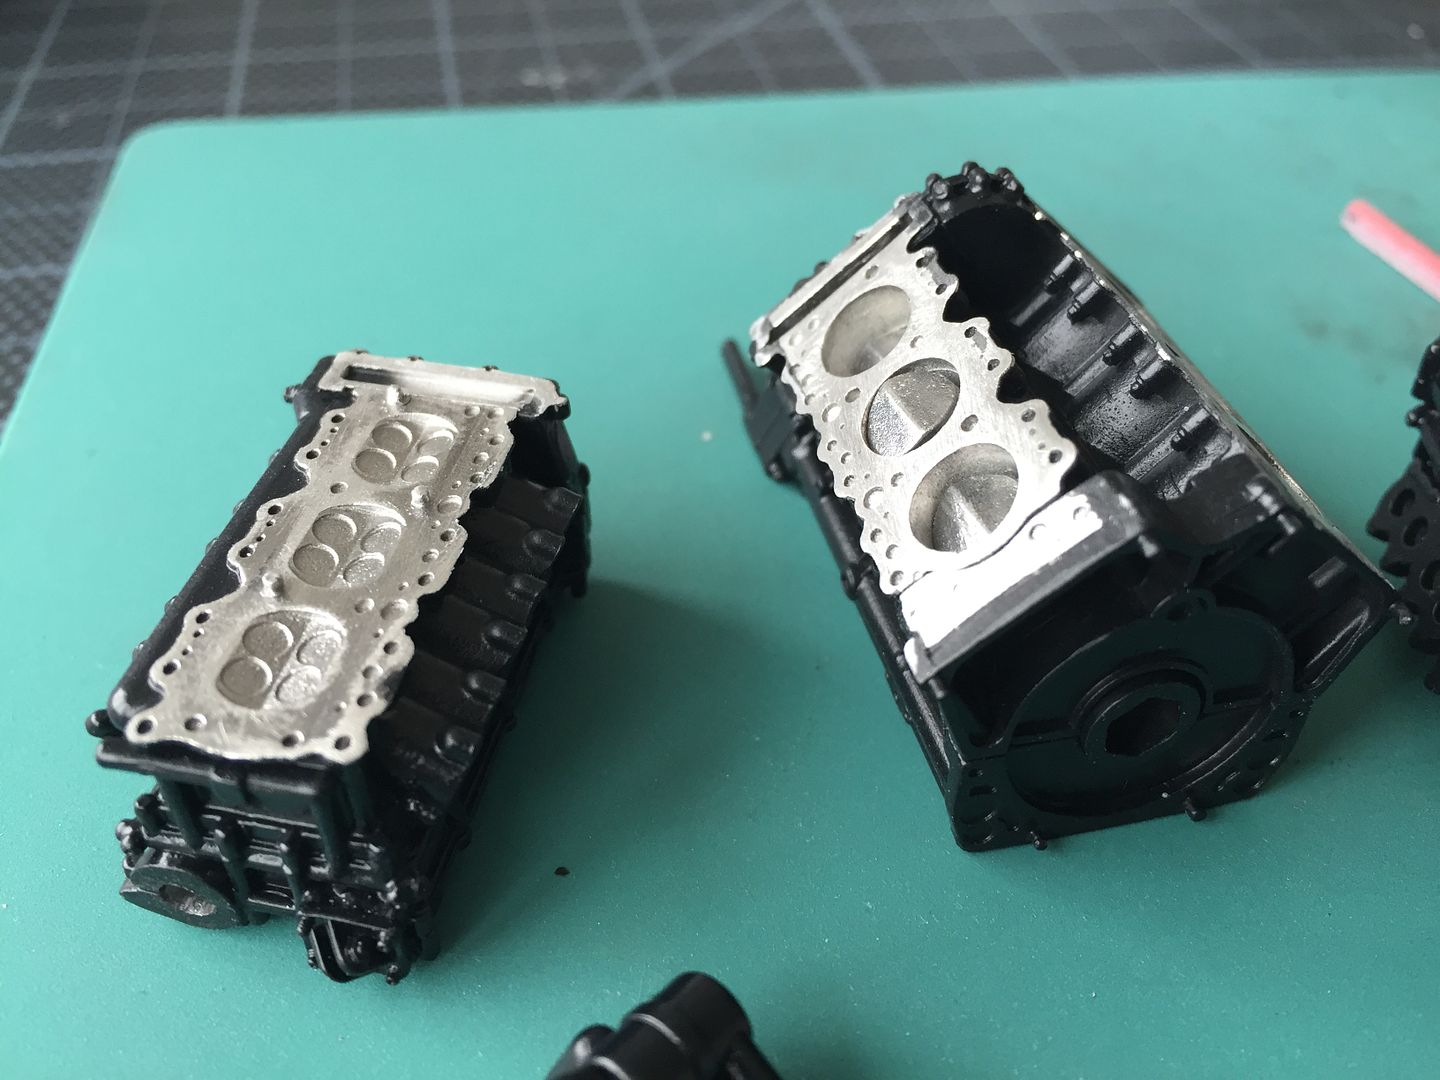
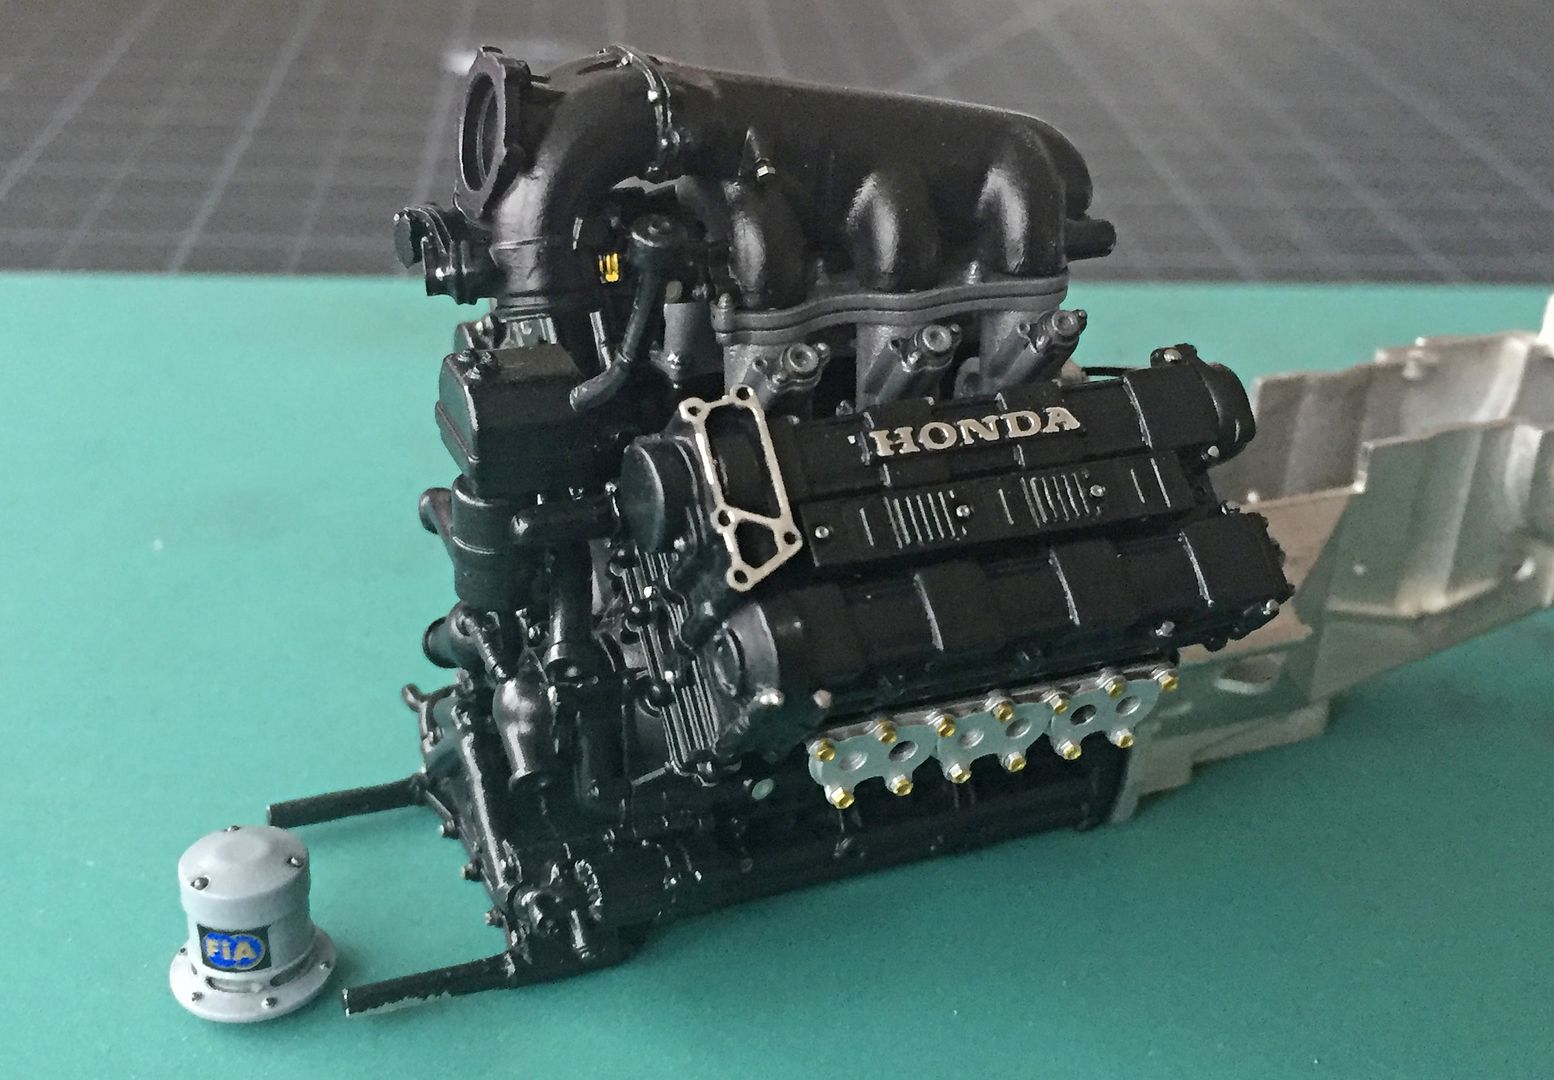
...note the head gaskets. Never to be seen once fitted!

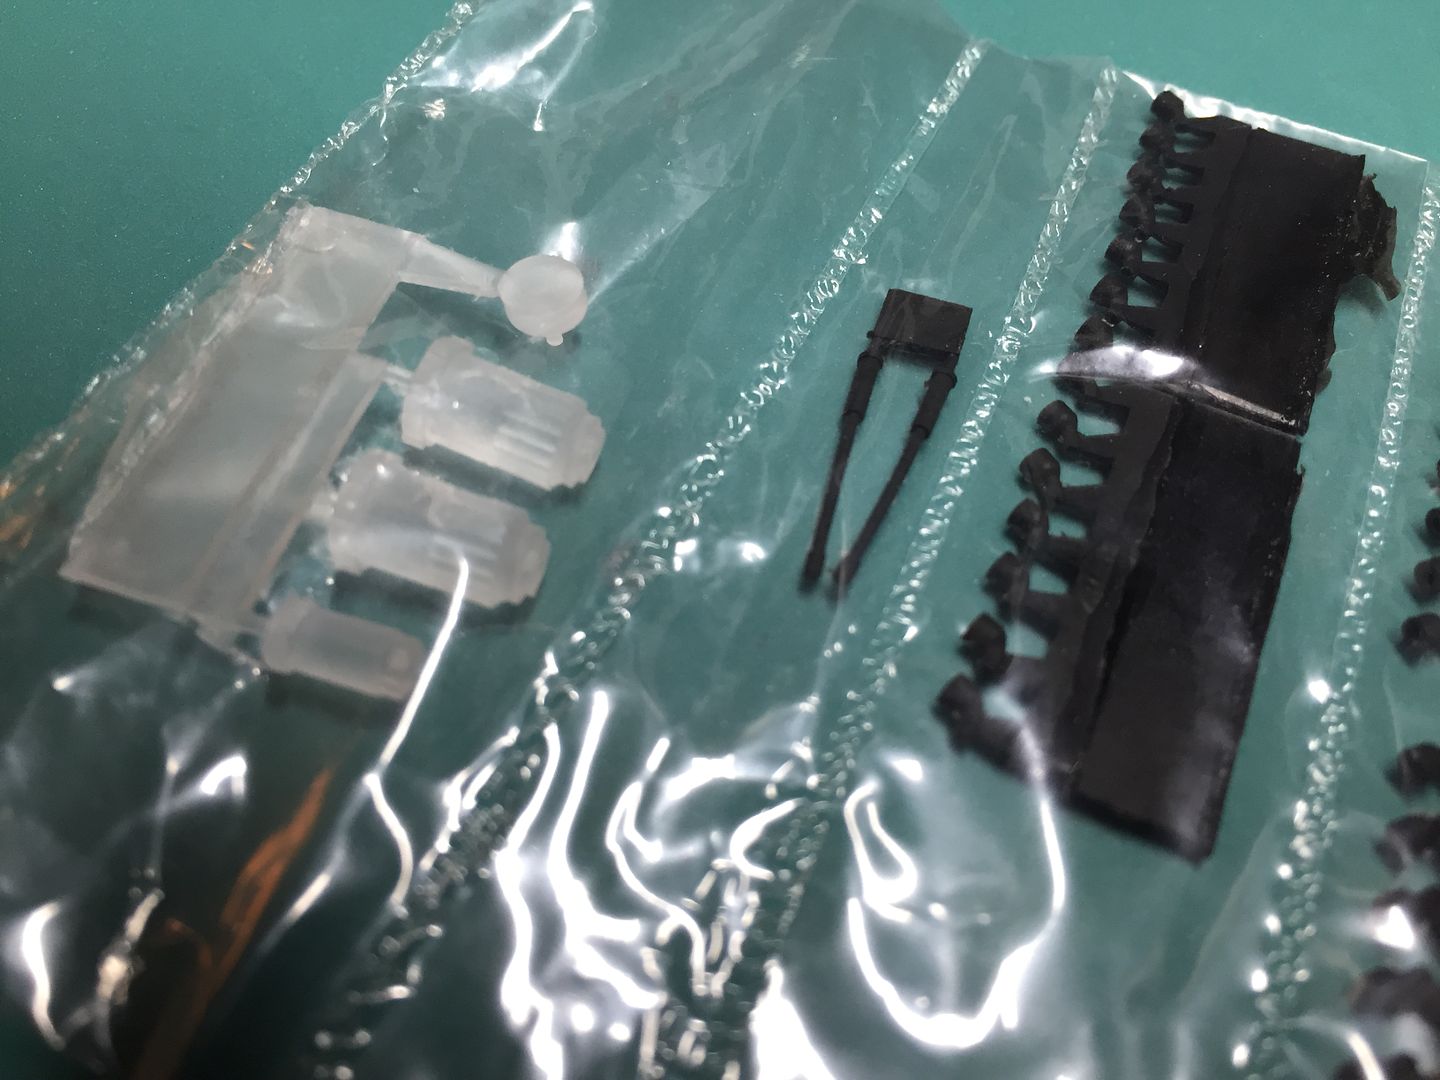
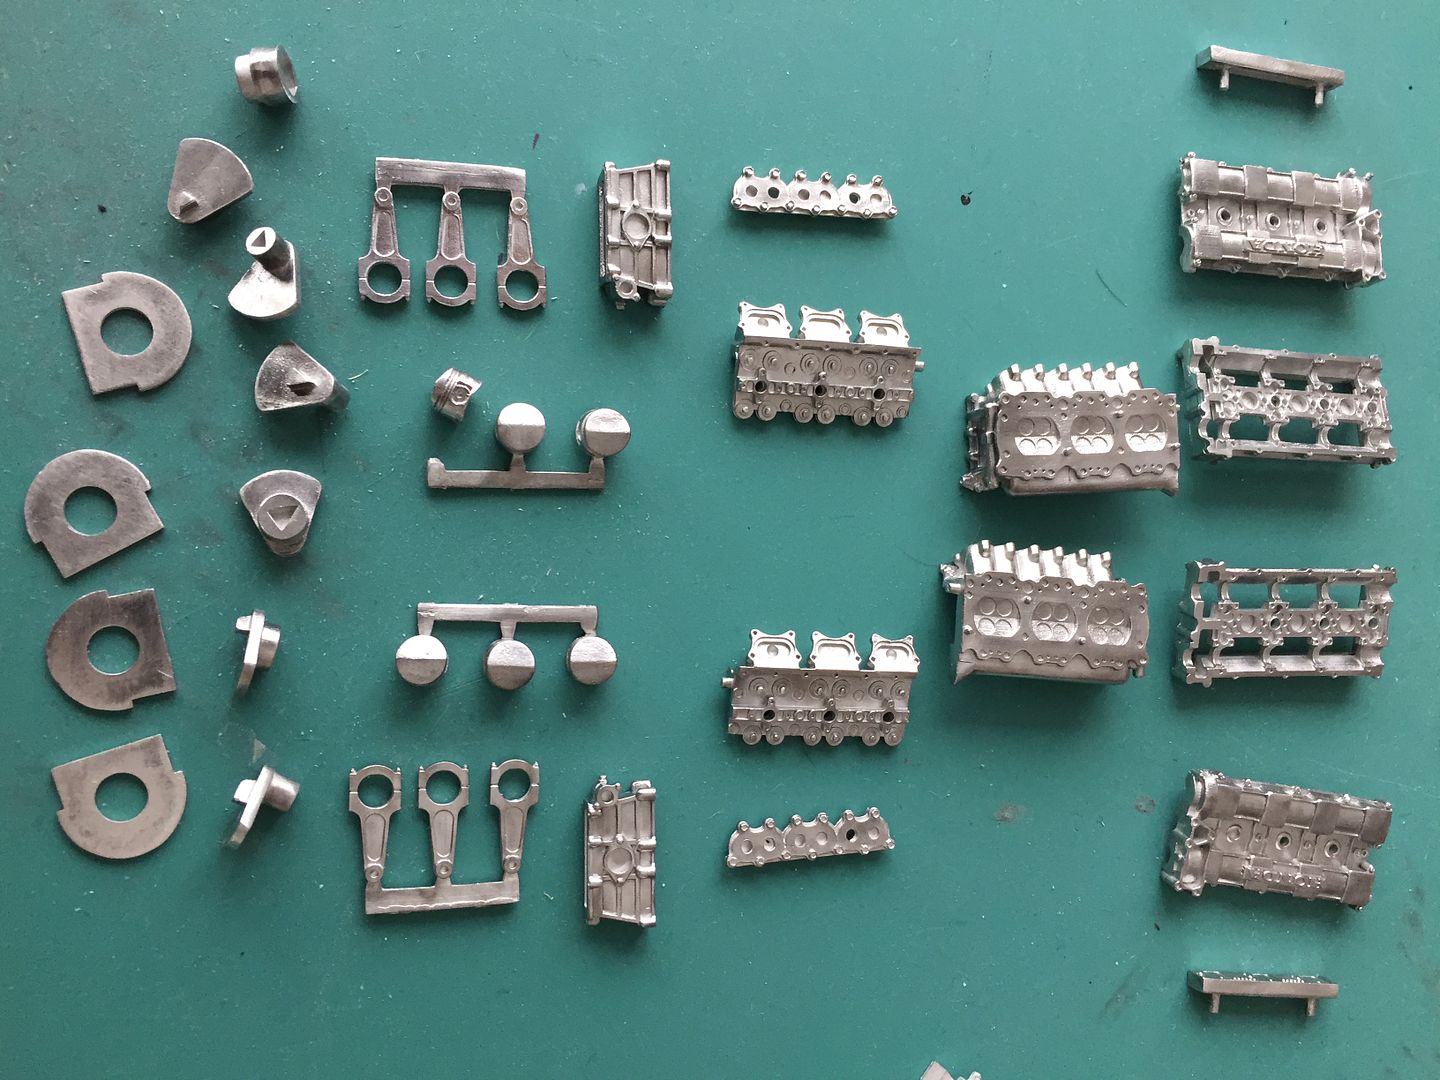
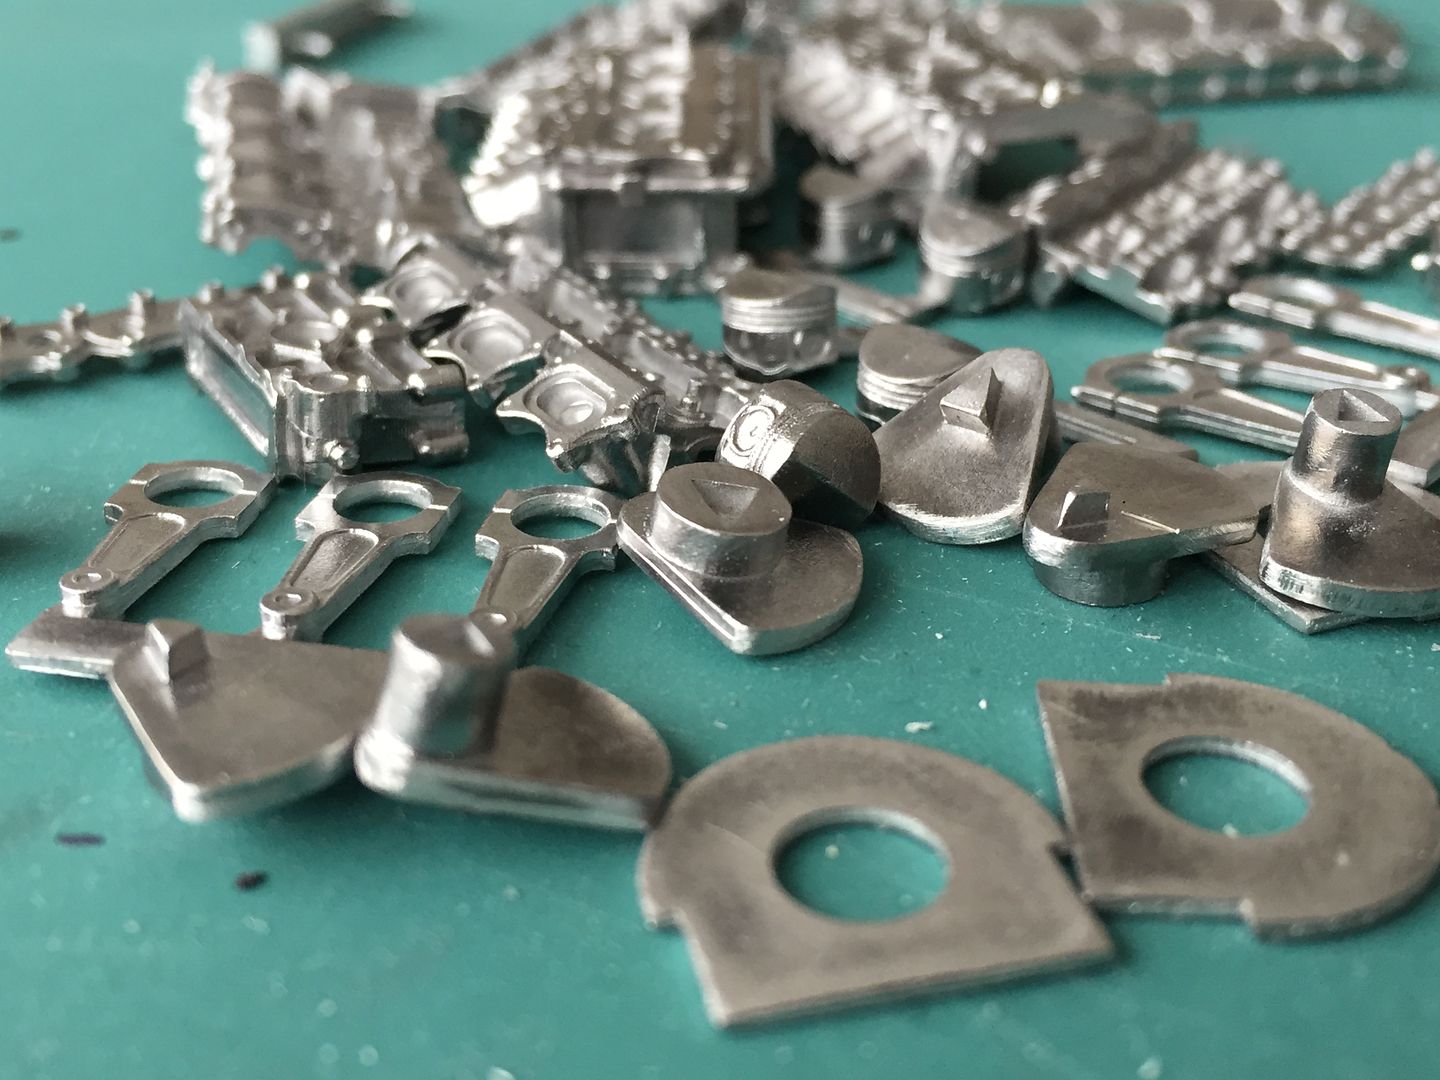
Tiny parts including rivets.
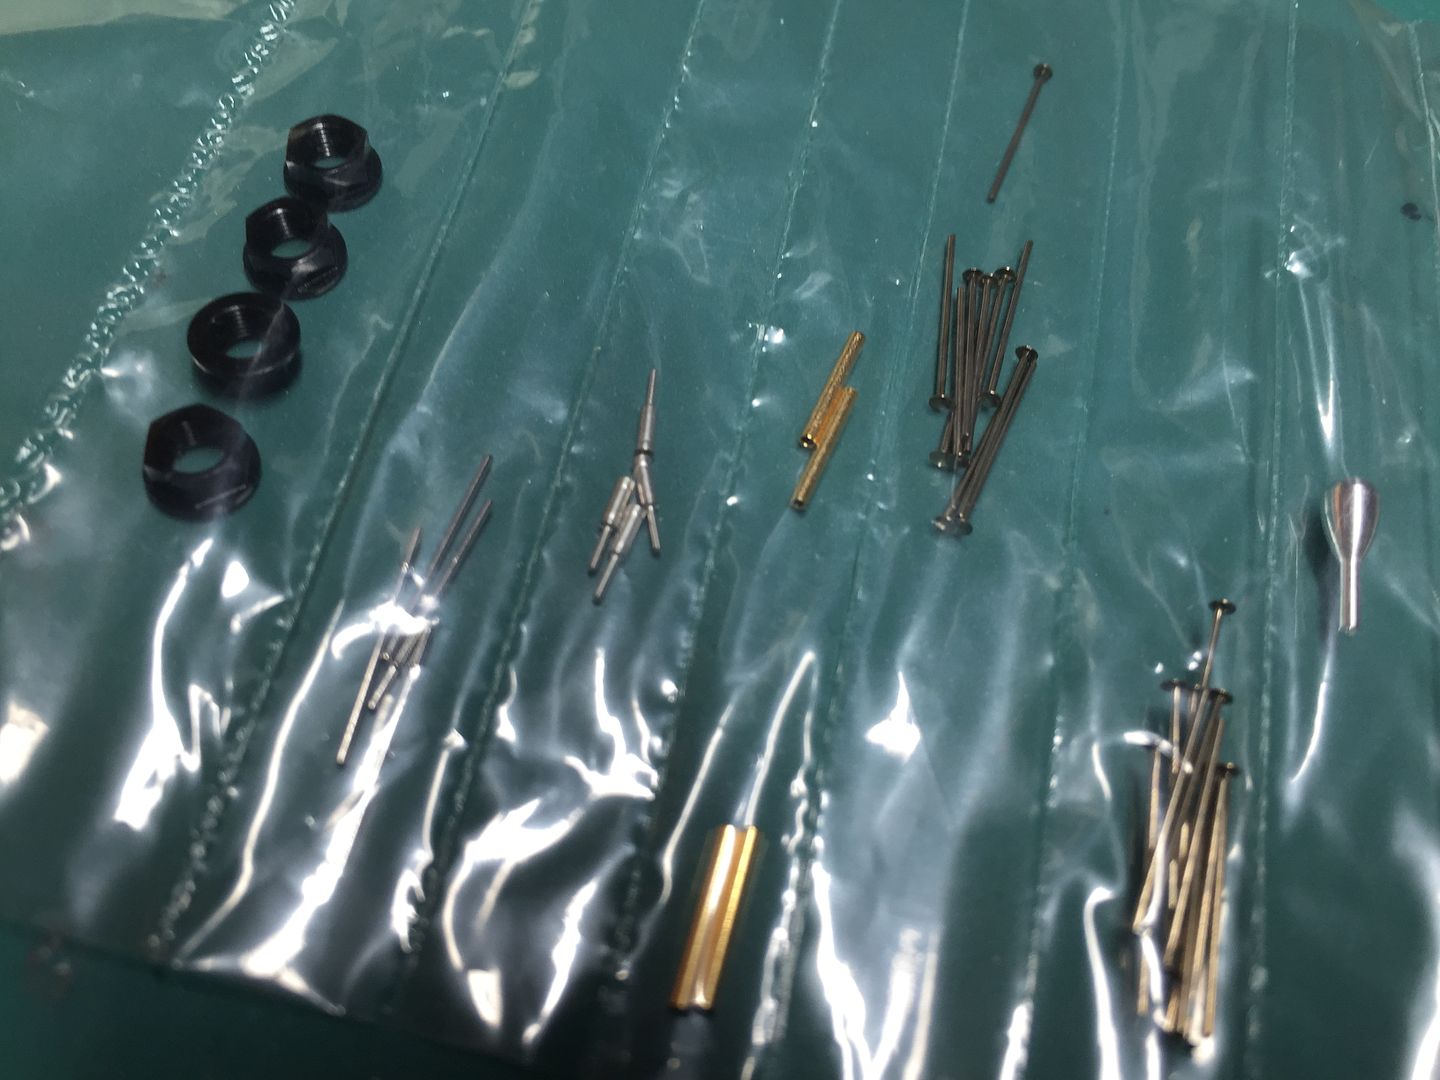
The black bits are rubber boots for the electrical fittings.
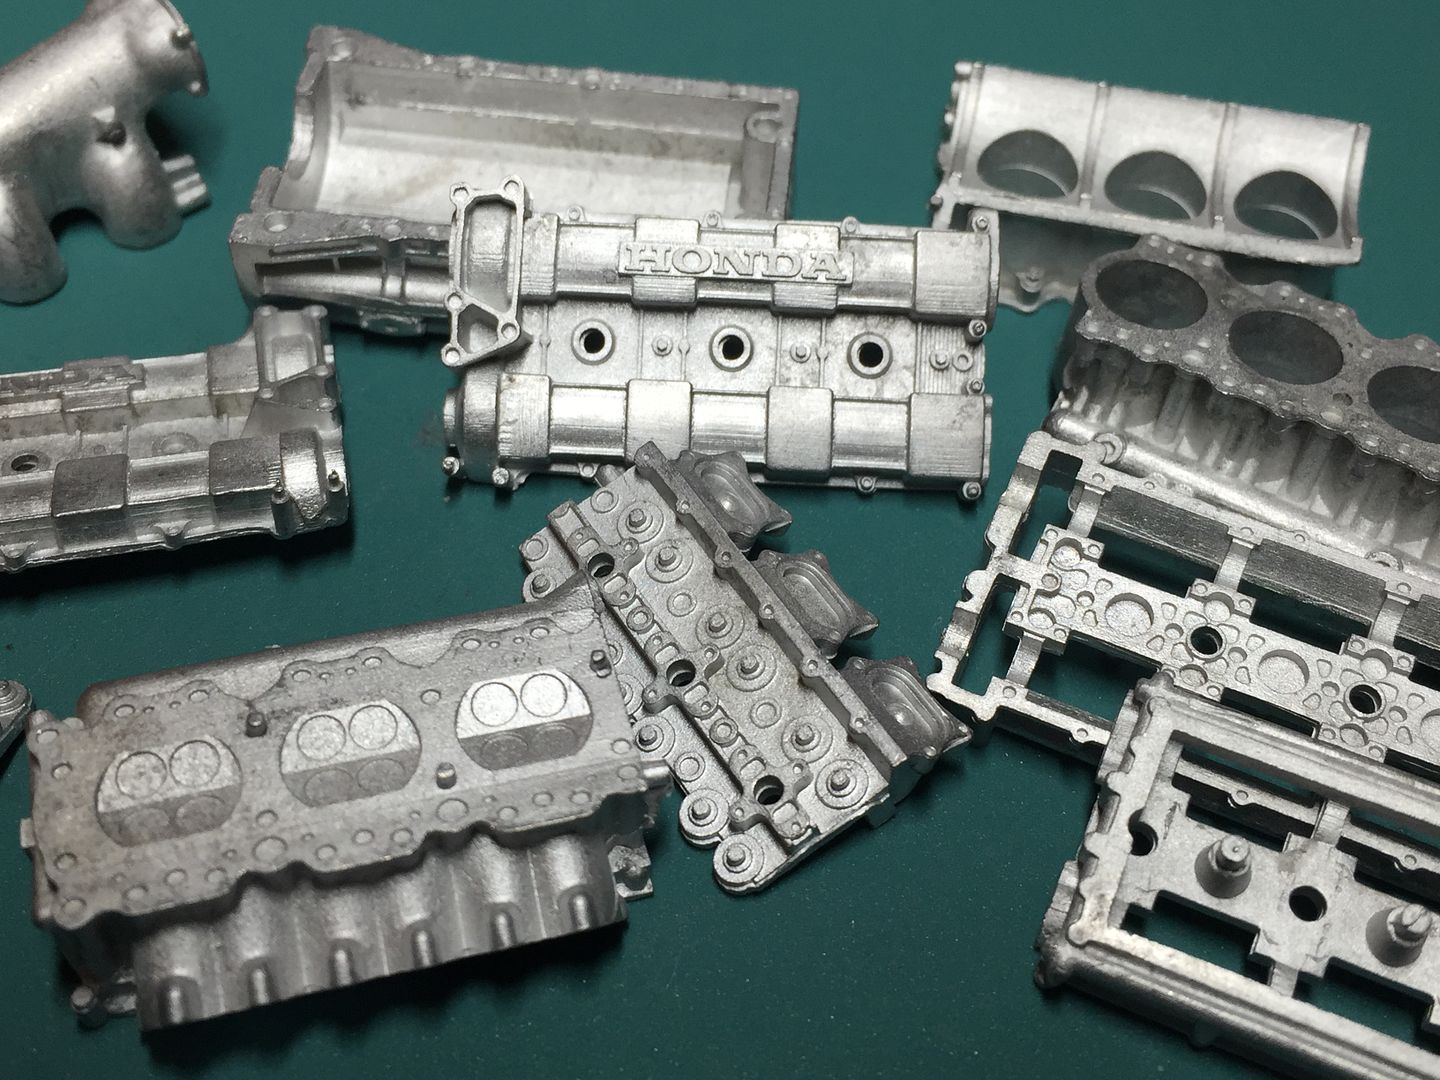
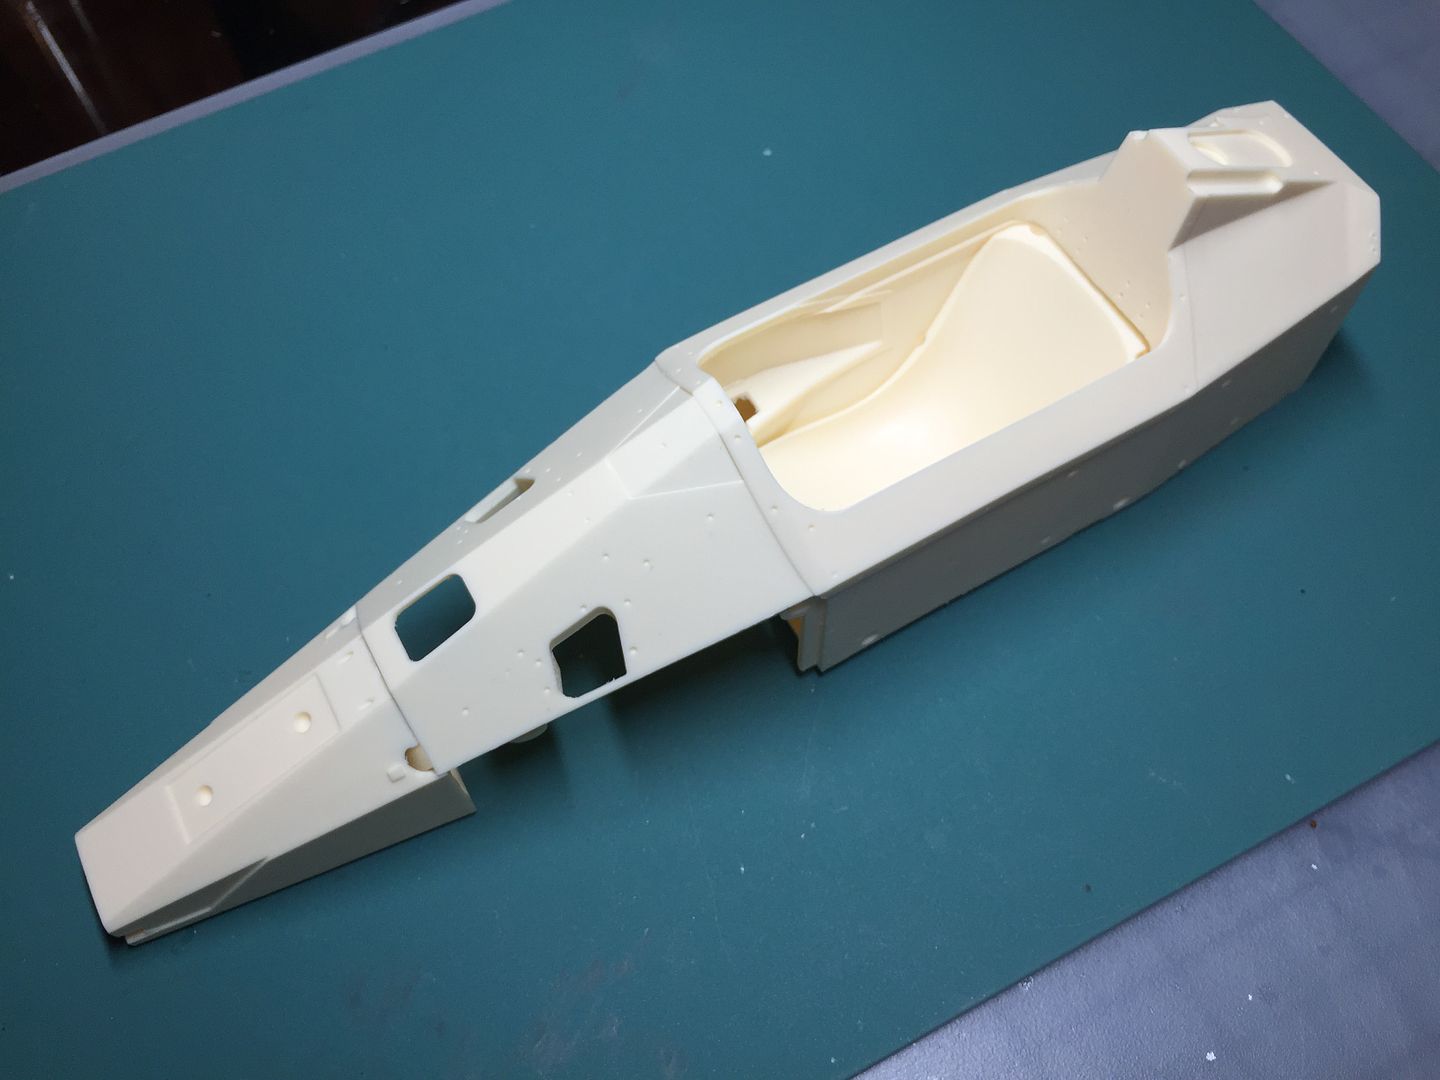
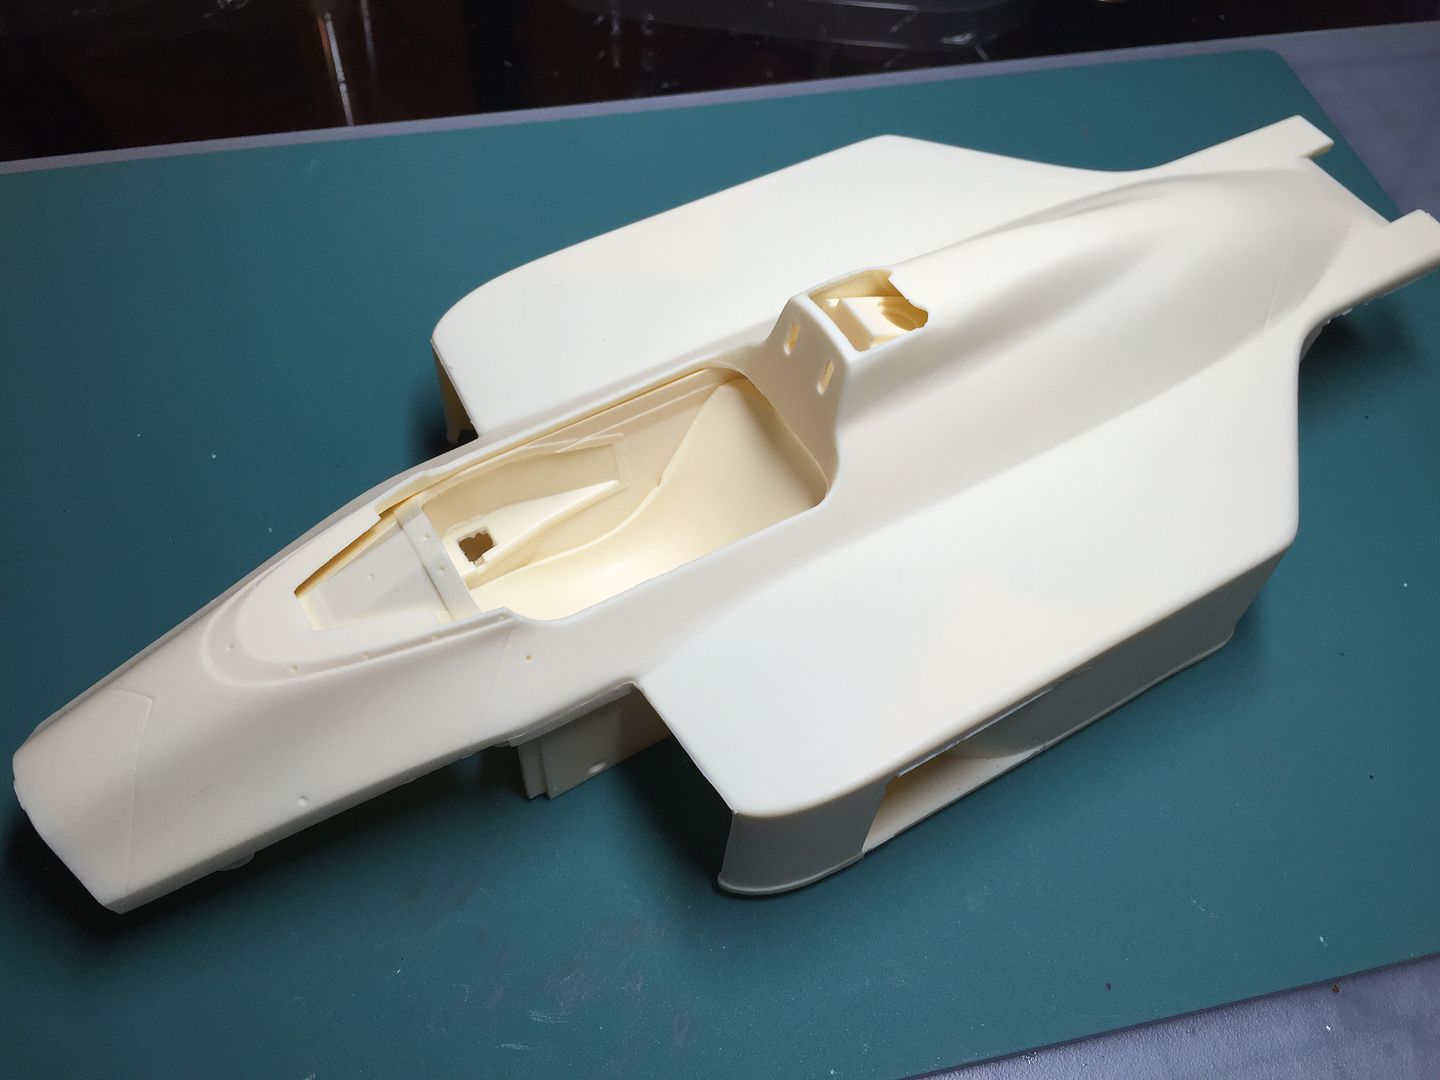
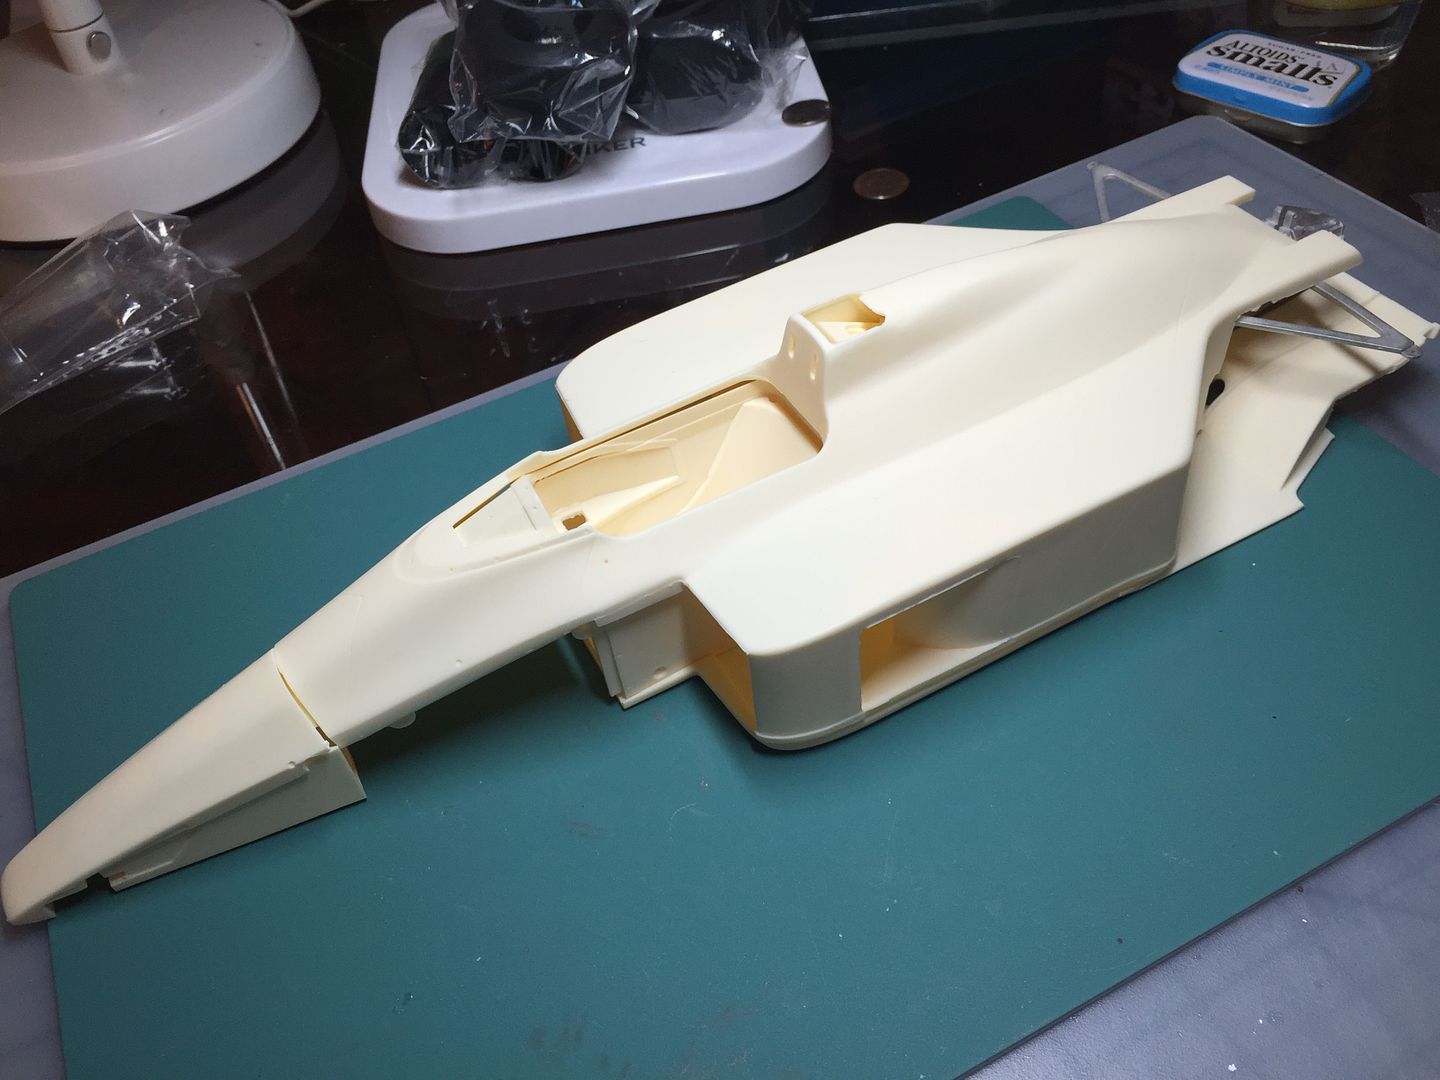
Resin body parts...
Top Tip! Sort out the parts...
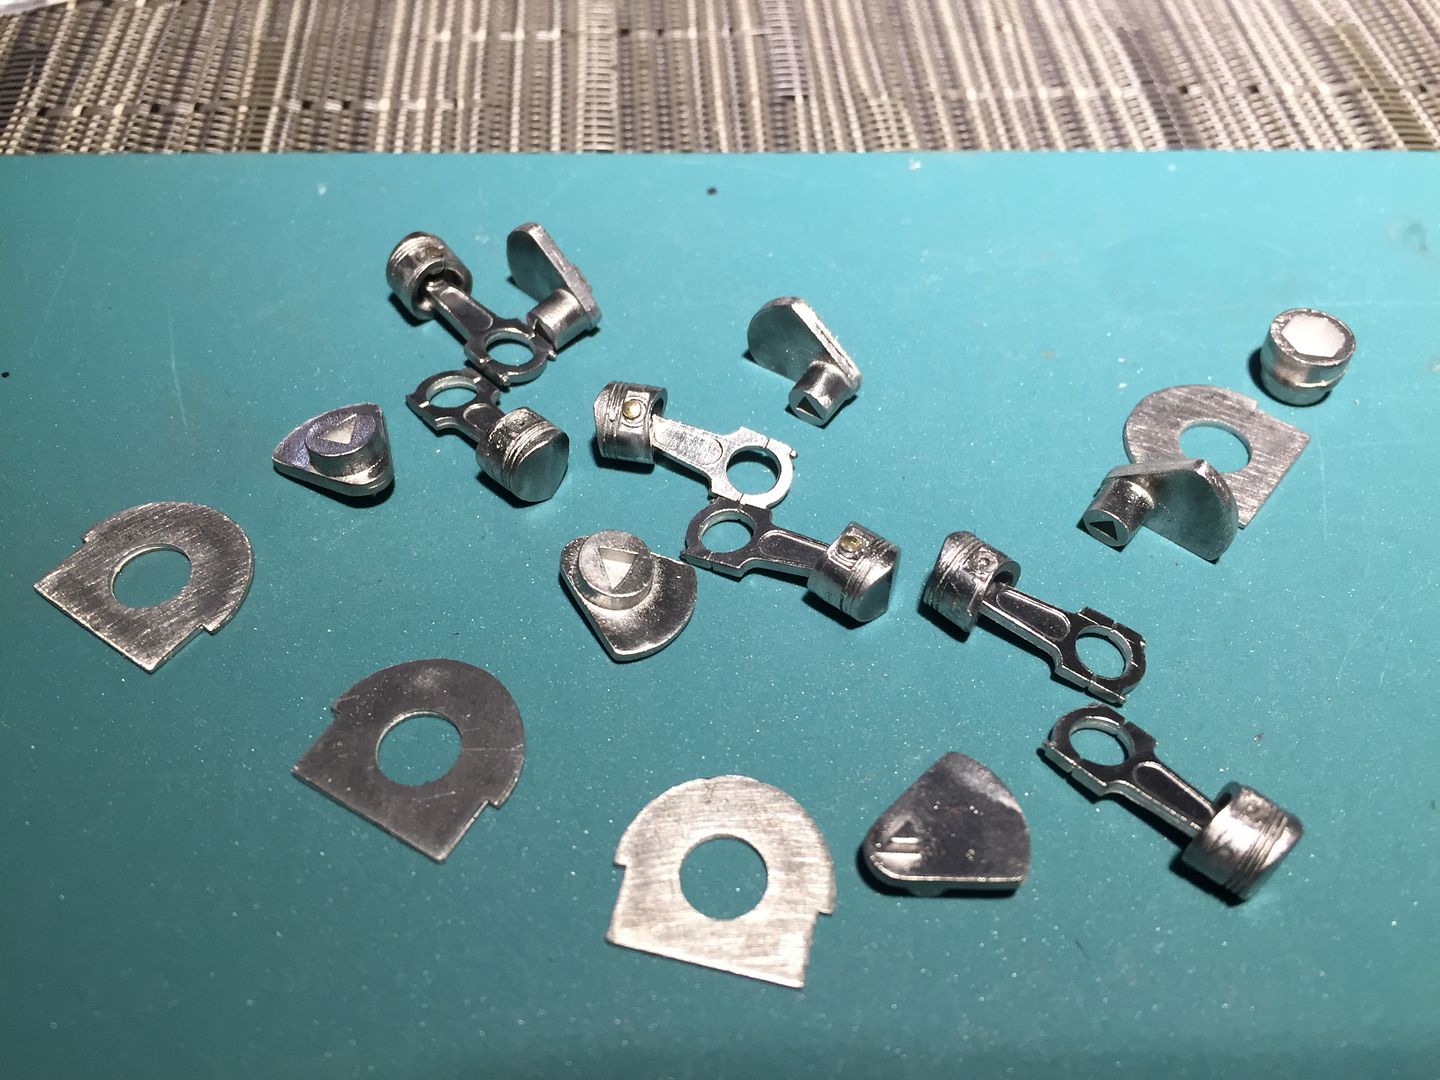
I separated all the metal parts into little ziploc bags, grouped as elements - such as 'brakes' or 'pistons' - makes life so much easier to tackle each element as unit.
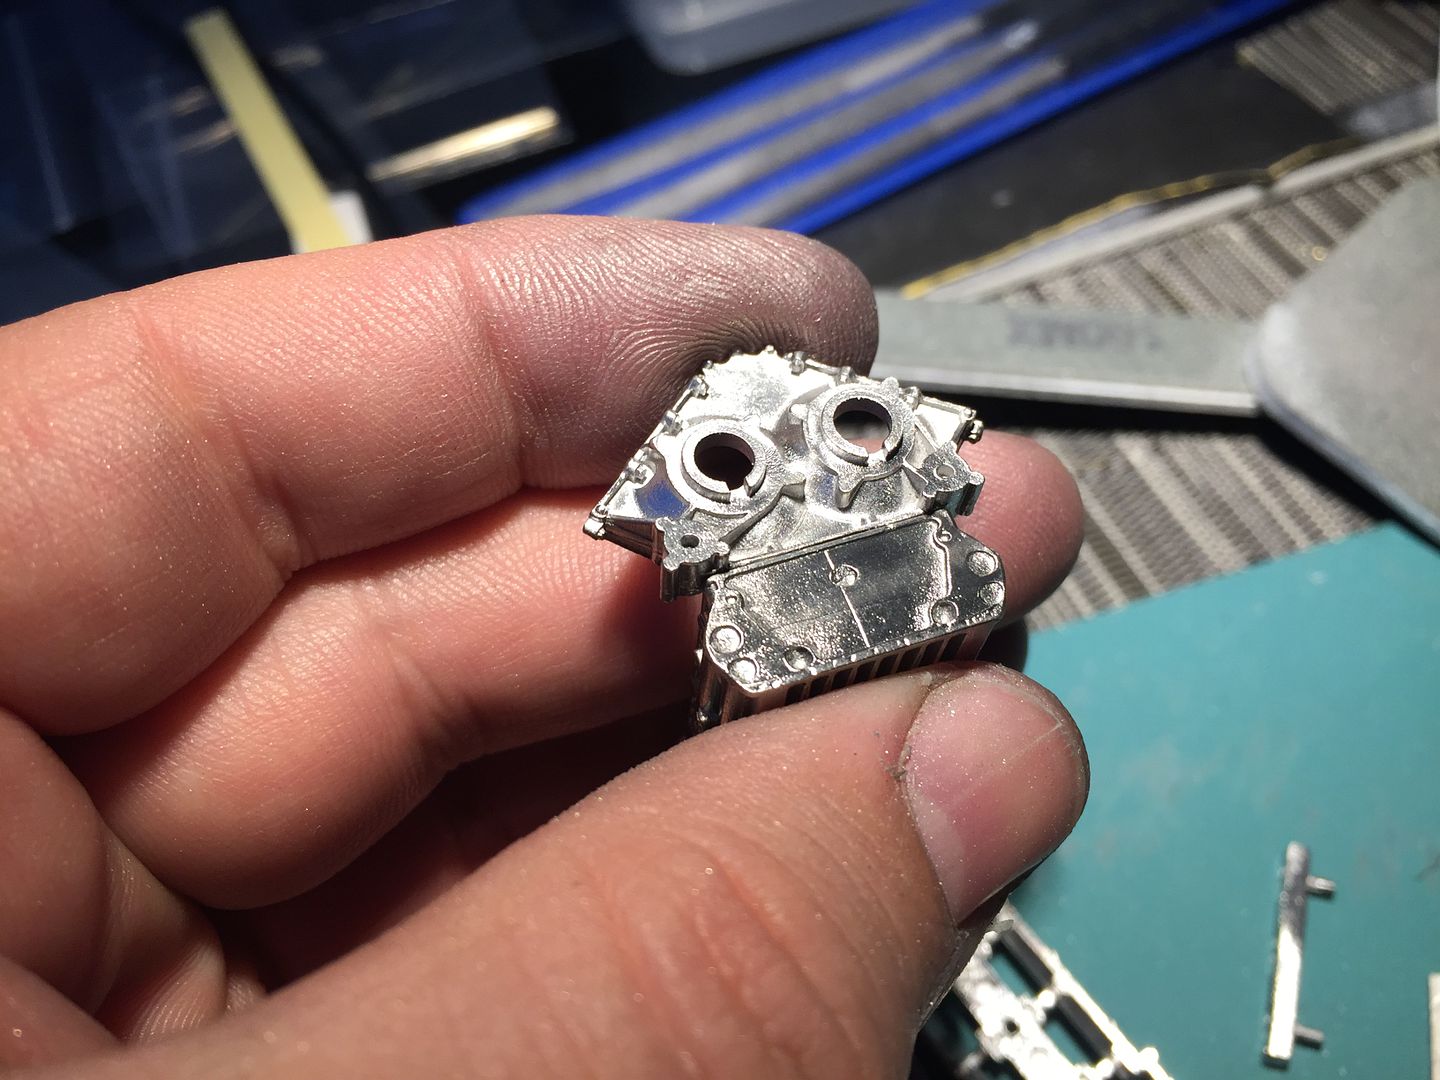
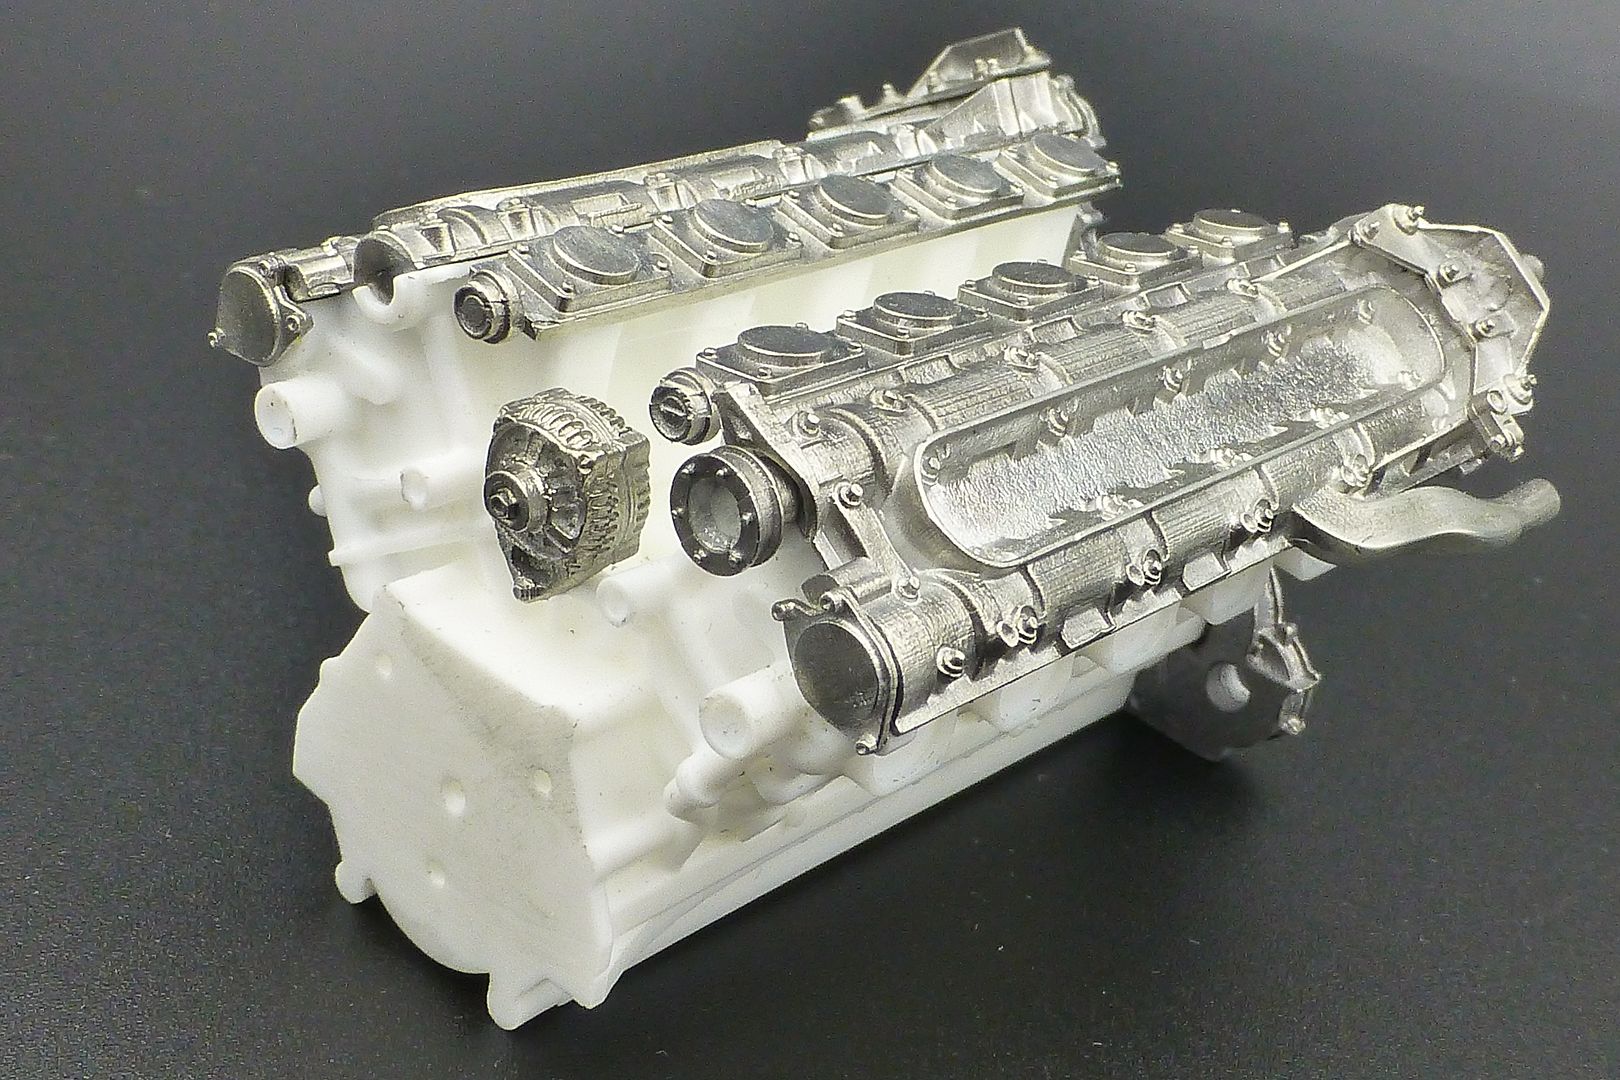
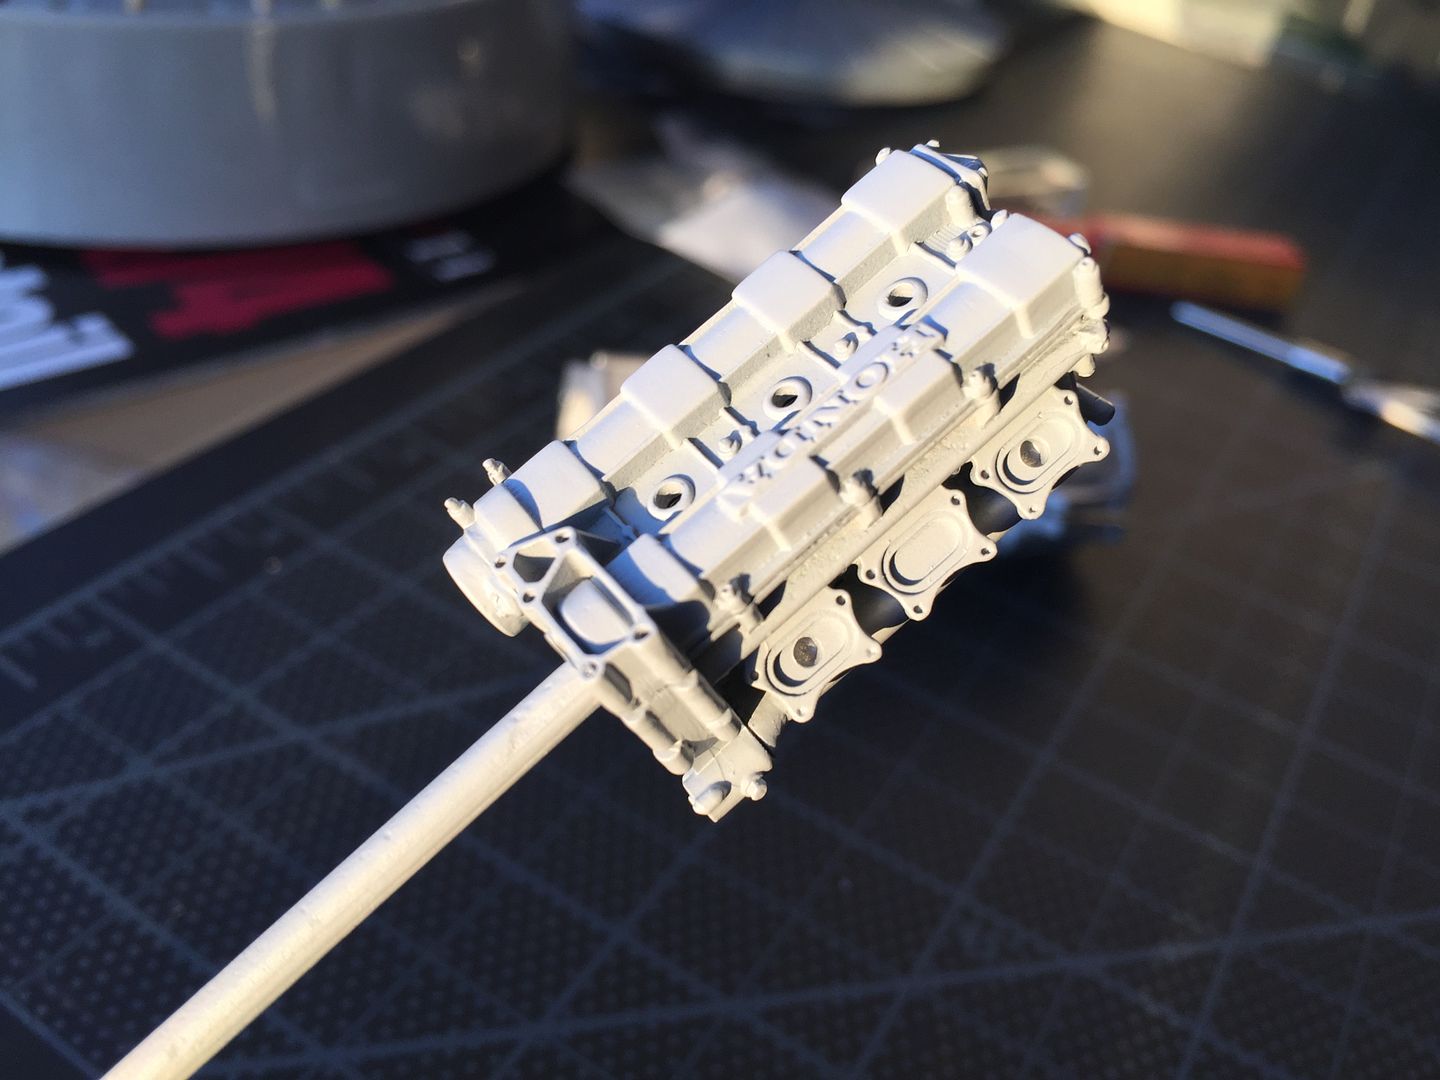
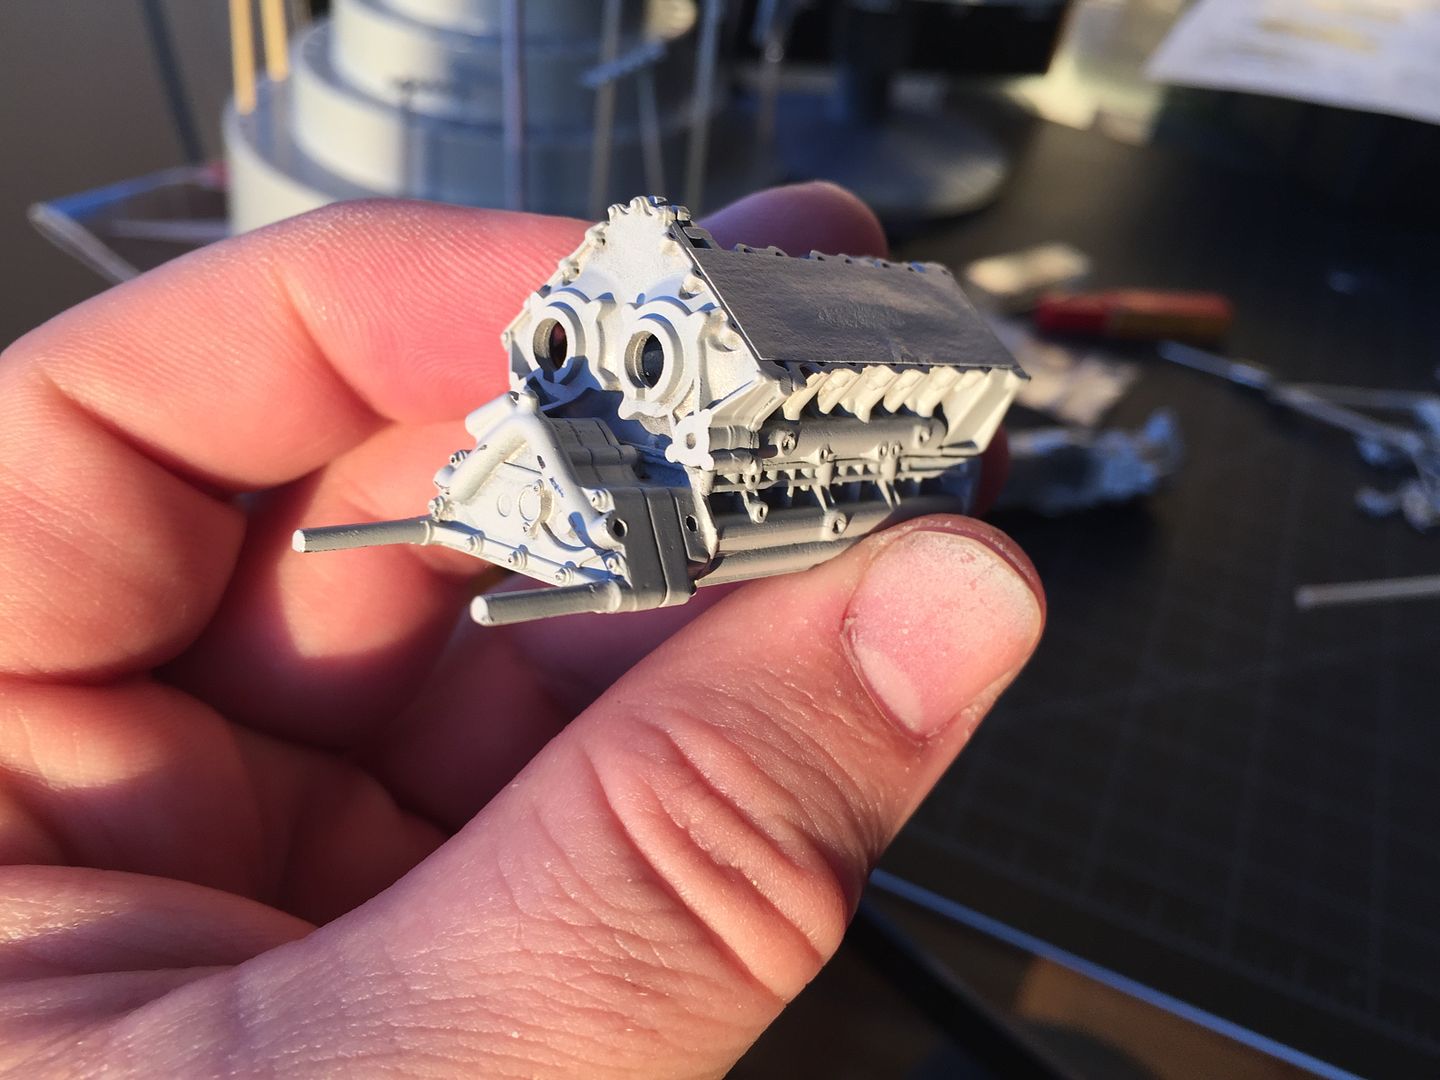
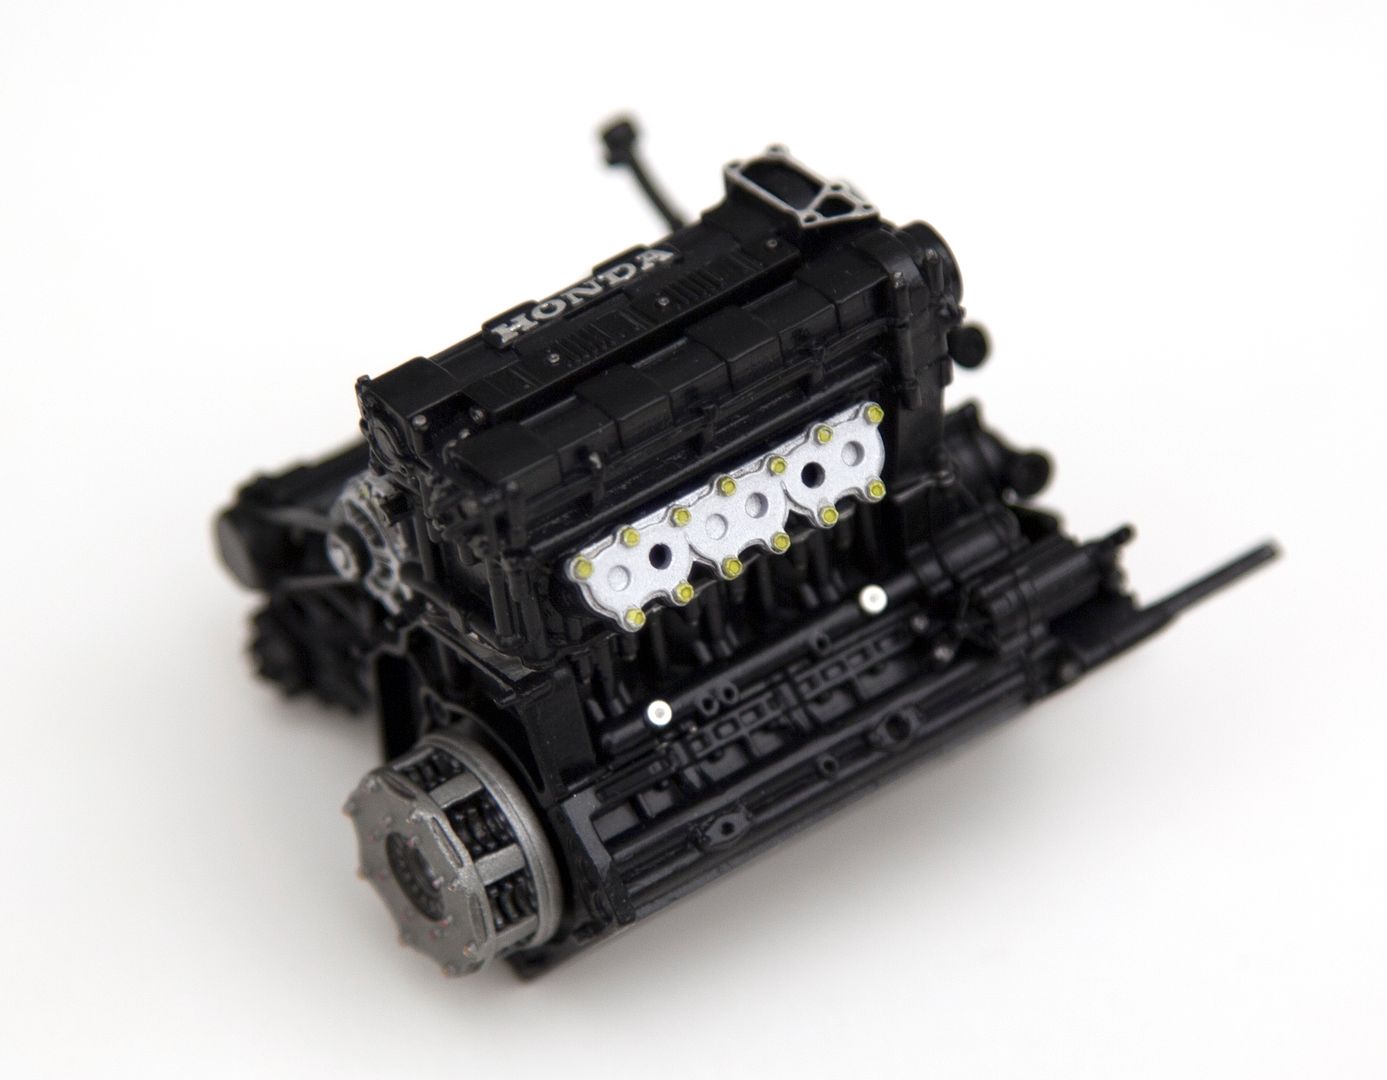
So, I'm starting with the engine.
Files and sanding sticks deal with the flashing, part lines etc. With these MFH kits, you must do test assemblies!
I have cleaned off all the parts with a brass wire wheel on a dremel. It cleans the metal but does not wear it away.
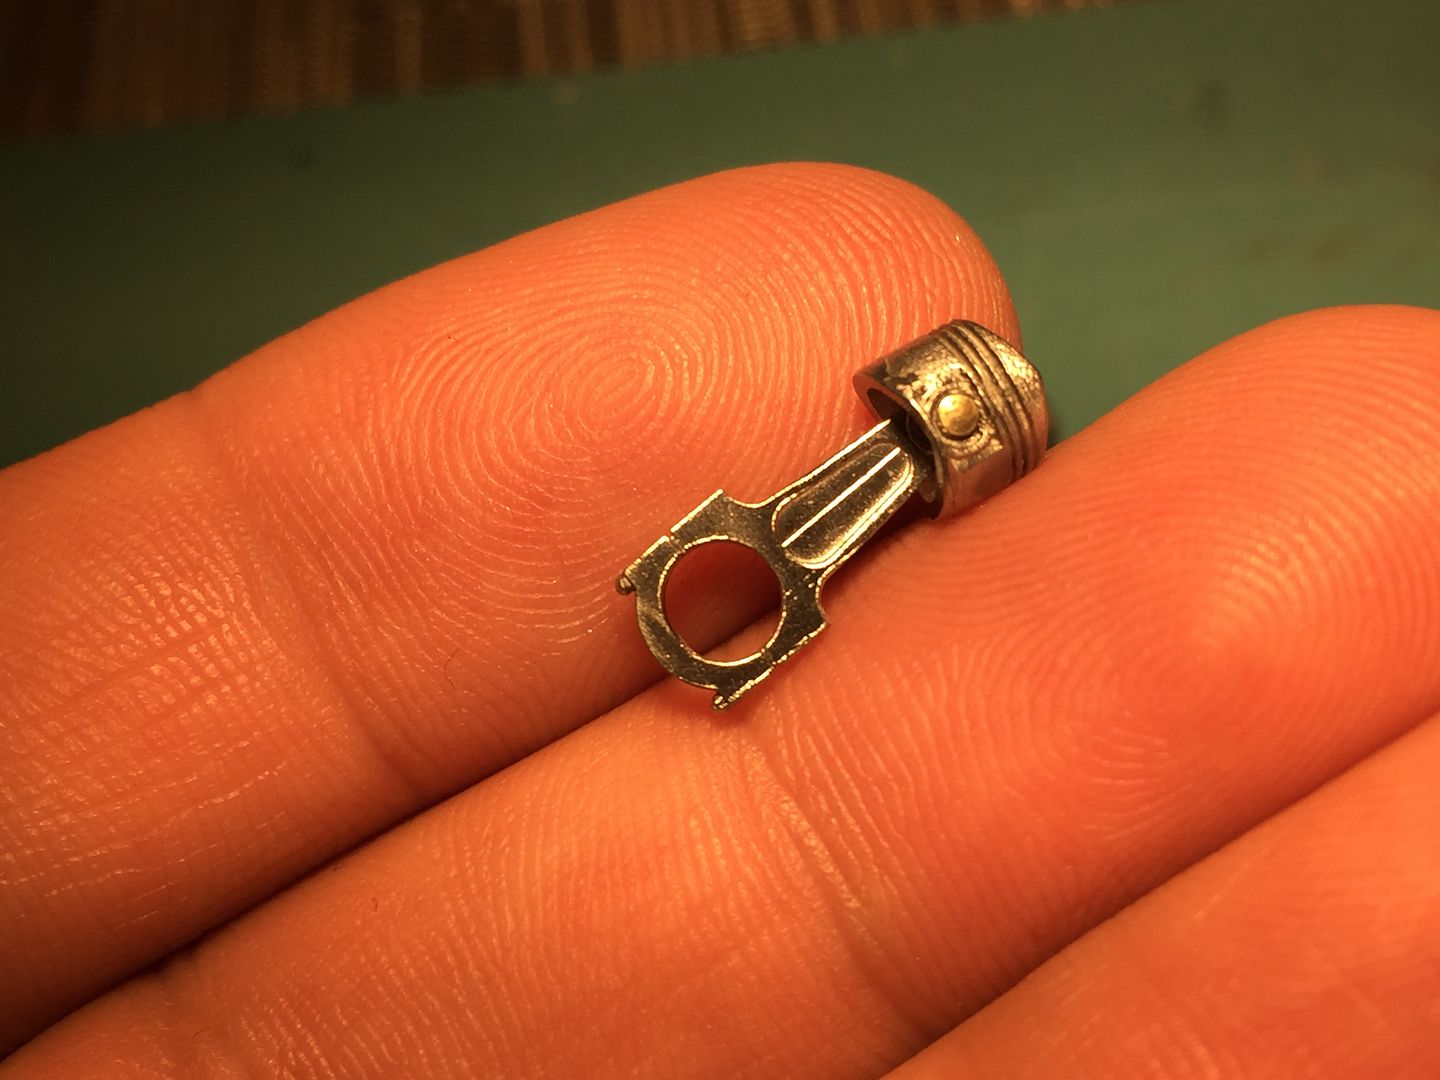
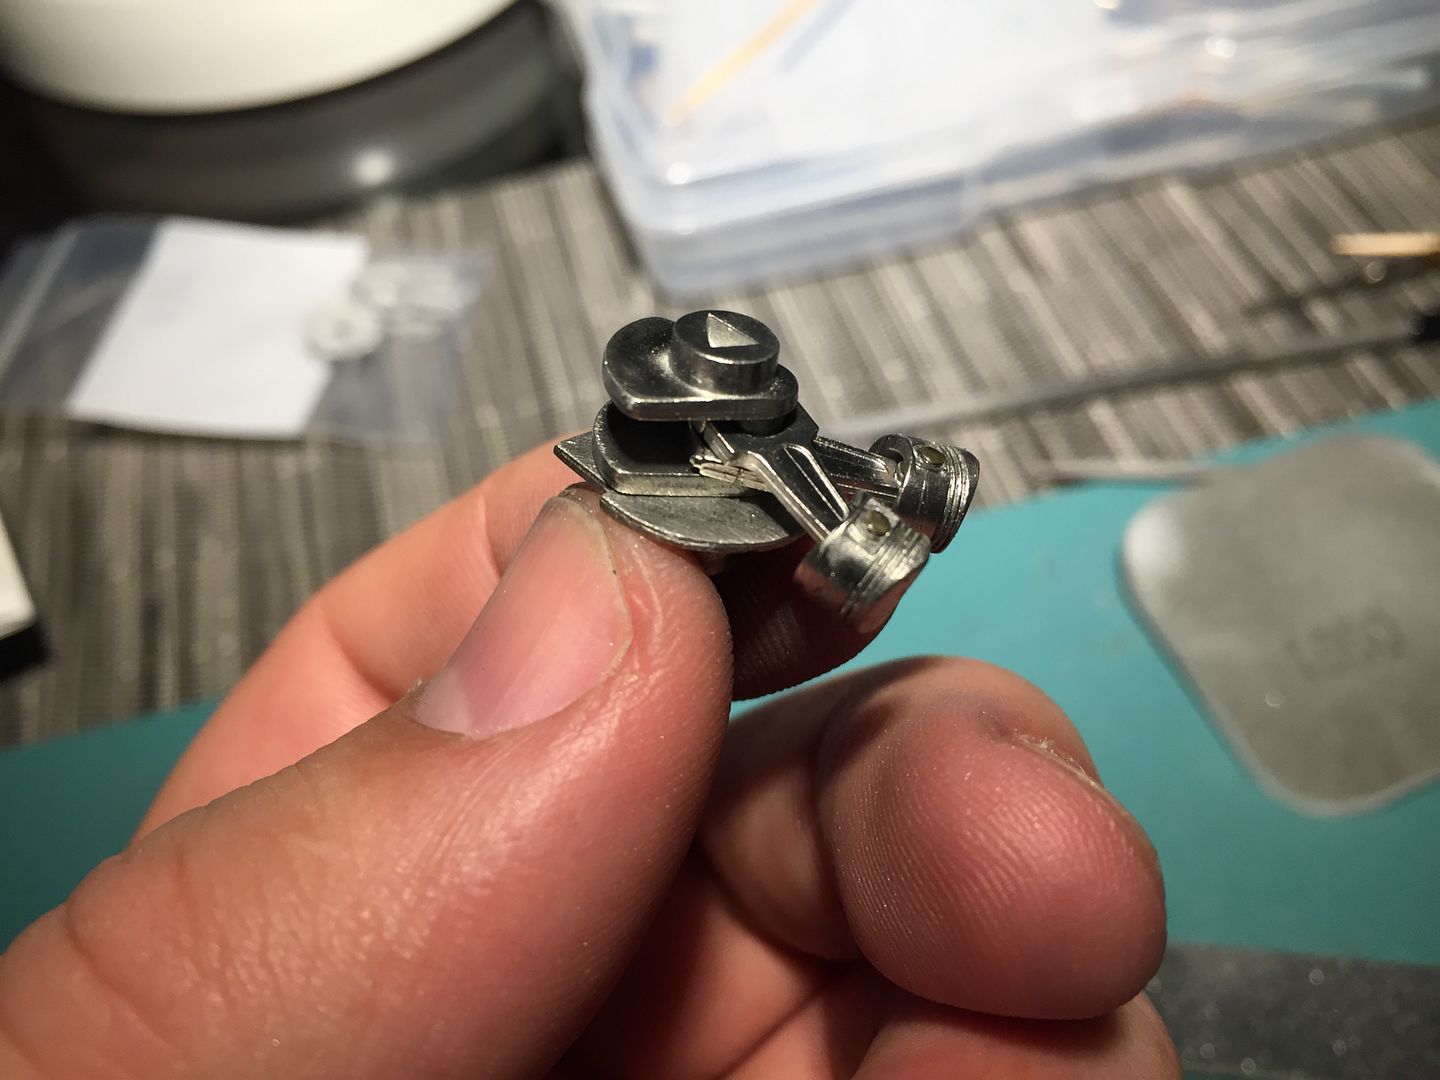
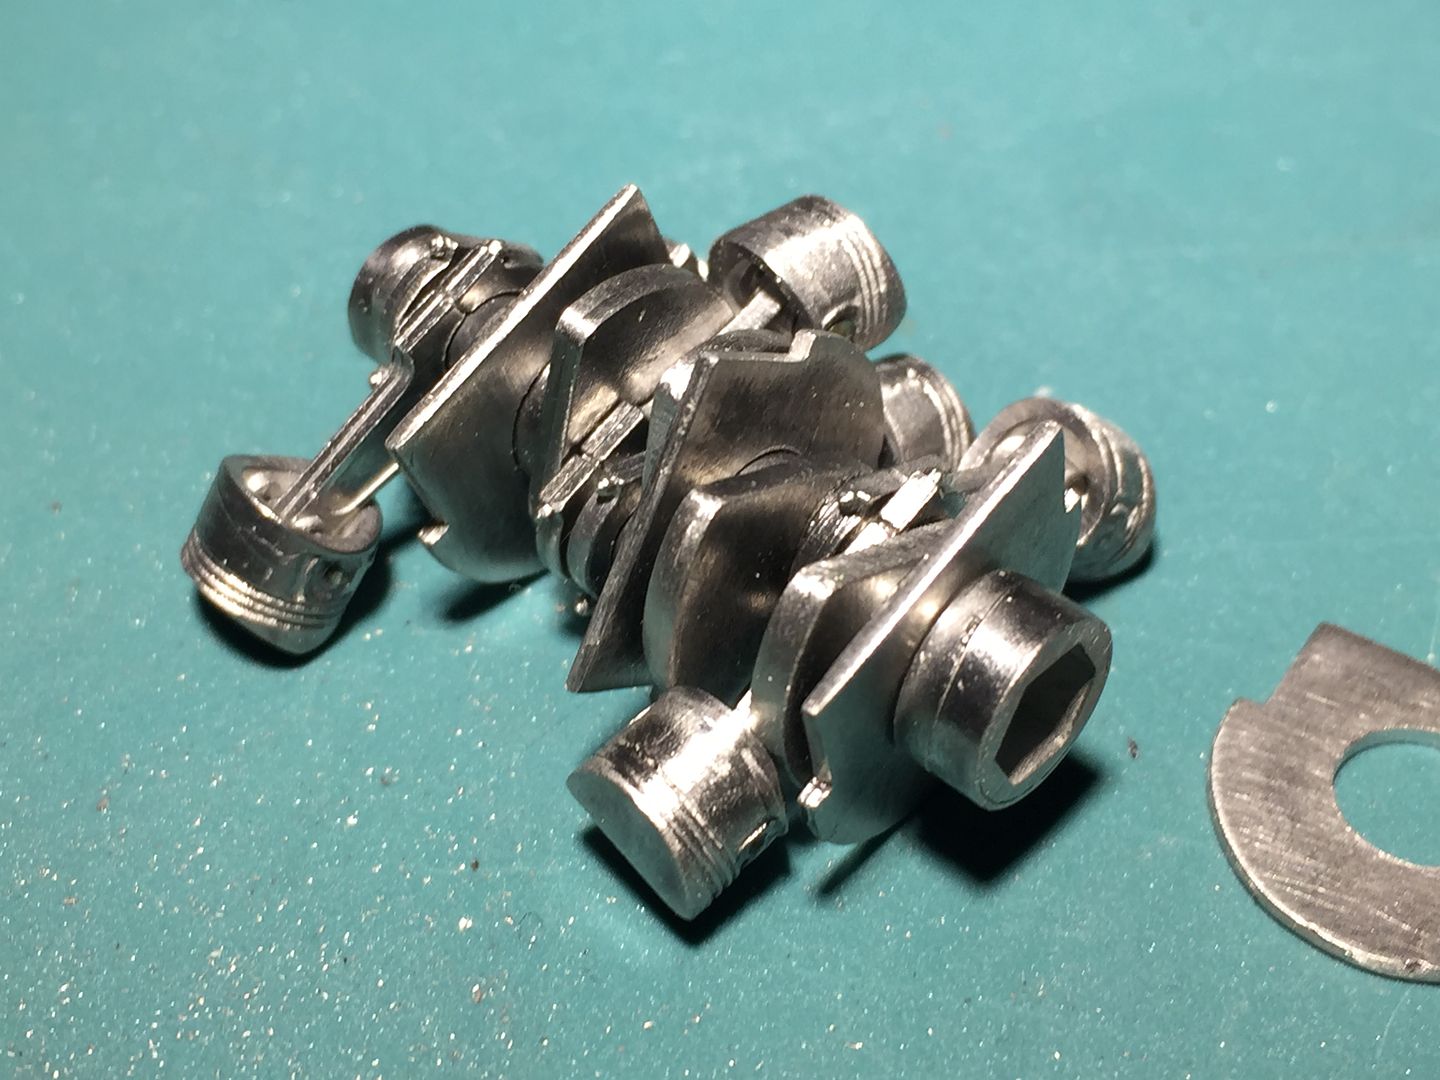
Amazingly on this kit, we have 'working' pistons! Once the engine is put together, you will never see these - but it is nice to know they are there!
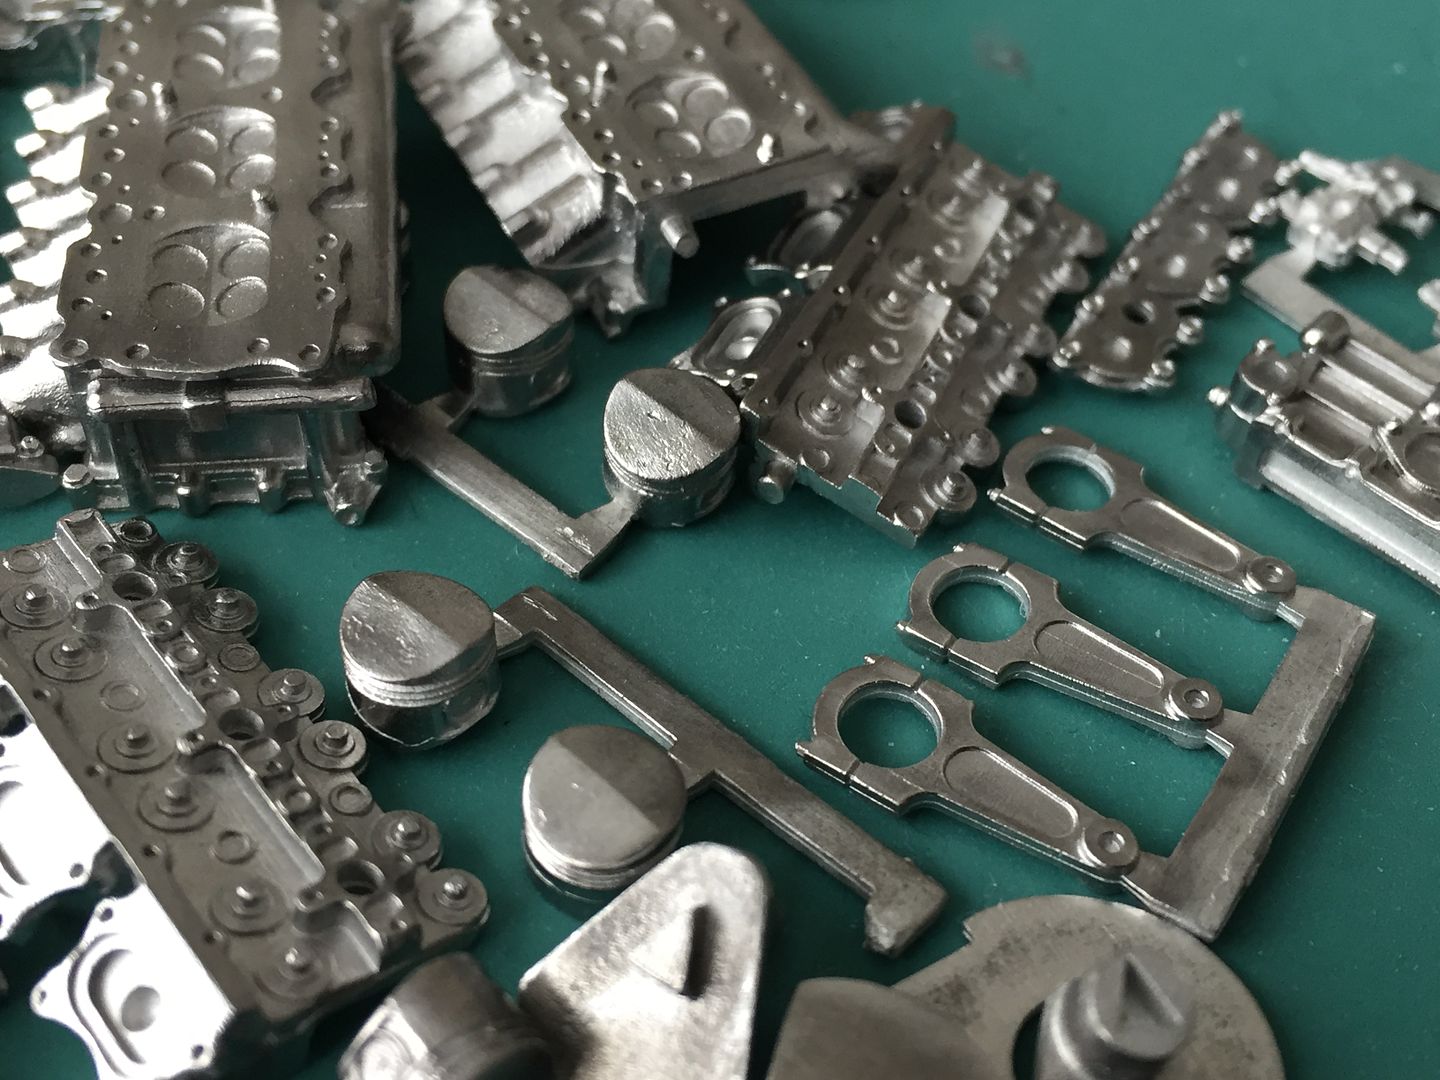
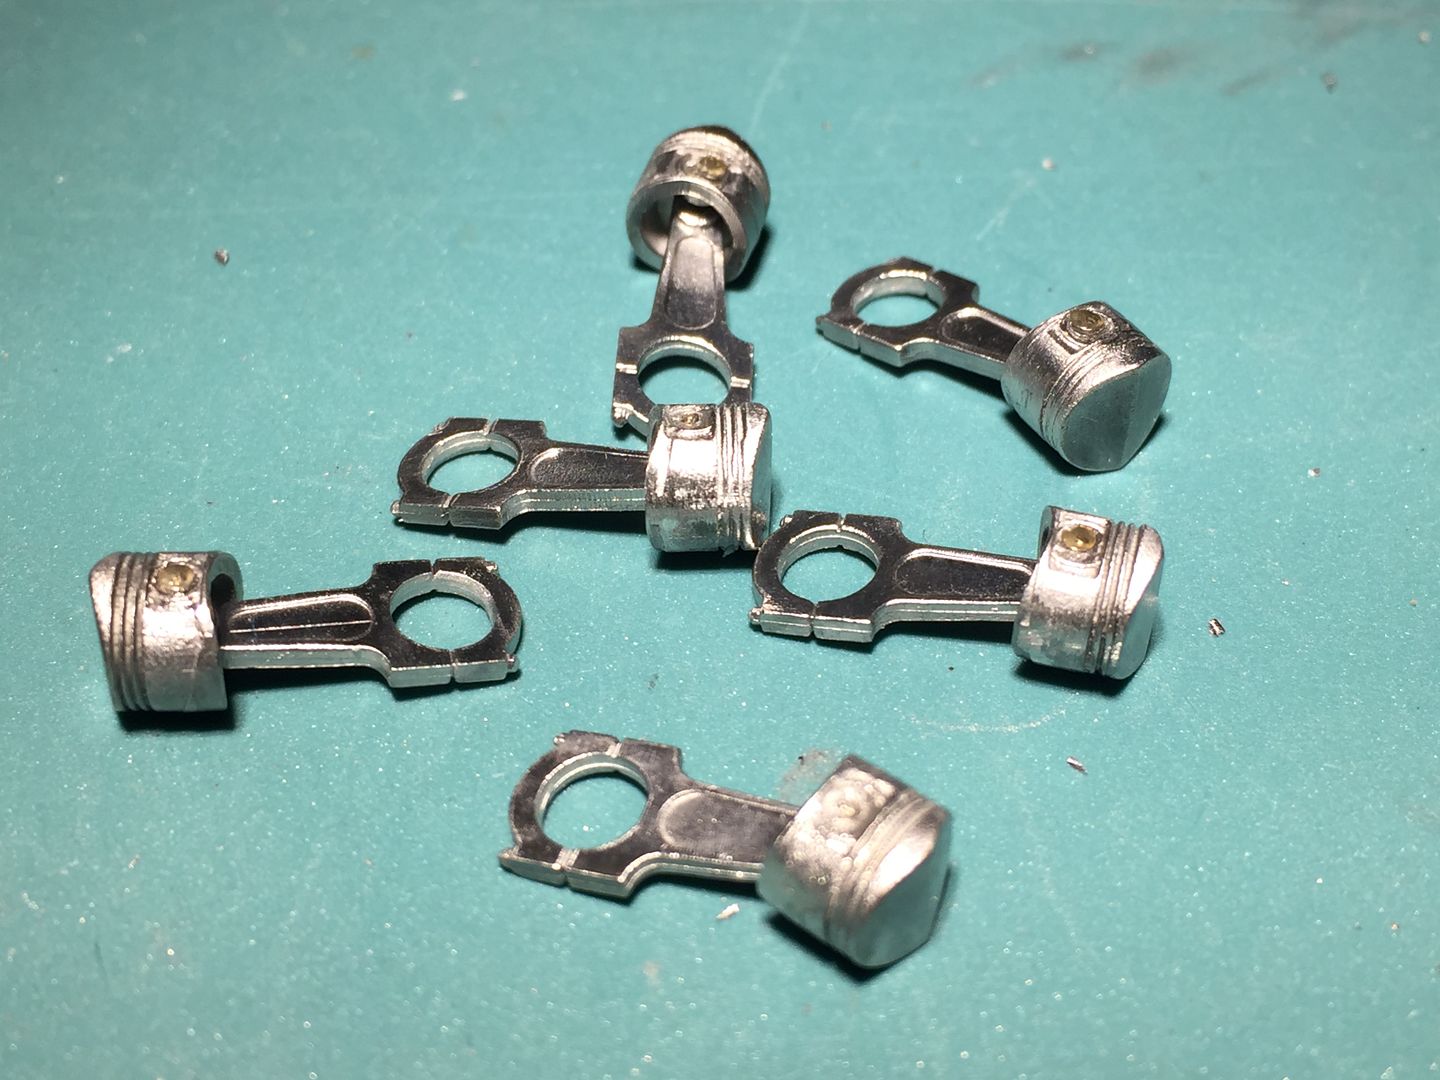
...complete with pins...
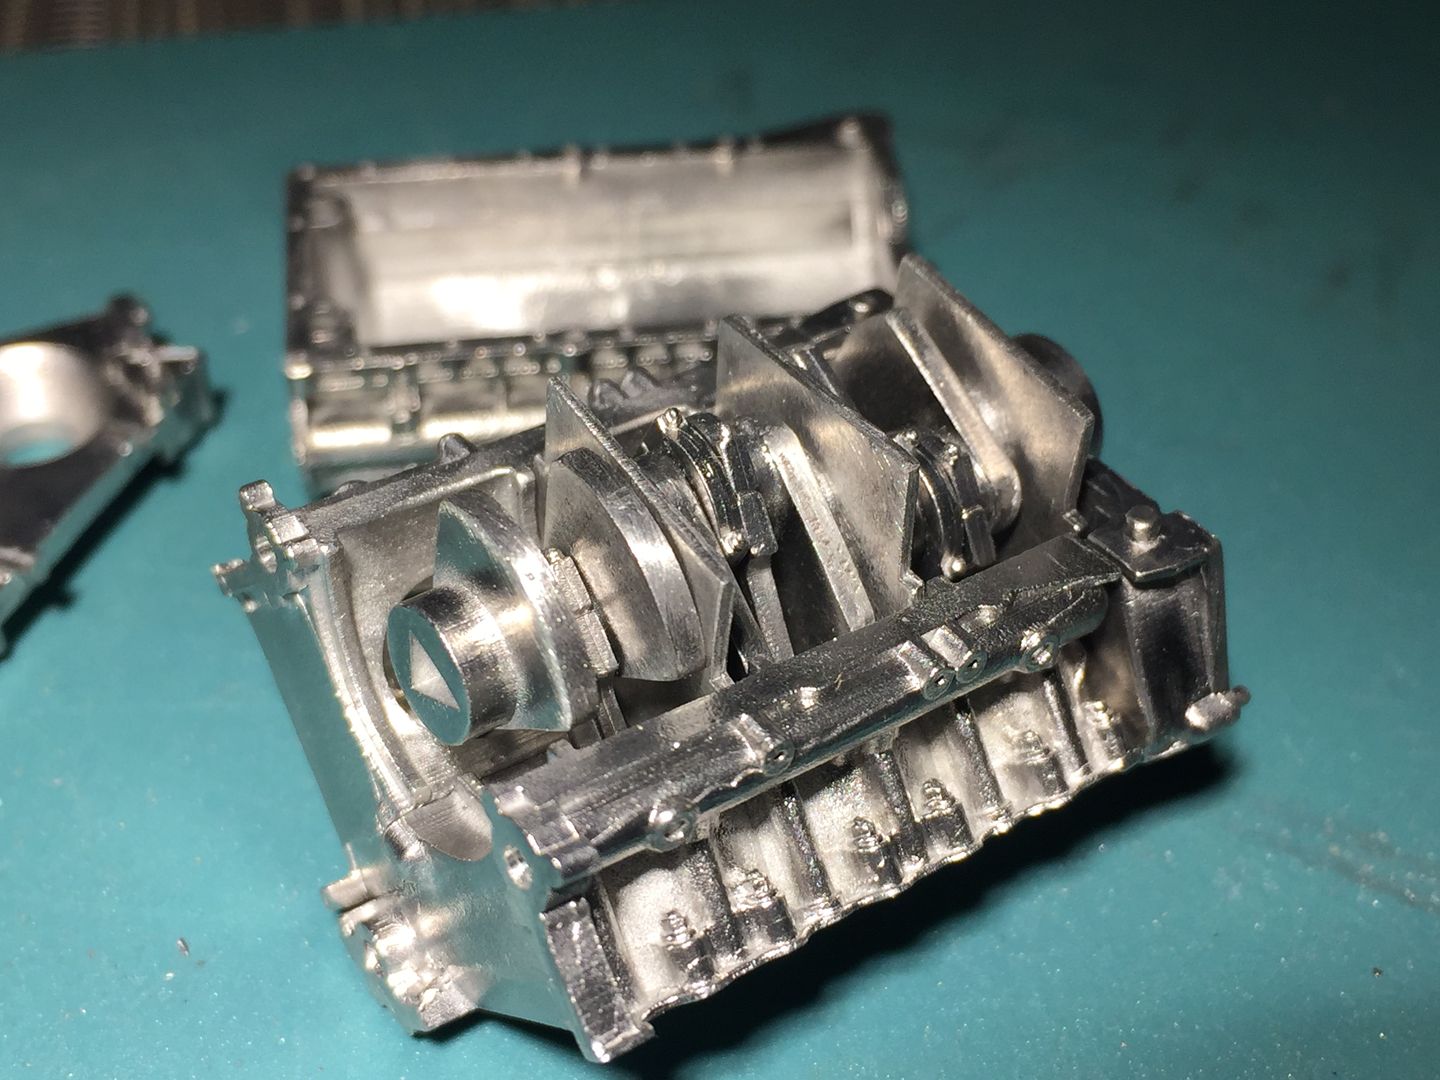
Crankshaft...
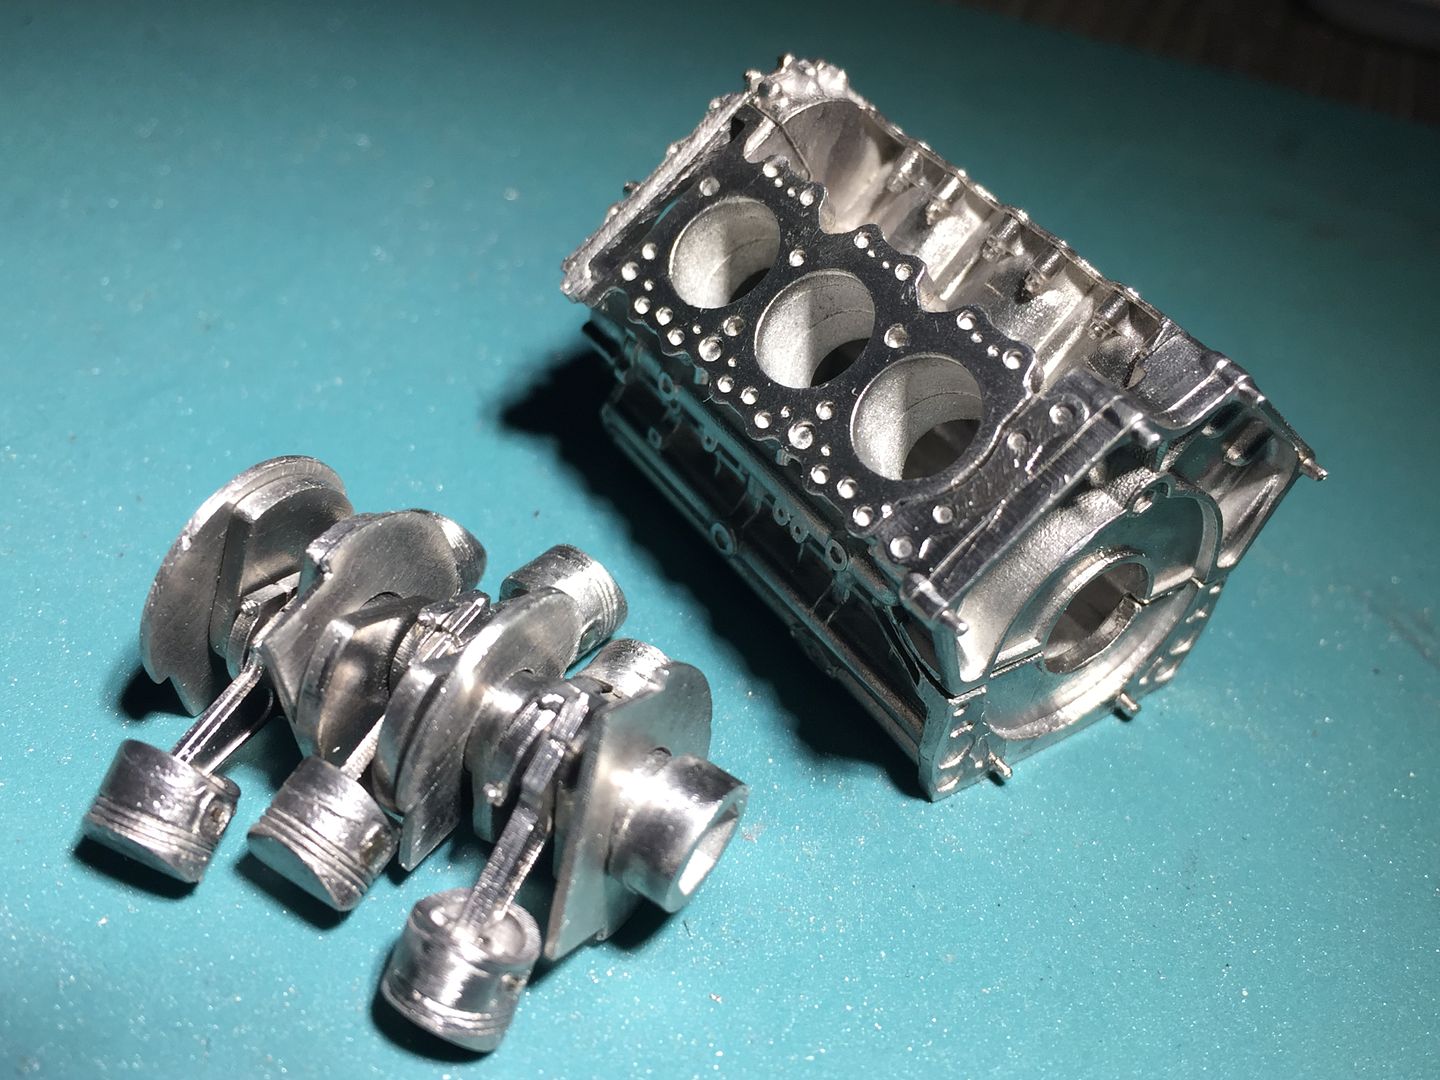
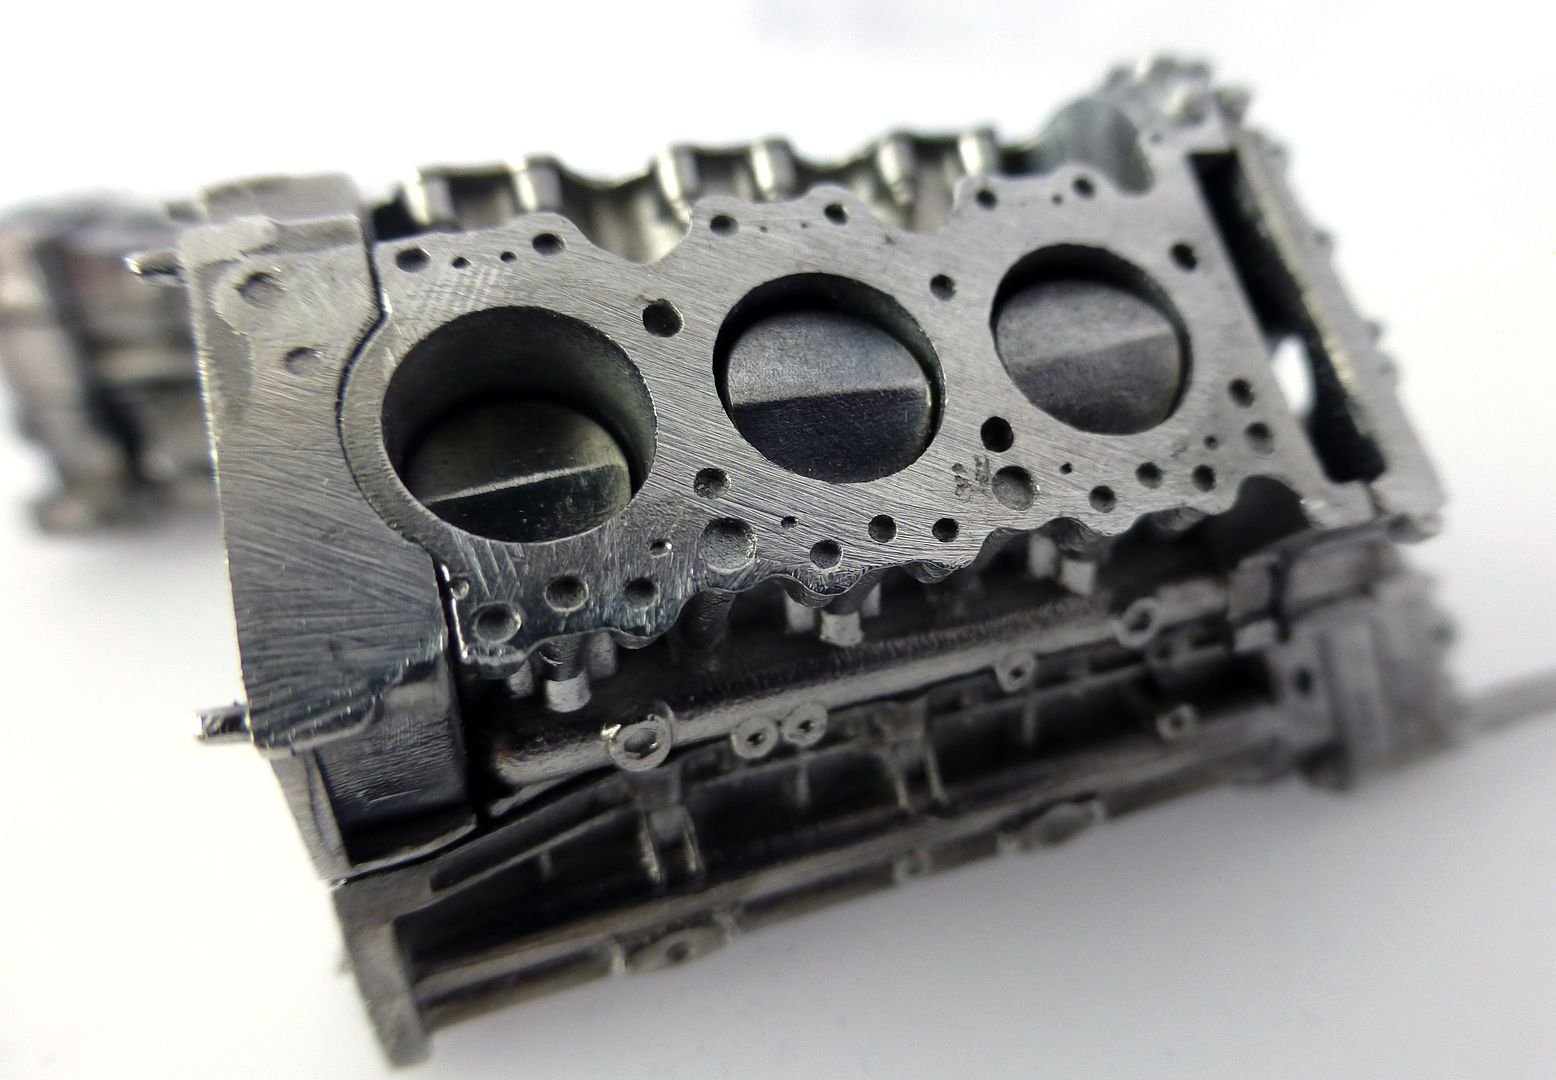
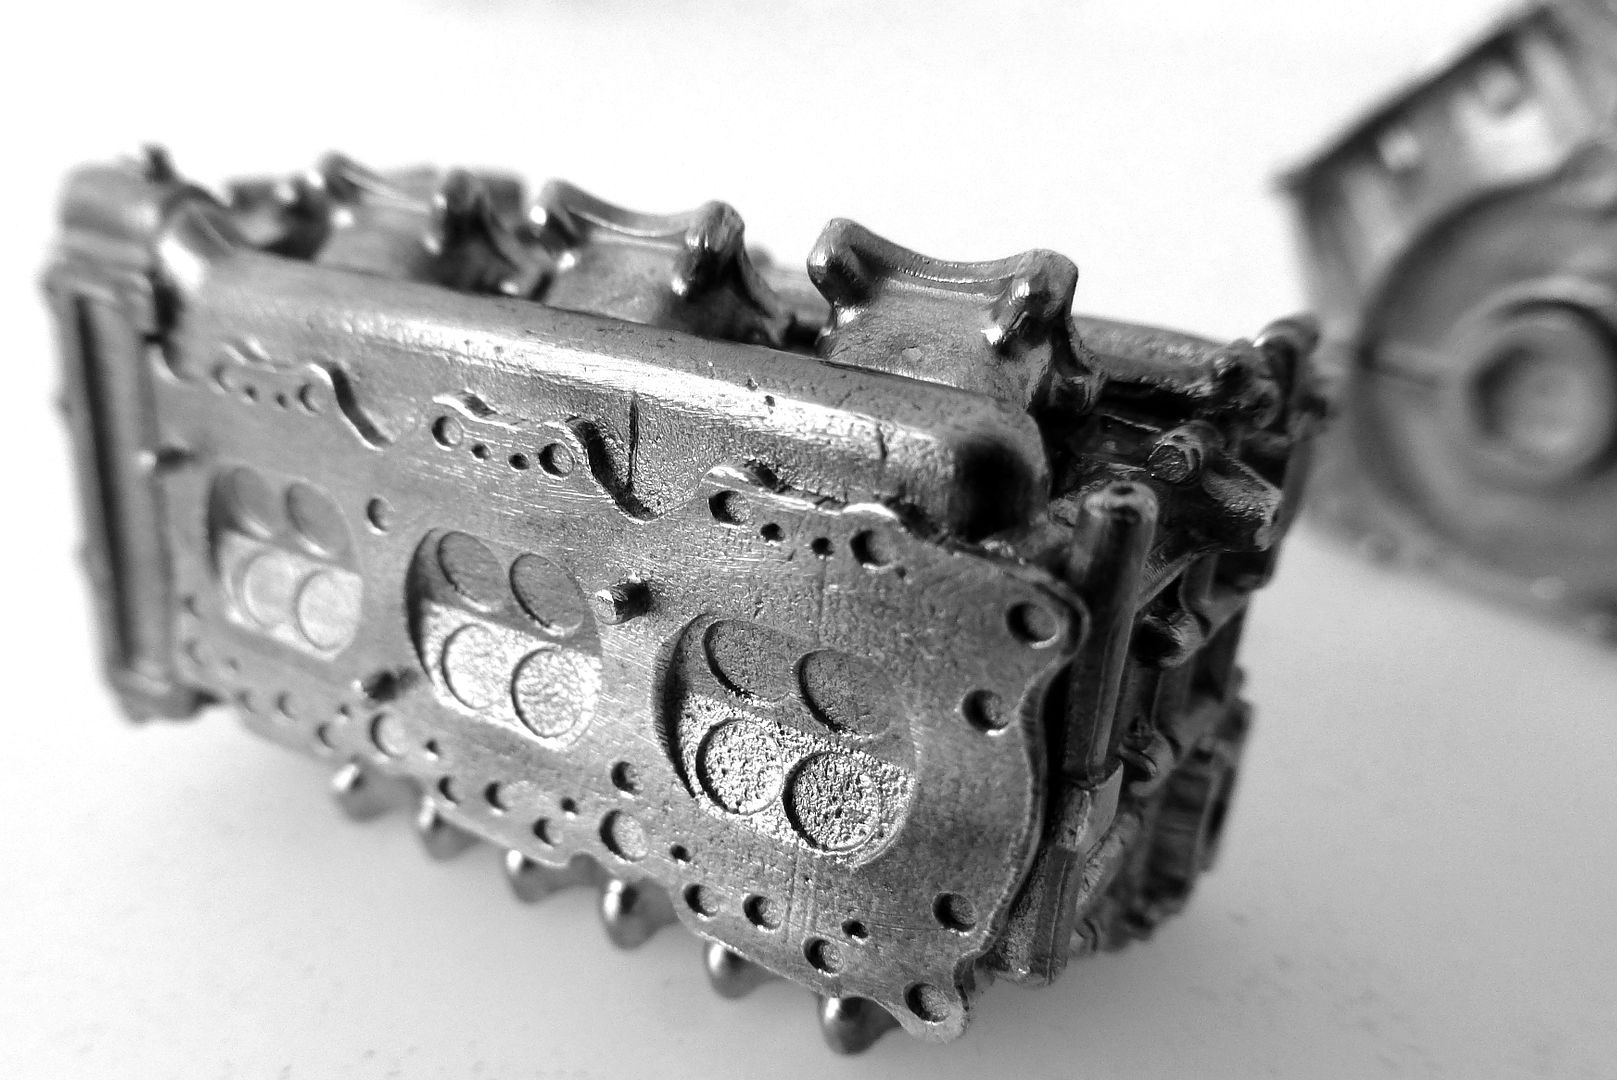
Yep - head gaskets...
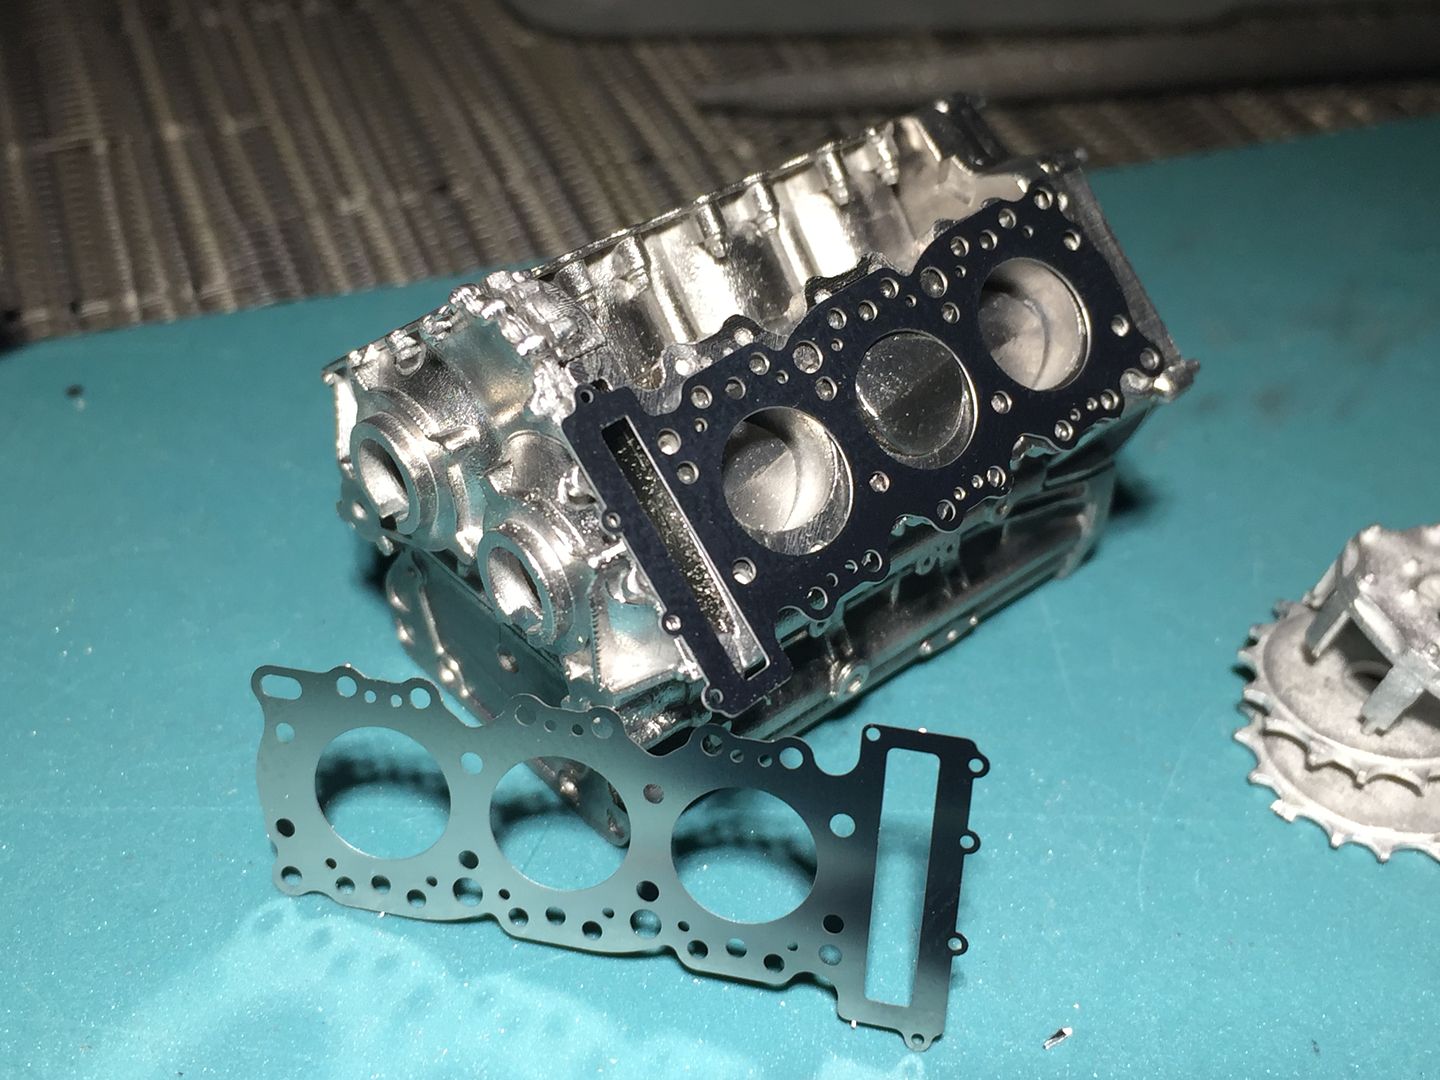
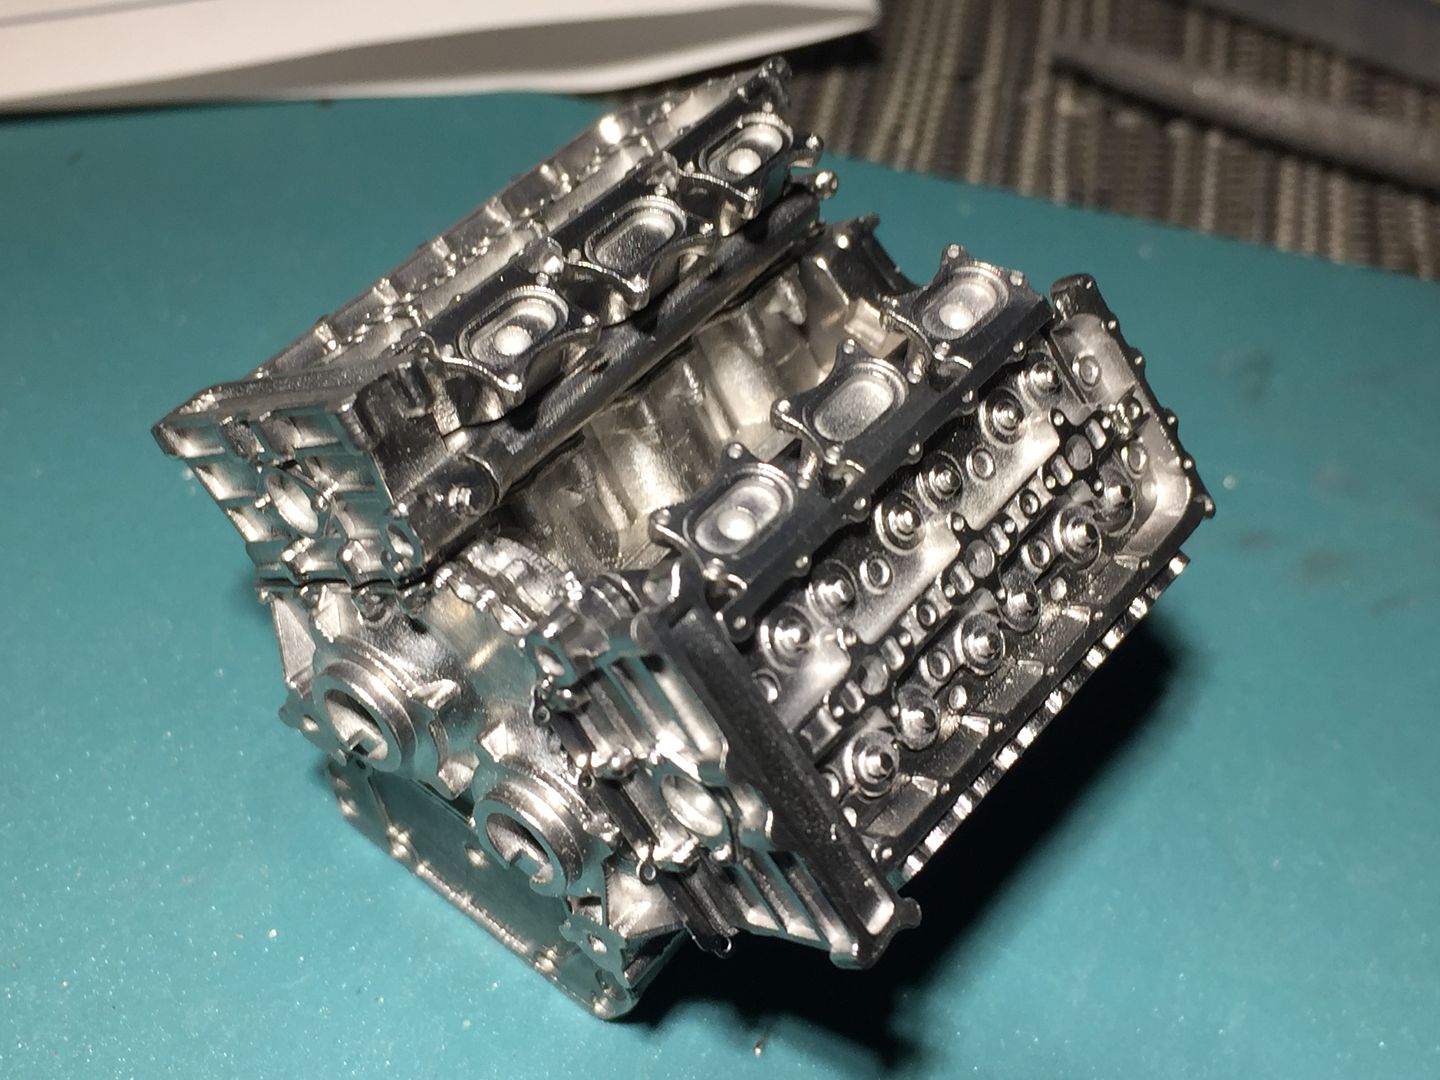
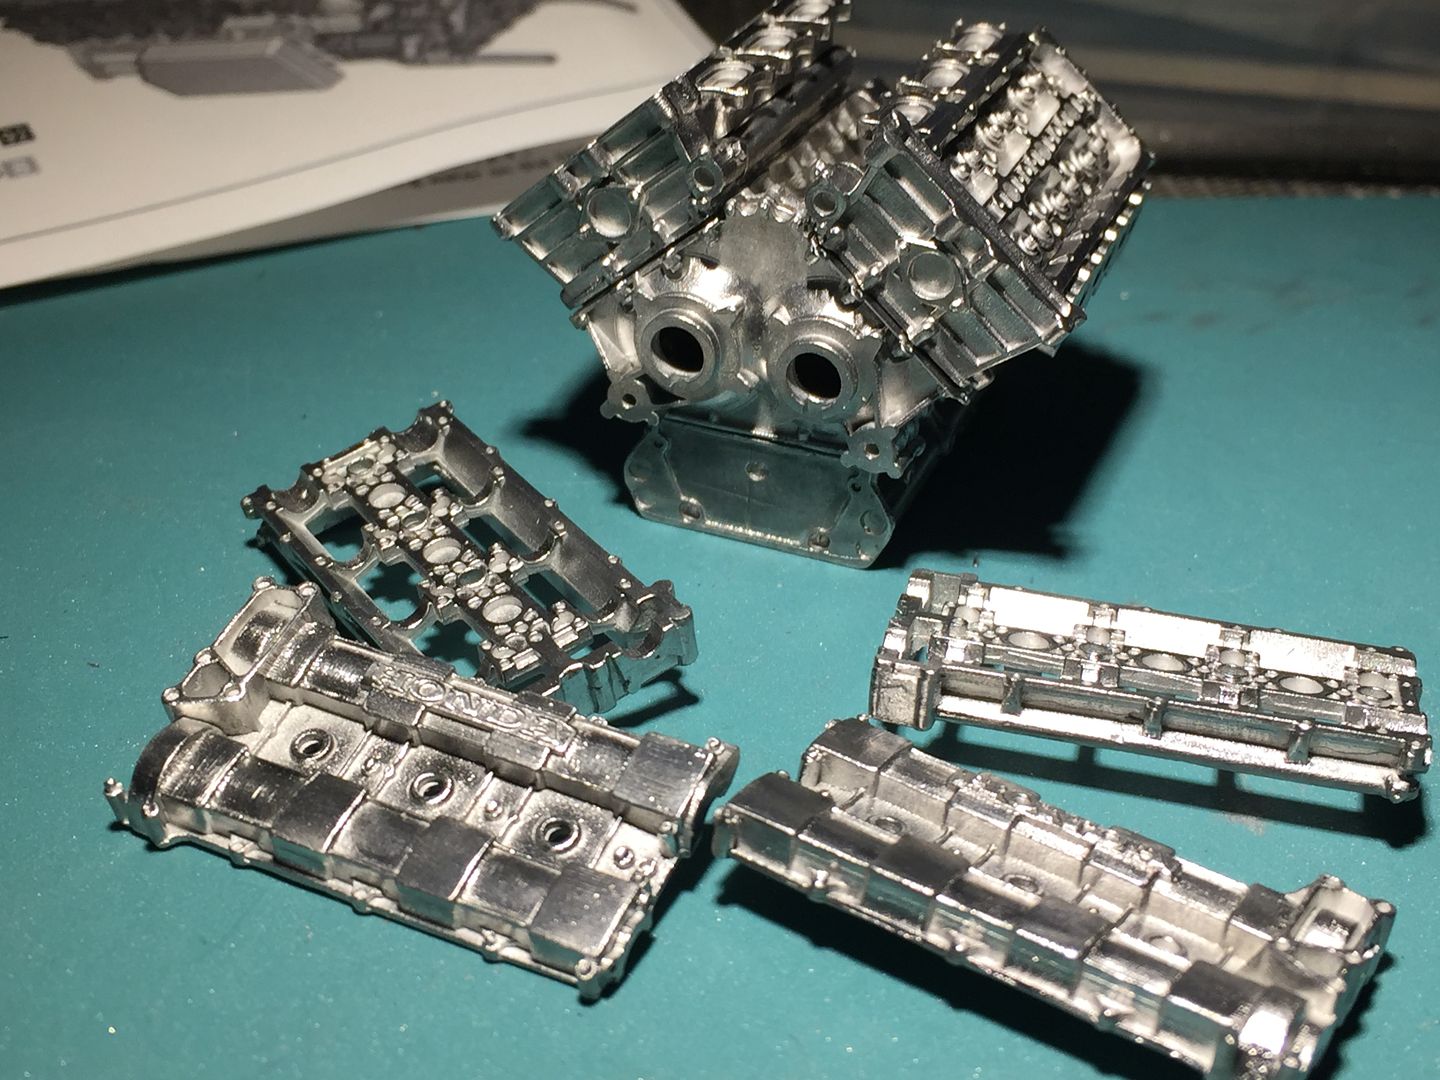
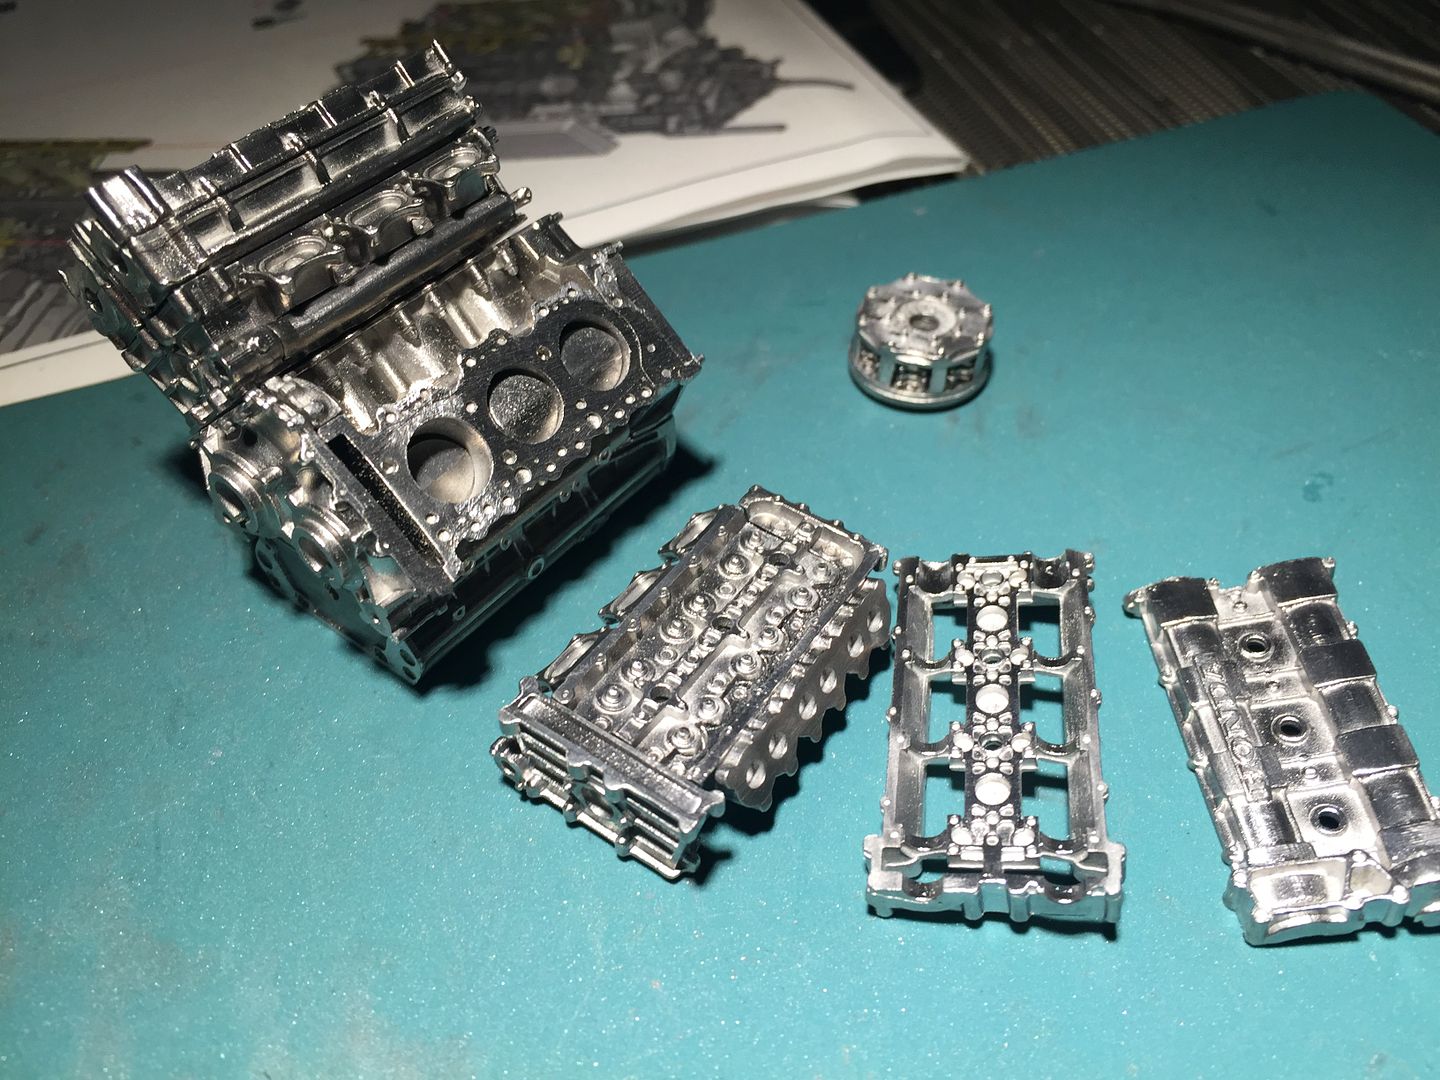
All the next pictures on this particular post show parts just popped in to place - not fixed, as things will have to be painted before assembly - hence the wide gaps in some places...

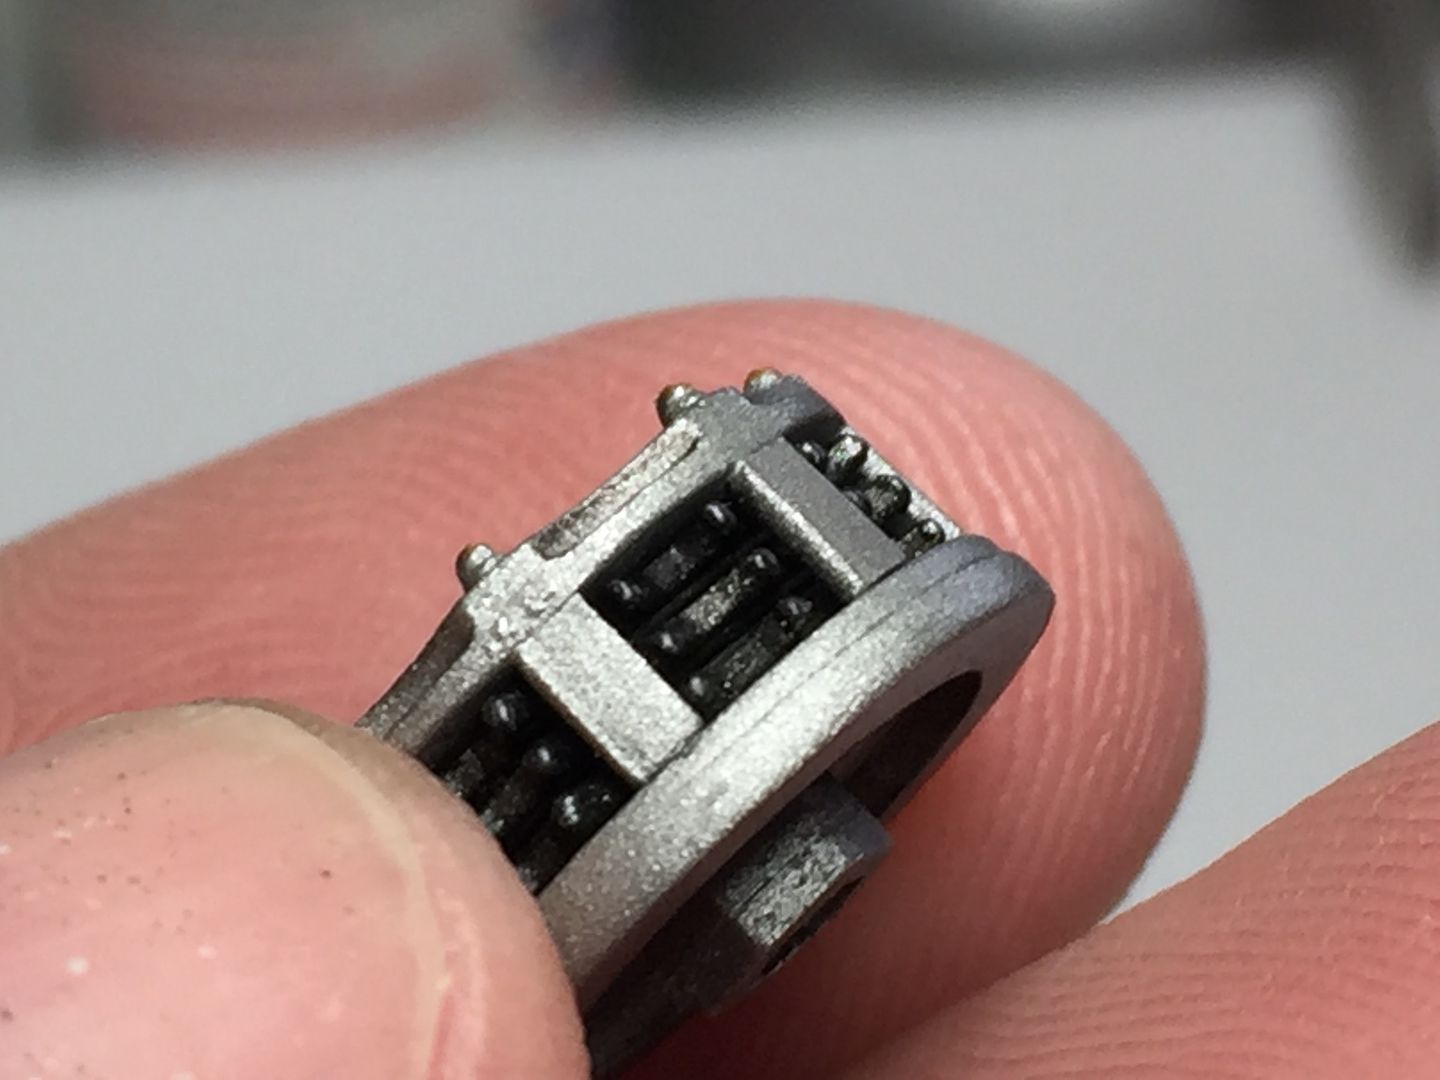
That little clutch has 3 separate plates inside!
I'll do a side-by-side comparison shot tonight - but here is the engine from the Williams FW16 - a few years later.
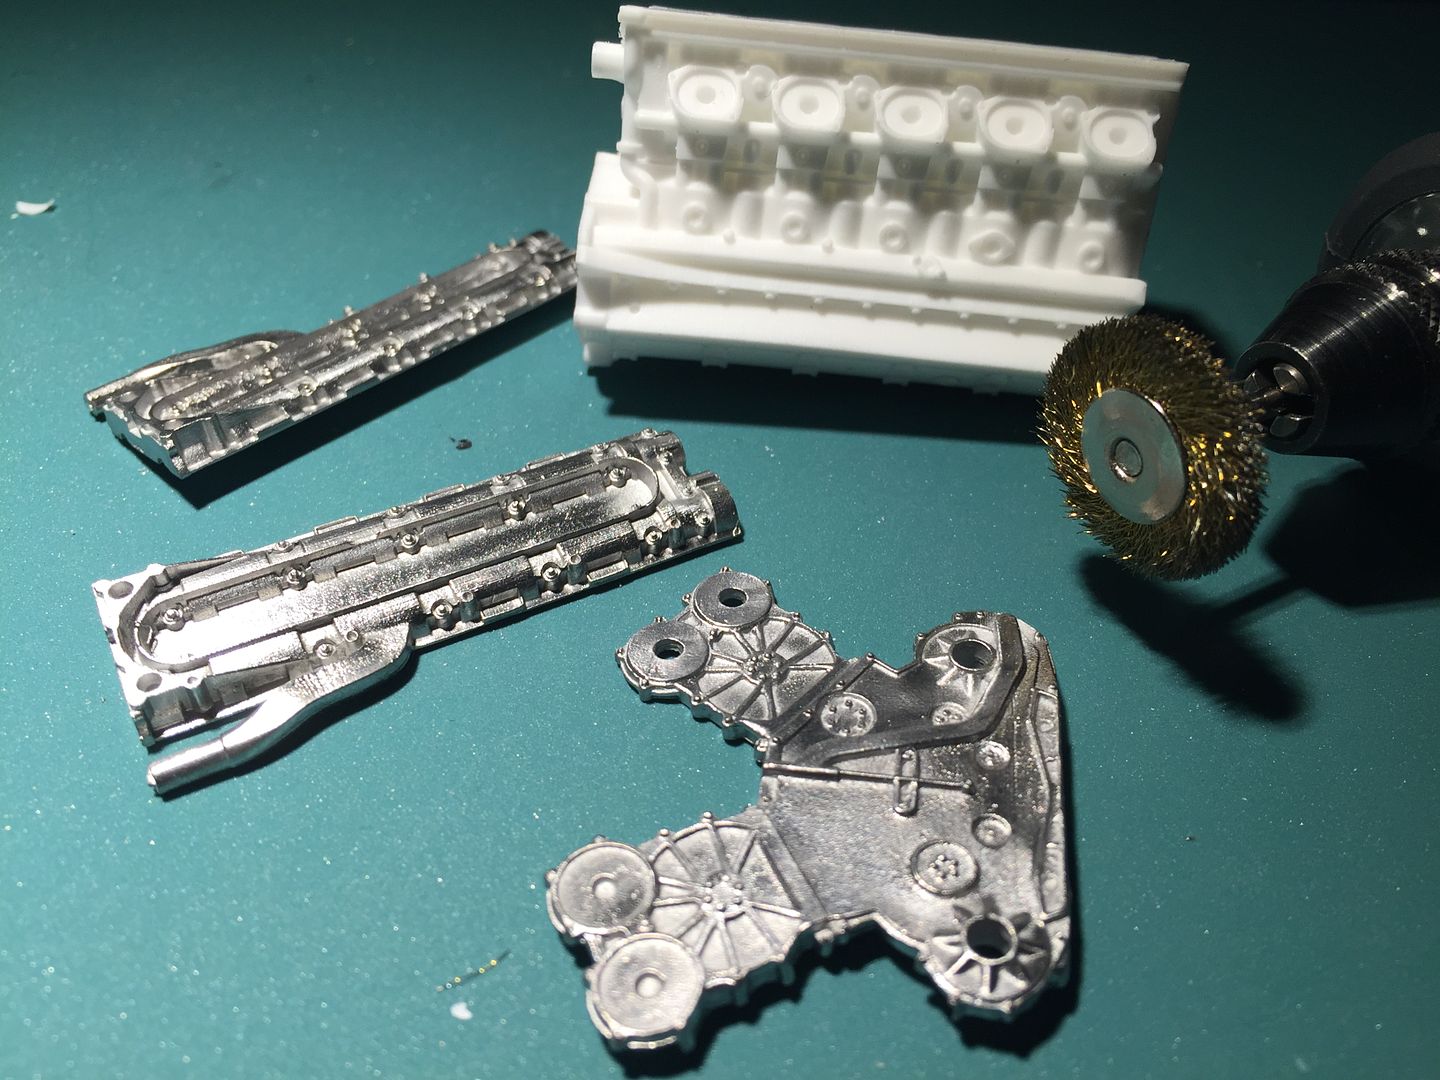
Obviously these parts are quite chunky - you need to be careful wheel doesn't 'snatch' or 'catch' on anything and maybe cause a breakage- again, a slow speed is fine. Also does not take much pressure. I'm also using sanding sticks and files, and sanding pads...
This pic shows the brass wheel on my dremel - key is that it is BRASS - not steel wire. This is what I use to clean the parts.
Also does not need hi-revs - just low-middle. Not screaming.
Other advantage is that it does not polish YOU - so I am fine holding the pieces by hand and working carefully - it doesn't hurt/burn/cut etc - BUT wear glasses of some sort because the wires DO come out of the wheel...
(just to add - I am only using this brass wheel on the METAL - not the resin!)
Starting to assemble the engine now - but will have to paint parts before gluing together.
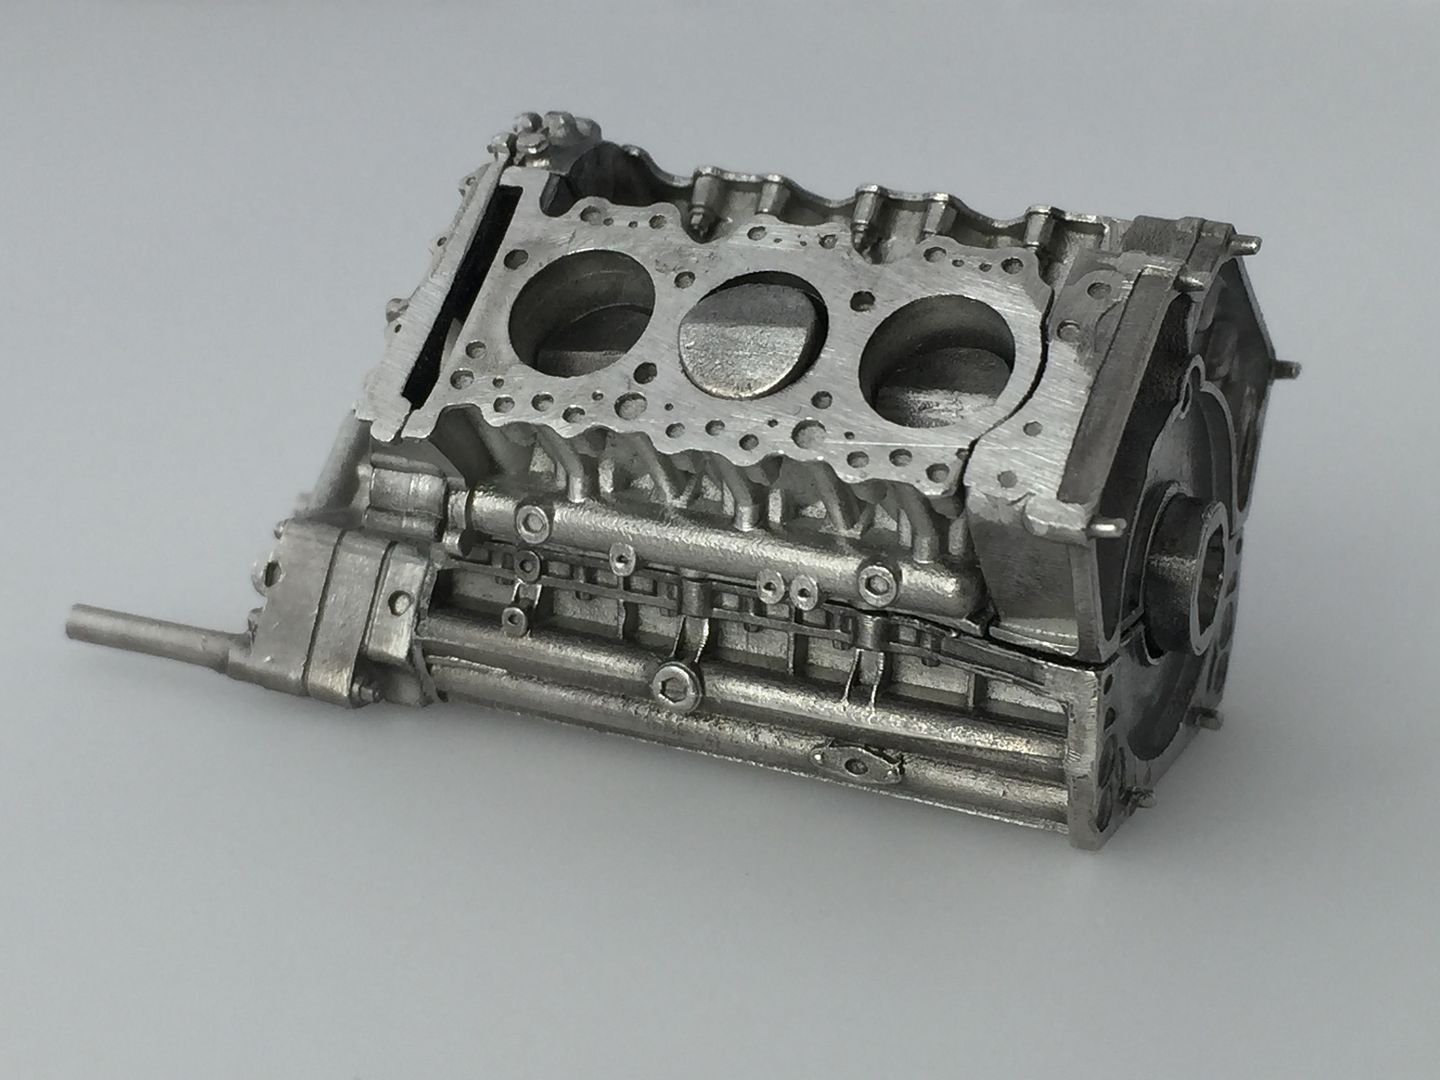
Priming...
Another MFH kit of a classic car - I seem to have defaulted to Senna cars in my recent kit buying frenzy - or McLarens in general.
I have the Tamiya MP4/6 and this will compliment it nicely.
I also got this book as a reference, but there is so much on the internet as well. With these kits, you really have to decide how far you want to go in terms of building the kit 'OOB' or adding a lot of details. A common 'upgrade' is replacing the cast in nuts and bolts with actual fittings. I'll do this in some places...same with rivet details.
Box contents! We all understand the pleasure taken from first opening these boxes and seeing what is in there, the quality - what might be missing etc etc - MFH does not disappoint - BUT - I wish they packaged the soft metal parts better - they are thrown into small plastic bags and piled in the box, next to the internal box that contains the resin parts - it certainly does not protect the longer, thinner parts from getting bent out of shape - on something this expensive, I would expect more...
Having said that - I did have a part in another kit that was broken, as a result of being bent (a barge board on the MP4/23) - MFH sent a replacement part instantly...
FYI - I have bought these kits direct from MFH website...very good, very quick service.
Anodized ali wheels...
...wooden plank!
...note the head gaskets. Never to be seen once fitted!
Tiny parts including rivets.
The black bits are rubber boots for the electrical fittings.
Resin body parts...
Top Tip! Sort out the parts...
I separated all the metal parts into little ziploc bags, grouped as elements - such as 'brakes' or 'pistons' - makes life so much easier to tackle each element as unit.
So, I'm starting with the engine.
Files and sanding sticks deal with the flashing, part lines etc. With these MFH kits, you must do test assemblies!
I have cleaned off all the parts with a brass wire wheel on a dremel. It cleans the metal but does not wear it away.
Amazingly on this kit, we have 'working' pistons! Once the engine is put together, you will never see these - but it is nice to know they are there!
...complete with pins...
Crankshaft...
Yep - head gaskets...
All the next pictures on this particular post show parts just popped in to place - not fixed, as things will have to be painted before assembly - hence the wide gaps in some places...
That little clutch has 3 separate plates inside!
I'll do a side-by-side comparison shot tonight - but here is the engine from the Williams FW16 - a few years later.
Obviously these parts are quite chunky - you need to be careful wheel doesn't 'snatch' or 'catch' on anything and maybe cause a breakage- again, a slow speed is fine. Also does not take much pressure. I'm also using sanding sticks and files, and sanding pads...
This pic shows the brass wheel on my dremel - key is that it is BRASS - not steel wire. This is what I use to clean the parts.
Also does not need hi-revs - just low-middle. Not screaming.
Other advantage is that it does not polish YOU - so I am fine holding the pieces by hand and working carefully - it doesn't hurt/burn/cut etc - BUT wear glasses of some sort because the wires DO come out of the wheel...
(just to add - I am only using this brass wheel on the METAL - not the resin!)
Starting to assemble the engine now - but will have to paint parts before gluing together.
Priming...
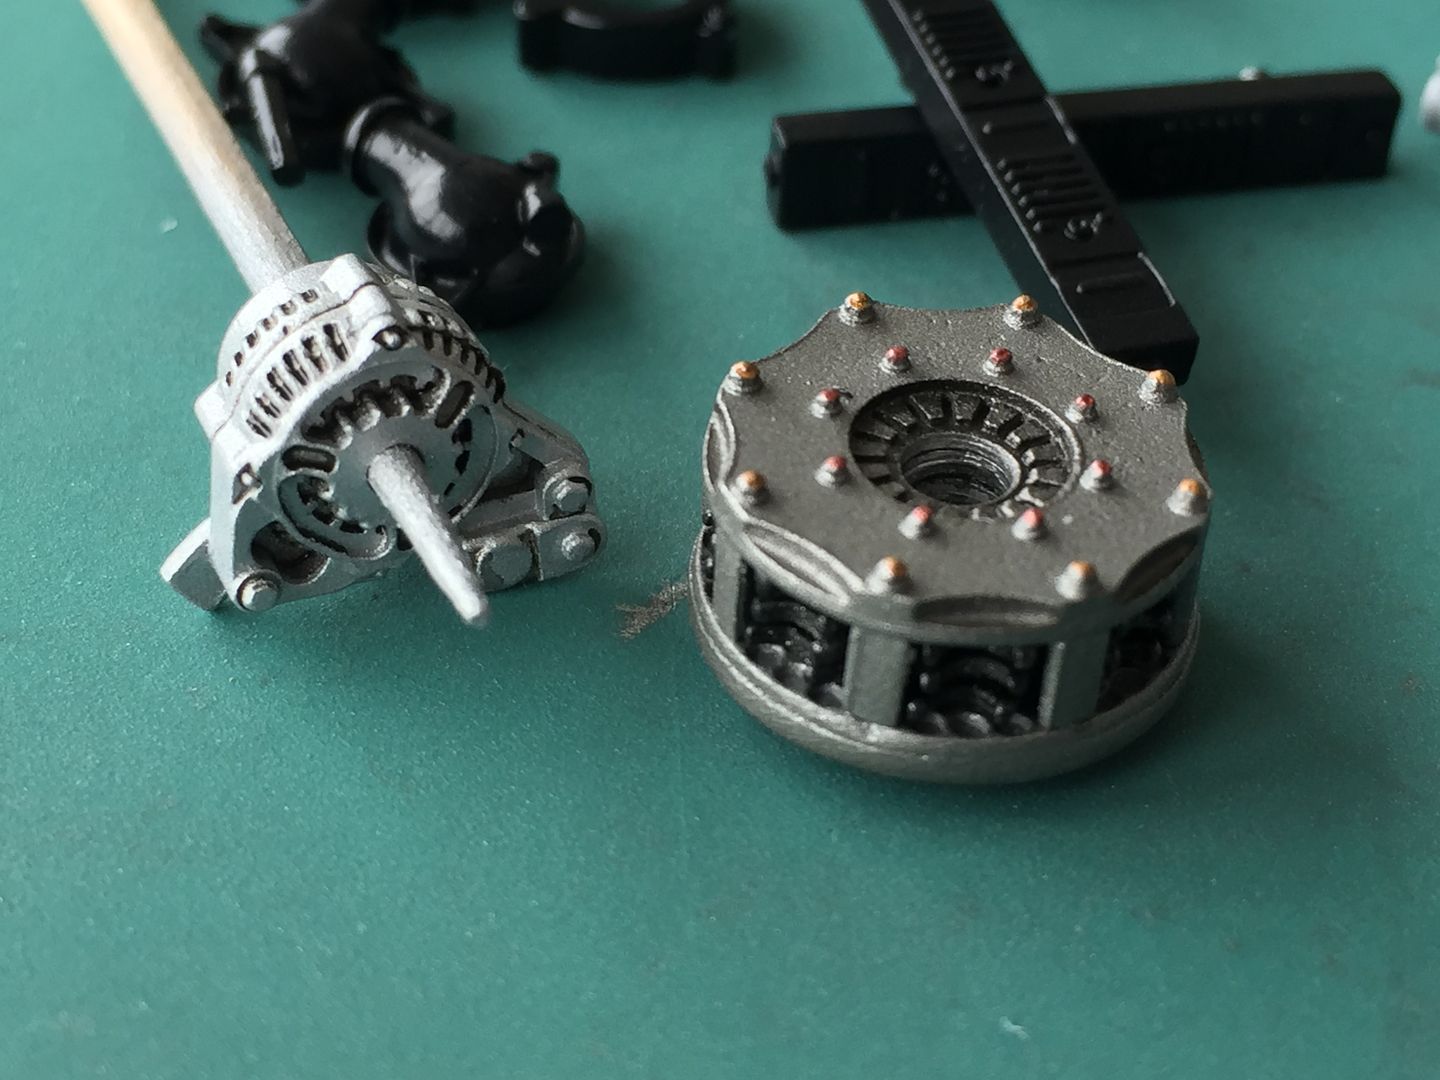
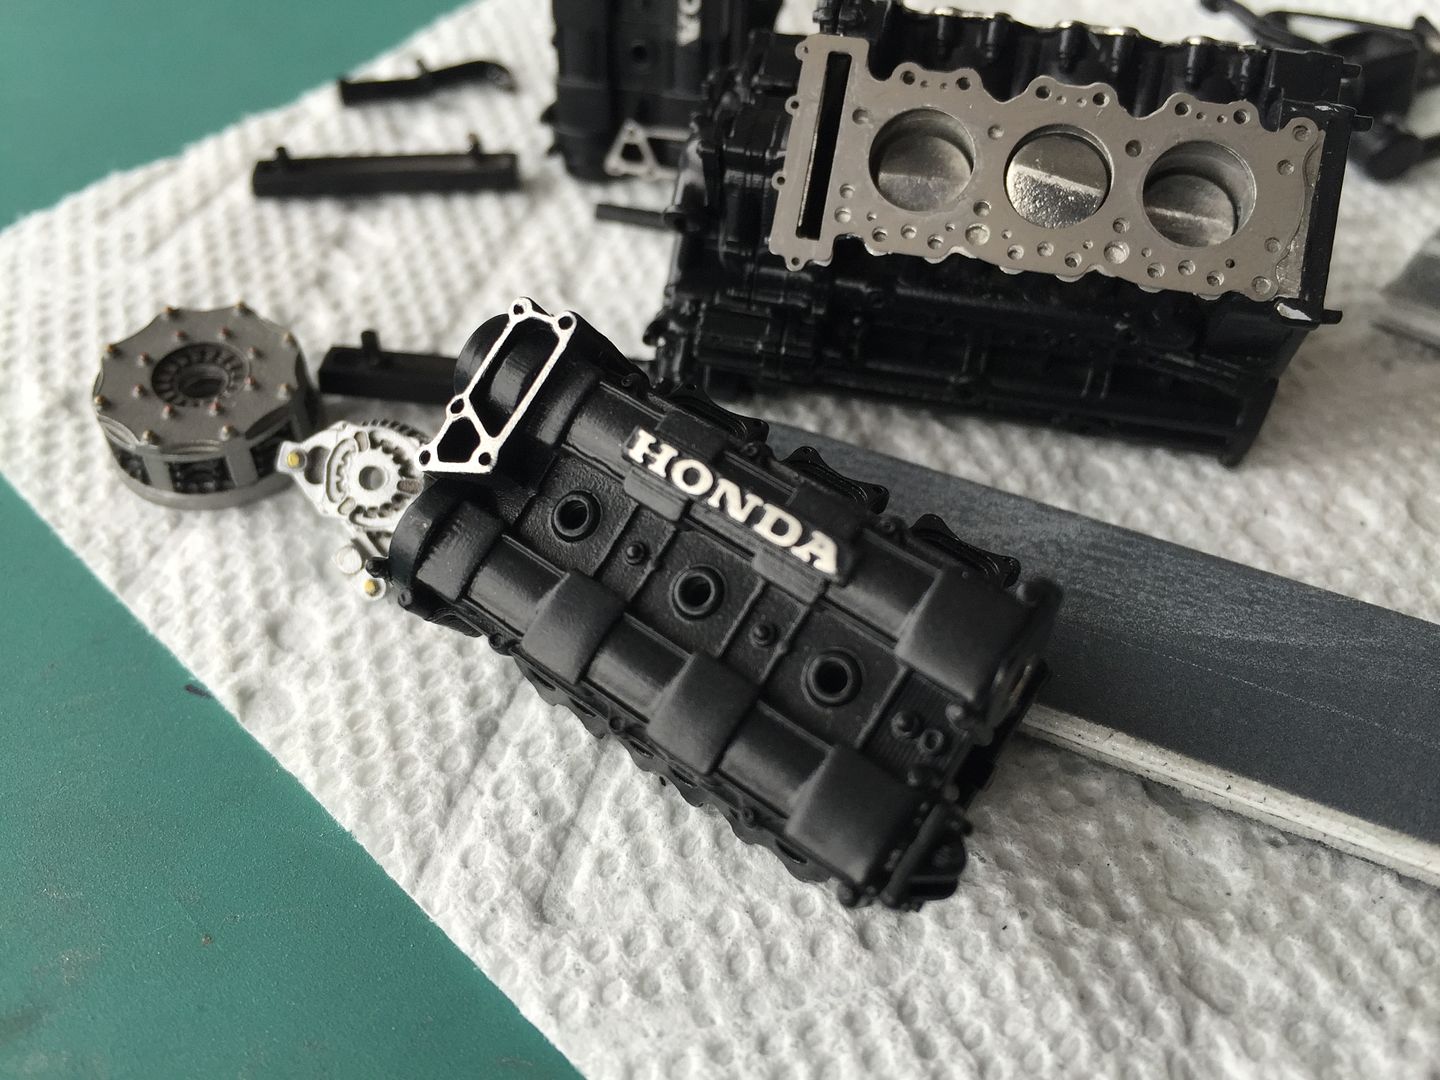
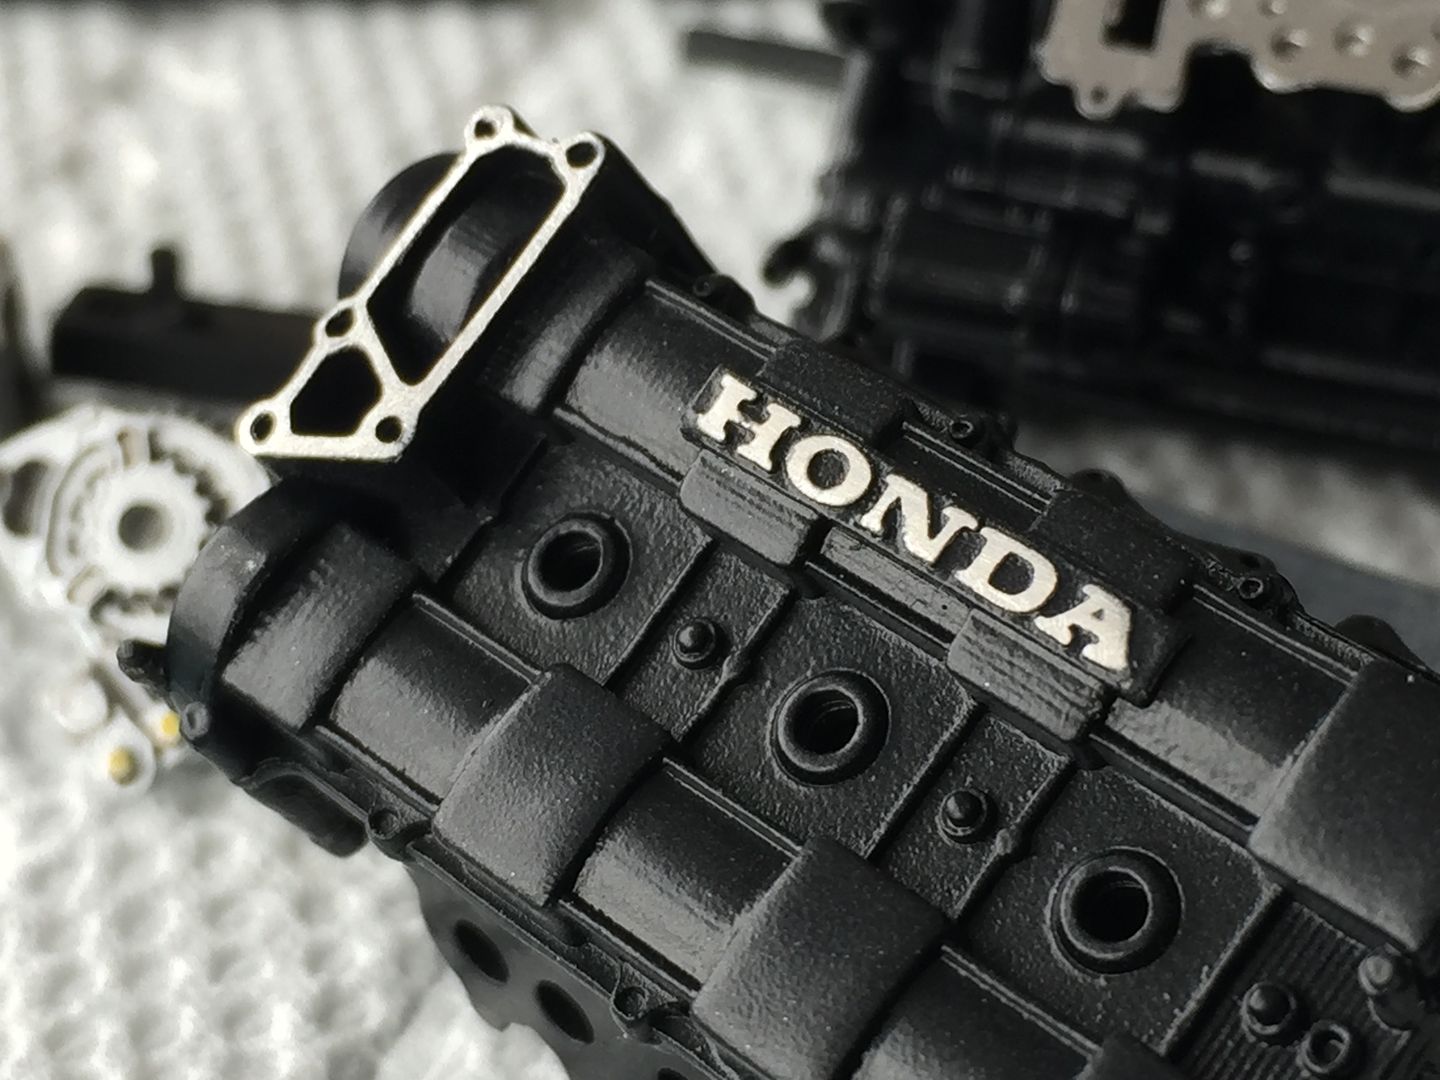
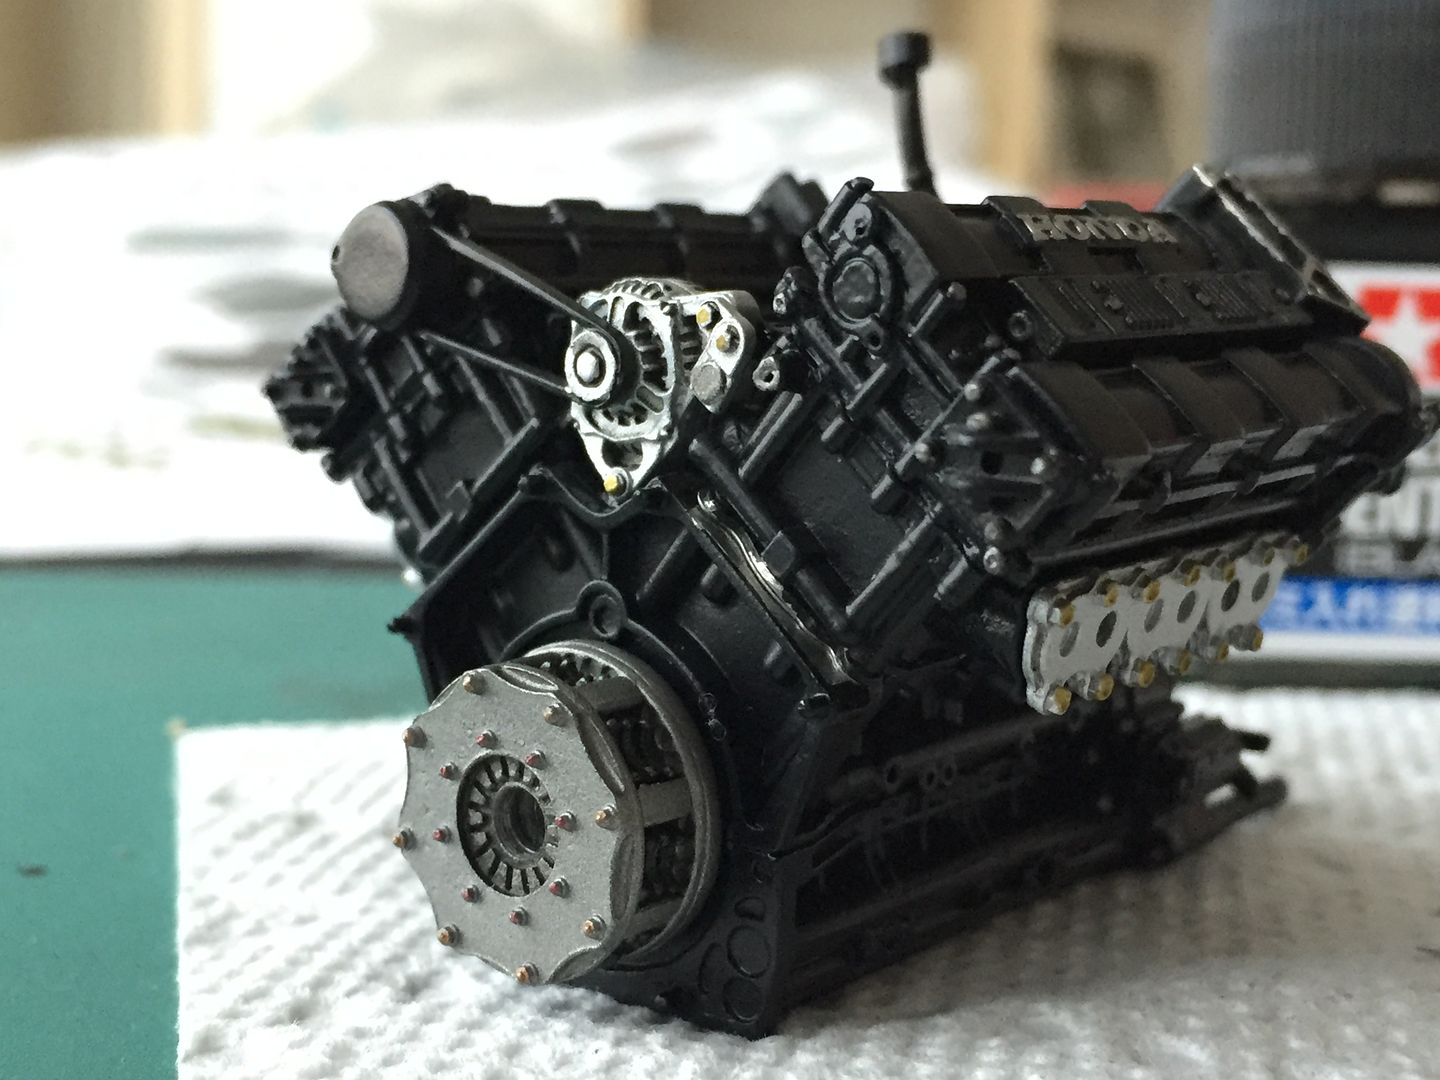
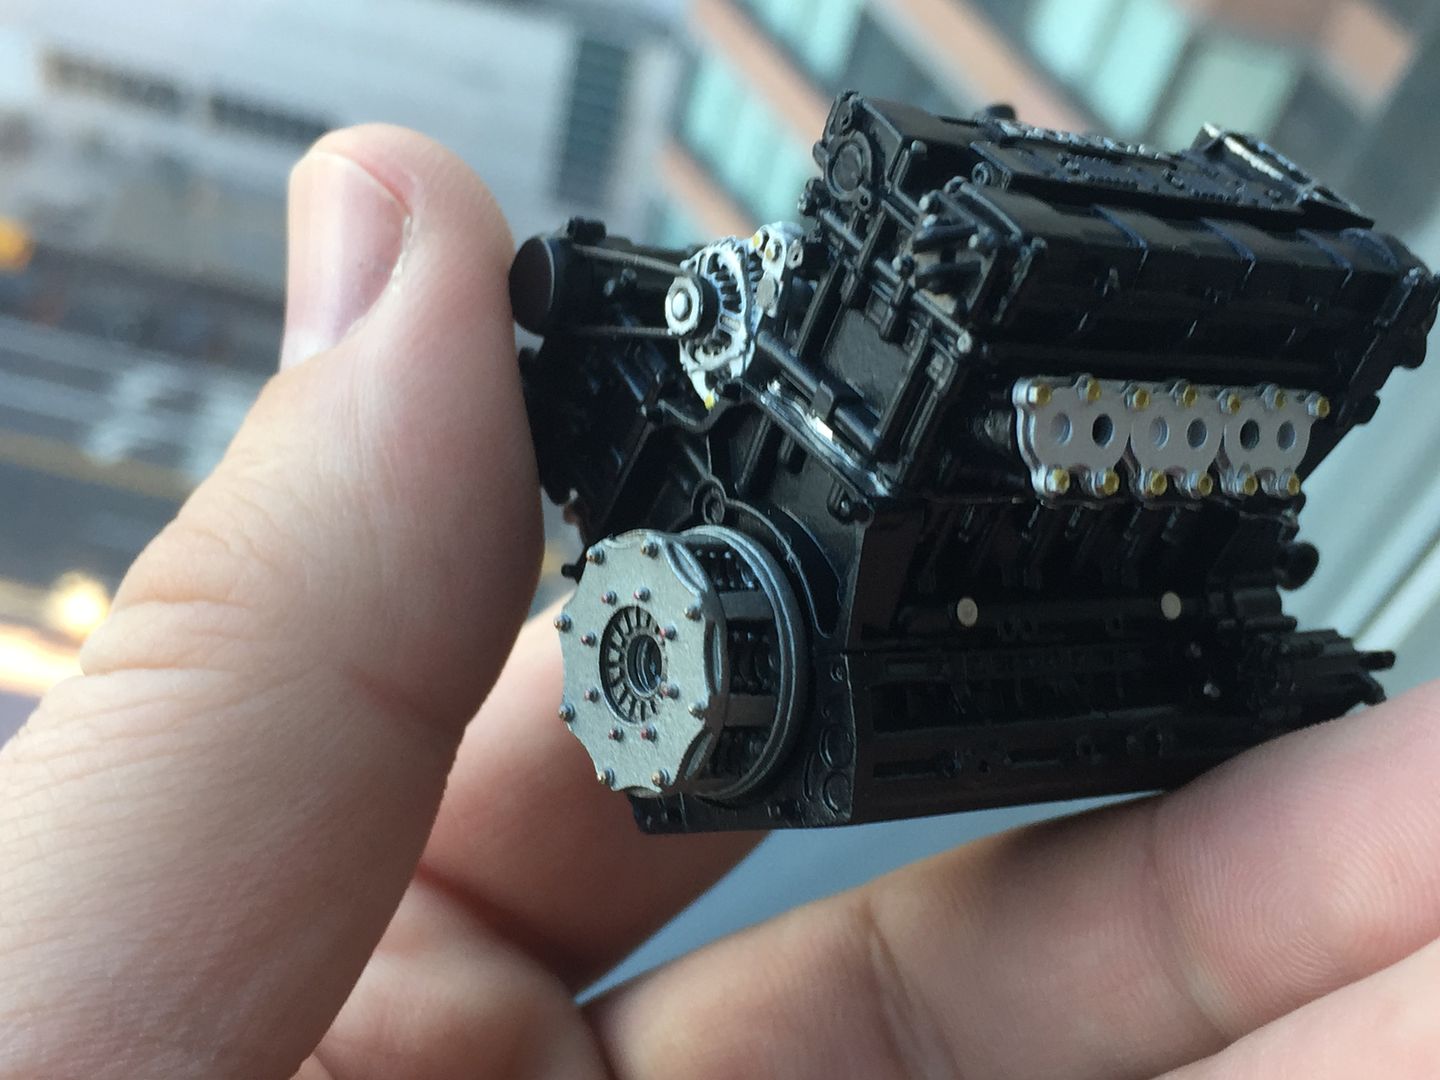
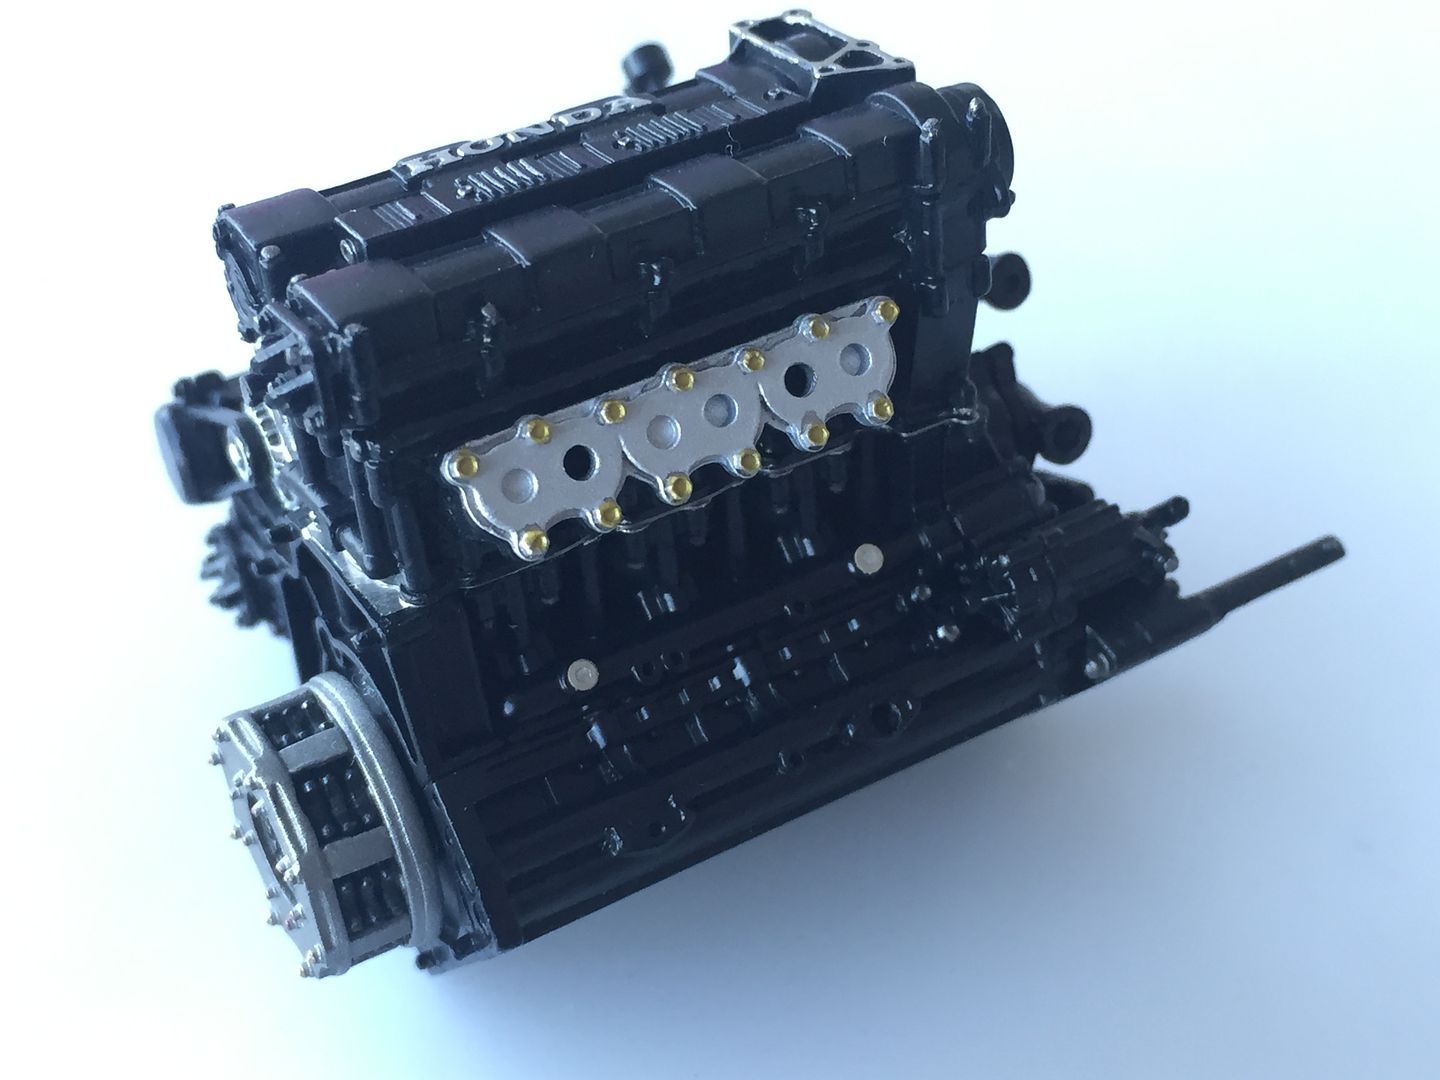
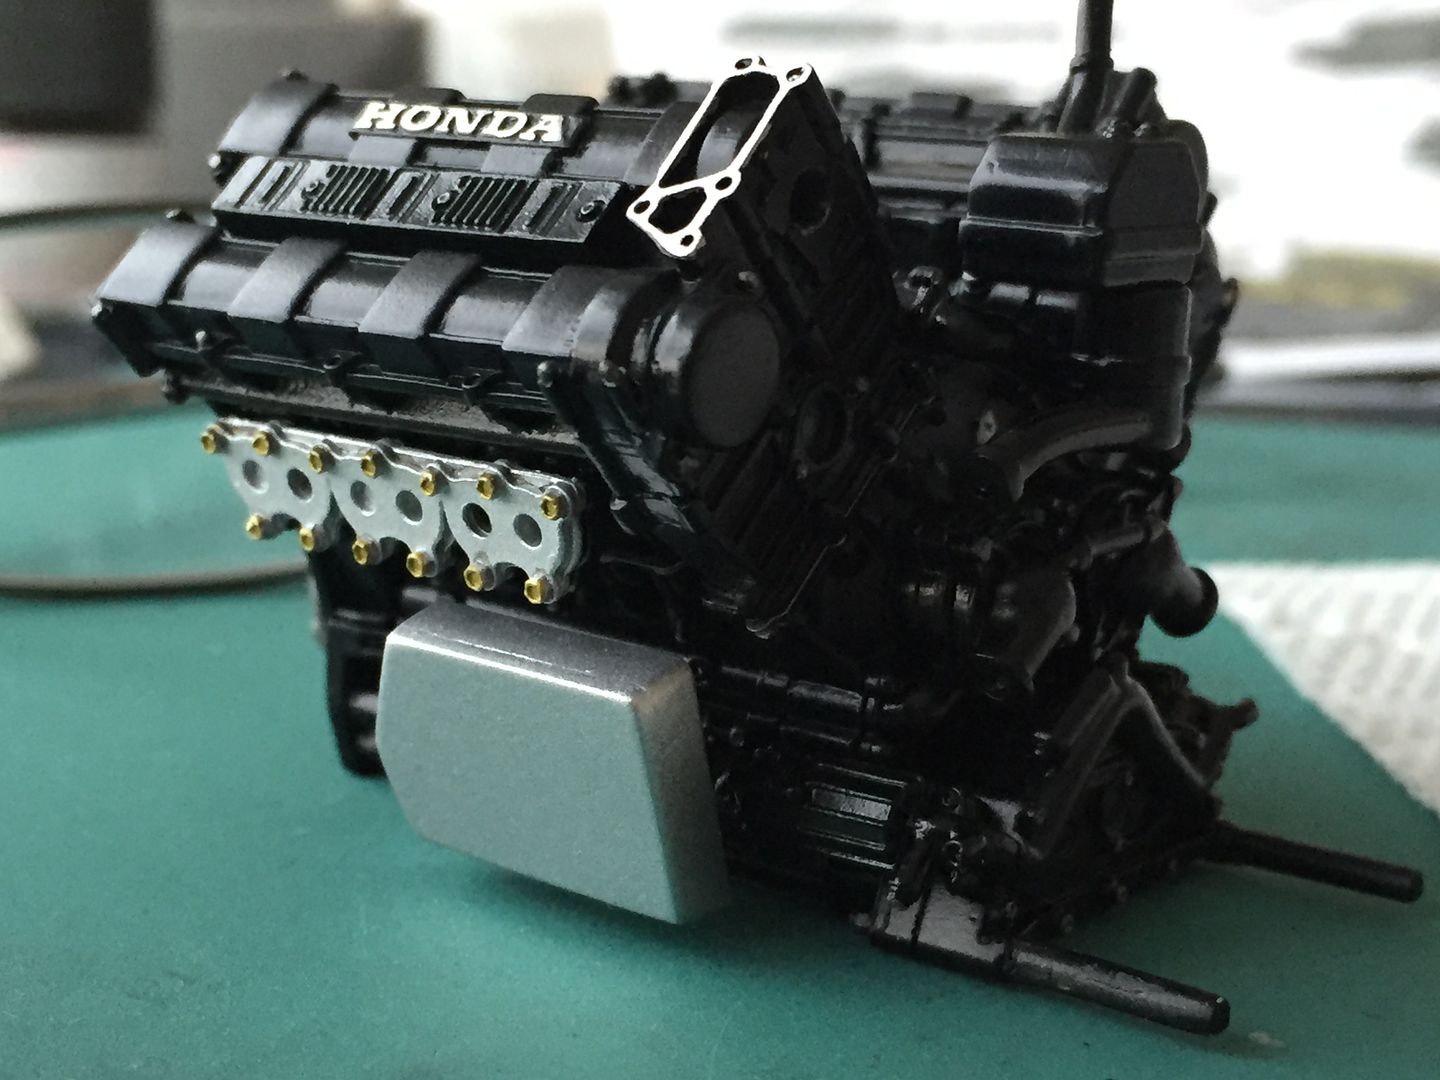
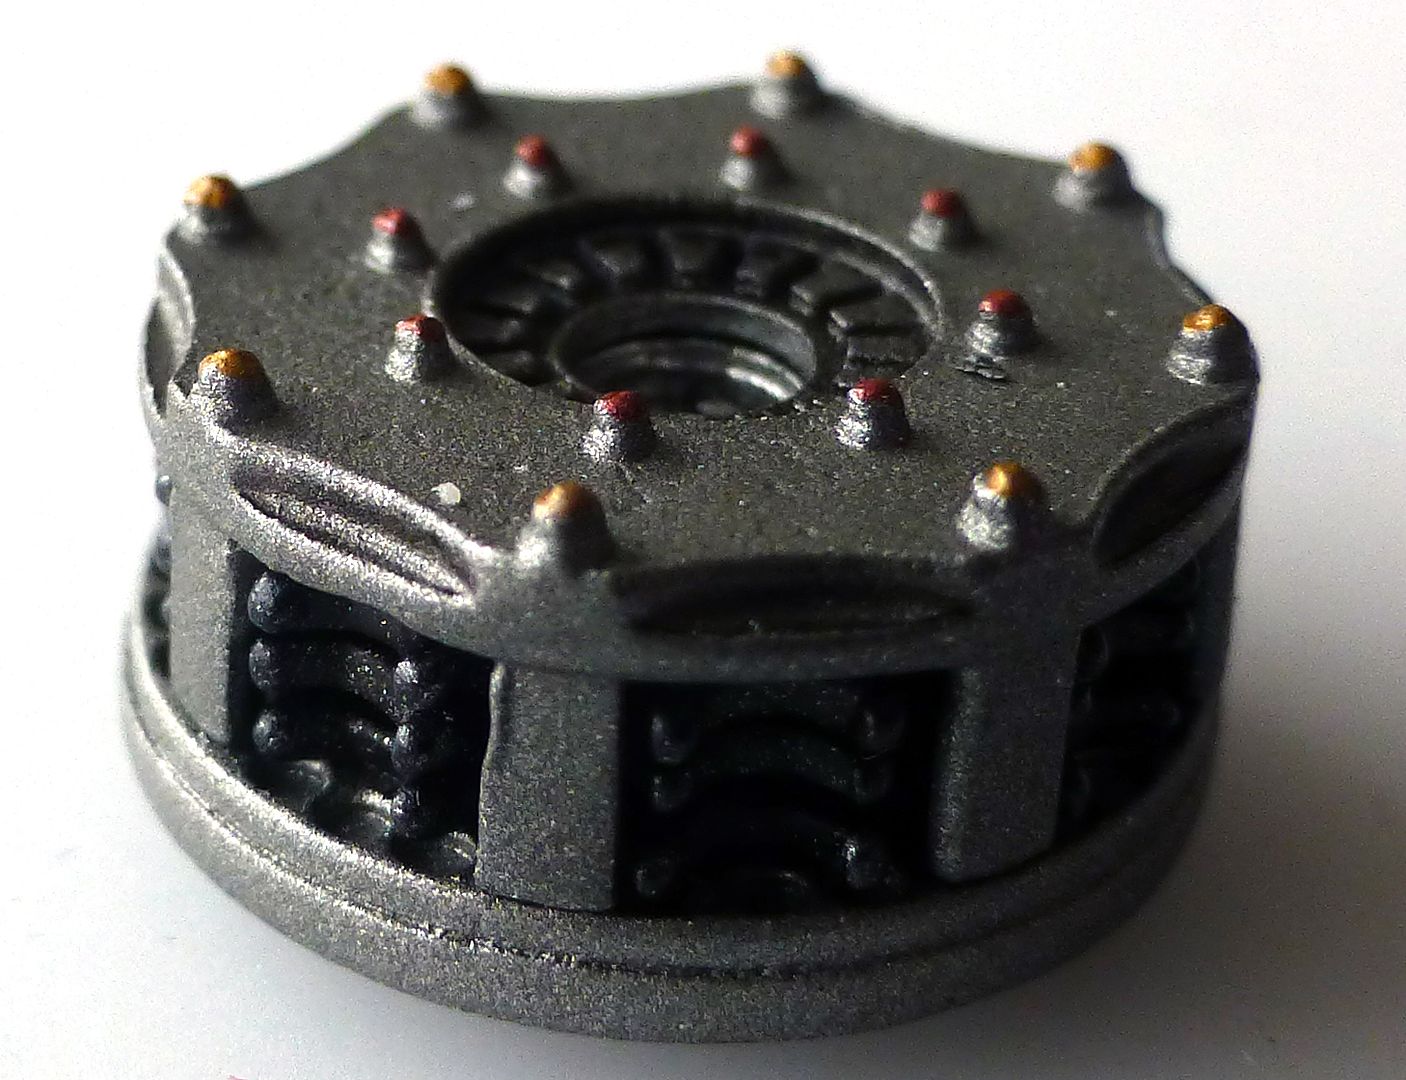
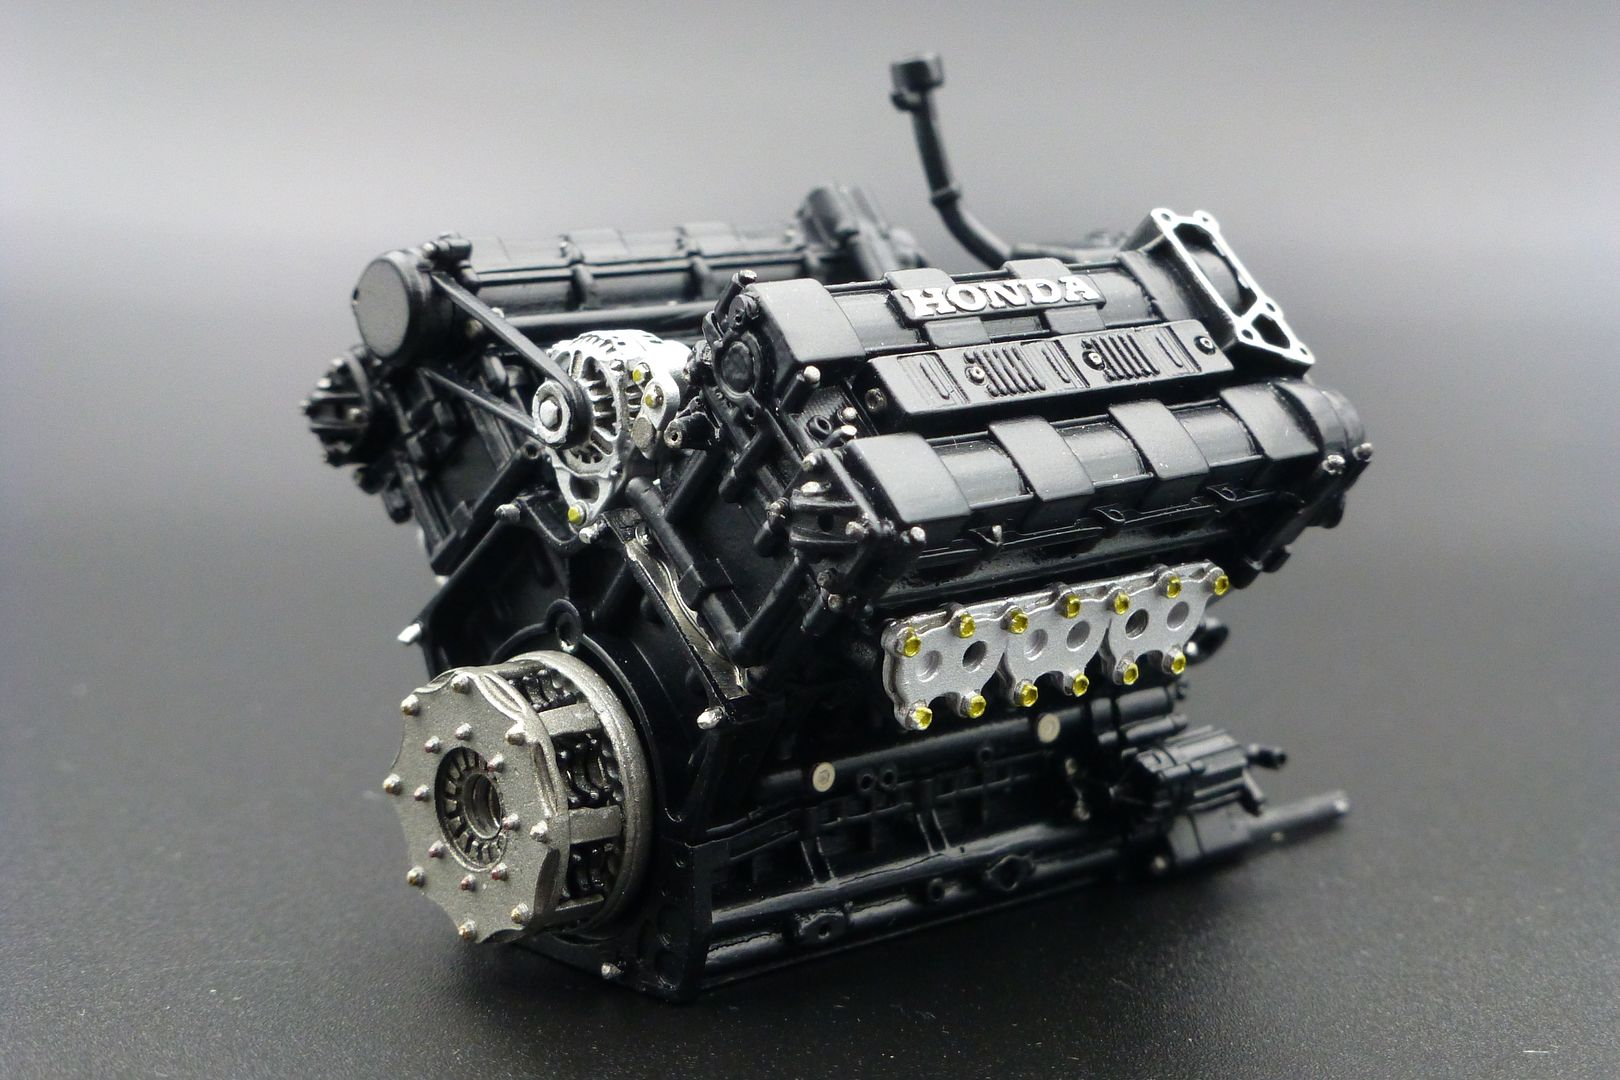
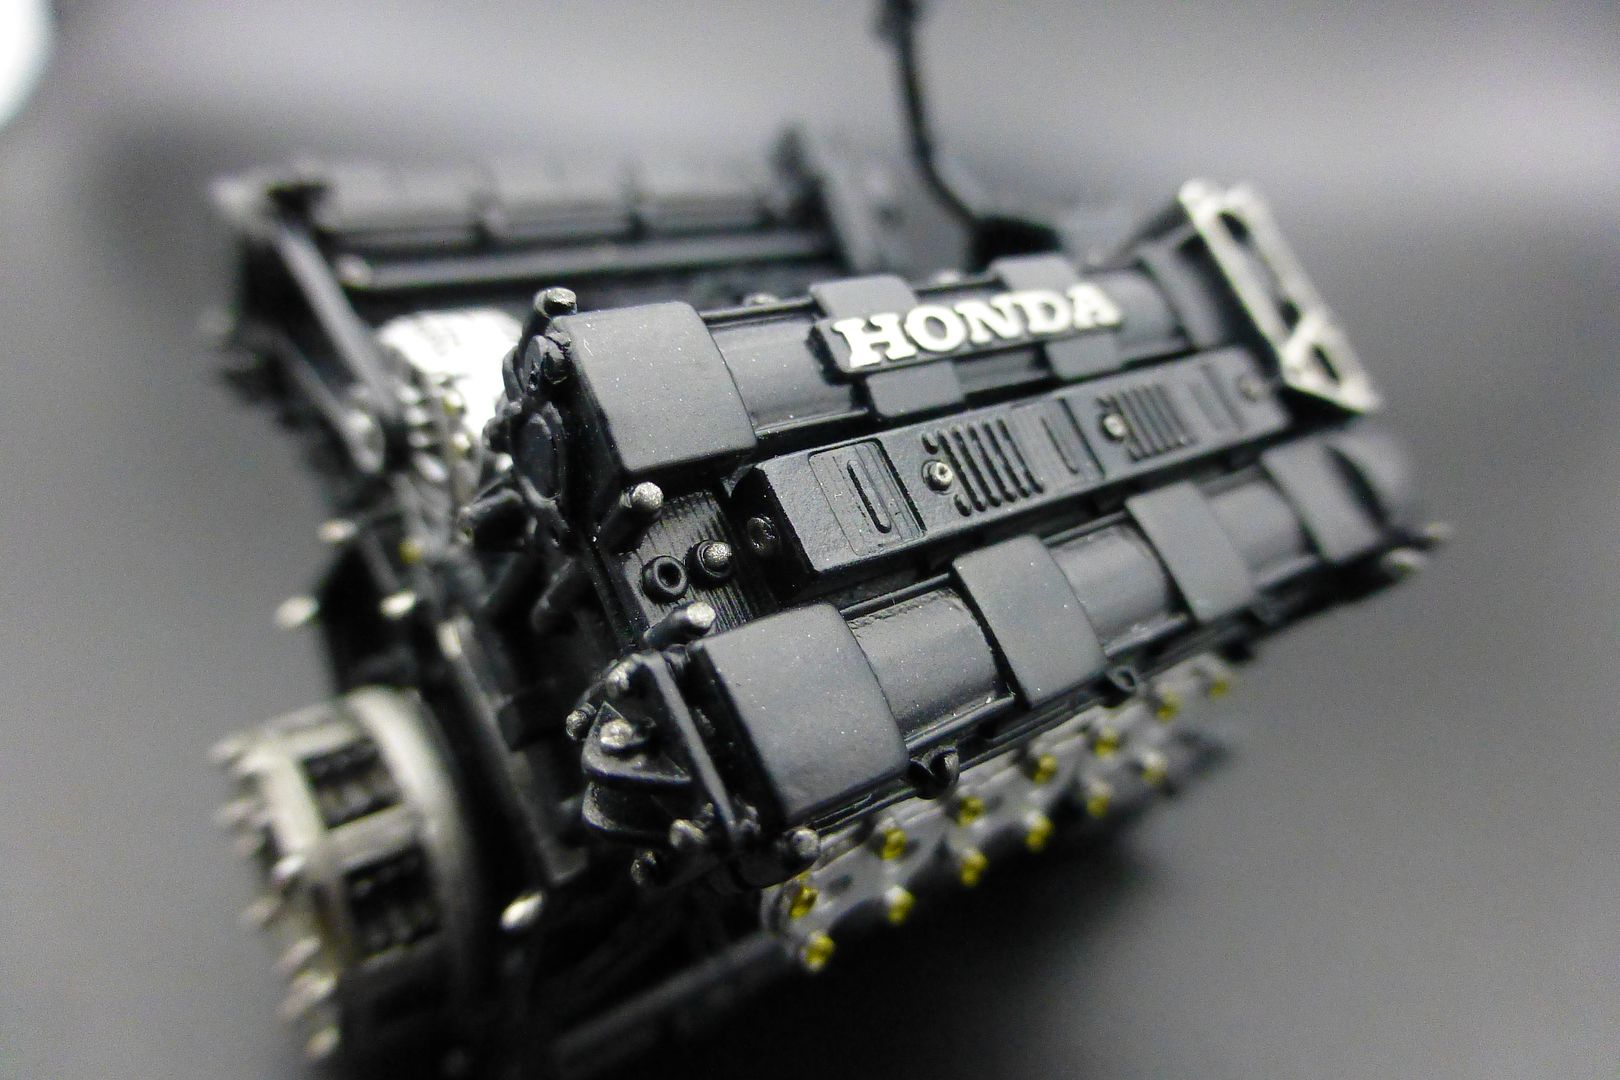
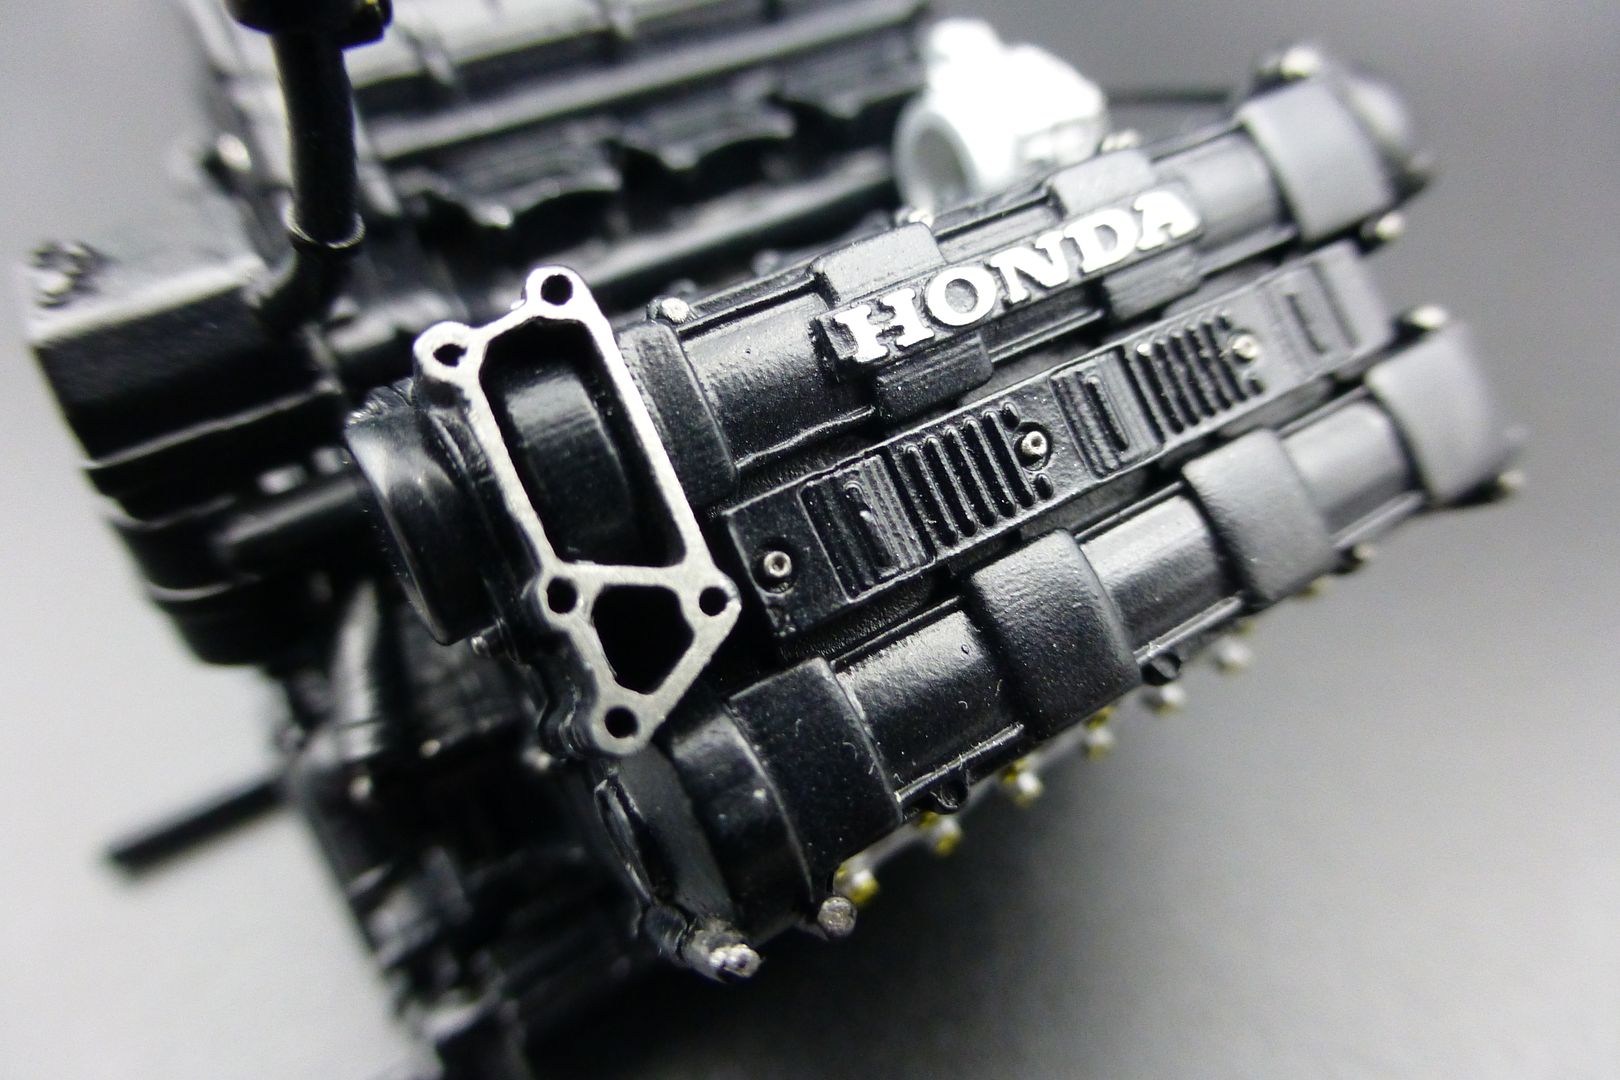
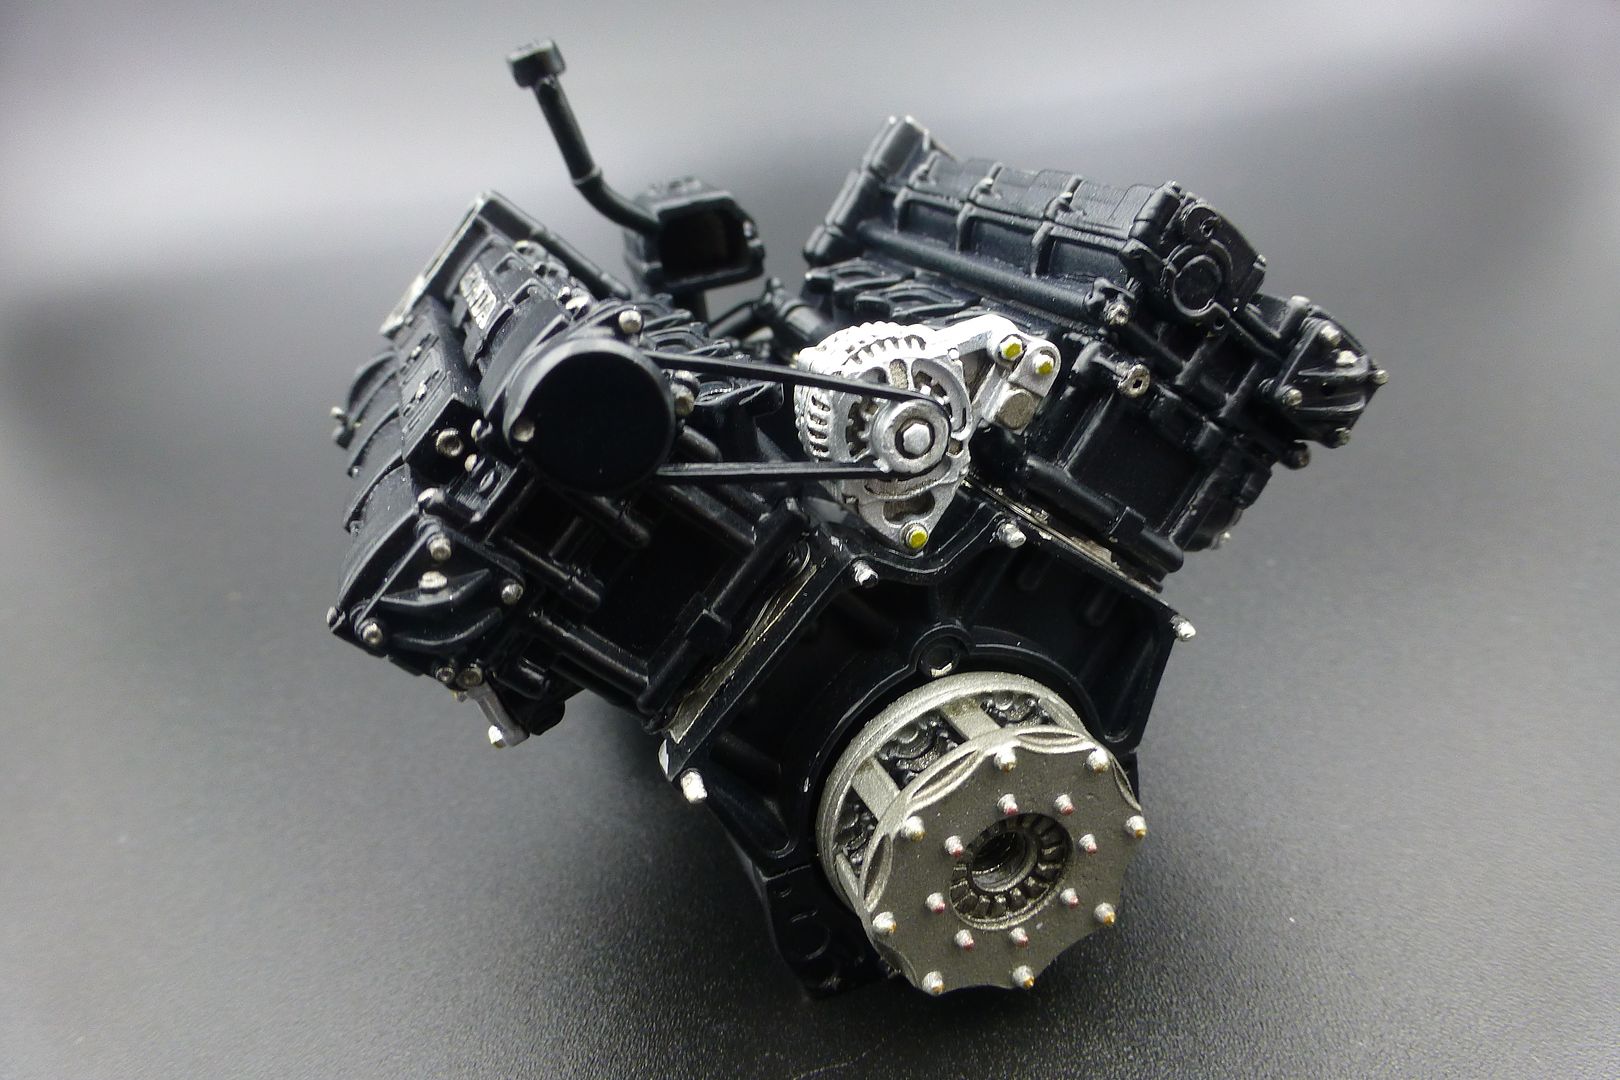
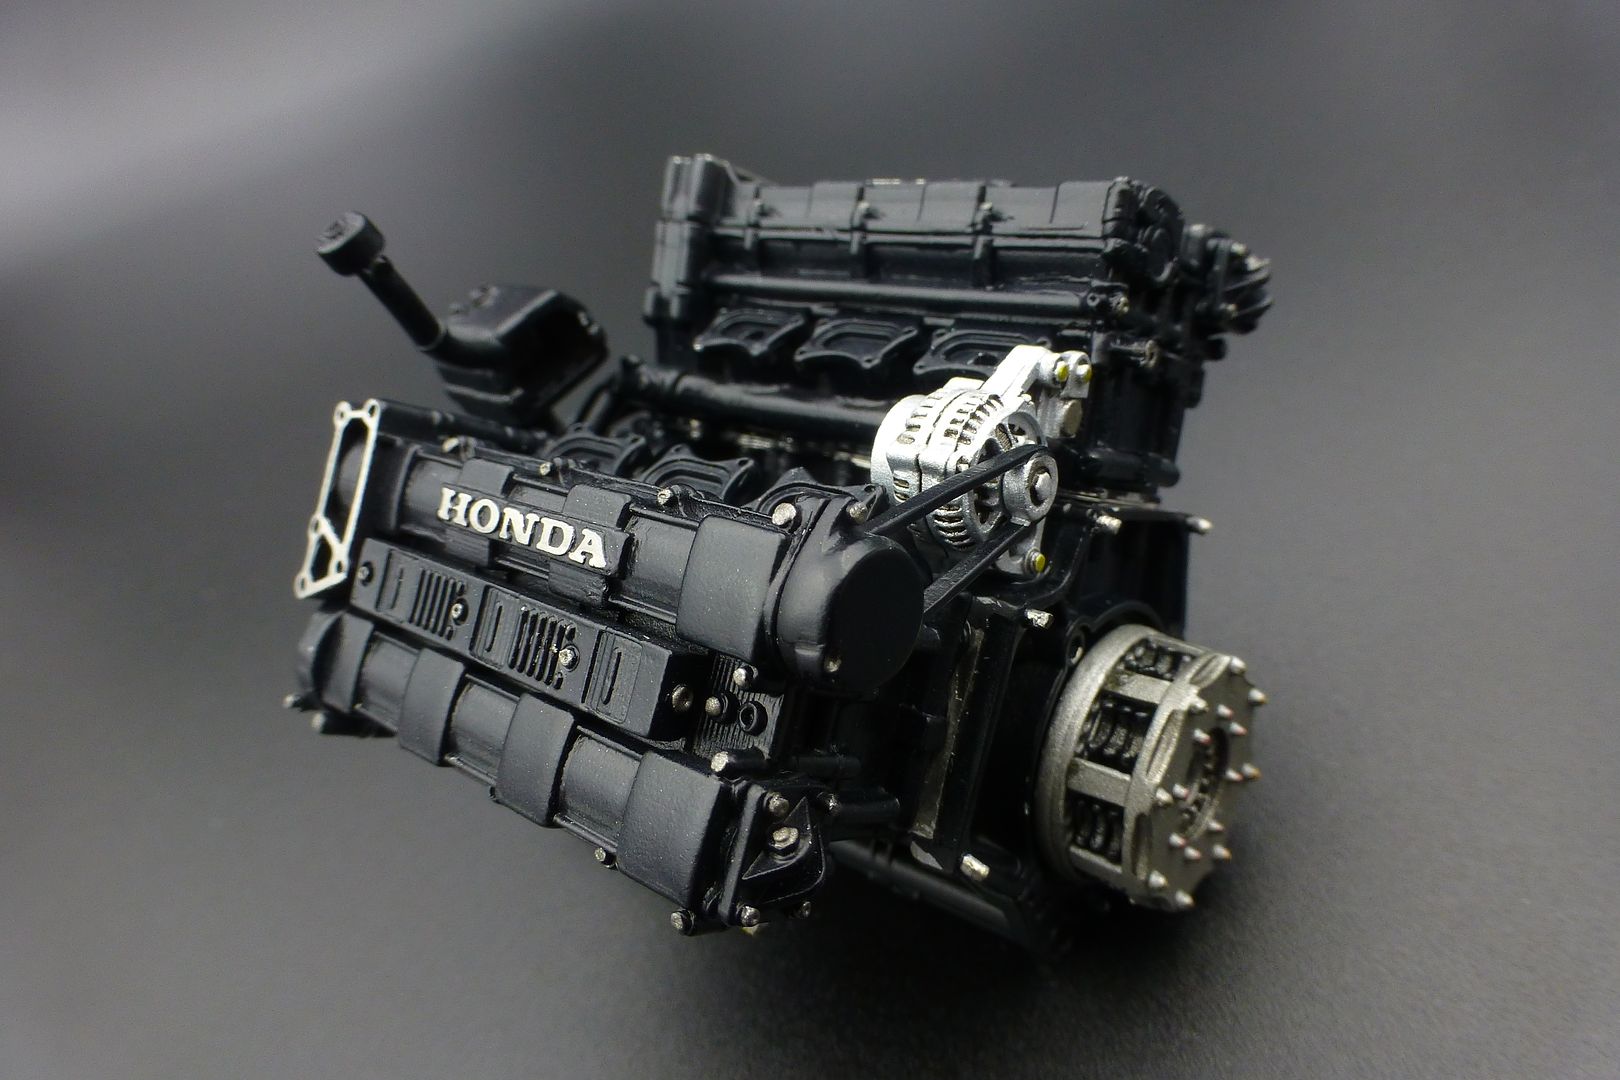
I decided to start small and make the clutch first - another beautiful part that you won't see once this kit is fully assembled...
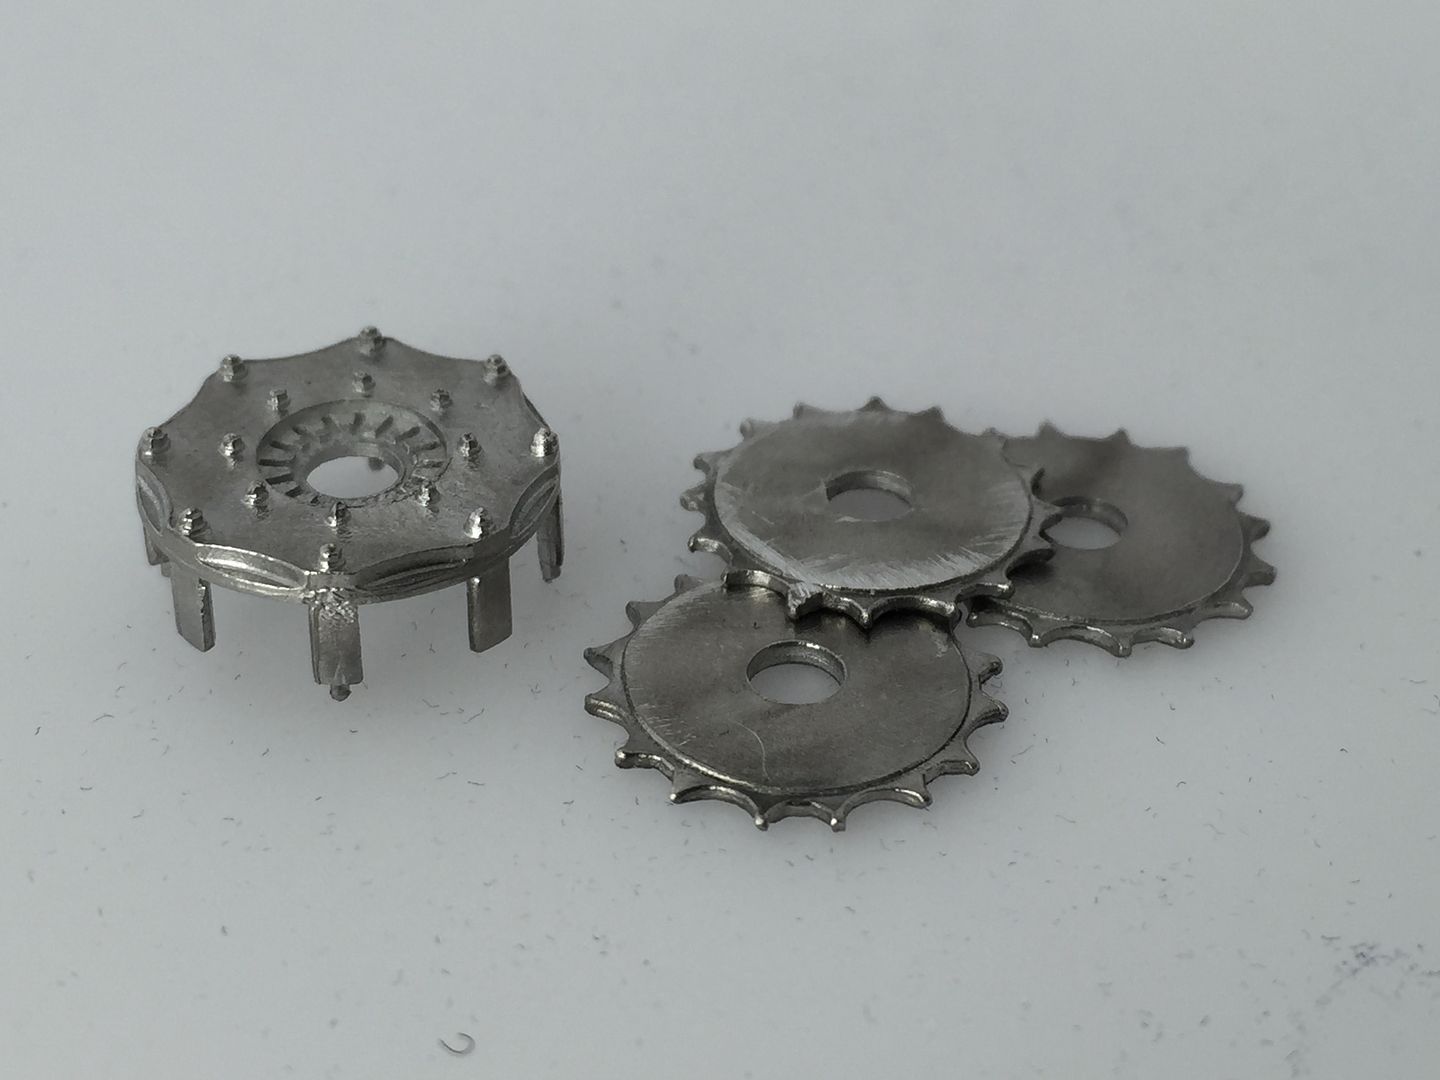
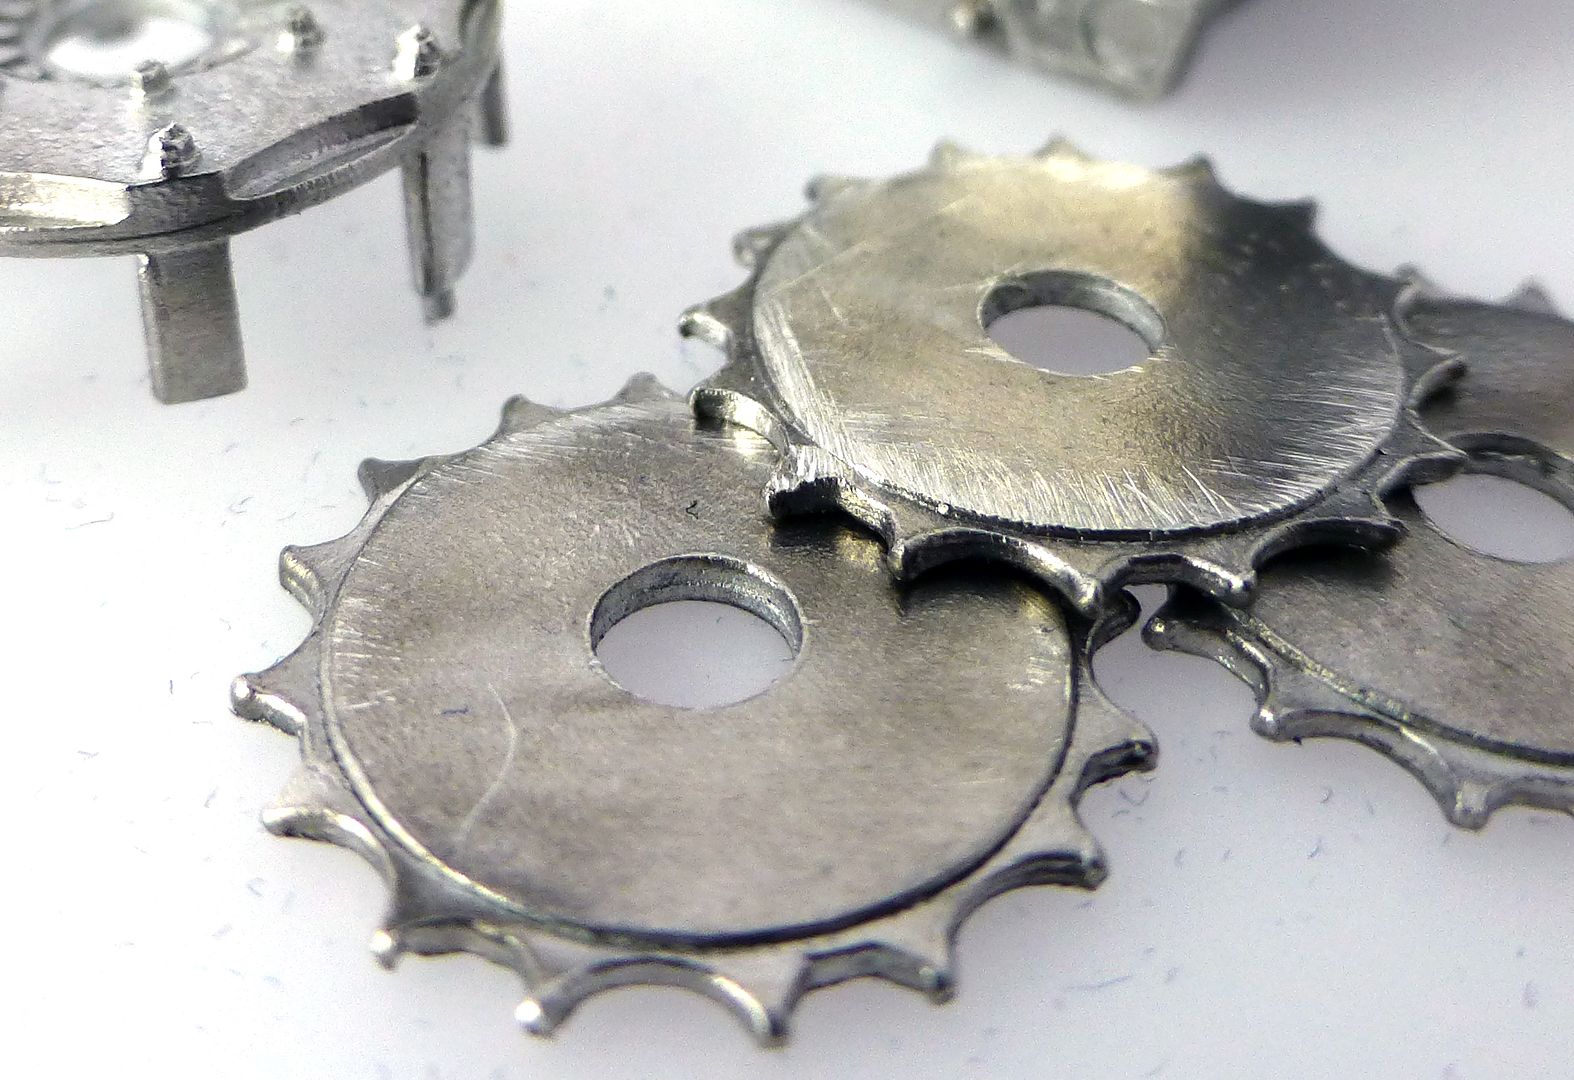
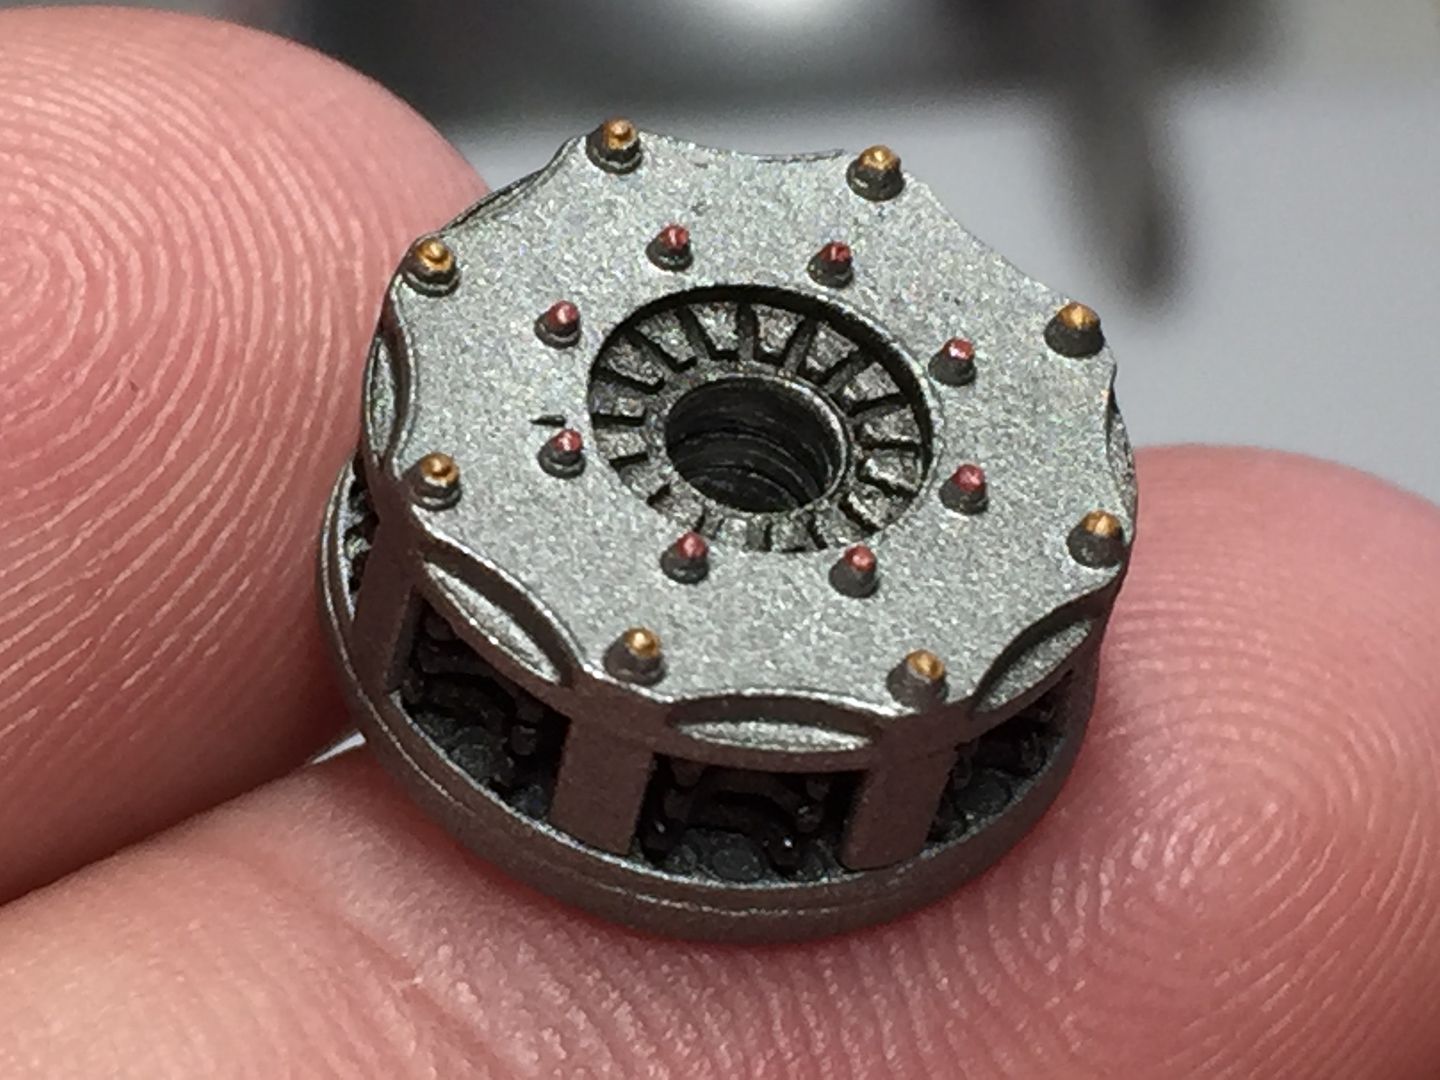
And here she is again next to the dinky alternator - I've added a bit of wash to show up vents and slots, and used a metallic pen for the details...
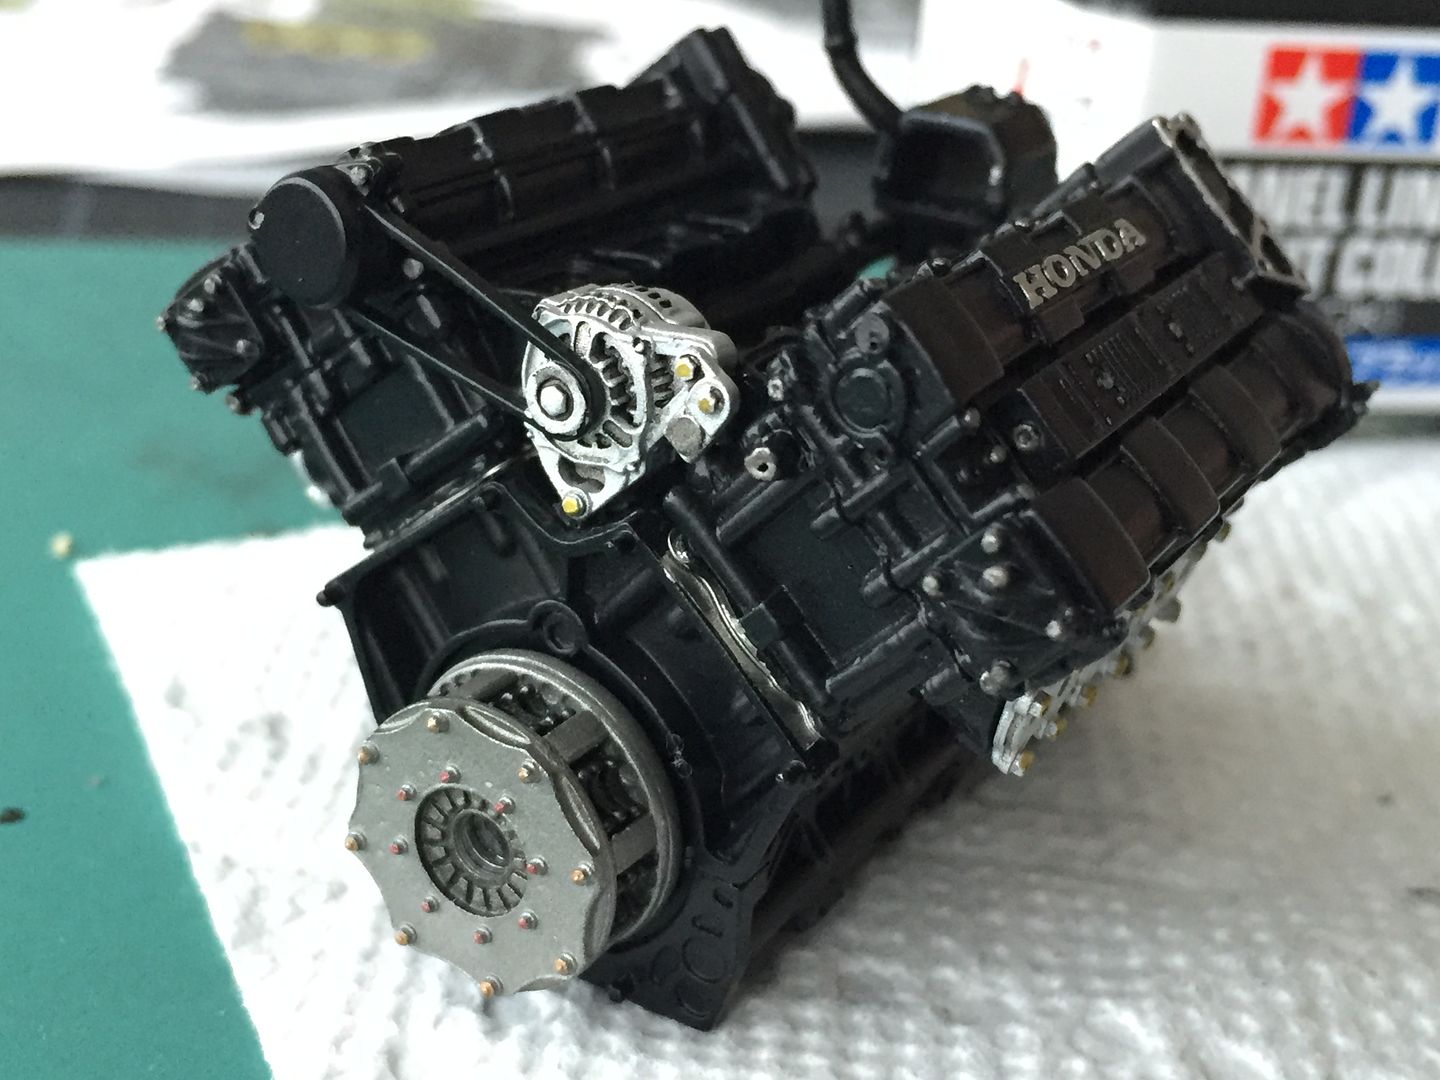
After priming with Tamiya Fine surface primer from a spray can, I have used semi-gloss black acrylic.
It has gone on very well, but you have to be very careful not to chip it!!
I had a complete muppet moment where I managed to knock the whole lot of sprayed components off the table - the heads went flying. I bit of corner denting and paint chipping but managed to patch up ok...I sprayed a layer of satin clear coat on everything in an effort to make it all a bit tougher - but fact is I am now treating it all like a piece of jewelry to avoid damage!
I roughly masked the heads and engine block surface where the gasket goes, then sanded them clean once sprayed...
Last time I'll see those pistons - so made a video, because yes - they move!
https://youtu.be/aBO-3rI1wQA
And here she is again next to the dinky alternator - I've added a bit of wash to show up vents and slots, and used a metallic pen for the details...
After priming with Tamiya Fine surface primer from a spray can, I have used semi-gloss black acrylic.
It has gone on very well, but you have to be very careful not to chip it!!
I had a complete muppet moment where I managed to knock the whole lot of sprayed components off the table - the heads went flying. I bit of corner denting and paint chipping but managed to patch up ok...I sprayed a layer of satin clear coat on everything in an effort to make it all a bit tougher - but fact is I am now treating it all like a piece of jewelry to avoid damage!
I roughly masked the heads and engine block surface where the gasket goes, then sanded them clean once sprayed...
Last time I'll see those pistons - so made a video, because yes - they move!
https://youtu.be/aBO-3rI1wQA
Edited by caterhamnut on Friday 20th May 22:05
Certainly is Dr! And hide all those moving parts.
One of the dilemmas I have is how many of the 'bolts' and fixings to machine off and replace with individual parts. Looking at the ref. pics I have, the head bolts and many others on the engine are actually quite small diameter allen-head fittings - as opposed to bolts with nuts. They are also not 'bright' but rather a sort of black finish - so do not stand out that much - so I decided to simple tough them with a little bit of brownish-blackish paint.
One lesson learnt of course is to drill any of the tiny holes I need to fit some of the more prominent fittings, before painting...to avoid damage.
Anyway, I'll leave the main block as it is, but have added some hex headed fittings to the 'air box' and some PE 'washers' to represent blanking bolts in some of the rails on the and airbox castings.
There are some quite complex fittings, springs and rods within the air box assembly which are cast metal - maybe I will try and substitute some for 'real' rods etc - we'll see!

I might have also drilled out these brass coloured bolts on the exhaust manifold - but having looked at the model, you don't see these - so I have stuck with the gold pen for now!
Different camera - and backgrounds...
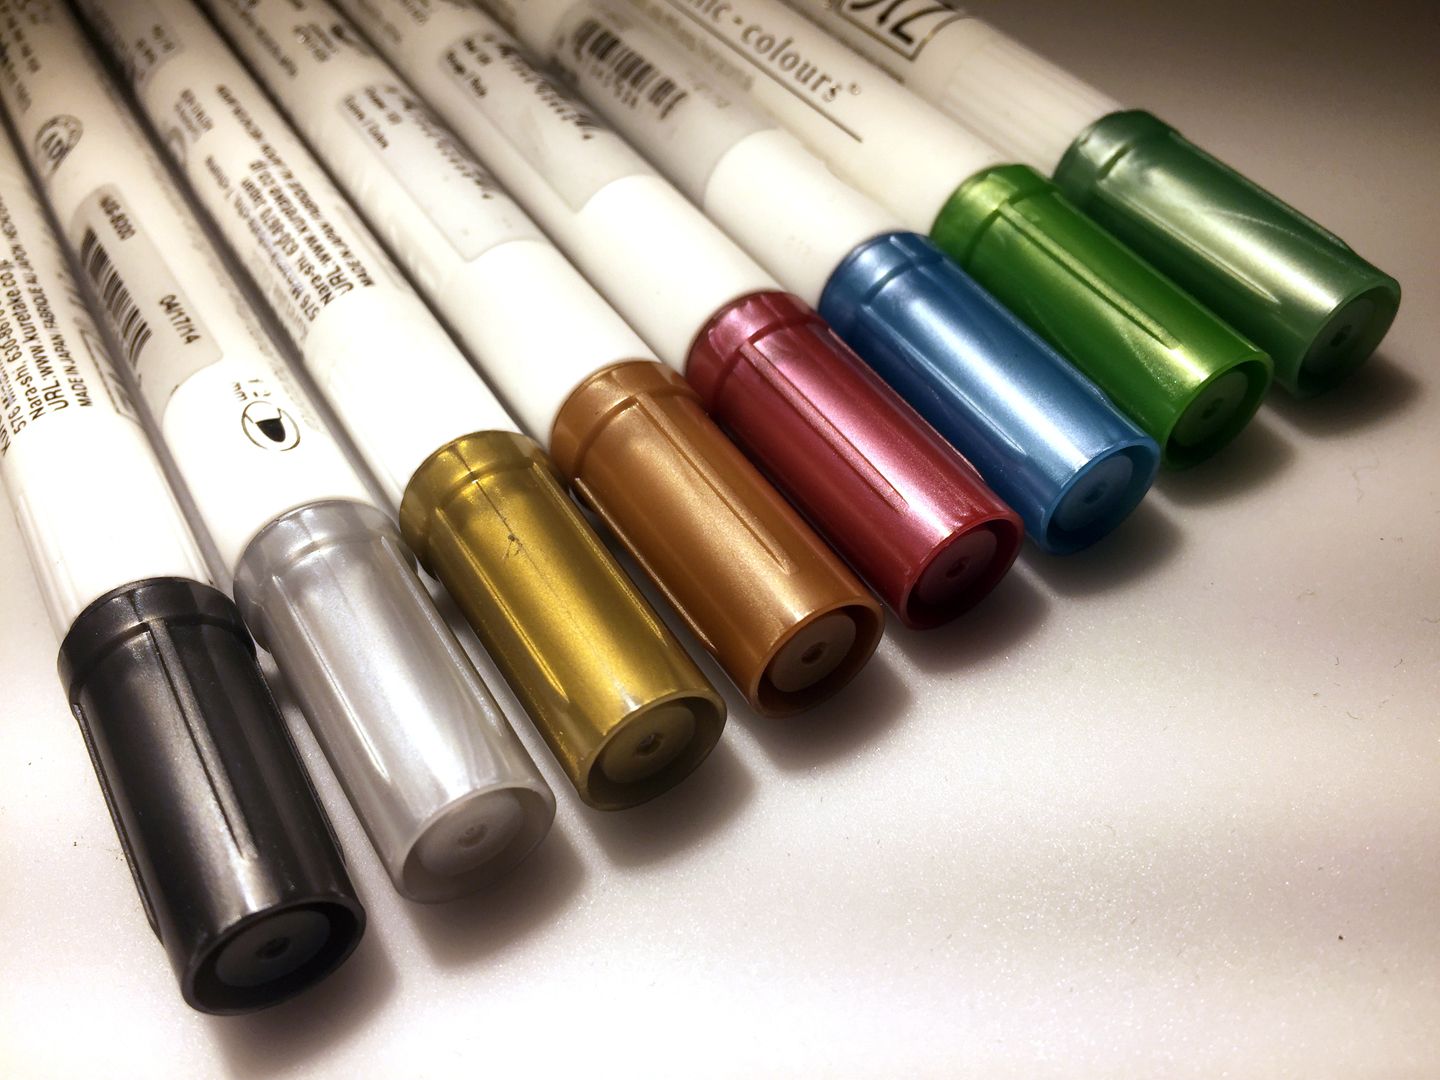
Another forum asked about some pens I have been using - metallic, no big 'glitter' bits, and some great colours for anodized parts pipe unions (blue/red) and nuts and bolts...
These particular ones are great as the calligraphy nib at one end gives you a sharp 'point' on the corner that you can touch onto the model in tighter places - you could also probably cut one nib into a small point with a sharp knife...
These pens do not have the rattle ball like the old metallic pens used to have - or paint pens - so the ink flow is much more controlled - just like a normal felt-tip.
The red and blue are perfect for anodized parts, the silver, grey, bronze and gold for loads of other fittings and pipes!
http://www.jetpens.c...Violet/pd/11333
...that gives you the name to search locally - amazon have them, and of course ebay!
http://www.amazon.co...2WNBADS1F1855KE
The shot below shows where I have used the blue, red and bronze (on the exhausts!)
Not found a use for the green yet!!
One of the dilemmas I have is how many of the 'bolts' and fixings to machine off and replace with individual parts. Looking at the ref. pics I have, the head bolts and many others on the engine are actually quite small diameter allen-head fittings - as opposed to bolts with nuts. They are also not 'bright' but rather a sort of black finish - so do not stand out that much - so I decided to simple tough them with a little bit of brownish-blackish paint.
One lesson learnt of course is to drill any of the tiny holes I need to fit some of the more prominent fittings, before painting...to avoid damage.
Anyway, I'll leave the main block as it is, but have added some hex headed fittings to the 'air box' and some PE 'washers' to represent blanking bolts in some of the rails on the and airbox castings.
There are some quite complex fittings, springs and rods within the air box assembly which are cast metal - maybe I will try and substitute some for 'real' rods etc - we'll see!
I might have also drilled out these brass coloured bolts on the exhaust manifold - but having looked at the model, you don't see these - so I have stuck with the gold pen for now!
Different camera - and backgrounds...
Another forum asked about some pens I have been using - metallic, no big 'glitter' bits, and some great colours for anodized parts pipe unions (blue/red) and nuts and bolts...
These particular ones are great as the calligraphy nib at one end gives you a sharp 'point' on the corner that you can touch onto the model in tighter places - you could also probably cut one nib into a small point with a sharp knife...
These pens do not have the rattle ball like the old metallic pens used to have - or paint pens - so the ink flow is much more controlled - just like a normal felt-tip.
The red and blue are perfect for anodized parts, the silver, grey, bronze and gold for loads of other fittings and pipes!
http://www.jetpens.c...Violet/pd/11333
...that gives you the name to search locally - amazon have them, and of course ebay!
http://www.amazon.co...2WNBADS1F1855KE
The shot below shows where I have used the blue, red and bronze (on the exhausts!)
Not found a use for the green yet!!
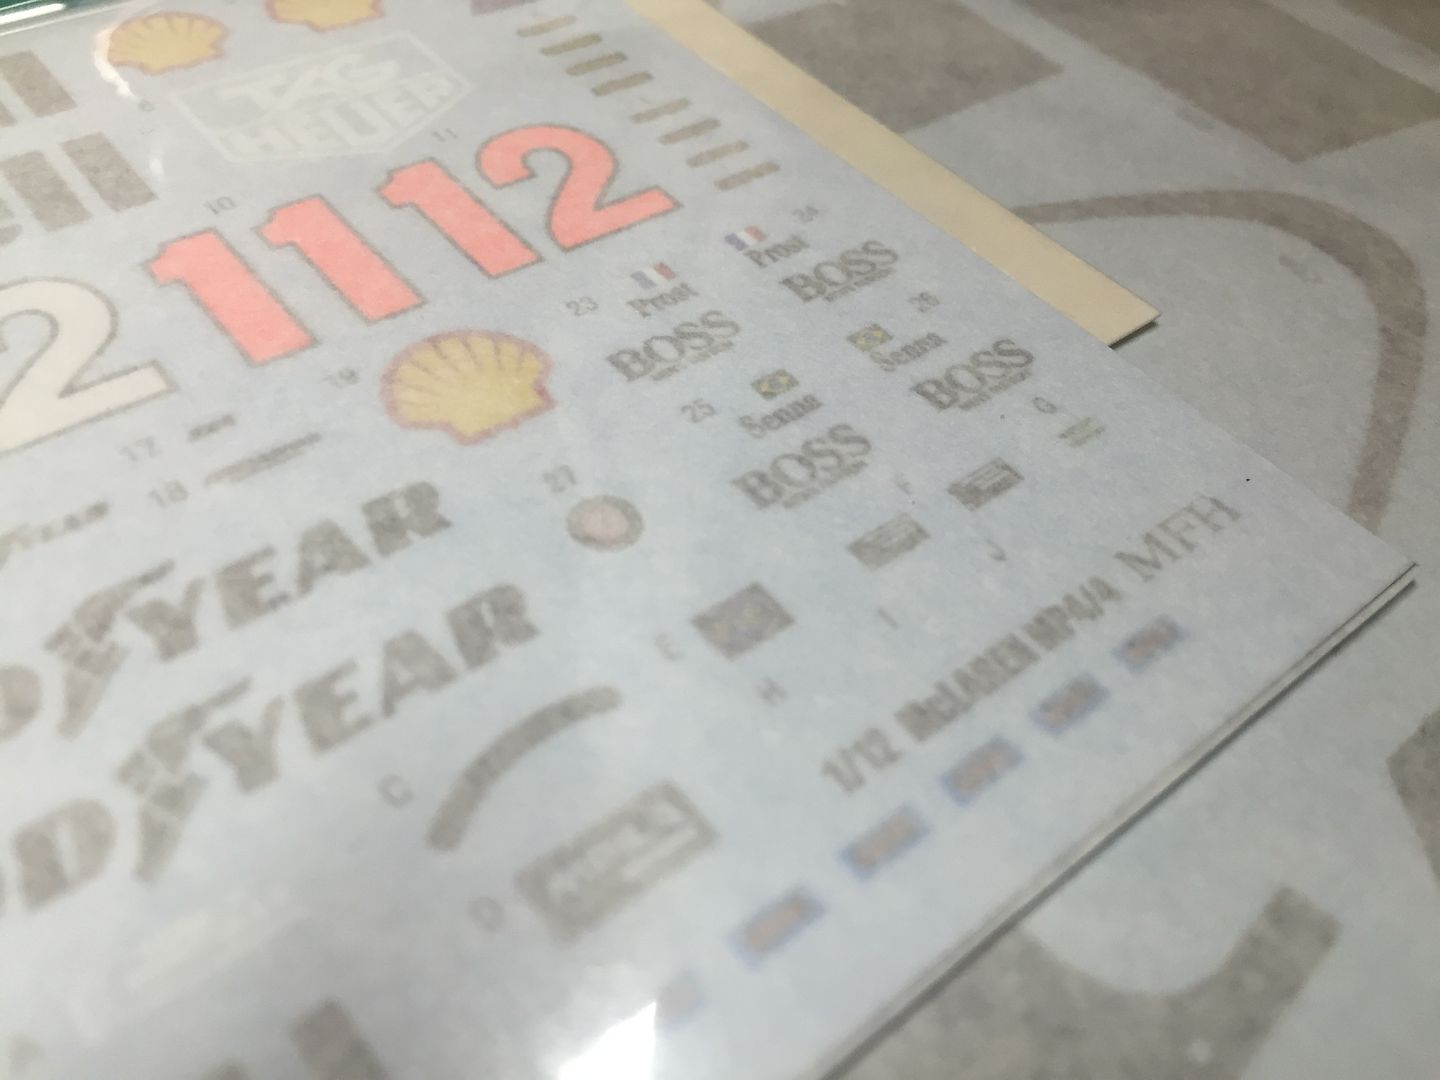
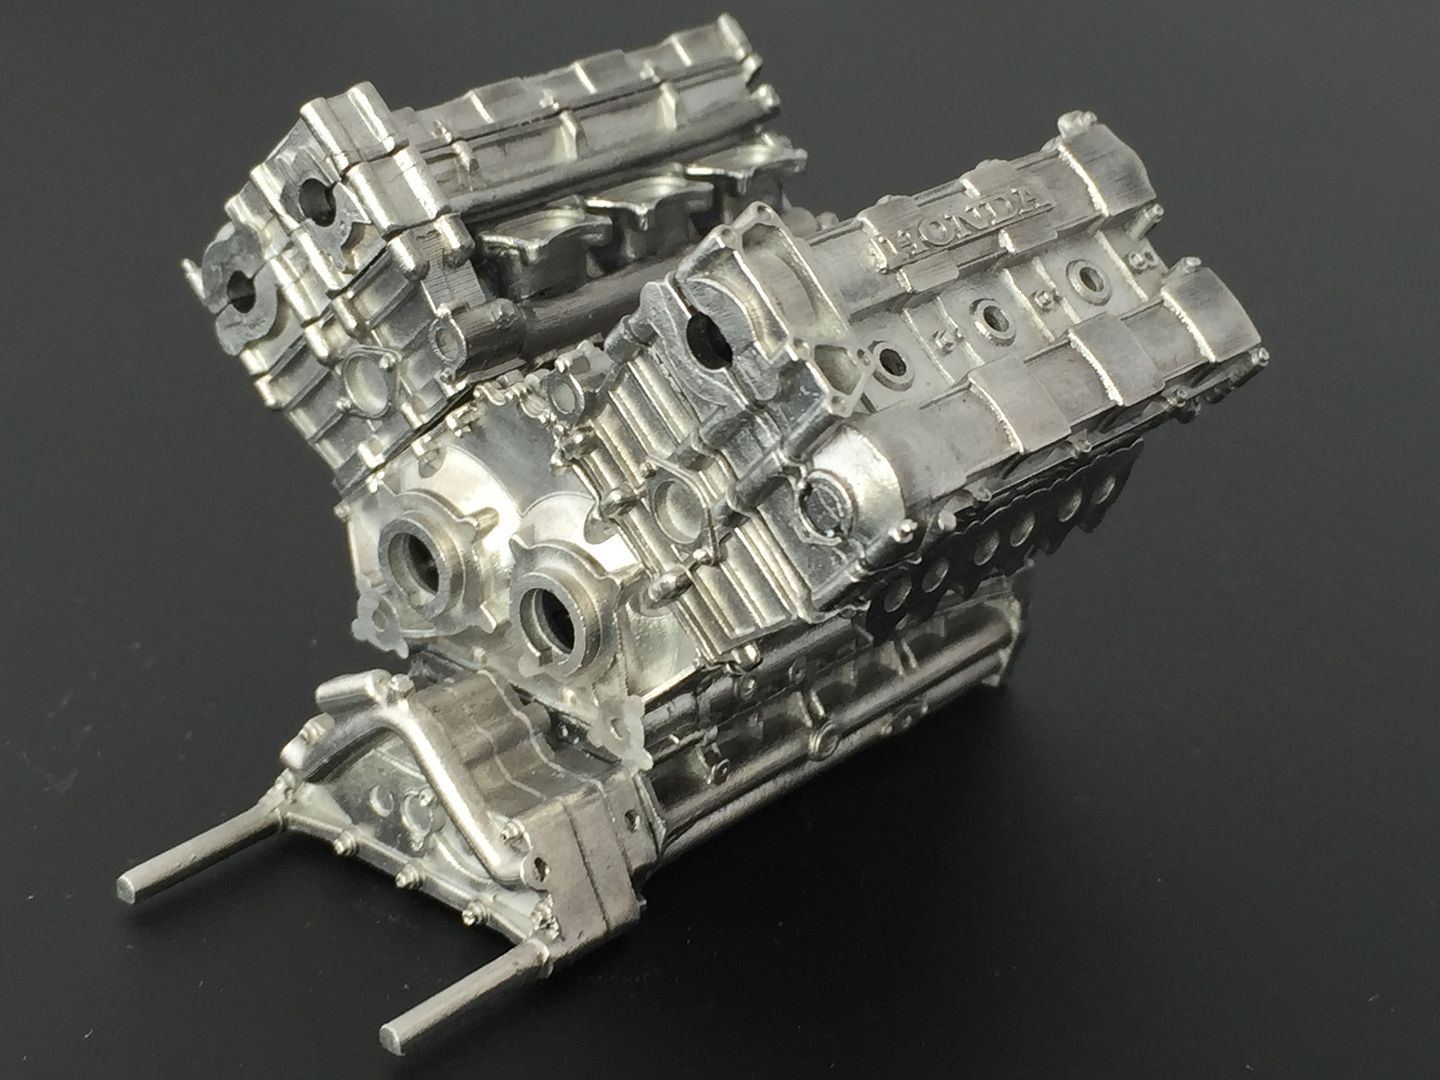
Some more bits, and first decal 
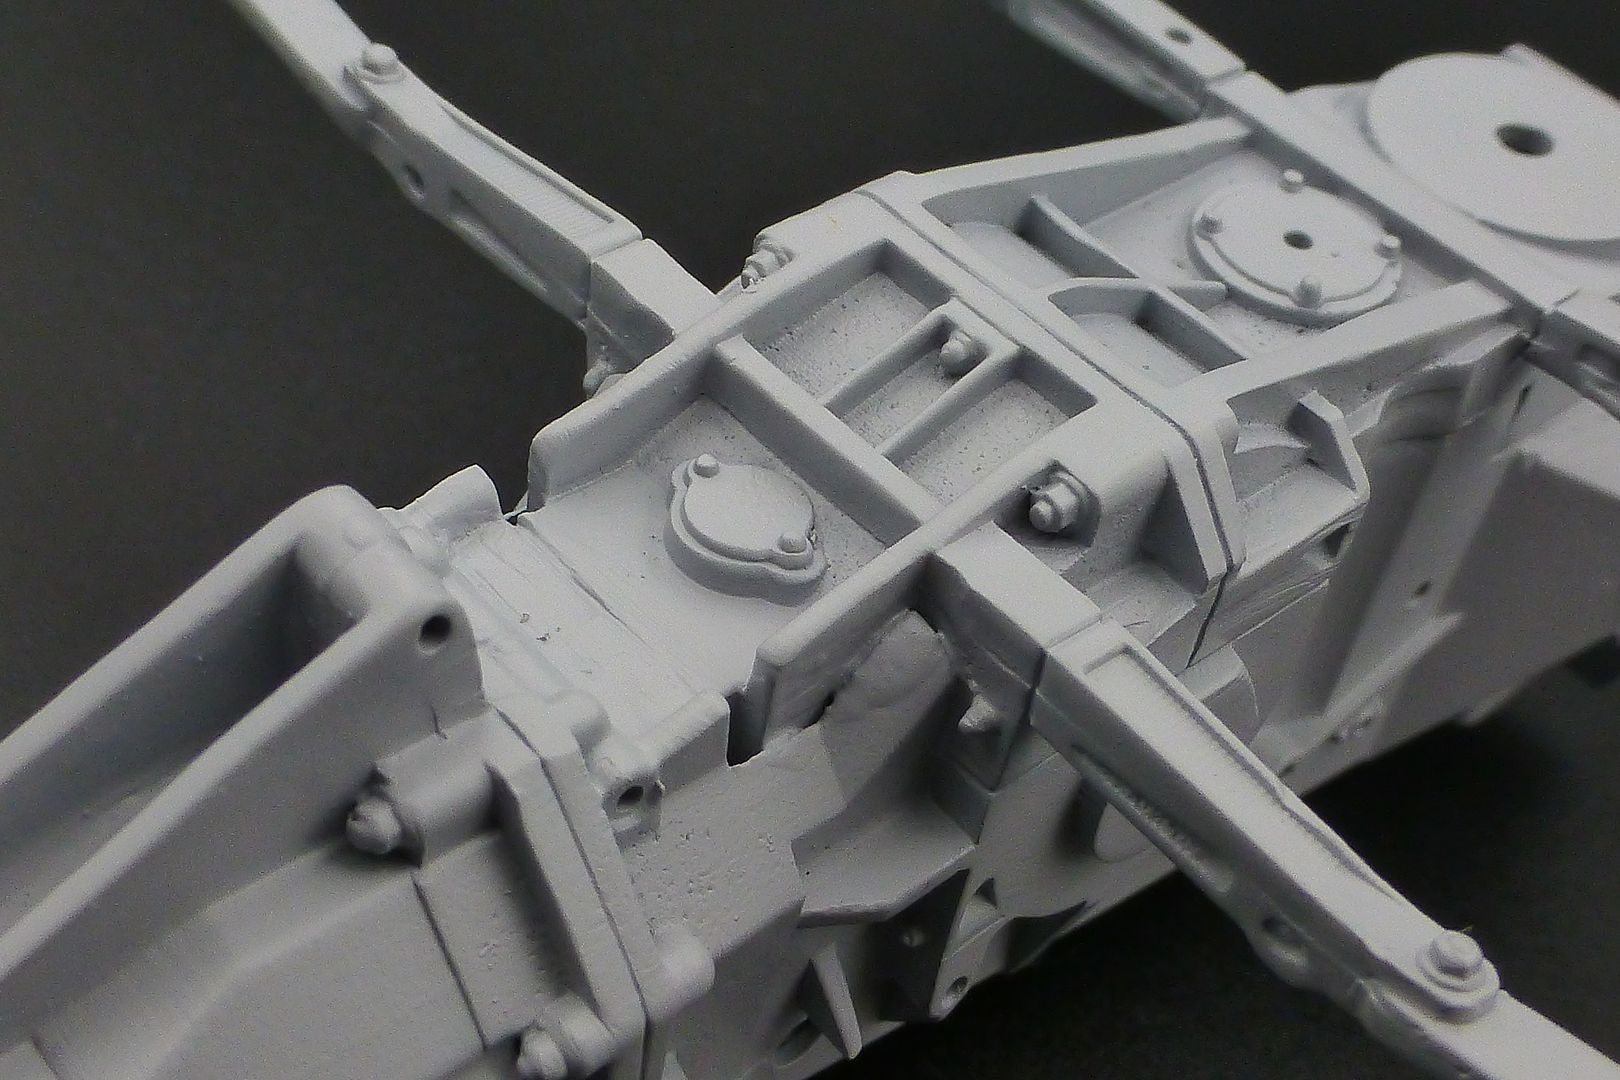
Air box etc just placed in position for now - next step is really the start of wiring, injectors, fuel rails etc...
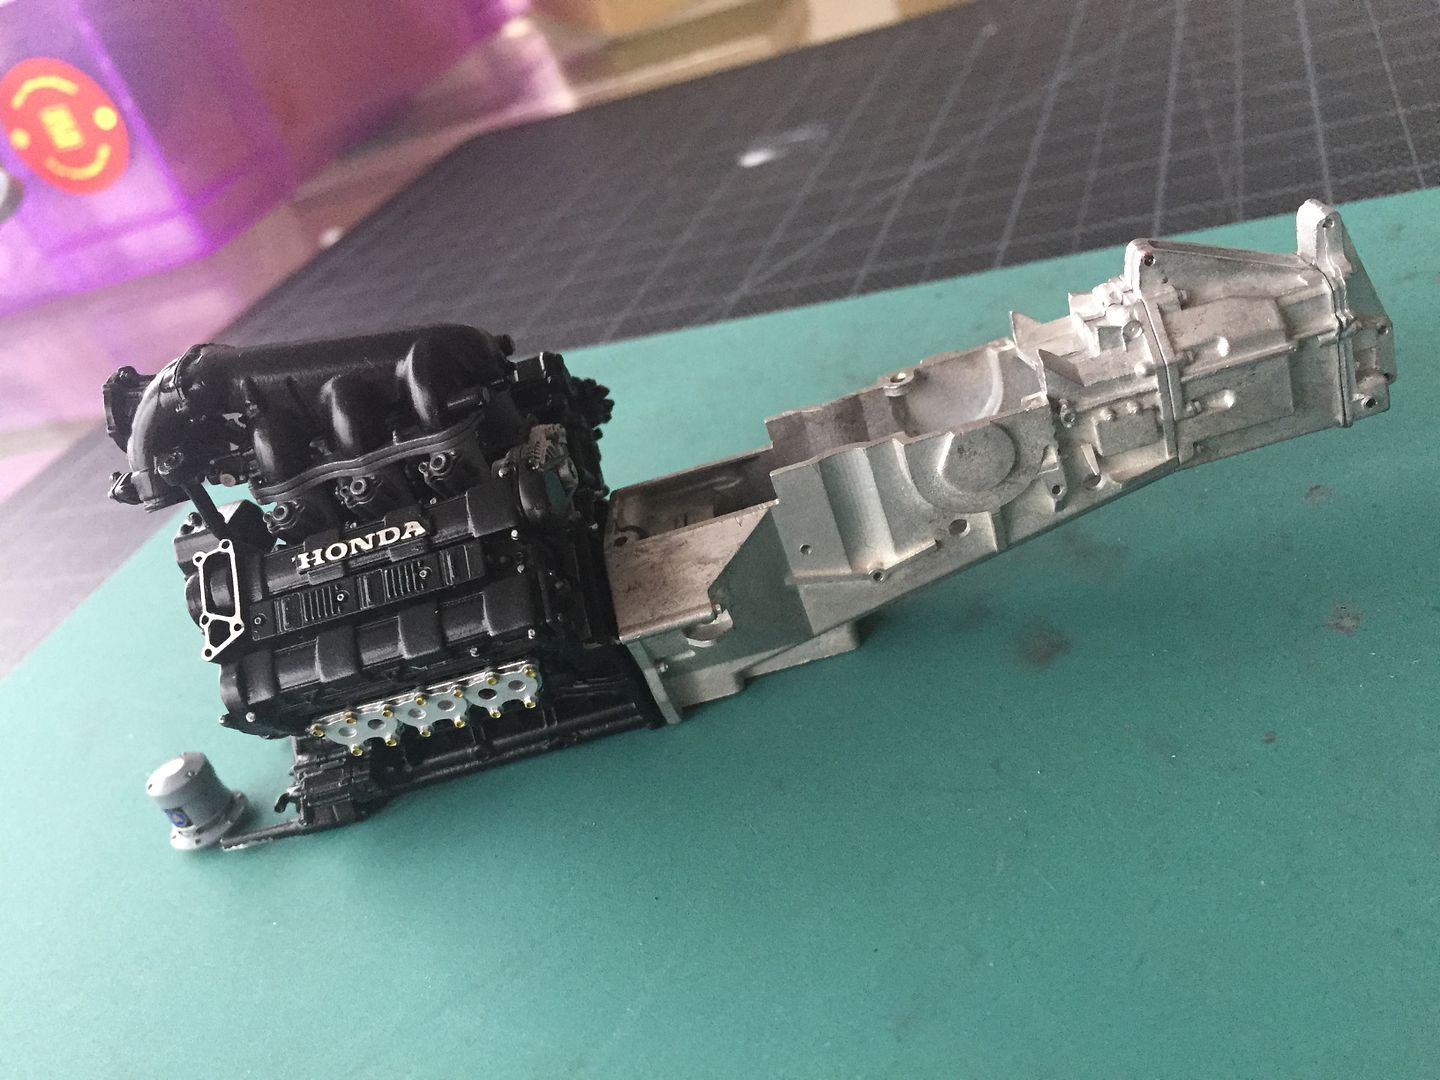
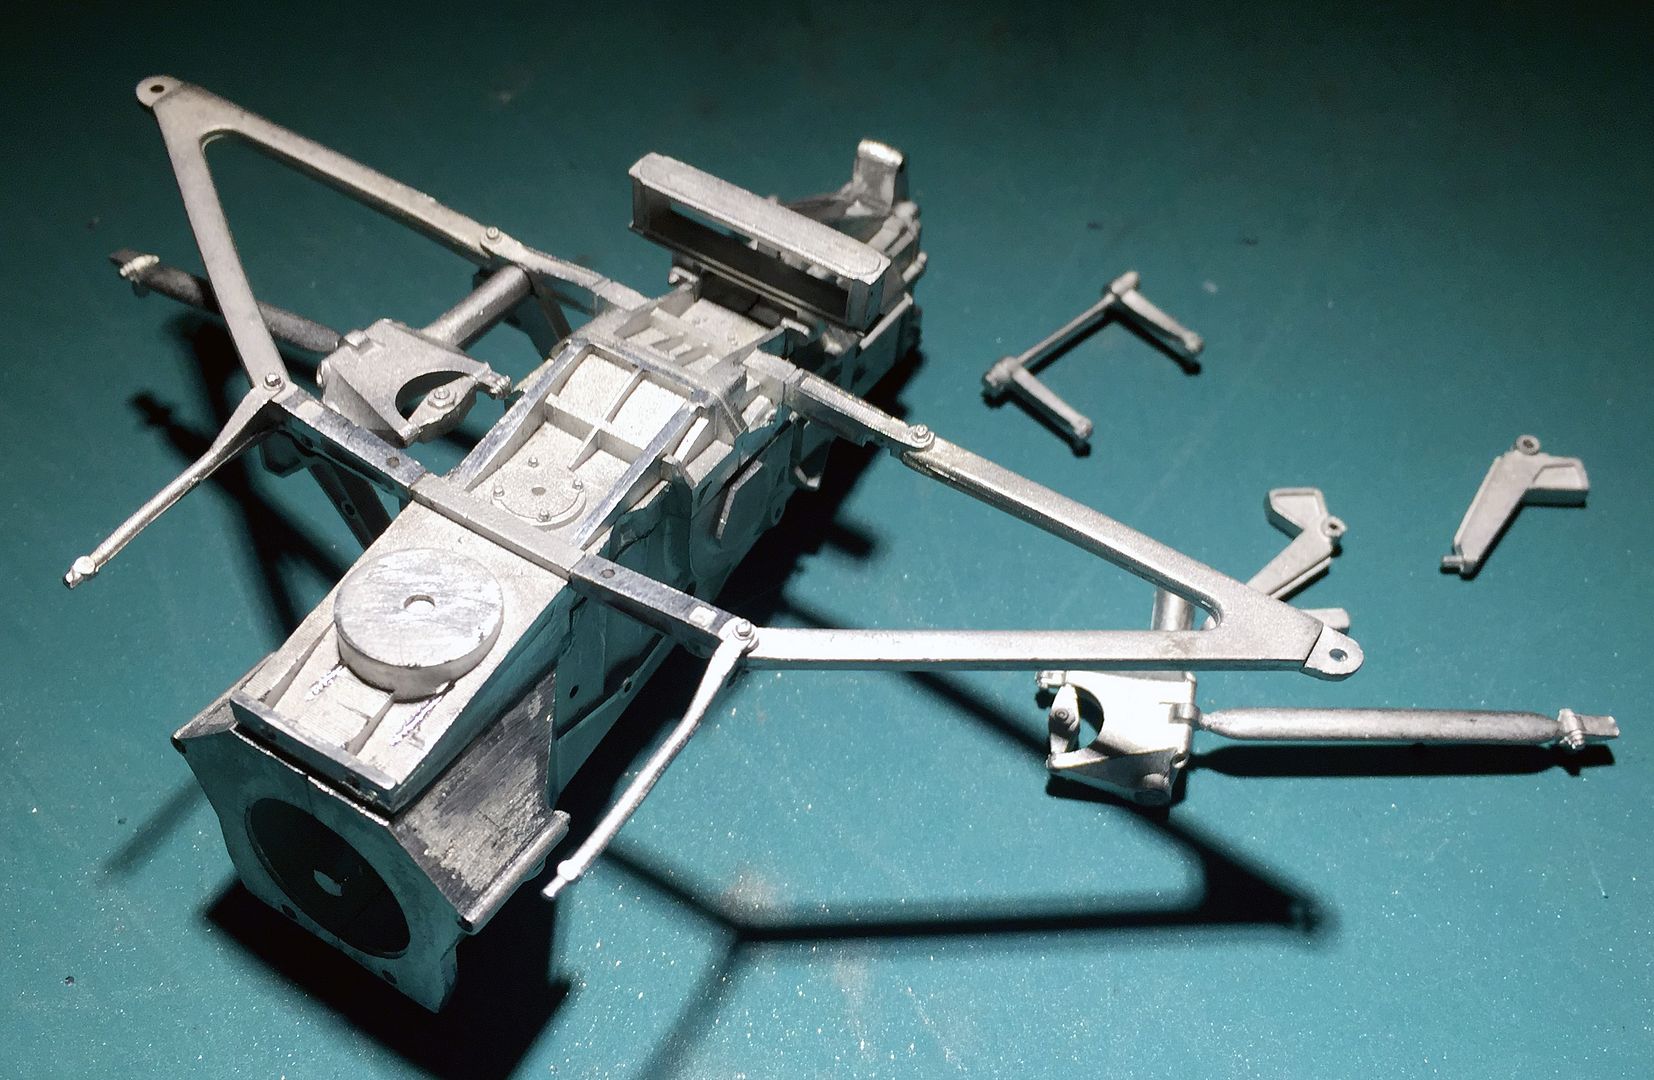
Playing with more parts...with these multi-media kits you have to test fit everything! These later MFH kits fit together pretty well (not Tamiya level!) but the white metal can bend, and you will need to drill out holes for pegs...
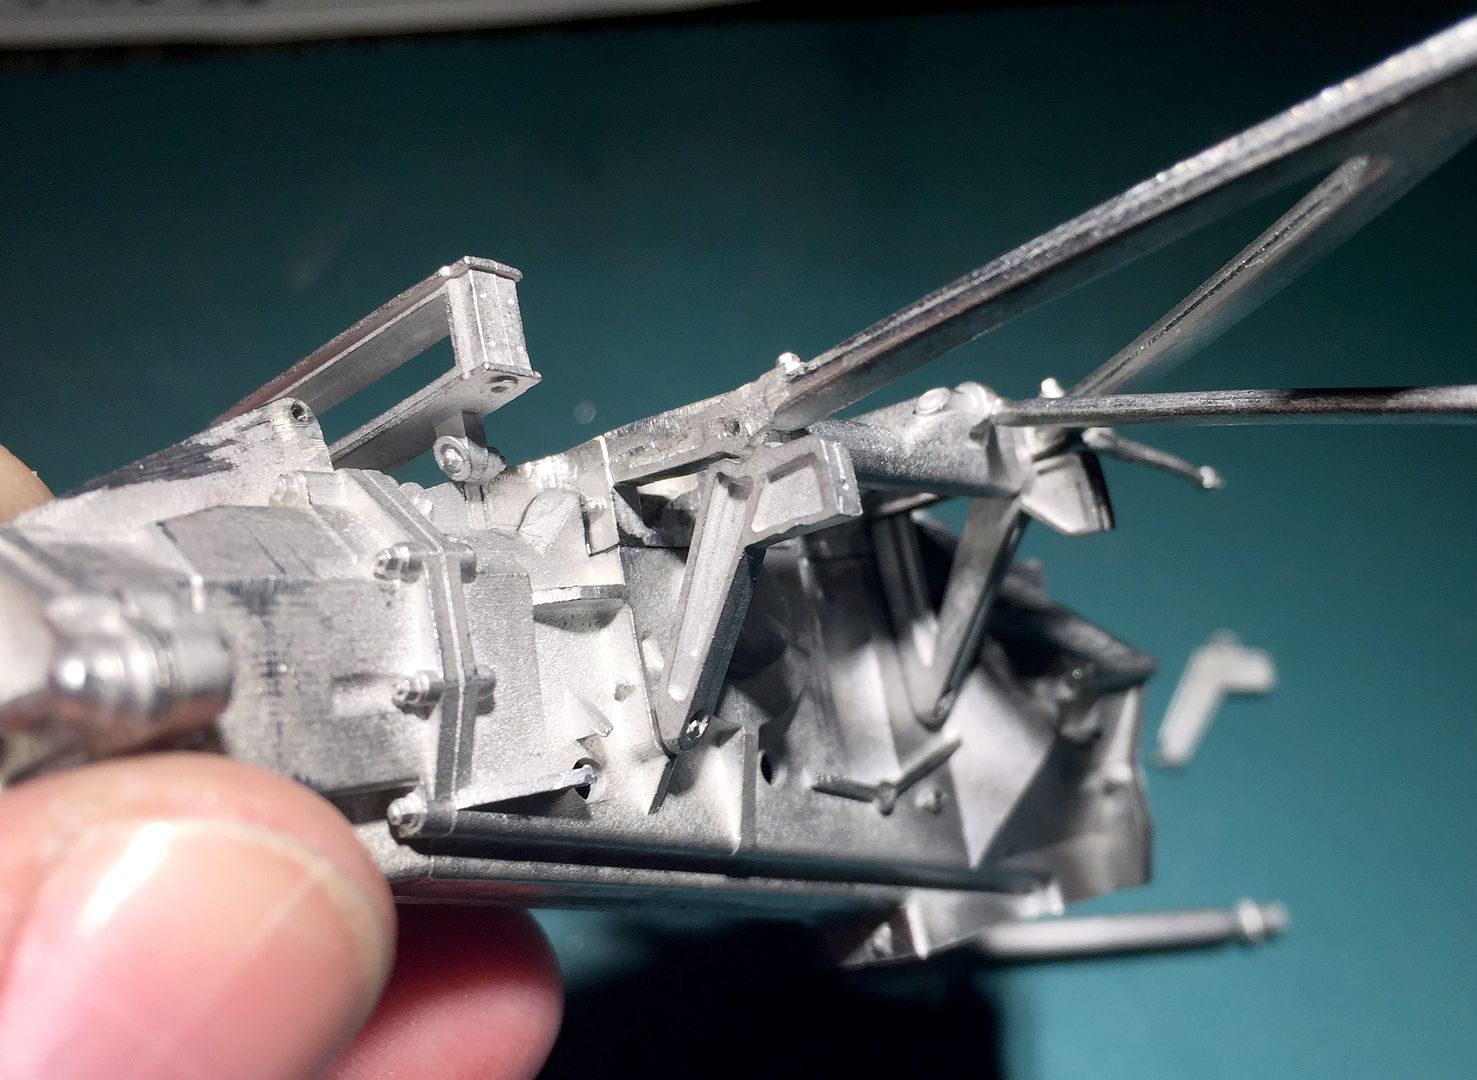
Fitting and filing before polishing...one of the 'issues' with I guess the 'newer' MFH metal work is that you can see the molds are made from 3D printed parts - and the ridges in these are still visible. Although the metal is soft, it is hard to reach a lot of these ridges...I think the dark paint will hide a lot of these though...
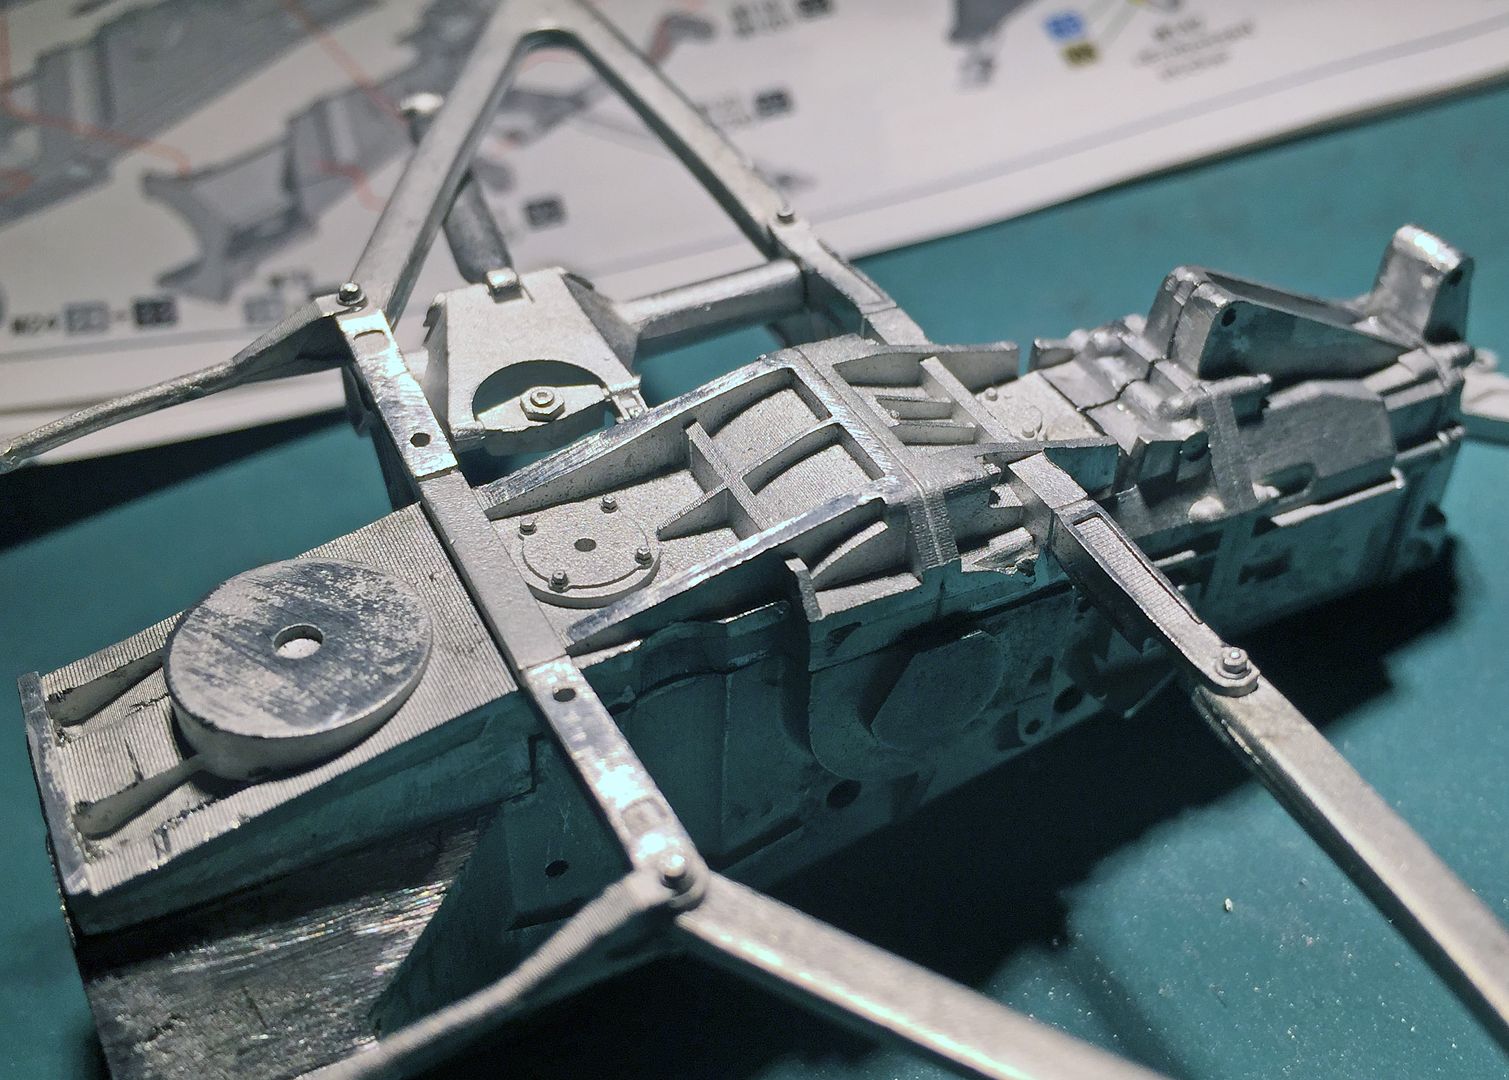
Seems to go together pretty well though...not that much fettling. Just deciding which cast 'nut and bolt' details I am going to remove, drill out and use separate detail parts for....
I am learning patience with this one - trying to fully assemble sub-assemblies before adding any paint, and deciding which casting details to switch out for 'real' nuts and bolts etc....
Hope to get more done this weekend...
The white metal is very soft - elements like suspension components and very easy to bend.
The brass wire wheel seems to work well, together with filing and sanding.
Centering holes being drilled will have to be very accurate...most holes have a tiny indent to start them - most need drilling out or made deeper (due to casting process)
Polished a lot of parts for future use, which was good - those brass wire 'bits' get everywhere, so wanted to do a lot in one go before having to clean up!
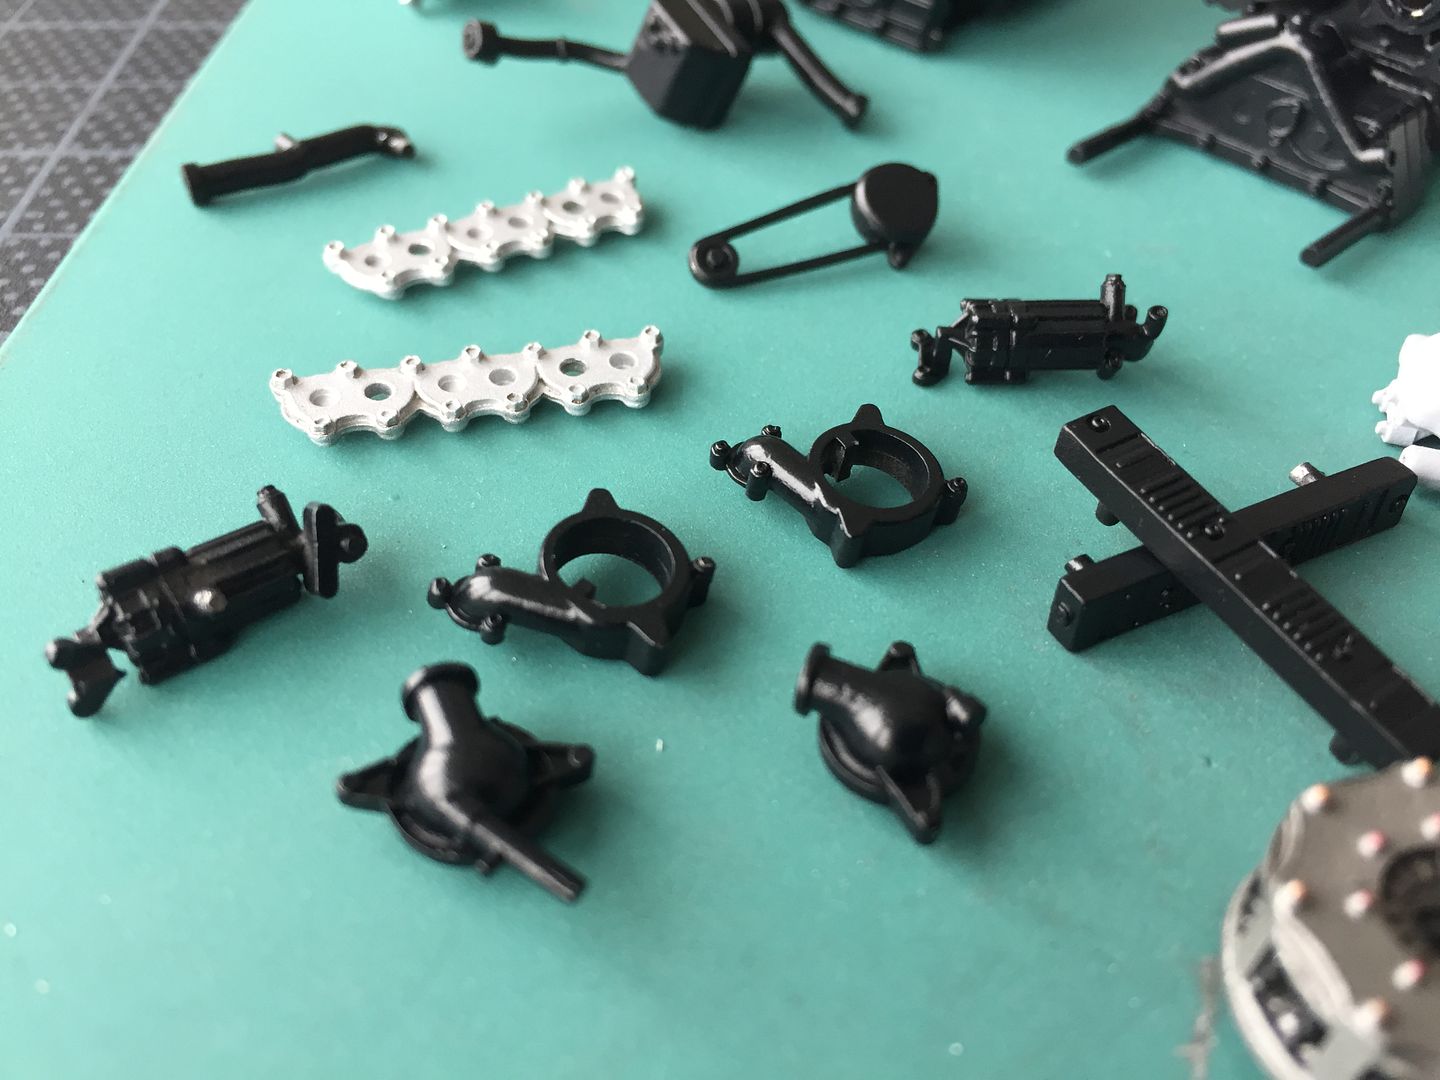
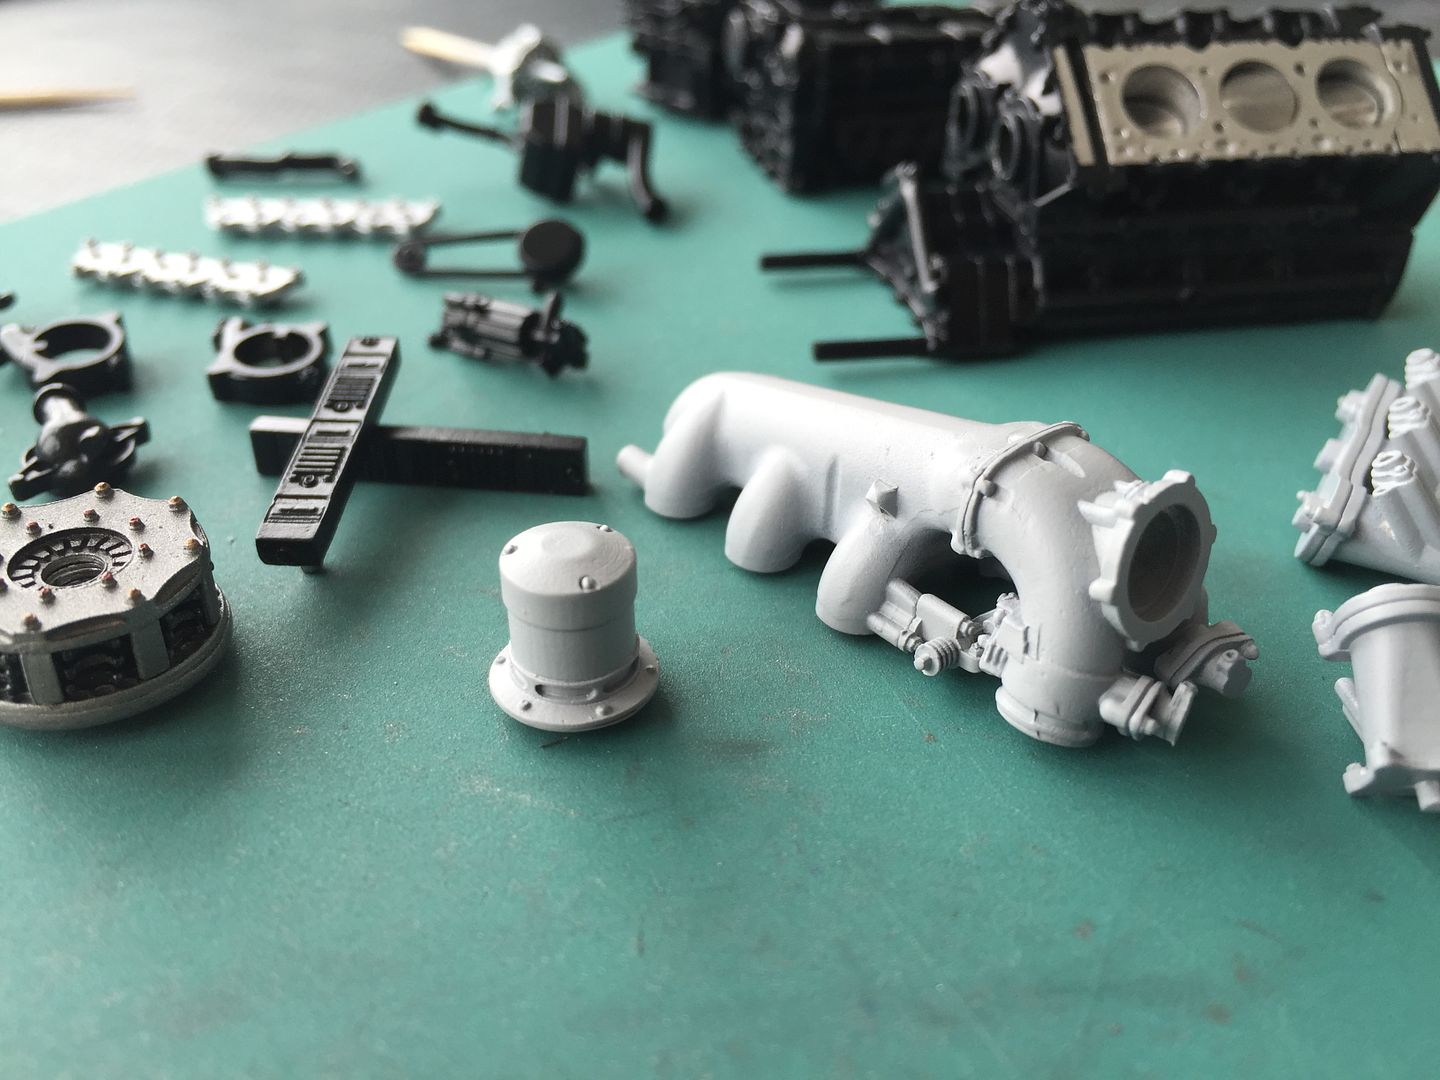
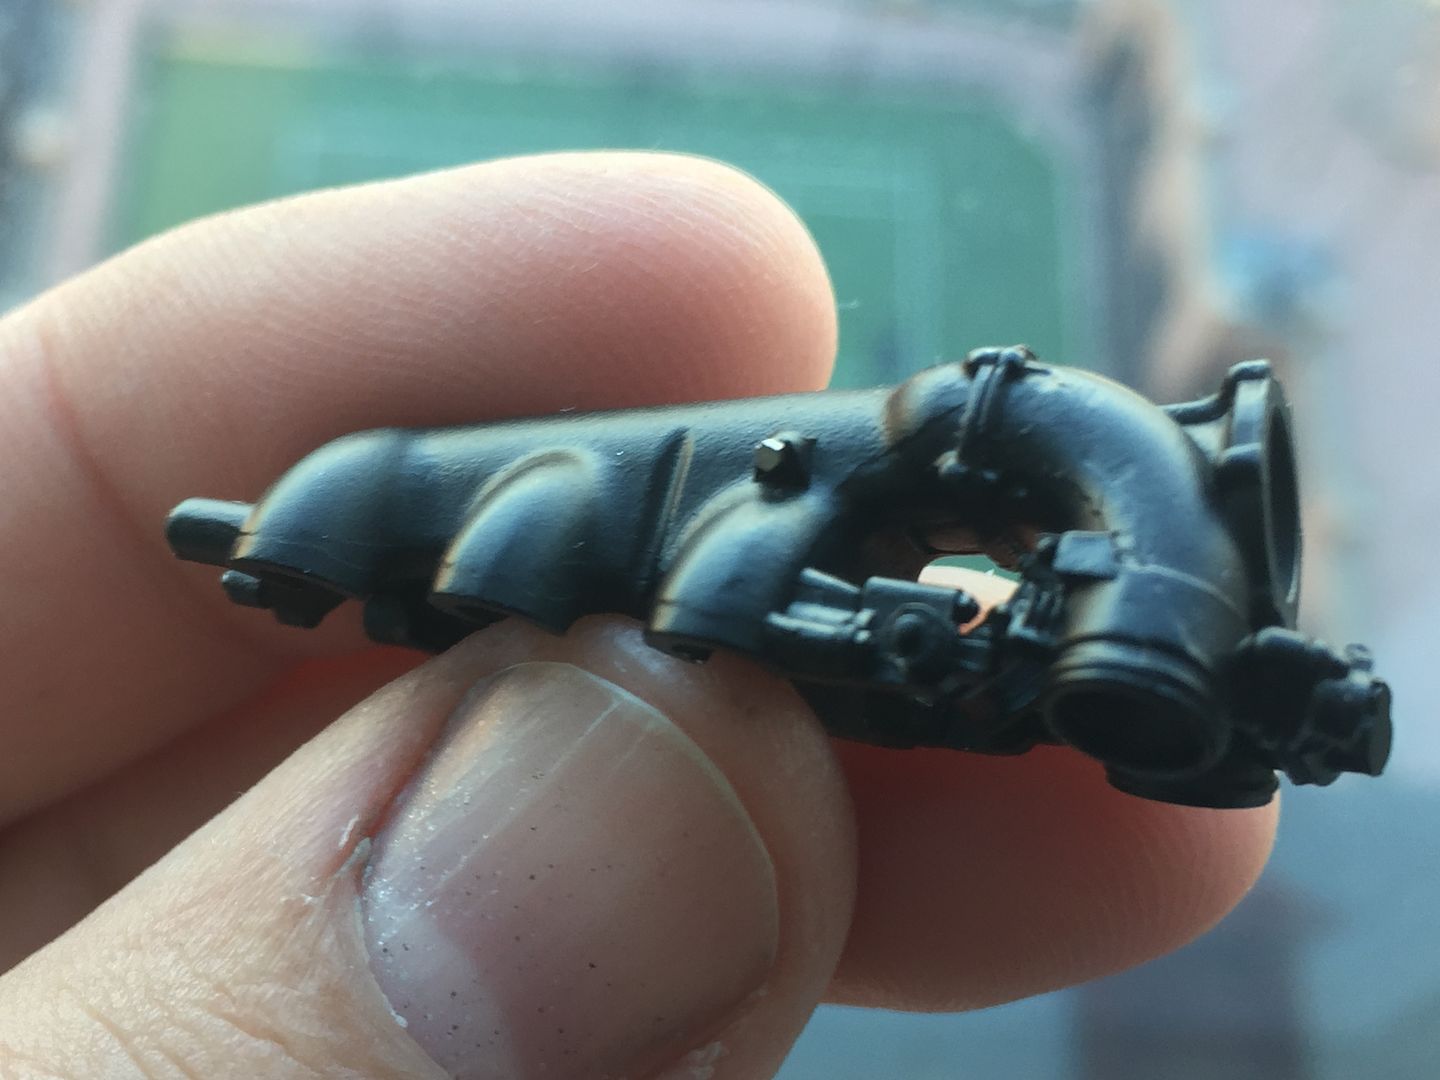
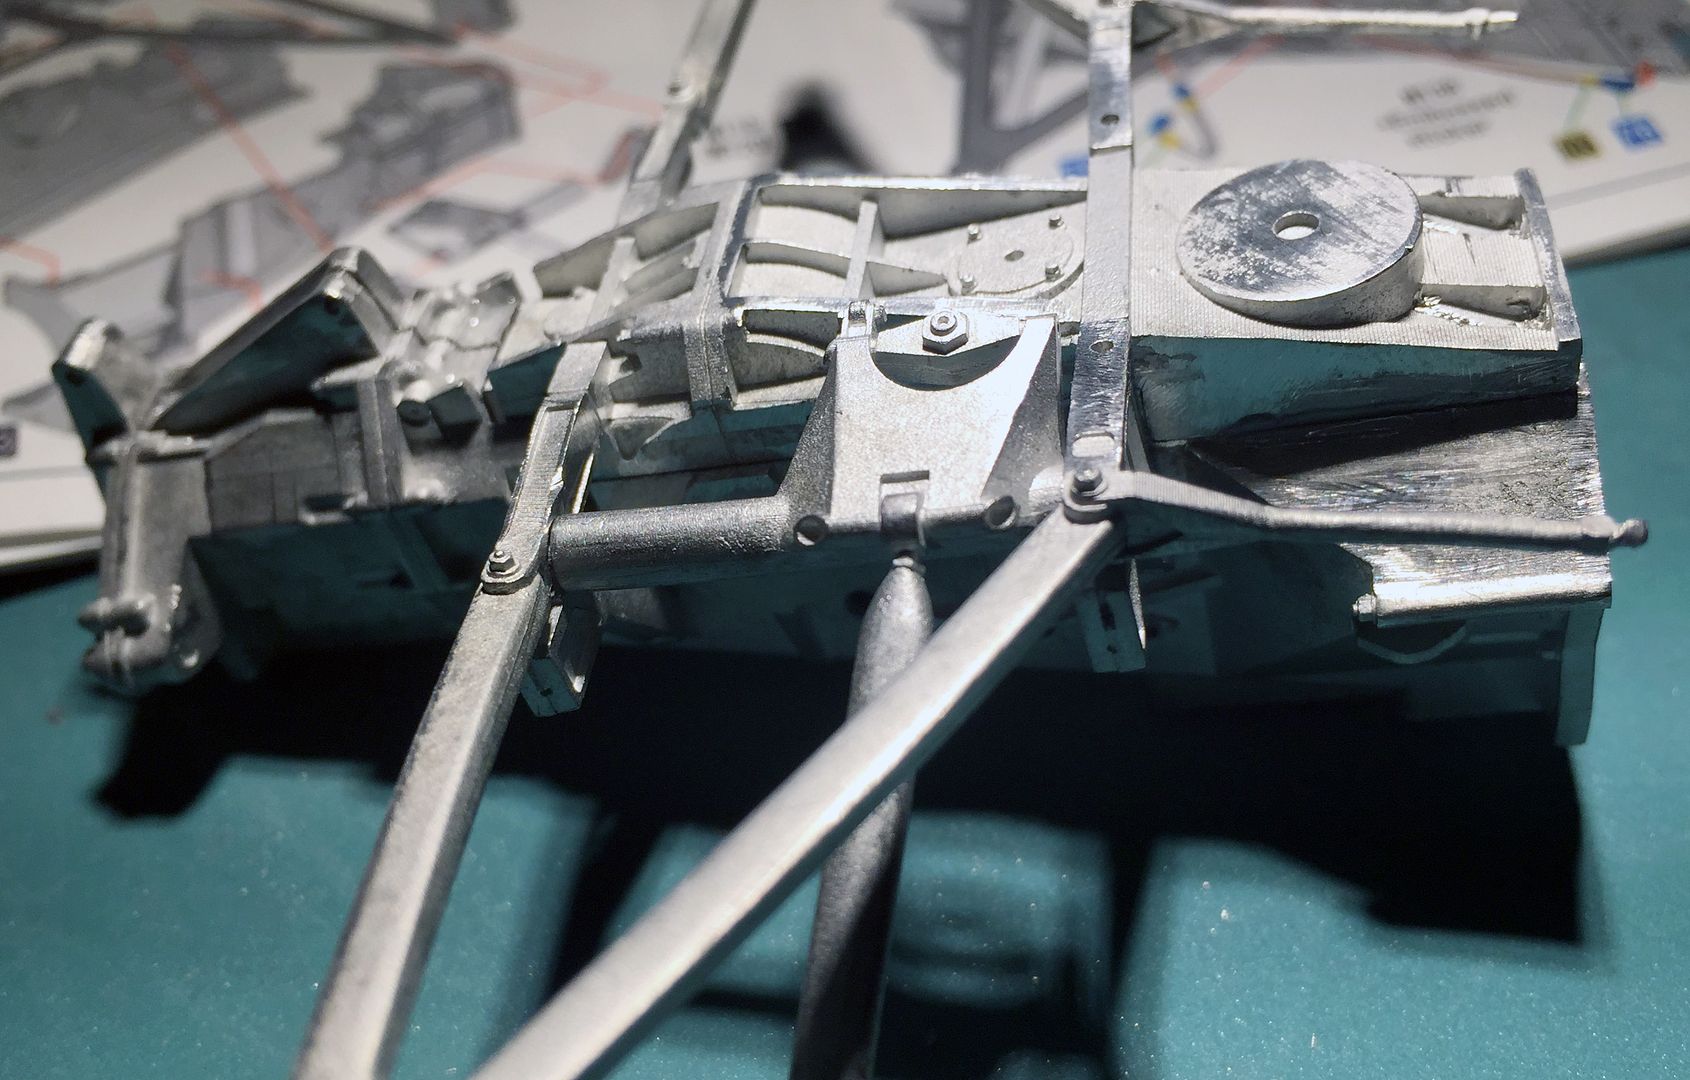
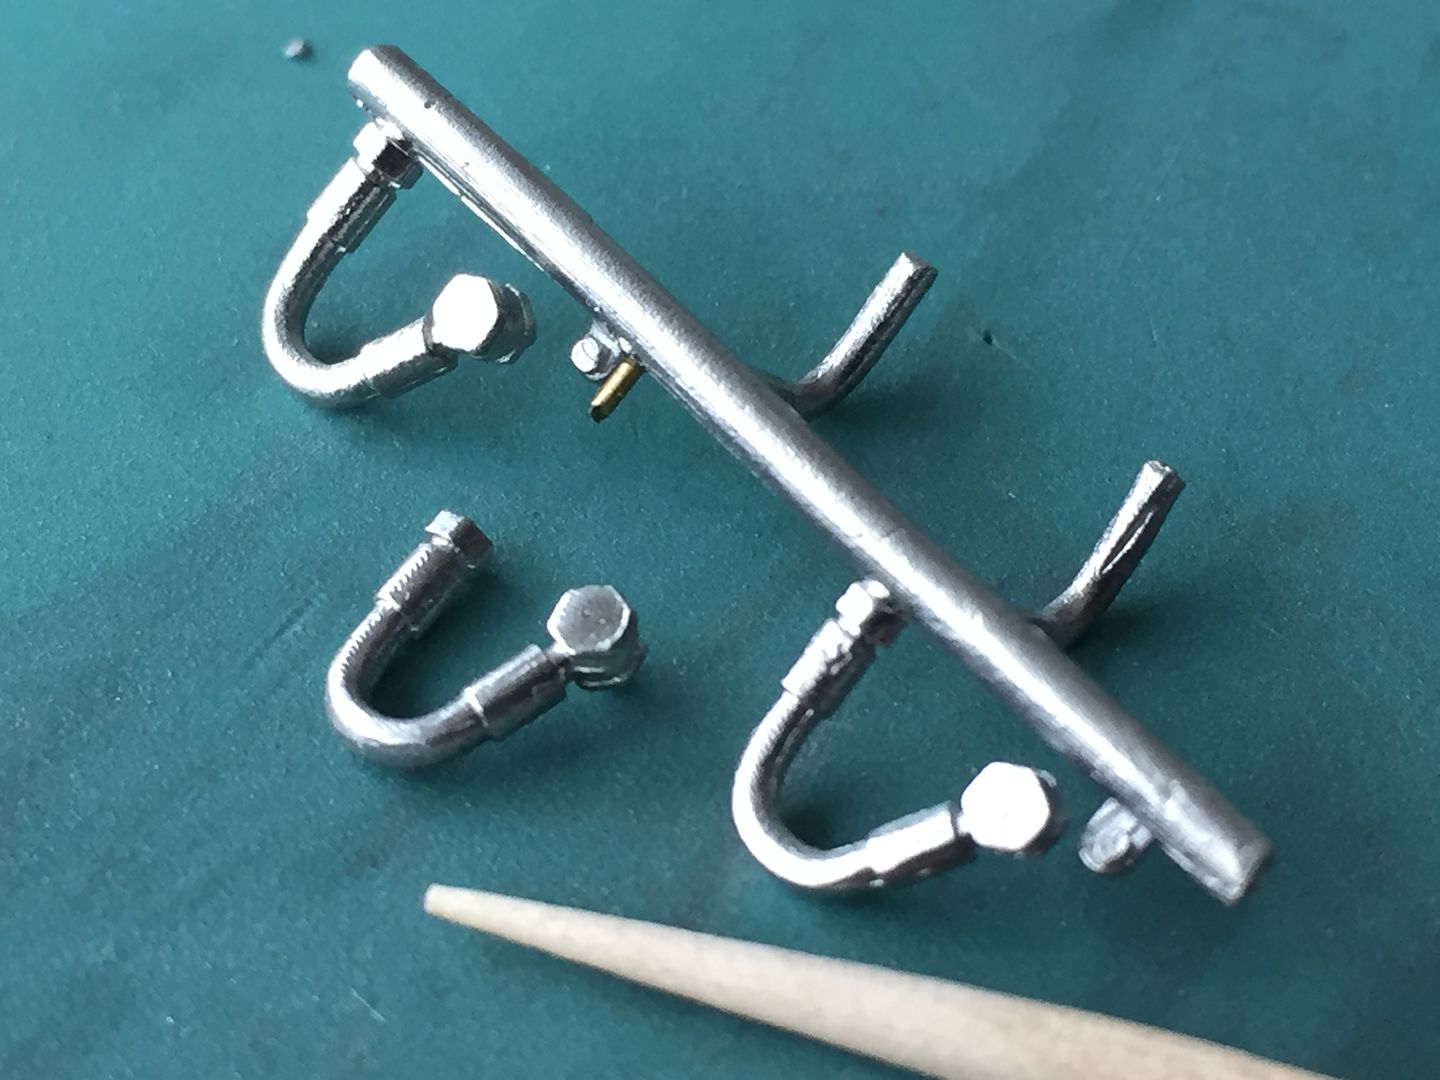
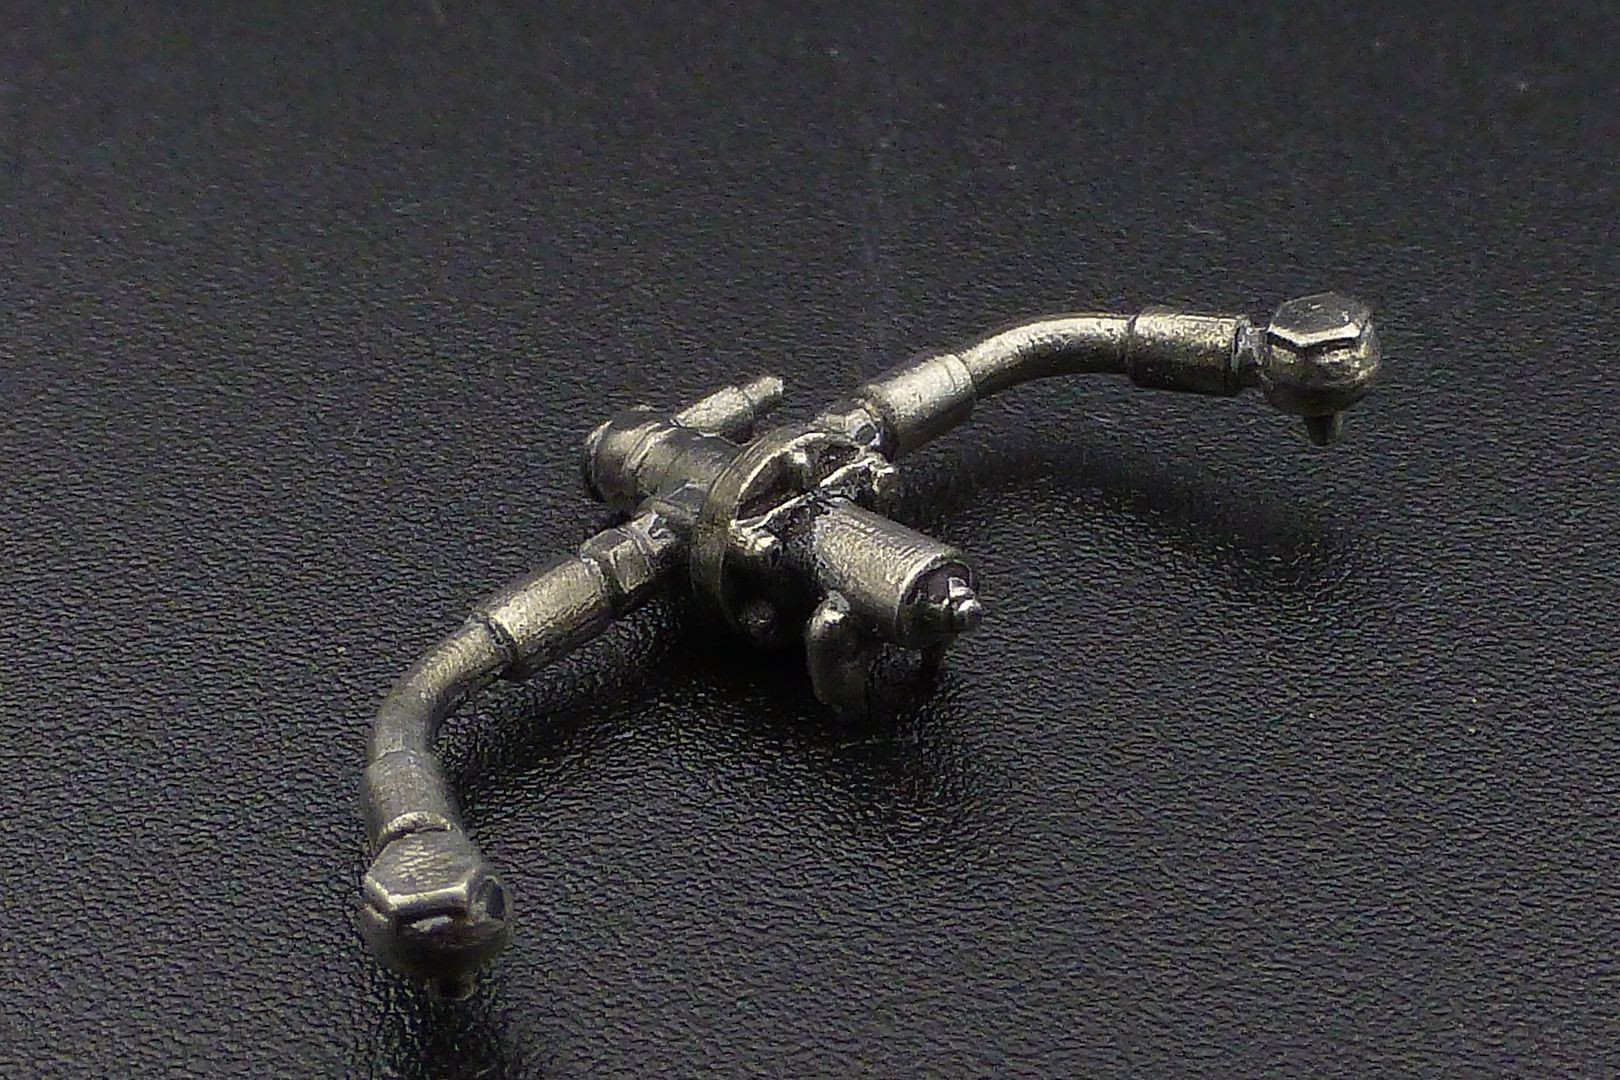
These are some engine plumbing, and some tiny plug lead headers...
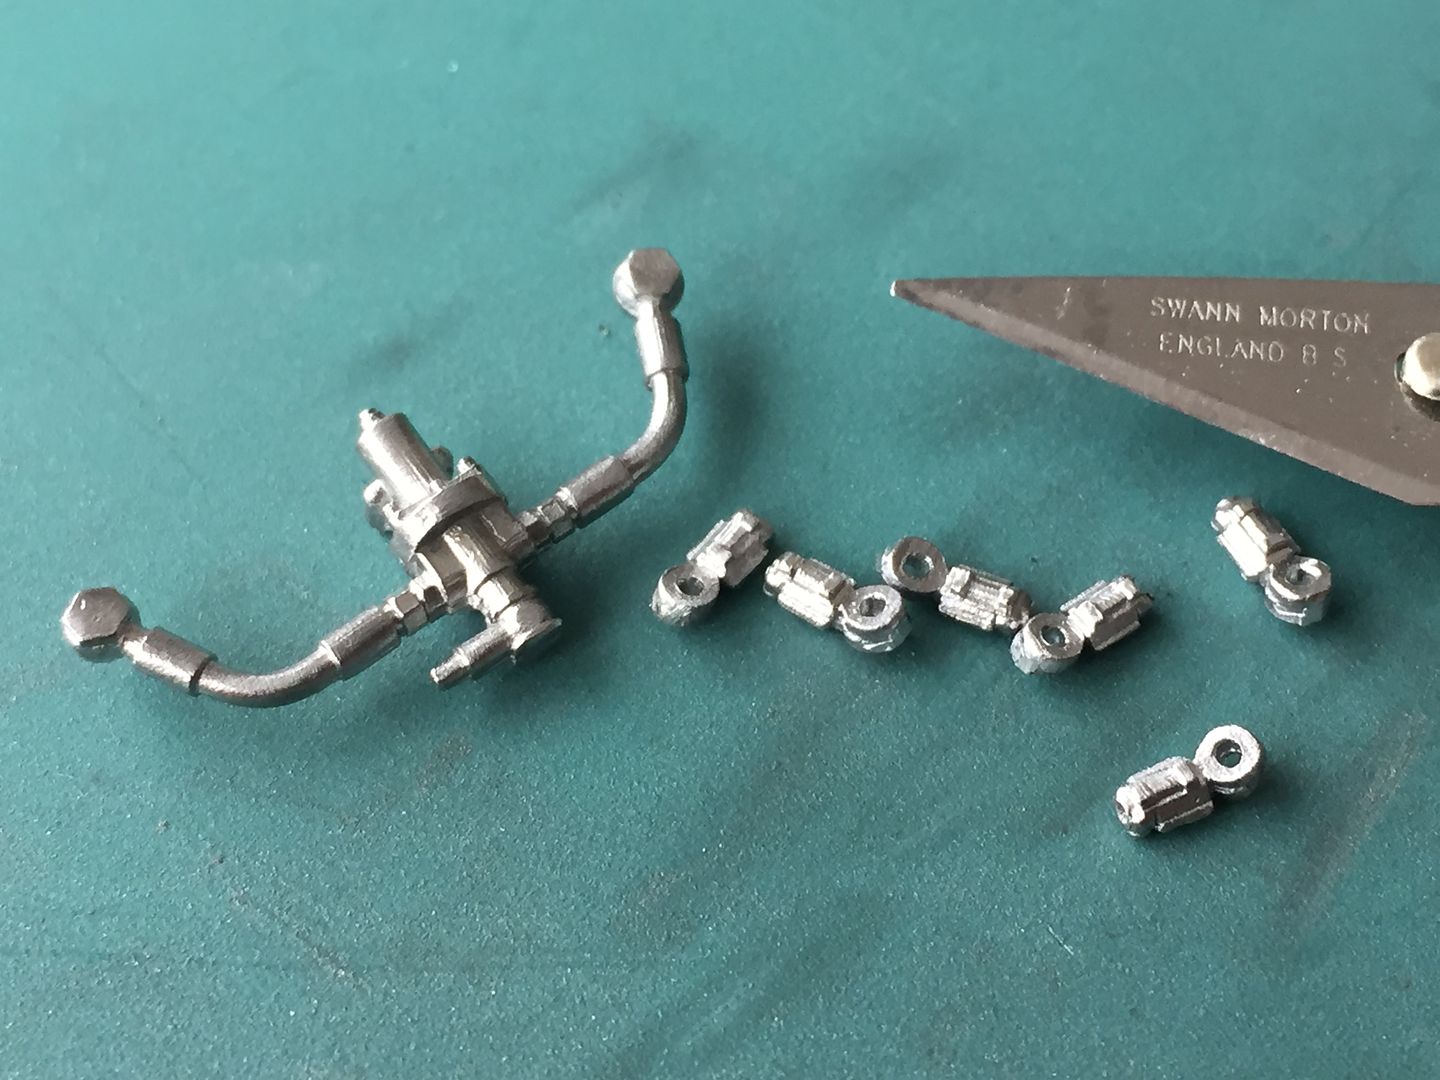
Fuel rails and pipes - real pain to clean up and a few have broken off, resulting in having to use a VERY small pin (brass wire) to repair..(that is a cocktail stick for scale)
I then wasted a lot of time painting these rails and pipes. They are black with silver fittings. I had primed, then sprayed black, then intended to alclad the shiny bits - I tried that blue masking fluid stuff for the black pipes. Big mistake - no good for using on such small pipe work, as it just pulled the underlying paint off as I struggled to remove some as a test - so had to remove all the paintwork (brass wire wheel) in order to start again.....
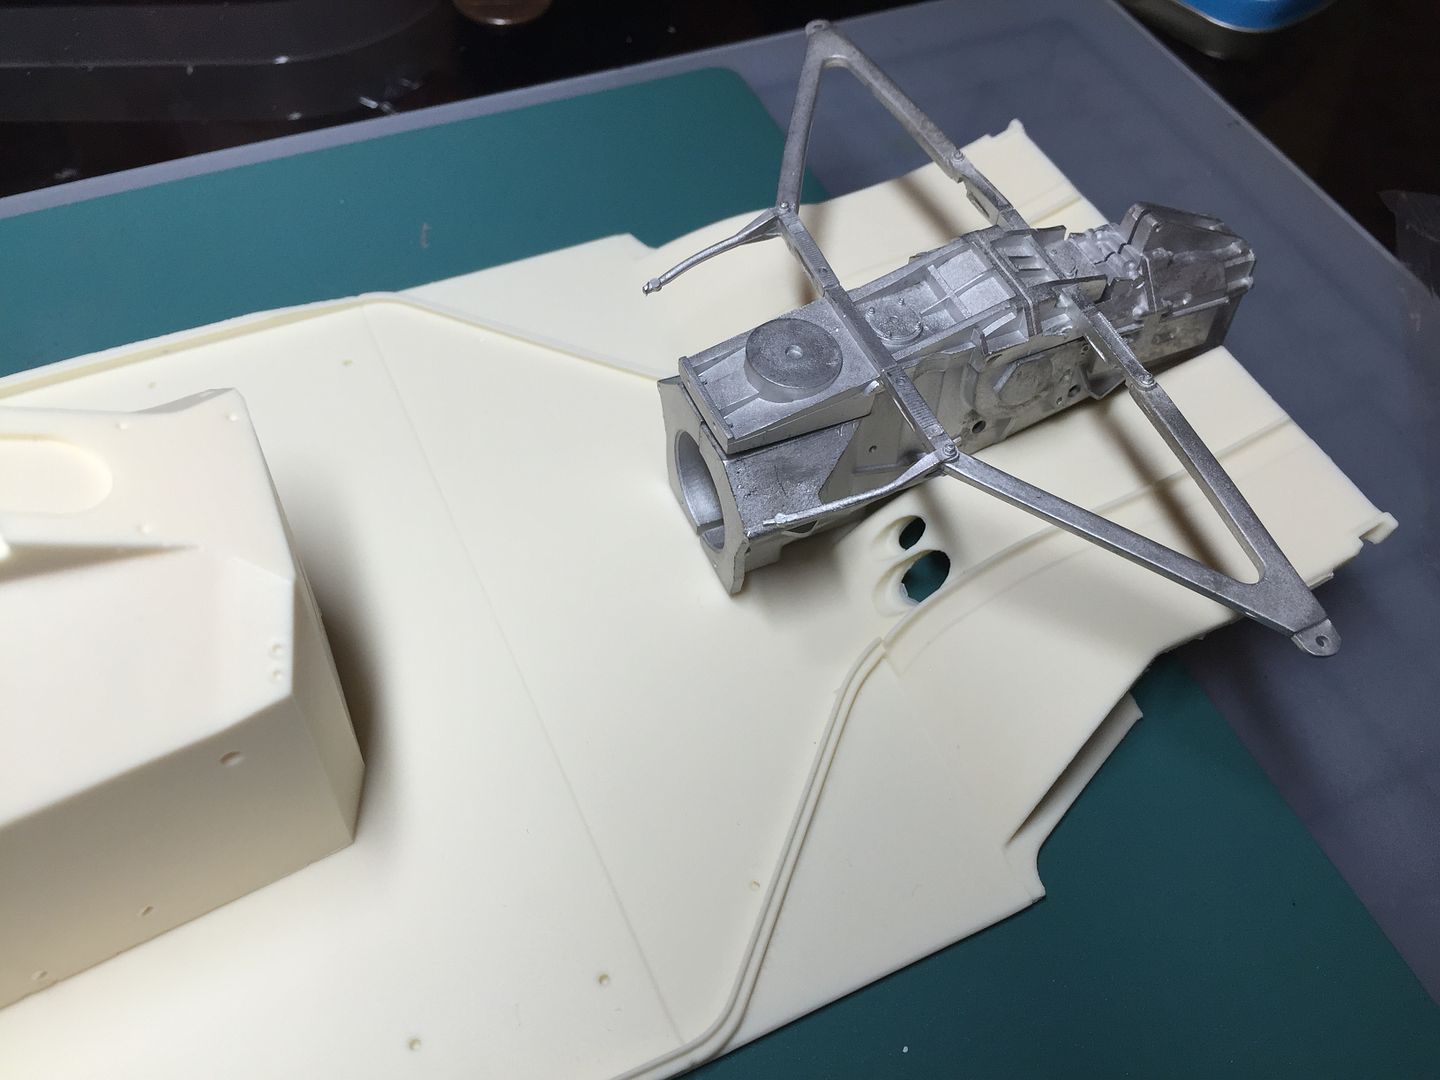
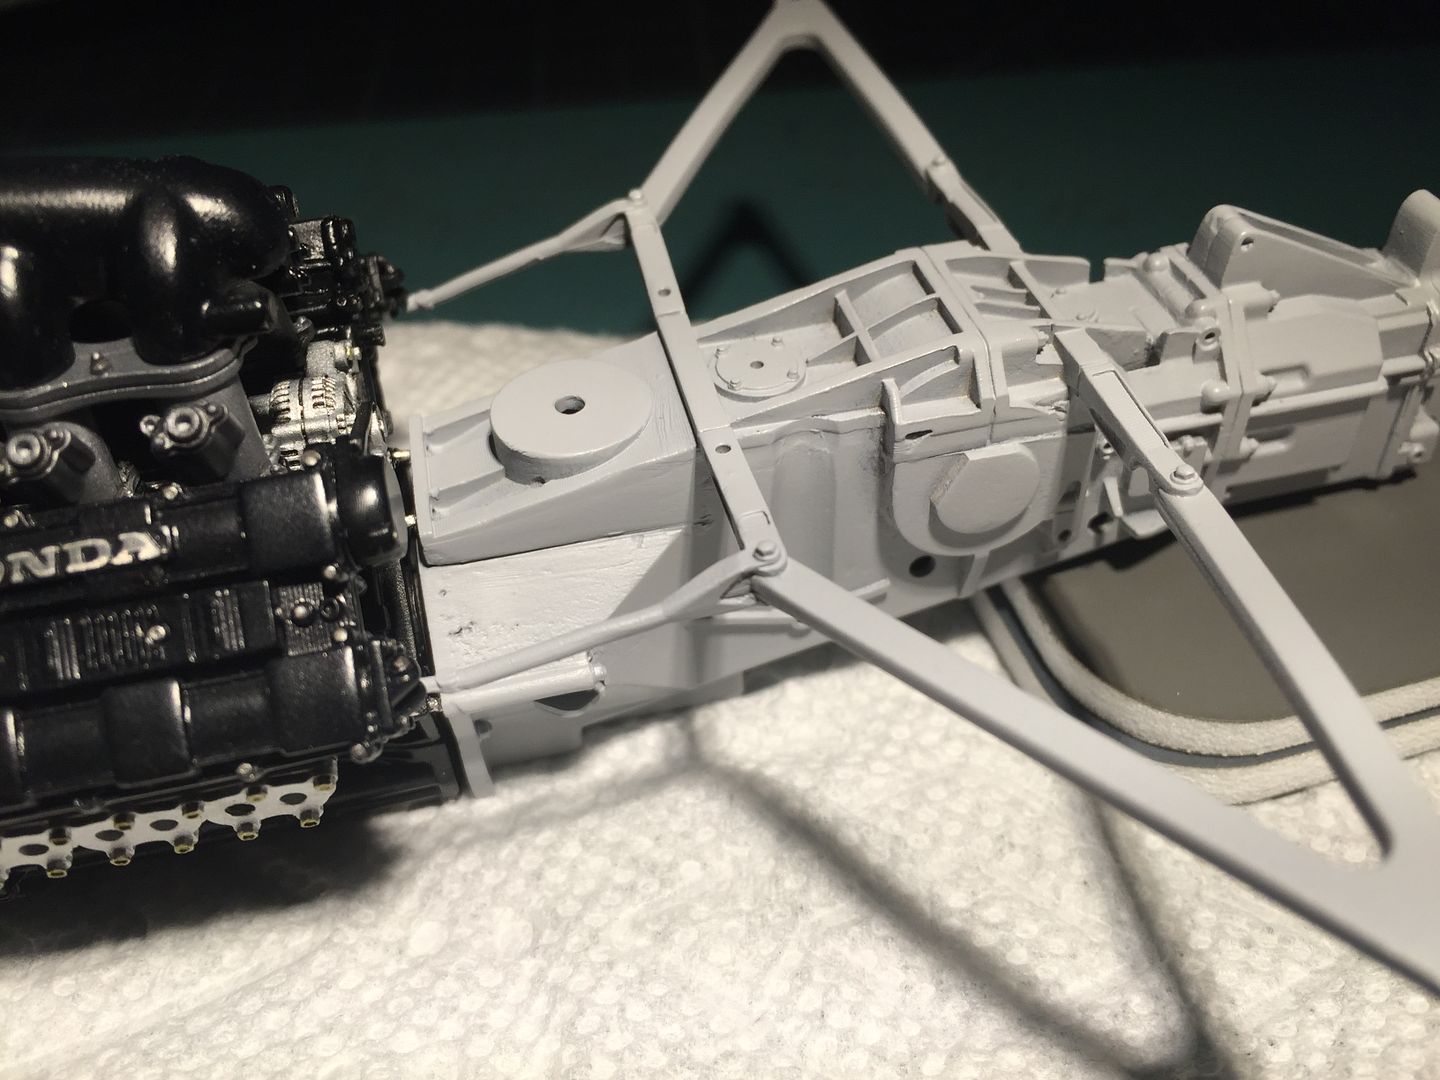
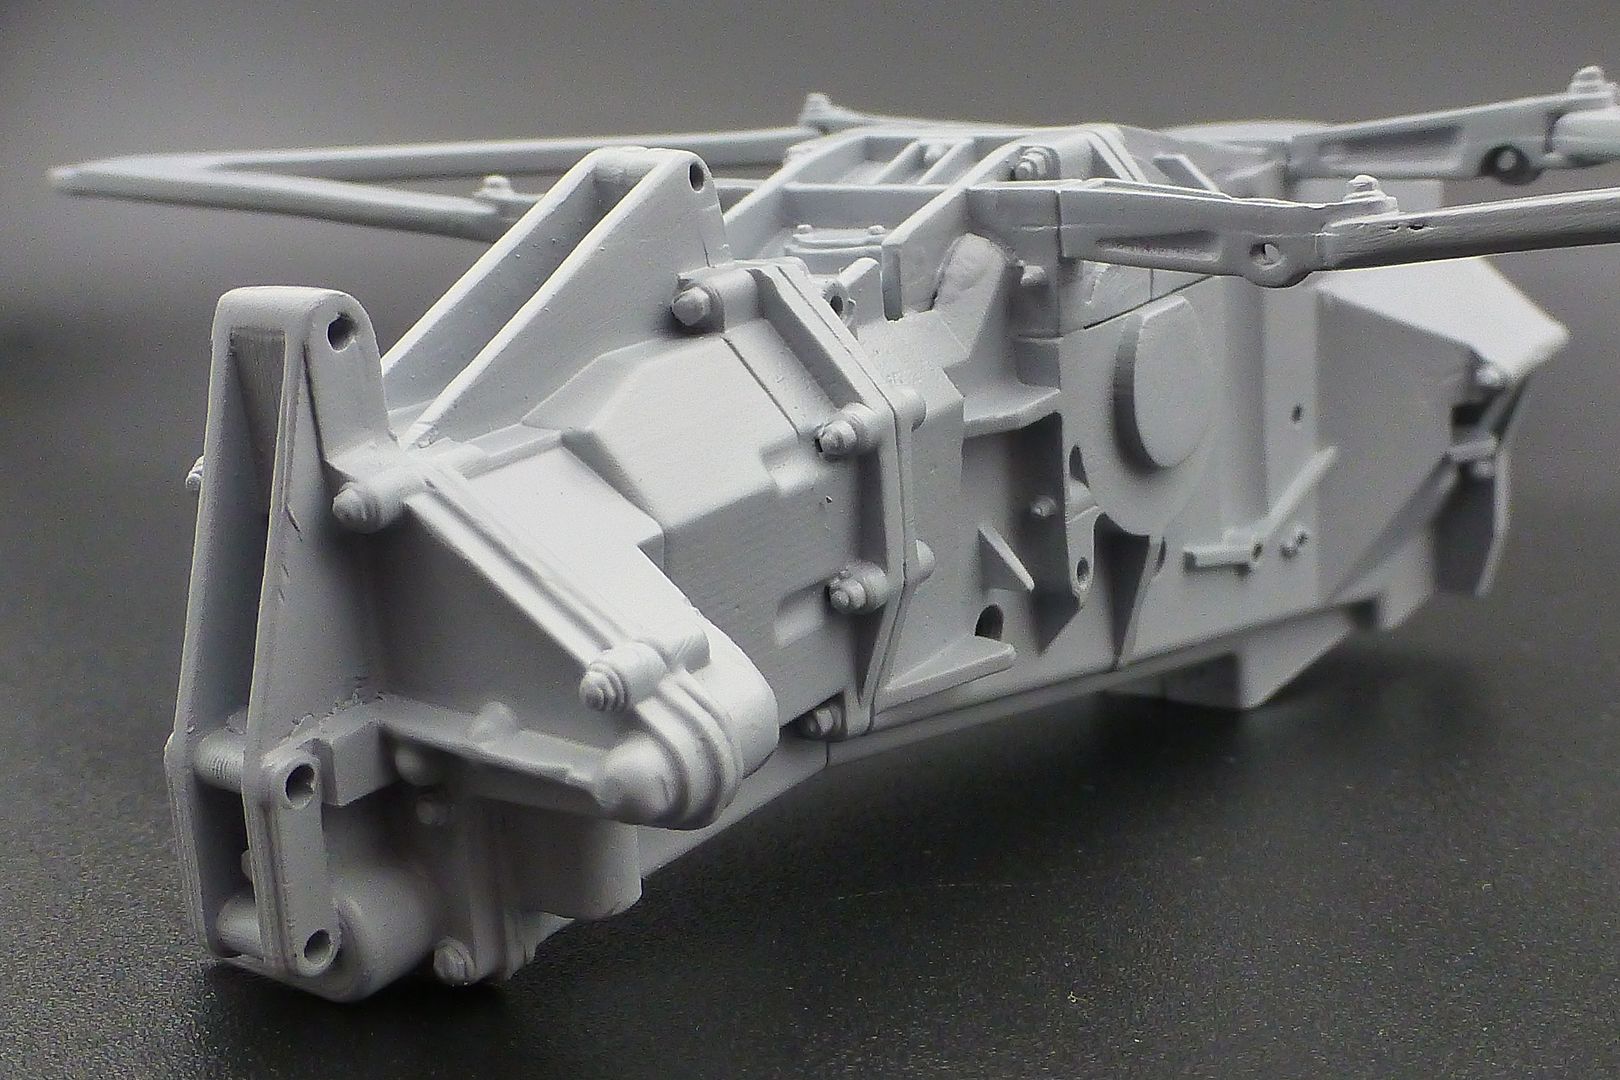
Primed the gearbox just to see, even though I still have work to do on the main casting...
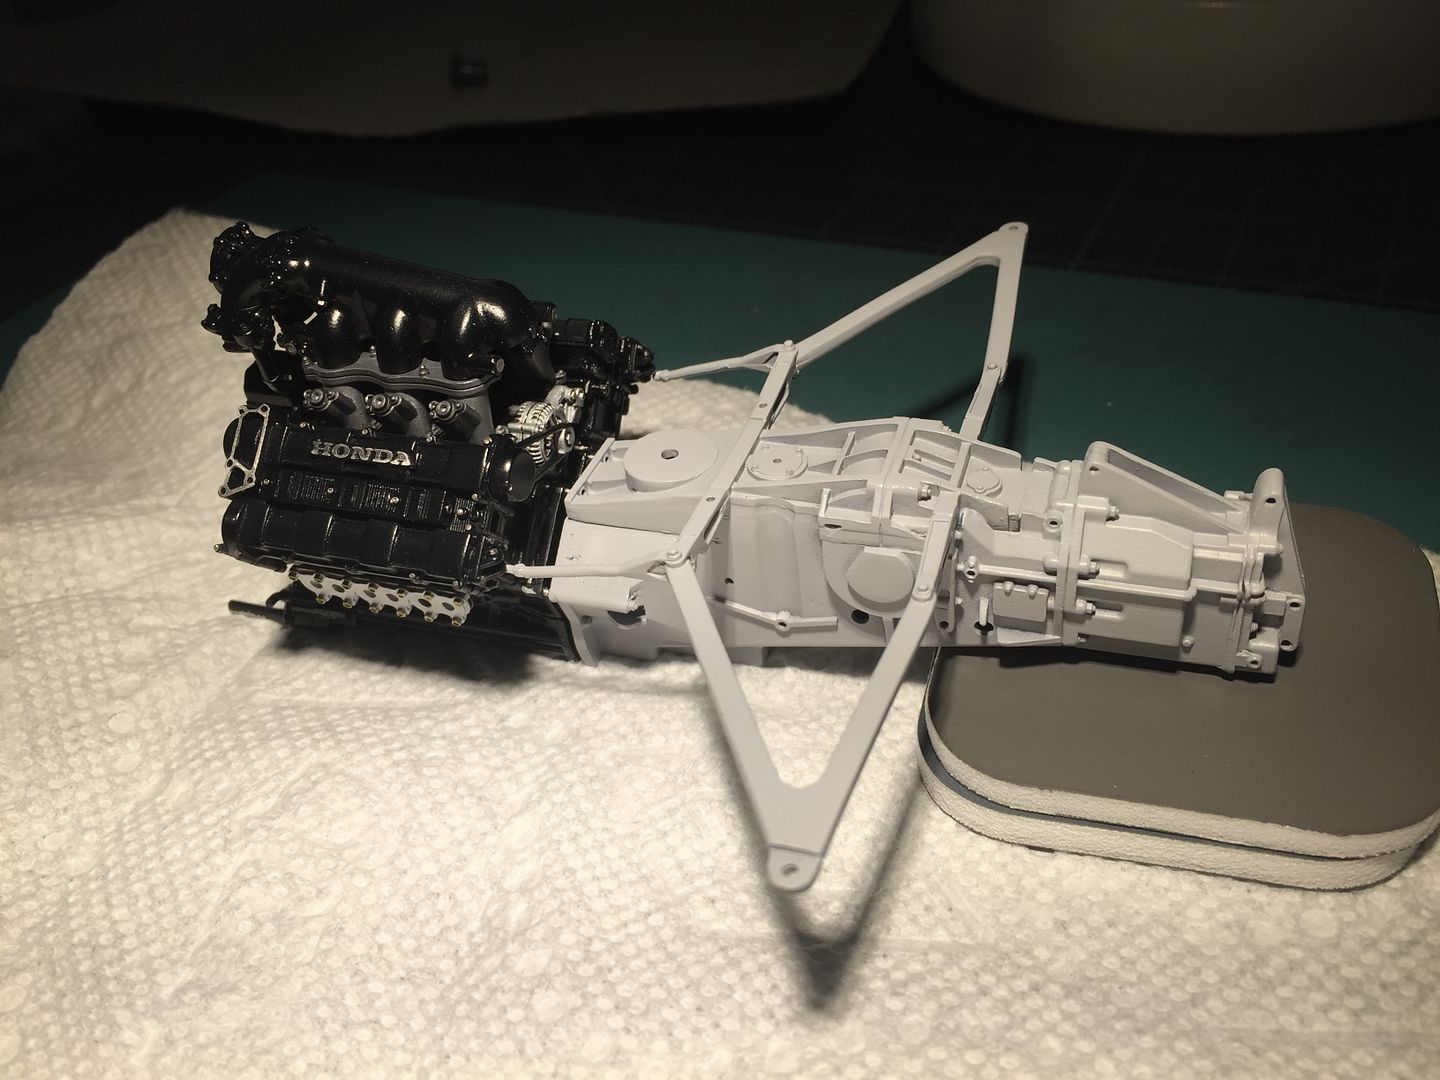
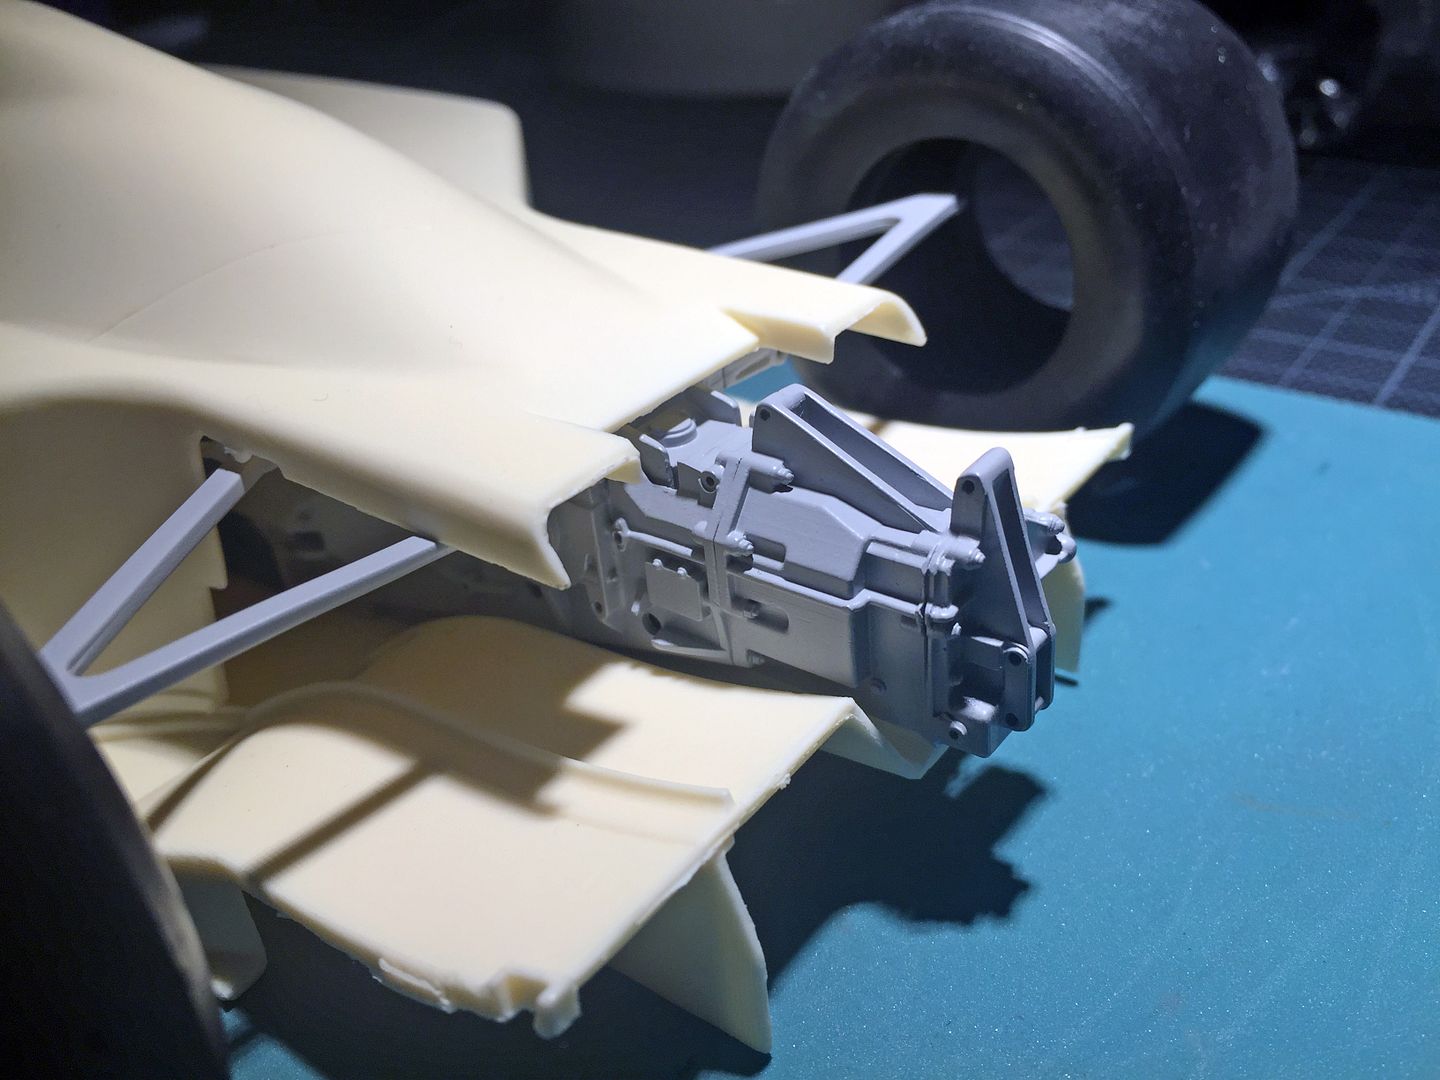
For scale...
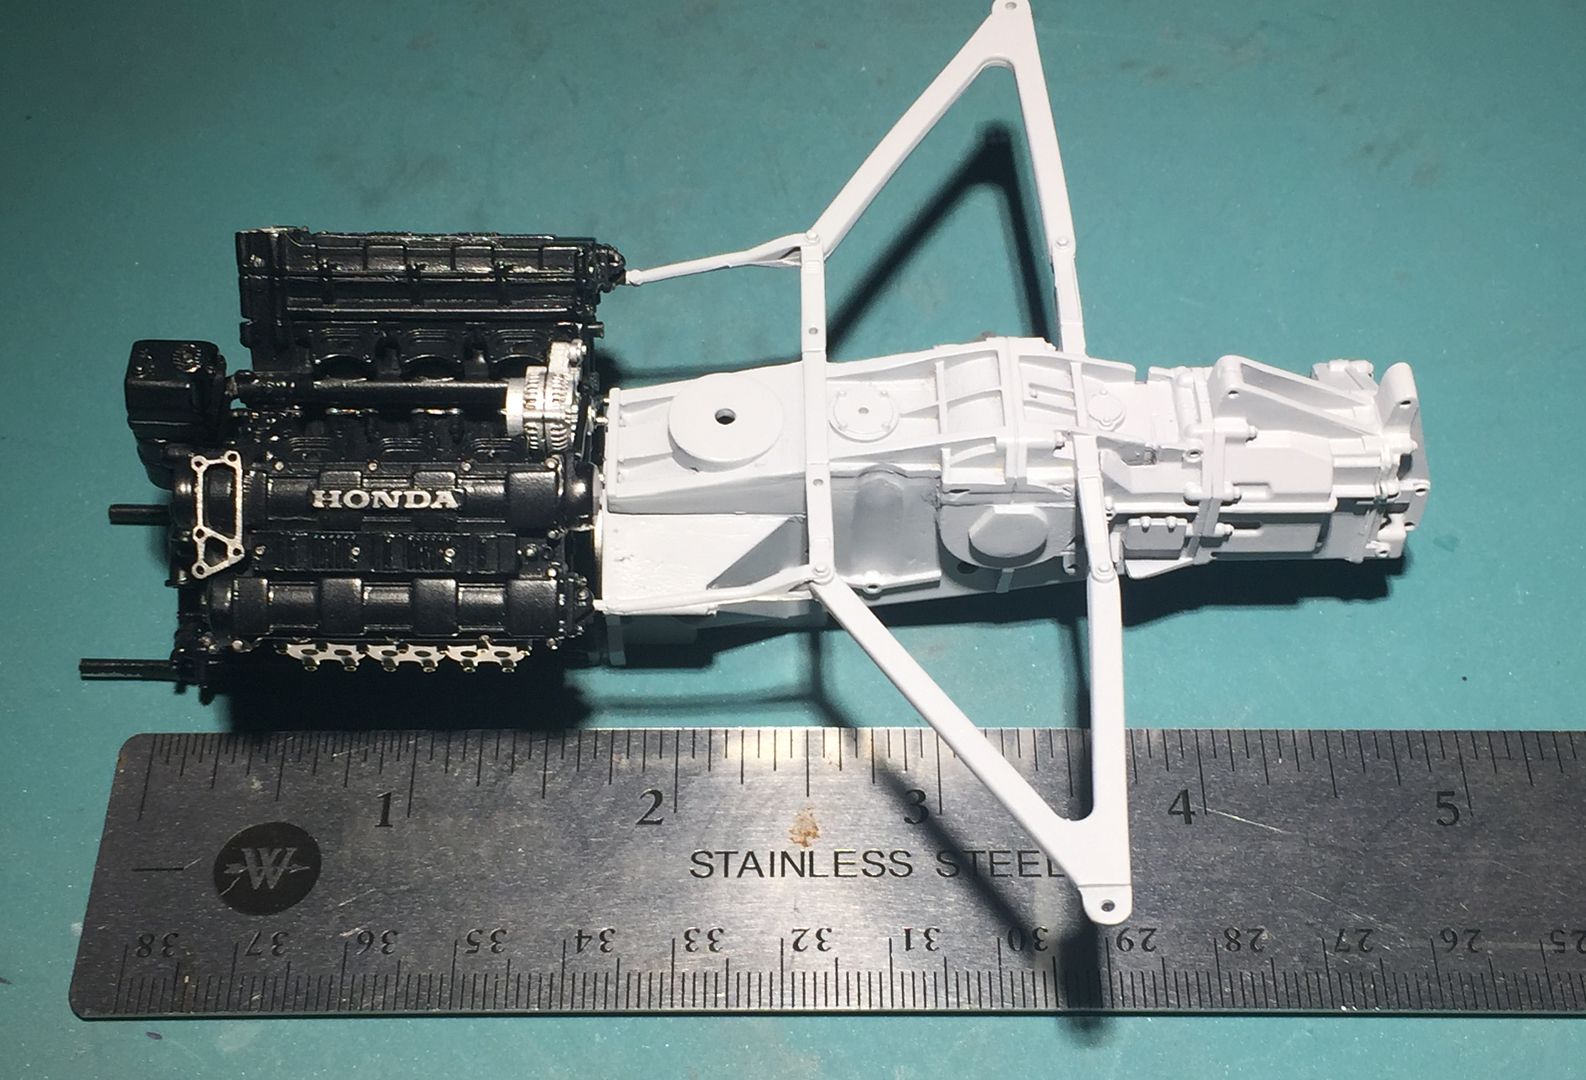
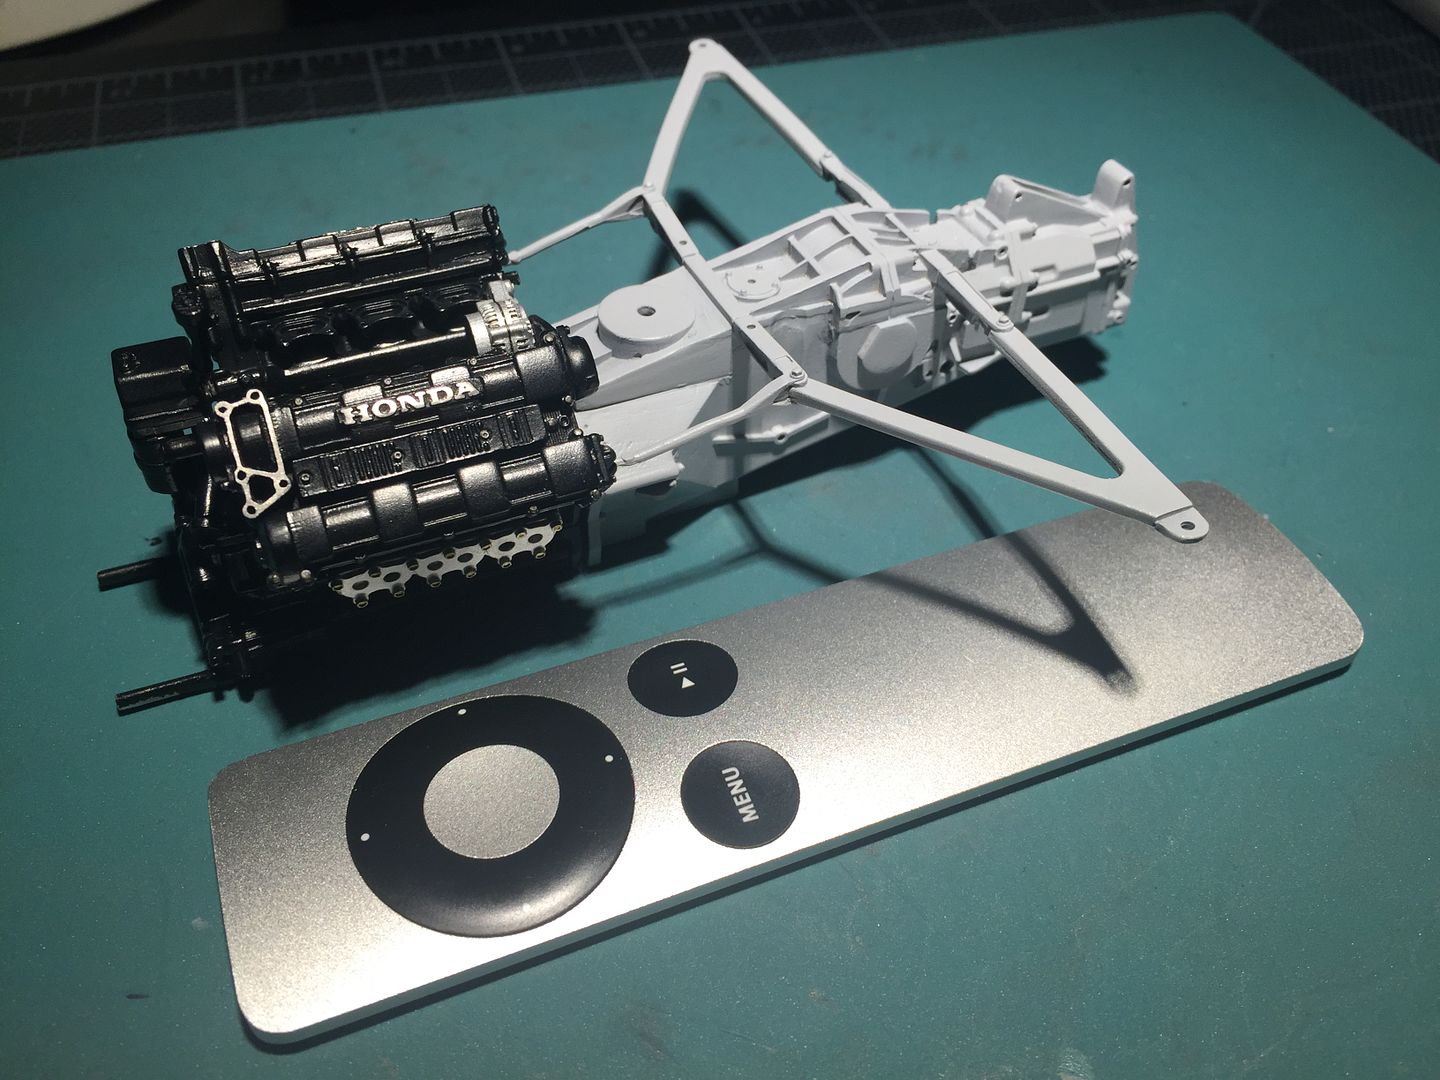
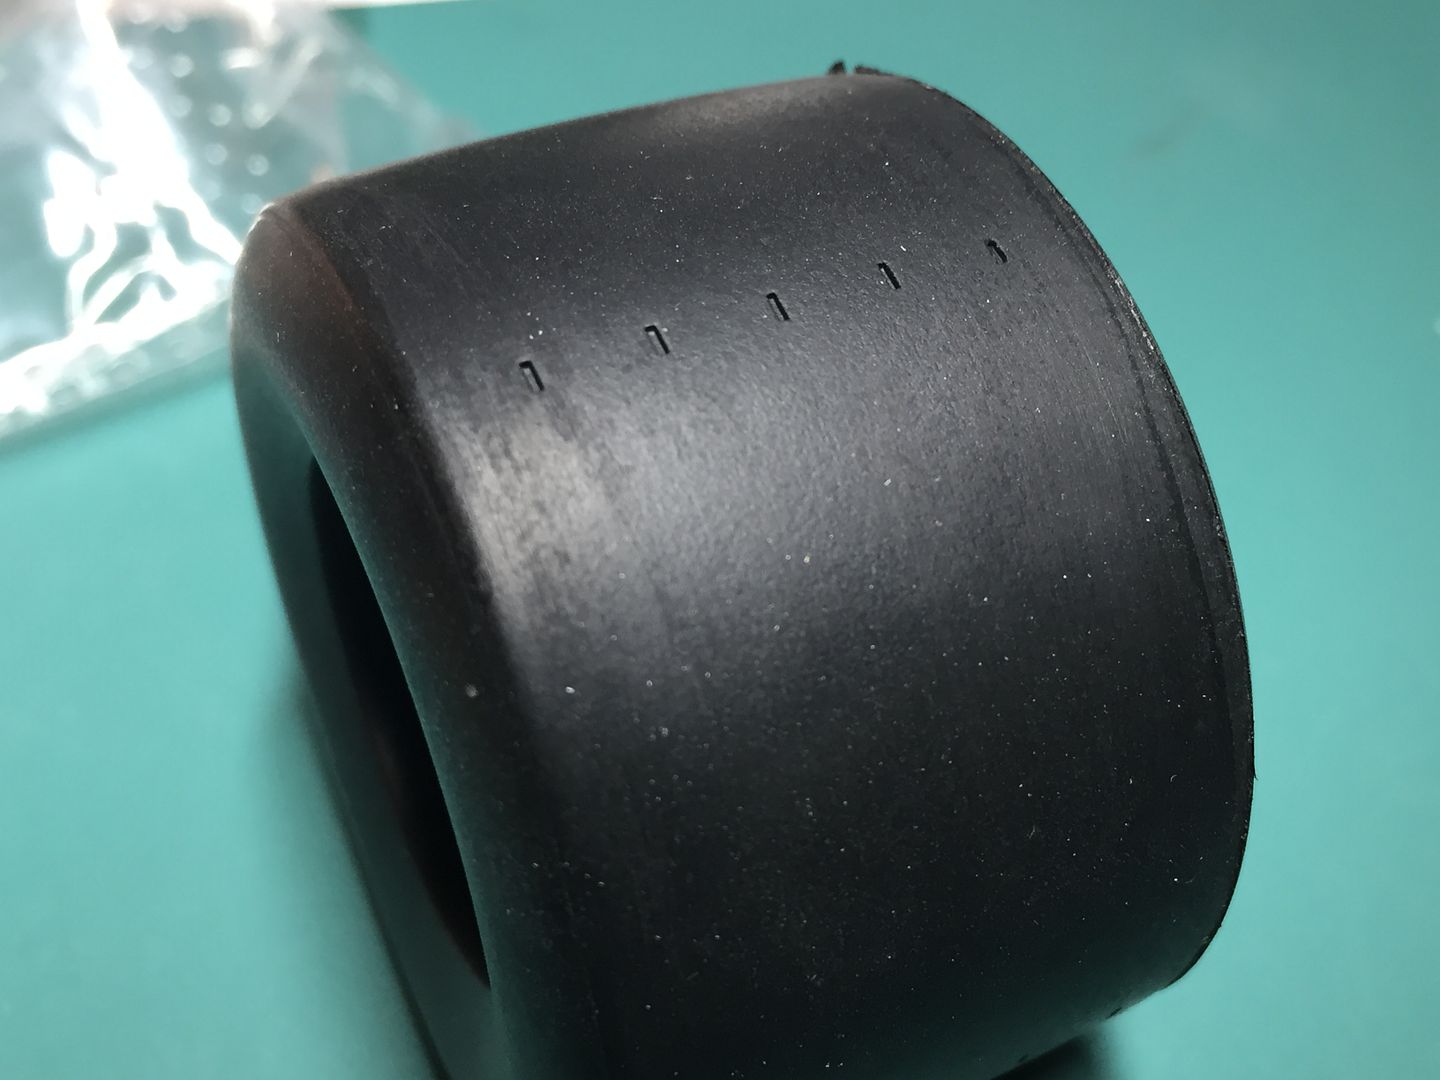
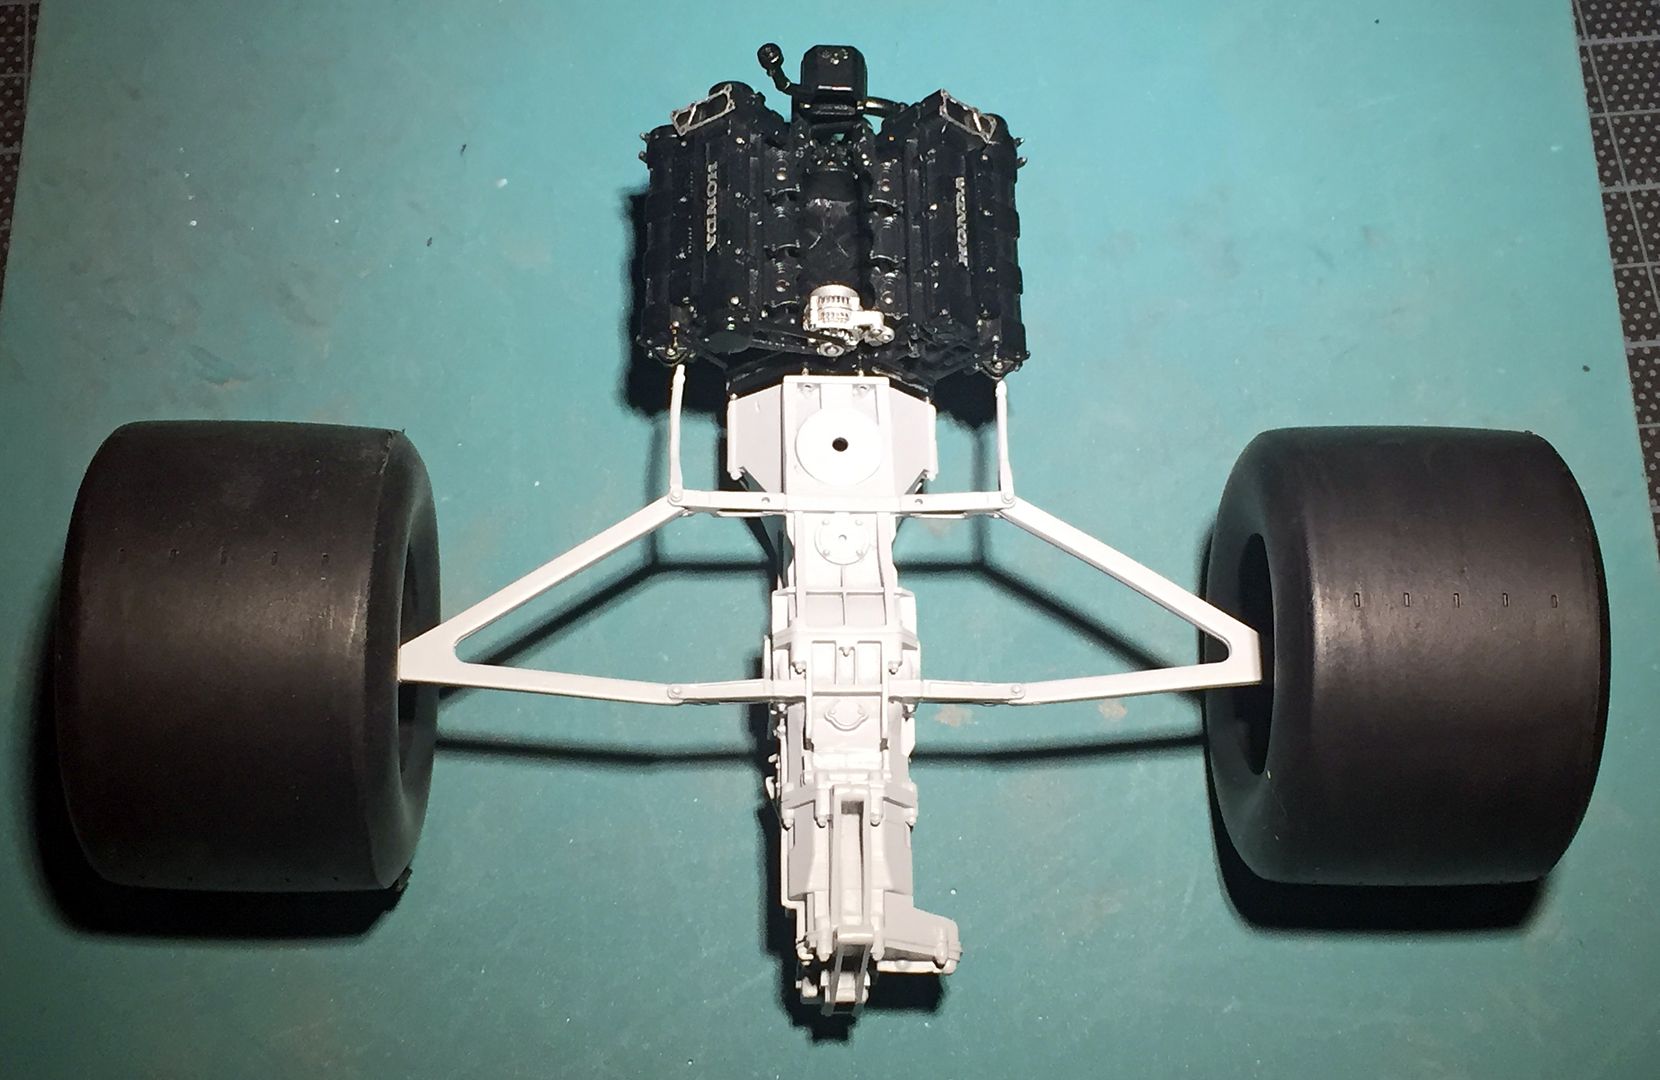
- just look at these old school slicks - just imagine the forces going through driveshafts and gearboxes when the clutch is dumped on supedr-sticky qualifying tyres.....
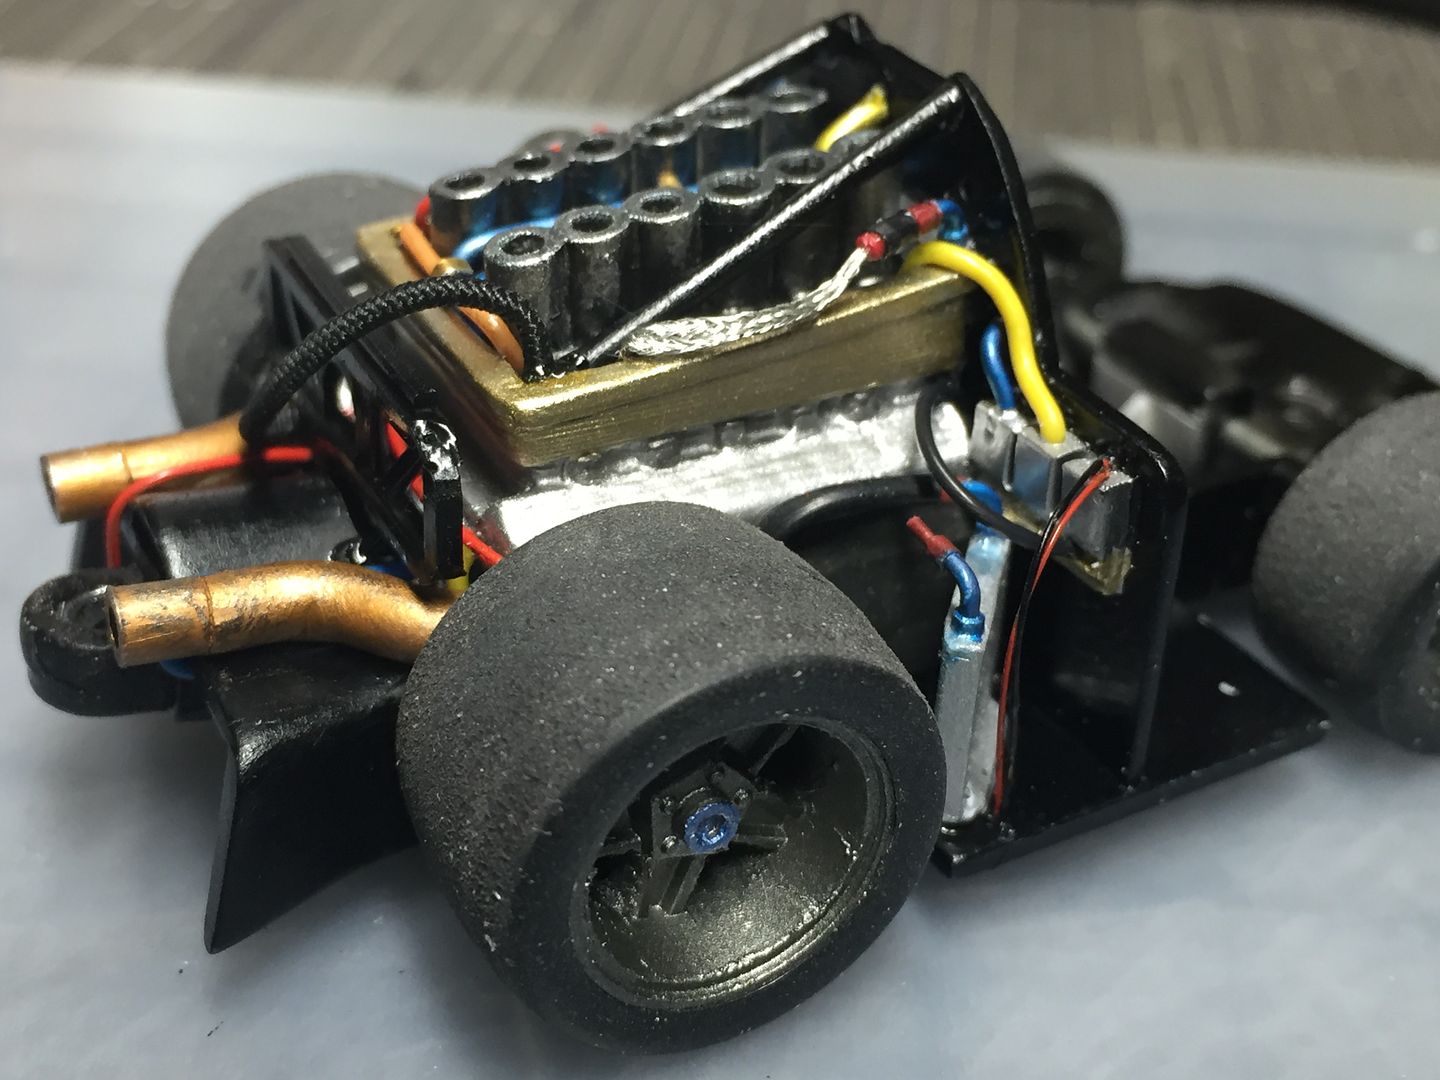
The engine is smaller than the tyre!
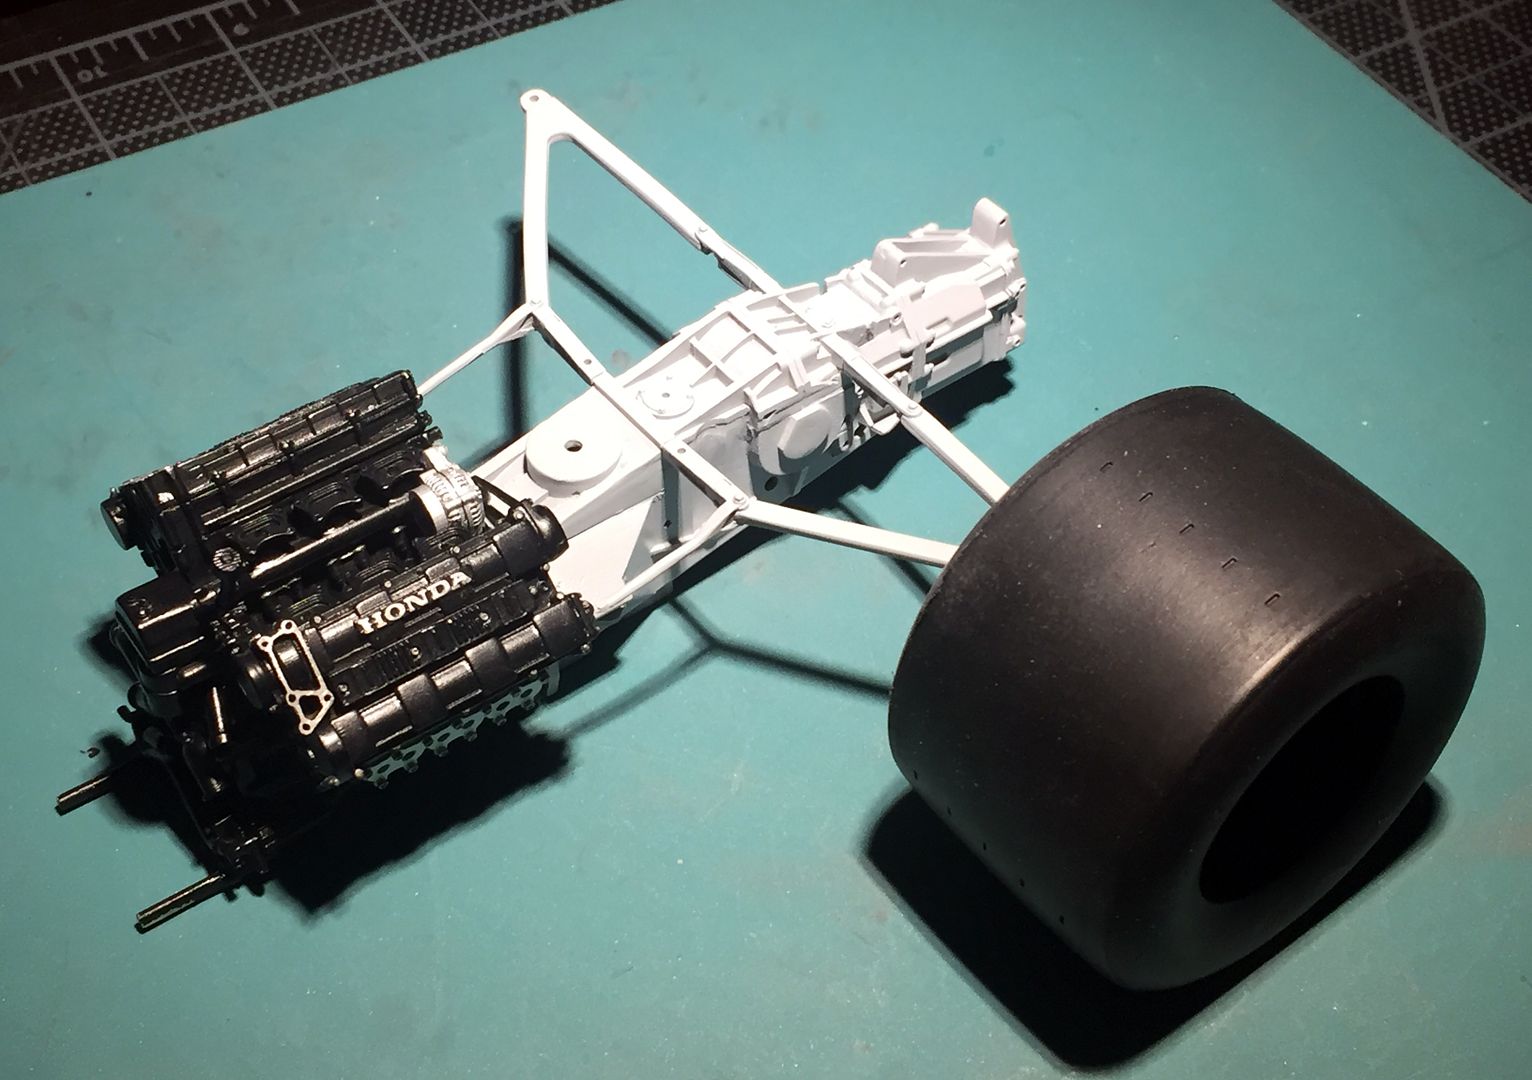
This last shot shows what will be visible once the bodywork is fitted (if I do!) - these are the bolts on the very end of the gearbox, that I think I will drill out and replace with detail fittings.
On another build I may replace others on the engine, but having rushed into painting, I left it too late to do this...
Air box etc just placed in position for now - next step is really the start of wiring, injectors, fuel rails etc...
Playing with more parts...with these multi-media kits you have to test fit everything! These later MFH kits fit together pretty well (not Tamiya level!) but the white metal can bend, and you will need to drill out holes for pegs...
Fitting and filing before polishing...one of the 'issues' with I guess the 'newer' MFH metal work is that you can see the molds are made from 3D printed parts - and the ridges in these are still visible. Although the metal is soft, it is hard to reach a lot of these ridges...I think the dark paint will hide a lot of these though...
Seems to go together pretty well though...not that much fettling. Just deciding which cast 'nut and bolt' details I am going to remove, drill out and use separate detail parts for....
I am learning patience with this one - trying to fully assemble sub-assemblies before adding any paint, and deciding which casting details to switch out for 'real' nuts and bolts etc....
Hope to get more done this weekend...
The white metal is very soft - elements like suspension components and very easy to bend.
The brass wire wheel seems to work well, together with filing and sanding.
Centering holes being drilled will have to be very accurate...most holes have a tiny indent to start them - most need drilling out or made deeper (due to casting process)
Polished a lot of parts for future use, which was good - those brass wire 'bits' get everywhere, so wanted to do a lot in one go before having to clean up!
These are some engine plumbing, and some tiny plug lead headers...
Fuel rails and pipes - real pain to clean up and a few have broken off, resulting in having to use a VERY small pin (brass wire) to repair..(that is a cocktail stick for scale)
I then wasted a lot of time painting these rails and pipes. They are black with silver fittings. I had primed, then sprayed black, then intended to alclad the shiny bits - I tried that blue masking fluid stuff for the black pipes. Big mistake - no good for using on such small pipe work, as it just pulled the underlying paint off as I struggled to remove some as a test - so had to remove all the paintwork (brass wire wheel) in order to start again.....
Primed the gearbox just to see, even though I still have work to do on the main casting...
For scale...
- just look at these old school slicks - just imagine the forces going through driveshafts and gearboxes when the clutch is dumped on supedr-sticky qualifying tyres.....
The engine is smaller than the tyre!
This last shot shows what will be visible once the bodywork is fitted (if I do!) - these are the bolts on the very end of the gearbox, that I think I will drill out and replace with detail fittings.
On another build I may replace others on the engine, but having rushed into painting, I left it too late to do this...
Those slicks...They've got small cuts in them - I think for gauging wear. Are there any photos in your reference book that show them? Pretty sure they weren't moulded-in at that time, although I clearly remember watching a mechanic manually cutting them in new tyres with a special tool (still got some of the cut-out bits of tyre I picked up as a kid, sadly enough). Can't remember when that was though.
Some more pictures - apologies for the quality - it is always dark by the time I get to work on this, and I am still sourcing/making a light box!
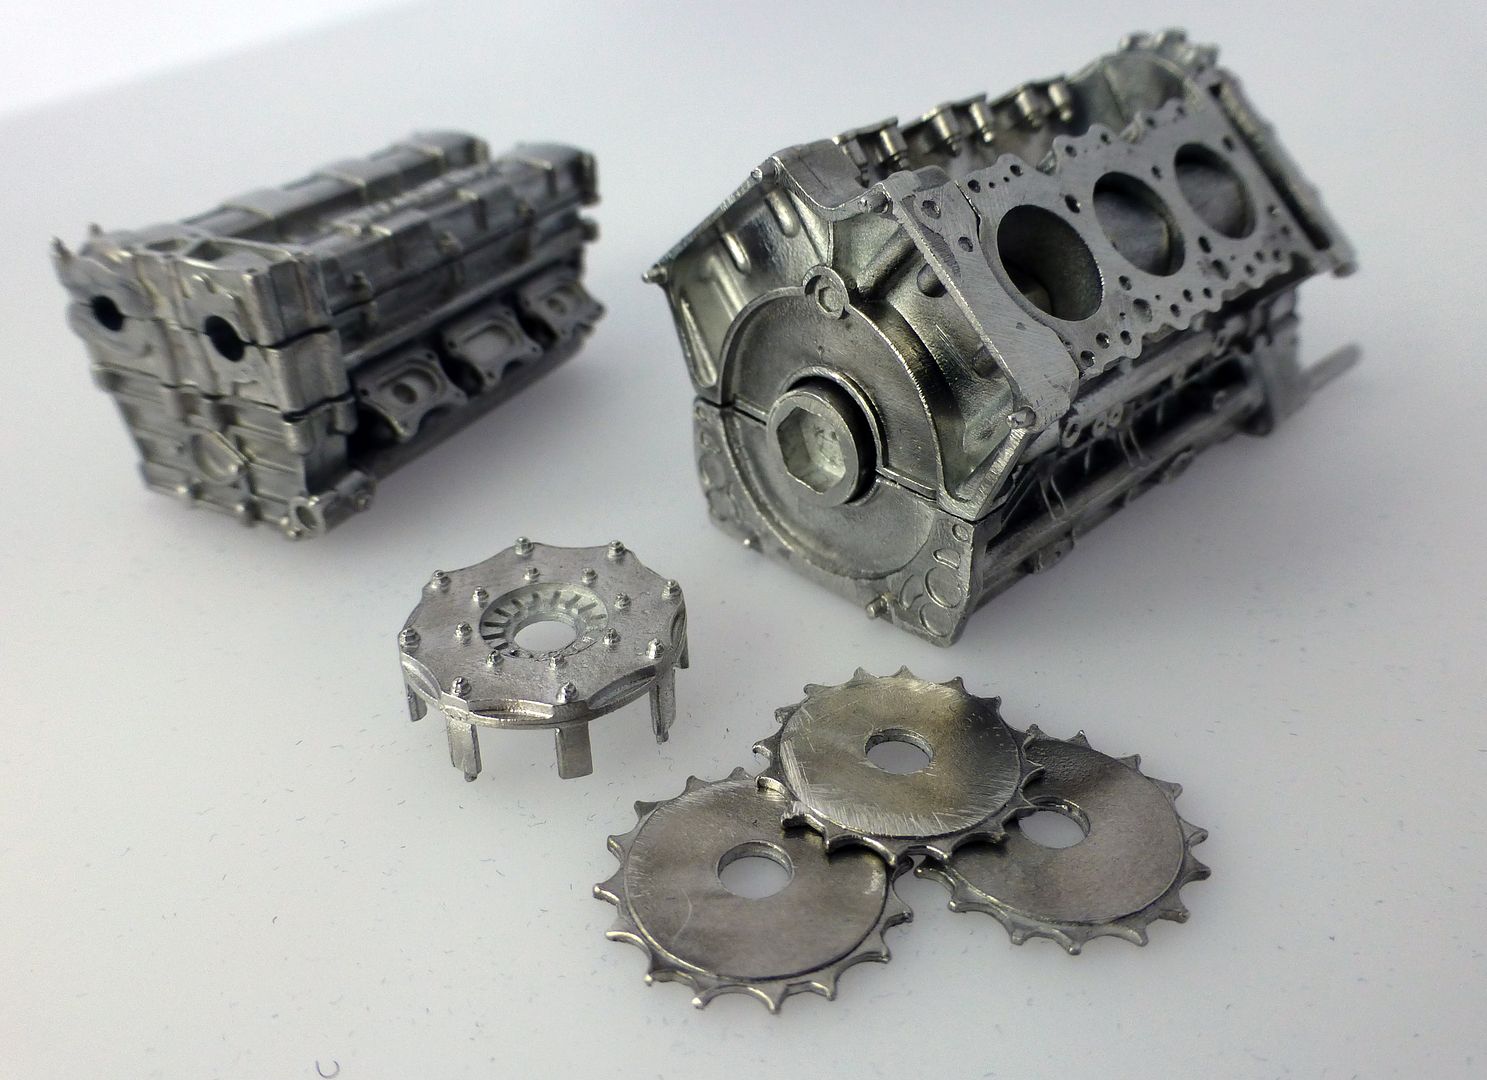
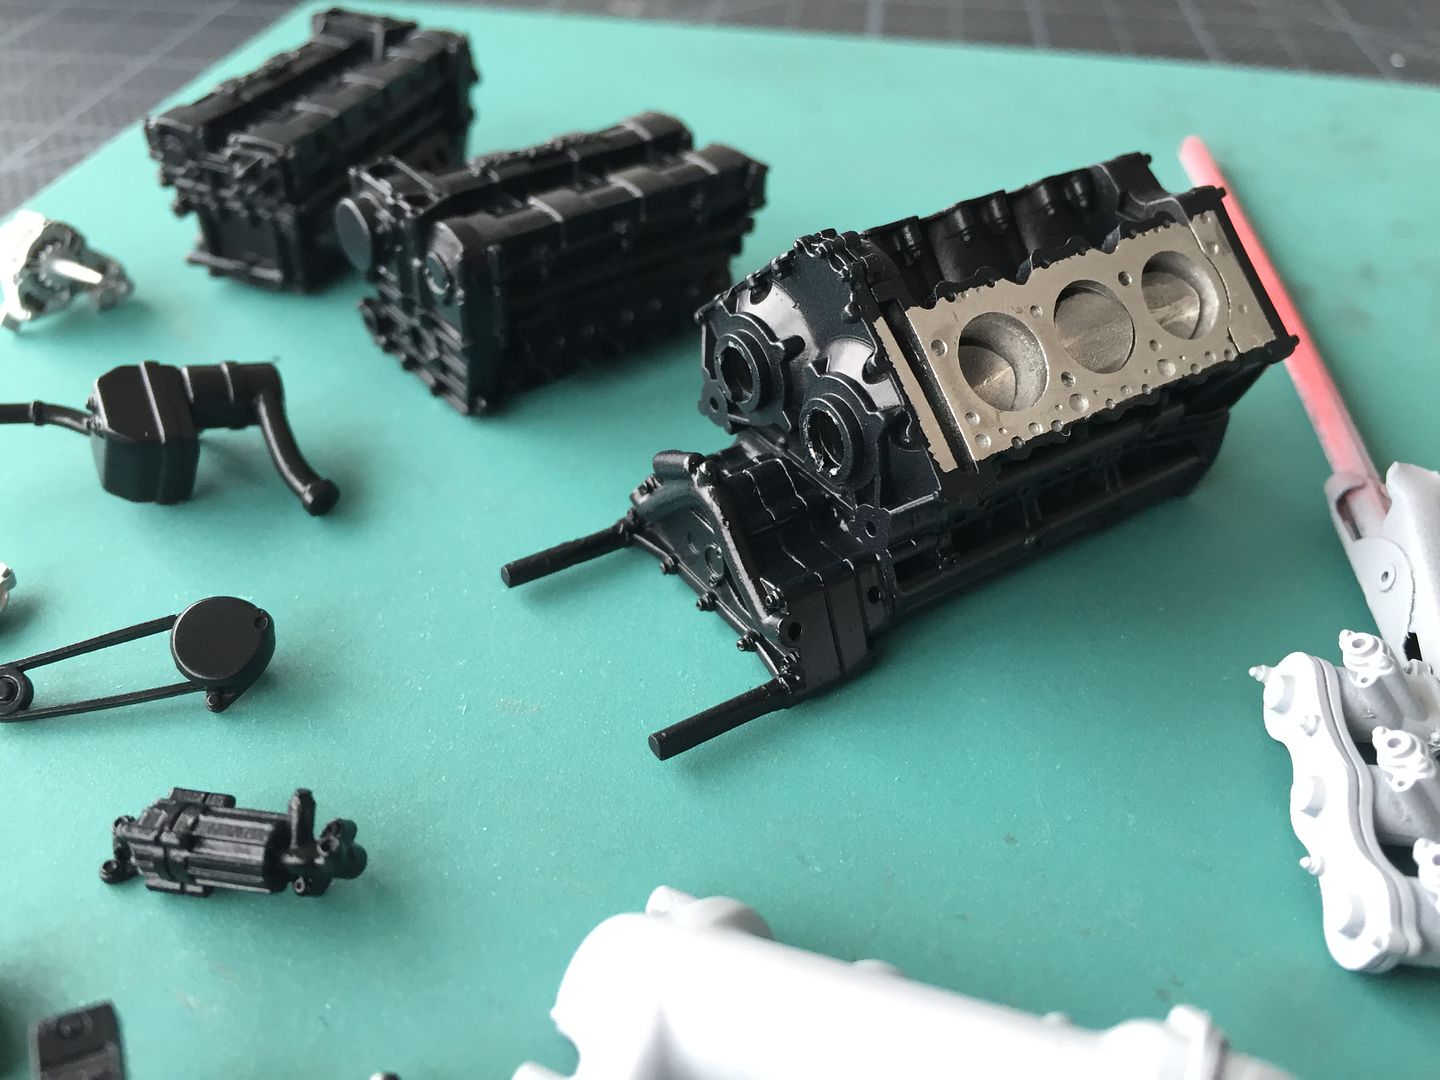
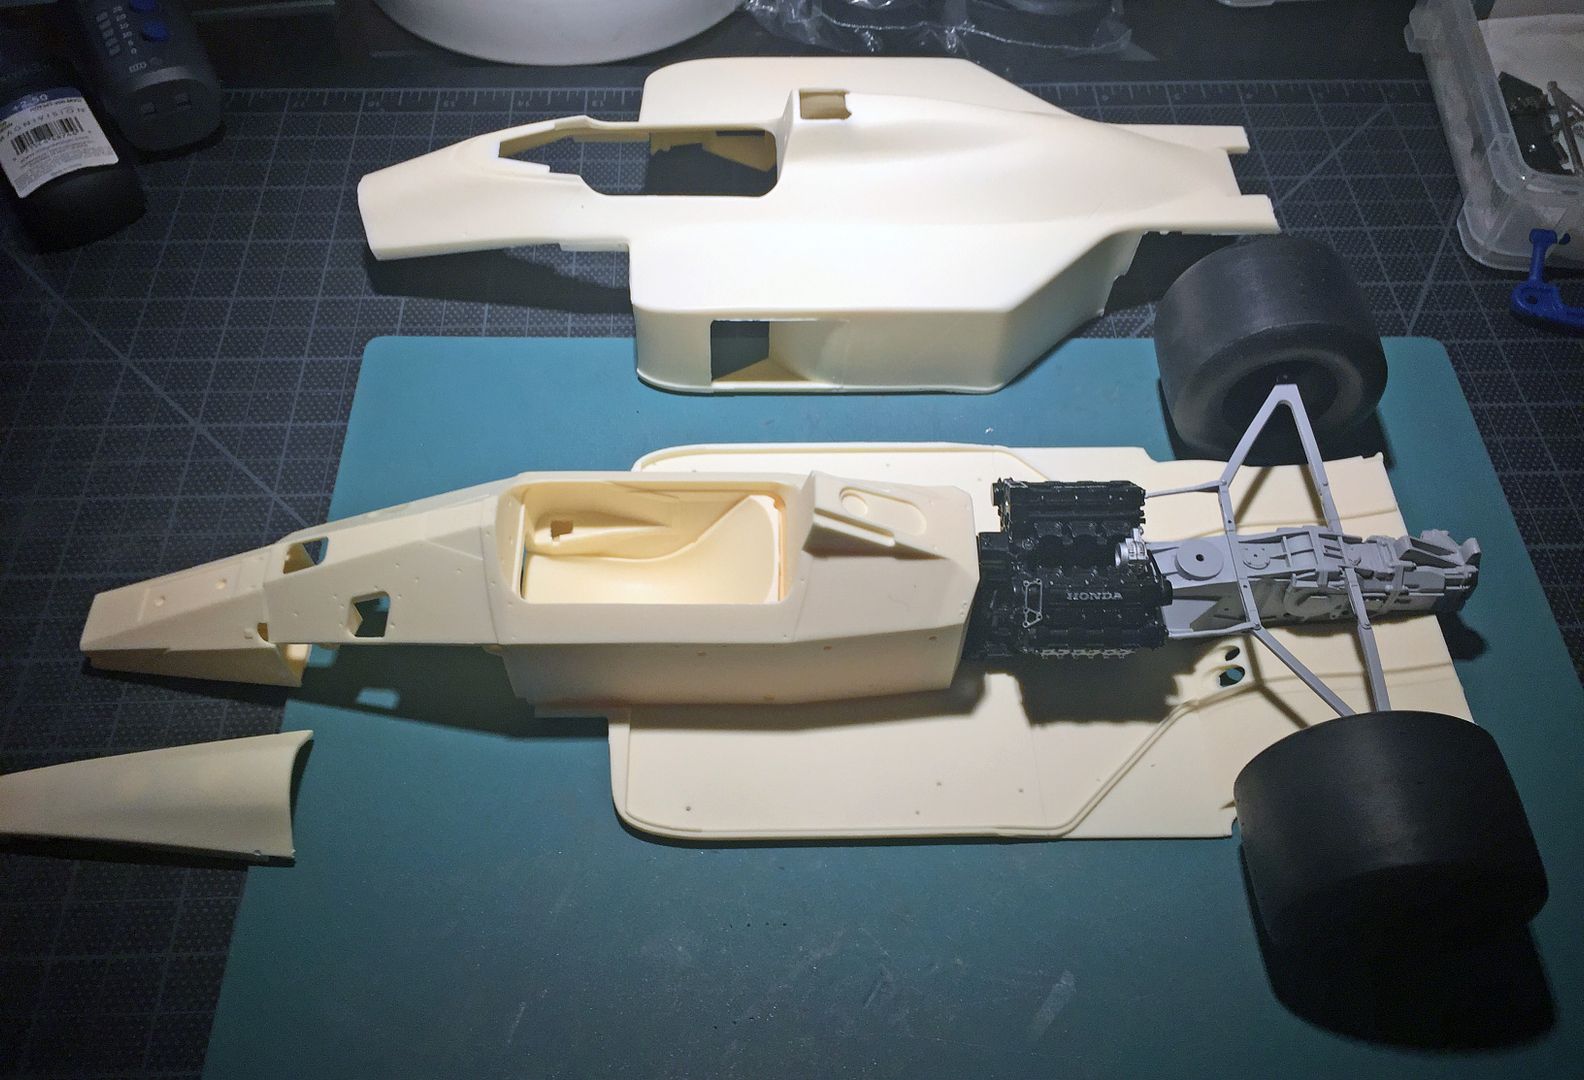
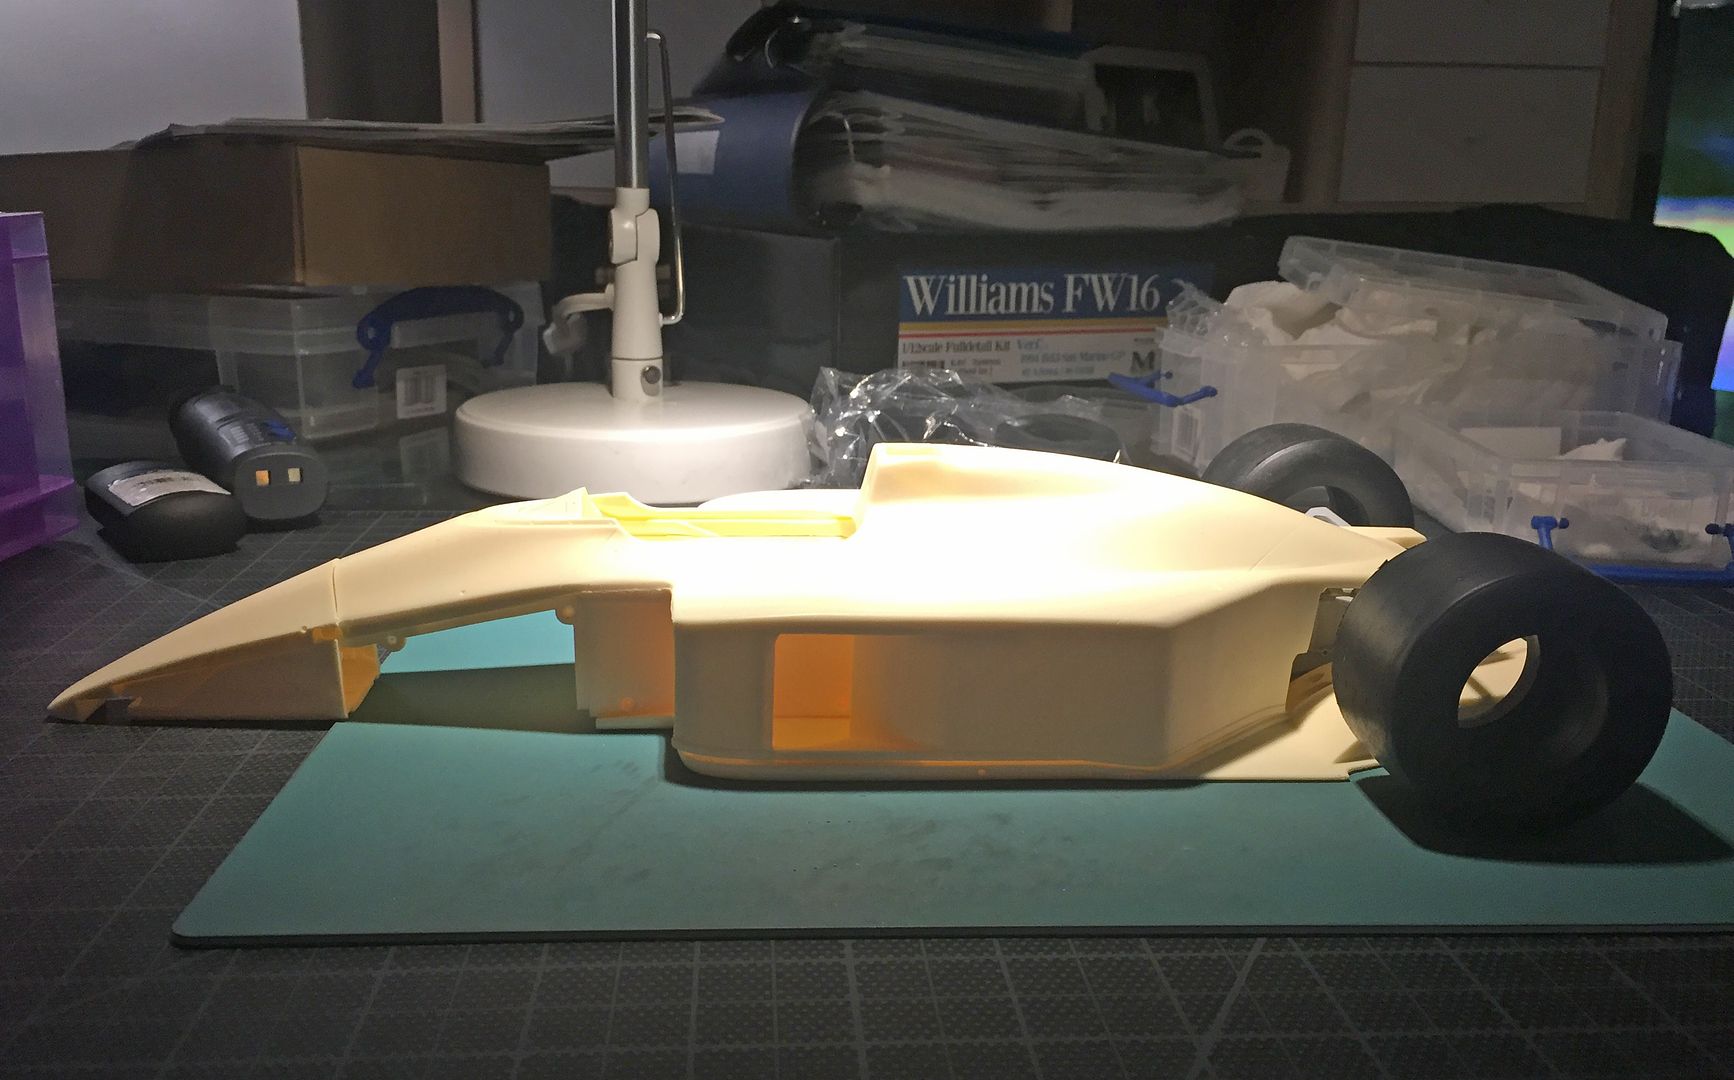
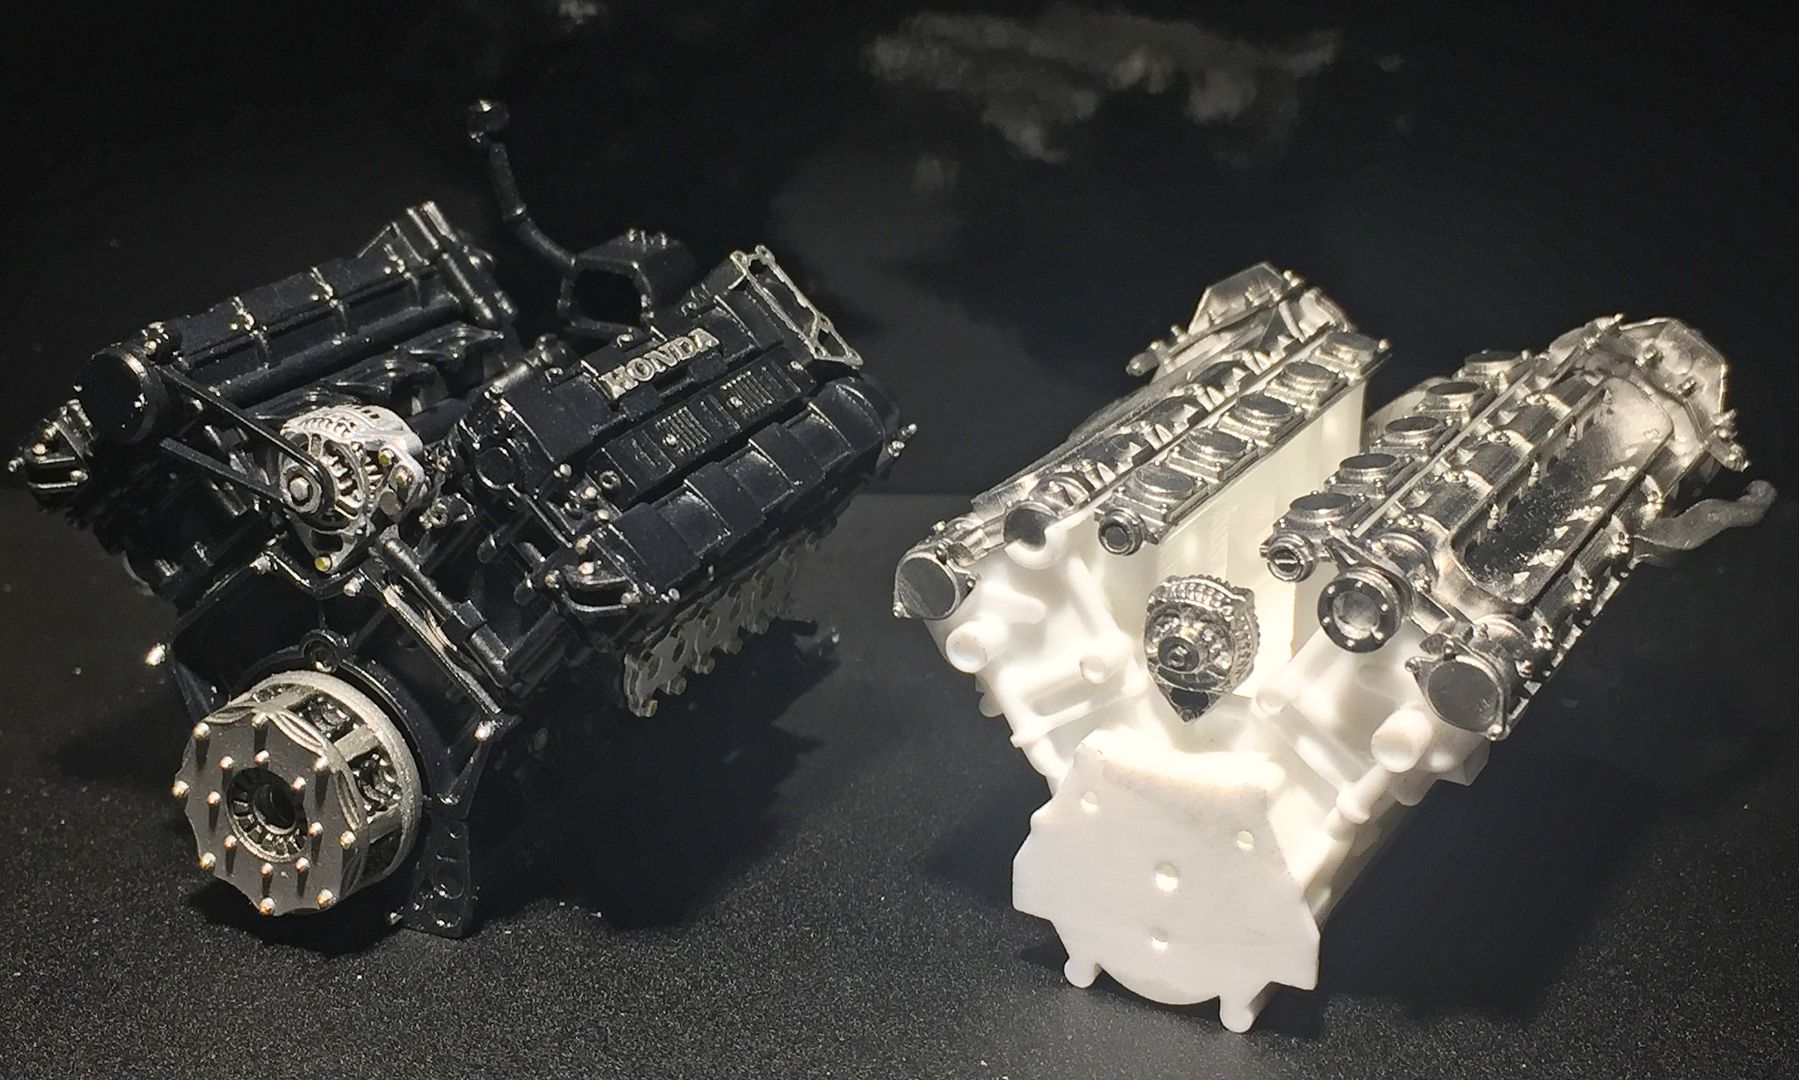
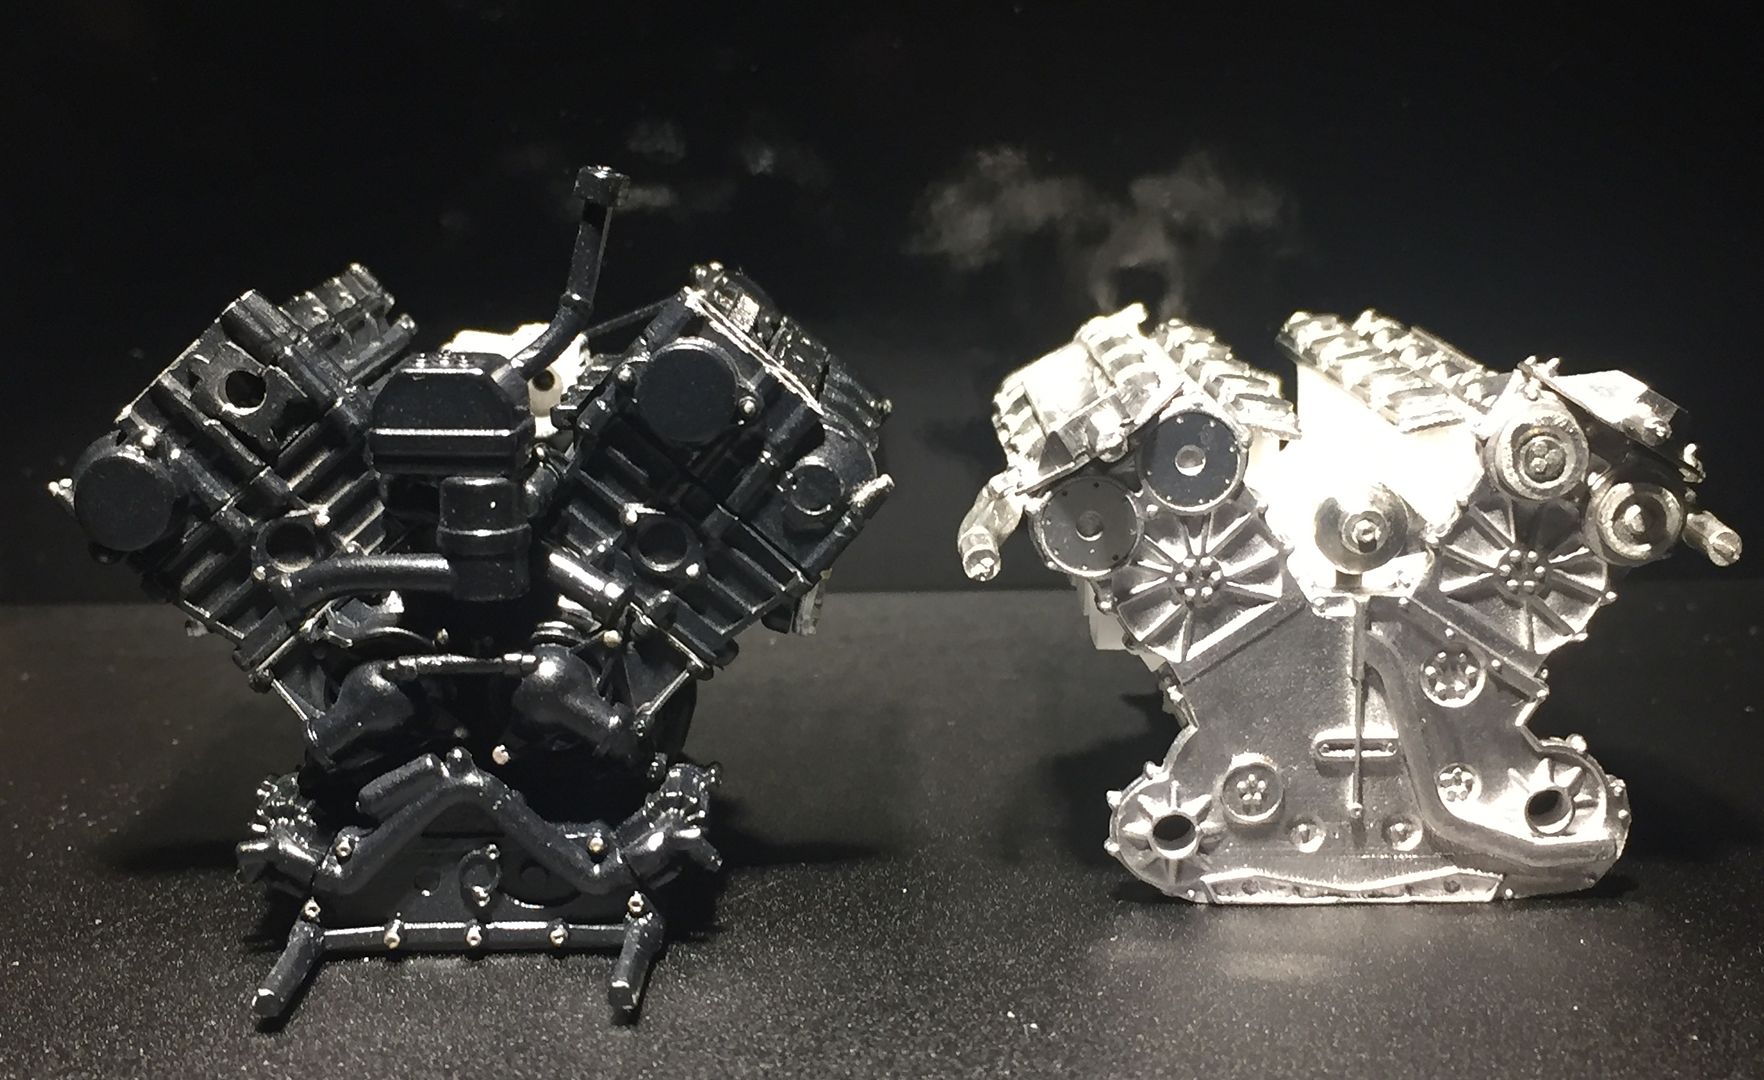
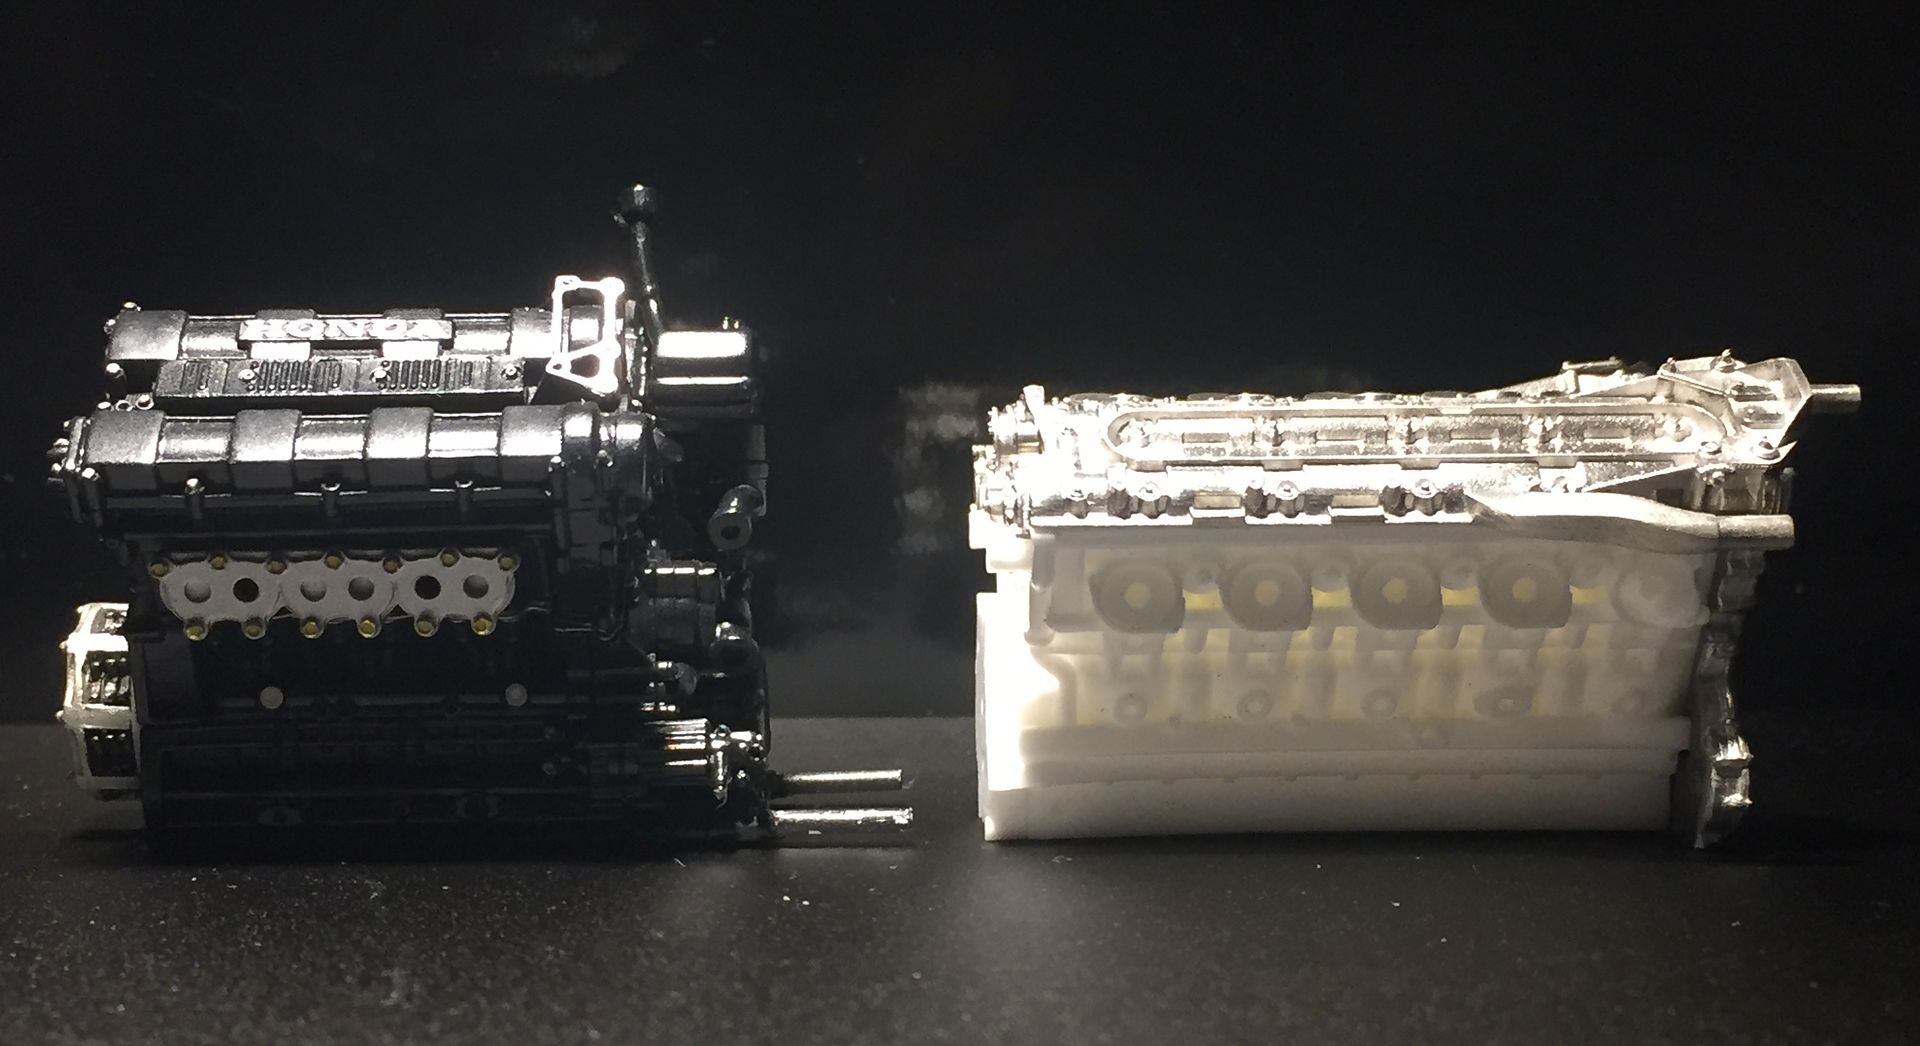
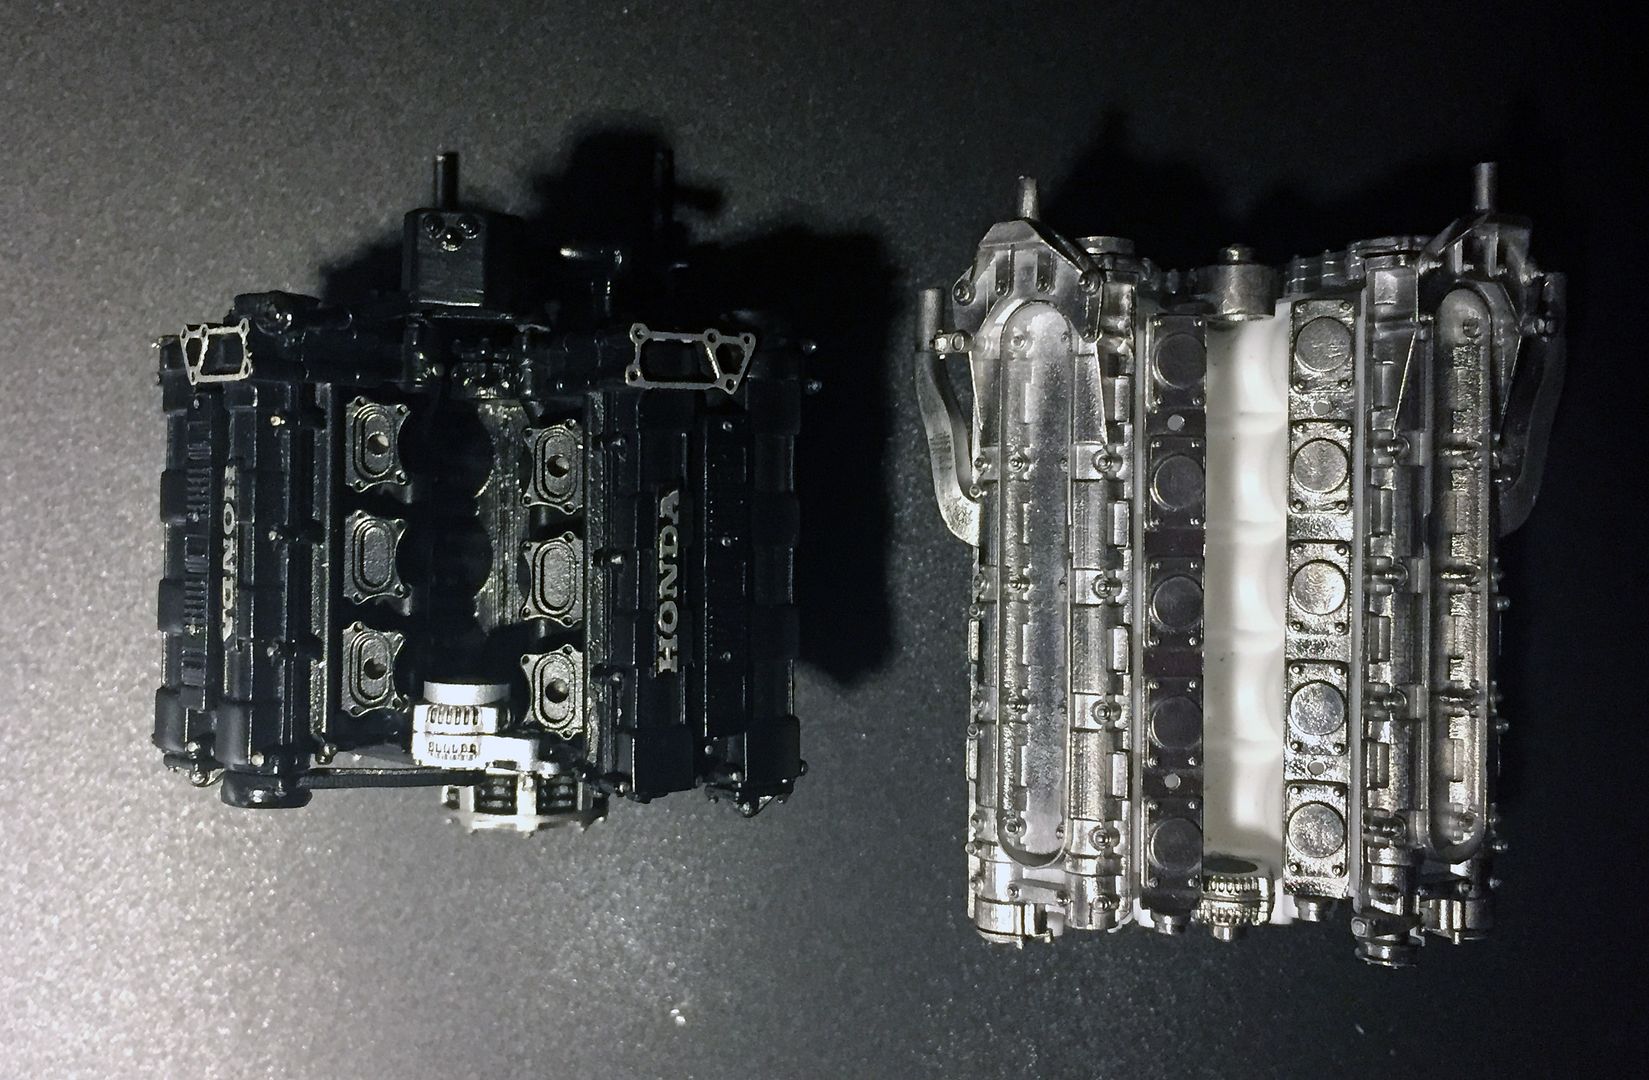
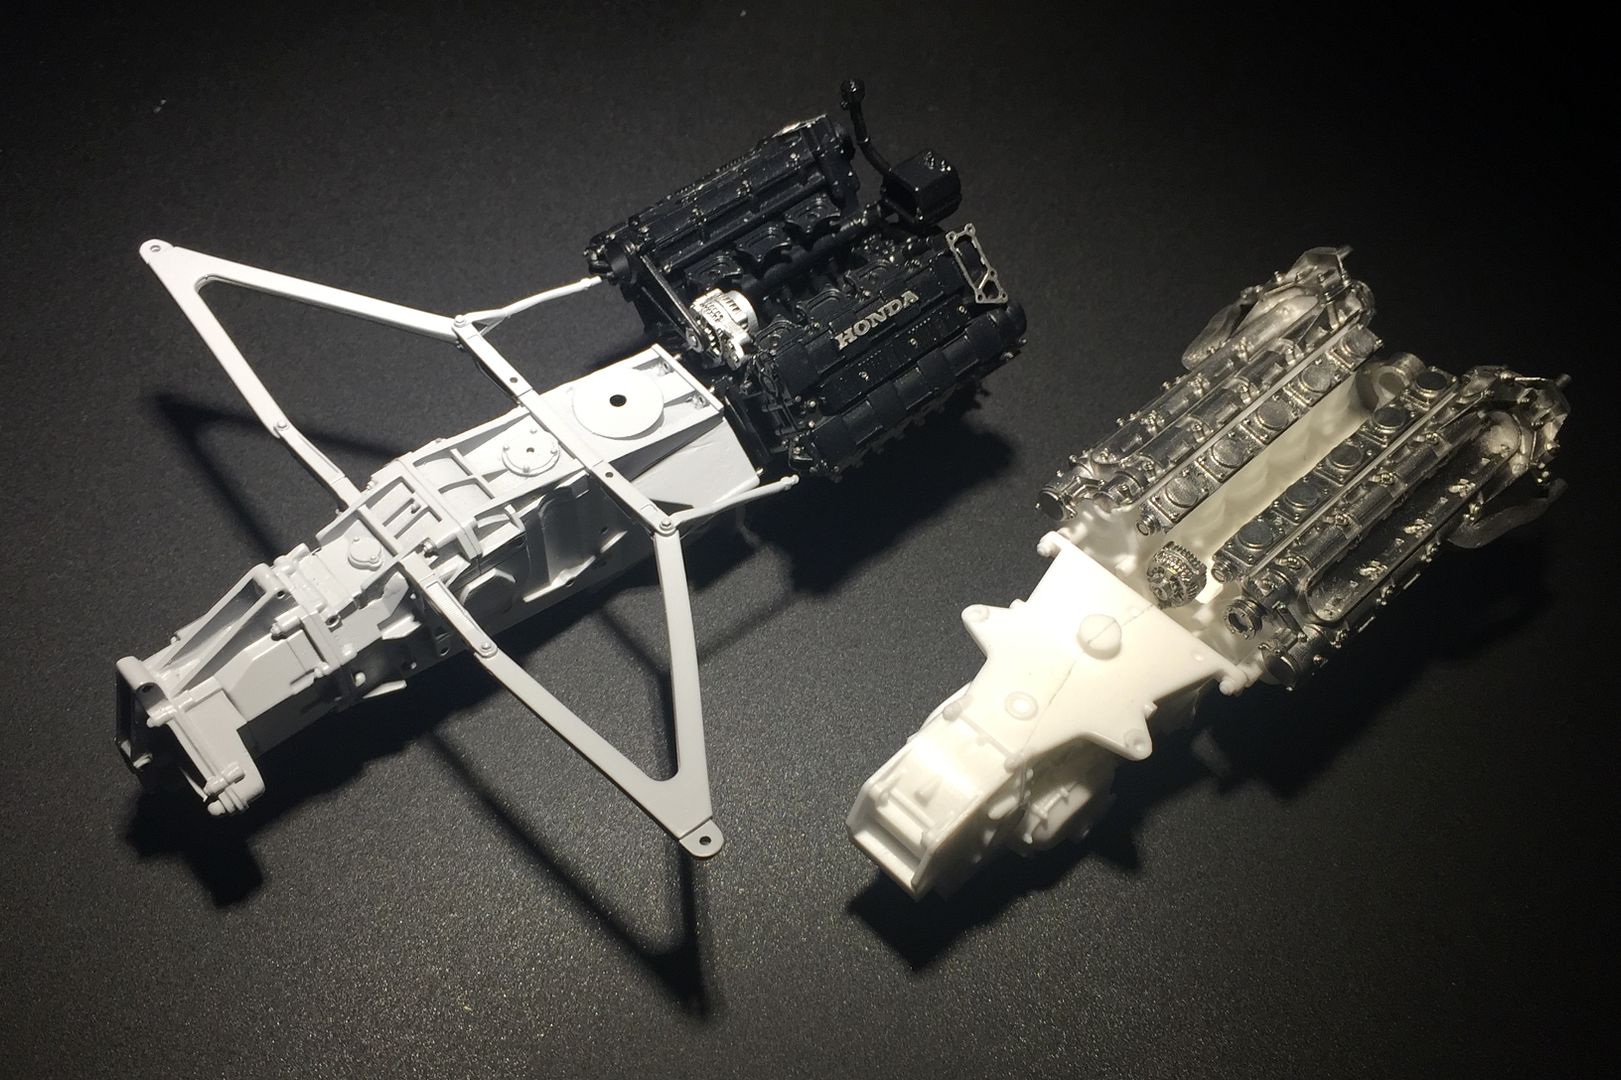
I am also making an FW16, and have put the engine block together (solid resin rather than the working MP4/4 engine!)
It is interesting seeing them together - note the difference in proportions (V6 / V10) but also, see how the gearbox has become much more compact - and the FW16 is 20 years old now)

I am also making an FW16, and have put the engine block together (solid resin rather than the working MP4/4 engine!)
It is interesting seeing them together - note the difference in proportions (V6 / V10) but also, see how the gearbox has become much more compact - and the FW16 is 20 years old now)
Right, I have invested in a light box from my local camera shop - B&H in NYC!
I've been wanting to get those lovely clean pictures that you see on lots of the threads here - you may have noticed how my threads are picture-heavy!
Still playing, but if you will forgive the indulgence and repetition, here are some more fancy pictures (and I might go back and swap a few above as well...)
They show every imperfection, that's for sure - and I'll have to get dusting!!
...and that is where I am right now with that kit!
I've also started a Porsche 917k - engine only so far - for my engine line-up!
I'll start another WIP for that, then get on with actually building some more!!
cheers
dr_gn said:
Those slicks...They've got small cuts in them - I think for gauging wear. Are there any photos in your reference book that show them? Pretty sure they weren't moulded-in at that time, although I clearly remember watching a mechanic manually cutting them in new tyres with a special tool (still got some of the cut-out bits of tyre I picked up as a kid, sadly enough). Can't remember when that was though.
I'll check my books!I'll end up scrubbing them in a bit anyway...and yes, depth gauges.
I think at least some of the difference in gearbox length is actually just a spacer on the 4/4, there to maintain wheelbase without resorting to angling the driveshafts. Of course it's also got a manual selector mechanism. Not sure if they were both longitudinal or if one was transverse either?
Re the light box: If you take pride in your work, why wouldn't you present it in the best way? The pictures are a joy to look at and no doubt reflect your approach to modelling.
Re the light box: If you take pride in your work, why wouldn't you present it in the best way? The pictures are a joy to look at and no doubt reflect your approach to modelling.
dr_gn said:
Those slicks...They've got small cuts in them - I think for gauging wear. Are there any photos in your reference book that show them? Pretty sure they weren't moulded-in at that time, although I clearly remember watching a mechanic manually cutting them in new tyres with a special tool (still got some of the cut-out bits of tyre I picked up as a kid, sadly enough). Can't remember when that was though.
I've got one, unused (signed by Senna), in which they're moulded in based on the tyre surface around the hole. I think it's from '91 or '92 based on the colour of the lettering and the fact it's also signed by Schumacher.ferrisbueller said:
dr_gn said:
Those slicks...They've got small cuts in them - I think for gauging wear. Are there any photos in your reference book that show them? Pretty sure they weren't moulded-in at that time, although I clearly remember watching a mechanic manually cutting them in new tyres with a special tool (still got some of the cut-out bits of tyre I picked up as a kid, sadly enough). Can't remember when that was though.
I've got one, unused (signed by Senna), in which they're moulded in based on the tyre surface around the hole. I think it's from '91 or '92 based on the colour of the lettering and the fact it's also signed by Schumacher.Gassing Station | Scale Models | Top of Page | What's New | My Stuff