HMV Hermes (1923) Paper Model
Discussion


(Or... how to prove i'm not Dr_GN in 277 easy steps)
Ok, a little back story to this one. I've done a few free papercraft items with varying success, but this is a first attempt at a commercial model.
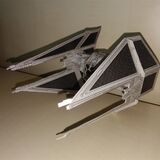
I've made a Formula Nippon racer, an R2-D2 and a Tie Interceptor that i'm happy with, but my attempts at the McLaren-Mercedes and the Yamaha racers have been substandard. A pretty spectacular spitfire attempt died due to delaminating cardstock.

After seeing Dr_GN's efforts, I took a look on the HMV webpage and spotted this, which looked a little familiar.
http://h-m-v.de/hermes.0.html?&L=1

My granda was a skipper, spent most of his life at sea, and was a little, erm, eccentric
His first christmas present to me (I was born in November), was an R/C Tug, the Bugsier 3.

They're pretty similar, and at £8 from amazon, I thought I'd push the boat out and treat myself...
The plan is pretty simple. Build this one totally O-O-B to see how I get on. If I'm happy, I'll give it to my Grandmother, who'll be chuffed as all hell.
I'll then buy another one for me, with the laser cut detail set, and display it alongside the old Rc version.
Alas, the thing was stored badly for about 15 years so is no longer functional - and as the kit inside was bought in 1978, it's not exactly state of the art - I reckon the easiest course of action would be a complete rip-out and install new gear, but that can wait. The youngest has a burgeoning Hornby and Lego hobby to fund first.
I digress.
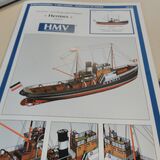
I give you the Hermes Tug, as presented by HMV models, Germany.
This will be my lunchtime "Do-Not-Disturb" project, so I can lock my monitors and de-stress.
I've broken out the metal ruler, cutting mat, and a new blade.
Stand back... I'm going in.
Ok, a little back story to this one. I've done a few free papercraft items with varying success, but this is a first attempt at a commercial model.
I've made a Formula Nippon racer, an R2-D2 and a Tie Interceptor that i'm happy with, but my attempts at the McLaren-Mercedes and the Yamaha racers have been substandard. A pretty spectacular spitfire attempt died due to delaminating cardstock.
After seeing Dr_GN's efforts, I took a look on the HMV webpage and spotted this, which looked a little familiar.
http://h-m-v.de/hermes.0.html?&L=1
My granda was a skipper, spent most of his life at sea, and was a little, erm, eccentric
His first christmas present to me (I was born in November), was an R/C Tug, the Bugsier 3.
They're pretty similar, and at £8 from amazon, I thought I'd push the boat out and treat myself...
The plan is pretty simple. Build this one totally O-O-B to see how I get on. If I'm happy, I'll give it to my Grandmother, who'll be chuffed as all hell.
I'll then buy another one for me, with the laser cut detail set, and display it alongside the old Rc version.
Alas, the thing was stored badly for about 15 years so is no longer functional - and as the kit inside was bought in 1978, it's not exactly state of the art - I reckon the easiest course of action would be a complete rip-out and install new gear, but that can wait. The youngest has a burgeoning Hornby and Lego hobby to fund first.
I digress.
I give you the Hermes Tug, as presented by HMV models, Germany.
This will be my lunchtime "Do-Not-Disturb" project, so I can lock my monitors and de-stress.
I've broken out the metal ruler, cutting mat, and a new blade.
Stand back... I'm going in.
Well, as is the usual case in this situation, I got sidetracked.
The eldest has a radar, and is unerring in her detection. The second I asked the location of the steel ruler, she knew I was going to be building something at work.
The orders were placed, and duly sorted.
Pikachu

Thomas

They're quick and dirty, but the kids are happy. Now on with the grown up stuff.
The eldest has a radar, and is unerring in her detection. The second I asked the location of the steel ruler, she knew I was going to be building something at work.
The orders were placed, and duly sorted.
Pikachu
Thomas
They're quick and dirty, but the kids are happy. Now on with the grown up stuff.
Progress: 1
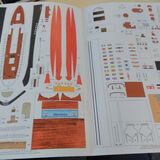
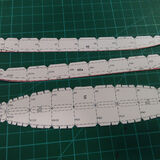
Step one. Assemble the hull sub-structure.
Ribs and central spine are double thickness - the ribs are folded and glued then stuck - the spine is two parts that are cut and folded then stuck together to form a T Shape

Note: The instructions are back to front from pretty much any other Paper model I've done
- - - - - - Represents score on the back and fold up (Valley Fold)
- . - . - . Represents score on front and fold down (Mountain Fold)
Fortunately, I caught this before scoring anything.
Step one. Assemble the hull sub-structure.
Ribs and central spine are double thickness - the ribs are folded and glued then stuck - the spine is two parts that are cut and folded then stuck together to form a T Shape
Note: The instructions are back to front from pretty much any other Paper model I've done
- - - - - - Represents score on the back and fold up (Valley Fold)
- . - . - . Represents score on front and fold down (Mountain Fold)
Fortunately, I caught this before scoring anything.
shortar53 said:
Note: The instructions are back to front from pretty much any other Paper model I've done
- - - - - - Represents score on the back and fold up (Valley Fold)
- . - . - . Represents score on front and fold down (Mountain Fold)
Fortunately, I caught this before scoring anything.
...and somethimes they get them the wrong way around, so beware!- - - - - - Represents score on the back and fold up (Valley Fold)
- . - . - . Represents score on front and fold down (Mountain Fold)
Fortunately, I caught this before scoring anything.
Good start BTW. If you can get the hull sides and main deck on accurately, the rest will be fine.
Ok. Minor "Stuck on hold waiting for a meeting with the customer" update.
Looking at the instructions for the next step, I noticed that the section fore of the rudder should have had sections cut-out.
Alas, I hadn't noticed this prior to gluing the two central sections, or attaching the stiffening ribs.
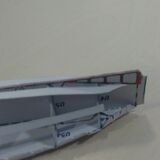
Cutting these sections out in-situ is impossible, so, slice down the tab for attaching the rudder, and as close to the point where the hull sides as possible - remove and cut out the holes.
reattach as tidily as possible.
(note, the front of the wedge has been re-aligned since this photo)
Once it's dried, the colouring will be touched up so that it's a more consistent red across the whole section - which is about 20mm*5mm at it's thickest point.
And Breathe...
Looking at the instructions for the next step, I noticed that the section fore of the rudder should have had sections cut-out.
Alas, I hadn't noticed this prior to gluing the two central sections, or attaching the stiffening ribs.
Cutting these sections out in-situ is impossible, so, slice down the tab for attaching the rudder, and as close to the point where the hull sides as possible - remove and cut out the holes.
reattach as tidily as possible.
(note, the front of the wedge has been re-aligned since this photo)
Once it's dried, the colouring will be touched up so that it's a more consistent red across the whole section - which is about 20mm*5mm at it's thickest point.
And Breathe...
shortar53 said:
Ok. Minor "Stuck on hold waiting for a meeting with the customer" update.
Looking at the instructions for the next step, I noticed that the section fore of the rudder should have had sections cut-out.
Alas, I hadn't noticed this prior to gluing the two central sections, or attaching the stiffening ribs.
Cutting these sections out in-situ is impossible, so, slice down the tab for attaching the rudder, and as close to the point where the hull sides as possible - remove and cut out the holes.
reattach as tidily as possible.
(note, the front of the wedge has been re-aligned since this photo)
Once it's dried, the colouring will be touched up so that it's a more consistent red across the whole section - which is about 20mm*5mm at it's thickest point.
And Breathe...
Small areas like that are often hatched in red if they're supposed to be cut-out.Looking at the instructions for the next step, I noticed that the section fore of the rudder should have had sections cut-out.
Alas, I hadn't noticed this prior to gluing the two central sections, or attaching the stiffening ribs.
Cutting these sections out in-situ is impossible, so, slice down the tab for attaching the rudder, and as close to the point where the hull sides as possible - remove and cut out the holes.
reattach as tidily as possible.
(note, the front of the wedge has been re-aligned since this photo)
Once it's dried, the colouring will be touched up so that it's a more consistent red across the whole section - which is about 20mm*5mm at it's thickest point.
And Breathe...
Must say the instructions on these things can be a bit hit and miss.
More progress;
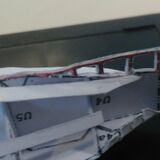
Not entirely happy with the lower hull. It's on, but it's not smooth - there is no fixing tab for the "darts" which allow for the curvature of the hull. There were also some issues with the colouration due to me being messy with the glue, but as this is just my trial run, I'm not too concerned, when I come to the laser cut version, I'll possibly use a higher tack glue, and take the glueing slower.
I've made up some extra "planks" from thin paper and glued over the most offensive areas - I'll de-white the edges of the exterior, then maybe a wash to make everything consistent.
Upper hull skeleton completed, and cutting out progressing well on the deck.
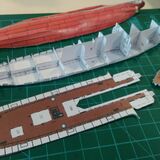
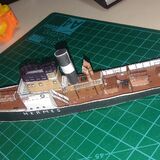
Progress definitely being made.
The upper hull is coming together nicely - the side pieces went on way better than the lower section
The interface between upper and lower halves isn't perfect, but when I put them together, I'll probably fill the gap and colour it to match, as the white is jarring and makes it more noticable

I'm learning as I go, can see 100 different ways I could improve my technique. The new one has been ordered and will be here soon, and I'm looking to locate the laser cut detail set.
The upper hull is coming together nicely - the side pieces went on way better than the lower section
The interface between upper and lower halves isn't perfect, but when I put them together, I'll probably fill the gap and colour it to match, as the white is jarring and makes it more noticable
I'm learning as I go, can see 100 different ways I could improve my technique. The new one has been ordered and will be here soon, and I'm looking to locate the laser cut detail set.
Slow progress the past few days. Major incidents at work, a day full of meetings and a desk move mean I've been limited to grabbing a snack on the go at lunchtime and not cocking about with sheets of paper.
It is getting there though.
I tried cutting the railing out using a blade, it's not overly consistent, definitely an area where the lasercut set will improve - if I can find one
It is getting there though.
I tried cutting the railing out using a blade, it's not overly consistent, definitely an area where the lasercut set will improve - if I can find one
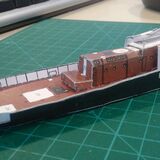
Calling this one finished.
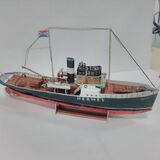
used thread for the cables as cutting paper would have been ridiculous.
It's not perfect but I've learned a lot.
Going to order something different tonight to do whilst I try and locate the laser cut set for this one
(as mentioned, this model has a personal attachment so I want my copy to be as good as it can be)
I think the key (as dr_gn mentioned at the very start) is to ensure the hull is square before you do anything else.
I've enjoyed watching Doc's build of the Mellum - Might give that a try next.
It looks like you can get the lasercut set from here:
kartonmodellbau.de
I've only just placed my first order with them so I know nothing about delivery or quality of service, but they definitely ship to the UK (and you can pay by Paypal, which may or may not be A Good Thing)
kartonmodellbau.de
I've only just placed my first order with them so I know nothing about delivery or quality of service, but they definitely ship to the UK (and you can pay by Paypal, which may or may not be A Good Thing)
Gassing Station | Scale Models | Top of Page | What's New | My Stuff