GB: Academy Tempest V : Yertis
Discussion


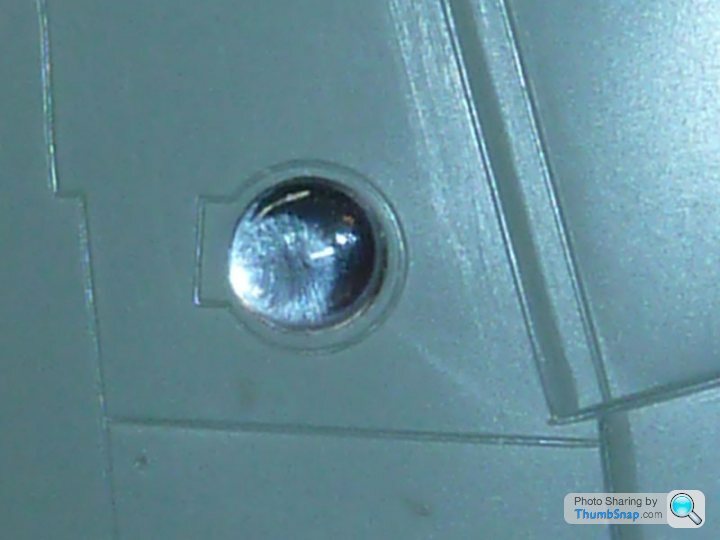
I've made a start, I've glued some shiny kitchen foil behind where the landing light lenses are located:
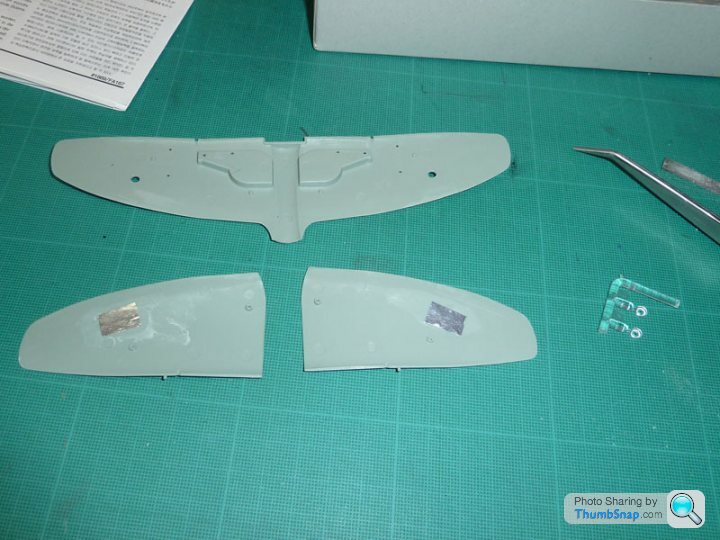
The wings are assembled. I've done a dry fit to the fuselage. The wing root fillets need to be slightly relieved toward the trailing edge.

This is how the landing light looks.
Overall, the fit of parts so far is excellent.
The wings are assembled. I've done a dry fit to the fuselage. The wing root fillets need to be slightly relieved toward the trailing edge.
This is how the landing light looks.
Overall, the fit of parts so far is excellent.
Yertis said:
I've made a start, I've glued some shiny kitchen foil behind where the landing light lenses are located:
The wings are assembled. I've done a dry fit to the fuselage. The wing root fillets need to be slightly relieved toward the trailing edge.
This is how the landing light looks.
Overall, the fit of parts so far is excellent.
Ah, missed this! I just did a similar thing last night, but I glued the foil around the edge of the lens. I then put a blob of Araldite on top so that when the wing is assembled, and I press masking tape or white tack over the lens, it hopefully won't pop out into the wing (which would be a disaster!).The wings are assembled. I've done a dry fit to the fuselage. The wing root fillets need to be slightly relieved toward the trailing edge.
This is how the landing light looks.
Overall, the fit of parts so far is excellent.
Yertis said:
I'm curious to see how I'm going to mask the landing lights now. I'll probably use a dollop of something.
Maskol would be ideal, but it apparently dissolves Klear, so I cant use it.White tack would do the trick. Could brush paint around the lens a couple of mm first, then blob the white tack on slightly oversize and it would all blend in nicely I reckon.
I was toying with the idea of masking the camouflage with bluetack, as away of getting the demarcation line feathered but narrow with slight variations. I've now started thinking in terms of creating a two-layer paper mask by using the offset path function in Illustrator.
I think I'm taking this a bit too seriously...
I think I'm taking this a bit too seriously...
Yertis said:
I was toying with the idea of masking the camouflage with bluetack, as away of getting the demarcation line feathered but narrow with slight variations. I've now started thinking in terms of creating a two-layer paper mask by using the offset path function in Illustrator.
I think I'm taking this a bit too seriously...
Bluetack works fine at 1:32:I think I'm taking this a bit too seriously...

...but I doubt you'd see a feathered edge on top surface camo at 1:72.
Yertis said:
Brushing certainly has its attraction when it comes to RAF camouflage.
As an aside, what's going on with the cannon on these Academy Tempests? I can't find any photographic reference to the little stub barrel thing present on these kits.
They are Hispano 20mm cannon, slightly staggered in the wing. The stub is the forward barrel, the hole is the rear barrel, and ends more or less flush with the leading edge.As an aside, what's going on with the cannon on these Academy Tempests? I can't find any photographic reference to the little stub barrel thing present on these kits.
http://www.hawkertempest.se/ArmamentDroptanks.htm
I'm cutting the stubs off and drilling the wing. Then the barrels will be painted brass tube glued into the appropriate depths.
Edited by dr_gn on Thursday 20th January 11:55
Yertis said:
Ah! I didn't realise that stump was supposed to represent one of the cannon, and was going to drill out anyway. I can see they do peep out a bit, so I'll have to put something in. Hypodermics or similar. Or maybe just leave holes.
Well, I assume its meant to be a cannon barrel, you can see one sticks out further than the other on one of the cutaway drawings in that link.dr_gn said:
Yertis said:
Ah! I didn't realise that stump was supposed to represent one of the cannon, and was going to drill out anyway. I can see they do peep out a bit, so I'll have to put something in. Hypodermics or similar. Or maybe just leave holes.
Well, I assume its meant to be a cannon barrel, you can see one sticks out further than the other on one of the cutaway drawings in that link.Yertis said:
dr_gn said:
Yertis said:
Ah! I didn't realise that stump was supposed to represent one of the cannon, and was going to drill out anyway. I can see they do peep out a bit, so I'll have to put something in. Hypodermics or similar. Or maybe just leave holes.
Well, I assume its meant to be a cannon barrel, you can see one sticks out further than the other on one of the cutaway drawings in that link.perdu said:
Might be a braided hose with probable degradation of its rubber inner
Waiting to see if this has happened to my Paasche in the twentyfive or so odd years since it was used last
I know
Kit like that left unused for so long
It's a crime

My Aerograph braided hose has got a tiny leak now, but that's after 29 years!Waiting to see if this has happened to my Paasche in the twentyfive or so odd years since it was used last
I know
Kit like that left unused for so long
It's a crime
Gassing Station | Scale Models | Top of Page | What's New | My Stuff