Frog (Rovex) Hawker Typhoon build [not GB]
Discussion


blimey have you seen the time/date?
This evil bug has weakened the will to delve, I can tell ya
I spent a happy hour or so tonight trying to get to grips with more detail tat'n'stuff
I used some plastic rod to make the elevator and aileron trim wheels

for about zixpence it doesn't look too far off the Academy parts that you chaps are really enjoying making fit
A cheap throwaway lighter held nearby (dont flame the rod) to the end of a rod and the residual blob laid down cold to the melamine to flatten it off soon has the job done

From this you can see I have addded the elevator trimwheel and the weapon's sight selector switch plinth (knob to follow) and to the cross frame above the rudders I've managed to fit a new refurbished and painted compass
All I intend to add to this side of the plane will be the red brake(?) lever in front of the right instrument panel extension for colour in a dark zone
I have decided to be less brave than the doc, no opening doors in the car door canopy but the lifting roof panel centre of the hood will be lifted up and let some peering inside happen, a benefit of remoulding the canopy to suit, let's face it, if I mess up I can always mould the later sliding hood for the mk 1
As a final looksee tonight (I am feeling utterly trashed) a look at tonight's work and the wheel bay roof sections in place. So far I have resisted the temptation to make the few lost ribs from the roof. I am not sure they will make it look better but may make it look "busier". As I've said I will be painting it the same silvery washed out colour of the photograph I showed earlier
Not convinced they wasted cockpit colour where it wasn't needed, from the picture earlier it seems there wasn't much of it on sight in the cockpit either
I have made the cockpit armour plate and am well on the way to having a seat that the ground crew can dump a parachute int when the pilot come in to work
How the hell those guys could fly to work daily in a plane that was trying to kill them amazes me. Oxygen failure was certain death due to the CO that leaked into every fuselage from the Sabre's poorly sealed exhausts. I wonder how many casualties were a result of Axis action or simply nature's chemical warfare.
Scary
As the kids say (sometimes)
Respect
I will be reading up on different bomb trolleys tomorrow, then decide which sort to use
Anyway
off to climb t'wooden hill
soon guys
This evil bug has weakened the will to delve, I can tell ya
I spent a happy hour or so tonight trying to get to grips with more detail tat'n'stuff
I used some plastic rod to make the elevator and aileron trim wheels
for about zixpence it doesn't look too far off the Academy parts that you chaps are really enjoying making fit
A cheap throwaway lighter held nearby (dont flame the rod) to the end of a rod and the residual blob laid down cold to the melamine to flatten it off soon has the job done
From this you can see I have addded the elevator trimwheel and the weapon's sight selector switch plinth (knob to follow) and to the cross frame above the rudders I've managed to fit a new refurbished and painted compass
All I intend to add to this side of the plane will be the red brake(?) lever in front of the right instrument panel extension for colour in a dark zone
I have decided to be less brave than the doc, no opening doors in the car door canopy but the lifting roof panel centre of the hood will be lifted up and let some peering inside happen, a benefit of remoulding the canopy to suit, let's face it, if I mess up I can always mould the later sliding hood for the mk 1
As a final looksee tonight (I am feeling utterly trashed) a look at tonight's work and the wheel bay roof sections in place. So far I have resisted the temptation to make the few lost ribs from the roof. I am not sure they will make it look better but may make it look "busier". As I've said I will be painting it the same silvery washed out colour of the photograph I showed earlier
Not convinced they wasted cockpit colour where it wasn't needed, from the picture earlier it seems there wasn't much of it on sight in the cockpit either
I have made the cockpit armour plate and am well on the way to having a seat that the ground crew can dump a parachute int when the pilot come in to work
How the hell those guys could fly to work daily in a plane that was trying to kill them amazes me. Oxygen failure was certain death due to the CO that leaked into every fuselage from the Sabre's poorly sealed exhausts. I wonder how many casualties were a result of Axis action or simply nature's chemical warfare.
Scary
As the kids say (sometimes)
Respect
I will be reading up on different bomb trolleys tomorrow, then decide which sort to use
Anyway
off to climb t'wooden hill
soon guys
Only if your Chicken Chop Suey and Egg Fried Rice came from the same place as mine did doc
Pretty certain that was who sold it to me
(yes and as an old semi-Scot I do resent having to pay for selfpoisoning)
What to we think guys, should I do all the roof inner surface ribs or leave she as-is?
I am quite pleased with the effect and will almost certainly scuplt each rib to follow the real thing's tapered ribbing, then with my favourite mechanical pencil I will dot some ribs with lightening stiffening holes
Anyway, hoping to feel better soon and get the two halves together (out of box the fuselage halves just "fit", realy nice and not likely to need much filling when the MEK has set
I must work on the cockpit heating duct from behind the rad
The wings with a simple pair of plastic rods each slip nicely together too
1ºanhedral-2ºdihedral it says on my plans... Looks perzackerly right to my eye
My Ebay win arrived on Saturday morning, £0.99 tyre valve adapter for the airbrush
Only just opened the package and it looks blooming darned good to me so there's another hurdle over and done
perdu said:
Only if your Chicken Chop Suey and Egg Fried Rice came from the same place as mine did doc
Pretty certain that was who sold it to me
(yes and as an old semi-Scot I do resent having to pay for selfpoisoning)
What to we think guys, should I do all the roof inner surface ribs or leave she as-is?
I am quite pleased with the effect and will almost certainly scuplt each rib to follow the real thing's tapered ribbing, then with my favourite mechanical pencil I will dot some ribs with lightening stiffening holes
Anyway, hoping to feel better soon and get the two halves together (out of box the fuselage halves just "fit", realy nice and not likely to need much filling when the MEK has set
I must work on the cockpit heating duct from behind the rad
The wings with a simple pair of plastic rods each slip nicely together too
1ºanhedral-2ºdihedral it says on my plans... Looks perzackerly right to my eye
My Ebay win arrived on Saturday morning, £0.99 tyre valve adapter for the airbrush
Only just opened the package and it looks blooming darned good to me so there's another hurdle over and done
Yeah do all the ribs - you know you want to!Pretty certain that was who sold it to me
(yes and as an old semi-Scot I do resent having to pay for selfpoisoning)
What to we think guys, should I do all the roof inner surface ribs or leave she as-is?
I am quite pleased with the effect and will almost certainly scuplt each rib to follow the real thing's tapered ribbing, then with my favourite mechanical pencil I will dot some ribs with lightening stiffening holes
Anyway, hoping to feel better soon and get the two halves together (out of box the fuselage halves just "fit", realy nice and not likely to need much filling when the MEK has set
I must work on the cockpit heating duct from behind the rad
The wings with a simple pair of plastic rods each slip nicely together too
1ºanhedral-2ºdihedral it says on my plans... Looks perzackerly right to my eye
My Ebay win arrived on Saturday morning, £0.99 tyre valve adapter for the airbrush
Only just opened the package and it looks blooming darned good to me so there's another hurdle over and done
FWIW: when I first used my airbrush (about 1982), I used a car tyre & adapter and it turned out to be the root cause of most of the problems I was having. My Super '63 needs 30psi+ to work properly. So a car tyre pumped up to 35 psi gave about 30 seconds of useful air after which things got progressively more hopeless.
When I finally got a compressor for the garage, and started using that, the vast majority of the problems I'd had miraculously disappeared.
Course if you're refilling the tyre with a foot pump, you'll do the equivalent of a 20 mile mountain bike ride by the time you've finished the model, so at least it'll keep you fit!
Whilst I did have early day troble with my old tyre adapter I soon got the knack of keeping it filled to ^ well above 40psi
I no longer have to pump pedally-ly, theres a stonking great compressor dowm in t'garage to use if or when the "reservoir" becomes depleted
I don't work in the garage, that's my Midget's home not mine but have agreed with She that I will paint down there. I just don't want the compressor on all the time when I finally get it sorted for comfort in there
So the tyre adapter is to enable a quiet compromise at painting time (and a sneaky [dont tell her] quiet access mode for the airbrush when her breathing difficulties abate)
Which brings me to a new question
Is it worth investing a few shillings in Extracolour (Dk Gn, Ocean Grey and Sea Grey Medium etc) or should I hope to find decent cross referred colours from Tamiya or Humbrol Acrylics?
Has to be paint soon after all
Thanks Eric (I can only spell when I have a basic knowlege of the product) Yes
I dont mind whether its superdooper as long as it airdries easily and I do prefer acrylics these days
I just want to paint this massively expensive baby with the right colours
(I paid £0.40 in the seventies at our club's branch sale of unwanted kits. Still have Sea Fury, Venom, Phantom F4K/M amongst other gold in that cache)
If I can get Ocean Grey, Dk Green and SGM in Humbrol acrylics that where I will go for quickness
perdu said:
Thanks Eric (I can only spell when I have a basic knowlege of the product) Yes
I dont mind whether its superdooper as long as it airdries easily and I do prefer acrylics these days
I just want to paint this massively expensive baby with the right colours
(I paid £0.40 in the seventies at our club's branch sale of unwanted kits. Still have Sea Fury, Venom, Phantom F4K/M amongst other gold in that cache)
If I can get Ocean Grey, Dk Green and SGM in Humbrol acrylics that where I will go for quickness
Just get some Tamiya:I dont mind whether its superdooper as long as it airdries easily and I do prefer acrylics these days
I just want to paint this massively expensive baby with the right colours
(I paid £0.40 in the seventies at our club's branch sale of unwanted kits. Still have Sea Fury, Venom, Phantom F4K/M amongst other gold in that cache)
If I can get Ocean Grey, Dk Green and SGM in Humbrol acrylics that where I will go for quickness
XF-61 (Dark Green)
XF-54 (Dark Sea Grey)
XF-53 (Neutral Grey)
They'll do!
Don't confuse the two Hannants products. They are quite different.
Xtracolour is enamel
Xtracrylix is acrylic
They use a similar colour coding structure but the Xtracrylix range ads a letter "A" to the designation i.e. Ocean Grey is X1006 in the Xtracolour range and XA1006 in the Xrtracrylix range
The enamels are gloss or semi-gloss (to aid decal application) but consequently can take well over 24 hours to dry properly.
The acrylics are dry within about 15 minutes.
Time for an update
I'm sorry but I just cannot get decent images from my digital these days so much of what you hear/see will be hearsay
I say I dunnit
You believe me until I get something sorted
All the shots go out of focus as I'm lining up the picture
head...me...in...it's...doing
Anyway
Seat has been made and painted cockpit green
Seat back cushion brown Tamiya XF64 red brown (over thirty years old and still viable in its jar, amazing.)
Behind seat armour plate made and fitted
Seat harness made from double layer of masking tape (stick together sticky side and trim to suit) with redoubled "adjusting" straps and all painted Tamiya Buff XF57 silver disc added to represent the quick release mechanism
Blind flying panel added
And the whole caboodle MEK'ed together ready for tomorrow's rub and scrape session

Wheel wells are now silver (Humbrol Metalcote 27002) and will be flattened with a diffusing coat later(prolly Tamiya Flatcote, I still have some left from way back)

Wings to be fitted this week, mayhap, tomorrow
depends on whether "real life" intrudes, not having a very good real life lately, buggerit!
I'm sorry but I just cannot get decent images from my digital these days so much of what you hear/see will be hearsay
I say I dunnit
You believe me until I get something sorted
All the shots go out of focus as I'm lining up the picture
head...me...in...it's...doing
Anyway
Seat has been made and painted cockpit green
Seat back cushion brown Tamiya XF64 red brown (over thirty years old and still viable in its jar, amazing.)
Behind seat armour plate made and fitted
Seat harness made from double layer of masking tape (stick together sticky side and trim to suit) with redoubled "adjusting" straps and all painted Tamiya Buff XF57 silver disc added to represent the quick release mechanism
Blind flying panel added
And the whole caboodle MEK'ed together ready for tomorrow's rub and scrape session
Wheel wells are now silver (Humbrol Metalcote 27002) and will be flattened with a diffusing coat later(prolly Tamiya Flatcote, I still have some left from way back)
Wings to be fitted this week, mayhap, tomorrow
depends on whether "real life" intrudes, not having a very good real life lately, buggerit!
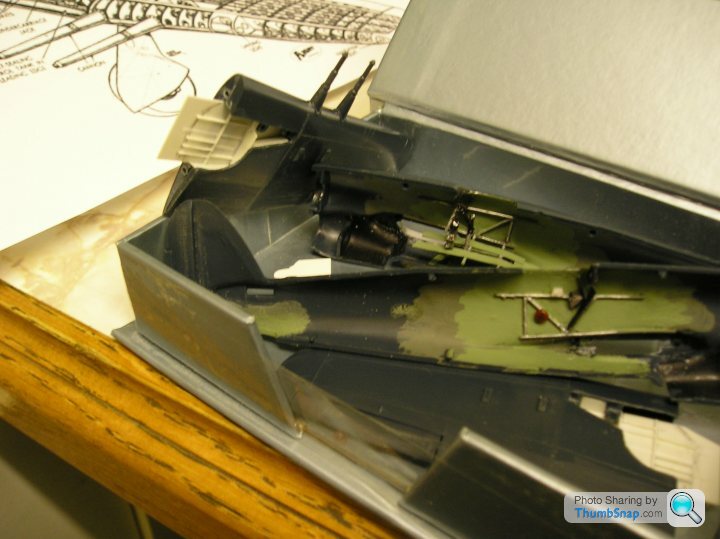
OK nothing new to mention but a few better pictures to gaze upon


And one of the wings slotted loosely to see the general effect of the wheel bay details, yet to be rubbed "down and out" to suit
found my "ninety-nine pence" shop minitripod and played around with the camera settings slightly, seems the way to go.
And one of the wings slotted loosely to see the general effect of the wheel bay details, yet to be rubbed "down and out" to suit
found my "ninety-nine pence" shop minitripod and played around with the camera settings slightly, seems the way to go.
perdu said:
OK nothing new to mention but a few better pictures to gaze upon
And one of the wings slotted loosely to see the general effect of the wheel bay details, yet to be rubbed "down and out" to suit
found my "ninety-nine pence" shop minitripod and played around with the camera settings slightly, seems the way to go.
Coming along nicely. It's surprising just how much cockpit detail is visible, even without the door/hatch removed.And one of the wings slotted loosely to see the general effect of the wheel bay details, yet to be rubbed "down and out" to suit
found my "ninety-nine pence" shop minitripod and played around with the camera settings slightly, seems the way to go.
Are you going to tone down the silver somehow? To my eyes (admittedly that doesn't mean much) it looks a bit harsh.
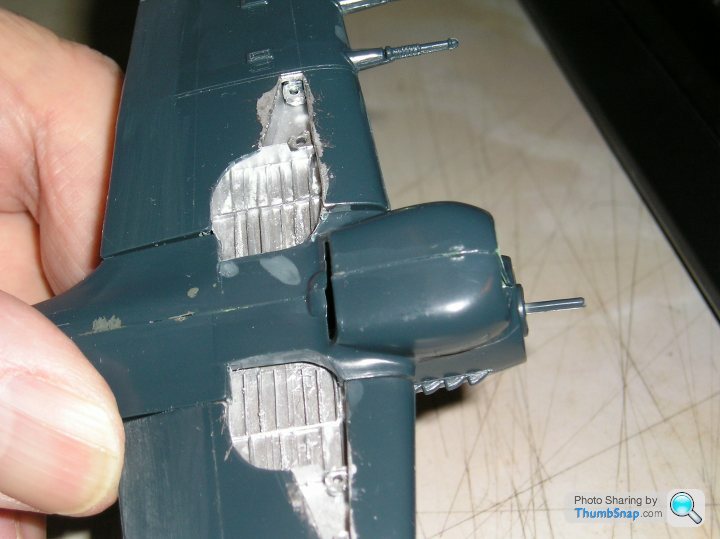
Not much happening tonight but I have begun rescribing the panel lines and made a start on the gunsight support structure
This HAS to be done as it is immediately visible inside the screen area
No pictures tonight but I am quite content with the "content" of the cockpit now
Tomorrow after finishing this area
I will be mostly working the wheel well doors
This HAS to be done as it is immediately visible inside the screen area
No pictures tonight but I am quite content with the "content" of the cockpit now
Tomorrow after finishing this area
I will be mostly working the wheel well doors
perdu said:
Not much happening tonight but I have begun rescribing the panel lines and made a start on the gunsight support structure
This HAS to be done as it is immediately visible inside the screen area
No pictures tonight but I am quite content with the "content" of the cockpit now
Tomorrow after finishing this area
I will be mostly working the wheel well doors
What are you using for rescribing? I think my Tamiya and Bare Metal Foil scribers will be too big for this scale. A pin maybe?This HAS to be done as it is immediately visible inside the screen area
No pictures tonight but I am quite content with the "content" of the cockpit now
Tomorrow after finishing this area
I will be mostly working the wheel well doors
Hi
I use a number one Swann-Morton blade, cutting edge first to start and then reversed so it "ploughs" out a deeper cut
Using a steel rule and the Swanny as the scriber it has a decent feel on the plastic surface
I am going to reduce the thickness of the moulded on tail-end stiffener plates, frankly in 1/72 they are just a tad embarassing
Should be bunging it all together tonight, wings and the like
I need to find a new 0.015" drill too, the tailwheel snapped off its leg last night, dammit, so I need to drill it for a stiffener from a nice new pin
Gassing Station | Scale Models | Top of Page | What's New | My Stuff