GB: Academy Tempest MKV: Red Firecracker
Discussion


Red Firecracker said:
Not sure to be honest and to be fair, prabably not, just thought it would be a bit different. Current light levels are definitely in the luminous paint range though!
Pretty sure they had seperate lamps shining onto the instrument panel.Edited by Red Firecracker on Thursday 27th January 18:38


Red Firecracker said:
Bit of an update.
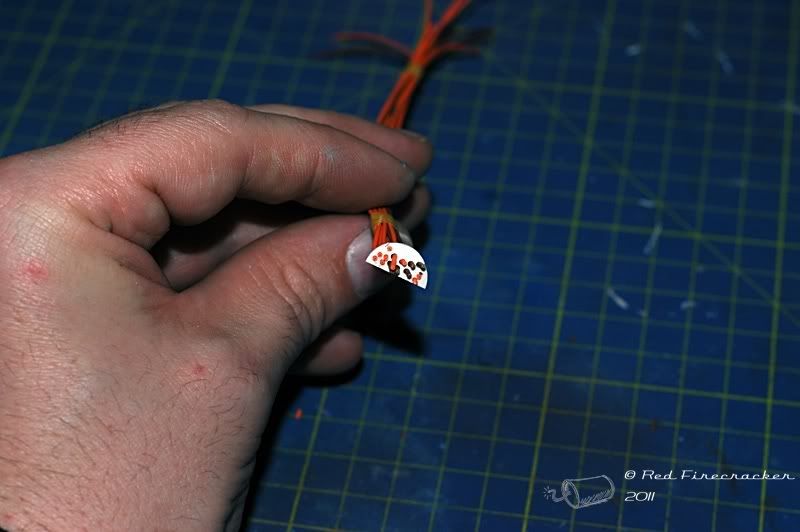
Why oh why did I think of lighting up the cockpit..........
Anyway, cockpit decals printed (excuse the flash);
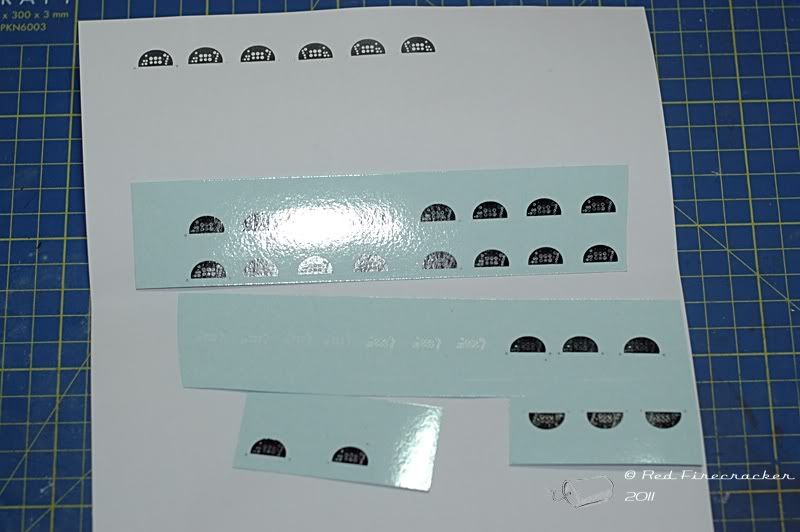
As you can see, I've given myself some room for screw ups! There are combined ones there as well as components (seperate silver rings, seperate white backing, plain black top decals). The paper sheet contains the masks for cutting out the plastic panels.
Speaking of which, here's a plastic panel that has been drilled to match up with the dial locatons;
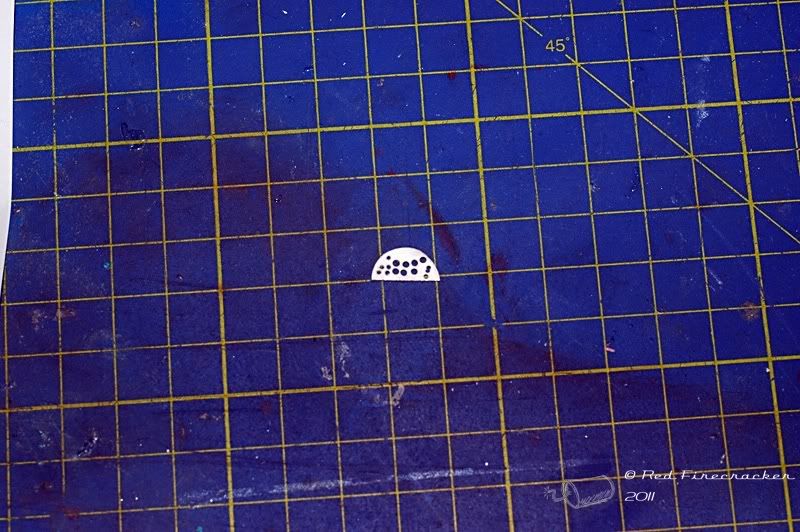
Bit fiddly, but not too bad.
To that we add some of this;
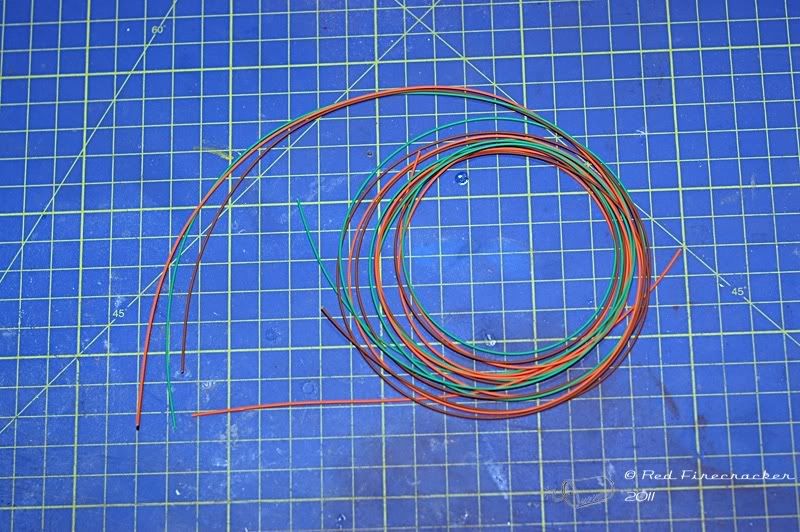
to create a spiders web;
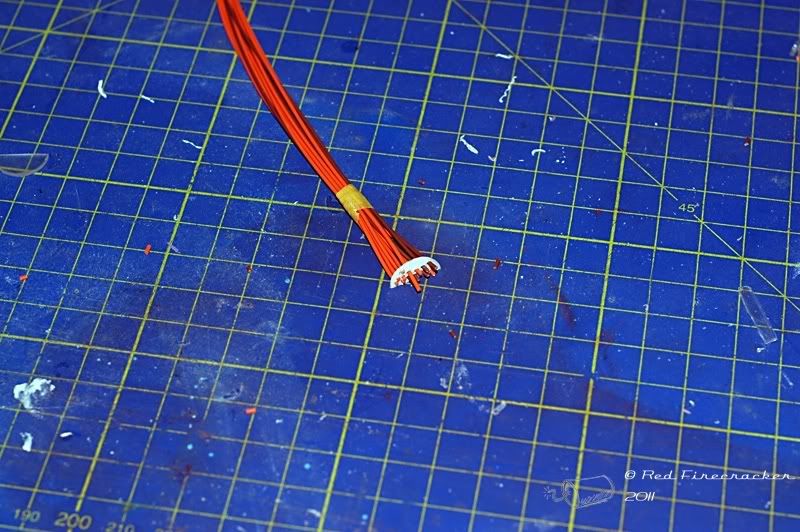
and
The fibres have been super glued into the plastic carrier and once that is dry I can then trim and polish the ends. If all goes to plan (which I really suspect it won't) I can then put a thin clear plastic sheet over the top and then add the decals (of course, it'll need cutting and bending as well). What I suspect may happen is that the light points will be too small, and will require a lens to disperse the light better. If that is the case then I'll create another panel with the same holes, glue the two panels togetehr and fill the new holes with clear resin. That might work.
If that doesn't work, it'll be a clear plastic panel with a couple of LEDs behind it.
I did this with the Revell A380 (navigation lights and flashing beacons etc). Worked fine, but even with that massive model, fitting a battery and switch was a nightmare. Are you planning on routing wires down the u/c legs onto pads under the wheels to power it from a baseboard?Why oh why did I think of lighting up the cockpit..........
Anyway, cockpit decals printed (excuse the flash);
As you can see, I've given myself some room for screw ups! There are combined ones there as well as components (seperate silver rings, seperate white backing, plain black top decals). The paper sheet contains the masks for cutting out the plastic panels.
Speaking of which, here's a plastic panel that has been drilled to match up with the dial locatons;
Bit fiddly, but not too bad.
To that we add some of this;
to create a spiders web;
and
The fibres have been super glued into the plastic carrier and once that is dry I can then trim and polish the ends. If all goes to plan (which I really suspect it won't) I can then put a thin clear plastic sheet over the top and then add the decals (of course, it'll need cutting and bending as well). What I suspect may happen is that the light points will be too small, and will require a lens to disperse the light better. If that is the case then I'll create another panel with the same holes, glue the two panels togetehr and fill the new holes with clear resin. That might work.
If that doesn't work, it'll be a clear plastic panel with a couple of LEDs behind it.
Edited by Red Firecracker on Wednesday 26th January 18:39
Also, beware of light leakage if you're using an LED. I drilled the LED lens itself and cyanoed the fibroptic stright into the plastic, then wrapped the whole LED in black heatshrink so no light could be seen through the fuselage. Might even be worth lining the fuselage with foil tape around the instrument panel region to stop any unwanted leakage?
dr_gn said:
I did this with the Revell A380 (navigation lights and flashing beacons etc). Worked fine, but even with that massive model, fitting a battery and switch was a nightmare. Are you planning on routing wires down the u/c legs onto pads under the wheels to power it from a baseboard?
Also, beware of light leakage if you're using an LED. I drilled the LED lens itself and cyanoed the fibroptic stright into the plastic, then wrapped the whole LED in black heatshrink so no light could be seen through the fuselage. Might even be worth lining the fuselage with foil tape around the instrument panel region to stop any unwanted leakage?
It's going to be gear up, so I'm planing on utilising the support to get the light to the panel/lights by whatever method, but my plan is no LED in the model itself. I started version 2 of the panel last night (the single mode fibre is just too fine) and it's looking very good. I'll be polishing the ends tonight but initial findings are good.Also, beware of light leakage if you're using an LED. I drilled the LED lens itself and cyanoed the fibroptic stright into the plastic, then wrapped the whole LED in black heatshrink so no light could be seen through the fuselage. Might even be worth lining the fuselage with foil tape around the instrument panel region to stop any unwanted leakage?
Of course, if the model is being depicted as 'in flight' then the prop really needs to be a disc rather than the kit supplied, which I'm not really a fan of. We'll have to see on that score.
Dinky used to do one in their Diecast Spitfire and Stuka models but nobody makes a suitable replacement. I have considered motorising but thought that might be going too far. The method I was (am?) thinking of is a remote motor with a long flexible shaft.
If the prop stays static or is a disc, I can use a clear acrylic rod as a stand. If the prop is turning, I need to change that to either a clear tube with internals or a metal/coloured tube, again with internals. Decisions decisions. (when is this thing supposed to be finished? )
)
If the prop stays static or is a disc, I can use a clear acrylic rod as a stand. If the prop is turning, I need to change that to either a clear tube with internals or a metal/coloured tube, again with internals. Decisions decisions. (when is this thing supposed to be finished?
)Red Firecracker said:
Dinky used to do one in their Diecast Spitfire and Stuka models but nobody makes a suitable replacement.
I've got the Dinky Zero and Sea King, also both motorised. AAA battery IIRC.Would this fit:

For 1:24 I think, but designed to fit within the engine, so it might be small enough. Might even fit the Dinky stuff too?
I'd be seriously tempted to route the LED wires and motor wired down an aluminium tube used as a stand. It might even be possible to mount a micro socket plate under the fuselage, and the corresponding plug on top of the stand tube to make the aircraft removable. ETA: even a simple jack plug & socket might work.
I know you're illuminating the instruments aas a bit of a laugh and a challenge, but if mine's anything to go by, the instrument panel is practically invisible, even more so with a closed canopy and emergency door. Just a thought.
I know you're illuminating the instruments aas a bit of a laugh and a challenge, but if mine's anything to go by, the instrument panel is practically invisible, even more so with a closed canopy and emergency door. Just a thought.
Taking the motor out of the equation, I can drive the fiber* channels from a clear acrylic stand, so I'm getting double value. This appeals to my way of thinking as it keeps all the stuff that can break/fail (LED's, wiring etc) out of the model. Nice socket in the model with the fibers sat in the end, does the job nicely, cockpit lit but invisible, other lights lit as well, LED in the base.
Now, there is the option of taking that further (motor still not being considered) that I can get the wing tip lights to flash (Did they? Again, showing my lack of knowledge) by having a tube (either clear or metal etc) with 2 sets of fiber inside, one to a constant, one to a flashing. This requires a little more thought in the socket arrangement, specifically it needs to be keyed. Not a major issue though and the model is still removeable without issue.
Bring the motor into the party adds a little (!) bit of complication. It has to be a tube mount even if the motor is in the nose as I'm not keen on switches on the model. It is easier to create a plug and socket for power than a plug and socket for a remote shaft drive. Of course, being sensible, the need to remove the model from the stand isn't really a massive requirement so feeding wires/fibers down and then permanently attaching isn't a great issue.
We'll see. Be nice to get some paint on it.
* I'm using the word fiber to generically define light carrying medium. It's probably going to end up as plastic filament as single mode fibre is too small.
Gassing Station | Scale Models | Top of Page | What's New | My Stuff