Modelling tips
Discussion


For me, the issue with decal solutions is the amount of water potentially still on the decal, thus diluting the solution. My way around this is to have a saucer of warm water with a firm sponge in it. Place the decal onto the sponge, it then releases without a surplus of water. Some of the decals I've used would just fall apart if placed into pure decal solution.
Two complete newbie questions:
What it is best way to remove each part from the plastic moulding sheet and how to I remove the little bits of left over plastic from the parts? I'm quessing a scalpel...
Also, what is a good, cheapish airbrush system? I'm probably not going to be doing too many other models after this one so there is no point in buying an expensive one.
This model cost a lot of money so I don't want to bugger it up!
Galsia said:
Two complete newbie questions:
What it is best way to remove each part from the plastic moulding sheet and how to I remove the little bits of left over plastic from the parts? I'm quessing a scalpel...
Also, what is a good, cheapish airbrush system? I'm probably not going to be doing too many other models after this one so there is no point in buying an expensive one.
This model cost a lot of money so I don't want to bugger it up!
Buying a cheap airbrush to use on an expensive kit doesn't make much sense. You usually get what you pay for - unless you're particularly lucky.What it is best way to remove each part from the plastic moulding sheet and how to I remove the little bits of left over plastic from the parts? I'm quessing a scalpel...
Also, what is a good, cheapish airbrush system? I'm probably not going to be doing too many other models after this one so there is no point in buying an expensive one.
This model cost a lot of money so I don't want to bugger it up!
You can buy plastic cutters for removing larger parts from the sprues, and a scalpel is good for the smaller parts and cleaning up edges. You can finish them with some fine sanding sticks if required.
Galsia said:
Two complete newbie questions:
What it is best way to remove each part from the plastic moulding sheet and how to I remove the little bits of left over plastic from the parts? I'm quessing a scalpel...
Also, what is a good, cheapish airbrush system? I'm probably not going to be doing too many other models after this one so there is no point in buying an expensive one.
This model cost a lot of money so I don't want to bugger it up!
You can use a scalpel, or side cutters, or scissors or specialist sprue cutters (which to be honest are just small side cutters). Removing the excess is down to a sharp scalpel and needle files,obviously depending on location and amount to remove.What it is best way to remove each part from the plastic moulding sheet and how to I remove the little bits of left over plastic from the parts? I'm quessing a scalpel...
Also, what is a good, cheapish airbrush system? I'm probably not going to be doing too many other models after this one so there is no point in buying an expensive one.
This model cost a lot of money so I don't want to bugger it up!
Your second question is rather perplexing though. I'm an advocate for cheap airbrushes for use in the right job, so I have a few Chinese copies that do me grand for specific jobs, such as blocking colour and clear coat, jobs where I don't have to be too careful. However, for fine detail work or on models/areas where optimum finish is essential, then the expensive brushes get brought out to play. It's not just the way that the brush puts the paint onto the model, it's the way you interact with the brush as well that contributes to the final finish.
If this is an expensive model that you wish to cherish and enjoy, I would build a cheaper one first, hone your skills and learn to airbrush with good quality kit. It will pay dividends when you come to paint the one you really care about. There are several good companies offering airbrush equipment, ones I've used include;
http://www.everythingairbrush.com/
http://www.little-cars.co.uk/
Most painting errors or issues can be undone, even if it means completely stripping the model, but you have to factor in your enjoyment of the whole process as well.
You guys are right, buying cheap doesn't make much sense.
The kit I'm doing it this one:
http://www.amazon.co.uk/Kotobukiya-Metal-Solid-fig...
Sounds quite ambitious doing a 600 piece model for my first since I was a kid but it is apparently completely snap-together.
It doesn't really need painting but I'd like to do it in 2-tone camouflague as in the promo model shots.
To be fair, unless the OP wants to get into pre-shading, a few rattle cans would soon sort that out: The main component camo looks like a fairly simple two tone masking job. It's not like it's a tiny model, and there are no fine mottled edges to paint.
Having said that, if I were building it, I would go for some pre-shading and light weathering.
Having said that, if I were building it, I would go for some pre-shading and light weathering.

Ok, if I'm going to do this I am going to do this properly.
First of all, I will order a scalpel and hobby cutting matt.
The model is snap-fit so I can construct it first, the remove the individual parts to paint.
I will also order a cheap model to practice on.
Where is a good resource for spray painting for beginners? Can anybody recommend an adequate set-up?
Thanks.
The thing with airbrushing is it subtly varies for every brush and every type of paint, so I can't give you a definitive 'do this and it'll work', it's a case of here's some pointers and feel your way to what works best for you. Lots of guides will say that you need to thin your paint to the same consistency as skimmed milk. Well, what the hell is that? To me it's a bit like using the 'London Double Decker' as a unit of measurement. Everyone knows what they look like but no bugger has a clue on their actual length (yes, I know, some do, but) so it's trial and error.
However, here are some guides (Google is full of links);
http://www.artistsandillustrators.co.uk/how-to/Acr...
http://forum.manticblog.com/showthread.php?2753-A-...
I'd suggest you may be better off going with acrylic paints and maybe just try painting some paper to start with, just to see how the brush behaves and how you interact with it. You can even use water for that, saves cleaning! Then move onto the cheapy model and once you're confident, go with the main show. Remember, it can all be stripped and redone. Started a thread and you'll get a mountain of advice, some of it helpful!
Dinoboy said:
Looking for some advice on glues etc, what would be the best to use for attaching photo etched windscreen surrounds to 1/24 plastic Ferrari 250GTO?
Microscale kristal klear is specifically designed for clear parts and will not cause any fog. Been using it for years with no issuesKristal-Kleer (have I spelt it correctly?) is wonderful stuff. It looks like thinned PVA glue, but my attempts to make it by thinning PVA, suggest it is not! You can thin it with water if required and it really does dry clear.
Something else I've found useful for attaching really delicate parts (the vacformed headlamp fairings on 1/43 scale cars come to mind) is Tamiya acrylic clear, number X-22 in the range.
Something else I've found useful for attaching really delicate parts (the vacformed headlamp fairings on 1/43 scale cars come to mind) is Tamiya acrylic clear, number X-22 in the range.
Glues: what glues are recommended these days? I have a 30 year old Airfix model (1:12 Bentley 4½ Litre) on which I need to reattach some loose parts. I used to use liquid solvent glue in a bottle with a dipper years back for the plastic parts and Araldite if I wanted to fix metal parts I'd made. Things have moved on so much I wonder what's in vogue now e.g. is super glue used at all?
RichB said:
Glues: what glues are recommended these days? I have a 30 year old Airfix model (1:12 Bentley 4½ Litre) on which I need to reattach some loose parts. I used to use liquid solvent glue in a bottle with a dipper years back for the plastic parts and Araldite if I wanted to fix metal parts I'd made. Things have moved on so much I wonder what's in vogue now e.g. is super glue used at all?
Super glue is probably best for an item like a mudguard, but beware the frosting effect you can get around the join sometimes. You can reduce it by only using the minimum amount of glue and/or using an accelerator. Liquid polystyrene cement is OK, but if it's a previously glued piece, the joint might not be too strong. Other option is epoxy (Araldite), but obviously you have to hold the part in place until it's set. Also you can use PVA on transparent parts (dries clear), or smaller parts that aren't under any load. RichB said:
Thanks for the info, so it seems not too much change. I imagine blu-tack could be useful to hold parts in place while glue sets?
Depends what part it is - if it's heavy, or a cantelever type thing, or alignments are critical, Blu-Tac might sag a bit. For things like that I usually use paint pots, or metal weights, or something else fairly solid:
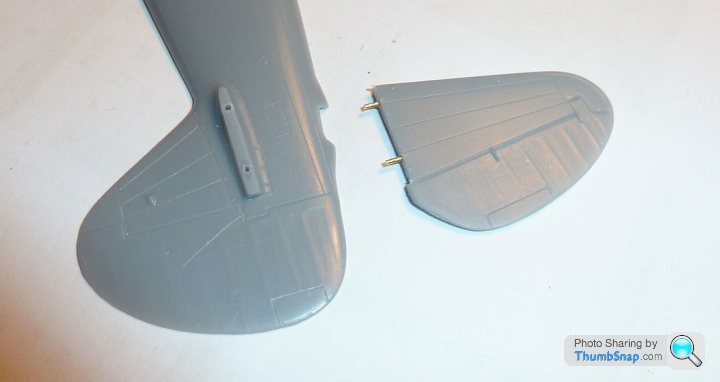
The other thing to consider, is drilling and pinning the parts with brass rod before glueing. This is a Curtiss Hawk short-run kit, which didin't have any moulded locating features:
Edited by dr_gn on Tuesday 20th January 21:42
For the resin figure kits I build these days, pinning is essential. (Never needed to do it on resin car kits though.) I recently bought a load of chandelier pins - they're made of brass so they're easy to bend or cut, and the ones I bought are exactly 1mm thick, so a 1mm drill in a hand chuck can be used to make the holes for them. They come in various lengths between 30mm and 45mm, and there's a little lump on one end like a pinhead, but you can just cut this off. 100g will cost about a tenner, including postage, this is about 450 pins so should last you a lifetime!
Gassing Station | Scale Models | Top of Page | What's New | My Stuff