Tamiya Honda S2000
Discussion


Rude-boy said:
dr gn
I am in awe of this and many others you have posted about. The attention to detail is fantastic!
Good work that man!
Appreciate the comments...but really all the detail is in the kit, this one's just painted, then assembled straight from the box. As I've said many times before, Tamiya models always build into great looking models without too much work and this is why I don't mind paying a slight premium for a decent kit (even though this one was only £10 form a model show!).I am in awe of this and many others you have posted about. The attention to detail is fantastic!
Good work that man!
Thanks again.
It could be the best kit in the world but it’s the attention to detail in your paining that really brings out the very best in all of the models I have seen you do. I could make a Spark resin kit look like a Dinky toy with my lack of painting ability but yours lifts the models I have seen to a different level.
With this one for example I was struck by details I suspect you have forgotten you even add such as the way the exhaust actually looks like it has discoloured over the miles with the constant heating and cooling. The shading appears a little darker in all the right areas to reflect the way the gases flow through these and the thickness of the metal at the joints. The subtle difference in the colour of the wealds on the cat compared to its body.
The only thing I’d say against it is that the more I see of your work the more I know I will never be able to even get close and so the further away I run from getting a kit or two and reliving those early teen years building M635csis and 935s
Rude-boy said:
It could be the best kit in the world but it’s the attention to detail in your paining that really brings out the very best in all of the models I have seen you do. I could make a Spark resin kit look like a Dinky toy with my lack of painting ability but yours lifts the models I have seen to a different level.
With this one for example I was struck by details I suspect you have forgotten you even add such as the way the exhaust actually looks like it has discoloured over the miles with the constant heating and cooling. The shading appears a little darker in all the right areas to reflect the way the gases flow through these and the thickness of the metal at the joints. The subtle difference in the colour of the wealds on the cat compared to its body.
The only thing I’d say against it is that the more I see of your work the more I know I will never be able to even get close and so the further away I run from getting a kit or two and reliving those early teen years building M635csis and 935s
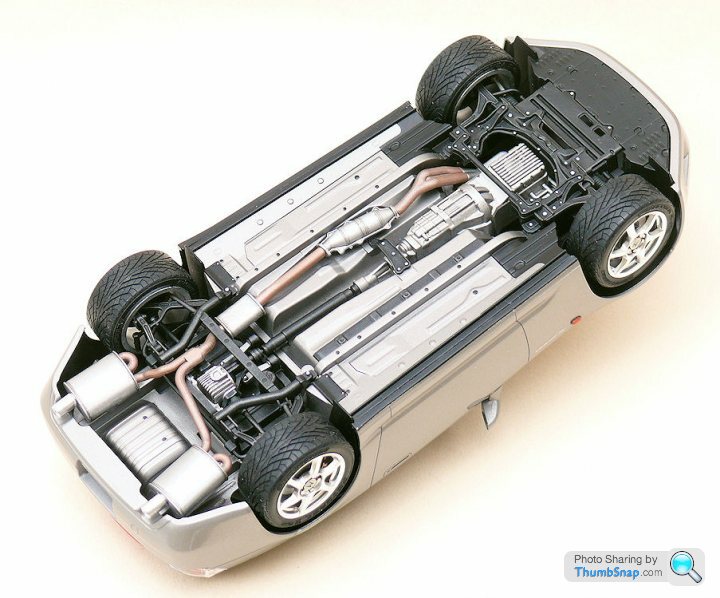
I must admit I'm happy with the cat/silencer boxes. I was going to leave everything as painted, but it looked a bit cartoon-ish. I considered using a blue tint around the seams, but ended up just dotting some MIG dark wash onto the raised lines and exhaust joints, followed by a dusting of Gunmetal Tamiya powder stuff. It really is as simple as that. Same with the gearbox/sump/rear axle castings: the dark wash highlights the details a bit. With this one for example I was struck by details I suspect you have forgotten you even add such as the way the exhaust actually looks like it has discoloured over the miles with the constant heating and cooling. The shading appears a little darker in all the right areas to reflect the way the gases flow through these and the thickness of the metal at the joints. The subtle difference in the colour of the wealds on the cat compared to its body.
The only thing I’d say against it is that the more I see of your work the more I know I will never be able to even get close and so the further away I run from getting a kit or two and reliving those early teen years building M635csis and 935s
There are plently of better examples of model exhaust painting skill out there, particularly with motorbike models:

Thanks again for the positive comments!
If I were you I'd just start a model if you fancy it and see how it goes, cars are far easier to build than aircraft!
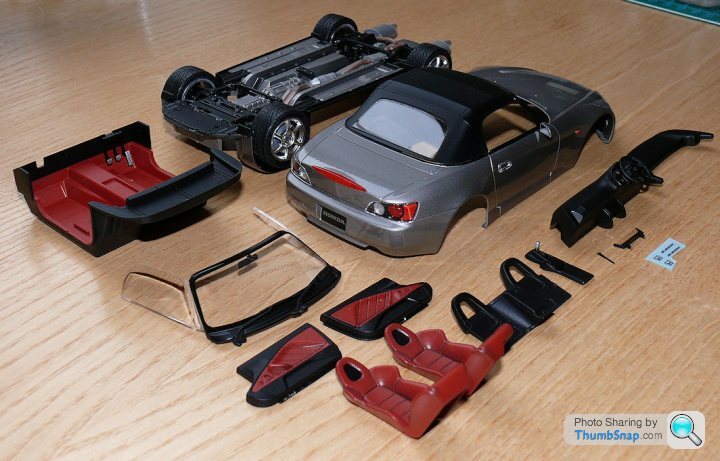
Got a few more bits done this weekend, mainly interior.

I was going to try flocking for the carpets, but just couldn't be motivated to find a supplier of the right colour. I decided to use a slightly darker red than on the actual car, becasue I think it's too garish. Call it modeller's license! To try and simulate different materials, I used different finishes: Matt for the carpets and satin for the leather and vinyl. I mixed Humbrol Bright red Acrylic with Tamiya Satin black for teh reds, and overcoated with either Humbrol Matt spray, Vallejo Satin or Klear. I also used preshading and MIG dark wash on the leather seats and door inserts. There is a lot of detail painting involved, many parts have different colours, and so I had to do a lot of masking and airbrushing; brush painting just doesn't give a good enough finish when you're used to seeing airbrushed results!

Need to detail the internal door latches, handles and window buttons, apply the self adhesive chrome badges and then it's final assembly time.
I was going to try flocking for the carpets, but just couldn't be motivated to find a supplier of the right colour. I decided to use a slightly darker red than on the actual car, becasue I think it's too garish. Call it modeller's license! To try and simulate different materials, I used different finishes: Matt for the carpets and satin for the leather and vinyl. I mixed Humbrol Bright red Acrylic with Tamiya Satin black for teh reds, and overcoated with either Humbrol Matt spray, Vallejo Satin or Klear. I also used preshading and MIG dark wash on the leather seats and door inserts. There is a lot of detail painting involved, many parts have different colours, and so I had to do a lot of masking and airbrushing; brush painting just doesn't give a good enough finish when you're used to seeing airbrushed results!
Need to detail the internal door latches, handles and window buttons, apply the self adhesive chrome badges and then it's final assembly time.
perdu said:
looks lovely dr_gn
Shall I just post my Revell Sauber to you to make for me for the next GB?
As always your attention compliments the detailing perfectly
Nice
Thanks Perdu - no, you can keep the Sauber, you'll enjoy it! It looks a nice kit although I've never built any F1 car other than by Tamiya with one exception: a Hasegawa Lola. It was atrocious!Shall I just post my Revell Sauber to you to make for me for the next GB?
As always your attention compliments the detailing perfectly
Nice
I think cars are easier than aircraft to build - they seem to need less weathering and general detailling to 'work'.
Your going to hate me, but we bought a real one over the weekend. Didn't set out to get one but popped into Honda with our Type-R for something completely unrelated and they had a limited edition White GT just delivered. Erm bit of haggling, chopped the R in and we pick it up on Friday !!
Tuscan Rat said:
Your going to hate me, but we bought a real one over the weekend. Didn't set out to get one but popped into Honda with our Type-R for something completely unrelated and they had a limited edition White GT just delivered. Erm bit of haggling, chopped the R in and we pick it up on Friday !!
Yeah I hate you 
Any more info on age/mileage, how it feels to drive etc? My Prelude just came up to 130,000 miles this morning - still going strong, but rust is taking a hold now. I need to swap it pretty soon, and it's either an old BMW M3 / 330i / S2000 or...something sensible. If I end up with something sensible I'll know that a bit of me has died and that I'm officially middle aged

I'd love an S2000 at the right price. Unfortunately the right price is only up to £5K !

Its an 09 reg, 17000 miles and is number 81 of 100. I test drove it back to back with a Porsche 911 / 997 Carrera S they also had on the forecourt and walked away from the Porker totally bored. However the S2000 was a great fun real drivers car. We currently own a Civic type R and although that is great fun its a very hard ride, where as the S2000 was a better ride. The only draw back is this is going to be my OH's car......
There is one for sale at Redhill Honda at the moment which is a bit more than your budget but is a tidy looking car
http://www.sytner.co.uk/search/honda-s2000-roadste...
Tuscan Rat said:
Its an 09 reg, 17000 miles and is number 81 of 100. I test drove it back to back with a Porsche 911 / 997 Carrera S they also had on the forecourt and walked away from the Porker totally bored. However the S2000 was a great fun real drivers car. We currently own a Civic type R and although that is great fun its a very hard ride, where as the S2000 was a better ride. The only draw back is this is going to be my OH's car......
There is one for sale at Redhill Honda at the moment which is a bit more than your budget but is a tidy looking car
http://www.sytner.co.uk/search/honda-s2000-roadste...
I hope you enjoy yours this summer.


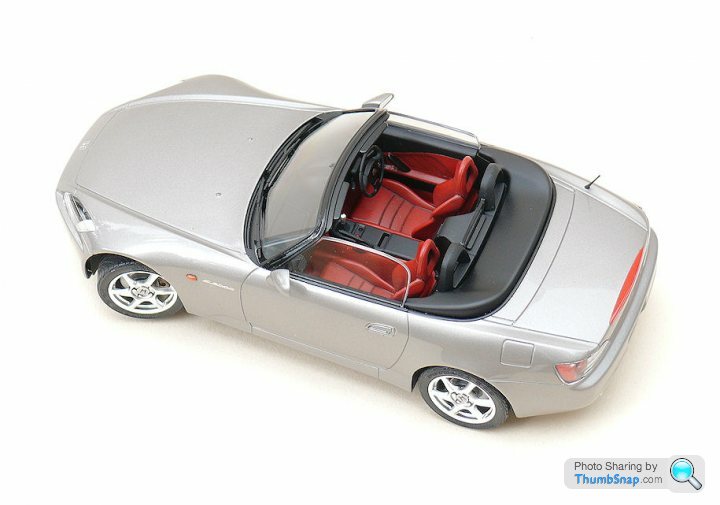


That's come out really well, I think Tamiya themselves could use those photos in a brochure.
Weathering the seats was a good idea, it's very easy to get an unrealistic look by using paints that are too glossy/matt in the interior.
Can I ask if you have any particular method to get the smooth finish on the paintwork? I know some people sand at several stages and apply multiple coats.
Weathering the seats was a good idea, it's very easy to get an unrealistic look by using paints that are too glossy/matt in the interior.
Can I ask if you have any particular method to get the smooth finish on the paintwork? I know some people sand at several stages and apply multiple coats.
Thanks guys - yep, I'm happy with it. It could probably do with a dark wash in the panel gaps, but I chickened out. I'll see what it looks like on an old model first.
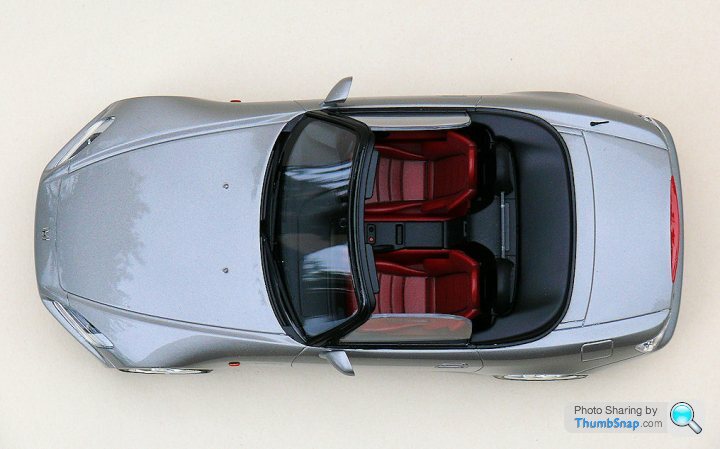
Slipstream - there's nothing special about the paint: Citadel/Revell Aqua mix applied in about three coats, no flatting at all. Then about 4 or 5 coats of clear lacquer, again, no flatting between coats. Then, after about a week, T-Cut and Autoglym polish. That's it. If I'd have stuck with Zero paints I'd still have been flatting it...
Slipstream - there's nothing special about the paint: Citadel/Revell Aqua mix applied in about three coats, no flatting at all. Then about 4 or 5 coats of clear lacquer, again, no flatting between coats. Then, after about a week, T-Cut and Autoglym polish. That's it. If I'd have stuck with Zero paints I'd still have been flatting it...
Meoricin said:
Excellent results! So much better with the smaller flake size - oversized flakes are one of my pet hates when it comes to modelling.
Would you mind setting out your process for doing the lights? It's something I'm really struggling with on my current model, and yours look good.
The lights?Would you mind setting out your process for doing the lights? It's something I'm really struggling with on my current model, and yours look good.
dr_gn said:
The lights?
Yes - it's something I've struggled with a lot. Yours look realistic. The best I've achieved has been when painting a mix of paint and gloss varnish directly on to the clear bits, but that wasn't for a car, and the same technique would look odd on one.Simply painting plain colours underneath the clear bits doesn't quite seem to produce the results I'm after - for one I struggle to match the colours. I was wondering what you've done with yours, so I could try to steal the techniques.
Gassing Station | Scale Models | Top of Page | What's New | My Stuff