Any Gordon Keeble Owners Out There?
Discussion


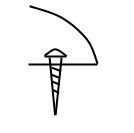
On 76 the chrome trim along the top of the doors is held on with small S/T screws but the heads of these are are covered by the top of the trim (see profile image). Decay has assisted removal, any suggestions on how to re-attach these, it almost looks as if the chrome was folded over after they'd been screwed in. Outside is even trickier as it contains the rubber seal.
Mellow Yellow said:
On 76 the chrome trim along the top of the doors is held on with small S/T screws but the heads of these are are covered by the top of the trim (see profile image). Decay has assisted removal, any suggestions on how to re-attach these, it almost looks as if the chrome was folded over after they'd been screwed in. Outside is even trickier as it contains the rubber seal.
Its a good question Chef. Are you sure the screws don't go up from inside the door into the trim?Door assembly sequence?
1. Fit felt channel into frame. Glue?
2. fit chrome trim inner and outer to door. Is there rubber and felt strips inserted into trim??
3. slide glass into frame.
4. Lower frame assembly into door.
5. Secure with the 4 1/4 UNF screws.
6. Fit electric window assembly into door and hook onto bottom of door glass.
7. Assemble door card.
Correct?
Edited by Huntsman on Tuesday 11th March 20:52
Huntsman said:
Its a good question Chef. Are you sure the screws don't go up from inside the door into the trim?
Door assembly sequence?
1. Fit felt channel into frame. Glue?
2. fit chrome trim inner and outer to door. Is there rubber and felt strips inserted into trim??
3. slide glass into frame.
4. Lower frame assembly into door.
5. Secure with the 4 1/4 UNF screws.
6. Fit electric window assembly into door and hook onto bottom of door glass.
7. Assemble door card.
Correct?
As to the inner and outer chrome ogee strips, apparently it is a complete pain, however, you do it from the top with shaved down self tapping screws (so as not to foul the window scraper rubber). The screws go in at a slight angle which facilitates the use of a thin screw driver.Door assembly sequence?
1. Fit felt channel into frame. Glue?
2. fit chrome trim inner and outer to door. Is there rubber and felt strips inserted into trim??
3. slide glass into frame.
4. Lower frame assembly into door.
5. Secure with the 4 1/4 UNF screws.
6. Fit electric window assembly into door and hook onto bottom of door glass.
7. Assemble door card.
Correct?
Edited by Huntsman on Tuesday 11th March 20:52
If anyone knows of a better way, please say now!
You have it GK52 and yes its a complete pain!
I put a trim tape between the the chrome strip and the door which doesn't show at all, I didn't have to shave the screws down though.
The weather rubber is a different story, prepare for much swearing and drawing of blood... a plastic trim tool, soapy water (not too much) and perseverance, insert into the lower side (either the inside or the outside trim) first or you cant get to the other side, done so many jobs now I cant remember if this is the outer or inner side so check for yourselves
Yes Huntsman, glue the window seal into the window channel.
The glass will feed through the newly fitted weather strips and into the channel, a piece of thin card or plastic sheet helps reduce the friction.
I used an AVO to check the open and closed micro switches on the window mech while winding the window up and down manually, adjusting as required, just add power and hope you got it right!
I didn't enjoy any aspect of the e/window set up!
Edited by B7trr on Wednesday 12th March 11:34
GK52 said:
If anyone knows of a better way, please say now!
I went for M3 button head socket set screws. You can just about get a nut on them from underneath (go for longish set screws). A cut down allen keep keeps the screws in place whilst you do up the nut. Not at all easy and I woudnt say a better way - just a different way.Dirk1 said:
Front brakes are Humber Hawk 59/67,seals SP2506 Piston 2.25"
Rear are unobtanium, piston is 42.70 mm, seals SP2505/2
When I had my calipers rebuilt recently I was told Daimler Dart - maybe this was specific to rears so Dirk is correct with identity of fronts? Just catching up on forum after a prolonged absence, someone asked about my spare and I had a spare front available.Rear are unobtanium, piston is 42.70 mm, seals SP2505/2
Also whilst catching up I am interested in the seal run and any advice from someone who has had any work to the glassed in B pillar metalwork. Ch30 "structure" is a riveted top hat section of rusty steel, so not terribly robust.
Vette Number said:
When I had my calipers rebuilt recently I was told Daimler Dart - maybe this was specific to rears so Dirk is correct with identity of fronts? Just catching up on forum after a prolonged absence, someone asked about my spare and I had a spare front available.
Also whilst catching up I am interested in the seal run and any advice from someone who has had any work to the glassed in B pillar metalwork. Ch30 "structure" is a riveted top hat section of rusty steel, so not terribly robust.
Rear are 'Dart', Front are 'Humber'. I can supply pistons & kits for both...Also whilst catching up I am interested in the seal run and any advice from someone who has had any work to the glassed in B pillar metalwork. Ch30 "structure" is a riveted top hat section of rusty steel, so not terribly robust.
Restoration of G-K 'B' post - See Keebling mag, Spring 2014 (out soon) ish.
My calipers had all 8 pistons seized in and the handbrake linkages were seized too.
Much drilling later I got all the handbrakes all apart, the bits are off for zinc plate.
All four calipers are with Past Parts for refurb.
I'll be making up new pivot pins for the hand brakes in stainless steel.
David Manners do keep spares for the rear caliper and I have an exploded drawing if anyone needs it.
Exploded drawing Huntsman? If someone has the time to compile all the vital info on here and in the GK mag then we have the makings of a GK Haynes manual - that would be a nice 50th legacy to continue E-K's great work.
Thanks for the B Pillar tip off oneof99 - which reminds me I must send my subs in!
Thanks for the B Pillar tip off oneof99 - which reminds me I must send my subs in!

Gassing Station | Classic Fibreglass | Top of Page | What's New | My Stuff