Stuka in winter camo' pics?
Discussion


I'm currently building a 1/32nd Scale JU-87 Stuka, D-5 Russian front and want to do the white washed winter camo scheme.
I can't find any colour photos of these on the internet though, does anone possibly have a book or magazine with a picture of such an aircraft in it?
Any help appreciated.
ETA: Just after a scan or something not asking for someone to send me the book. There are pictures of models on t'internet with this camo' but I like to see the original machine to try and get an idea of how the paint was actually applied in the field. Also why this is not in the scale models forum.
Edited by T89 Callan on Sunday 3rd January 21:08
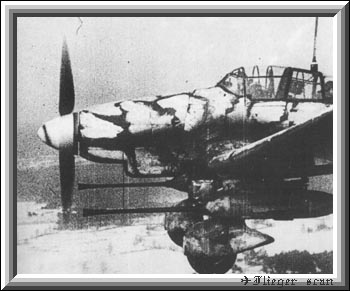
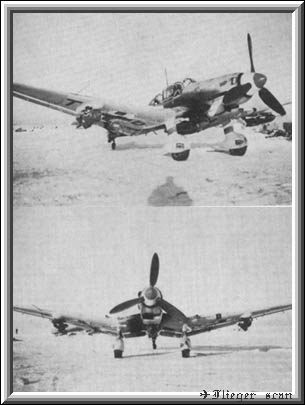
I tried to scan a couple of pics in, but they turned out crap. Here are a couple I found online:
And some here:
http://tinyurl.com/ybvrf7u
They are different from the ones in my book, but I'd think that virtually any brush applied white over the original camo would be representitive of an Eastern Front Stuka.
If Eric's pics are different from my book, I'll try again to scan them.

And some here:
http://tinyurl.com/ybvrf7u
They are different from the ones in my book, but I'd think that virtually any brush applied white over the original camo would be representitive of an Eastern Front Stuka.
If Eric's pics are different from my book, I'll try again to scan them.


Thats brillaint guys cheers.
As with the winter camo' tank I did it seems that they were all different and done by the crews with thin whitewash.
Also I wanted to see if they did it after the sqd/number/luftwaffe marking or before so I know when to add the water stickers.
What i'll do is paint and sticker it then add the whit wash after to get the effect of crew-added temporary camo'
This months "Military Aircraft Monthly" magazine contains a potted history of the D and G model Stukas. There is some nice artwork acompanying the article too as well as a build of the Hasegawa 1/32 Stuka D. The magazine should still be available on shop shelves gor a few more weeks.
Scraggles said:
Thats a model though.I like to try and understand how it was done on the real planes.
Eric Mc said:
This months "Military Aircraft Monthly" magazine contains a potted history of the D and G model Stukas. There is some nice artwork acompanying the article too as well as a build of the Hasegawa 1/32 Stuka D. The magazine should still be available on shop shelves gor a few more weeks.
Cheers I'll check the shelves next time I go into town.

T89 Callan said:
Cheers man, I really like this one. This is what I am going to aim for.
The pictures show that each one was definately a product of it's own crew and unique.

Cotton bud with some thinned white paint on it? The pictures show that each one was definately a product of it's own crew and unique.
dr_gn said:

Edited by T89 Callan on Monday 4th January 20:03
Or a tiny sponge? I got one from Hobbycraft for wiping excess wash off a model. I think it was in the watercolour/painting equipment section.
EDIT : I'd be inclined to add the whitewash after the decal stage, but before applying a dark wash to bring out the panel lines, possibly with some post-shading (using thinned Tamiya Smoke), and exhuast staining etc. I think if you apply the white as a final touch, it would look wrong. I'd also leave any canopy masking in place before doing it. BTW I've never tried post-shading, but the rebuilt Mustang on Britmodeller (mentioned in my Spitfire rebuild thread) looks good IMO, and would make the whitewash look a bit more subtle.
Edited by dr_gn on Monday 4th January 21:54
dr_gn said:
T89 Callan said:
Cheers man, I really like this one. This is what I am going to aim for.
The pictures show that each one was definately a product of it's own crew and unique.
Cotton bud with some thinned white paint on it? The pictures show that each one was definately a product of it's own crew and unique.
dr_gn said:
Edited by T89 Callan on Monday 4th January 20:03
Or a tiny sponge? I got one from Hobbycraft for wiping excess wash off a model. I think it was in the watercolour/painting equipment section.
EDIT : I'd be inclined to add the whitewash after the decal stage, but before applying a dark wash to bring out the panel lines, possibly with some post-shading (using thinned Tamiya Smoke), and exhuast staining etc. I think if you apply the white as a final touch, it would look wrong. I'd also leave any canopy masking in place before doing it. BTW I've never tried post-shading, but the rebuilt Mustang on Britmodeller (mentioned in my Spitfire rebuild thread) looks good IMO, and would make the whitewash look a bit more subtle.
Edited by dr_gn on Monday 4th January 21:54
 king clue what you're talking about though.
It will be stickers - whitewash - finished
The Luftwaffe often applied "field camouflage" using sponges on the end of sticks. This can be easily replicated by taping a piece of sponge to the wooden end of a model paint brush. I usually cut small chunks off a standard kitchen sponge.
The secret is to REALLY thin the paint you are going to apply, dip the sponge in the paint and then blotch most of the paint off on a tissue or a piece of unused model sprue until there's hardly any left on the sponge. THEN you can start applying the sponge to your model.
It's best to practice this technique on an old unwanted model first but it does work.
T89 Callan said:
dr_gn said:
T89 Callan said:
Cheers man, I really like this one. This is what I am going to aim for.
The pictures show that each one was definately a product of it's own crew and unique.
Cotton bud with some thinned white paint on it? The pictures show that each one was definately a product of it's own crew and unique.
dr_gn said:
Edited by T89 Callan on Monday 4th January 20:03
Or a tiny sponge? I got one from Hobbycraft for wiping excess wash off a model. I think it was in the watercolour/painting equipment section.
EDIT : I'd be inclined to add the whitewash after the decal stage, but before applying a dark wash to bring out the panel lines, possibly with some post-shading (using thinned Tamiya Smoke), and exhuast staining etc. I think if you apply the white as a final touch, it would look wrong. I'd also leave any canopy masking in place before doing it. BTW I've never tried post-shading, but the rebuilt Mustang on Britmodeller (mentioned in my Spitfire rebuild thread) looks good IMO, and would make the whitewash look a bit more subtle.
Edited by dr_gn on Monday 4th January 21:54
king clue what you're talking about though.It will be stickers - whitewash - finished
A wash is just thinned pigment capillaried or wiped into the panel lines and control surface breaks (assuming your model has recessed lines), then any excess wiped off the main surfaces of the model. It then leaves the panel lines darker than the rest of the model. It can look really good, but if overdone it looks crap. I have been using Promodeller dark and light washes (can be mixed), which is water soluble, so if you get it wrong you can just rinse it off. Brush or airbrush a coat of Johnson's Klear onto the model before you try it (stops the wash staining/soaking into any matt or satin paint). After the wash, you then coat with whatever varnish you prefer, and it's done.
This, IMO is slightly overdone, but this model has had a panel line wash:

Here is some info:
http://www.youtube.com/watch?v=BwHP6Tj13DE
There is loads of stuff on YouTube about weathering models, much of it presented by a very very scary looking man.
Gassing Station | Boats, Planes & Trains | Top of Page | What's New | My Stuff