Sourdough breadmaking
Discussion


Agreed, sourdough has much better keeping qualities than commercially produced bread. We also freeze part of our weekend batch. Cut the loaves in half, polybag individually, pop in the freezer, then take out 2 hours before you need it, can then either be sliced individually as required, or popped back in the oven to recrisp if devouring the lot in one sitting! Cost of flour? 1 80p bag will make you 3 loaves and a pizza. Go figure!
uncinqsix said:
escargot said:
Chaps, those loaves look amazing. How long do they last for before going stale?
They never get a chance to go stale in our house, but a sourdough will generally last 3-4 days. 
The funny thing with sourdough bread is that even when it is a bit stale, it doesn't taste stale.
Sourdough is well worth the effort of learning how to make, although you'll need a reliable oven for good results. Get an oven thermometer rather than rely on the dial.
Mobile Chicane said:
uncinqsix said:
escargot said:
Chaps, those loaves look amazing. How long do they last for before going stale?
They never get a chance to go stale in our house, but a sourdough will generally last 3-4 days. The funny thing with sourdough bread is that even when it is a bit stale, it doesn't taste stale.
Sourdough is well worth the effort of learning how to make, although you'll need a reliable oven for good results. Get an oven thermometer rather than rely on the dial.

Most fan assisted ovens will run at a higher temperature than on the dial. It really is just a case of trial and error. As a previous poster said if it's overcooking then simply reduce the dial temperature.
Although I'm relatively new to this baking/cooking lark, on our fan assisted oven, I find that if following most cookery book or online recipes which tend to give the temperature with conventional ovens in mind, I need to reduce the dial temperature by about 20 deg or so.
So for example, if the book recipe states 225c, then I reduce the temp to around 200c. if that then results in an underbake, then next time I notch it up a tad!
Every oven is different, and practice makes perfect.
Baking time will depend on the size of the loaves and your oven prrformance.
For example, I bake 3 standard bread tin loaves at once (1pound 14 oz each) for 22 mins, then flip over in the tins and back in for further 2 mins.
With my fan assisted oven 200deg c works.
Just get baking - it's trial and error!
For example, I bake 3 standard bread tin loaves at once (1pound 14 oz each) for 22 mins, then flip over in the tins and back in for further 2 mins.
With my fan assisted oven 200deg c works.
Just get baking - it's trial and error!
Edited by Boo152 on Monday 4th March 05:16
Ok. Time to get baking again.
All this sourdough talk in the last few days has resulted in us eating a whole weeks batch in about 4-days, so I need to get cracking and do an extra bake!
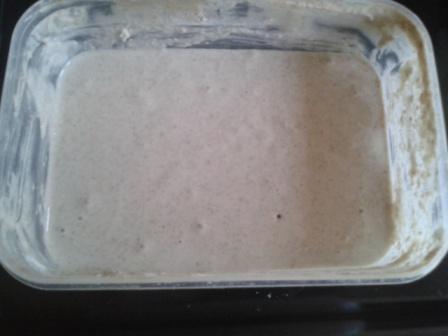
Here's the starter, just out of the fridge and before it's pre-bake feed.

An hour later, fed well and agitated. It will now stay at room temperature on the worktop (covered of course) for the next few hours until I'm ready to use it this evening.
So is anybody interested in a step by step guide to my typical weekend bake?
All this sourdough talk in the last few days has resulted in us eating a whole weeks batch in about 4-days, so I need to get cracking and do an extra bake!
Here's the starter, just out of the fridge and before it's pre-bake feed.
An hour later, fed well and agitated. It will now stay at room temperature on the worktop (covered of course) for the next few hours until I'm ready to use it this evening.
So is anybody interested in a step by step guide to my typical weekend bake?
Edited by Boo152 on Monday 4th March 14:56

Step by step guide to my weekend bake
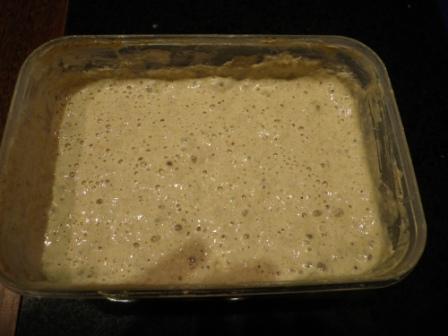
1. Starter out of the fridge around lunchtime - feed well and agitate
2. Leave out on the worktop at room temperature until required
Starter after 4 hours out of the fridge today:
EQUIPMENT NEEDED:
A very large ceramic or glass mixing bowl.
A scrupulously clean worktop
A large wooden spoon for the initial mix.
A jug for the water
Clingfilm to cover while rising.
Baking tins – I use standard bread tins for the loaves, and large heavy oblong oven tins for any pizzas, flatbreads, naan bread, or monster loaves.

INGREDIENTS:
1.5 kilo bag strong white flour
4 level teaspoons cooking salt
About 2 pints lukewarm water
Extra flour for dusting the worktop etc
Semolina for dusting if doing Pizzas or Naan
Lard for greasing the tins – better than oil due to higher burn temperature
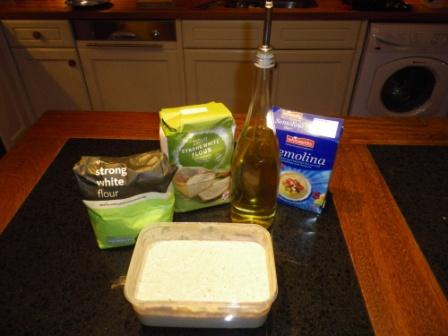
The above ingredients are sufficient for my typical weekend bake, which could be, say 3 loaves plus what we call our ‘speciality treat’. Your speciality treat of the week could be (for example) A Pizza; A Cheesy Savoury Flat bread; Fruit and Nut bread; or A herb and Garlic, etc, etc. With sourdough bread the only limit is your imagination!
METHOD:
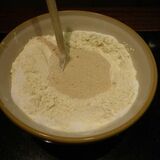
Pre-dust your worktop with strong white flour.
Put the whole 1.5 kilo bag of flour into the mixing bowl, making a well in the middle, and pour in your starter culture. Sprinkle the 4 teaspoons salt round the edges of the bowl to keep initially separated from the starter. You can however whack the 4 tablespoons oil in any where you like! With the wooden spoon start stirring from the middle mixing everything together, then pour in half your water. Continue stirring the whole mixture with the spoon, adding more and more water as required.
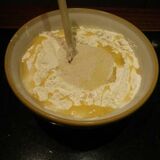
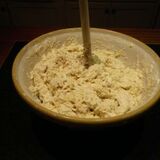
Once you have added about 3 quarters of the water, put the wooden spoon in your water jug, flour your hands, and start to knead the dough with your hands in the bowl for a minute or so.
WARNING. If you are kneading bread dough for the very first time it may feel absolutely horrible and sticky on your hands, like when you were a kid making mud pies (or worse!), but don’t worry, your hands will come clean again I promise!
Next, tip out your dough onto the floured worktop, scraping as much of it off the sides as you can and start to knead in earnest. Leave the bowl within reach on the worktop.
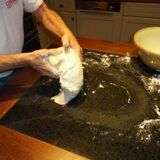
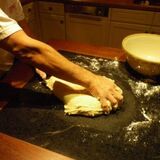
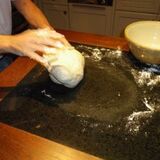
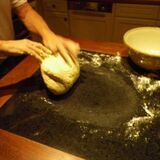

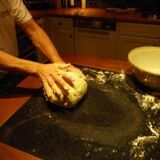

Hold the dough with one hand while stretching it away from yourself with the other, then fold the stretched dough back-in towards yourself with both hands and press down. Next a quarter turn of the dough either clockwise or anti clockwise, then repeat the whole process. Keep doing this for about 10 minutes, stretching, pulling back, turning - always turning in the same direction, by which time the initial sticky disgusting mess should have magically turned into soft pliable dough, and will no longer be sticking to your hands or to the work top!
You may need to add either more water or more flour during the kneading process, the consistency to aim for is that of soft dough, but not too wet. This is deffo where the art or artisan bit comes in, you will really only know how dough should feel when you’ve baked a few batches.
Once it feels ready (not too sticky, not too dry!) lift up the dough and slap back in the mixing bowl. Don’t worry about the bits you previously left in the bowl, they will amalgamate nicely with your dough as it slowly tries to climb out overnight!
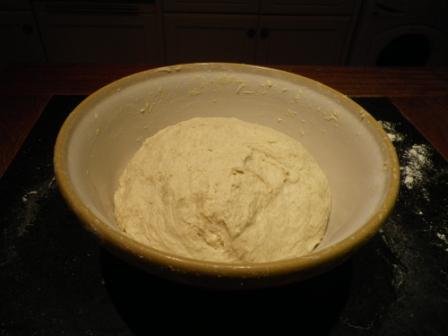
Cover the top of the bowl with some oiled Clingfilm.
Place it on the centre of your floured worktop, and that’s it until tomorrow!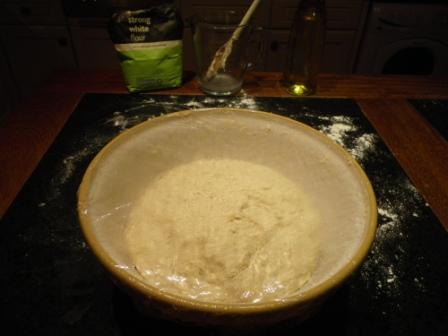
You can now leave to rise over-night, or about 6 to 8 hours, in a cool room. Do not be tempted speed the process by placing in the warm - sourdough bread needs a long slow rise to develop its flavour properly.
I will continue tomorrow for anybody interested.
6:30am: Looks like it's going well, time to start the tins!
PS: 1Lb 14oz is 30oz or just over 850grammes in metric for you modernists!
1. Starter out of the fridge around lunchtime - feed well and agitate
2. Leave out on the worktop at room temperature until required
Starter after 4 hours out of the fridge today:
EQUIPMENT NEEDED:
A very large ceramic or glass mixing bowl.
A scrupulously clean worktop
A large wooden spoon for the initial mix.
A jug for the water
Clingfilm to cover while rising.
Baking tins – I use standard bread tins for the loaves, and large heavy oblong oven tins for any pizzas, flatbreads, naan bread, or monster loaves.
- The mixing bowl should be large enough to hold at least double the volume of all your ingredients when mixed together to allow for the dough to grow.
INGREDIENTS:
1.5 kilo bag strong white flour
- ABOUT 3/4 LITRE OF YOUR VERY ACTIVE POURING CONSISTANCY STARTER CULTURE
4 level teaspoons cooking salt
About 2 pints lukewarm water
Extra flour for dusting the worktop etc
Semolina for dusting if doing Pizzas or Naan
Lard for greasing the tins – better than oil due to higher burn temperature
The above ingredients are sufficient for my typical weekend bake, which could be, say 3 loaves plus what we call our ‘speciality treat’. Your speciality treat of the week could be (for example) A Pizza; A Cheesy Savoury Flat bread; Fruit and Nut bread; or A herb and Garlic, etc, etc. With sourdough bread the only limit is your imagination!
METHOD:
Pre-dust your worktop with strong white flour.
Put the whole 1.5 kilo bag of flour into the mixing bowl, making a well in the middle, and pour in your starter culture. Sprinkle the 4 teaspoons salt round the edges of the bowl to keep initially separated from the starter. You can however whack the 4 tablespoons oil in any where you like! With the wooden spoon start stirring from the middle mixing everything together, then pour in half your water. Continue stirring the whole mixture with the spoon, adding more and more water as required.
Once you have added about 3 quarters of the water, put the wooden spoon in your water jug, flour your hands, and start to knead the dough with your hands in the bowl for a minute or so.
WARNING. If you are kneading bread dough for the very first time it may feel absolutely horrible and sticky on your hands, like when you were a kid making mud pies (or worse!), but don’t worry, your hands will come clean again I promise!
Next, tip out your dough onto the floured worktop, scraping as much of it off the sides as you can and start to knead in earnest. Leave the bowl within reach on the worktop.
Hold the dough with one hand while stretching it away from yourself with the other, then fold the stretched dough back-in towards yourself with both hands and press down. Next a quarter turn of the dough either clockwise or anti clockwise, then repeat the whole process. Keep doing this for about 10 minutes, stretching, pulling back, turning - always turning in the same direction, by which time the initial sticky disgusting mess should have magically turned into soft pliable dough, and will no longer be sticking to your hands or to the work top!
You may need to add either more water or more flour during the kneading process, the consistency to aim for is that of soft dough, but not too wet. This is deffo where the art or artisan bit comes in, you will really only know how dough should feel when you’ve baked a few batches.
Once it feels ready (not too sticky, not too dry!) lift up the dough and slap back in the mixing bowl. Don’t worry about the bits you previously left in the bowl, they will amalgamate nicely with your dough as it slowly tries to climb out overnight!
Cover the top of the bowl with some oiled Clingfilm.
Place it on the centre of your floured worktop, and that’s it until tomorrow!
You can now leave to rise over-night, or about 6 to 8 hours, in a cool room. Do not be tempted speed the process by placing in the warm - sourdough bread needs a long slow rise to develop its flavour properly.
I will continue tomorrow for anybody interested.
6:30am: Looks like it's going well, time to start the tins!
PS: 1Lb 14oz is 30oz or just over 850grammes in metric for you modernists!
Edited to adjust the starter quantity
Edited by Boo152 on Tuesday 23 April 07:28
Going to try to get the starter on the go today. Recent loaf of ordinary tin part failed on a second rise so I suspect I am not treating the yeast correctly. Good to see this starter in action and a different way than yeast. I have a few large kilner jars I use for jam (yep, huge jam jars, run out of ordinary  ....).
....).THE KNOCK-BACK AND SHAPE
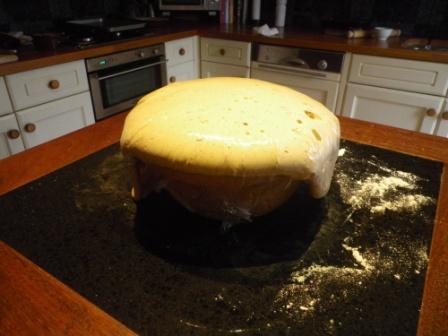
Next morning, your dough should have risen to at least double the size.
If your starter culture is a vigorous one like mine, it could well be overflowing from the bowl like molten lava from Vesuvius!
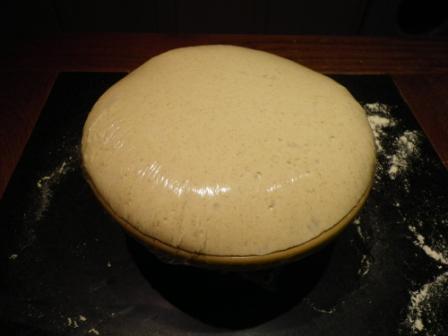
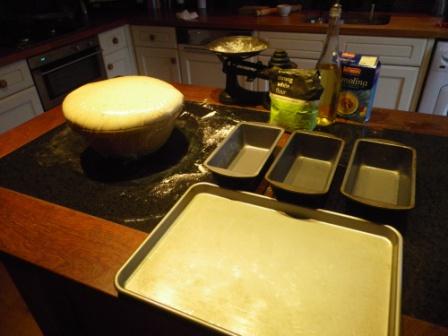
1st job, lightly grease all your bread tins with lard: all done and ready. time to take a cup of tea and a slice of last weeks toasted sourdough back to the wife who's still snoring!
8:30 am Definitley ready to knock back now:
Next dust your hands and the worktop with a little more flour, dig your fingers quickly into the dough to ‘Knock-back’
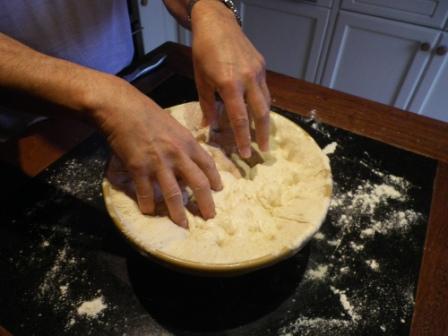
Then tip/scrape out onto the worktop again.
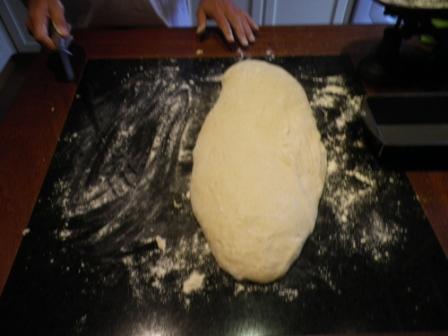
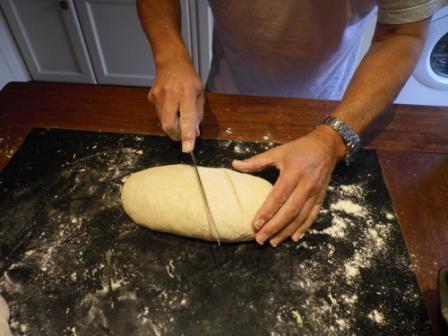
IMHO re-working again at this stage is NOT required; simply divide the dough into your preferred loaf size portions.
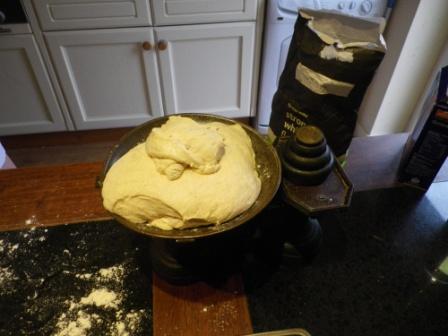
I weigh each loaf portion (1LB 14 oz, or 850 grammes for the metrosexuals!)
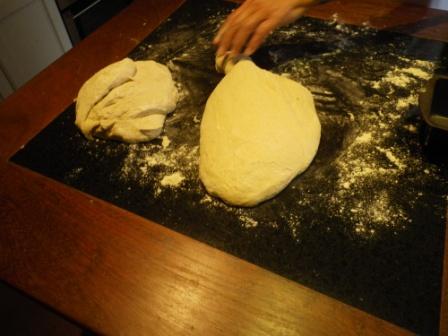
Then quickly shape each into a large fat ‘sausage’ by folding in.
Then flip over and slap each one seam side down in the bread tins. They should sit between about a third or half way down the tin.
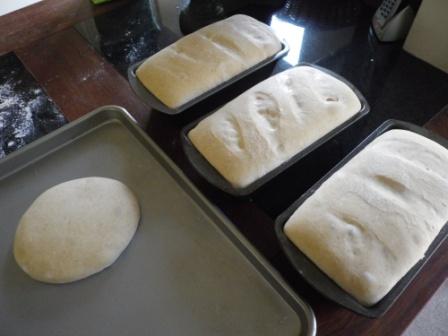
If you want to be arty you can do diagonal slashes or other fancy cuts to the tops before putting in the tins, but this won’t improve the flavour or texture, it just seems to be custom and practice amongst the chattering classes!
For the purpose of the thread photos I've slashed mine this time (I don't always bother) but I'm a bit fingers and thumbs so don't expect pretty looking loaves!
With your 3 loaves the above size, the remainder of your dough should be just enough for a Pizza or some other speciality treat. Instructions for that later for those interested.

Oops miscalculated the amount this time. Not quite enough left for a Pizza, just enough for a big breadcake! Note to self: make slightly smaller loaves next time.
THE PROVE
Leave in the tins for about 1 ½ hours, by which time they should have doubled in size at least and be raising above the top of the tin. If you press lightly with a floured finger, they should spring back.
Proved and ready to bake!
FINALLY THE BAKE
Preheat your oven to temperature (mine is 200 deg c for a fan assisted oven)
Place the 3 loaves in the oven on the same shelf with no shelves above.
Set a timer for 22 minutes, take out after the time and tap the bottoms – they should sound hollow. Flip over in the tins, (this can be a bit of a panicky moment if you are all fingers and thumbs like me when handling hot things!) then back in the oven for a further 2 minutes.
That’s it folks, your lovely sourdough bread is baked to perfection!
Shame about that Pizza though
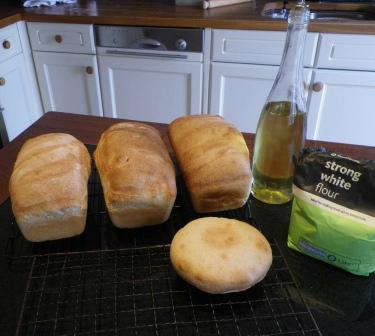
If you can bear to, wait 10 minutes until it has cooled slightly, then slice off your first warm crust, spreading it generously with best butter and enjoy. Yum Yum!
You may need to experiment with times and temperature – it will of course depend on your personal preferences and on your oven efficiency etc. Larger loaves will need a longer bake, smaller ones less time so it’s trial and error!
Let’s face it, even if you ruin the whole batch, the ingredients have cost you less than 1 pound sterling!
Finally, it never ceases to amaze me how just flour, water, oil, and salt, with the help of organisms that grow wild on the flour can produce such wonderful grub.
Get Baking!
Edited to add photos
Next morning, your dough should have risen to at least double the size.
If your starter culture is a vigorous one like mine, it could well be overflowing from the bowl like molten lava from Vesuvius!
1st job, lightly grease all your bread tins with lard: all done and ready. time to take a cup of tea and a slice of last weeks toasted sourdough back to the wife who's still snoring!
8:30 am Definitley ready to knock back now:
Next dust your hands and the worktop with a little more flour, dig your fingers quickly into the dough to ‘Knock-back’
Then tip/scrape out onto the worktop again.
IMHO re-working again at this stage is NOT required; simply divide the dough into your preferred loaf size portions.
I weigh each loaf portion (1LB 14 oz, or 850 grammes for the metrosexuals!)
Then quickly shape each into a large fat ‘sausage’ by folding in.
Then flip over and slap each one seam side down in the bread tins. They should sit between about a third or half way down the tin.
If you want to be arty you can do diagonal slashes or other fancy cuts to the tops before putting in the tins, but this won’t improve the flavour or texture, it just seems to be custom and practice amongst the chattering classes!
For the purpose of the thread photos I've slashed mine this time (I don't always bother) but I'm a bit fingers and thumbs so don't expect pretty looking loaves!
With your 3 loaves the above size, the remainder of your dough should be just enough for a Pizza or some other speciality treat. Instructions for that later for those interested.
Oops miscalculated the amount this time. Not quite enough left for a Pizza, just enough for a big breadcake! Note to self: make slightly smaller loaves next time.
THE PROVE
Leave in the tins for about 1 ½ hours, by which time they should have doubled in size at least and be raising above the top of the tin. If you press lightly with a floured finger, they should spring back.
Proved and ready to bake!
FINALLY THE BAKE
Preheat your oven to temperature (mine is 200 deg c for a fan assisted oven)
Place the 3 loaves in the oven on the same shelf with no shelves above.
Set a timer for 22 minutes, take out after the time and tap the bottoms – they should sound hollow. Flip over in the tins, (this can be a bit of a panicky moment if you are all fingers and thumbs like me when handling hot things!) then back in the oven for a further 2 minutes.
That’s it folks, your lovely sourdough bread is baked to perfection!
Shame about that Pizza though
If you can bear to, wait 10 minutes until it has cooled slightly, then slice off your first warm crust, spreading it generously with best butter and enjoy. Yum Yum!
You may need to experiment with times and temperature – it will of course depend on your personal preferences and on your oven efficiency etc. Larger loaves will need a longer bake, smaller ones less time so it’s trial and error!
Let’s face it, even if you ruin the whole batch, the ingredients have cost you less than 1 pound sterling!
Finally, it never ceases to amaze me how just flour, water, oil, and salt, with the help of organisms that grow wild on the flour can produce such wonderful grub.
Get Baking!
Edited to add photos
Edited by Boo152 on Tuesday 5th March 12:42
Gassing Station | Food, Drink & Restaurants | Top of Page | What's New | My Stuff