Suspension Settings - Dialing Out Bump Steer
Discussion


I've done the string box thing (no good once the bodywork is on the car), laser pens, etc and now I want to be 100% sure that measurements are correct without all the pissing around. I've bought a Longacre gauge, so as soon as it arrives, I'll be in the garage getting this sorted once & for all. For all the time I've wasted to far and based on feedback from other owners, I think this gauge is going to pay for itself immediately, but I am cheesed off at the lack of proper adjustment and general geo on the front suspension 
Time to drag this thread back up again...
My Longacre gauge landed in Feb and I've now spent a chunk of time tweaking & measuring the rack position to address the BS problem. Things have improved markedly, but it's still some way from being neutralised and doesn't give the confidence I'd expect from the car.
At this point it'd be good to get some data on the front suspension geo, pick up points and the inner / outer mounting planes. Has anyone modelled or documented this and feeling happy to share? I've had an offer to modify the steering rack and then there's the more radical option of fully custom & redesigned front suspension on the table too.... Before I make any choices, it would be good to know if there's any data out there that can help with identifying the root cause. Is anyone sitting on some nice modelled drawings?
hi
ive played alot with camber, bump steer castor and toe in.. i had huge problem at high speed felt like steering was too light and had no confidence in front at all/
All sorted now, what do you need to know,
tell exactly what you are experiancing and if needed email me with your readings and settings
i also need to know if you have wing.. what angle the wing is set at and the adjustable elliment where it is set at too.. also ride height front and back and if you have a splitter... i also need to know if you have splitter what angle the splitter is running at(stupid as it seems mine was creating uplift)
Dom...
Hi Dom, thanks for the reply.... I take it as you mention Castor, you've got rose jointed suspension? I've got the red-bushed standard wishbones (wish I'd done the upgrade now).
My car is setup as per factory specs: ride height 110mm / 160mm, 2mm toe front & rear, camber 1.3 front / 0.4 rear (as close as it could be adjusted with the std setup). No spoiler or splitter.
I've played around with the rack height and on the dial gauge I can calm the BS effect, but it won't go away. It's now a lot better a lower speed / over gentle bumps, but when you press on and over bigger bumps, the BS effect requires two strong hands on the wheel to hold onto the car, it's very unnerving and dictates your pace.
Any info you've got would be great!
I've been considering some very radical options (steering rack surgery / custom front suspension), but before making any decisions, it would be good to get some real data about the geometry. A nice 3D model of the suspension & steering would be brilliant if anyone's done it?
ill check my data when home.
also what tyres are you running?
memory might be wrong but isn't tracking front 2mm each side? ill check when home
yes I have full rose joint, and yes its a brilliant upgrade, opens up the adjustability so much.
caster is pretty good as standard and the factory arms well within spec.. camber can be adjusted by top rose joint so with camber and toe adjustable you have most you want really..#
I will check when im home and the cars coming to work tomorrow so ill measure tracking while here
dom
Thanks Johnny, you might have a point. I'm still wanting to do a more wholesale analysis of the full geometry following some interesting off-line conversations.... I might be disappearing down a dark road here ;-)
Dom - I agree tyres have an impact (I've got Kumhos on the front), but this isn't just tramlining, it's certainly an unpredictable bump steer issue. I do wish I'd taken the rose-jointed suspension setup during build, it's the only thing I didn't upgrade and I'm kicking myself over it... Any other info you've got, pls ping me on a PM
Dom - I agree tyres have an impact (I've got Kumhos on the front), but this isn't just tramlining, it's certainly an unpredictable bump steer issue. I do wish I'd taken the rose-jointed suspension setup during build, it's the only thing I didn't upgrade and I'm kicking myself over it... Any other info you've got, pls ping me on a PM
set ride height first front and back, and then decide if you have a bump steer problem...
ride height will effect castor angle
i can give you a rough measurement front top of cross member to alloy block on mine but all are different,
i used a laser pointer
measure shock length in normal static possition, then fully off ground to fully compressed but normal most important(measurement bottom bolt to top bolt of shock
jacked car, removed front clip... 2 bolts plus hinge and electric connectors x 2, removed wheels and shocks front
put small jack under disc(with cloth) to raise / lower the disc
make sure car is accactly level and raised disc so stock length is the normal measured length(mounting hole to mounting hole.
attached lazer pen to side of disc pointing forward
have a piece of card mounted in front with vertical line(perfect vertical)
moved suspension up and down noting how far each side of line pointer went. if a strong curve it needs adjusting.
to adjust, the holes mounting the steering rack need to be elongated when the rack bolts to the chassis.. i removed my rad to do it but its possible clip off to do it. rack needs removing to gain access.. elongate holes
move rack down 1mm at a time and recheck..mine moved down about 5mm i think but ive painted 69.3mm on left side top rail and 67mm on right.
now the tricky bit. both sides are not the same. 2 lasers are easier but as you adjust one side it upsets other.. i have a flat vertical line for most of movement but not all, its flat where it matters in normal height and movement each side of the measurement and only changes on extreeme compression or wheels off the ground..:0)
however initially it was all an arc, not straight at all the pointer.
its takes a while but great when done.. important you note height for furture, but also important ride height done first to get shock static length .
when remonting the rack its important a desent grab washer is used as you dont want the rack to move...
Charles dunn has made some lovely washers, knurled finish, the correct width for frame rail but deeper... its important these type of washers are used... also take it from me, fit a small piece of sponge under hole inside, you will drop the washer and nut numerous times and the sponge will stop u spending 10mins with a magnet trying to find them at the bottom of the chasiss
Charles is available here http://www.charlesdunn.uk.com/
and all i can say is he is briliant, very helpful, knows his ultimas and a guru with V8 engines..
Dom
Check out how Clive has changed the suspension geometry on his design...
http://youtu.be/6sWz3B04Jgc
Mart
http://youtu.be/6sWz3B04Jgc
Mart
Although not intuitive, the rear bump steer is worth checking.
I found that I had a fair amount of bump steer on the left side. (Toe-out in compression). The right side was minimal.
Unlike the front, the rear bump steer is linear. The adjustment is fairly easy and involves changing the tilt (Castor) of the upright slightly. I can send a picture of the change I made later. (For now, refer to the picture of the upright in the Rear Upright Thread) The spacer at the top of the upright will need to be reduced on one end and equivalent washers added to the other end to achieve the change. (Or make new spacers.)
Caution: If you are doing this, be very careful to make sure that you achieve a tight fit, otherwise you risk damaging the upright when you tighten the upper control arm bolt. (Really bad safety issue).
If you have the rose joint control arms, you can make very minor changes by adjusting those. The best way is to modify the spacers though. In my case, after I examined the upright tab dimensions closely I could see that the thickness of the upright tabs were different. That would explain the differences in tilt when using the same upright on the right and left side and why the left side was very close to zero.
I do not know if this currently the case with new builds.
In previous versions of the uprights, there were 2 part numbers (L & R). Now that there is only one version, it would help to explain why the left side bump steer is minimal and the right side is more significant.
Although a bit fiddly, I was able to adjust the rear bump steer to ZERO on both L&R sides without too much trouble.
One more note: When you change the tilt of the upright, there will be a significant change in the toe setting. It is an iterative process of making changes until everything is set up properly.
Peter
Thanks chaps!
Dom - That's basically the process I was following before I bought the Longacre gauge. After hours spent messing around with it, I was able calm the issue, but I've got to the point where I'm confident it's not going to be perfect without more radical work....
Martin - Thanks for the video link, clearly Clive has done his homework! I'd like a fully adjustable pushrod suspension setup front & rear, that's really very, very nice! What Clive talks about in that video backs up the research I've been doing over the last few months and while I'm not going to be able to mimic his setup *sniff*, I'm hoping that some steering work will give me the results I'm looking for.
I appreciate the feedback guys, it'll be a few weeks before I can give any more feedback as I'm going to be off the road sorting this and a few other jobs before the Dunsfold Supercar day at the end of the month.... no pressure then!
There is another option to moving the rack up or down.
In the past I have used a bump steer kit. It effectively moves the outer tie-rod up or down to correct the angle between the lower control arm and the angle of the tie-rod.
You need to drill out the hole in the steering arm to accommodate a 5/8 inch wide bolt. This bolt will go thru a rose joint that is screwed onto inner tie-rod.
If you add shims under the rose joint it will change toe out or toe in.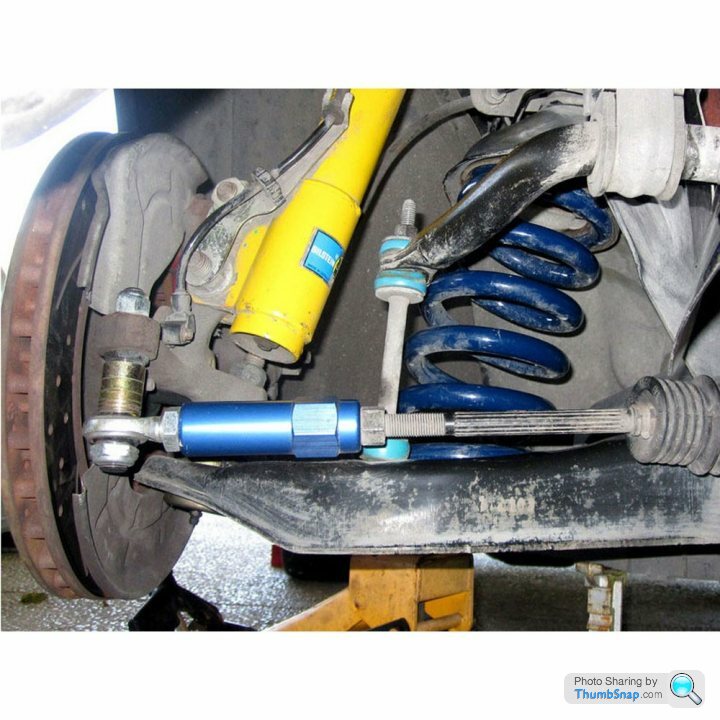
Rscocca said:
There is another option to moving the rack up or down.
In the past I have used a bump steer kit. It effectively moves the outer tie-rod up or down to correct the angle between the lower control arm and the angle of the tie-rod.
You need to drill out the hole in the steering arm to accommodate a 5/8 inch wide bolt. This bolt will go thru a rose joint that is screwed onto inner tie-rod.
If you add shims under the rose joint it will change toe out or toe in.
Do you have a link to such a kit? Having adjustment on the tie rod end would be beneficical.In the past I have used a bump steer kit. It effectively moves the outer tie-rod up or down to correct the angle between the lower control arm and the angle of the tie-rod.
You need to drill out the hole in the steering arm to accommodate a 5/8 inch wide bolt. This bolt will go thru a rose joint that is screwed onto inner tie-rod.
If you add shims under the rose joint it will change toe out or toe in.
Using spacers like that ^^^^ puts absolutely horrible bending loads in to the steering arm on the upright though.............
The other thing worth noting, before people go too mad on bump steer, is that you can only ever remove it when the rack is precisely centered! Try measuring it with some lock on, and then think about how often you drive you car with the steering perfectly centered...........
(generally, "instability" in the steering on bump roads is caused by toe changes at the back of the car, and by coneicity in the tyres dynamically moving the steering offset)
Max_Torque said:
Using spacers like that ^^^^ puts absolutely horrible bending loads in to the steering arm on the upright though.............
The other thing worth noting, before people go too mad on bump steer, is that you can only ever remove it when the rack is precisely centered! Try measuring it with some lock on, and then think about how often you drive you car with the steering perfectly centered...........
(generally, "instability" in the steering on bump roads is caused by toe changes at the back of the car, and by coneicity in the tyres dynamically moving the steering offset)
Yes that does look a bit drastic, I have to admit, We have two shims under one side and one under the other - so a couple of mm at most.The other thing worth noting, before people go too mad on bump steer, is that you can only ever remove it when the rack is precisely centered! Try measuring it with some lock on, and then think about how often you drive you car with the steering perfectly centered...........
(generally, "instability" in the steering on bump roads is caused by toe changes at the back of the car, and by coneicity in the tyres dynamically moving the steering offset)
The issue is that it can (and does!) send you all over the place when going down a bumpy road with the steering dead straight - so as such it is worth dialling out. So the answer to your second point is 'quite often'! But yes, point noted.
Gassing Station | Ultima | Top of Page | What's New | My Stuff