House renovation and garage build
Discussion


Finally got around to taking some after photos of the front bedroom, which is almost finished - just needs some pictures and the mirror hanging, but it has been like this since September.
First a before:

Front Bedroom Before by Lewis Craik, on Flickr
And a couple of afters:

Bedroom by Lewis Craik, on Flickr
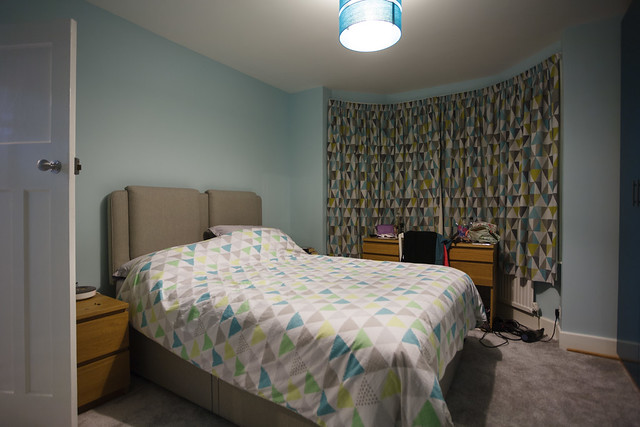
Bedroom by Lewis Craik, on Flickr
First a before:
Front Bedroom Before by Lewis Craik, on Flickr
And a couple of afters:
Bedroom by Lewis Craik, on Flickr
Bedroom by Lewis Craik, on Flickr
We have pretty much finished paining the new cupboards, just a few bits of tidying up to do.
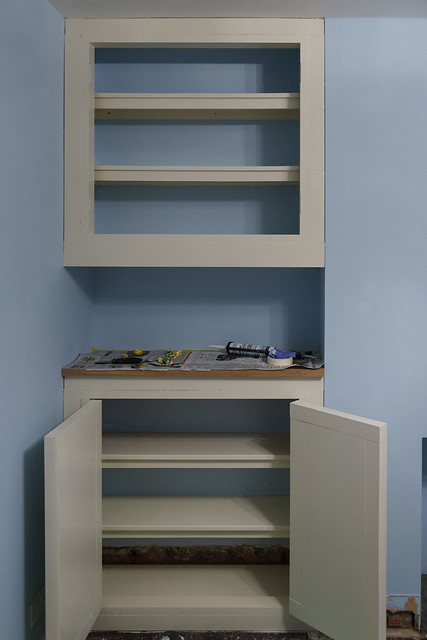
Dining room cupboard painted by Lewis Craik, on Flickr
Whilst waiting for the paint to dry we started removing the hardboard from the stairs:

Stairs un-boarded by Lewis Craik, on Flickr
I'm not sure which are the original spindles, but the spacing isn't regular and there are obviously some missing. We're currently not sure what the plan is for the stairs, but at least we now know that it is going to be more than a lick of paint. The de-boarding stopped at this point as the board on the other side is boxed in on the other side:

Top of the stairs by Lewis Craik, on Flickr
I''m going to try and have a look at next doors stairs when I next see my neighbour and work out what they should look like without the boxing in.
Dining room cupboard painted by Lewis Craik, on Flickr
Whilst waiting for the paint to dry we started removing the hardboard from the stairs:
Stairs un-boarded by Lewis Craik, on Flickr
I'm not sure which are the original spindles, but the spacing isn't regular and there are obviously some missing. We're currently not sure what the plan is for the stairs, but at least we now know that it is going to be more than a lick of paint. The de-boarding stopped at this point as the board on the other side is boxed in on the other side:
Top of the stairs by Lewis Craik, on Flickr
I''m going to try and have a look at next doors stairs when I next see my neighbour and work out what they should look like without the boxing in.

I didn't get much done over the weekend, but did make a start on stripping the wallpaper for the hall, stairs and landing. We got as much off as we could without using steam as we can't just shut the door on any mess as we have with the other rooms. We will have to get the steamer out next weekend and blitz the rest/clean up in one day.
Things are moving ahead nicely, new door next week, stairs the next week and hopefully plastering the week after.
Things are moving ahead nicely, new door next week, stairs the next week and hopefully plastering the week after.
One question I forgot to ask yesterday was how to finish the edges of platerboard when overboarding the hall ceiling, specifically around the stairs:
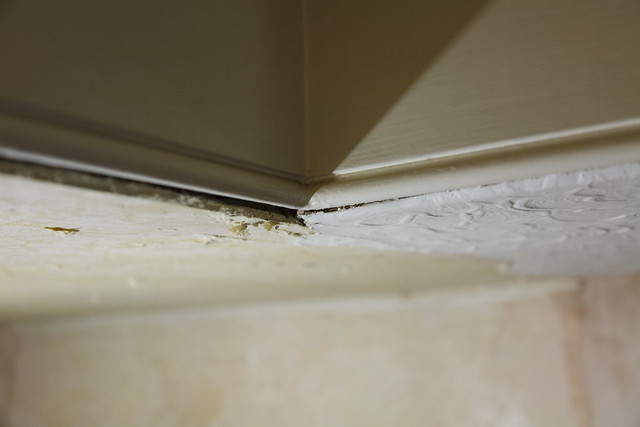
Hall ceiling by Lewis Craik, on Flickr
Will I need to remove the existing lath and plaster ceiling? Or maybe replace the wood around the hole in the ceiling?
Hall ceiling by Lewis Craik, on Flickr
Will I need to remove the existing lath and plaster ceiling? Or maybe replace the wood around the hole in the ceiling?
Today is a great day - 119 is officially free of wallpaper!
After 5 rooms we finally got the process nailed and got the hall, stairs and landing stripped, quicker, tidier and with less tantrums than the other rooms. Our previous technique involved putting plastic sheeting on the floor, then steaming the paper off the walls, which was hot and messy work. As we needed to keep the hall, stairs and landing in use for normal life we wanted a cleaner method and we found one by accident.
This was the answer:

A long handled scraper from Screwfix originally bought for the hard to reach bits, but with the wider blade and double handles we were able to get the textured paper off 3 walls and the ceilings dry. Set stripping was hard work, but cleaning up was easy, just a quick whizz round with the vacuum cleaner.
The wall up the stairs had a lovely 70's patterned wallpaper, which always got lots of comments from visitors:

Hallway Before by Lewis Craik, on Flickr
We are able to get the patterned layer off mostly unscathed - hopefully we will be able to reuse some of it in an artwork to keep the theme going.
The backing for the patterned paper was the only bit where we needed to wet the paper, sticky backed carpet protector and a pressure spray bottle (as opposed to our normal trigger spray bottle) made this a lot easier. I also managed to borrow a combination ladder from my next door neighbour, which along with the long handled scraper allowed me to reach the tricky bits fairly safely.
Jen has set us a challenge to get our hall, stairs and landing finished before her Mum - who started her's in November! The inlaws are on holiday for the next few weeks, so we're hoping we can catch up with them by getting the mist coat done by the time they get back. We've got the new door being fitted on Tuesday and the carpenter booked in, hopefully the plasterer will be able to fit us in soon.
After 5 rooms we finally got the process nailed and got the hall, stairs and landing stripped, quicker, tidier and with less tantrums than the other rooms. Our previous technique involved putting plastic sheeting on the floor, then steaming the paper off the walls, which was hot and messy work. As we needed to keep the hall, stairs and landing in use for normal life we wanted a cleaner method and we found one by accident.
This was the answer:
A long handled scraper from Screwfix originally bought for the hard to reach bits, but with the wider blade and double handles we were able to get the textured paper off 3 walls and the ceilings dry. Set stripping was hard work, but cleaning up was easy, just a quick whizz round with the vacuum cleaner.
The wall up the stairs had a lovely 70's patterned wallpaper, which always got lots of comments from visitors:
Hallway Before by Lewis Craik, on Flickr
We are able to get the patterned layer off mostly unscathed - hopefully we will be able to reuse some of it in an artwork to keep the theme going.
The backing for the patterned paper was the only bit where we needed to wet the paper, sticky backed carpet protector and a pressure spray bottle (as opposed to our normal trigger spray bottle) made this a lot easier. I also managed to borrow a combination ladder from my next door neighbour, which along with the long handled scraper allowed me to reach the tricky bits fairly safely.
Jen has set us a challenge to get our hall, stairs and landing finished before her Mum - who started her's in November! The inlaws are on holiday for the next few weeks, so we're hoping we can catch up with them by getting the mist coat done by the time they get back. We've got the new door being fitted on Tuesday and the carpenter booked in, hopefully the plasterer will be able to fit us in soon.
Another milestone has been reached - even before we started on this project (in 2012!!!) we had discussed how replacing the front door would make a big change to the front of the house. Today it happened - we went from:

Old front door - outside by Lewis Craik, on Flickr
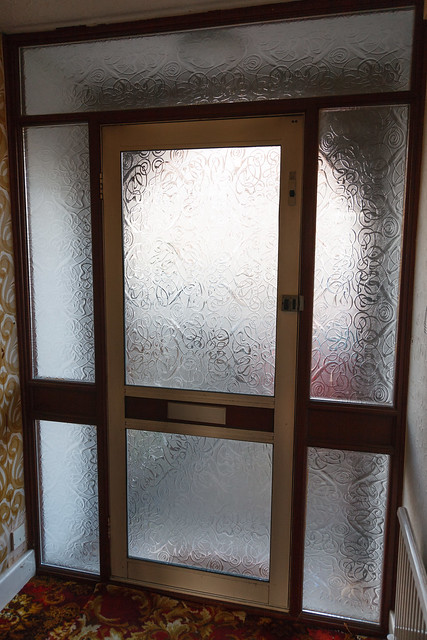
Old front door - inside by Lewis Craik, on Flickr
To:

New front door - outside by Lewis Craik, on Flickr

New front door - inside by Lewis Craik, on Flickr
We're really happy with it, well Jen has only seen the photos so far, but it looks even better than we expected. The only niggle is a small scratch on one of the handles, which the installers are coming back to replace.
Old front door - outside by Lewis Craik, on Flickr
Old front door - inside by Lewis Craik, on Flickr
To:
New front door - outside by Lewis Craik, on Flickr
New front door - inside by Lewis Craik, on Flickr
We're really happy with it, well Jen has only seen the photos so far, but it looks even better than we expected. The only niggle is a small scratch on one of the handles, which the installers are coming back to replace.

What a very smart front door!
Back to your overboarding the (hallway?) ceiling: by the looks of it, it may be simpler, and tidier overall, to NOT bodge the edges, but to pull down the existing celing and attach the new plasterboard directly to the rafters and, presumably, skim. Take care when removing so as to not damage any beading edges on the stairs, from your piccie?
Back to your overboarding the (hallway?) ceiling: by the looks of it, it may be simpler, and tidier overall, to NOT bodge the edges, but to pull down the existing celing and attach the new plasterboard directly to the rafters and, presumably, skim. Take care when removing so as to not damage any beading edges on the stairs, from your piccie?
Thanks! The nice front door has shown up the flakey paint on the concrete step, but at least that will only be a quick job to sort when the weather has improved a bit.
I've got the plasterer coming round this evening to quote for the hall, stairs and landing, so will see what he says. Like you I think the neatest option will be to pull the existing ceiling down, but will see what the expert thinks later.
I've got the plasterer coming round this evening to quote for the hall, stairs and landing, so will see what he says. Like you I think the neatest option will be to pull the existing ceiling down, but will see what the expert thinks later.

Renovation said:
You can buy a 90 angle moulding in timber if you want to bodge the stairs.
Painted ceiling colour it's hardly noticeable.
That is what the plasterer said, but he also said that if we want it to be done perfectly the existing ceiling needs to come down. He's getting back to me with a quote over the weekend with the price and when he can fit us in. Unless it really ramps the price up we will get the existing ceiling downstairs removed.Painted ceiling colour it's hardly noticeable.
With the ceiling down it also opens up the possibility of running a cable from the fuse board to the porch for a possible electric car charger in the porch.
After getting carried away thinking about possible electric cars, having the ceiling down should make it easy to update the lighting in the hall - at the moment we only have one pendant at the moment and it gets a bit dark at the dining room end. I've started a separate thread for suggestions.
We've hit a point where we're waiting for trades to come in for the next few steps, so it was nice to have a weekend catching up with family and life admin.
We also made a start on planting seeds for our veg plot.
We've hit a point where we're waiting for trades to come in for the next few steps, so it was nice to have a weekend catching up with family and life admin.
We also made a start on planting seeds for our veg plot.
This week we have had a carpenter in to refurbish the stairs. The boarding and odd spindles that is was hiding have gone and we have some nice new spindles:

New stairs by Lewis Craik, on Flickr

New stairs by Lewis Craik, on Flickr
The plasterer is booked in for the first week in April, so we've got a few weeks to get the stairs painted, or at least started.
New stairs by Lewis Craik, on Flickr
New stairs by Lewis Craik, on Flickr
The plasterer is booked in for the first week in April, so we've got a few weeks to get the stairs painted, or at least started.
Gassing Station | Homes, Gardens and DIY | Top of Page | What's New | My Stuff