Our Little Durham Restoration Project...
Discussion


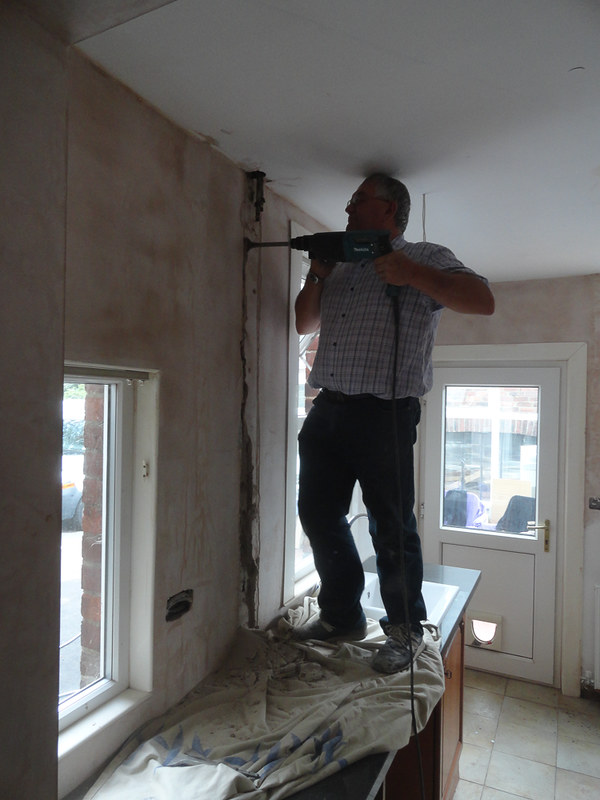
Well we have pipes now!
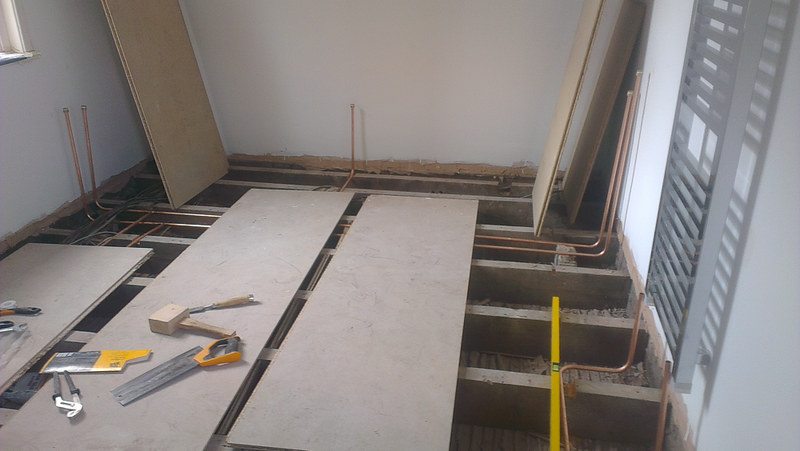
We managed to get all the hot and cold water pipes plumbed in and the central heating pipes are laid in the room, they still need to be plumbed through the wall to tie into the existing pipework, but that is pretty straightforward.
Was a bit fiddly in places, but was easier than I was expecting. I bought a pipe bender to do the turns and managed to plumb everything using just a handfull of t-pieces. Everything is capped off and pressure tested, no leaks except....

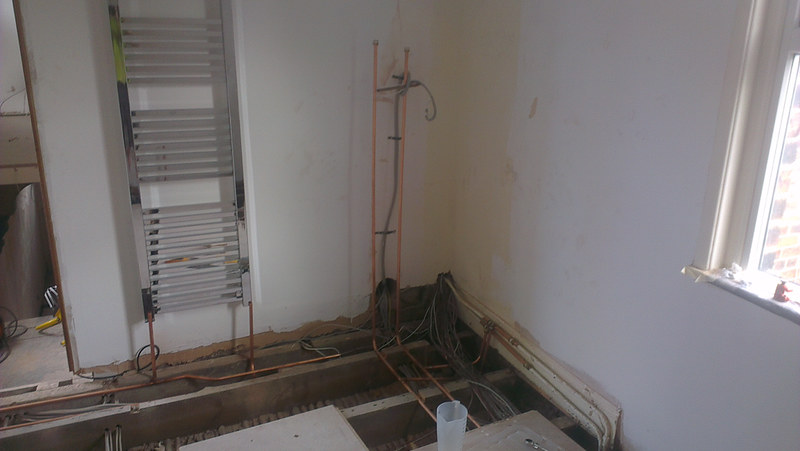
This is where we've plumbed the hot and cold in, the cold is going from the kitchen to the boiler, the hot is going from the boiler back to the kitchen. Unfortunately the old pipe is half inch and the new pipe is 15mm and although it isn't pissing water everywhere, it is weeping very slowly.
I'm on the look-out for some suitable adaptors if anyone has any bright ideas? I'll be trying to sort that out next weekend.
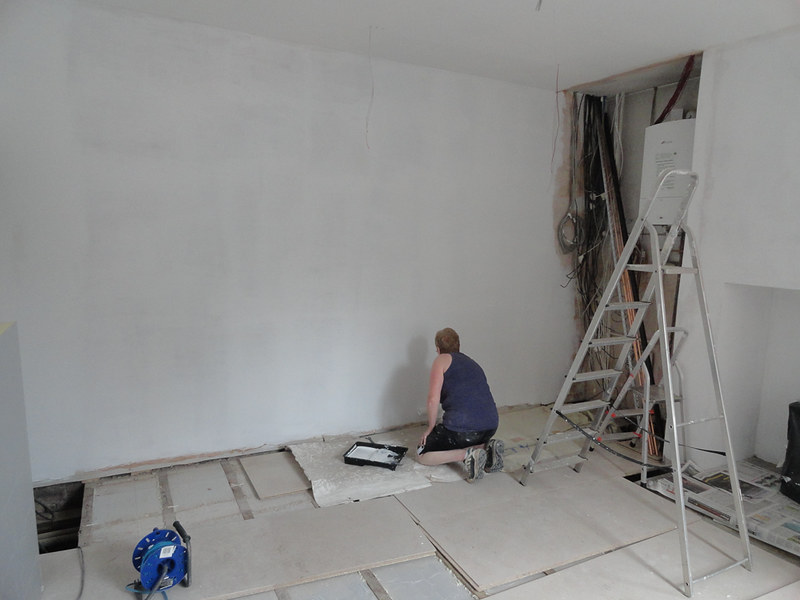
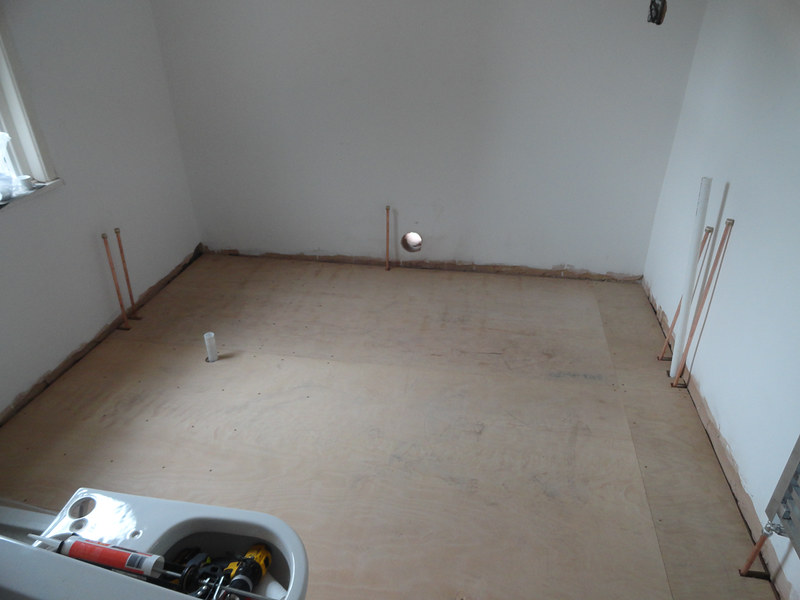
We spent today re-fitting the floorboards and doing the pipe cutouts. We've also fitted the waste pipe for bath and basin and we know what we're doing with the shower waste too. That's going to be a right faff to say the least! We also cut the boards so that the floor could come up without disturbing the shower tray, which sits on a mortar bed. This is essential for fitting as the shower tray has to go down, then the waste plumbed in with the rest of the floor up. I'll need to fit a load of noggins to make sure the shower has maximum support first too.
We've also measured up the new banister rails, step into the bathroom and a few other bits of woodwork, so that's all going to Laithes Mill near Penrith so the woodman can start getting everything together. Skirtings and architraves are being ordered this week too. I've solved the last of my issues with the new kitchen, so that should be ordered soon too.
Plasters finished downstairs this week, all looks great and my Mum is there painting for the next three days, so a lot more should be painted by my next update.
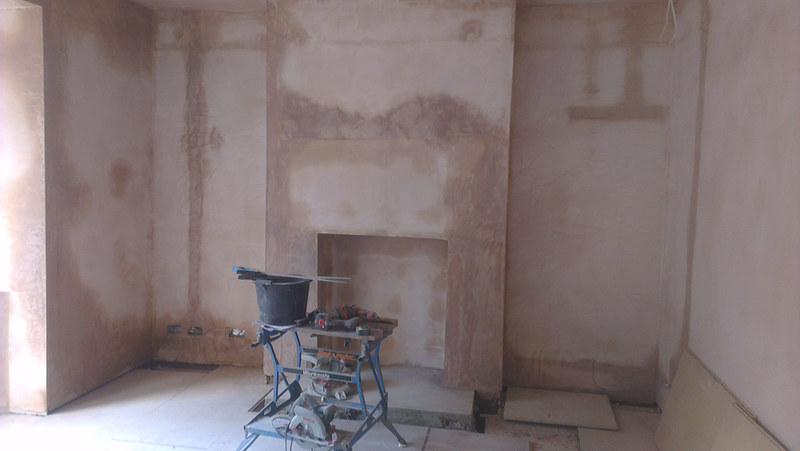
Living room chimney, looks really good:
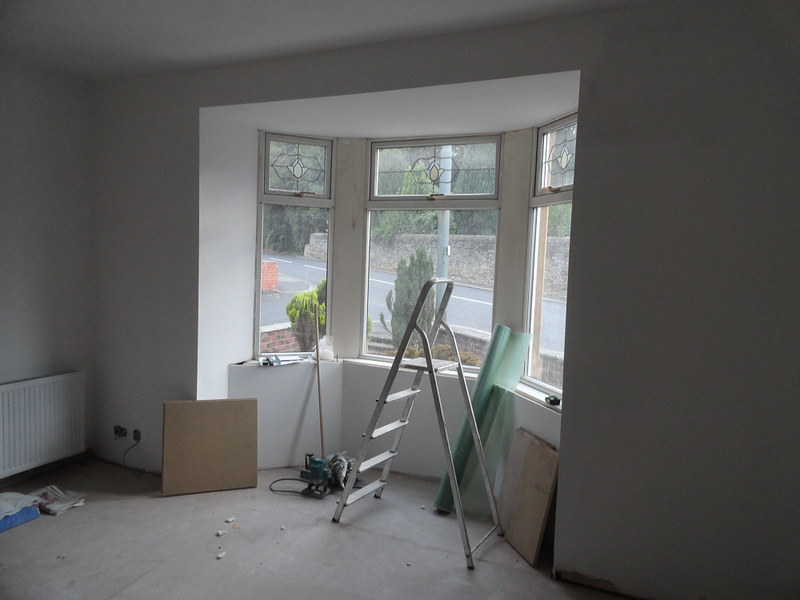
I'm particularly pleased with this, the new bay window:
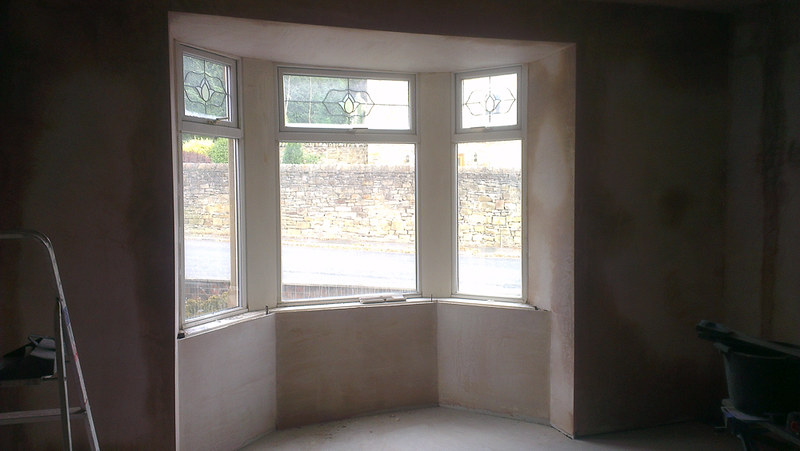
When we bought the house it was all wood panelled and looked very much like it had been added onto the room rather than being a part of the room. I've lined it with an insulated stud frame, insulated the roof, the it's all been covered with plasterboard and skim right up to the window. It looks so much better like this and I'm really happy with how it's turned out! There's an oak window sill to go on to finish it off.
Next up I've a few more plumbing jobs to do, hopefully will get all the radiators on the walls and plumbed in so we can think about leak testing the central heating. That'll get me a long way towards being able to screw the floor down. Insulation to finish downstairs too. Stud walls to go in the bathroom. Hopefully I'll have electricity in the Blacksmith's this week and then I can build a workbench.
We managed to get all the hot and cold water pipes plumbed in and the central heating pipes are laid in the room, they still need to be plumbed through the wall to tie into the existing pipework, but that is pretty straightforward.
Was a bit fiddly in places, but was easier than I was expecting. I bought a pipe bender to do the turns and managed to plumb everything using just a handfull of t-pieces. Everything is capped off and pressure tested, no leaks except....
This is where we've plumbed the hot and cold in, the cold is going from the kitchen to the boiler, the hot is going from the boiler back to the kitchen. Unfortunately the old pipe is half inch and the new pipe is 15mm and although it isn't pissing water everywhere, it is weeping very slowly.
I'm on the look-out for some suitable adaptors if anyone has any bright ideas? I'll be trying to sort that out next weekend.
We spent today re-fitting the floorboards and doing the pipe cutouts. We've also fitted the waste pipe for bath and basin and we know what we're doing with the shower waste too. That's going to be a right faff to say the least! We also cut the boards so that the floor could come up without disturbing the shower tray, which sits on a mortar bed. This is essential for fitting as the shower tray has to go down, then the waste plumbed in with the rest of the floor up. I'll need to fit a load of noggins to make sure the shower has maximum support first too.
We've also measured up the new banister rails, step into the bathroom and a few other bits of woodwork, so that's all going to Laithes Mill near Penrith so the woodman can start getting everything together. Skirtings and architraves are being ordered this week too. I've solved the last of my issues with the new kitchen, so that should be ordered soon too.
Plasters finished downstairs this week, all looks great and my Mum is there painting for the next three days, so a lot more should be painted by my next update.
Living room chimney, looks really good:
I'm particularly pleased with this, the new bay window:
When we bought the house it was all wood panelled and looked very much like it had been added onto the room rather than being a part of the room. I've lined it with an insulated stud frame, insulated the roof, the it's all been covered with plasterboard and skim right up to the window. It looks so much better like this and I'm really happy with how it's turned out! There's an oak window sill to go on to finish it off.
Next up I've a few more plumbing jobs to do, hopefully will get all the radiators on the walls and plumbed in so we can think about leak testing the central heating. That'll get me a long way towards being able to screw the floor down. Insulation to finish downstairs too. Stud walls to go in the bathroom. Hopefully I'll have electricity in the Blacksmith's this week and then I can build a workbench.
Dunno, my Dad has always used PTFE on compression fittings, so I have too. What's it for if not for putting on the threads of plumbing fittings?
Another plumber has advised that they would just wrap PTFE around the 15mm olive, but I presume using the half inch olive will be the better fix, so I've ordered some.
Thanks.
Another plumber has advised that they would just wrap PTFE around the 15mm olive, but I presume using the half inch olive will be the better fix, so I've ordered some.
Thanks.
The tape is for sealing a pipe fitting thread where the thread is the seal. In the case of compression fittings the olive makes the seal, not the thread so don't use it on compression fitting threads, you need the thread to be free and clean so it can exert the correct force on the olive.
herewego said:
You just need 1/2" olives for the 1/2" pipe and 15mm olives for the 15mm pipe. The 15mm fitting serves both. I've never seen anyone use PTFE tape in compression fittings before. What is that about?
Never heard of a 1/2" imperial olive before, I'd try taking the PTFE tape off the thread and then turning the nut 1 1/4 turns to see if you get a better compression onto the imperial pipe. I've found some half inch olives on eBay, so they are real!
I'll let my Dad know about the PTFE tape, is it detrimental to the seal, or just not necessary?
Plan of attack is to remove PTFE tape and see if that works. Then add ptfe tape to the olive and see if that works, then either a soldered connector or a half inch olive.
I'll let my Dad know about the PTFE tape, is it detrimental to the seal, or just not necessary?
Plan of attack is to remove PTFE tape and see if that works. Then add ptfe tape to the olive and see if that works, then either a soldered connector or a half inch olive.
Right, big update for you because, a) last week I was too busy to update the thread and b) we cracked on over the weekend!
On the leaking joints; I fixed them with the PTFE tape no problems. But I remove PTFE tape as advised from the other joints when I redid them and they leaked instead. Annoying! When my Dad redid them this weekend he got them sorted, all good to go.
However...... he also dislodged some dirt in the box section that those pipes run through in the kitchen, which then bridged the gap between the pipes and the box, which then caused two damp patches in the fresh plaster. Also annoying. Except that it identified a leak that had been going on for a while and we were able to sort that out, dodgy connections hidden away:
Exploratory hole:

Creating a mess:
Pipes bent and dropped down:
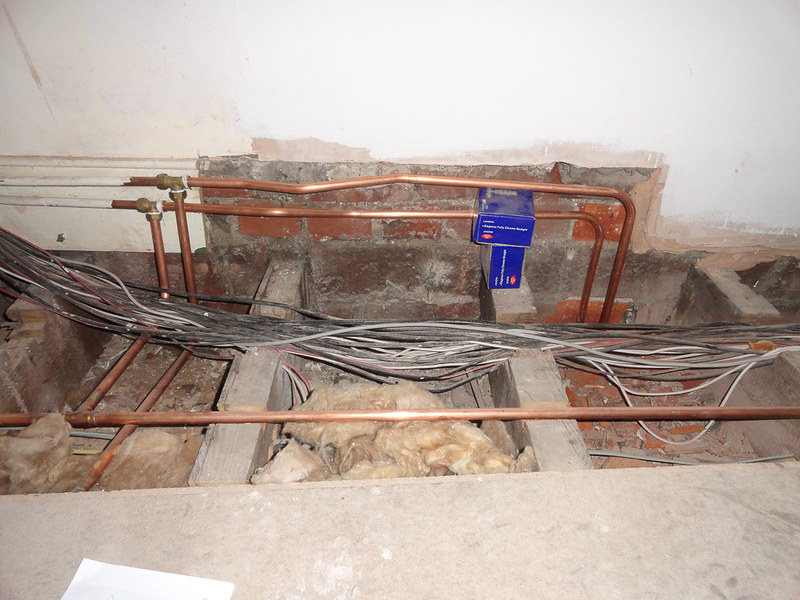
Pipes recessed into the wall and wrapped in vapour barrier:
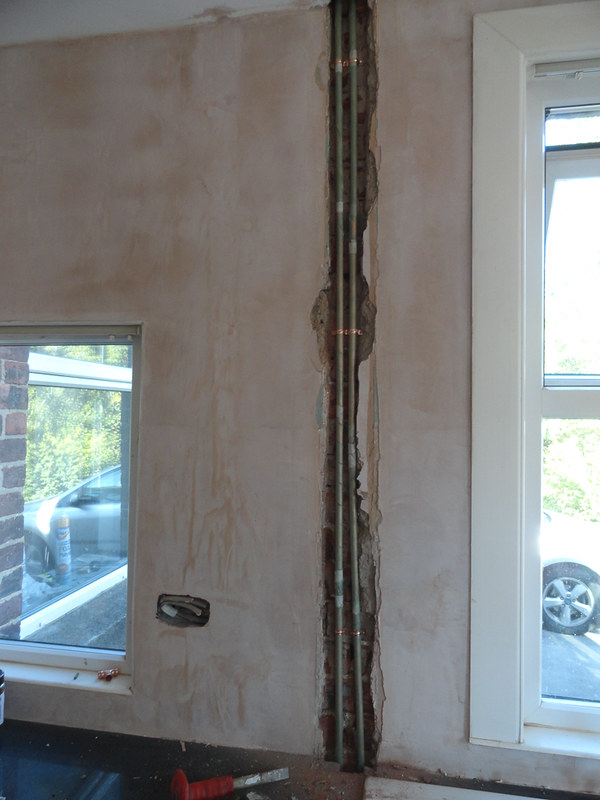
Cemented in place ready for a plaster skim:

So the box is gone too, which neatens things up and solves a problem I was going to have down the line. I figured it was easier to recess than to rebuild the box and to then do the fiddly tiling around it. When we sort the kitchen the worktop will be trimmed and slid left as at present the conservatory door doesn't open fully. The pipes would have made that job harder, but that's sorted. I can cut a piece of the off-cut to fill the hole left in the worktop as the best solution with that, though that was inevitable given the problem with the worktop length.
Central heating is in and working! We plumbed up all the radiators, leak tested, fixed a few leaks and then refilled and ran it up to temperature. It heats up extremely quickly and the house was boiling in no time, really impressed with it and no risk of being cold in the winter with that and the two wood burners. Need to drain, remove a few rads when the finished floor goes down, refit, flush and add inhibitors and then balance the radiators when the TRVs are on. That can wait.

I jacked up the dining room floor on scaffold planks so that a rotten cross member could be replaced. Now the floor has no bounce!
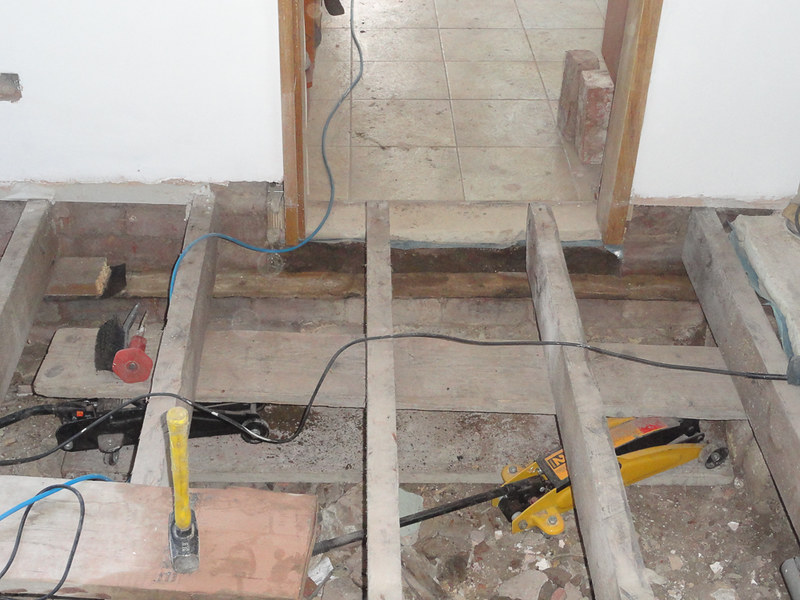
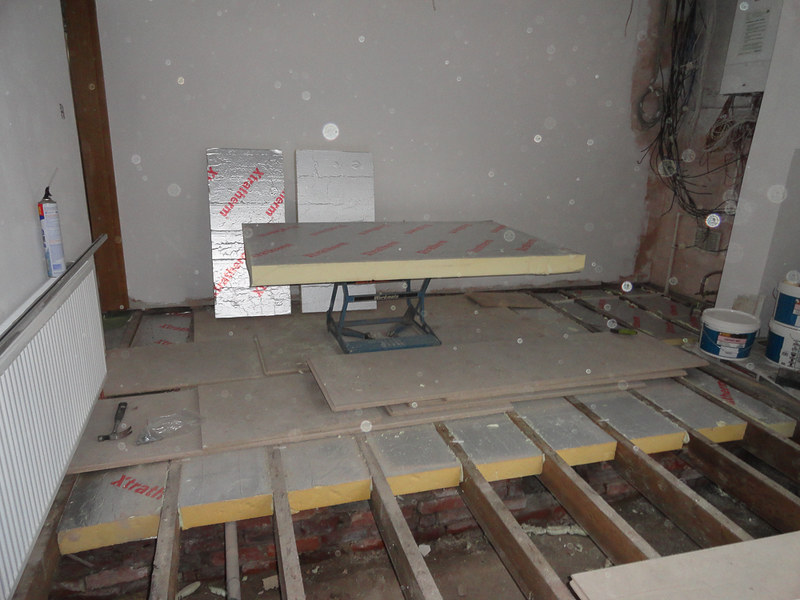
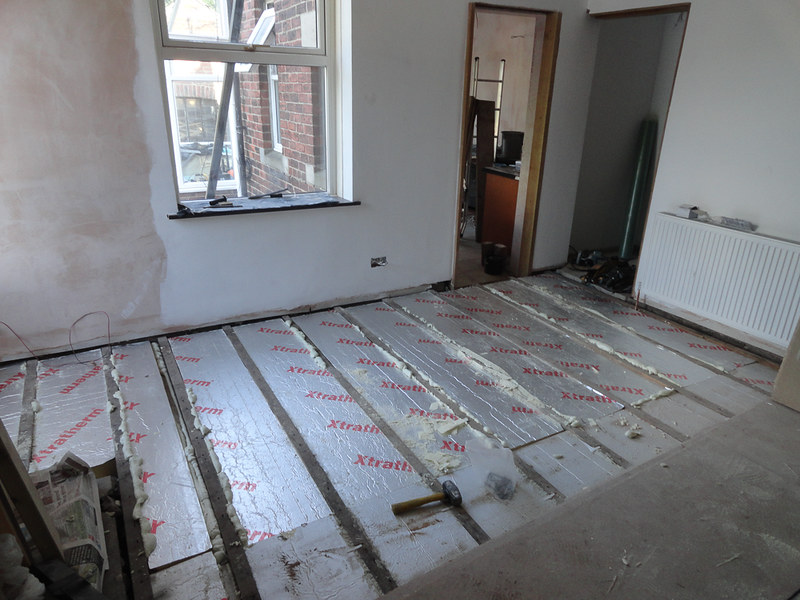
Insulation is finished in the downstairs floor. I decided to bin-off the special clips that I had been using and just prop each board on 4 nails while the expanding foam set and glued the boards in place. Can't believe I persevered with the clips, it took me an entire day messing with the first half of the dining room, but I had it all finished in about 90 minutes without having to rout slots and mess about. Maybe I got quicker at it too as I got the technique for sizing the cuts right.
Ready to go:
Done and ready for the floor:
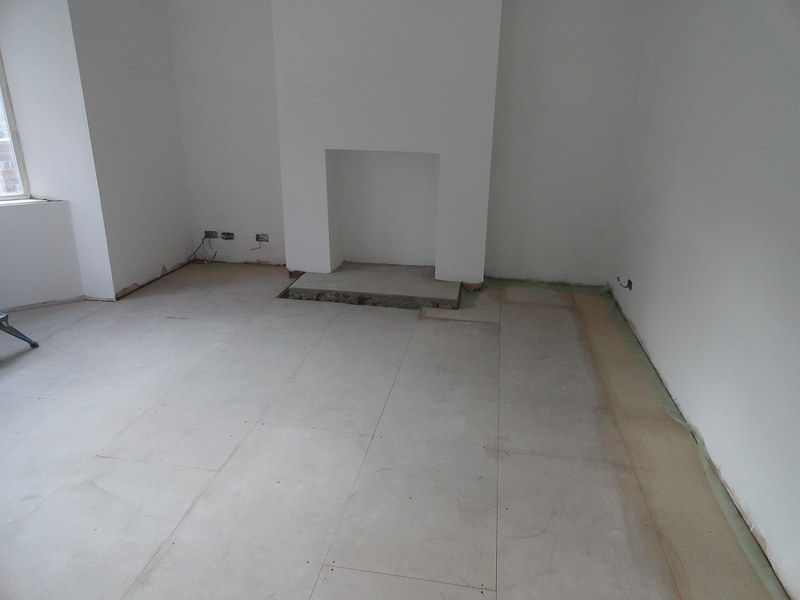
After leak-testing the plumbing there was nothing stopping the floor downstairs going down, so we got that screwed and glued as well. All done except for two boards to cut in the hallway and a strip of boards in the dining room (I needed to drive back to Manchester and was falling asleep at the saw by this point!)
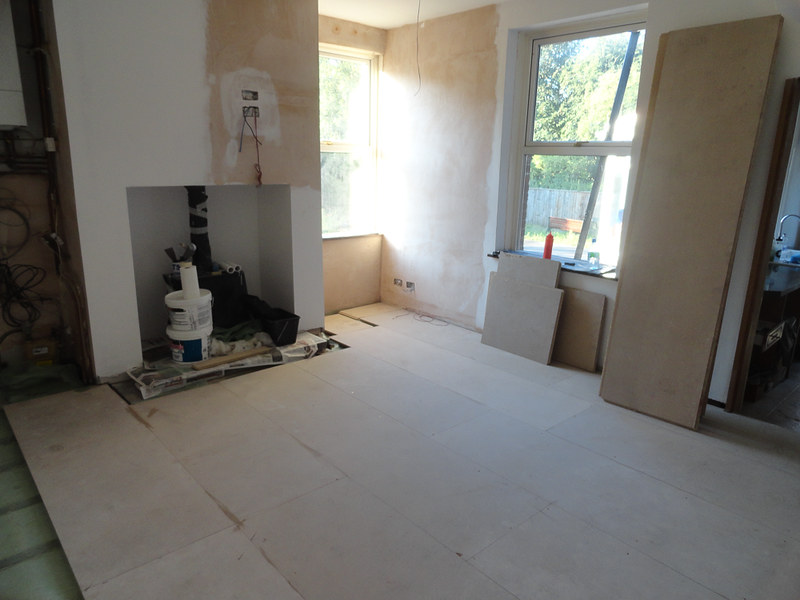
Living room, you can see the fresh cut boards vs the dirty ones!
Dining room nearly finished:
It's amazing how much stiffer the floor is than the boards we lifted, it's absolutely rock solid, really impressed with it!
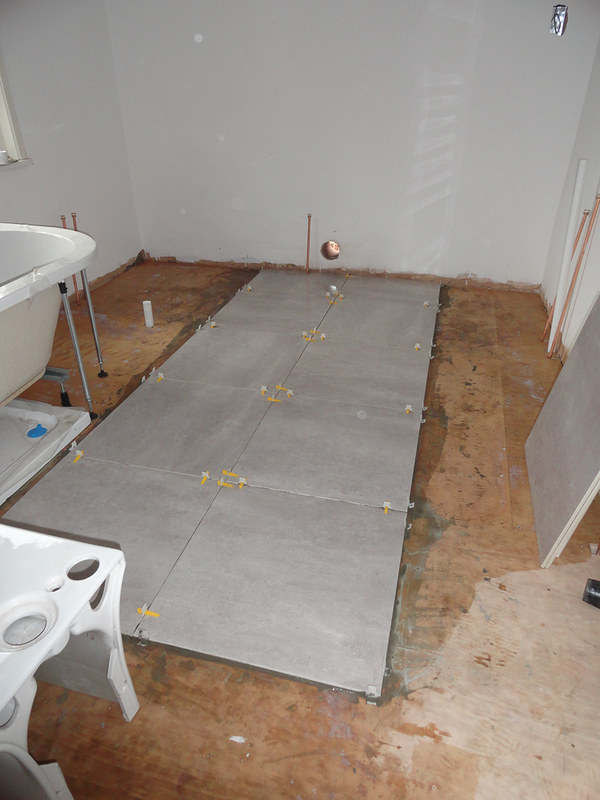
We also made good progress in the bathroom and hopefully most of the suite will be going in next weekend:
You can see right through the wall! (Twin brick, no cavity.)

Boards are screwed and glued as much as can be. The missing section is to allow the fitting and subsequent plumbing of the shower tray. Once the wastes are all solvent welded together the rest of the floor goes down.

I've still not sorted out a vanity unit, so I'll have to make a frame to support the sink and taps we do have so that we have the sink working in there. Might be a while before the vanity unit happens as the prices quoted mean I can get my carpenter to do bespoke from Oak to match the rest of the wood going in.
Painting continued at a pace, most of the house is now two coated in matt white, so you have to be careful to avoid snow-blindness. My Mum is there this week finishing off ceilings and a few walls that haven't been done yet, so that should be just about done for the next update.
My last bit of news is that the electrician called round on Saturday and sorted out the Blacksmiths for me! Just a small temporary installation that'll see me right until the place is properly sorted, but it's a big step forward! Two lights and 4 double sockets:
Blocks are there to block up those entrances as I don't need them, it'll make the building more secure and it'll give me more wall to hang things off. I have all the wood I need to be able to construct my workbench, so hopefully I can get that kicked off next weekend. Plan is to hang the bench full width across one side then cut my shelves so they slide underneath. I then need some more tracks for the wall and can mount the rest of the shelves above the bench. Should hopefully get my tool cabinet delivered next weekend, which will mean I can get properly organised and start using the place for more than just storage.
So we're still roughly on target. Aiming to move in towards the end of September, though I'll need to have a chat with the Financial Director about what stuff is essential prior to moving in and what can be lived with.
On the leaking joints; I fixed them with the PTFE tape no problems. But I remove PTFE tape as advised from the other joints when I redid them and they leaked instead. Annoying! When my Dad redid them this weekend he got them sorted, all good to go.
However...... he also dislodged some dirt in the box section that those pipes run through in the kitchen, which then bridged the gap between the pipes and the box, which then caused two damp patches in the fresh plaster. Also annoying. Except that it identified a leak that had been going on for a while and we were able to sort that out, dodgy connections hidden away:
Exploratory hole:
Creating a mess:
Pipes bent and dropped down:
Pipes recessed into the wall and wrapped in vapour barrier:
Cemented in place ready for a plaster skim:
So the box is gone too, which neatens things up and solves a problem I was going to have down the line. I figured it was easier to recess than to rebuild the box and to then do the fiddly tiling around it. When we sort the kitchen the worktop will be trimmed and slid left as at present the conservatory door doesn't open fully. The pipes would have made that job harder, but that's sorted. I can cut a piece of the off-cut to fill the hole left in the worktop as the best solution with that, though that was inevitable given the problem with the worktop length.
Central heating is in and working! We plumbed up all the radiators, leak tested, fixed a few leaks and then refilled and ran it up to temperature. It heats up extremely quickly and the house was boiling in no time, really impressed with it and no risk of being cold in the winter with that and the two wood burners. Need to drain, remove a few rads when the finished floor goes down, refit, flush and add inhibitors and then balance the radiators when the TRVs are on. That can wait.
I jacked up the dining room floor on scaffold planks so that a rotten cross member could be replaced. Now the floor has no bounce!
Insulation is finished in the downstairs floor. I decided to bin-off the special clips that I had been using and just prop each board on 4 nails while the expanding foam set and glued the boards in place. Can't believe I persevered with the clips, it took me an entire day messing with the first half of the dining room, but I had it all finished in about 90 minutes without having to rout slots and mess about. Maybe I got quicker at it too as I got the technique for sizing the cuts right.
Ready to go:
Done and ready for the floor:
After leak-testing the plumbing there was nothing stopping the floor downstairs going down, so we got that screwed and glued as well. All done except for two boards to cut in the hallway and a strip of boards in the dining room (I needed to drive back to Manchester and was falling asleep at the saw by this point!)
Living room, you can see the fresh cut boards vs the dirty ones!
Dining room nearly finished:
It's amazing how much stiffer the floor is than the boards we lifted, it's absolutely rock solid, really impressed with it!
We also made good progress in the bathroom and hopefully most of the suite will be going in next weekend:
You can see right through the wall! (Twin brick, no cavity.)
Boards are screwed and glued as much as can be. The missing section is to allow the fitting and subsequent plumbing of the shower tray. Once the wastes are all solvent welded together the rest of the floor goes down.
I've still not sorted out a vanity unit, so I'll have to make a frame to support the sink and taps we do have so that we have the sink working in there. Might be a while before the vanity unit happens as the prices quoted mean I can get my carpenter to do bespoke from Oak to match the rest of the wood going in.
Painting continued at a pace, most of the house is now two coated in matt white, so you have to be careful to avoid snow-blindness. My Mum is there this week finishing off ceilings and a few walls that haven't been done yet, so that should be just about done for the next update.
My last bit of news is that the electrician called round on Saturday and sorted out the Blacksmiths for me! Just a small temporary installation that'll see me right until the place is properly sorted, but it's a big step forward! Two lights and 4 double sockets:
Blocks are there to block up those entrances as I don't need them, it'll make the building more secure and it'll give me more wall to hang things off. I have all the wood I need to be able to construct my workbench, so hopefully I can get that kicked off next weekend. Plan is to hang the bench full width across one side then cut my shelves so they slide underneath. I then need some more tracks for the wall and can mount the rest of the shelves above the bench. Should hopefully get my tool cabinet delivered next weekend, which will mean I can get properly organised and start using the place for more than just storage.
So we're still roughly on target. Aiming to move in towards the end of September, though I'll need to have a chat with the Financial Director about what stuff is essential prior to moving in and what can be lived with.
Edited by paulrockliffe on Tuesday 27th August 17:22

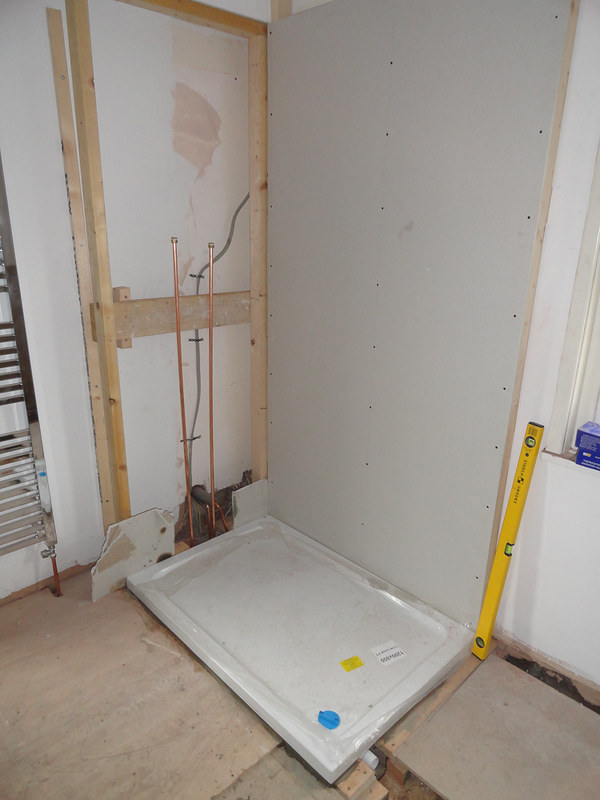
Got a good couple of days work in over the weekend, Dad came over to teach me how to do stuff and we made a good start on the bathroom.
The wastes are in under the floor, the floor is screwed and glued. And over-boarded with plywood. The studwork for the shower is in, the back is plasterboarded, the side needs a bit more plumbing to get that boarded and the shower tray has been cemented in place.
We removed the old down-spout and replaced with new stuff, with a hopper thingy to take the wastes from bath, shower and basin. Not a conventional method of plumbing, but all our drains run to the sewage drain, so it makes no difference and is the neatest way of getting everything plumbed in.

One of the benefits of working in Manchester and living in Durham is that I get a lot of thinking time, so I was able to design a washstand in my head on the way up and put it together in about 90 minutes on Saturday morning. First proper use of my Dewalt DW770 compound mitre saw, so I did a few unnecessary mitres:
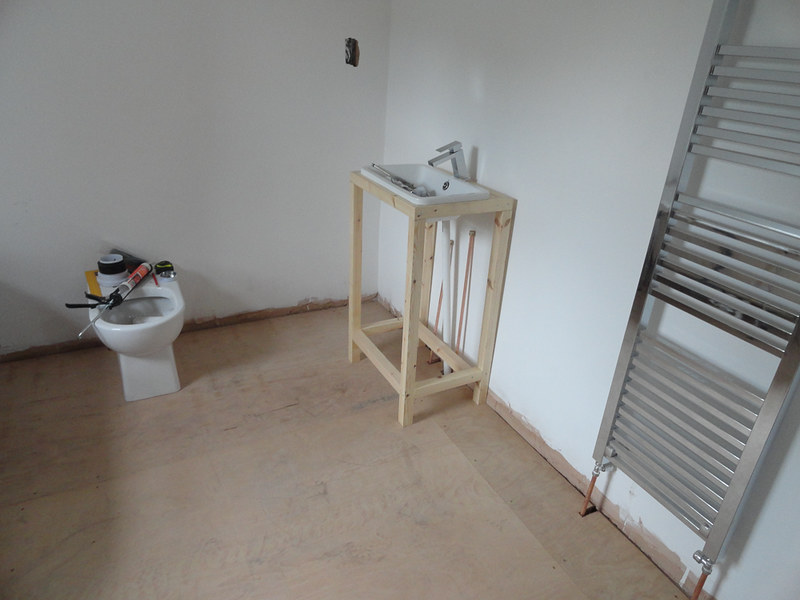
This is just a temporary solution as I've not sorted a proper stand out yet. I've brought it back to Manchester to sand and paint and I think I'm going to drop the legs a couple of inches as it's too high as it is. Very happy with it though, will look good when it's all plumbed in etc.
I spent Sunday evening working on a workbench for the Blacksmith's, progress was slow as the wall needed a few bricks trimming to get a level piece of wood on. That's screwed on and level, I've cut the sides and the next job is to get them screwed to the wall level. Then the back is to come off the wall and have the top built, then all screwed back on with a couple of joist hangers to support the front face. Sounds complicated, I'll get some pics as I'm doing it next weekend.
I've been on an adventure this evening to get wall tiles for the shower and tile adhesive for the floor tiles as that's the job for next weekend.
The wastes are in under the floor, the floor is screwed and glued. And over-boarded with plywood. The studwork for the shower is in, the back is plasterboarded, the side needs a bit more plumbing to get that boarded and the shower tray has been cemented in place.
We removed the old down-spout and replaced with new stuff, with a hopper thingy to take the wastes from bath, shower and basin. Not a conventional method of plumbing, but all our drains run to the sewage drain, so it makes no difference and is the neatest way of getting everything plumbed in.
One of the benefits of working in Manchester and living in Durham is that I get a lot of thinking time, so I was able to design a washstand in my head on the way up and put it together in about 90 minutes on Saturday morning. First proper use of my Dewalt DW770 compound mitre saw, so I did a few unnecessary mitres:
This is just a temporary solution as I've not sorted a proper stand out yet. I've brought it back to Manchester to sand and paint and I think I'm going to drop the legs a couple of inches as it's too high as it is. Very happy with it though, will look good when it's all plumbed in etc.
I spent Sunday evening working on a workbench for the Blacksmith's, progress was slow as the wall needed a few bricks trimming to get a level piece of wood on. That's screwed on and level, I've cut the sides and the next job is to get them screwed to the wall level. Then the back is to come off the wall and have the top built, then all screwed back on with a couple of joist hangers to support the front face. Sounds complicated, I'll get some pics as I'm doing it next weekend.
I've been on an adventure this evening to get wall tiles for the shower and tile adhesive for the floor tiles as that's the job for next weekend.
Gingerbread Man said:
paulrockliffe said:
I've brought it back to Manchester to sand and paint and I think I'm going to drop the legs a couple of inches as it's too high as it is.
If it helps, a basin with pedestal is normally 32" high.Thanks, we're trying to do the best we can wherever possible, but there's a few big jobs that we haven't looked at that might make a big difference. Would love to get the cavity walls insulated, but it's probably going to be too much cash for us at the moment with everything else we've got going on. Eventually the roof will want insulating properly too, but that'll be part of a loft conversion hopefully.
Spent two days working at the weekend, but popped out to see our five year old Nephew make his football debut (scored the winner!), so didn't get a great deal done on Saturday. I had intended to finish plumbing the shower valves and get the other plasterboard wall up, but I'd bought the wrong connectors and when I realised B&Q didn't open until 10 on Sunday I decided to do something else instead.
Whenever I start a new job it always involves a good bit of thinking time and you always lose a lot of time the first time round making sure you're doing things right etc, so not many pics for this week.
I started off by finishing screwing down the ply in the bathroom, then sealing with PVA. While that was drying I popped outside to carry on with my workbench. I've mounted and levelled a beam around the outside of the span, then cut 5 cross supports to length. Then I removed the beam from the wall, screwed and glued the cross supports to the beam, then screwed the front beam on. Next up the whole thing was lifted into place (Heavy!) and sat on a couple of workstands while it was rescrewed to the wall and the front beam was fixed with a pair of joist hangers.
Does that make sense? Anyway, next I cut two large sheets of 18mm ply to size and dropped those in so it looks like this:
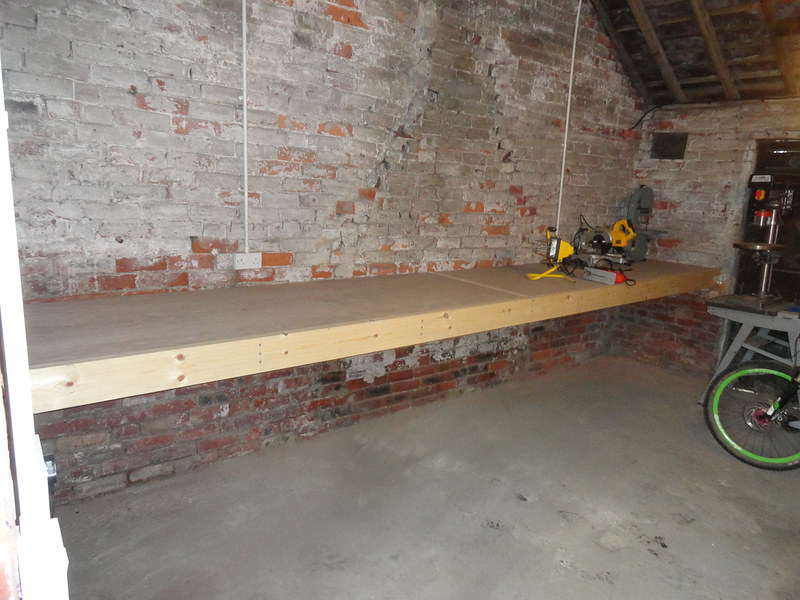
There's surprisingly little deflection across the span and you could easily work with it as it is. I'll be putting a centre support in to stiffen it up a bit though. It does need the ply lifting out and adjusting a bit as the bench isn't perfectly square due to the constraints of working in a bent building. Once I've done that it needs the ply fixing in, a little filler and varnishing. Will need a vice fitting too. Not sure how best to fix the ply, I'd normally glue for a better working surface, but the bench is semi-temporary and it would be good to be able to reuse the ply when the time comes, so I might screw it.
Storage under the bench will probably come from the shelving that was in the workshop when I bought the place, but cut down to height. I don't know what to do about shelving above though as I deliberately made the bench very deep so any shelving on that wall will be a pain to get to.
Anyway, by this time the PVA was dry and I was back inside laying out tiles. The bathroom floor is 60 x 60 Epsilon Perla tiles from betterbathrooms.com. I'm doing the shower back and side in the same but the 60 x 30 ones. Plan is then to do the back wall where the toilet is in something bright (loads of samples coming..) and then the two side walls will be tiled in the same style of tile as the back, but in white. Walls that are tiles will be done to the height of the shower screen and the rest painted in either a white or a colour that goes with the bright tiles.
The tile layout was fairly straightforward; because of the layout I can absorb any small bits easily, but in the end there wasn't too much to worry about. Normally you'd lay from the centre of the room with an even gap around the room to fill, however this would mean just under 30cm strip running from the doorway which wouldn't look very good, but you can't see the run at the opposite side. Running a full tile by the door means trimming 15cm off the tiles that are at the far end of the room, but these aren't obvious because of the toilet bath and cabinet.
I decided the best bet was to tile out from the doorway with full-sized tiles. Highly unconventional, but it will work as there's only 3 tiles before they hit the cabinet on the side and a thick skirting board over the top, so easy enough to ensure the tiles don't go out of line further up. If there was a problem, the tiles could be cut and any gap wouldn't be visible.
The only bit I'm not entirely happy with is that I'll be left with a 5cm strip of tile running up to the shower tray. It'll look fine, but it's annoyed me because I was talked out of getting a 900 deep shower tray, which would have left me trimming the last tile to fit and no narrow strip. Oh well. The rest of the tiles fit well and will work well with the door threshold/oak step that's being made as we speak.
I managed to get two rows down, including cutting two end tiles and notching for the toilet water supply. I've got a £10 eBay wet tile cutter which made the cuts a doddle! Best £10 I've ever spent I think, just eclipsing the £16 Black and Decker Workmate!
This was a job I wasn't really looking forward to because it requires skill as well as knowledge. So far I've been just using knowledge, which is all over the internet. However I found it pretty straightforward in the end. I dry laid the two tiles for the doorway to get the first tile in that pic in the right place, then worked from there before removing the doorway tiles. The tiles in the doorway sit over the oak step to give a seamless entrance, so they can't go down for a few more weeks yet.
The tiles were easy to get level and get the corners lined up, I used the wedge system that B&Q sells to make sure, but I don't think it was really necessary or that it did much with such heavy tiles. Maybe it'll help minimise movement as the adhesive sets? I think one tile is a tiny bit low at one corner, but it's underneath the toilet, so no problems. All the grout lines look the same width and perfectly lined up! Having said that, I'll wait until I've checked them after the adhesive has set before signing the job off as a success!
Next weekend I should get the rest of the tiles down and the shower fixed and possibly tiled too. Hopefully I can et sign-off on the wall tiles and get those delivered and on the wall the following weekend, which will let me plumb in the toilet and fit the bath.
I sanded and painted up my washstand during the week. It's only temporary so I used the cheapest non-hideous B&Q paint, but I think it looks great:
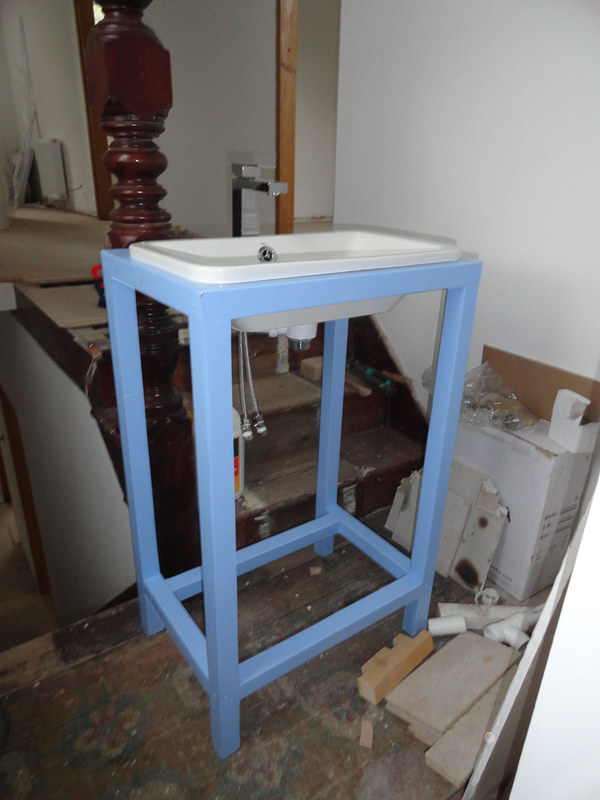
The tap is fitted and the basin sat-in, the basin will likely need a bead of silicone round it, but apart from that it's ready to plumb in and fix to the wall.
The girlfriend finished painting the ceilings, but I've stopped taking pictures of white walls now, but she did get rid of the hideous green on the archway:
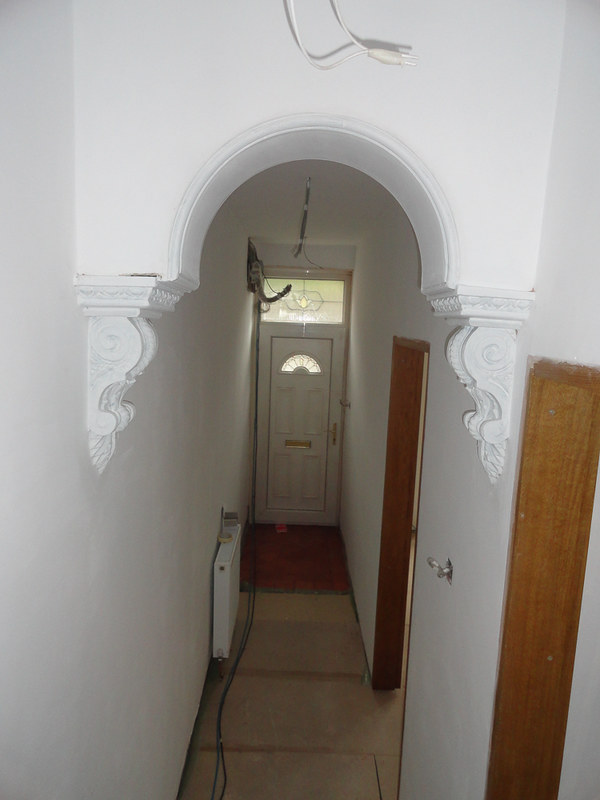
It needs some filling and sanding and a few more coats, but looks loads better now!
Hopefully the oak floor will be ordered this week, I'm nearly ready to order coving and the hearth has been ordered. Once that's tiled the stove can go in, and the living room will start coming together.
More next week........
Spent two days working at the weekend, but popped out to see our five year old Nephew make his football debut (scored the winner!), so didn't get a great deal done on Saturday. I had intended to finish plumbing the shower valves and get the other plasterboard wall up, but I'd bought the wrong connectors and when I realised B&Q didn't open until 10 on Sunday I decided to do something else instead.
Whenever I start a new job it always involves a good bit of thinking time and you always lose a lot of time the first time round making sure you're doing things right etc, so not many pics for this week.
I started off by finishing screwing down the ply in the bathroom, then sealing with PVA. While that was drying I popped outside to carry on with my workbench. I've mounted and levelled a beam around the outside of the span, then cut 5 cross supports to length. Then I removed the beam from the wall, screwed and glued the cross supports to the beam, then screwed the front beam on. Next up the whole thing was lifted into place (Heavy!) and sat on a couple of workstands while it was rescrewed to the wall and the front beam was fixed with a pair of joist hangers.
Does that make sense? Anyway, next I cut two large sheets of 18mm ply to size and dropped those in so it looks like this:
There's surprisingly little deflection across the span and you could easily work with it as it is. I'll be putting a centre support in to stiffen it up a bit though. It does need the ply lifting out and adjusting a bit as the bench isn't perfectly square due to the constraints of working in a bent building. Once I've done that it needs the ply fixing in, a little filler and varnishing. Will need a vice fitting too. Not sure how best to fix the ply, I'd normally glue for a better working surface, but the bench is semi-temporary and it would be good to be able to reuse the ply when the time comes, so I might screw it.
Storage under the bench will probably come from the shelving that was in the workshop when I bought the place, but cut down to height. I don't know what to do about shelving above though as I deliberately made the bench very deep so any shelving on that wall will be a pain to get to.
Anyway, by this time the PVA was dry and I was back inside laying out tiles. The bathroom floor is 60 x 60 Epsilon Perla tiles from betterbathrooms.com. I'm doing the shower back and side in the same but the 60 x 30 ones. Plan is then to do the back wall where the toilet is in something bright (loads of samples coming..) and then the two side walls will be tiled in the same style of tile as the back, but in white. Walls that are tiles will be done to the height of the shower screen and the rest painted in either a white or a colour that goes with the bright tiles.
The tile layout was fairly straightforward; because of the layout I can absorb any small bits easily, but in the end there wasn't too much to worry about. Normally you'd lay from the centre of the room with an even gap around the room to fill, however this would mean just under 30cm strip running from the doorway which wouldn't look very good, but you can't see the run at the opposite side. Running a full tile by the door means trimming 15cm off the tiles that are at the far end of the room, but these aren't obvious because of the toilet bath and cabinet.
I decided the best bet was to tile out from the doorway with full-sized tiles. Highly unconventional, but it will work as there's only 3 tiles before they hit the cabinet on the side and a thick skirting board over the top, so easy enough to ensure the tiles don't go out of line further up. If there was a problem, the tiles could be cut and any gap wouldn't be visible.
The only bit I'm not entirely happy with is that I'll be left with a 5cm strip of tile running up to the shower tray. It'll look fine, but it's annoyed me because I was talked out of getting a 900 deep shower tray, which would have left me trimming the last tile to fit and no narrow strip. Oh well. The rest of the tiles fit well and will work well with the door threshold/oak step that's being made as we speak.
I managed to get two rows down, including cutting two end tiles and notching for the toilet water supply. I've got a £10 eBay wet tile cutter which made the cuts a doddle! Best £10 I've ever spent I think, just eclipsing the £16 Black and Decker Workmate!
This was a job I wasn't really looking forward to because it requires skill as well as knowledge. So far I've been just using knowledge, which is all over the internet. However I found it pretty straightforward in the end. I dry laid the two tiles for the doorway to get the first tile in that pic in the right place, then worked from there before removing the doorway tiles. The tiles in the doorway sit over the oak step to give a seamless entrance, so they can't go down for a few more weeks yet.
The tiles were easy to get level and get the corners lined up, I used the wedge system that B&Q sells to make sure, but I don't think it was really necessary or that it did much with such heavy tiles. Maybe it'll help minimise movement as the adhesive sets? I think one tile is a tiny bit low at one corner, but it's underneath the toilet, so no problems. All the grout lines look the same width and perfectly lined up! Having said that, I'll wait until I've checked them after the adhesive has set before signing the job off as a success!
Next weekend I should get the rest of the tiles down and the shower fixed and possibly tiled too. Hopefully I can et sign-off on the wall tiles and get those delivered and on the wall the following weekend, which will let me plumb in the toilet and fit the bath.
I sanded and painted up my washstand during the week. It's only temporary so I used the cheapest non-hideous B&Q paint, but I think it looks great:
The tap is fitted and the basin sat-in, the basin will likely need a bead of silicone round it, but apart from that it's ready to plumb in and fix to the wall.
The girlfriend finished painting the ceilings, but I've stopped taking pictures of white walls now, but she did get rid of the hideous green on the archway:
It needs some filling and sanding and a few more coats, but looks loads better now!
Hopefully the oak floor will be ordered this week, I'm nearly ready to order coving and the hearth has been ordered. Once that's tiled the stove can go in, and the living room will start coming together.
More next week........
Thanks, yes that's my Dad's influence I think. We're able to do everything to a very high spec because we're not paying someone else to do the work for us, so I get to have all the woodwork machined from oak trees at a little sawmill near Penrith rather than having Travis Perkins send me MDF skirtings to paint etc. (also it's the only way I'll get a budget signed off for the workshop to be done to the spec I'm aiming for...)
To keep motivated and pushing things forward I'm treating it as a second job, every time I get tired and have a strop because the walls aren't square or the floors aren't level I think about how much I'd have had to pay a professional to do the work and focus on what I'm going to do with the savings when I'm finished (Westfield...?)
I don't think I've done any jobs yet where I think I would have preferred someone else to just do them, I'd rather have done it myself and learned something. Only complaint is really that I can't spend enough time working each week because I'm away during the week so it's taken longer than hoped to get to where we are. Once we're moved in I think the pace will slow a bit because I need to get back out on my bike at the weekends.
Just had word that the skirting boards are being delivered this afternoon and that the newel posts and banister rails will be ready next Friday. Really looking forward to the skirting, it's 7" x 1" oak to match the doors with a slightly modified ogee profile. Should look fantastic!
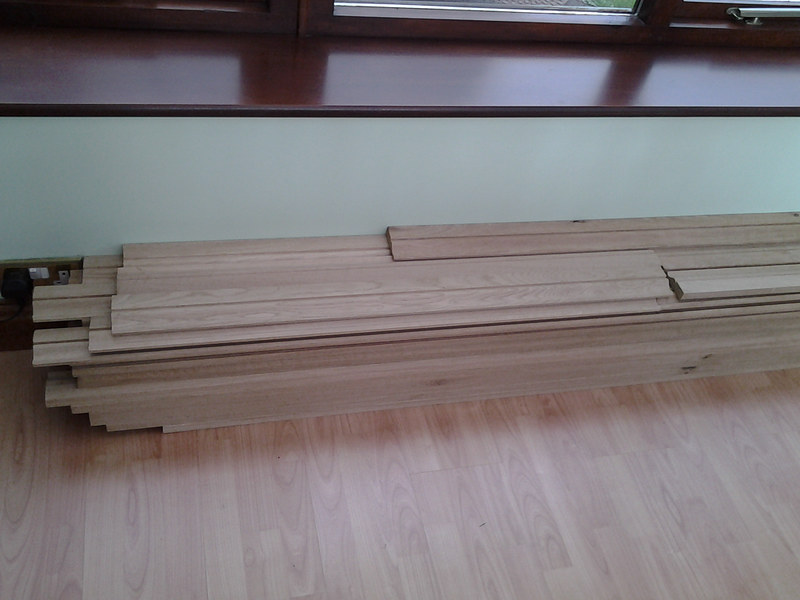
Here it is! Lovely English Oak!
Skirting Boards:
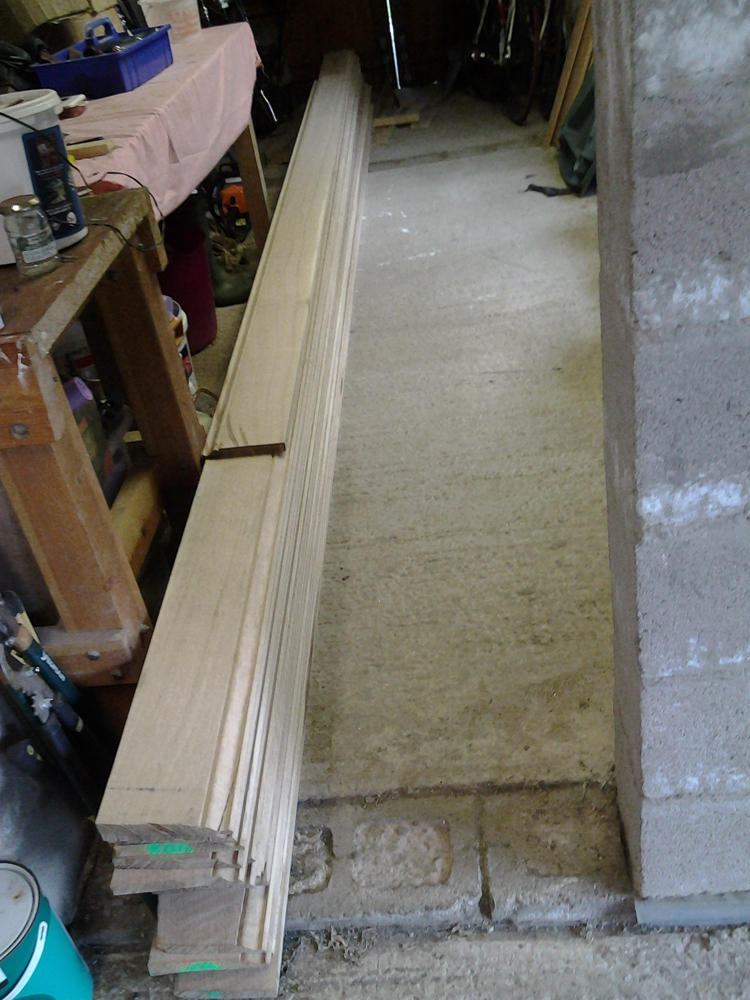
Architraves:
The skirtings have been supplied in 5m lengths ready to be cut to length. Someone on a different thread told me that it wasn't possible to get lengths over 4m and they had a good reason for that, so not sure what's going on here. I asked my Dad about it and he said he was offered up to 8m in length, though that stuff was French.
Mum is staining it all ready and then I need to hire a van to go and retrieve it from the Lakes a week on Friday.
Skirting Boards:
Architraves:
The skirtings have been supplied in 5m lengths ready to be cut to length. Someone on a different thread told me that it wasn't possible to get lengths over 4m and they had a good reason for that, so not sure what's going on here. I asked my Dad about it and he said he was offered up to 8m in length, though that stuff was French.
Mum is staining it all ready and then I need to hire a van to go and retrieve it from the Lakes a week on Friday.
Gassing Station | Homes, Gardens and DIY | Top of Page | What's New | My Stuff