The ebay generator restoration thread
Discussion


More progress made yesterday, got the front panel and electrics refitted.

Also fitted new spark plugs.

Now the generator was back together I wanted try the LPG kit I removed from the EX4000, the installation is pretty simple.
To get the gas into the engine a collar which fits between carburetor and air filter has to be installed.
Gas collar, the hose goes to the regulator

Opening for gas

Stud extensions have to be used to allow for the extra thickness of the gas collar.

Gas collar fitted to intake

I had to make a plate to hold the air intake on as the stud extensions weren’t a perfect fit. Once I know it works, I’ll make something better.

I temporally fitted the gas regulator.

The regulator works by using the induction pulse to act on a diaphragm which opens a valve to let the gas flow. The pipe between the gas collar and regulator needs be kept as short as possible for best operation.
To start the engine the primer button on the regulator has to be pressed for a couple of seconds to inject some gas into the intake and the choke has to be disabled as it’ not needed for LPG.
Moment of truth, will it work?

Of course, it does (note position of fuel valve!)

Happily running a 2kw load with no problems.
Best of all with this setup, if I want to run it on petrol it’s just a case of filling the tank with petrol and re enabling the choke and it will run as before.
Only thing I don’t know is if its running rich or lean as there is no “mixture” adjustment on the regulator. I’m going on the theory it should be rich ish…
The kit was removed from a single cylinder 340cc engine and is now on a 2 cylinder 360cc engine, I’m going on the theory that it is now feeding two 180cc cylinders so should be rich?
I decided to remove the spark plugs to see if there is any clue on how its running.

The engine had been running under load for 15-20 min, the only thing I could see on the spark plug was a white coating on the negative electrode (both spark plugs the same). Apart from that there was nothing else.
Did a quick bit of googling, but couldn’t find anything definitive on how spark plugs should look when running LPG.
Next step is to try and fit the regulator properly, trouble is there isn’t much space inside the case.
Also fitted new spark plugs.
Now the generator was back together I wanted try the LPG kit I removed from the EX4000, the installation is pretty simple.
To get the gas into the engine a collar which fits between carburetor and air filter has to be installed.
Gas collar, the hose goes to the regulator
Opening for gas
Stud extensions have to be used to allow for the extra thickness of the gas collar.
Gas collar fitted to intake
I had to make a plate to hold the air intake on as the stud extensions weren’t a perfect fit. Once I know it works, I’ll make something better.
I temporally fitted the gas regulator.
The regulator works by using the induction pulse to act on a diaphragm which opens a valve to let the gas flow. The pipe between the gas collar and regulator needs be kept as short as possible for best operation.
To start the engine the primer button on the regulator has to be pressed for a couple of seconds to inject some gas into the intake and the choke has to be disabled as it’ not needed for LPG.
Moment of truth, will it work?
Of course, it does
(note position of fuel valve!)Happily running a 2kw load with no problems.
Best of all with this setup, if I want to run it on petrol it’s just a case of filling the tank with petrol and re enabling the choke and it will run as before.
Only thing I don’t know is if its running rich or lean as there is no “mixture” adjustment on the regulator. I’m going on the theory it should be rich ish…
The kit was removed from a single cylinder 340cc engine and is now on a 2 cylinder 360cc engine, I’m going on the theory that it is now feeding two 180cc cylinders so should be rich?
I decided to remove the spark plugs to see if there is any clue on how its running.
The engine had been running under load for 15-20 min, the only thing I could see on the spark plug was a white coating on the negative electrode (both spark plugs the same). Apart from that there was nothing else.
Did a quick bit of googling, but couldn’t find anything definitive on how spark plugs should look when running LPG.
Next step is to try and fit the regulator properly, trouble is there isn’t much space inside the case.
Edited by Blue32 on Sunday 2nd December 12:42
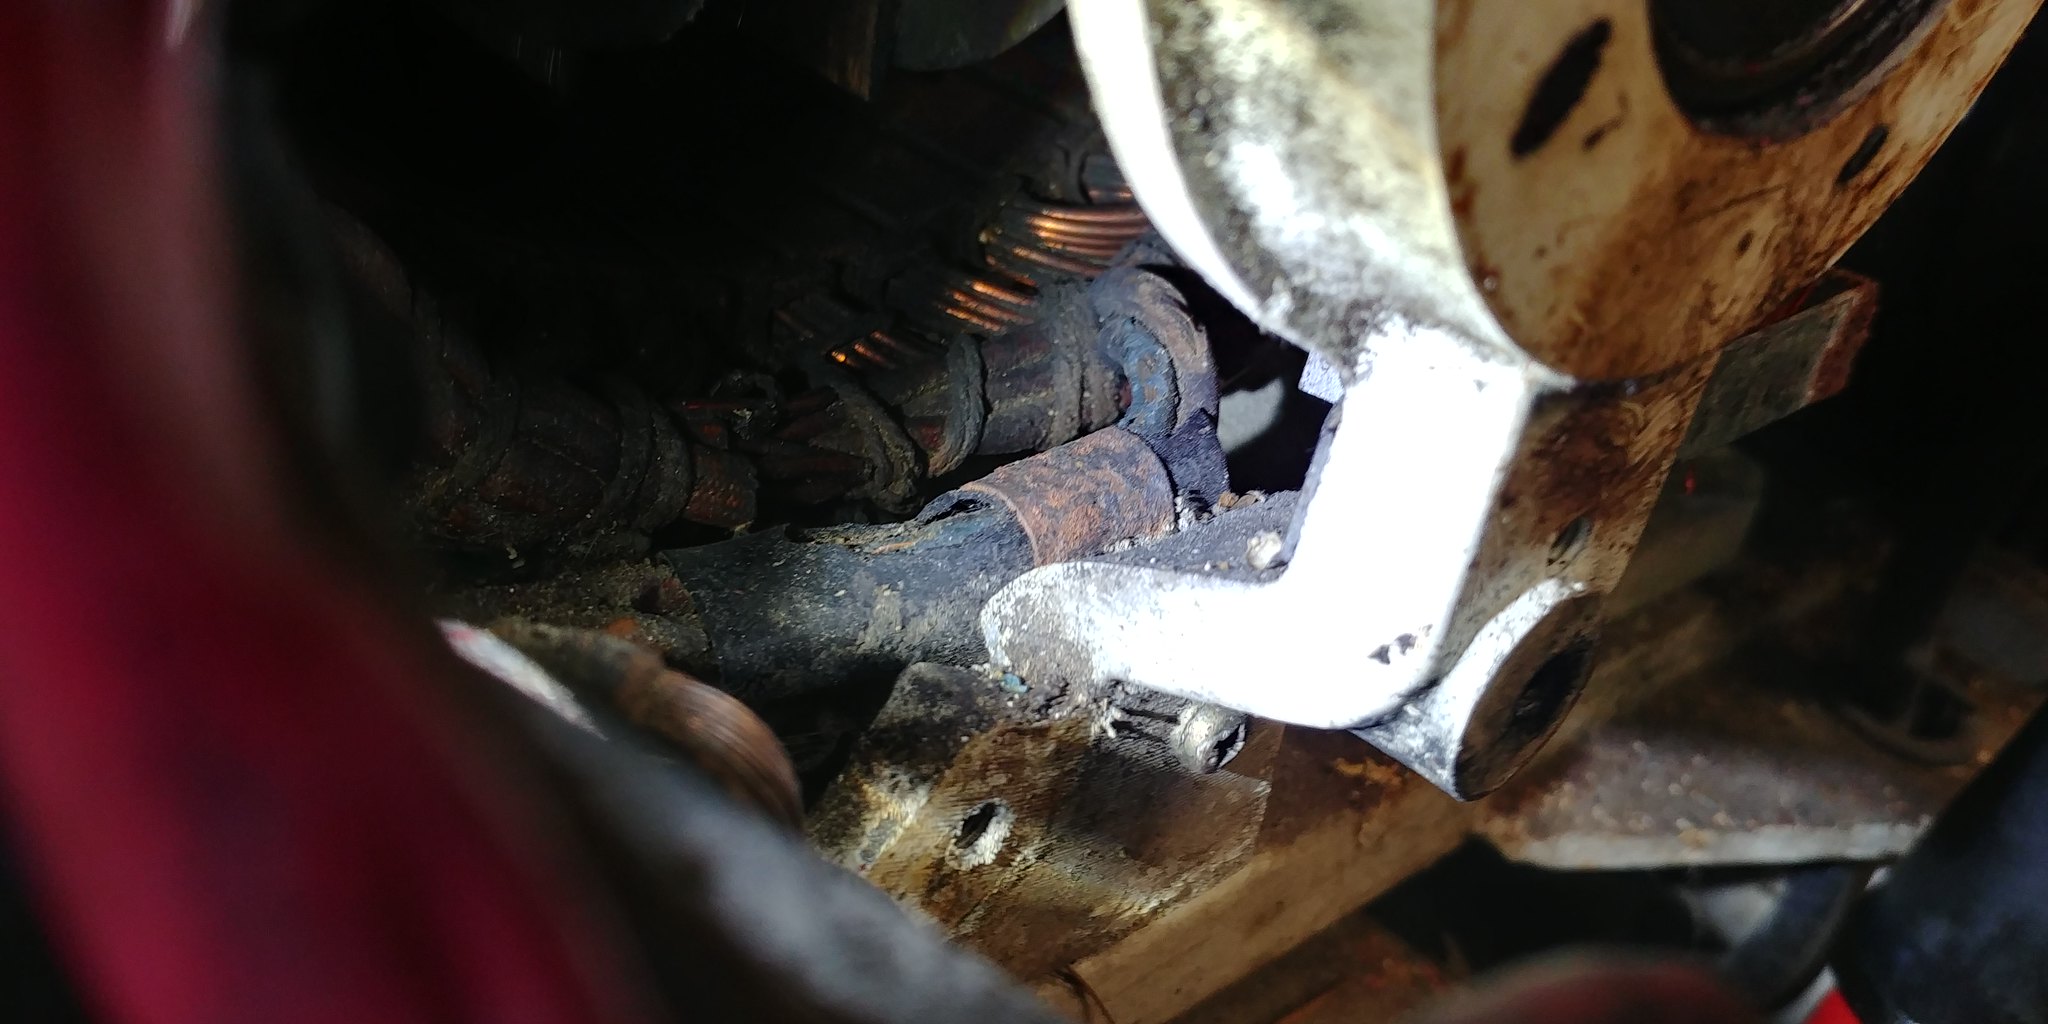
I found the gas jet, it was screwed inside a barbed hose fitting.

Jet removed, the hole in the jet is 3.4mm and is used to meter the amount of gas the engine can draw in.

Some gas conversions use an adjustable valve to control the gas flow which has the advantage it can be fine tuned while the engine is running. More on this later.
I wasn’t happy with using the gas collar as it made the intake stick out too far which was stopping the side door from being closed.
So I came up with the idea to modify the carburettor to take the gas fitting so the collar wouldn’t be needed.
I had a spare carburettor I had bought as a parts donor for the fuel shutoff valve.

The plan is to mount the gas fitting on the side something like this.

Marked where to drill the hole for the fitting


Gas fitting installed, best of all the carb will still work on petrol


Unfortunately, as I was about to fit the modified carburettor I discovered a major problem. The carburettor air passage was different to the original (right)
 [/url]
I did try fitting the modified carburettor, but the throttle butterfly was catching on the intake manifold so wouldn’t open. Oh well back to the drawing board….
Back to the gas jet.
After contacting someone who has converted a EX5500 to run on LPG I found the gas jet should be 4.4mm, so I decided to make my own jet instead of drilling out the jet I had (in case it needs fine tuning)
I started with a 9.5mm steel bar, using a die I cut a 1/8 NPT thread on the outside of the bar, I cut a small piece of the bar and clamped it between two vee bocks to hold it parallel (made these during engineering apprenticeship)

My jet vs the original

It even screws into the barbed fitting

Its not perfect as ideally it should have been made on a lathe, but I’m happy and it should work. The hole I drilled is 4.1mm, I did it this way so I can test and fine tune once it’s all fitted back on the generator.
Jet removed, the hole in the jet is 3.4mm and is used to meter the amount of gas the engine can draw in.
Some gas conversions use an adjustable valve to control the gas flow which has the advantage it can be fine tuned while the engine is running. More on this later.
I wasn’t happy with using the gas collar as it made the intake stick out too far which was stopping the side door from being closed.
So I came up with the idea to modify the carburettor to take the gas fitting so the collar wouldn’t be needed.
I had a spare carburettor I had bought as a parts donor for the fuel shutoff valve.
The plan is to mount the gas fitting on the side something like this.
Marked where to drill the hole for the fitting
Gas fitting installed, best of all the carb will still work on petrol
Unfortunately, as I was about to fit the modified carburettor I discovered a major problem. The carburettor air passage was different to the original (right)
[/url]I did try fitting the modified carburettor, but the throttle butterfly was catching on the intake manifold so wouldn’t open. Oh well back to the drawing board….
Back to the gas jet.
After contacting someone who has converted a EX5500 to run on LPG I found the gas jet should be 4.4mm, so I decided to make my own jet instead of drilling out the jet I had (in case it needs fine tuning)
I started with a 9.5mm steel bar, using a die I cut a 1/8 NPT thread on the outside of the bar, I cut a small piece of the bar and clamped it between two vee bocks to hold it parallel (made these during engineering apprenticeship)
My jet vs the original
It even screws into the barbed fitting
Its not perfect as ideally it should have been made on a lathe, but I’m happy and it should work. The hole I drilled is 4.1mm, I did it this way so I can test and fine tune once it’s all fitted back on the generator.
jet_noise said:
Story of my life.
(the getting near the end of the project and the "oh, s t" moment!)
Any reason why you can't fit the gas inlet to the original carb?
Or maybe sleeve the new 'un and swap butterflies?
Although might there be other differences - jets etc?
I didn't want to alter the original carb as they are not available any more. The risk was that if it hadn't worked the engine wouldn't run on either petrol or gas.(the getting near the end of the project and the "oh, s
t" moment!)Any reason why you can't fit the gas inlet to the original carb?
Or maybe sleeve the new 'un and swap butterflies?
Although might there be other differences - jets etc?
Fired the engine up today with the new gas fitted and loaded it up to 4kW, all appeared to be OK. The engine maintained the correct speed was spot on 50Hz, only minor issue was off load there was an occasional backfire.
I think this is due to the "wasted spark" ignition, the spark plugs fire on each revolution of the engine, instead on every 4th revolution like a car engine so i think the fuel air mix is occasionally igniting on the intake stroke.
A bit more investigation/experimentation required.....
I’m back!
New project:

The problem with this one is it has a broken rope on the pull start (pull handle and remains of rope in front of generator)
Disassembly started, nice and clean inside which makes a change

Getting closer

There we go

The old EX5500 makes a nice work bench

Unfortunately the captive nuts which hold the pull start assembly to the engine cover decided not to be captive so had to do more disassembly

Engine cover removed, now I can see what happened.

Those plastic bits in the middle of the ring with the rope should attach the ring to the to the pull start, so new parts needed.
My plan is to get it partially reassembled so I can test it makes power before I start buying parts. Also need to work on freeing up the bolts that hold the pull start to the engine cover
To be continued
New project:
The problem with this one is it has a broken rope on the pull start (pull handle and remains of rope in front of generator)
Disassembly started, nice and clean inside which makes a change
Getting closer
There we go
The old EX5500 makes a nice work bench
Unfortunately the captive nuts which hold the pull start assembly to the engine cover decided not to be captive so had to do more disassembly
Engine cover removed, now I can see what happened.
Those plastic bits in the middle of the ring with the rope should attach the ring to the to the pull start, so new parts needed.
My plan is to get it partially reassembled so I can test it makes power before I start buying parts. Also need to work on freeing up the bolts that hold the pull start to the engine cover
To be continued
Thanks for the comments everyone, its good to see there is interest in this. Sorry I haven’t been able to post much as there haven’t been many that have come up that were worthwhile buying and fixing.
I did start looking at Lawn tractors as something else to tinker with, but i just don't have the space or access to the shed/workshop to get one to where it can be worked on
On the positive side I have now got the LPG kit installed on the EX5500 now and sorted most of the bugs/running issues, I’ll get some photos and a write up done at some point.
The case seems to be the same sort of plastic as Tupperware and just sort of clips together in places. It will be interesting to see what it sounds like once its all back together, I suspect it will be running a reasonably high engine speed to achieve the rated (1.9kW)/max (2.3kW) output as its only a 96cc engine. A 2.2kW Honda (EU22i) has a 120cc engine so I suspect it will be working quite hard when compared with the Honda.
It does have some niceties like a 12v lighter socket, and it can be paralleled with another unit to get double the output.
I did start looking at Lawn tractors as something else to tinker with, but i just don't have the space or access to the shed/workshop to get one to where it can be worked on
On the positive side I have now got the LPG kit installed on the EX5500 now and sorted most of the bugs/running issues, I’ll get some photos and a write up done at some point.
eliot said:
what’s the quality like (low i suspect)
Well it’s not a Honda, that’s for sure, I think the state of the bits of plastic in the pull start says it all, but still costs £532 to buy new today! And is supposedly made in America, not sure if that’s a good thing? The case seems to be the same sort of plastic as Tupperware and just sort of clips together in places. It will be interesting to see what it sounds like once its all back together, I suspect it will be running a reasonably high engine speed to achieve the rated (1.9kW)/max (2.3kW) output as its only a 96cc engine. A 2.2kW Honda (EU22i) has a 120cc engine so I suspect it will be working quite hard when compared with the Honda.
It does have some niceties like a 12v lighter socket, and it can be paralleled with another unit to get double the output.
Bit more progress, I managed to extract the nuts from the fan housing to release the pull start. I tried spraying penetrating oil on the back of the nuts and left them to soak overnight which didn’t work.
I ended up using a drill to spin the bolt so it used friction to generate heat and melt the plastic so it would come out.

Both stuck nuts removed.

Before I went any further, I wanted to make sure the generator actually worked, so I reattached the fan housing and rigged up a temporary fuel supply (funnel pushed into fuel line)

As I couldn’t use the pull start I tried using a drill, unfortunately my battery drill didn’t have enough grunt to overcome the compression so I dug out an old Bosch 110v drill which has loads of torque and spun the engine nicely.

It worked, sorry no picture unfortunately as I couldn’t operate a camera, the drill and prevent it from sliding off the “work bench” at the same time.
Back to the fan housing, I have glued the nuts back in, hopefully it will hold.

I have also been able to source a replacement pull start unit for a reasonable £22 so I’ll get that ordered next week and hopefully everything back together by the weekend.
I ended up using a drill to spin the bolt so it used friction to generate heat and melt the plastic so it would come out.
Both stuck nuts removed.
Before I went any further, I wanted to make sure the generator actually worked, so I reattached the fan housing and rigged up a temporary fuel supply (funnel pushed into fuel line)
As I couldn’t use the pull start I tried using a drill, unfortunately my battery drill didn’t have enough grunt to overcome the compression so I dug out an old Bosch 110v drill which has loads of torque and spun the engine nicely.
It worked, sorry no picture unfortunately as I couldn’t operate a camera, the drill and prevent it from sliding off the “work bench” at the same time.
Back to the fan housing, I have glued the nuts back in, hopefully it will hold.
I have also been able to source a replacement pull start unit for a reasonable £22 so I’ll get that ordered next week and hopefully everything back together by the weekend.
Finally got the latest project back together, new pull start fitted.

On the first test run there was a horrible metallic sound coming from the top of the engine so I popped the rocker cover off and found there was massive gaps between the valves and the rocker arms.
Exhaust

Intake

The clearances should be 0.1mm for both intake and exhaust. When I measured them the exhaust was at 0.4mm and the intake was 0.3mm.
Valves correctly adjusted

No more big gaps

The engine sounded so much quieter with the valves set correctly. I suspect the original pull start failed due the out of spec clearances.
On small engines there is a sprung loaded extra lobe on the cam that slightly decompresses the engine to help with starting.
My guess is due to the big gap between the rocker and the valve the engine wasn’t been decompressed which put extra strain on the pull start.
On the first test run there was a horrible metallic sound coming from the top of the engine so I popped the rocker cover off and found there was massive gaps between the valves and the rocker arms.
Exhaust
Intake
The clearances should be 0.1mm for both intake and exhaust. When I measured them the exhaust was at 0.4mm and the intake was 0.3mm.
Valves correctly adjusted
No more big gaps
The engine sounded so much quieter with the valves set correctly. I suspect the original pull start failed due the out of spec clearances.
On small engines there is a sprung loaded extra lobe on the cam that slightly decompresses the engine to help with starting.
My guess is due to the big gap between the rocker and the valve the engine wasn’t been decompressed which put extra strain on the pull start.
I usually wade through ebay trying to find parts, if no luck and depending on how much you want to spend, this place is a good source of parts (US based though) https://www.jackssmallengines.com/manufacturer/bri...
I used them a couple of times and the parts turned up relatively quickly.
) https://www.jackssmallengines.com/manufacturer/bri...I used them a couple of times and the parts turned up relatively quickly.
kev b said:
I have followed this interesting thread since the start and now I have to ask for advice.
Honda eg3000x generator, starts and runs perfectly but the stator is shorted out. A rewind is north of £300 and spares are £600+ and unavailable anyway.
Do I just scrap it or is there anything I can do?
What makes you think the stator is shorted? Honda eg3000x generator, starts and runs perfectly but the stator is shorted out. A rewind is north of £300 and spares are £600+ and unavailable anyway.
Do I just scrap it or is there anything I can do?
Stators generally have a low resistance, for example the stator on the EX5500 shown in this thread has 2 sets of winding's, the main AC winding which is 0.26ohm and a sub winding which is 0.25ohm.
If the stator is burnt to a crisp or showing signs of blackening in the enameling or resin then it's probably toast, however when they burn out they tend to go open circuit so resistance will be very high.
Can you post some pictures?
Sounds like the main jet in the carburetor is partially blocked, the engine looks like clone of a Honda GX engine so you have 2 options.
Option 1 buy a new carburetor, somewhere on the data plate it should say the engine cc. Have a look on eBay for a Honda GX carburetor and find one for an engine that closest matches the engine cc on the data plate. It will probably be something equivalent to a GX120, GX160, GX240 (120cc, 160cc, 240cc) the carburetors are usually really cheap, somewhere between £5 - £15 and usually work straight out of the box.
Option 2, strip the carburetor down and clean the jets and internal passages, quick google for cleaning Honda GX carburetor brings up YouTube guides like this https://www.youtube.com/watch?v=uksV4JFsFc0
Looks like an interesting project, shame about the smashed pulleys but i think both are the same size. Assuming I picked the right one, according to the parts list here: https://www.lingshondaparts.com/partscatalog/catal... the engine pulley is 119mm.
Good luck with getting it going
Good luck with getting it going
Try pilling the fuel line off the carb and see whats the fuel flow is like.
looking at this https://www.lingshondaparts.com/partscatalog/catal...
there is a strainer in the pickup (item 003) which could be restricting the fuel flow.
How old is the fuel? as the little EM650 i showed earlier in the thread is quite sensitive to old fuel.
looking at this https://www.lingshondaparts.com/partscatalog/catal...
there is a strainer in the pickup (item 003) which could be restricting the fuel flow.
How old is the fuel? as the little EM650 i showed earlier in the thread is quite sensitive to old fuel.
22 said:
He lives! Welcome back OP, get some projects going already!
This thread was always strangely satisfying considering I have no understanding of such witchcraft.
Unfortunately there hasn't been any that were worthwhile working on. Also in the current climate it's probably not best to go round to strangers houses to collect generators to work on or re sell,This thread was always strangely satisfying considering I have no understanding of such witchcraft.
Heroin chic said:
finlo said:
Could it be something on the Genny side causing it to bog down?
A dead short on the output can - not sure about Honda, but I've had that on a couple of small gennys. Not common though.Do you have a multimeter?, if yes when running whats the output voltage? should be 220-230v (depending on engine speed)
If no volts it could be as suggested a short in the generator windings, if the voltage is very low or very high the capacitor which regulates the voltage cold be at fault.
This clip shows how to test https://www.youtube.com/watch?v=o2JjXp0V1Fg Obviously be careful when the engine is running as there could be hazardous voltages present (Don't zap yourself!)
Another check is to measure the resistance of the generator windings to see if there is a short. typically the generator windings have a resistance of 0.2 - 0.5 ohm (based on the ex5500).
Start by measuring the resistance of the meter leads and make a note of the reading, then measure across the generator windings at the output socket. Subtract the meter lead resistance from the reading across the output socket to get the generator winding resistance if the reading is 0 the generator windings are likely to be shot.
littlebasher said:
Had a play around today, looks like Finlo takes the prize
With the windings disconnected, the engine runs a treat. Plug them back in again, and it struggles to run at anything over like 1000rpm.
Does make some power on the 12v side when running (badly, only manages 5v)
Guess the genny side is shafted!
Unusual for a Honda alternator to fail, out all the machines i have worked on its only the cheap Chinese gennys that like to burnout alternators. With the windings disconnected, the engine runs a treat. Plug them back in again, and it struggles to run at anything over like 1000rpm.
Does make some power on the 12v side when running (badly, only manages 5v)
Guess the genny side is shafted!
Wondering if something downstream from the alternator has a problem, as if the short was in the windings unplugging shouldn't make make a difference.
Were you able to take any measurements of the windings?
I'm back
Not posted on here for a while as not had any thing interesting/different to work on.
New project collected today, It's a Honda E4000 V-twin diesel generator which I think dates from the late 60s/early 70s... Bodywork needs a bit of TLC as it fell off the back of a lorry!

Will get some more pictures/ info up when I get a chance.
To be continued...
Not posted on here for a while as not had any thing interesting/different to work on.
New project collected today, It's a Honda E4000 V-twin diesel generator which I think dates from the late 60s/early 70s... Bodywork needs a bit of TLC as it fell off the back of a lorry!
Will get some more pictures/ info up when I get a chance.
To be continued...
Harrison Bergeron said:
shtu said:
Blue32 said:
I'm back

If you're all suffering generator withdrawl symptoms, there's a whole channel for you to gorge on, https://www.youtube.com/channel/UCr_GXW2Y56hOpGchX...
https://www.youtube.com/user/SmallEngineMechanic
Now had a chance to have a bit more of a look and had it running for a short while. So far we have learnt its very heavy and not very quiet, but looks like it works (volt meter indicated 200v). There is about 1/3 tank of fuel which i think is either kerosene/heating oil or red diesel, it's a little bit smokey which i think is from the air cleaner which is an oil bath type, so when it fell over its likely the oil from the air cleaner got into the intake. Oh and did I mention its very heavy

Hopefully it doesn't need any parts as so far I have not been able to find anything for it, not even a manual. Fortunately the previous owner has found both the generator and engine manuals and is sending them to me (couldn't find them when I collected it), so hopefully I might be able to find some part numbers to search on.
The engine is a GD90 and I think is 400cc and develops around 9hp from what limited information I have found so far. I found some references to the engines been used on custom motorbikes.
Anyway some photos:
You can see the top cover is a bit bent, but should be reasonably easy to straighten out

Cover removed, all looks ok, just need a clean

Fuel filler is a a bit bent though
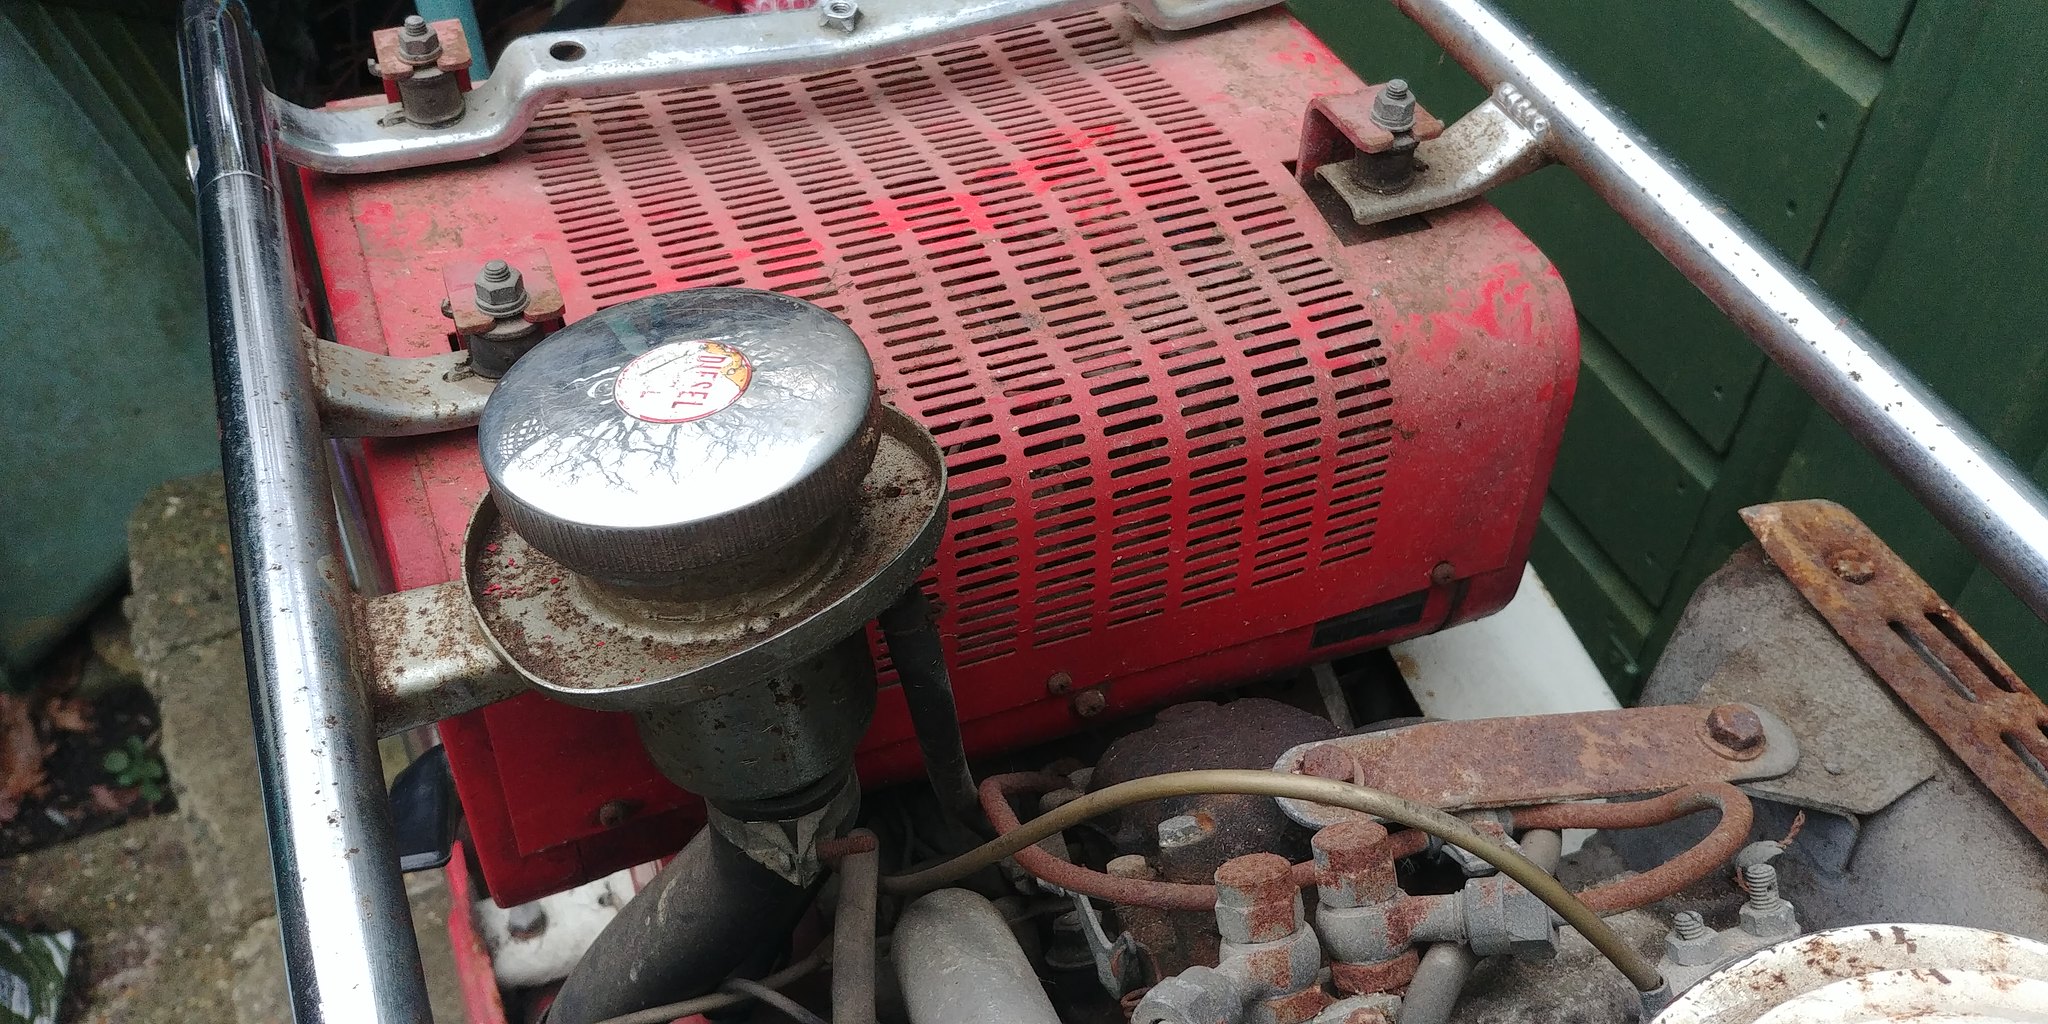
Side of engine with oil fill and drain. Found the oil filter is behind the cover where the red bullet connector is

Handy wiring schematic inside control unit
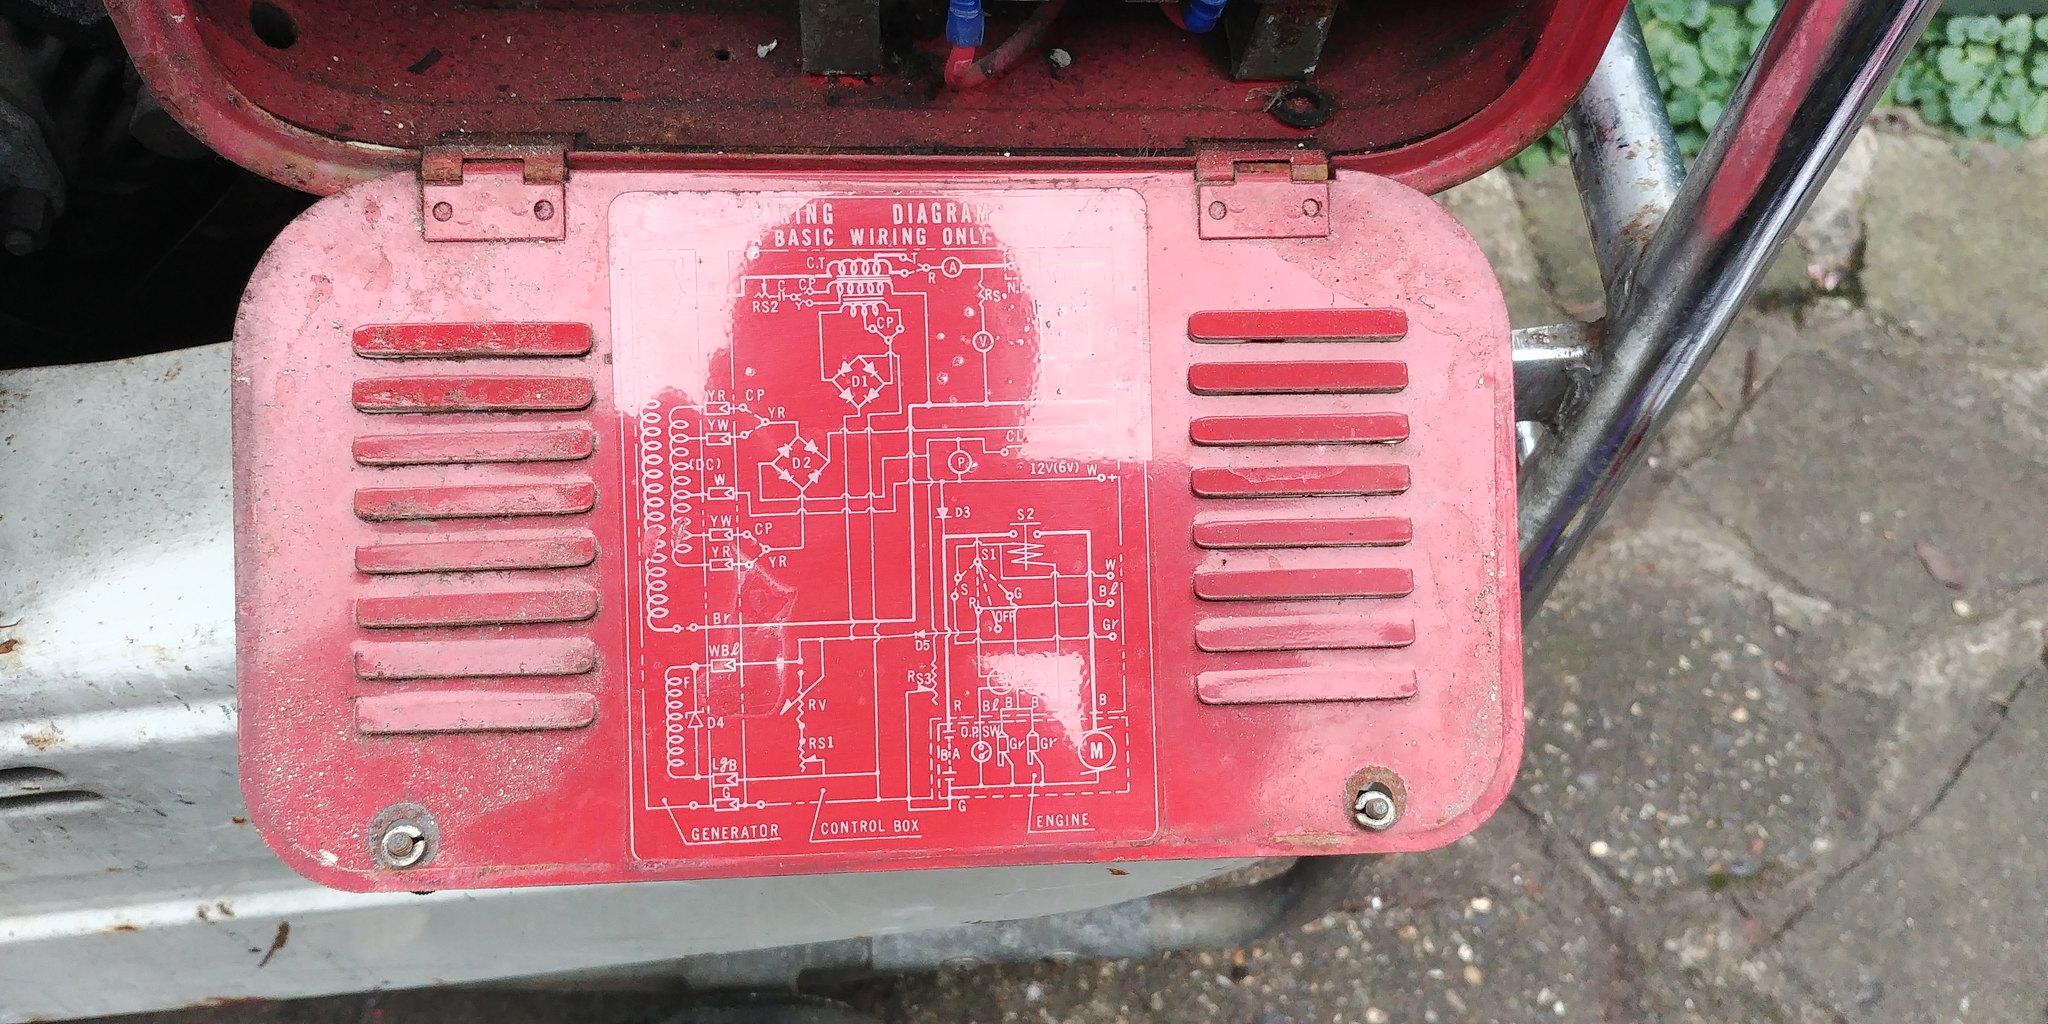
Old school components

The main damage looks to be on the fan cover where a chunk if the casting has broken away

When we had it running the fan was making a grinding noise where it was rubbing against the inside of the cover

With the cover removed we could see where the fan blades were rubbing
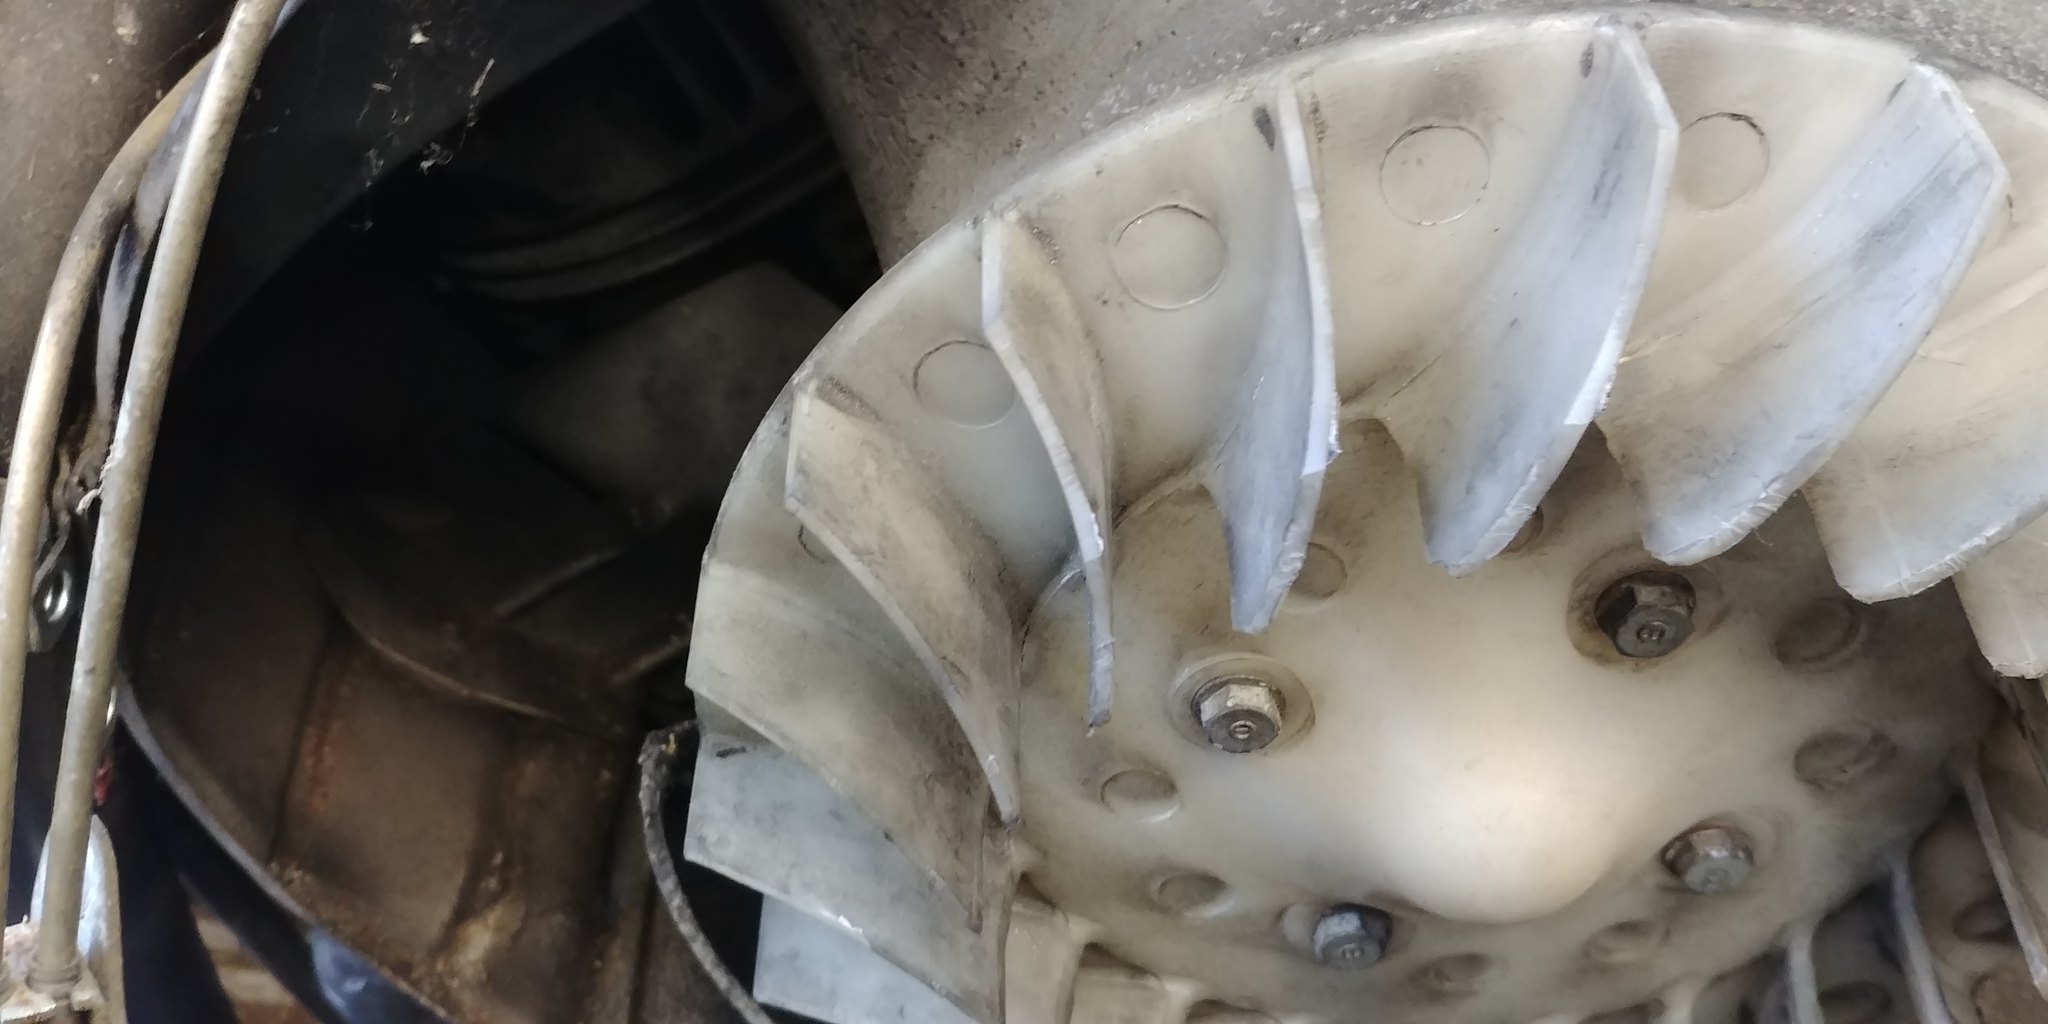
Rub marks in inside of cover, you can also see where it is slightly raised where the cover was pushed in from when it fell off the lorry..

After some gentle persuasion with a rubber mallet no more rubbing and i definitely didn't crack the cover


Just need to straighten out the intake grill, which we removed for the test run as the mesh was getting caught in the fan.

Next I started checking the alternator, when i removed the cover i was greeted with loads of mouse droppings, pine needles and seed husks


The slip rings which apply power to the rotor were in need of a clean, probably the reason it only indicated 200v on the test run
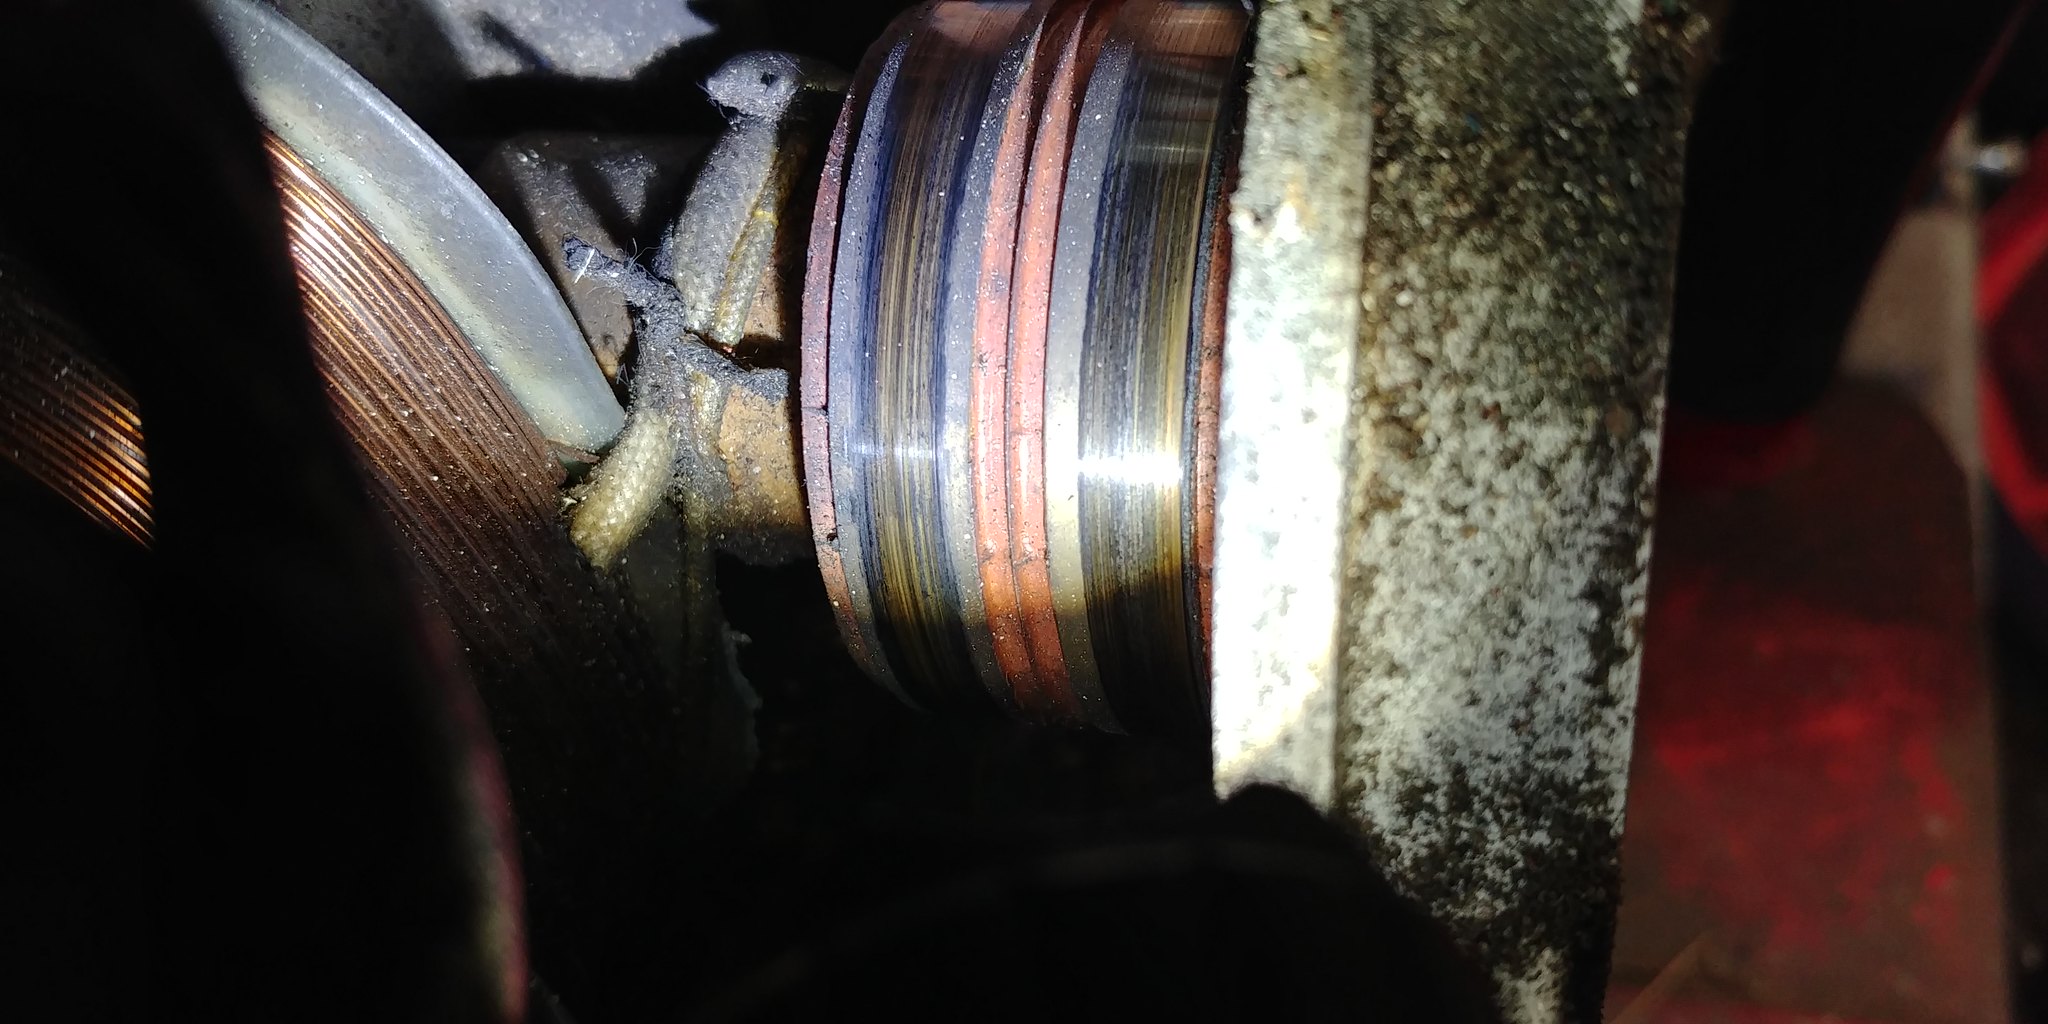
Looking better after a clean, but could probably do with a bit more cleaning.

Looks like the mice who made it a home for a while had a bit of a chew on the insulation on the wires

Plan is to try and release the wires and slip some heat shrink sleeving over the damaged sections.
Finished off by air-lining the alternator cover filter mesh, everyone loves a 50/50

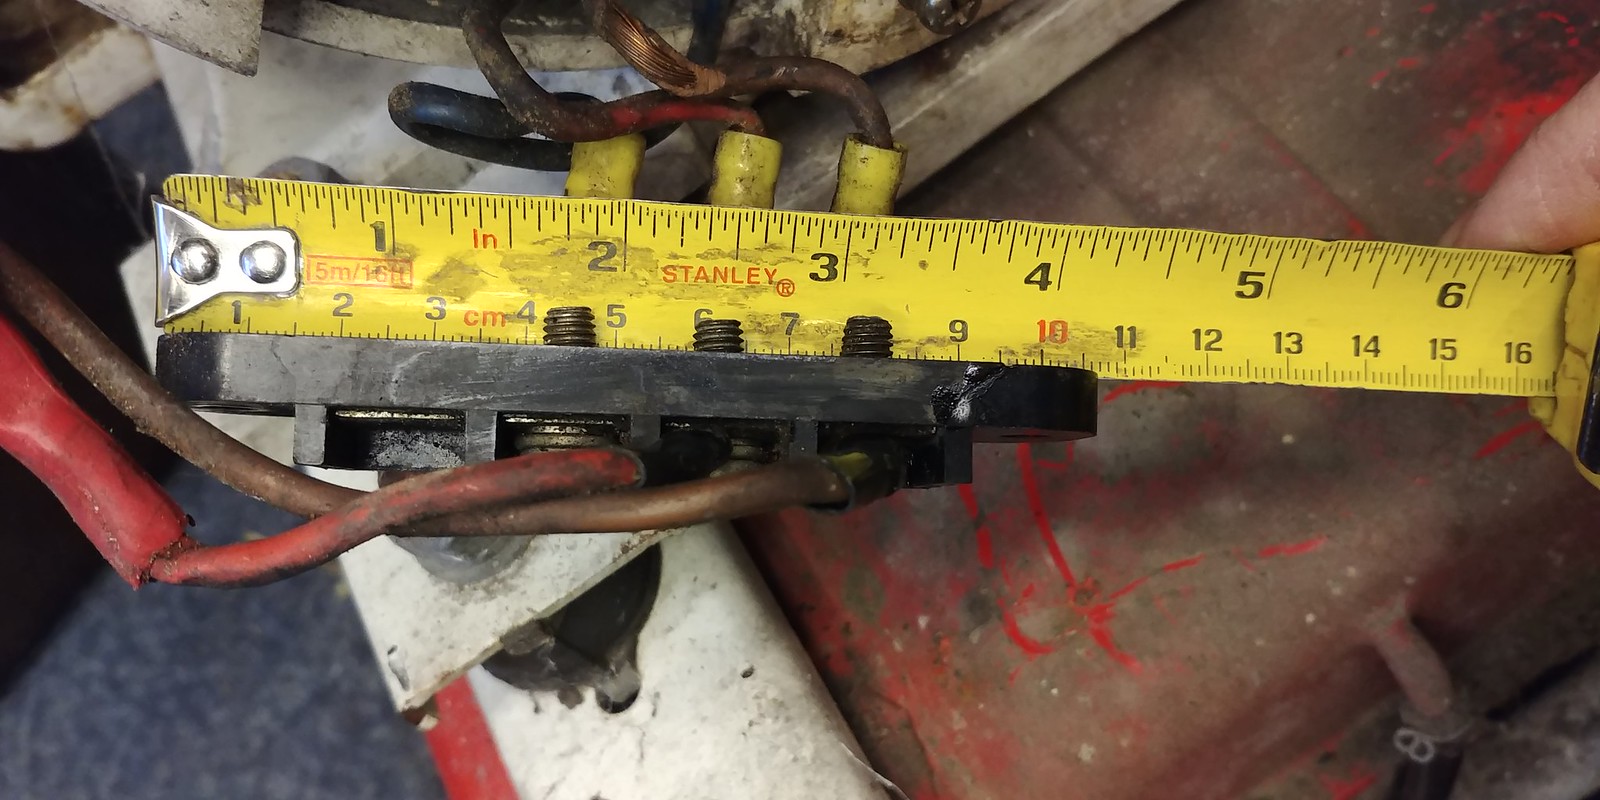
Oh and also need to fix the terminal block

Fortunately all the broken bits were in the bottom of the alternator cover, so hopefully with some careful application of super glue it should be back on one piece.
dhutch said:
Probably fell out! You dont live near to each other do you? Could be the same unit.,.. 
Hope not, the seller i got it from had photos of the original manuals in the listing (which hopefully are on the way to me now he has found them) so pretty sure it doesn't have a suspect past at least I hope not
Looking at the stickers on the cover it looks like it lived in Sevenoaks
Origin Unknown said:
There doesn't appear to be an hour meter on it so I don't suppose you have an idea what sort of life it's led? Even so, I'd say that was in very good condition given it's ~50 years old!
Nope no hour meter, so no idea how much use it's had. Was thinking of adding one as I need to add a box or something with UK style socket, as it currently has 2 American style sockets. The engine oil is very black and thin so hasn't been changed for a while, data plate says SAE30 oil so just looking for a decent equivalent. The drive belts to the alternator don't appear to have much wear either.
I spent some time rocking the flywheel back and forth to see if I could feel any play in the crank and rods etc which would indicate wear.
Couldn't hear/feel any play so that's a good sign, as with pretty much every other machine I have worked on so far there has always been a little bit of play which you can hear/feel by rocking flywheel back and forth
Someone has been in the back of the alternator before me as you can see from the broken terminal block and rounded off screw. Apart from the obvious damage all the metalwork is in really good condition, there is some minor surface rust in places with the worst on the chrome heat shield on the exhaust.
I think it just needs a good clean and service and it will probably work quite happily for another 50 or so years...
First job is to repair the damaged wiring and run it up with a load to make sure its working correctly before deciding how deep to dig into it. All the rubber hoses in the fuel system are rock hard so could do with replacing. The valve adjustment probably wants checking but until I can get a manual I have no idea what the setting should be.
spikeyhead said:
How big is that broken terminal block? I might have something equivalent here.
Thanks, it's probably 6-7cm long will get some measurements/ better photos when i next working on it. Edit
patched it up with superglue and measured it, its around 10.5 cm long 25mm wide, fixings look to be 90mm centers
Edited by Blue32 on Tuesday 25th January 16:49
spikeyhead said:
bugger, I got rid of the box they were in a couple of months ago.
Oh well thanks for checking. Hopefully the superglue will hold...I did find a potential replacement, it looks very similar to the terminal block in the back of the EX5500 alternator which is still available but it's nearly £50!
Gassing Station | Homes, Gardens and DIY | Top of Page | What's New | My Stuff