Harrogate House Renovation..
Discussion


The tiles are from Topps and I believe the range is called 'Jewel'.. They are quite easy to keep clean to be fair.. A bit more of a pain when it comes to grouting but that's all.
The basecoat I used on the walls is by polycell and I think they just call it a 3 in 1 basecoat..
Ive spent all night trying to figure out RSJ's and the practicalities of actually fitting them so hopefully in the not too distant future I can show you some photos of that stuff..
The basecoat I used on the walls is by polycell and I think they just call it a 3 in 1 basecoat..
Ive spent all night trying to figure out RSJ's and the practicalities of actually fitting them so hopefully in the not too distant future I can show you some photos of that stuff..
Just seen this thread. Looking good. The en-suite shower is a slight odd one for me. Maybe a small electruc UFHing mat could have helped dry it out quicker, otherwise you surely get wet feet when going to brush your teeth after the other halfs showered?
Are the shower screens sat on the edge of the tiles or sat on the floor?
Also in this snap. What other wastes run into the same one as the shower? Being a low/ shallow waste, it can easily be pulled.

Are the shower screens sat on the edge of the tiles or sat on the floor?
Also in this snap. What other wastes run into the same one as the shower? Being a low/ shallow waste, it can easily be pulled.
Gingerbread Man said:
Just seen this thread. Looking good. The en-suite shower is a slight odd one for me. Maybe a small electruc UFHing mat could have helped dry it out quicker, otherwise you surely get wet feet when going to brush your teeth after the other halfs showered?
Are the shower screens sat on the edge of the tiles or sat on the floor?
Also in this snap. What other wastes run into the same one as the shower? Being a low/ shallow waste, it can easily be pulled.
You're right about the wet feet.. Because its only me I don't have the issues with the other half's shower however I get your point. I suppose this would be an issue in any wet room dependent upon size.Are the shower screens sat on the edge of the tiles or sat on the floor?
Also in this snap. What other wastes run into the same one as the shower? Being a low/ shallow waste, it can easily be pulled.
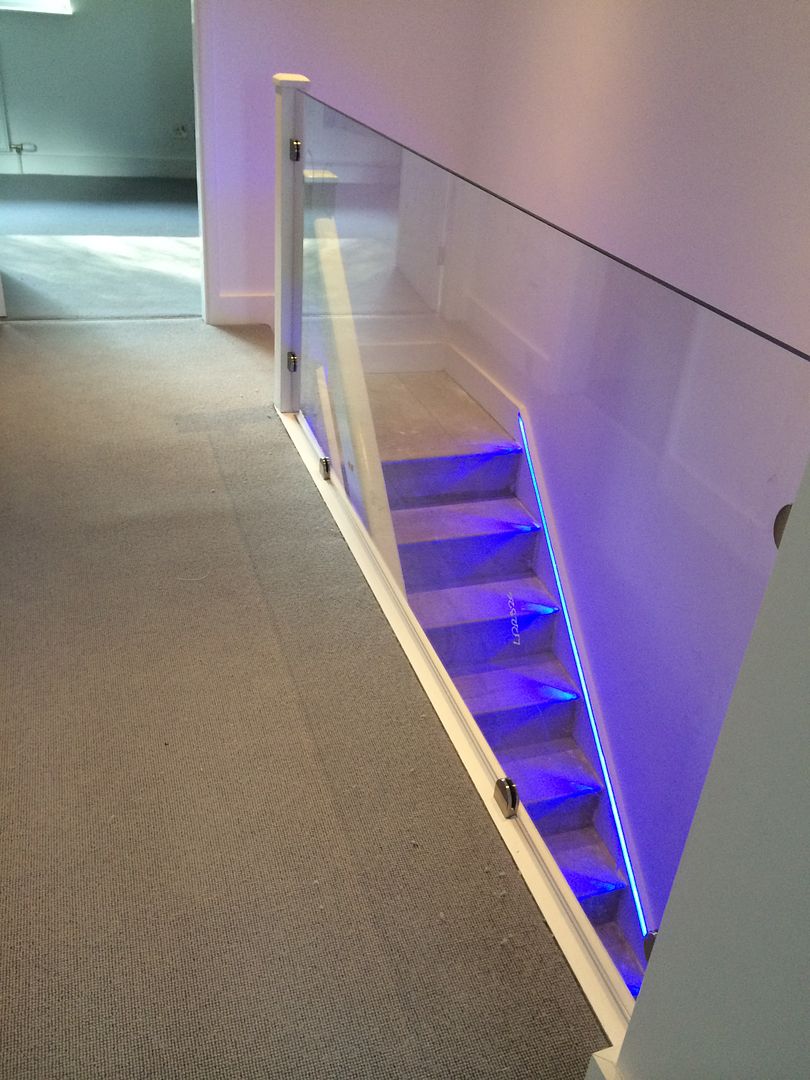
The glass panels are sat in 20mm channels which butt up against the edge of the tiles. A bead of silicone was run along the bottom and top edges of the channels before they were fitted and there is also a bead of silicon that secures the glass into the channels.
I couldn't see the picture you were refering to regarding wastes however the master bathroom shower, the ensuite sink and shower wastes all go into one pipe which then goes into the 4" soil stack.
SydneyBridge said:
good choice - things would be very different if it was a toilet with a clear door..
I stayed in a hostel like that in Hong Kong, 4 of us in the room (2 guys, 2 girls) with 2 "double" (maybe 3.5ft!) beds facing the door. Oh and the toilet faced the door too, with not much space in between, not the best place I've stayed.Back on topic though great job on the renovation OP and I like the glass en-suite too, it's a stand out feature that differentiates between your place and others.
Oh and I love the tiling on the built in cistern and basin, also unusual.
Bookmarked as I can't wait to see the downstairs progress!
So when the upstairs bathroom was finished I was able to replace the very dated balustrade on the upstairs landing with a glass one. I was very keen to replace all the balustrades in the house with glass to add to the contemporary feel.. Once the balustrade was sorted the carpet was laid in the third bedroom and on the landing. I used the same dove grey carpet throughout the top floor of the house.
Old balustrade and some pre carpet photos...
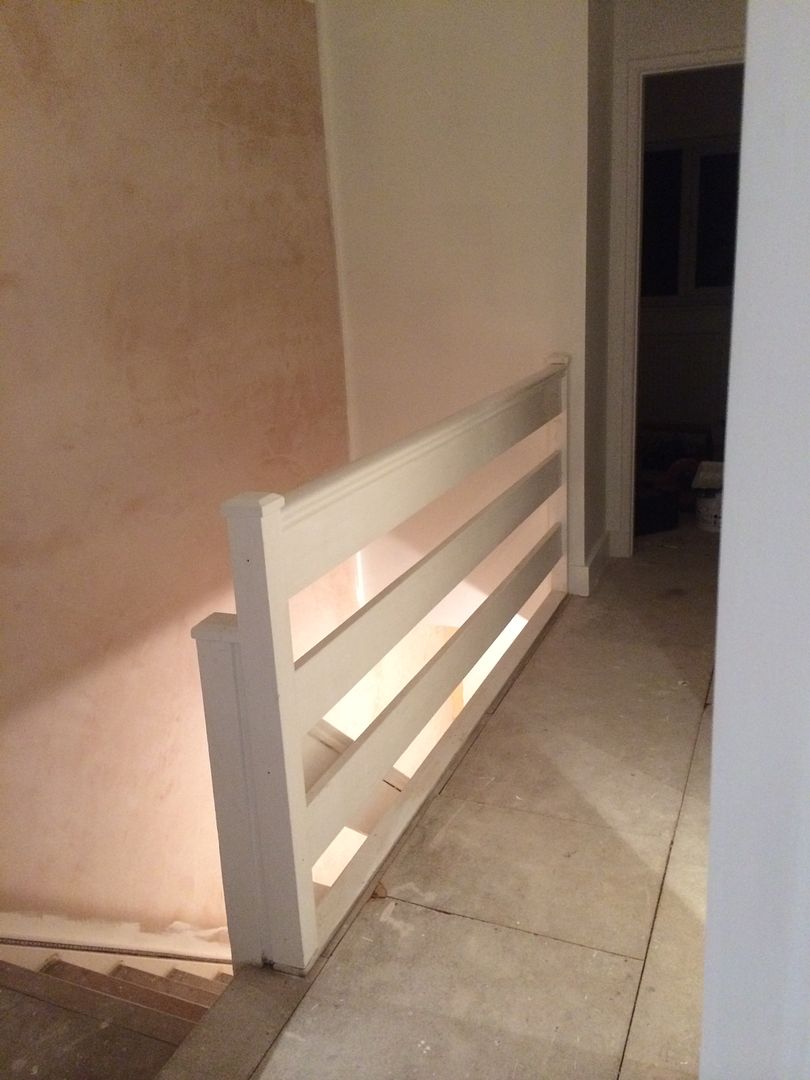
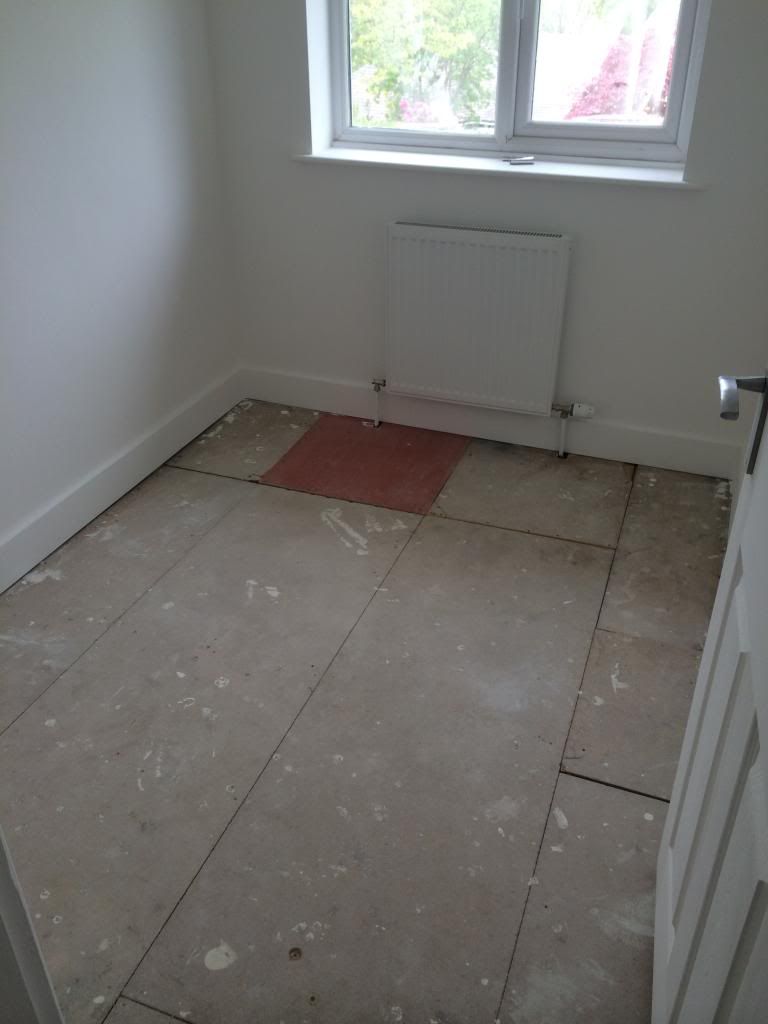
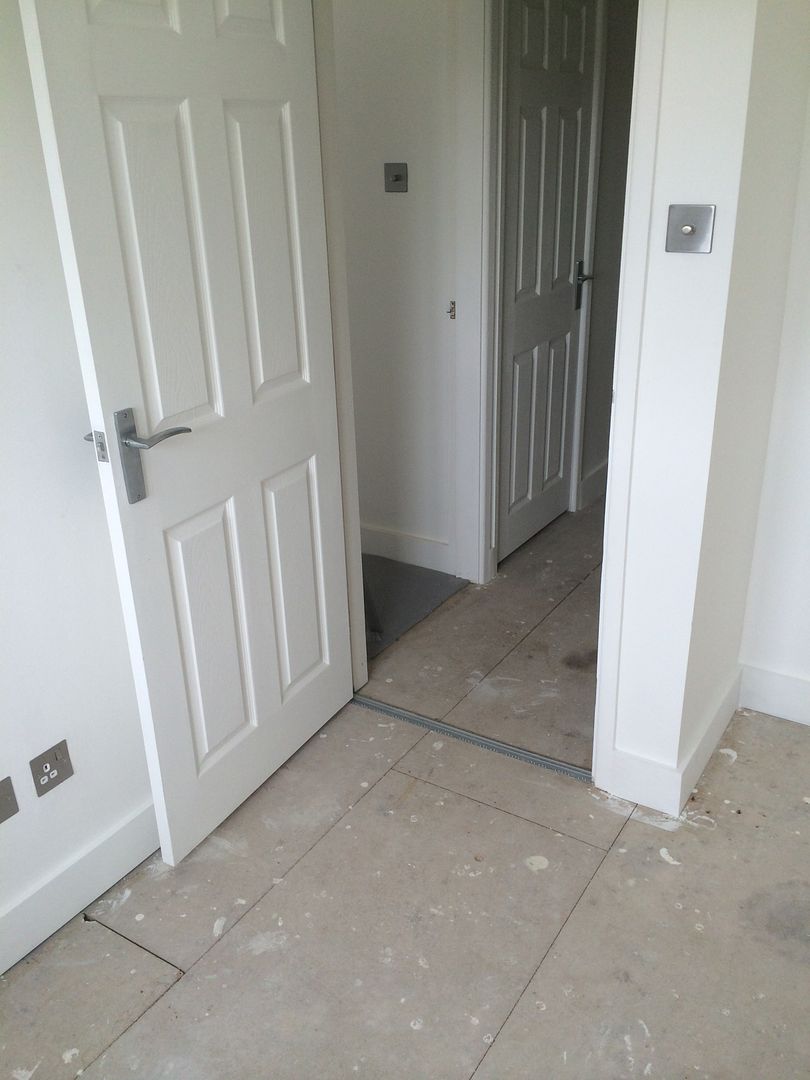
And after the carpet and balustrade..
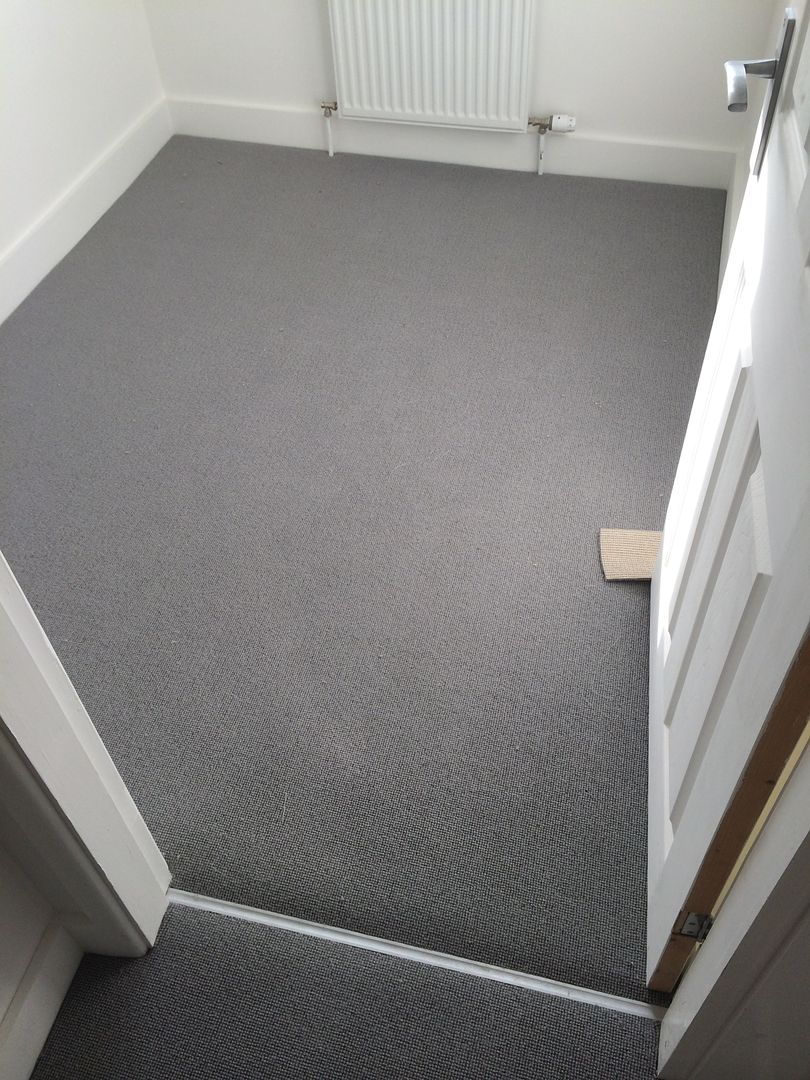
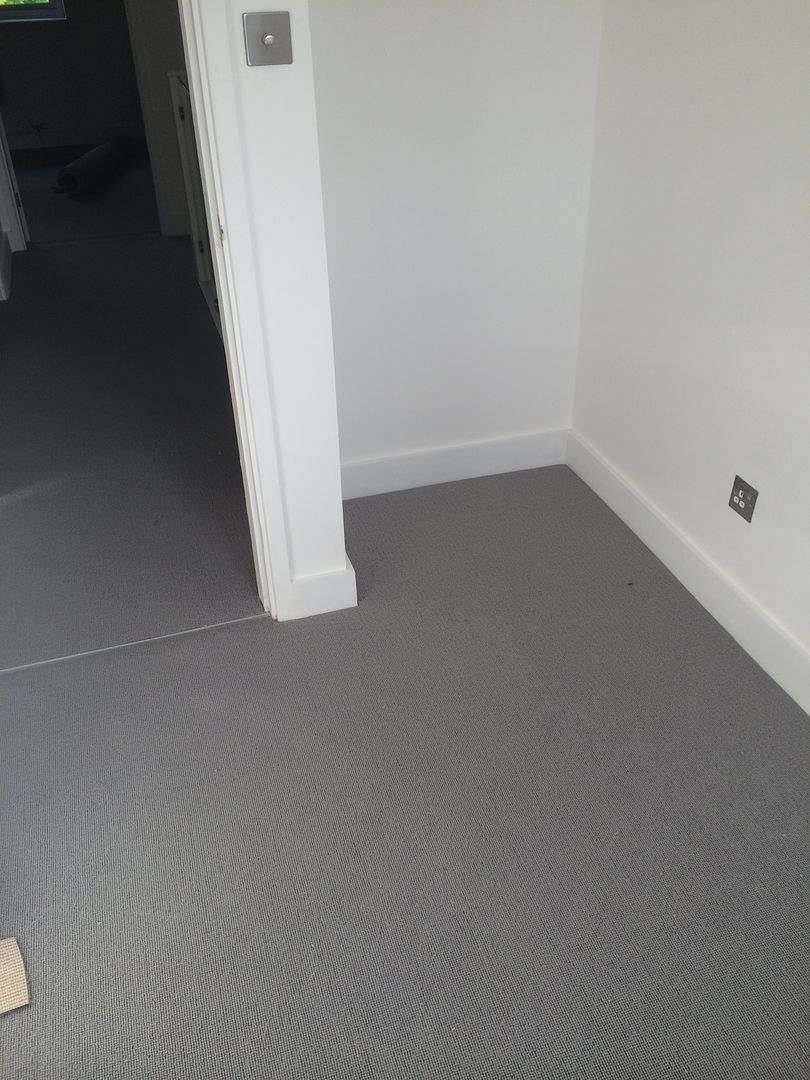
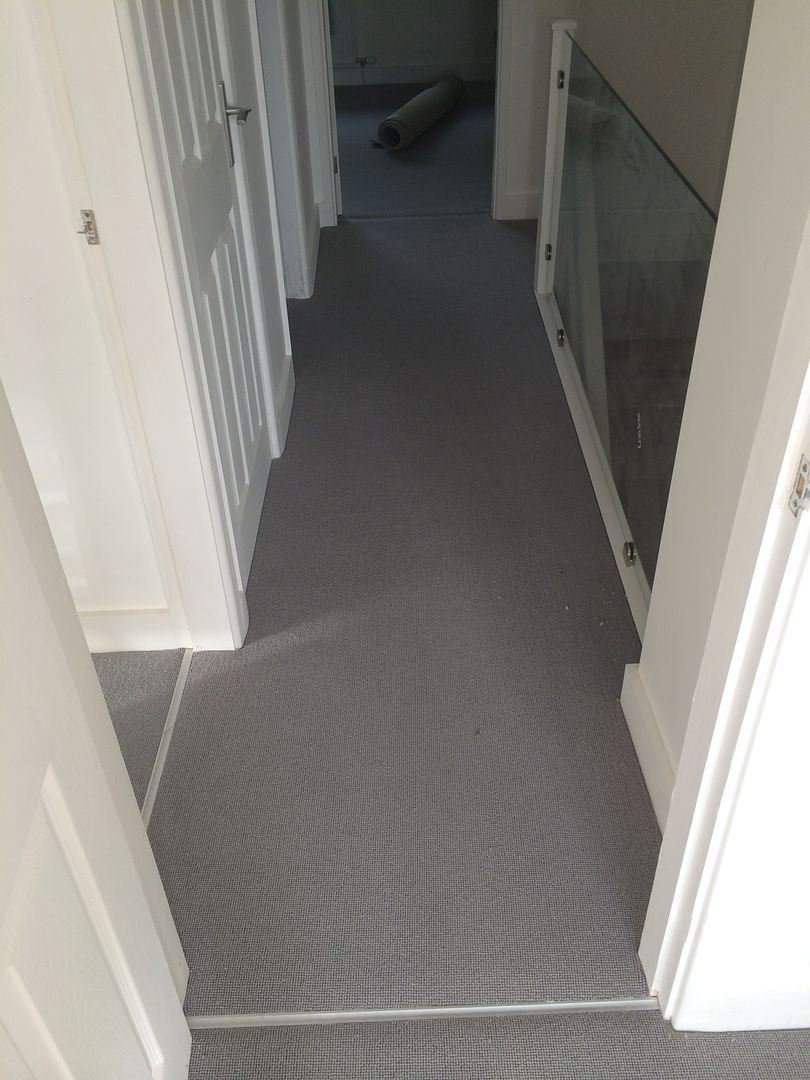
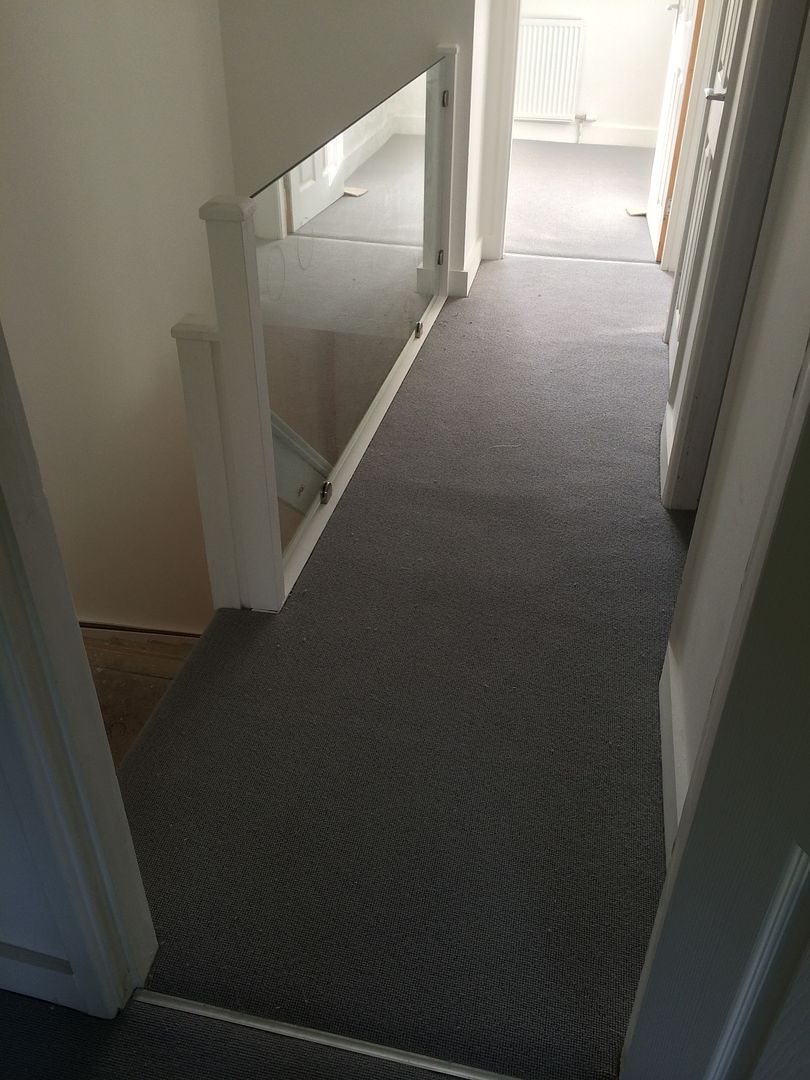
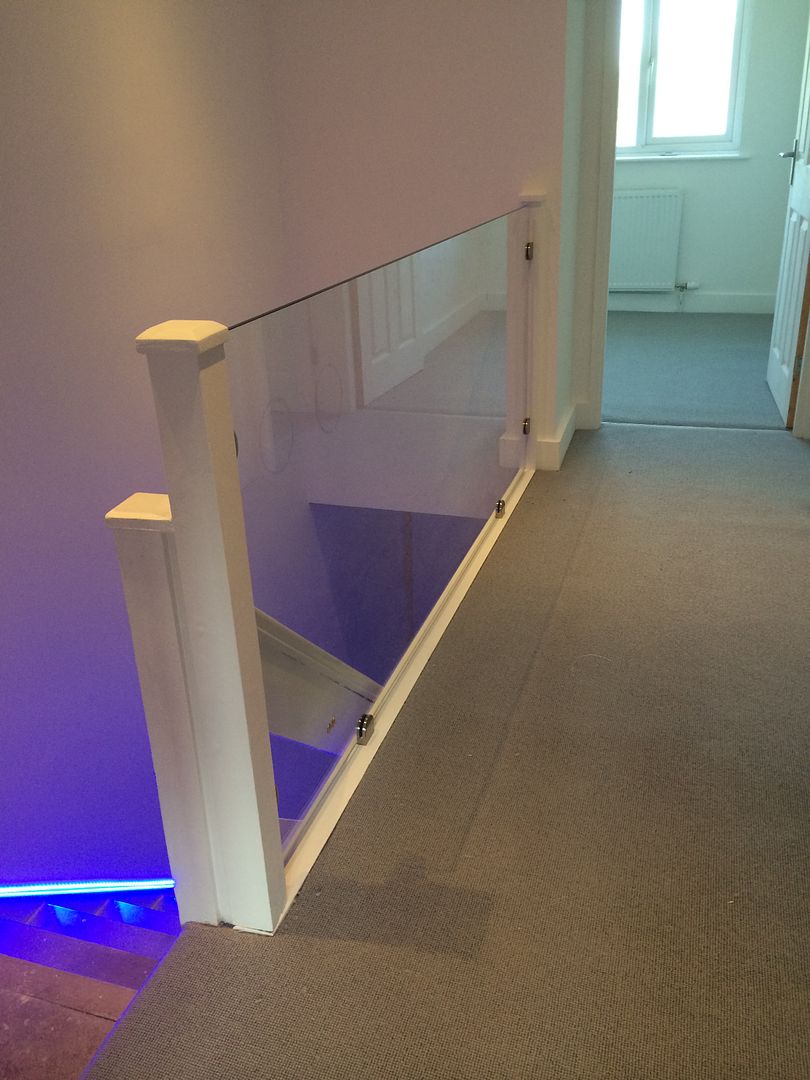
So this marks the completion of the top floor.. I am pleased with how it has turned out. The issue I am having now is keeping it clean whilst working on the lower floors as dust manages to get everywhere.
Old balustrade and some pre carpet photos...


And after the carpet and balustrade..


So this marks the completion of the top floor.. I am pleased with how it has turned out. The issue I am having now is keeping it clean whilst working on the lower floors as dust manages to get everywhere.
The top floor was just about finished at the beginning of May this year so I made the decision to do the garden over the summer as opposed to starting the next step of works inside the house.
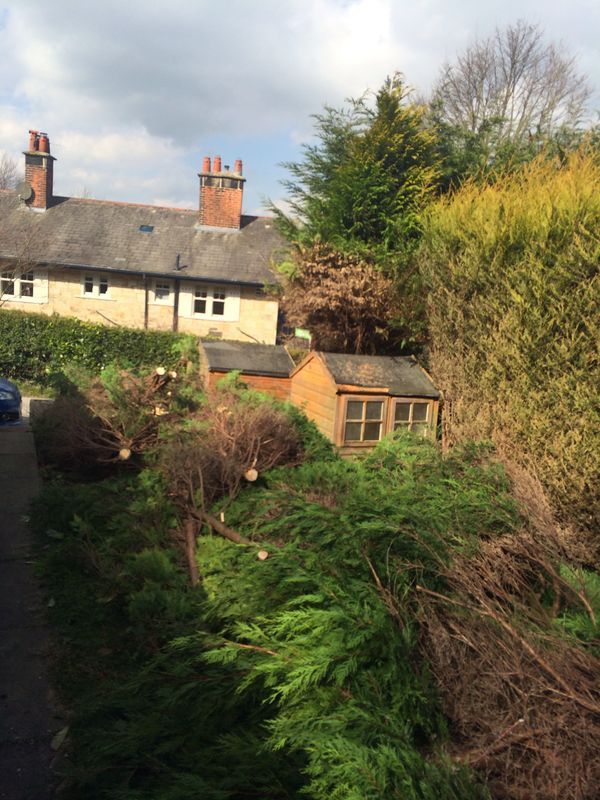
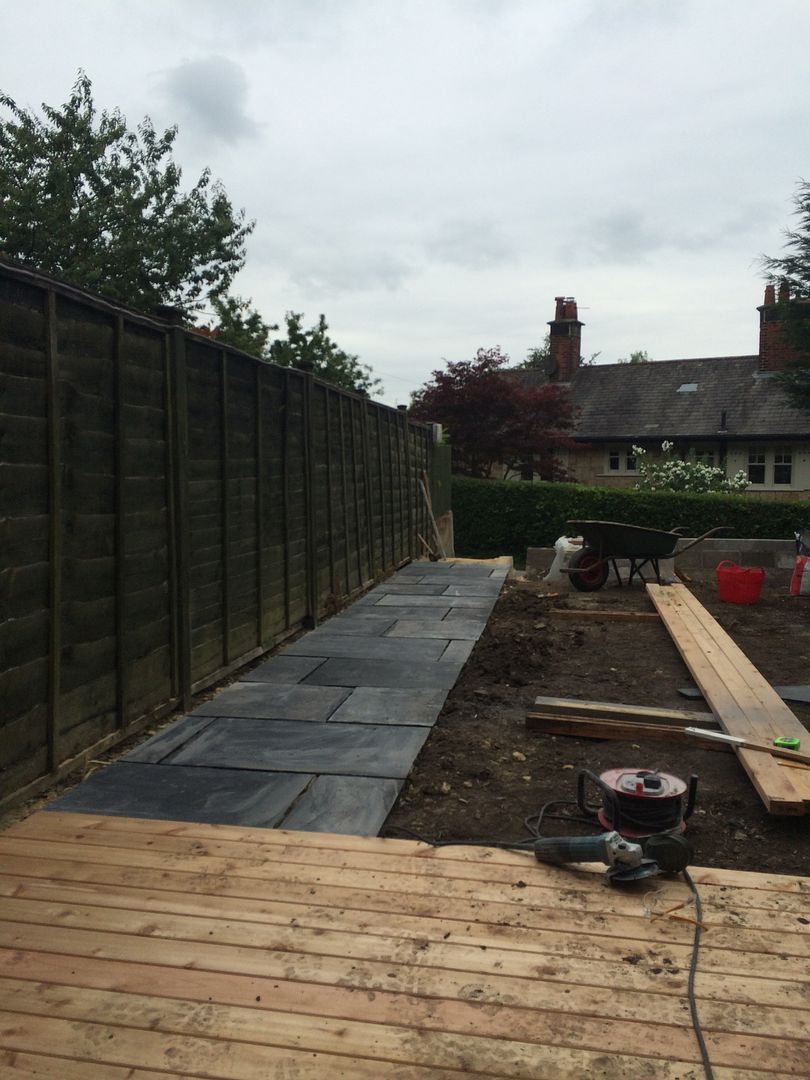
The garden was a real mess. There were conifer trees at the front blocking a lot of light and taking up usable space. There was also a big bay? type tree in the garden which also contributed to me having about 4 metres at the front of the garden which was unusable. The hedge dividing my neighbour's house and mine was also very overgrown. Generally the garden was just crap. Old wonky concrete slabs as a path and patio outside the door.. As per the first pic on the first page.

I was a bit crap with the photos as the beginning of the garden makeover however I took one photo out of the kitchen window after the bay tree was felled..

Then another when the conifers at the front were done..
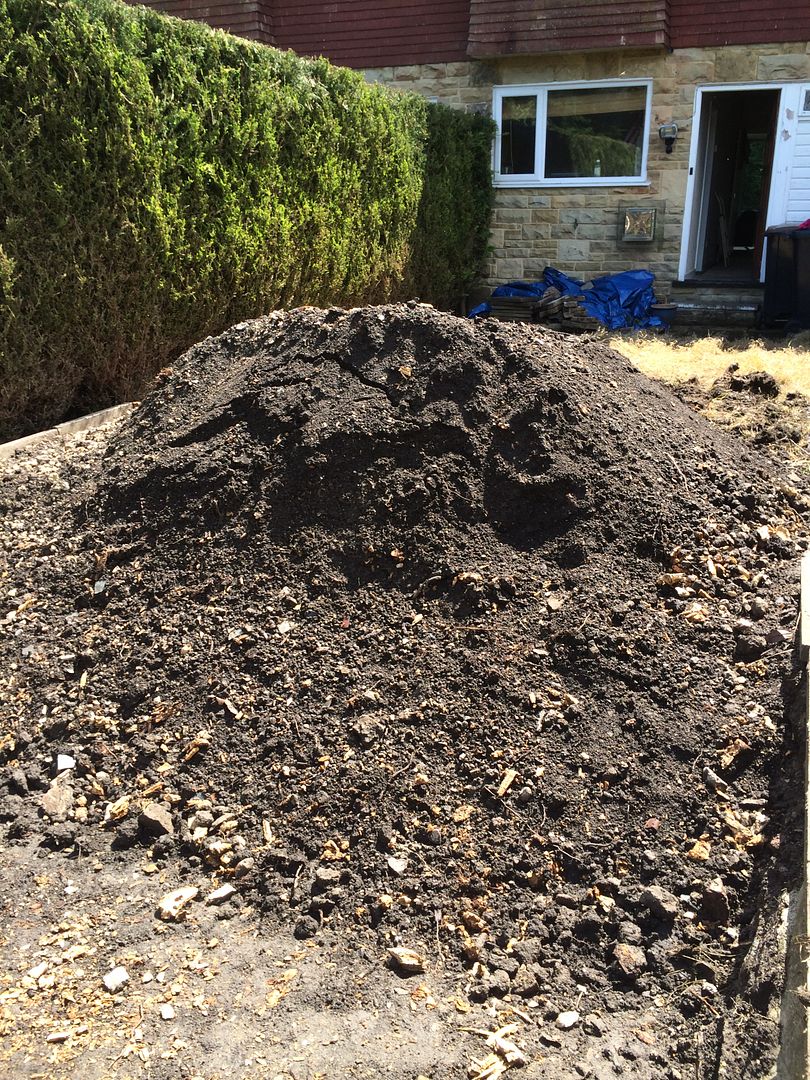
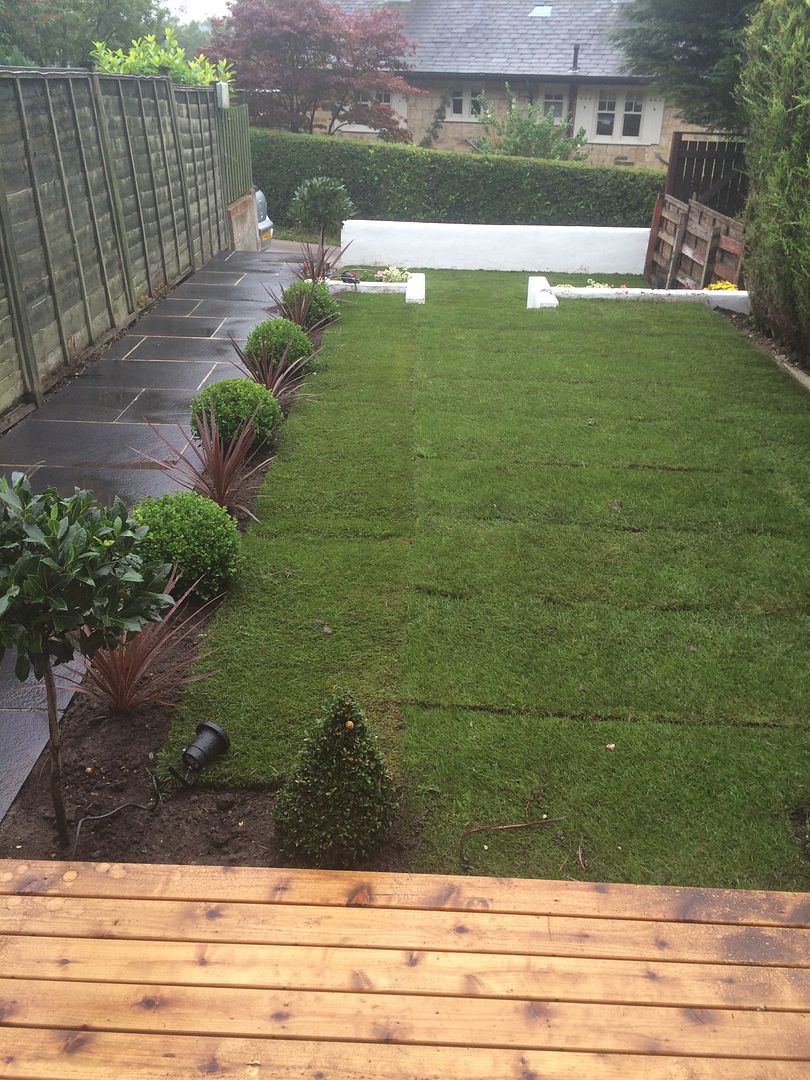
Digging out all of the roots for the trees was an absolute pig of a job however it enabled me to create two distinct levels in the garden as opposed to it sloping away from the house. I also levelled it from left to right. A big pile of earth as the levelling was under way.
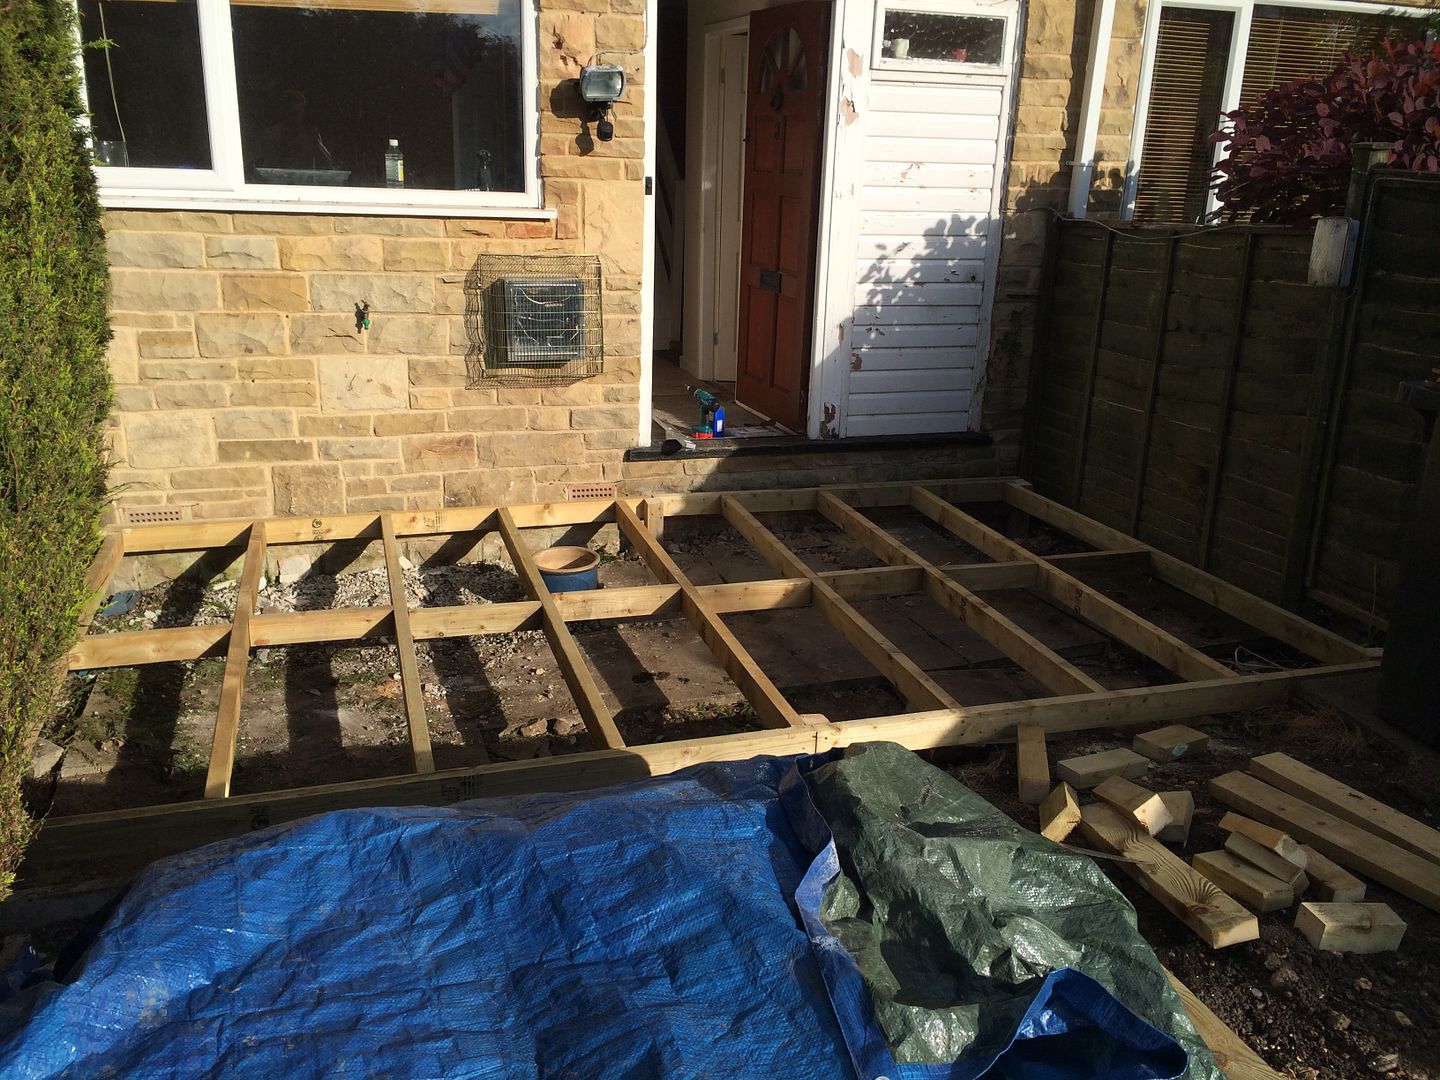
I then decided to build a deck out of the front door one step below the door as opposed to the 2 steps down there were.. I built the frame then was able to get rid of all the hardcore from the old slabs and also my old bathroom tiles in the framework. Perhaps not the best way of getting rid of it but it works for me.

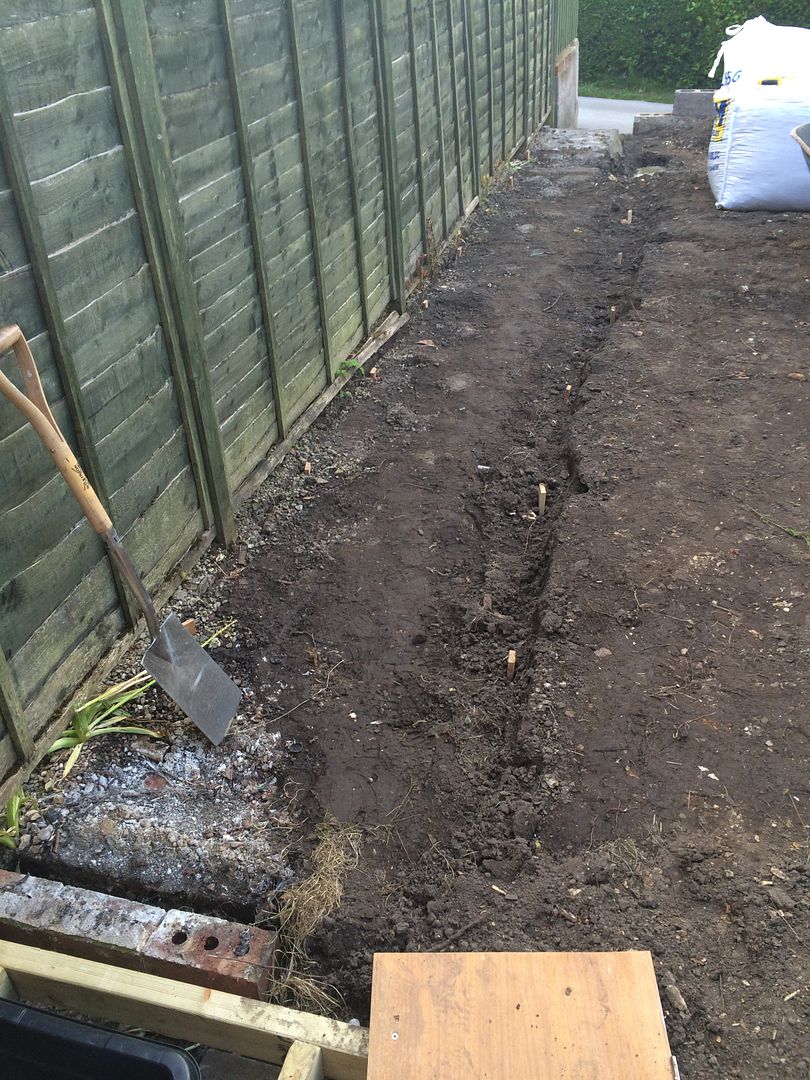
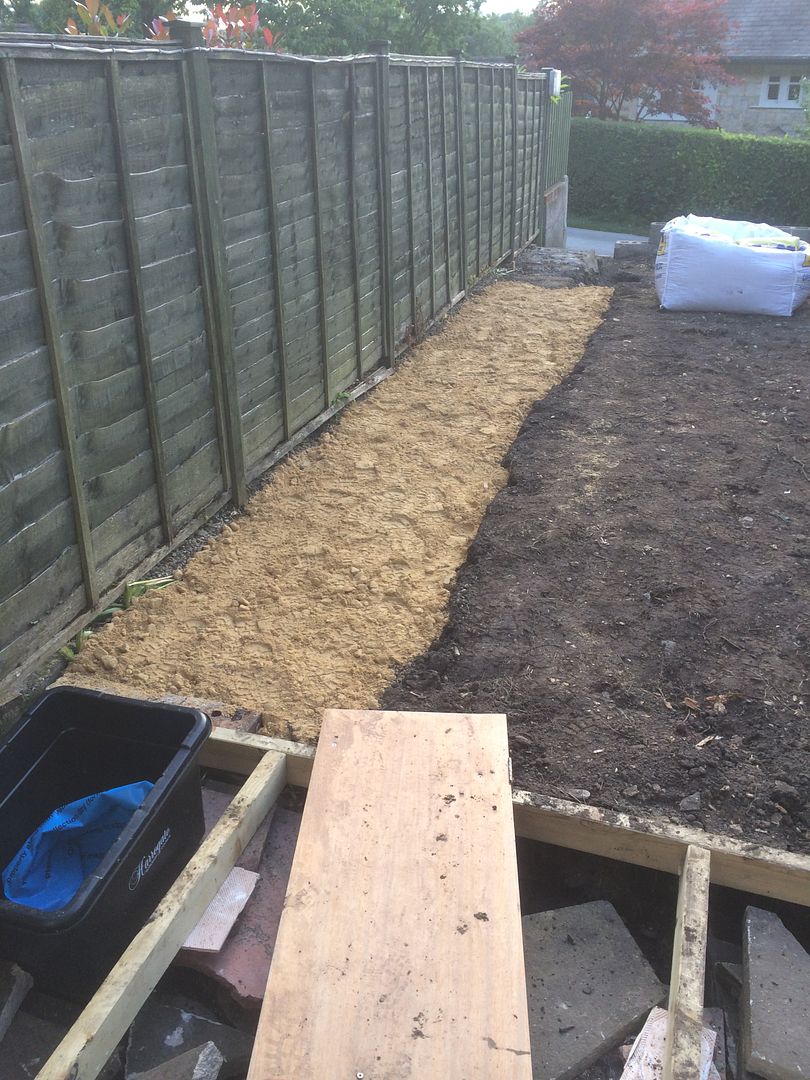
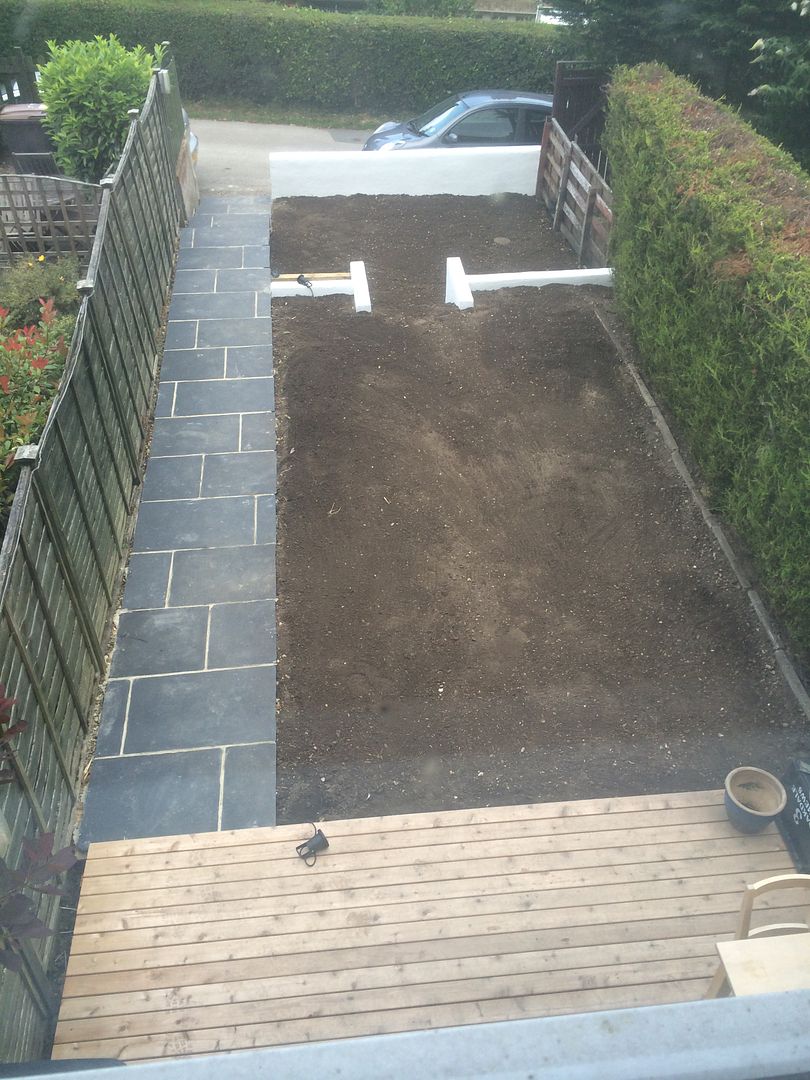
The area where the old path ran was levelled and then some hardcore was put down and compacted.
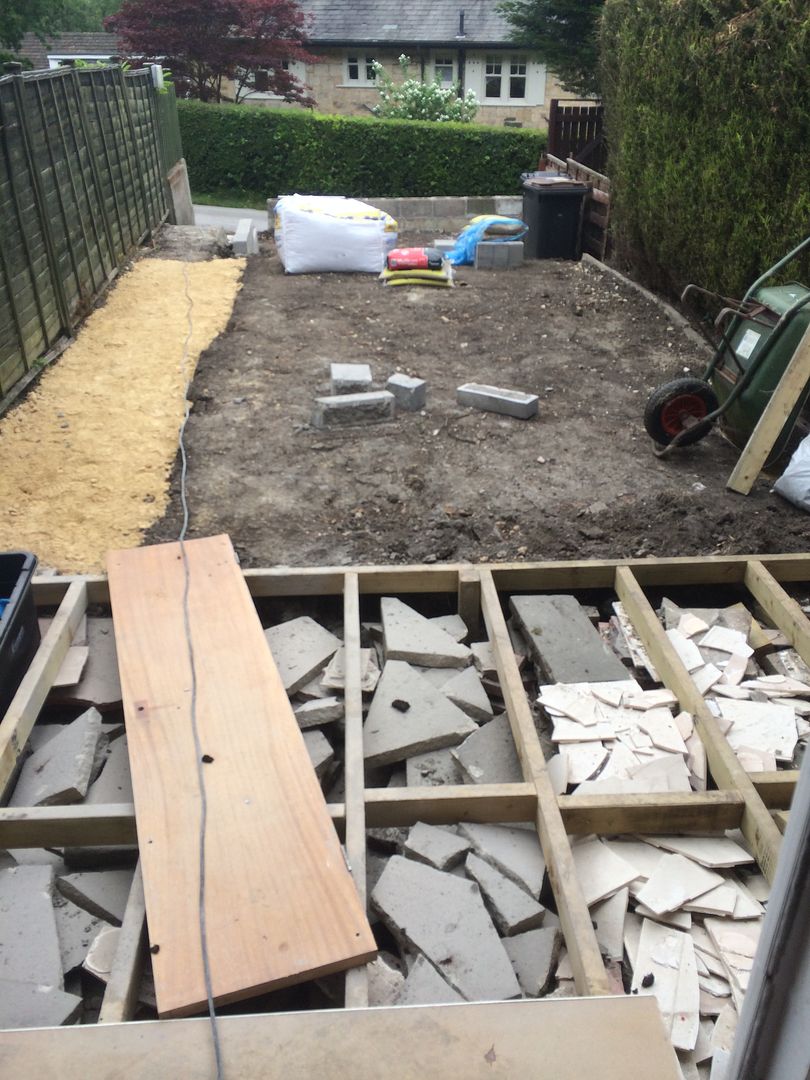
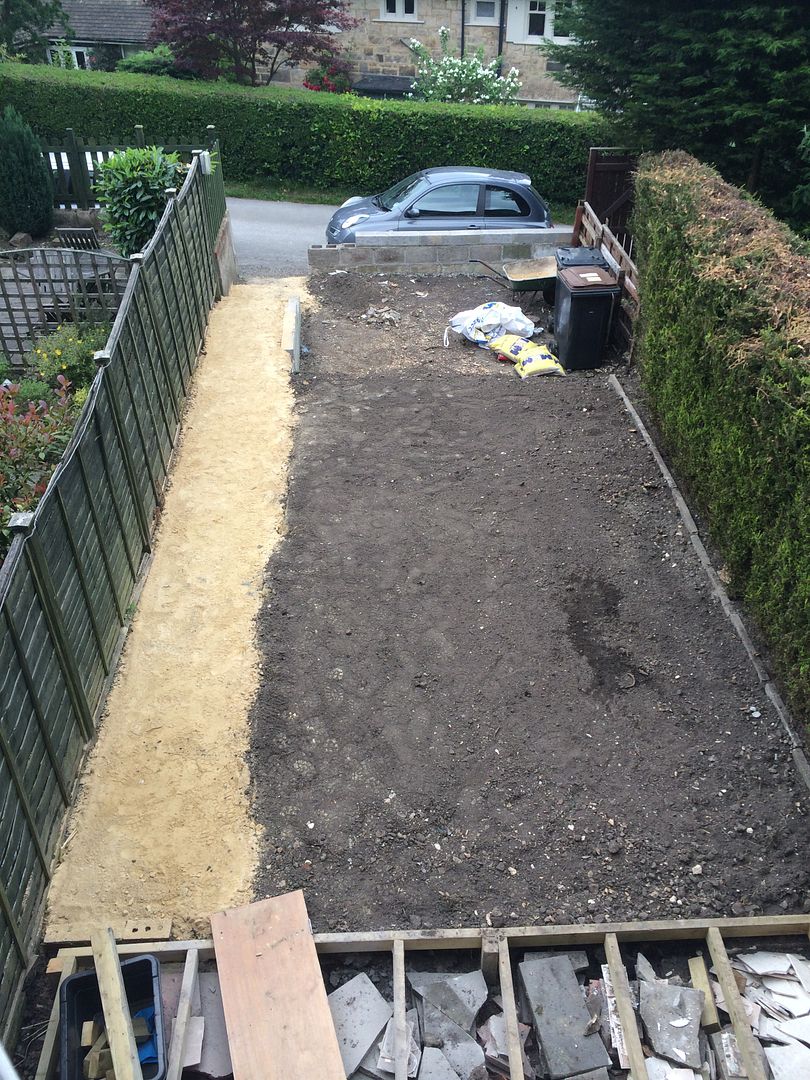
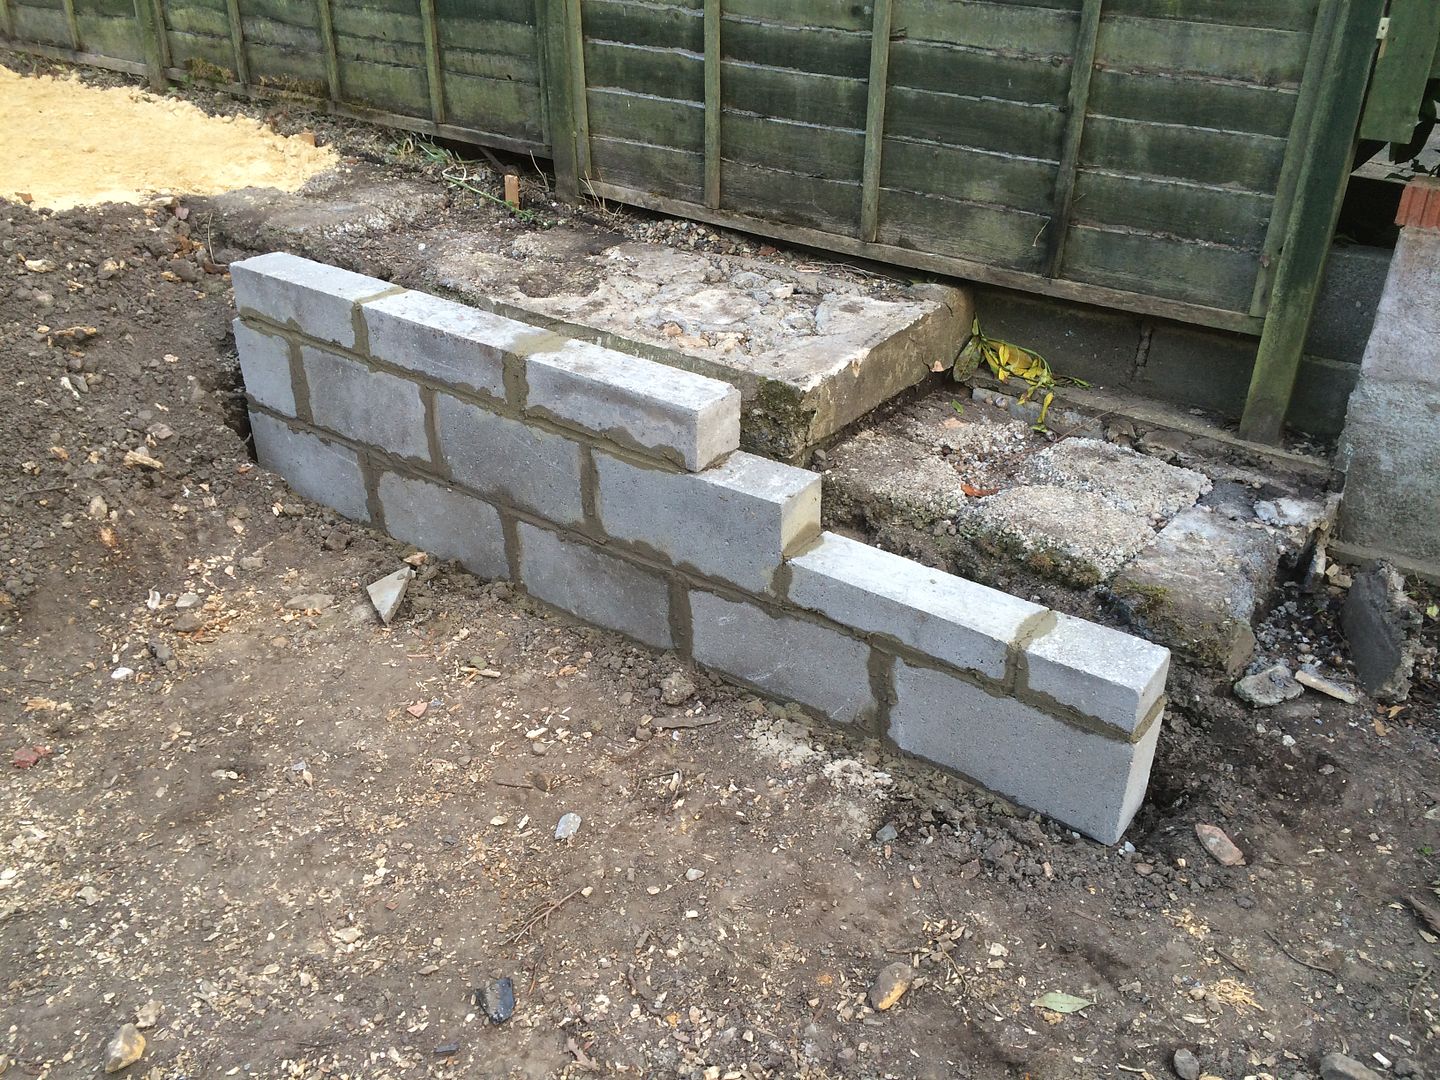
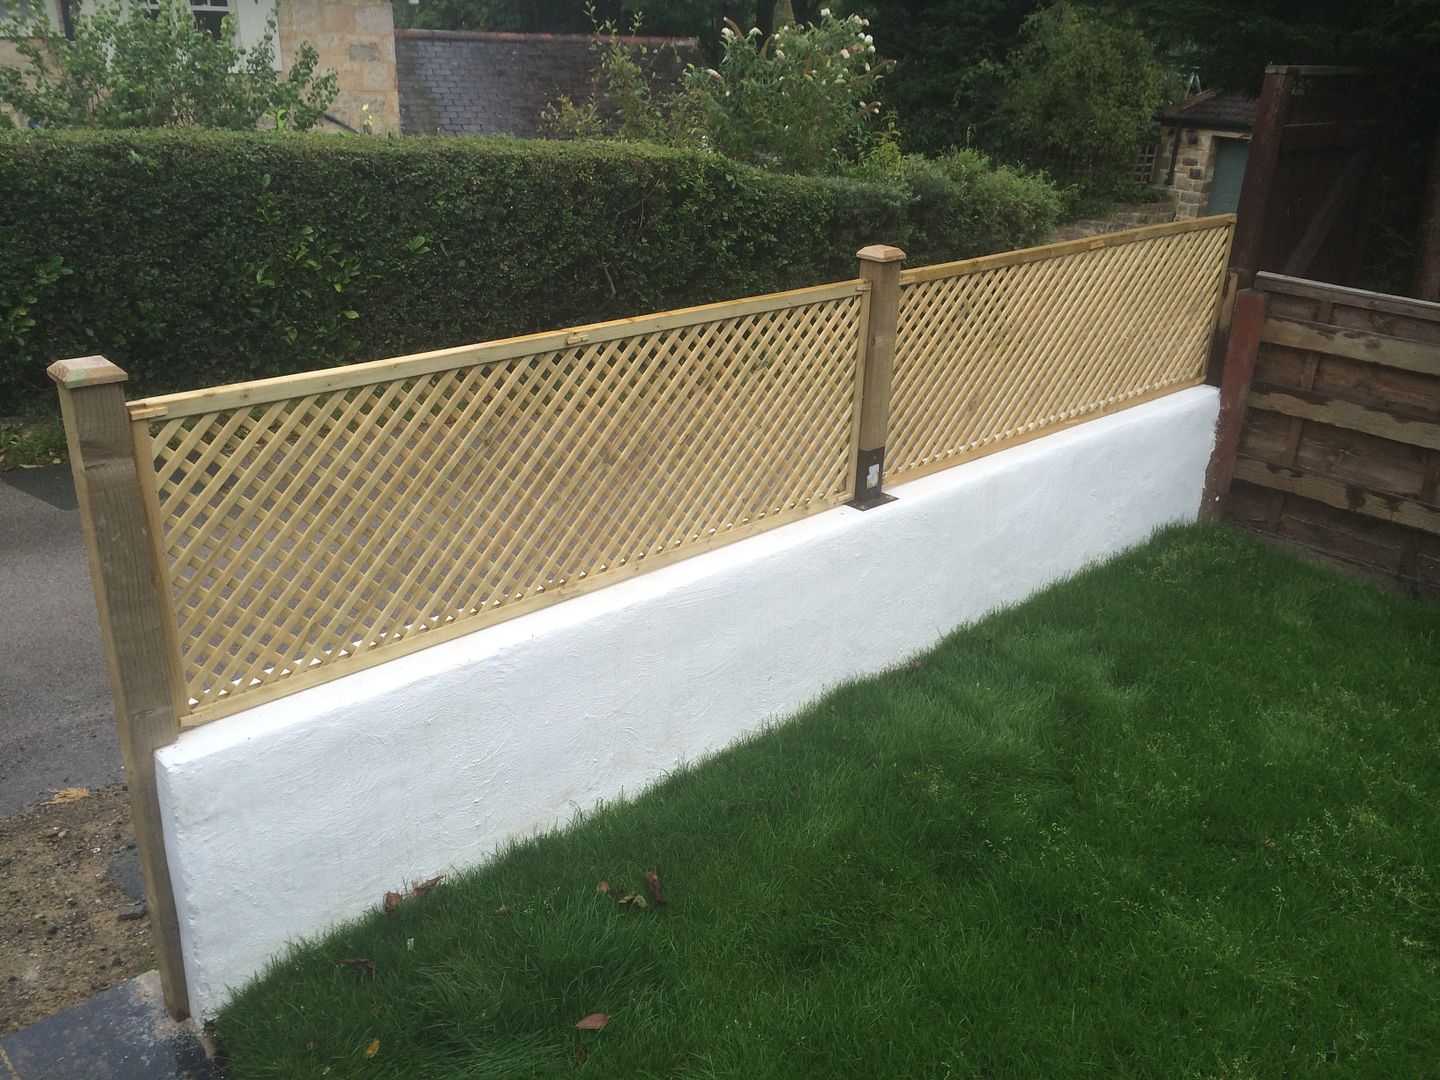
In the last pic you can see that I have started to add a course of blocks to the end wall. 2 courses went on in total.
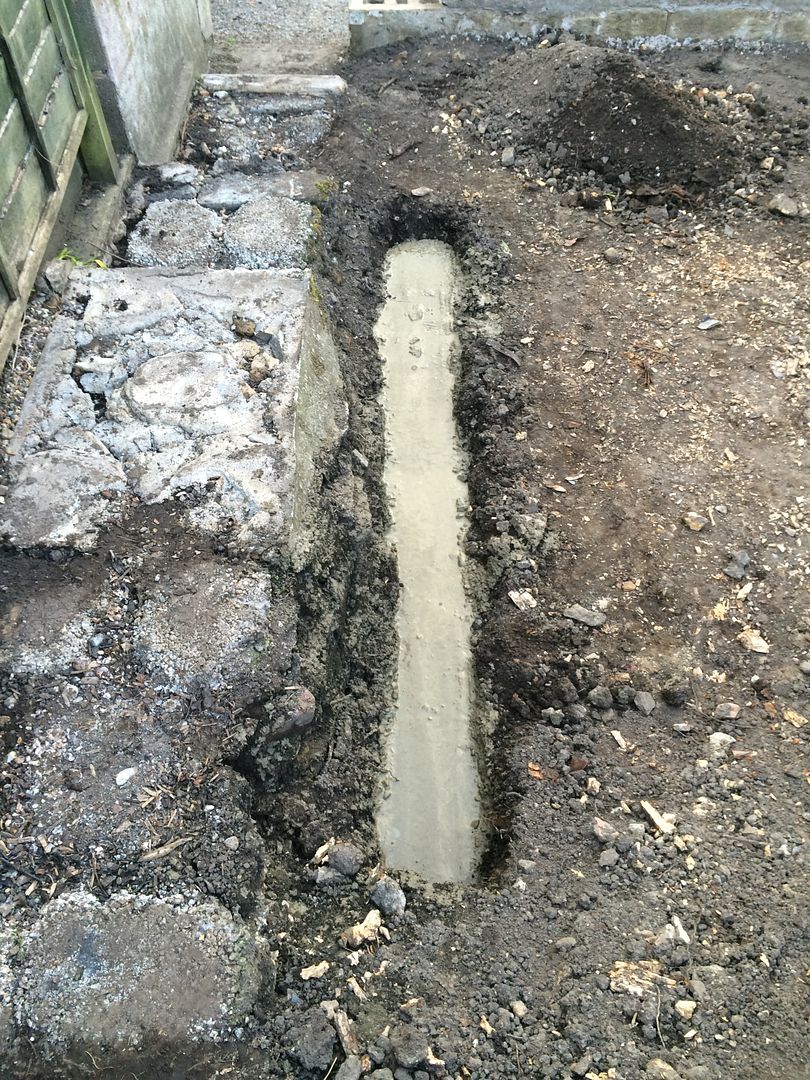
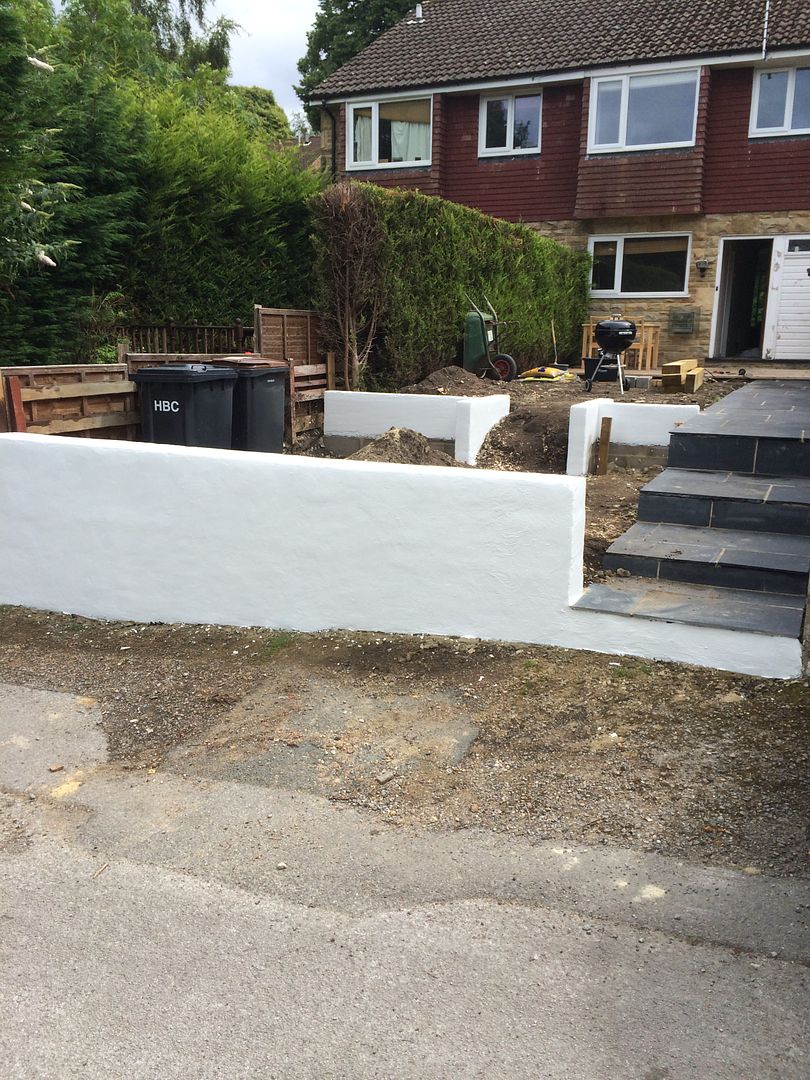
I wanted to make sure the new path was wider than the one that was there previously and I also wanted to create some proper steps down toward the entrance to the garden. I poured some foundations then built a wall to support the path.
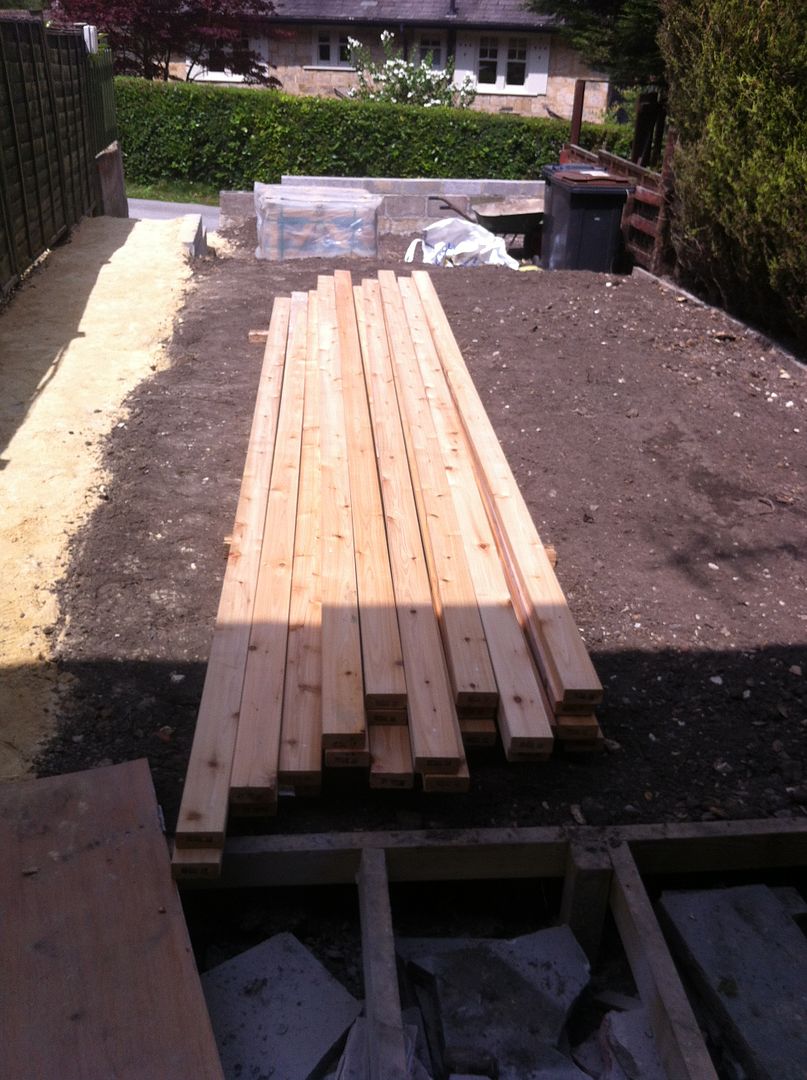
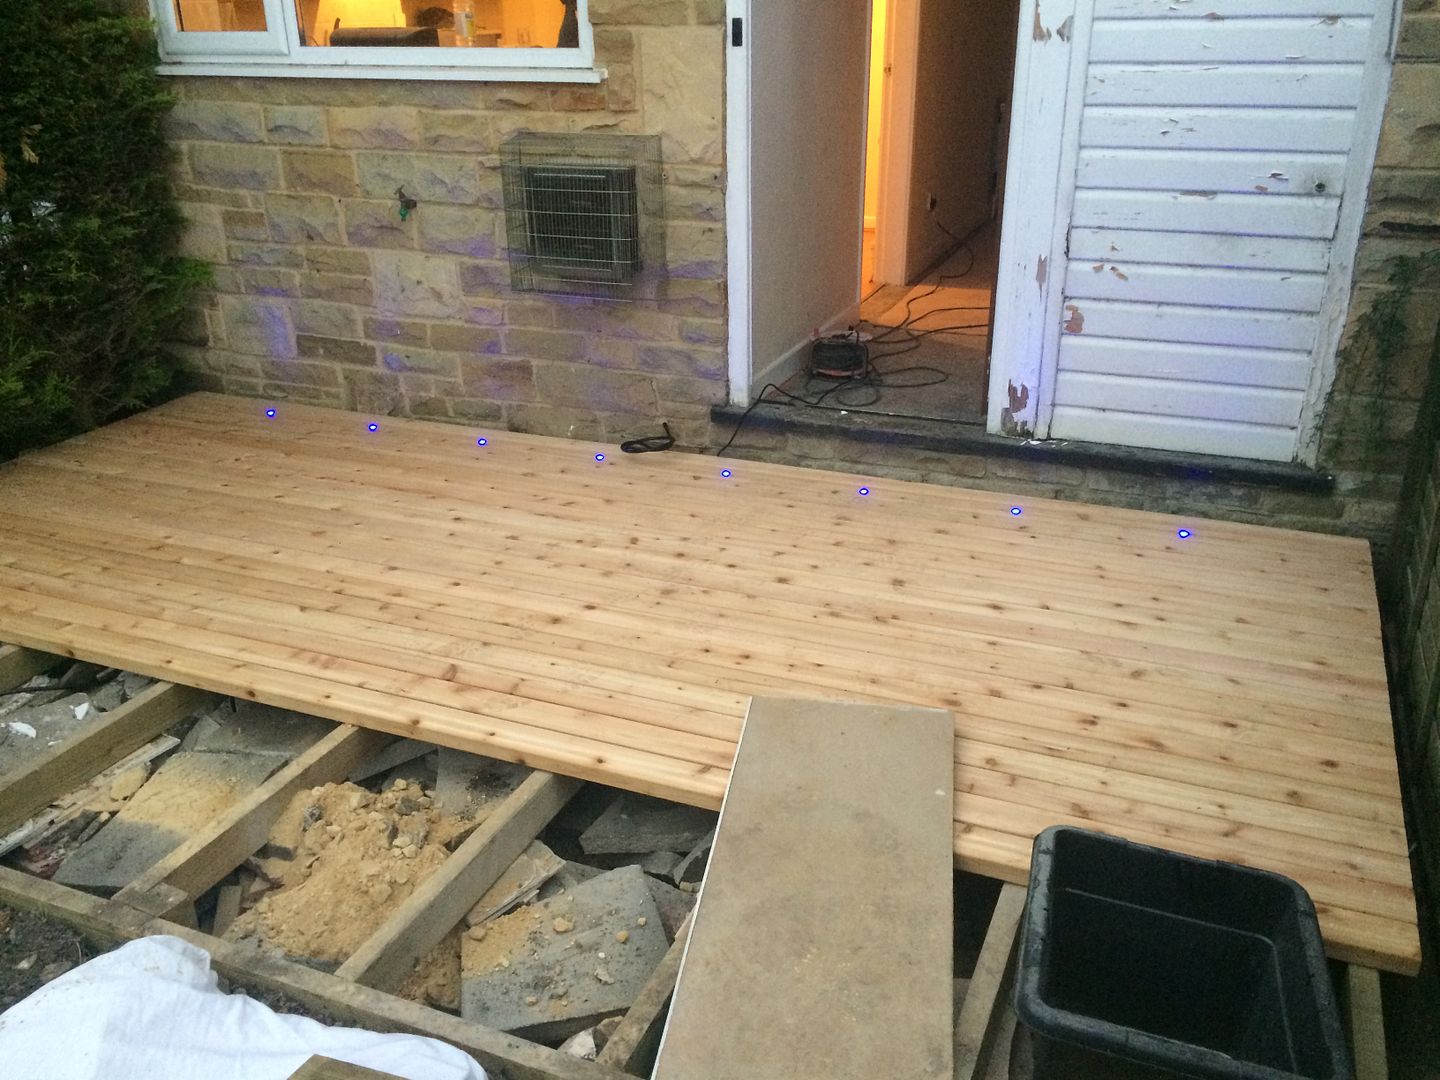
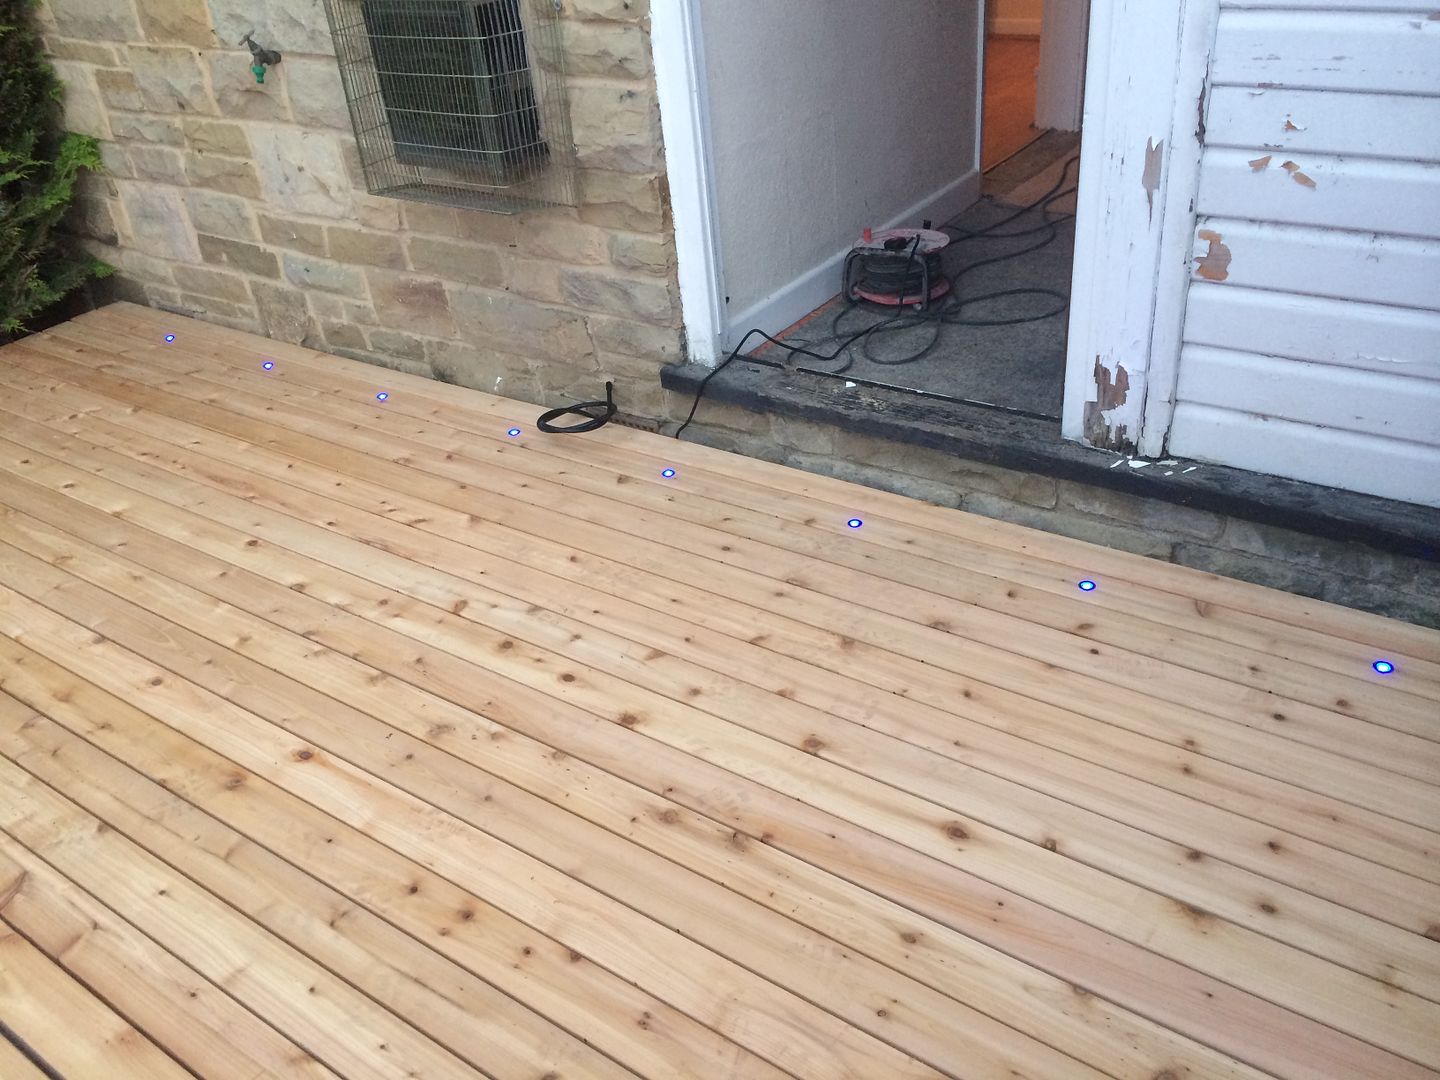
The timber arrived for my deck. I spent more than I needed to buying Western Red Cedar as I really like the reddish colour however it fades to grey so quickly untreated so next summer I plan to sand and treat it again. (I did treat it with some sealer once but it hasn't worked.)
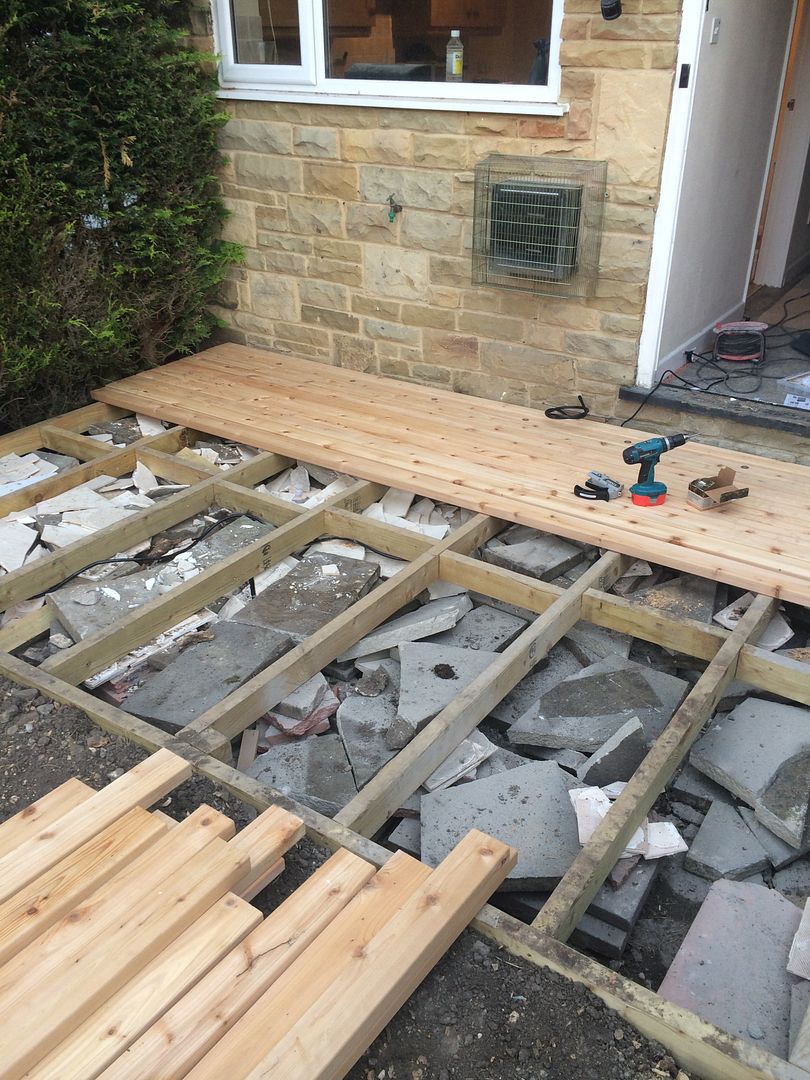
The deck then started to go down. I bought a tool to enable me to hide screws which worked well but wasn't cheap. I made sure to put plenty of rat poison down amongst the hardcore also prior to laying the deck as the downside of putting all the hardcore there is the perfect environment for rats/mice you create. I also bought some led deck lights which I put into the first plank closest to the house.
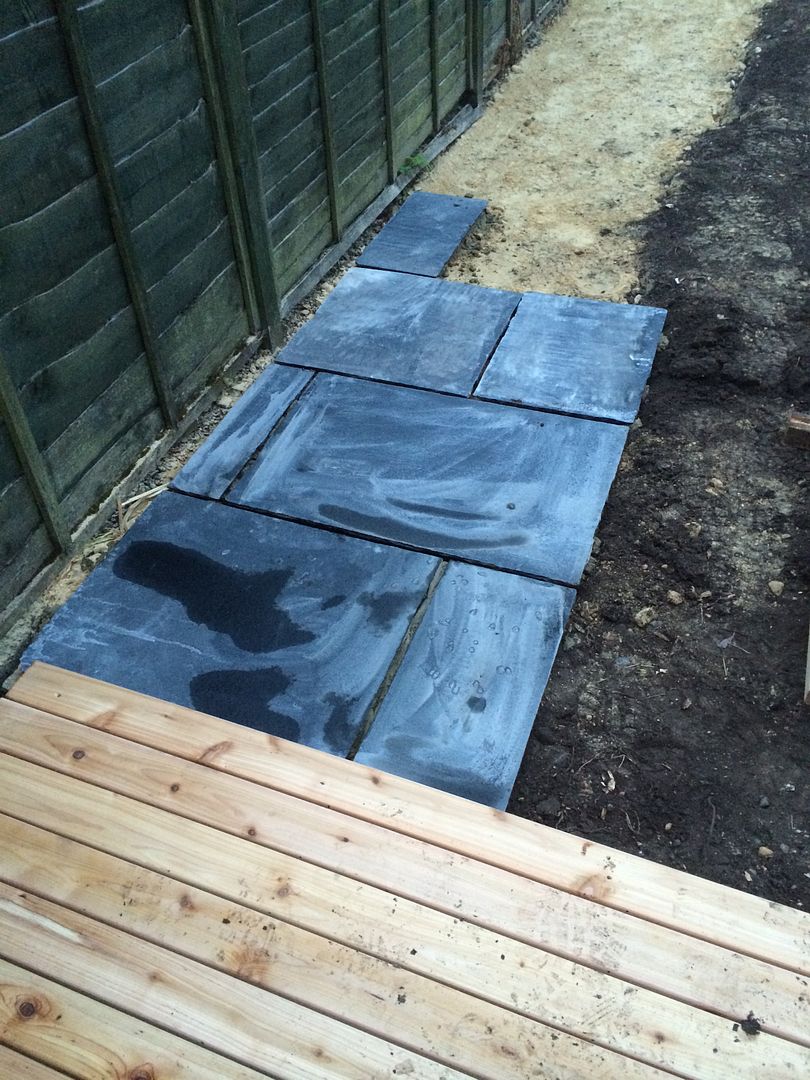
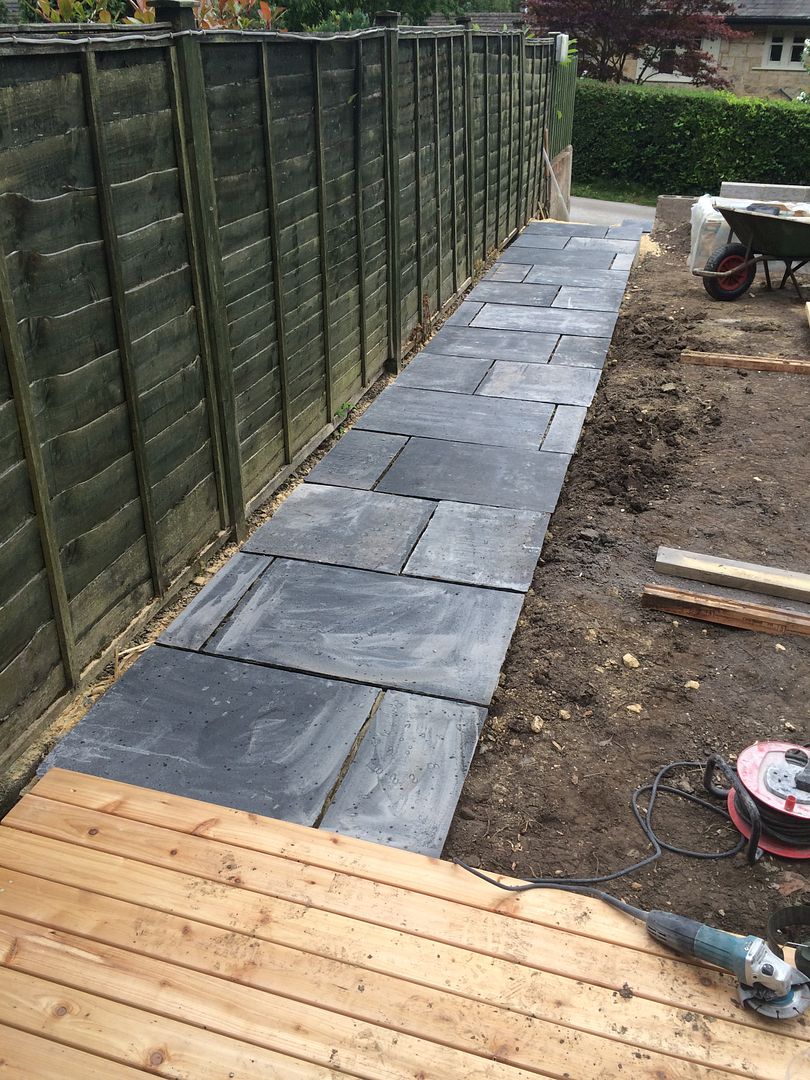
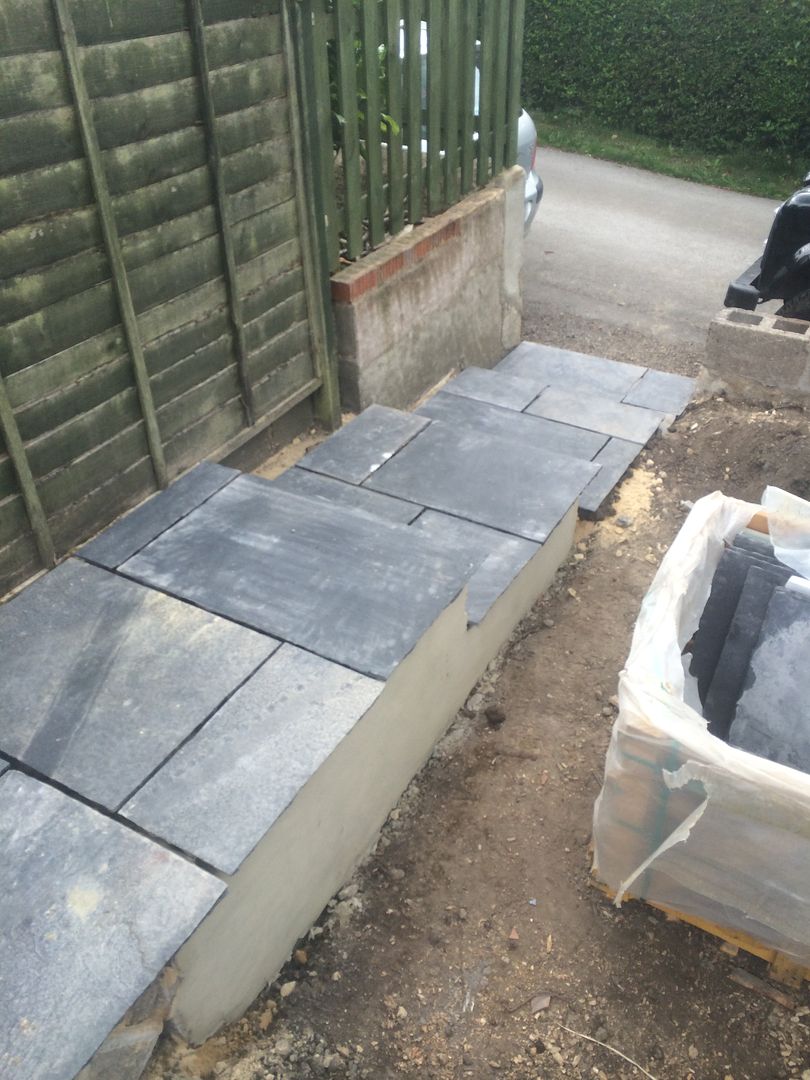
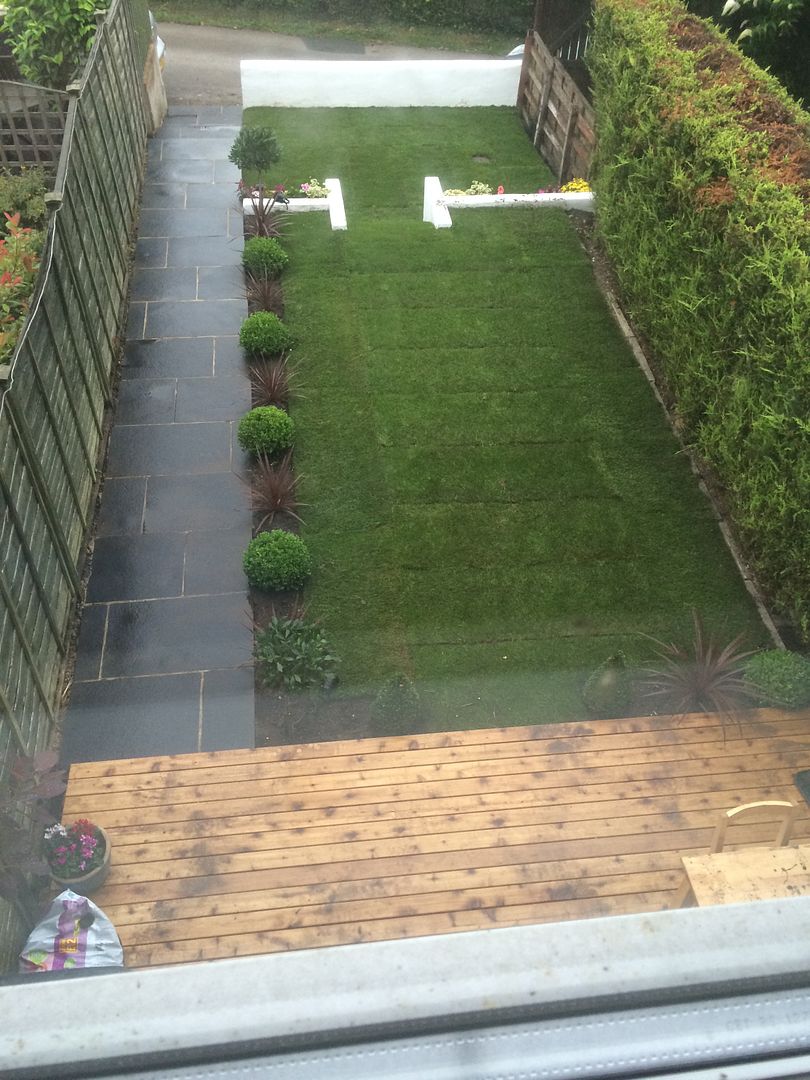
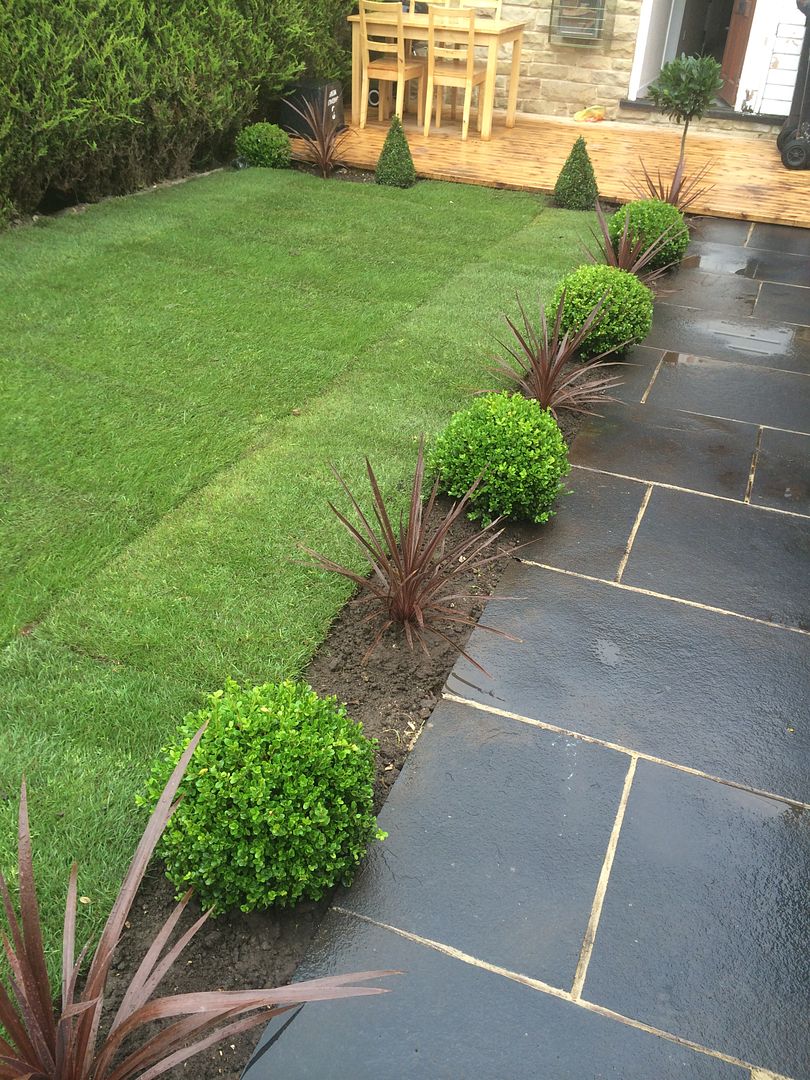
I rendered the wall I had built to support the slabs then work started on laying them. I chose Indian Black Limestone slabs which I have been very pleased with.
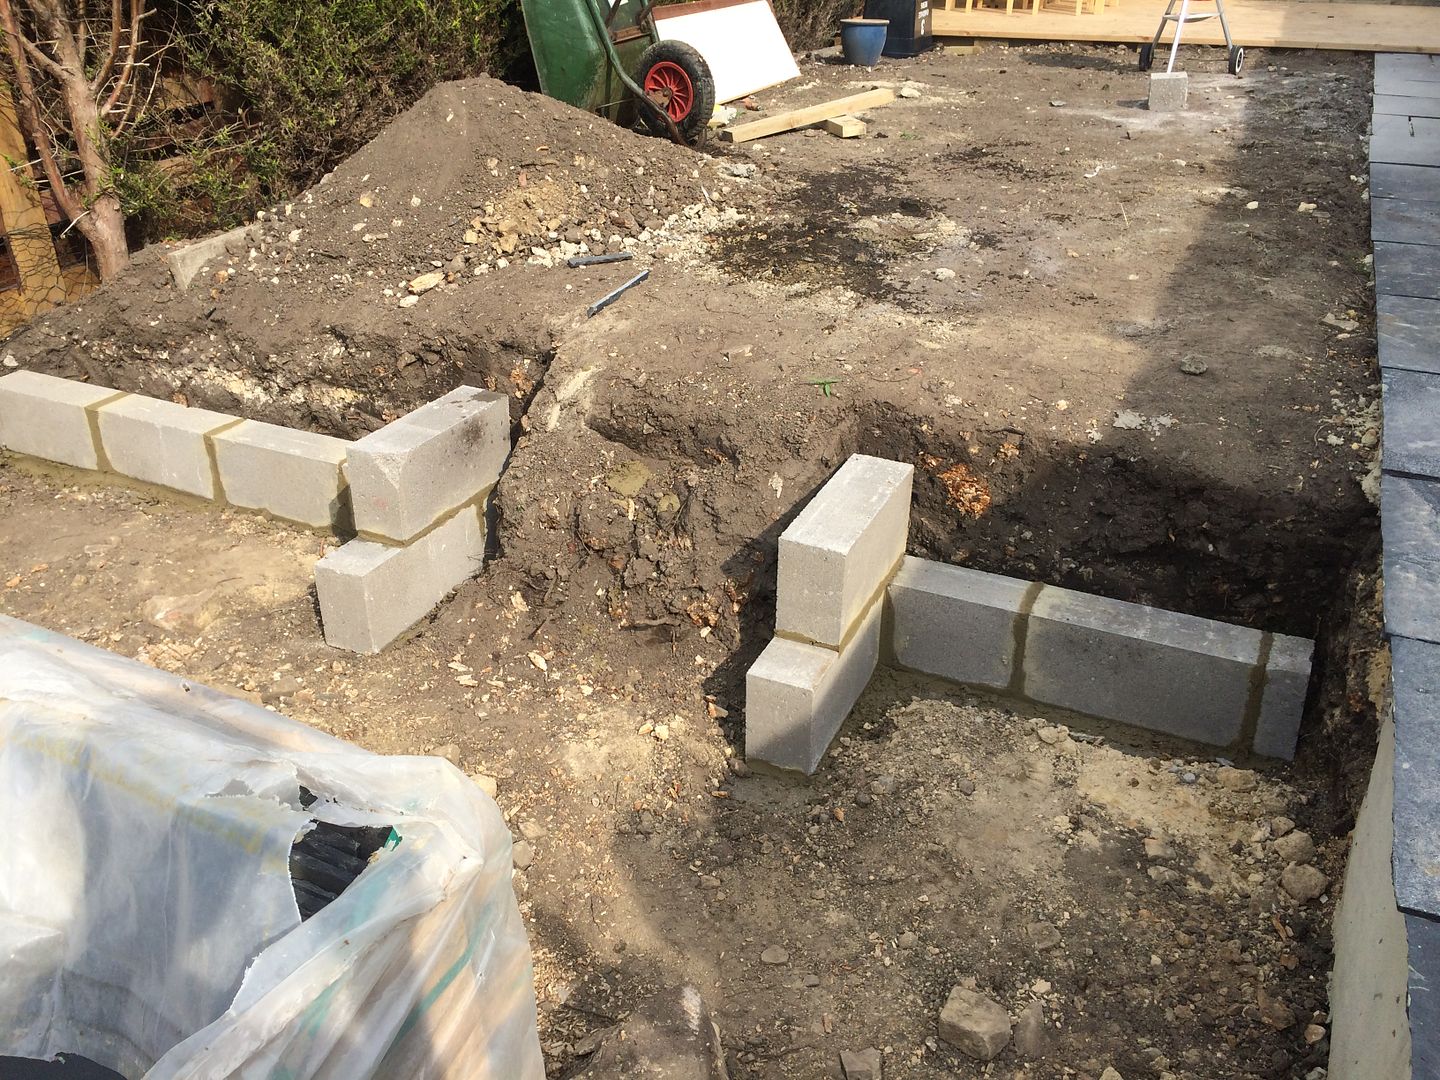
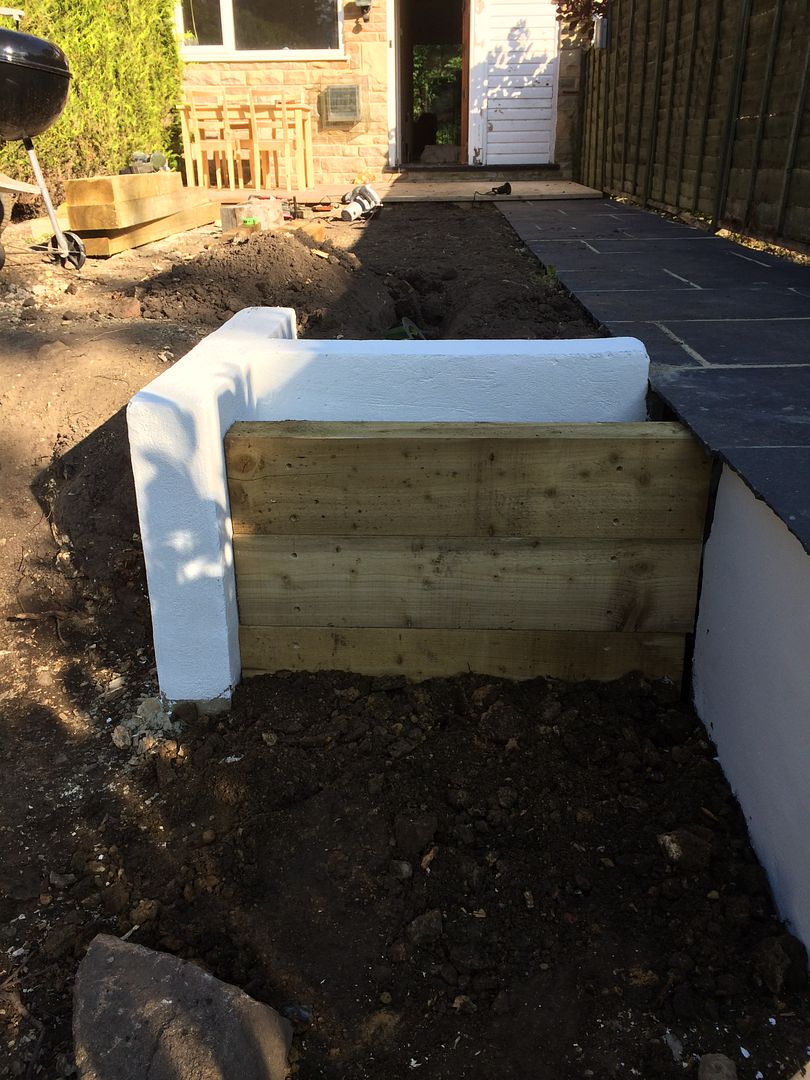
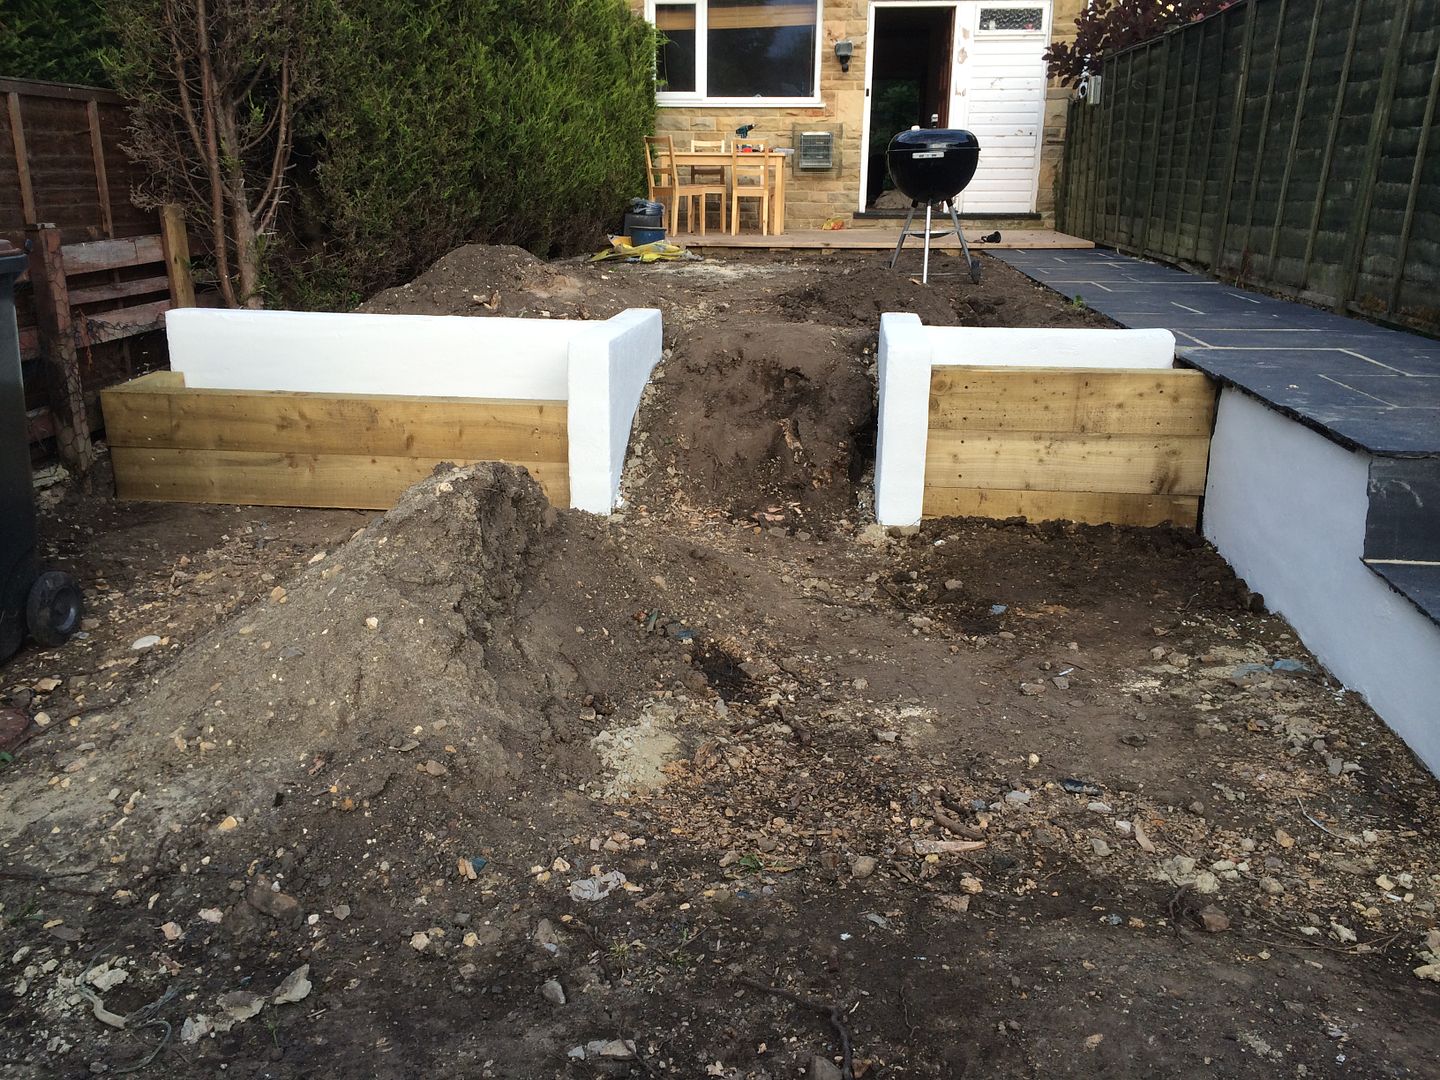
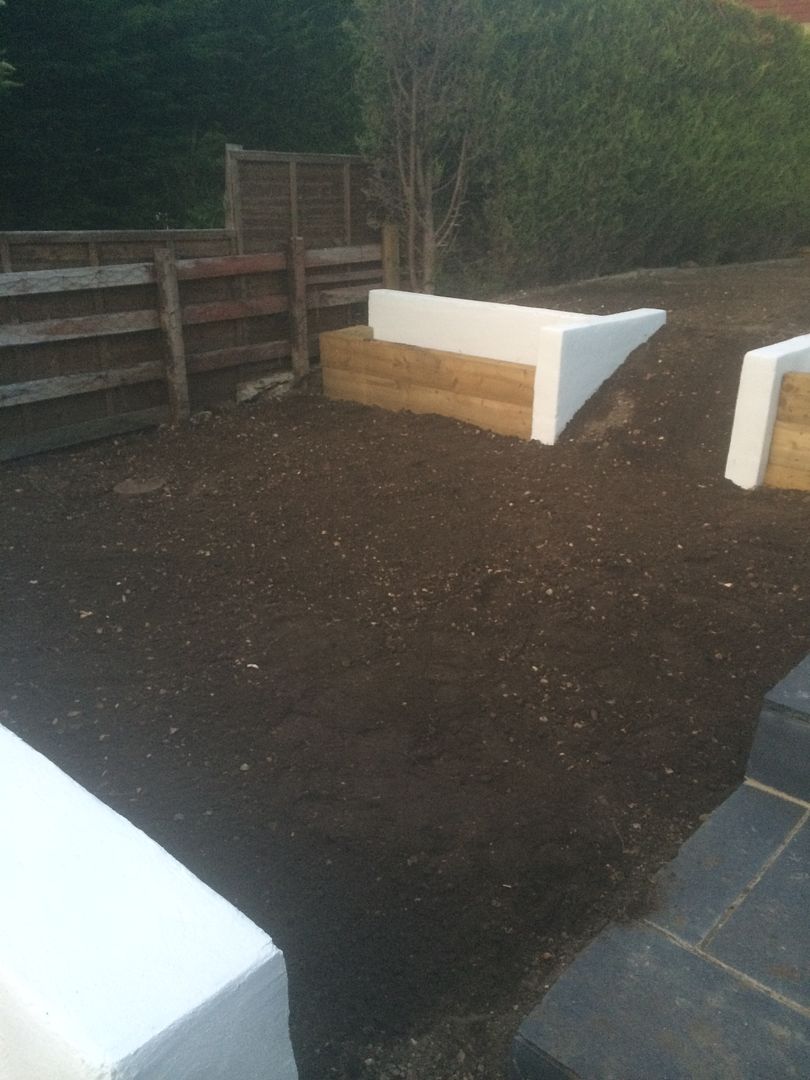
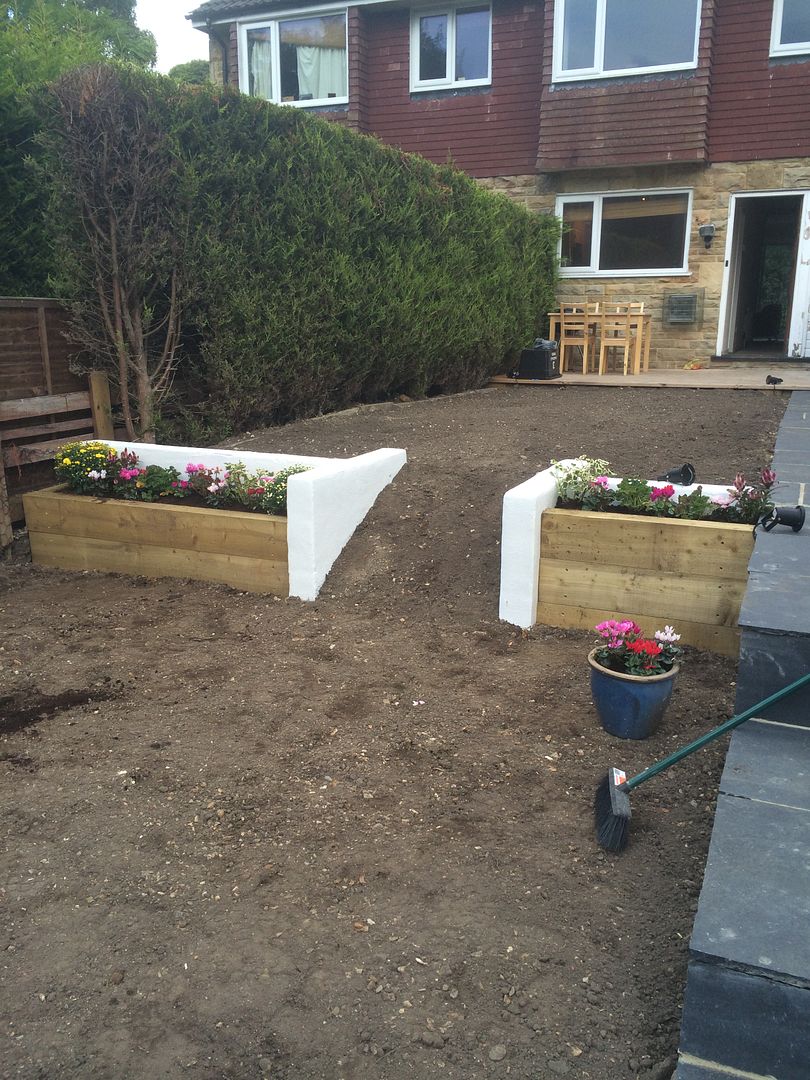
The next job was to create a wall between the two levels. I thought about making some more steps but decided a slope would be better to enable me to just drive the mower down. Again I poured some foundations and built a wall out of breeze blocks.
Obviously forgot to take photos during the stages of this but the next step was to render that wall along with my end wall. I then painted all my rendered walls with some white masonry paint.
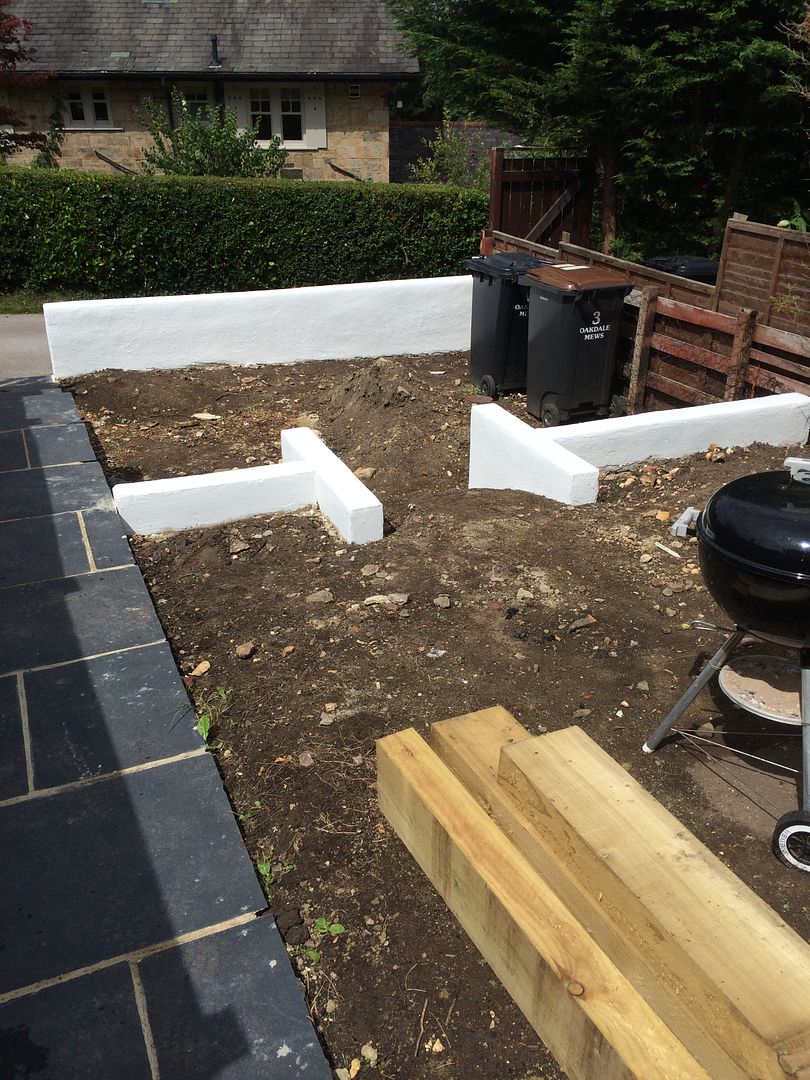
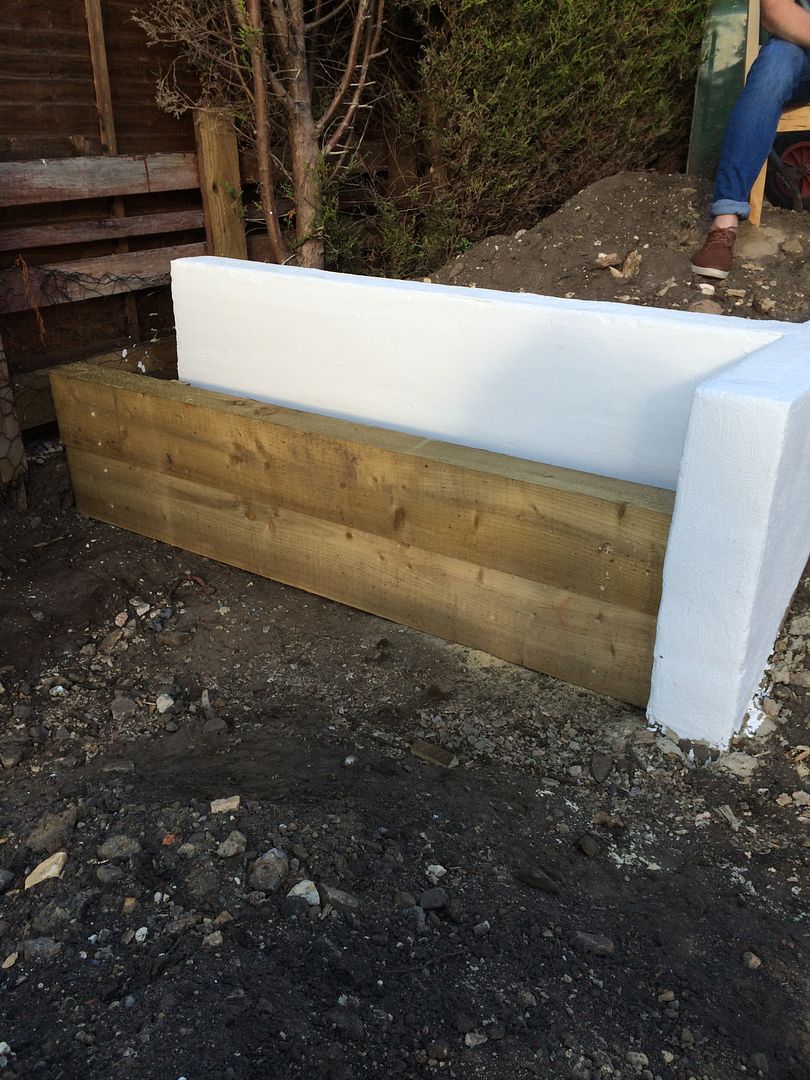
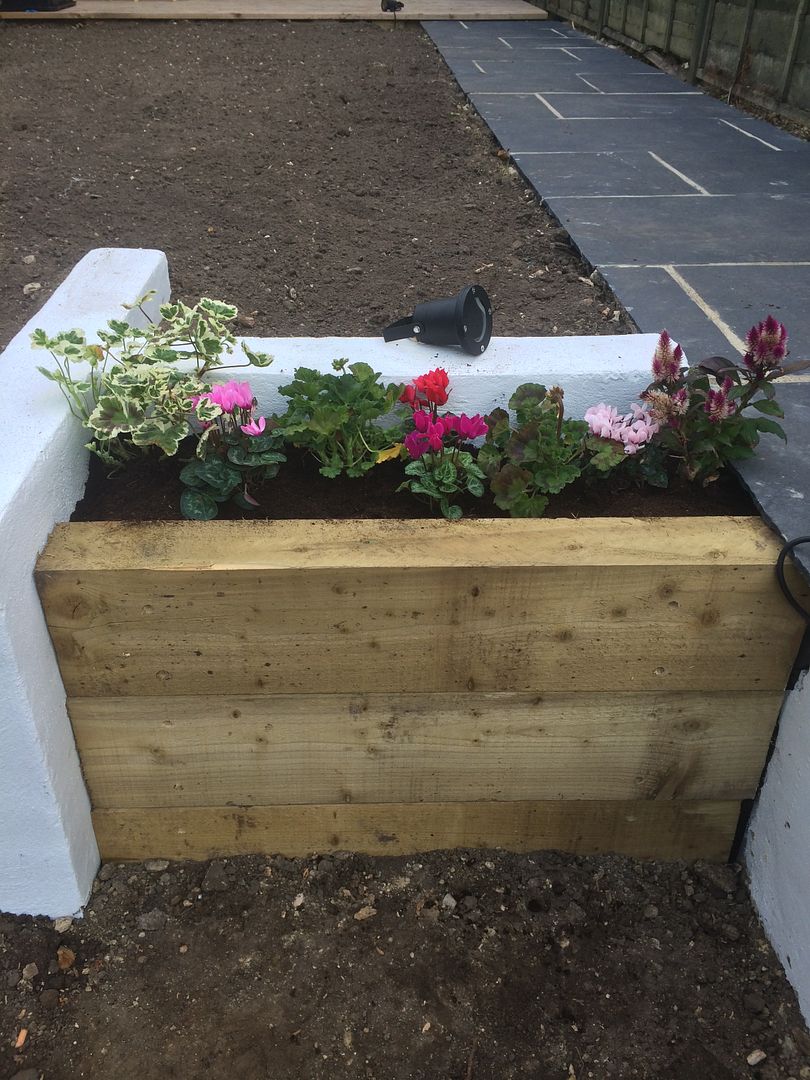
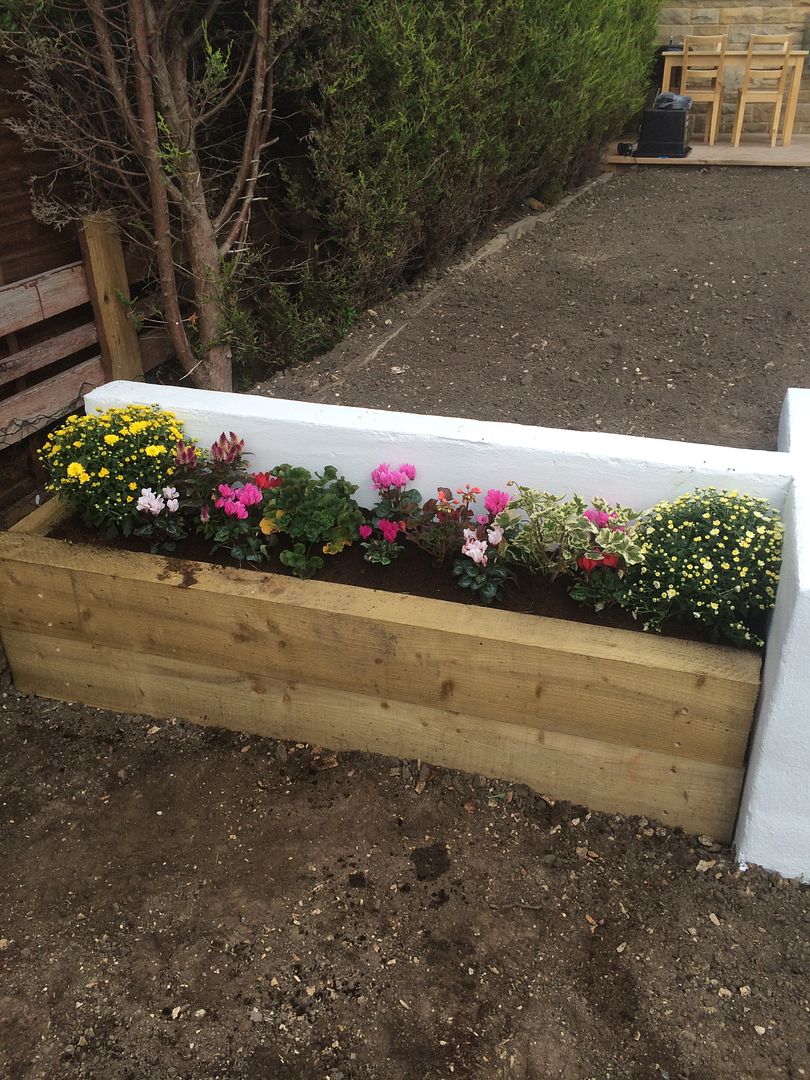
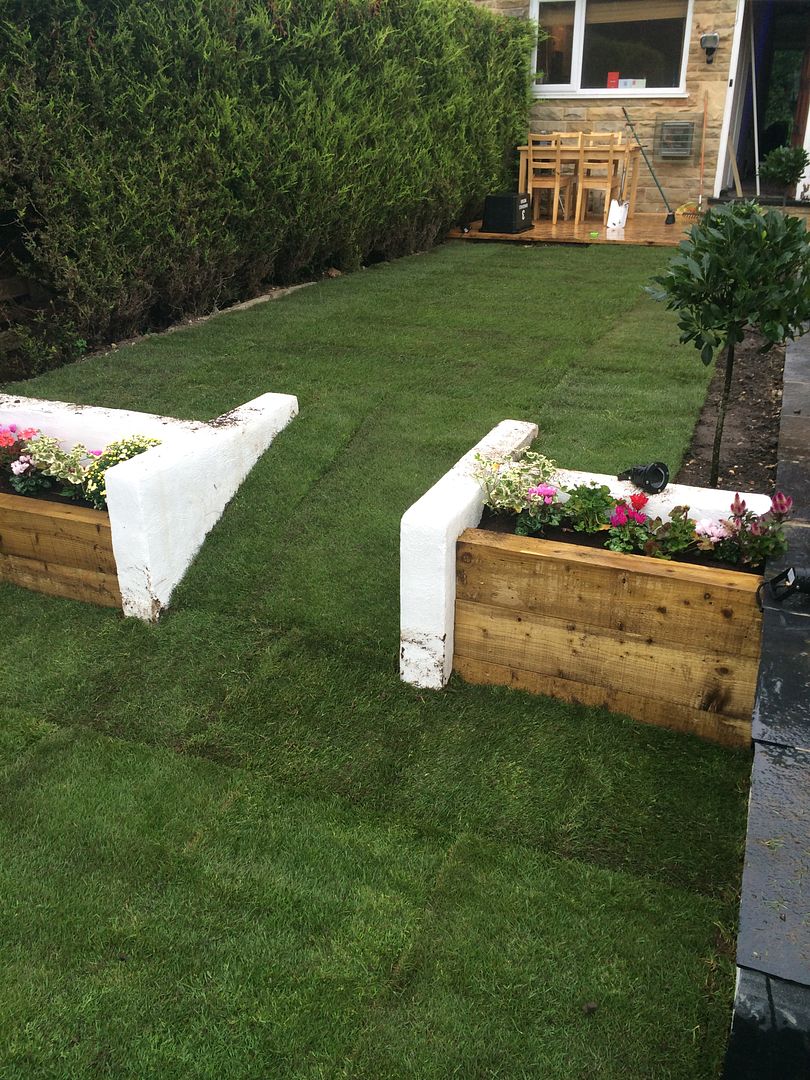
I wanted to create some planters out of sleepers on the front side of the new wall..
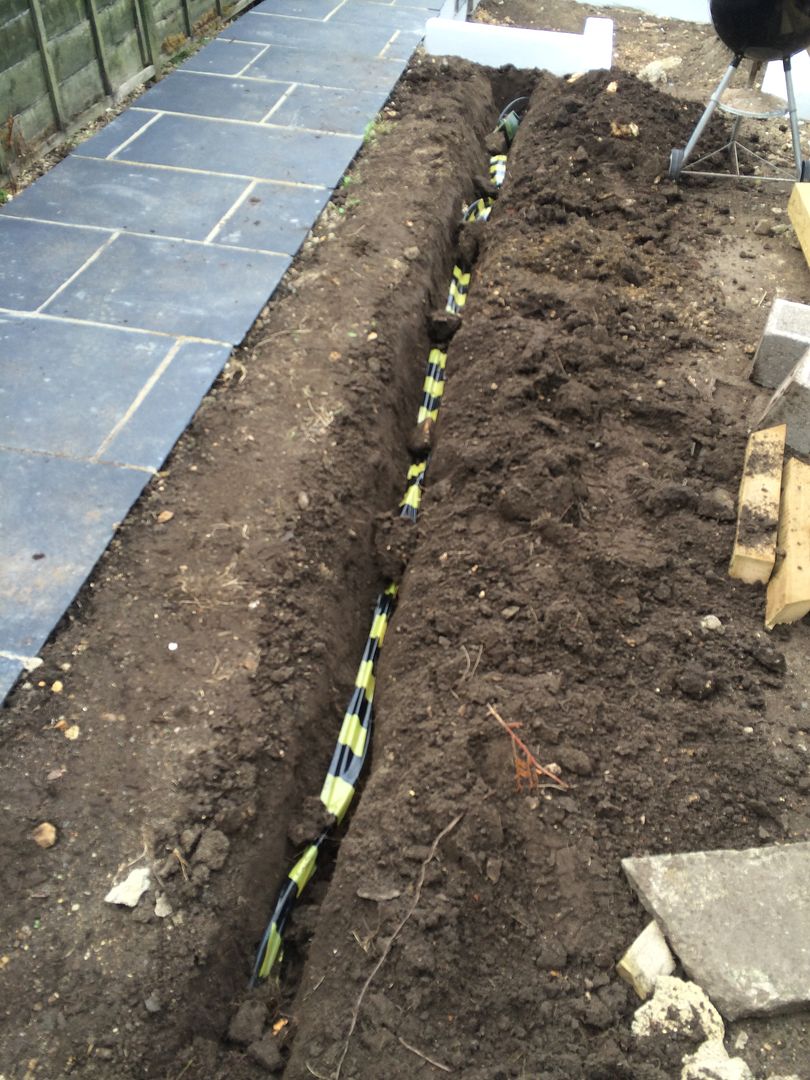
I wanted some spot lights in the garden so I had to bury some cable to allow for this. It is a special armoured cable for outside use.
I then put some nice flowers in my new planters!.. I'm not very good with flowers to be honest but I thought they looked ok!.. In an ideal world Id have some that stay nice all year but the ones I planted are dead now as it comes into winter so will re plant next spring.

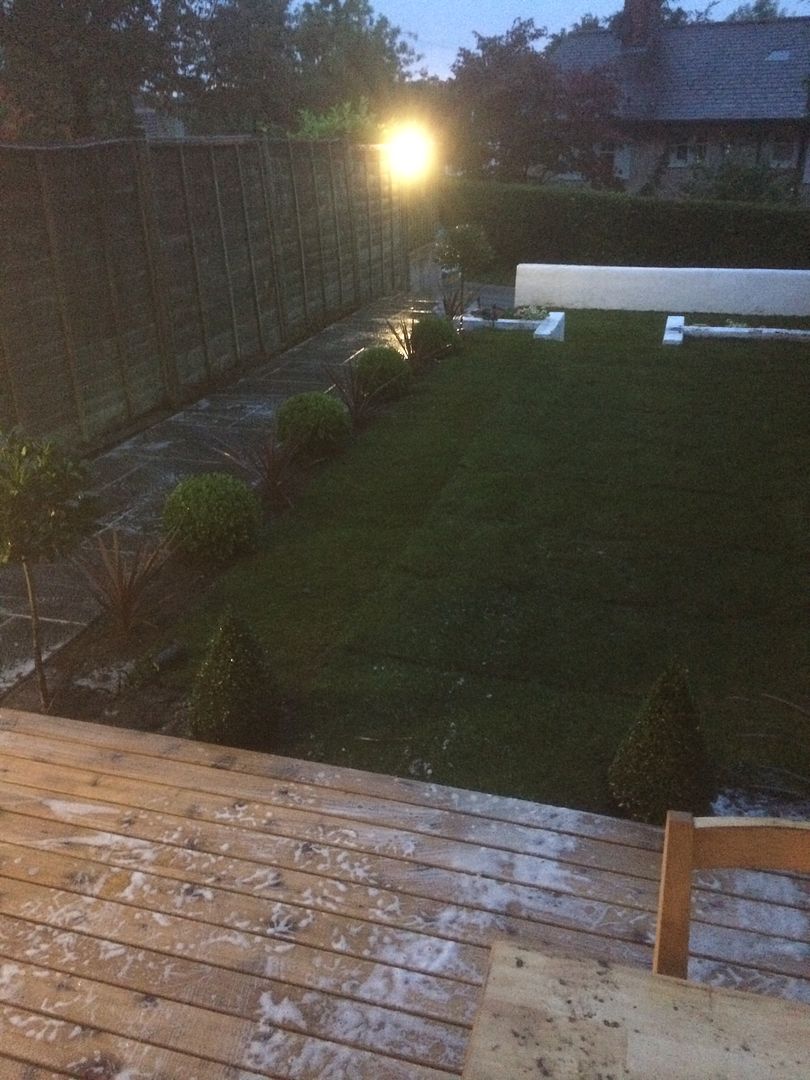
I then gave the garden a final level off and compacting in preparation for turf. I really wanted to go for artificial grass but I just couldn't justify the cost.
Next job.. Turf!
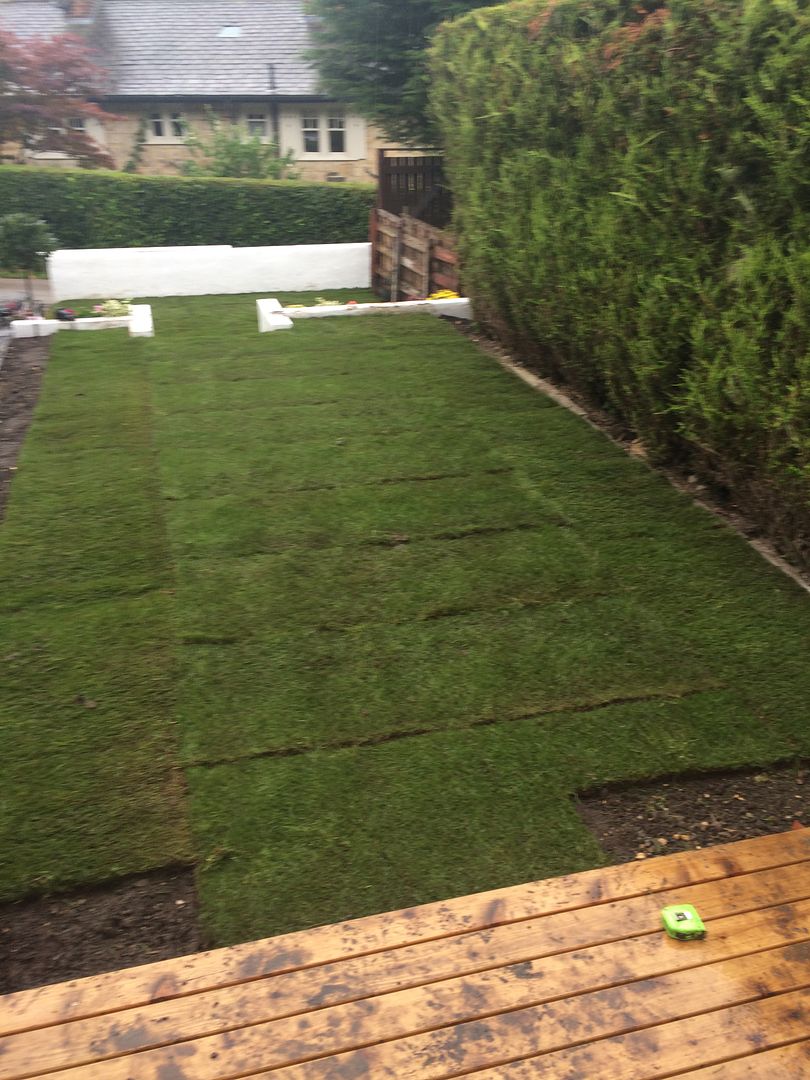
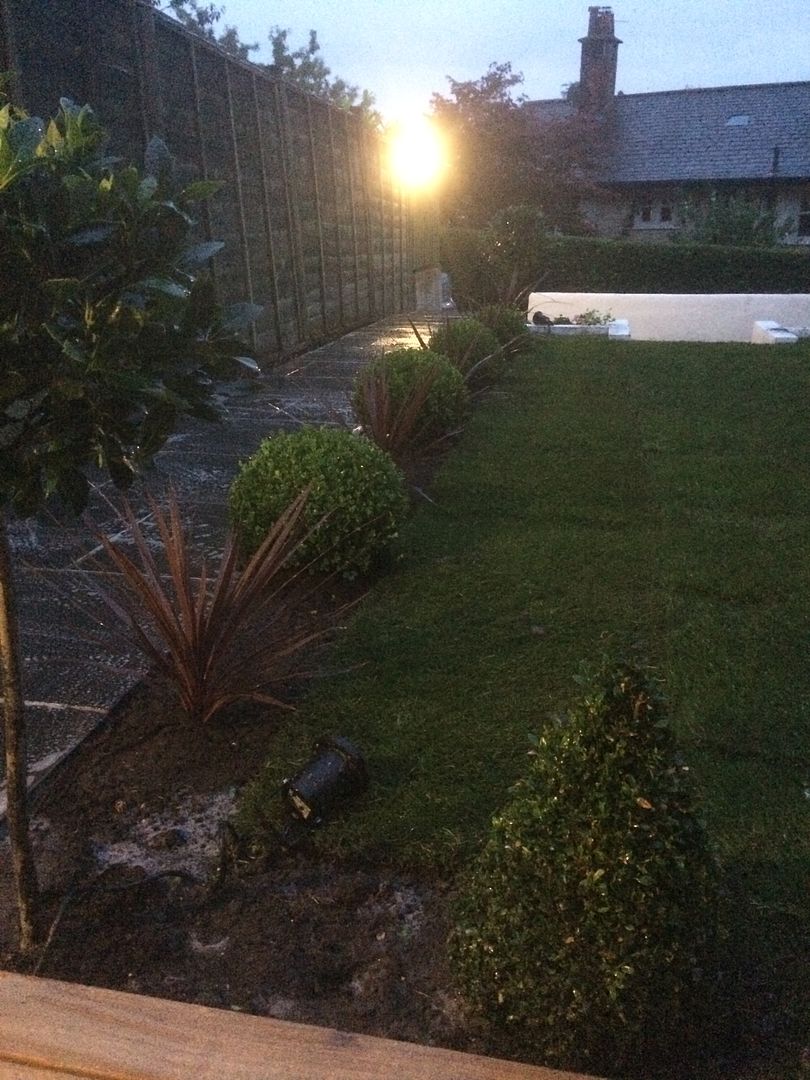
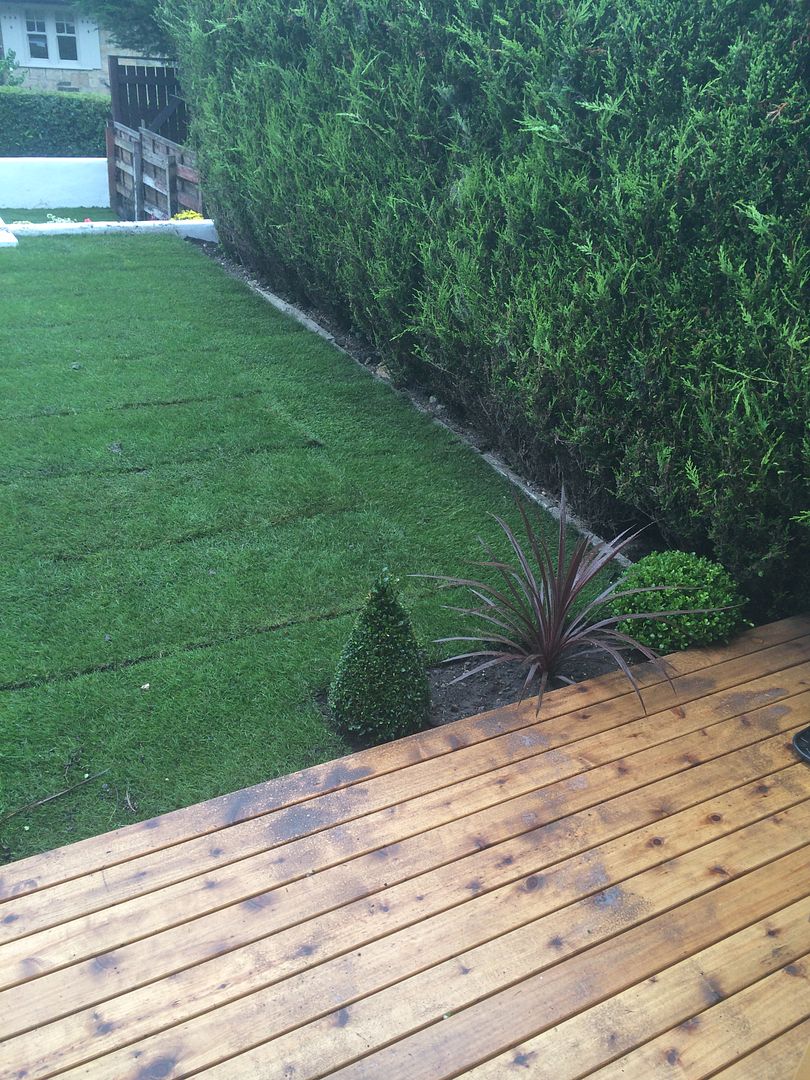
I left an area next to the slabs and in front of the deck for some topiary. This was eventually in filled with gravel around the plants.
I then had the roof jet washed. I came home from work one day as the neighbour was having his done... I'm not great with heights and couldn't believe the different it made so I asked the chap to come back tomorrow and do mine!.. (photo of next doors done compared to mine not done.. Again forgot to take a photo of mine done!)

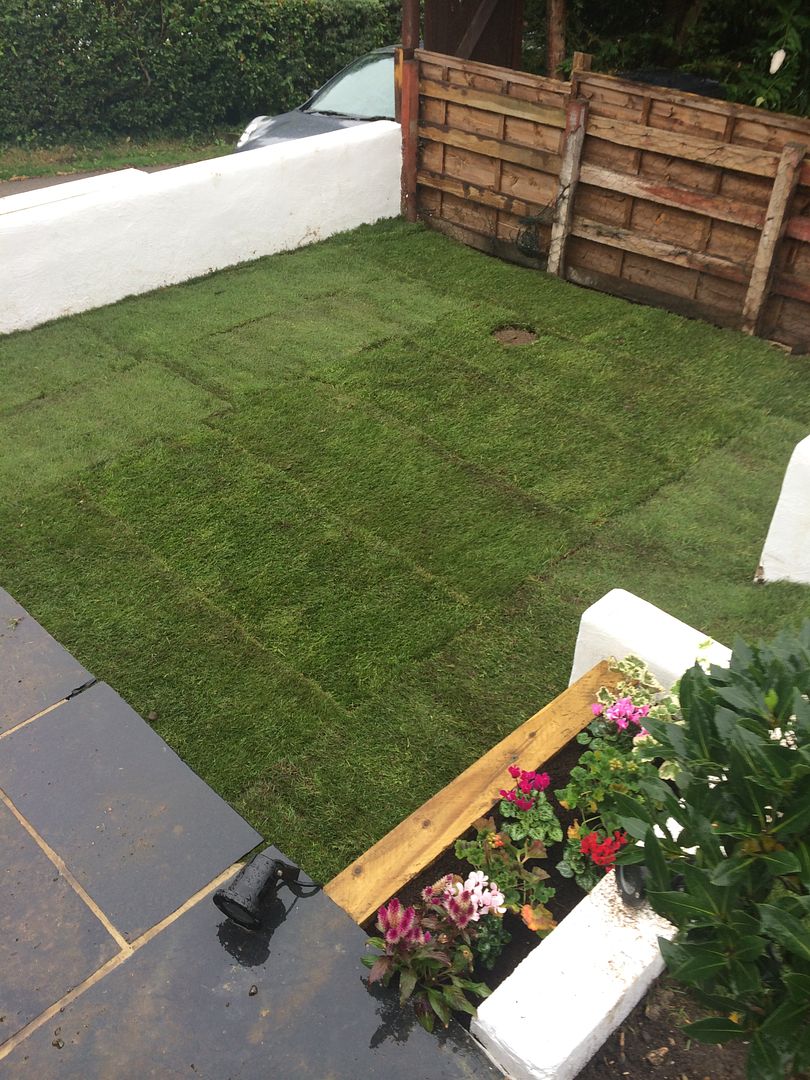
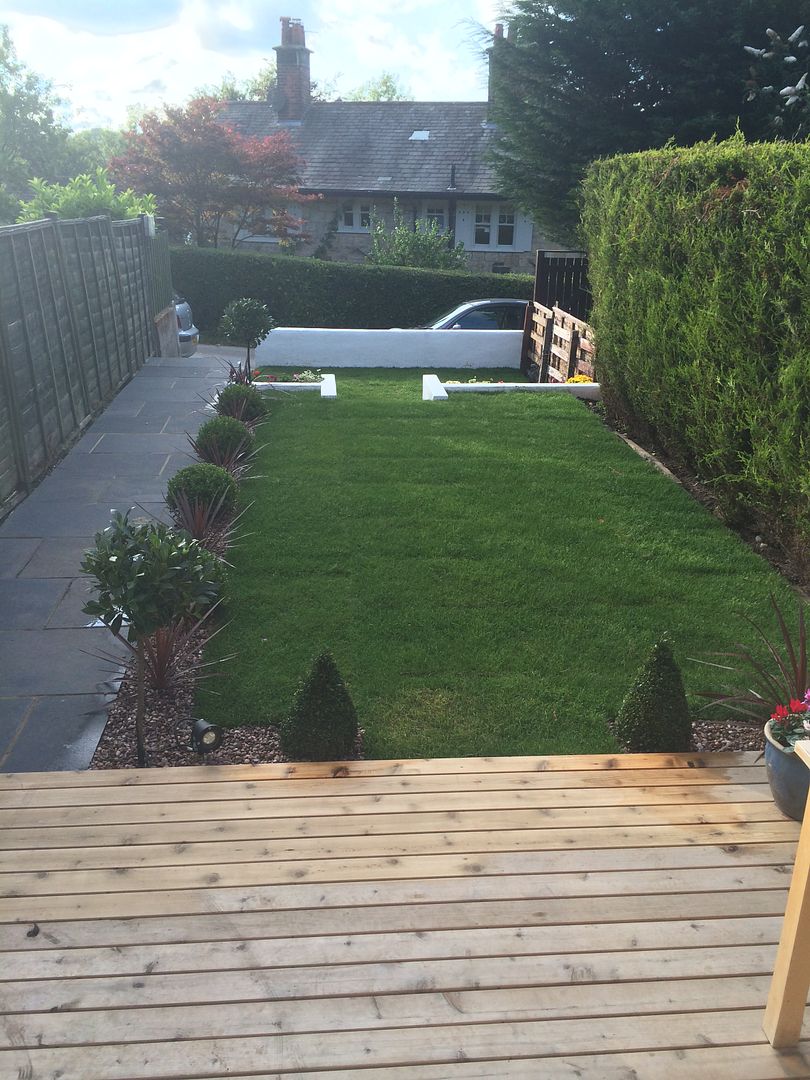
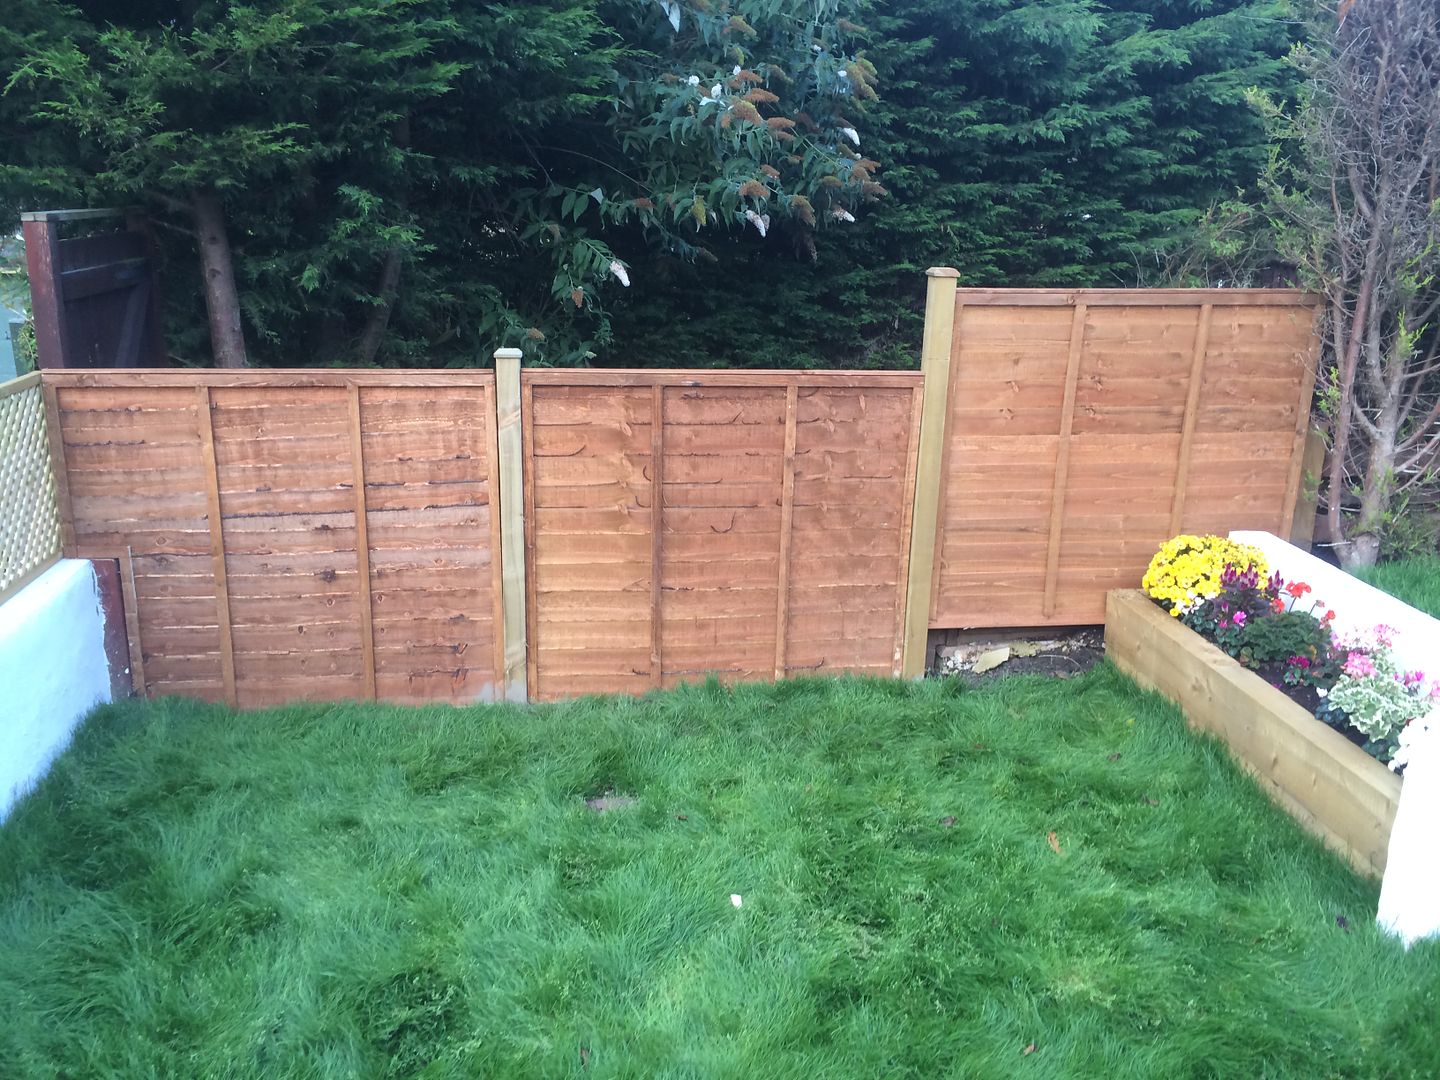
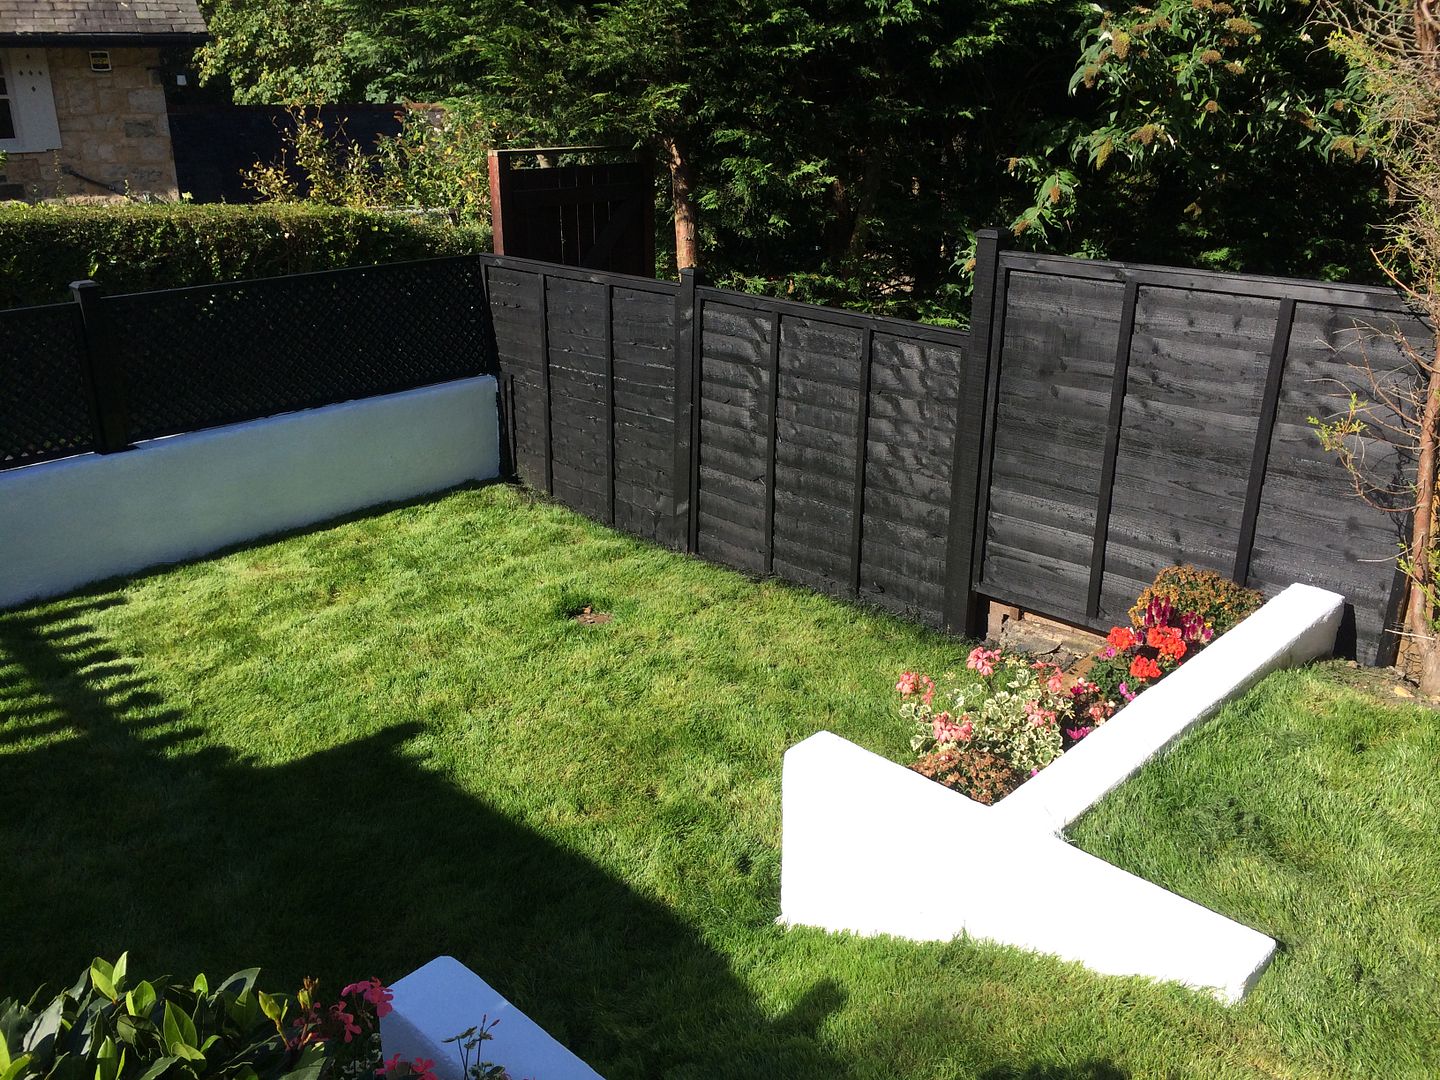
The final job for the garden this year was to replace the fence to the right as I look out and also put a fence on top of the end wall to add a little privacy. I did the fencing then painted them in a colour called black ash which I am very pleased with. Next spring I will be replacing the neighbour on the other side's fence for him and again painting it in the same colour..


This update takes you all up to about a month ago and not too much has happened in that space of time.. I am very pleased with how the garden turned out and due to working outside on it all summer I have never been as tanned in my life!..
The garden was a real mess. There were conifer trees at the front blocking a lot of light and taking up usable space. There was also a big bay? type tree in the garden which also contributed to me having about 4 metres at the front of the garden which was unusable. The hedge dividing my neighbour's house and mine was also very overgrown. Generally the garden was just crap. Old wonky concrete slabs as a path and patio outside the door.. As per the first pic on the first page.

I was a bit crap with the photos as the beginning of the garden makeover however I took one photo out of the kitchen window after the bay tree was felled..

Then another when the conifers at the front were done..

Digging out all of the roots for the trees was an absolute pig of a job however it enabled me to create two distinct levels in the garden as opposed to it sloping away from the house. I also levelled it from left to right. A big pile of earth as the levelling was under way.

I then decided to build a deck out of the front door one step below the door as opposed to the 2 steps down there were.. I built the frame then was able to get rid of all the hardcore from the old slabs and also my old bathroom tiles in the framework. Perhaps not the best way of getting rid of it but it works for me.


The area where the old path ran was levelled and then some hardcore was put down and compacted.


In the last pic you can see that I have started to add a course of blocks to the end wall. 2 courses went on in total.
I wanted to make sure the new path was wider than the one that was there previously and I also wanted to create some proper steps down toward the entrance to the garden. I poured some foundations then built a wall to support the path.


The timber arrived for my deck. I spent more than I needed to buying Western Red Cedar as I really like the reddish colour however it fades to grey so quickly untreated so next summer I plan to sand and treat it again. (I did treat it with some sealer once but it hasn't worked.)

The deck then started to go down. I bought a tool to enable me to hide screws which worked well but wasn't cheap. I made sure to put plenty of rat poison down amongst the hardcore also prior to laying the deck as the downside of putting all the hardcore there is the perfect environment for rats/mice you create. I also bought some led deck lights which I put into the first plank closest to the house.


I rendered the wall I had built to support the slabs then work started on laying them. I chose Indian Black Limestone slabs which I have been very pleased with.


The next job was to create a wall between the two levels. I thought about making some more steps but decided a slope would be better to enable me to just drive the mower down. Again I poured some foundations and built a wall out of breeze blocks.

Obviously forgot to take photos during the stages of this but the next step was to render that wall along with my end wall. I then painted all my rendered walls with some white masonry paint.


I wanted to create some planters out of sleepers on the front side of the new wall..


I wanted some spot lights in the garden so I had to bury some cable to allow for this. It is a special armoured cable for outside use.

I then put some nice flowers in my new planters!.. I'm not very good with flowers to be honest but I thought they looked ok!.. In an ideal world Id have some that stay nice all year but the ones I planted are dead now as it comes into winter so will re plant next spring.


I then gave the garden a final level off and compacting in preparation for turf. I really wanted to go for artificial grass but I just couldn't justify the cost.


Next job.. Turf!


I left an area next to the slabs and in front of the deck for some topiary. This was eventually in filled with gravel around the plants.


I then had the roof jet washed. I came home from work one day as the neighbour was having his done... I'm not great with heights and couldn't believe the different it made so I asked the chap to come back tomorrow and do mine!.. (photo of next doors done compared to mine not done.. Again forgot to take a photo of mine done!)

The final job for the garden this year was to replace the fence to the right as I look out and also put a fence on top of the end wall to add a little privacy. I did the fencing then painted them in a colour called black ash which I am very pleased with. Next spring I will be replacing the neighbour on the other side's fence for him and again painting it in the same colour..


This update takes you all up to about a month ago and not too much has happened in that space of time.. I am very pleased with how the garden turned out and due to working outside on it all summer I have never been as tanned in my life!..
Very impressive stuff, and of particular interest to me, since I am looking for a similar project.
I can't claim to be able to do eveything you've done here so far though...
Looking forward to the Downstairs getting the treatment...!
What's your budget?
How quickly are you looking to sell it on?
Are you looking to keep turning these projects over?
I can't claim to be able to do eveything you've done here so far though...
Looking forward to the Downstairs getting the treatment...!
What's your budget?
How quickly are you looking to sell it on?
Are you looking to keep turning these projects over?
Same here. Have some questions on the bathrooms and balistrades as well if thats ok!
Bathrooms:
Specifically on the shower cubicle. Was this custom made? I have an odd bit in the bathroom which I think I can fit a 1000x700 cublicle into, but I'd need random size bits of glass, like yours I think.
Also, were you not concerned about leaks with a wet-room? I've heard that retrofitting these is not always a good idea due to leaks (movement of boards etc could crack the tanking/tiles etc), Again though it would maximize space for me if we could take your approach.
Balistrade:
Wondering if you had thoughts on how you would do the main stair? I have an issue with mine (its quite similar) in that the newel posts don't work in the same way as yours. Specifically, there is only one at the top, so its out of line with the one on the wall. I'd have to add another one somehow (perhaps bolt onto the existing one, but worry about stability. Where did you get the parts?
NicoG said:
Very impressive stuff, and of particular interest to me, since I am looking for a similar project.
I can't claim to be able to do eveything you've done here so far though...
Looking forward to the Downstairs getting the treatment...!
What's your budget?
How quickly are you looking to sell it on?
Are you looking to keep turning these projects over?
I don't really have a budget to be fair.. To me the most important thing is how it looks when its done. It has to look a certain way and it will cost what it costs.. Within reason obviously. I do anticipate the cost of work totalling at least £20k when it is finished. Being prepared to do a lot of the work myself I am able to save on labour costs.I can't claim to be able to do eveything you've done here so far though...
Looking forward to the Downstairs getting the treatment...!
What's your budget?
How quickly are you looking to sell it on?
Are you looking to keep turning these projects over?
The plan will probably be to sell it when it is finished and look to do the same again on a slightly larger scale or if I could find a plot build a house. While I am still relatively young and single with no children I plan to keep taking on projects with a view to increasing my net worth or by ending up in a house that I would not have been able to afford on my salary. I don't have stacks of cash in the bank.. never have been any good at saving. Always been good at borrowing money and paying it back. The money to do the project is borrowed so I suppose I am taking a calculated risk.
Pheo said:
Same here. Have some questions on the bathrooms and balistrades as well if thats ok!
Bathrooms:
Specifically on the shower cubicle. Was this custom made? I have an odd bit in the bathroom which I think I can fit a 1000x700 cublicle into, but I'd need random size bits of glass, like yours I think.
Also, were you not concerned about leaks with a wet-room? I've heard that retrofitting these is not always a good idea due to leaks (movement of boards etc could crack the tanking/tiles etc), Again though it would maximize space for me if we could take your approach.
Balistrade:
Wondering if you had thoughts on how you would do the main stair? I have an issue with mine (its quite similar) in that the newel posts don't work in the same way as yours. Specifically, there is only one at the top, so its out of line with the one on the wall. I'd have to add another one somehow (perhaps bolt onto the existing one, but worry about stability. Where did you get the parts?
Yep, the shower cubicle in the bedroom was all custom made out of glass. I measured up the sizes I figured I needed and the fixings required to make them work and a local glass company manufactured the glass. I did all the fitting myself also to keep costs down. Glass is great and there is a lot that can be done with it... If the wet room process is done correctly i.e under boarding then the risk of movement is reduced. As I have said earlier in the post I think in future I will just use very slim shower tray as opposed to doing a wet room. Bathrooms:
Specifically on the shower cubicle. Was this custom made? I have an odd bit in the bathroom which I think I can fit a 1000x700 cublicle into, but I'd need random size bits of glass, like yours I think.
Also, were you not concerned about leaks with a wet-room? I've heard that retrofitting these is not always a good idea due to leaks (movement of boards etc could crack the tanking/tiles etc), Again though it would maximize space for me if we could take your approach.
Balistrade:
Wondering if you had thoughts on how you would do the main stair? I have an issue with mine (its quite similar) in that the newel posts don't work in the same way as yours. Specifically, there is only one at the top, so its out of line with the one on the wall. I'd have to add another one somehow (perhaps bolt onto the existing one, but worry about stability. Where did you get the parts?
I plan to do the further 3 balustrades in the house using the same method however the actual staircases will need more thought due to the end angles required. If you want to post a picture up of yours I can maybe suggest some ideas... There are a few different ways glass balustrades can be done.. A couple of which have been shown in other threads on here.. the one which is least like mine was in the Chamonix studio renovation thread which is essentially sandwiching the glass along the bottom edge.
P4T said:
I don't really have a budget to be fair.. To me the most important thing is how it looks when its done. It has to look a certain way and it will cost what it costs.. Within reason obviously. I do anticipate the cost of work totalling at least £20k when it is finished. Being prepared to do a lot of the work myself I am able to save on labour costs.
Assuming you are doing this on a renovation rather than living in it basis, are you not keeping track of the costs?Whilst it is an interesting project, if you want to do this as a semi-regular job then you have to have an idea of how much you plan to spend and how much you have spent. Otherwise you will never know if you have made a profit or loss at the end of the day...
P4T said:
Yep, the shower cubicle in the bedroom was all custom made out of glass. I measured up the sizes I figured I needed and the fixings required to make them work and a local glass company manufactured the glass. I did all the fitting myself also to keep costs down. Glass is great and there is a lot that can be done with it... If the wet room process is done correctly i.e under boarding then the risk of movement is reduced. As I have said earlier in the post I think in future I will just use very slim shower tray as opposed to doing a wet room.
I plan to do the further 3 balustrades in the house using the same method however the actual staircases will need more thought due to the end angles required. If you want to post a picture up of yours I can maybe suggest some ideas... There are a few different ways glass balustrades can be done.. A couple of which have been shown in other threads on here.. the one which is least like mine was in the Chamonix studio renovation thread which is essentially sandwiching the glass along the bottom edge.
I remember now, I scanned the thread at work and went back to look at the photos, but blocked at work, now working (odd!). Looks great. Did the glass company supply the fittings as well?I plan to do the further 3 balustrades in the house using the same method however the actual staircases will need more thought due to the end angles required. If you want to post a picture up of yours I can maybe suggest some ideas... There are a few different ways glass balustrades can be done.. A couple of which have been shown in other threads on here.. the one which is least like mine was in the Chamonix studio renovation thread which is essentially sandwiching the glass along the bottom edge.
I'm thinking I might "need" to go wet-room, simply because fitting a tray in might cause space issues. But depends a bit if we are able to route the soil pipe to the stack through the joists or not. Basically we can scavange a small bit of landing space to extend one corner of the bathroom out by about 25cm, having knocked what is a separate WC and bathroom into one. This just about makes room for a shower, but its only a door's width wide... I may not bother trying to do it in the end as it might not be worth the cost, but interesting to see what might be possible!
KTF said:
Assuming you are doing this on a renovation rather than living in it basis, are you not keeping track of the costs?
Whilst it is an interesting project, if you want to do this as a semi-regular job then you have to have an idea of how much you plan to spend and how much you have spent. Otherwise you will never know if you have made a profit or loss at the end of the day...
I have been living in the house whilst doing the work.. When I first moved in I thought it might cost 10k to do it and as time has progressed I think its more likely to break 20k..I'm not too concerned with the overspend as I am confident I am still going to end up with plenty of equity. I do understand your point that of course the sums have to work for it to be worthwhile.. Perhaps I came across a tad to blasé about the budget.. It has to obviously stop somewhere before it starts being a pointless activity as far as making a profit is concerned. Whilst it is an interesting project, if you want to do this as a semi-regular job then you have to have an idea of how much you plan to spend and how much you have spent. Otherwise you will never know if you have made a profit or loss at the end of the day...
Pheo said:
Did the glass company supply the fittings as well?
Yep, the local glass co were very helpful as far as supplying the necessary fittings etc. I essentially first went in with an idea sketched out of what I wanted to achieve and we discussed what was and wasn't possible from there until a final plan was drawn at which point I then measured up and provided measurements. Pheo said:
Also, were you not concerned about leaks with a wet-room? I've heard that retrofitting these is not always a good idea due to leaks (movement of boards etc could crack the tanking/tiles etc), Again though it would maximize space for me if we could take your approach.
If you get someone in who knows and has previous with wet rooms, there should be no leaks. A fan of the Impy system myself. Comes with a membrane and instructions. It's quite a simple process really.
Gassing Station | Homes, Gardens and DIY | Top of Page | What's New | My Stuff