Our School House project
Discussion


Harry - thanks for the comments. I love your new project; the house looks beautiful and the thread is bookmarked!
Looking back at what I've done so far I think that had I had the money available I would have paid somebody to come in and get the house to a good shell (plaster, electrics, plumbing etc) then would have done the rest myself. I found the demolition and dust/prep work to be the worst - but the putting it back together to be quite rewarding. It's a lot like old cars - all the hard graft is welding and cutting out which I can't stand, but the fun is when you have a solid shell and you put the shiny bits on. Hence why I built the 3 wheeler from new!
Just got back from taking Mrs. H. to a Star Wars convention at Manchester (don't ask) and had time to collect these from my dad who had dipped them in his 'gunk tank'. I didn't ask exactly what the gunk was, but it's removed a good 50 years of old paint. Welcome back original brass sash catches...

Phil
Evening,
Another small update - it's amazing how slow progress can be when you're only working on it a day a week. My attention is turning to the car and garage in preparation for summer too, so I can't see me getting on much faster anytime soon!
I'll keep to pics; a thousand words and all that..
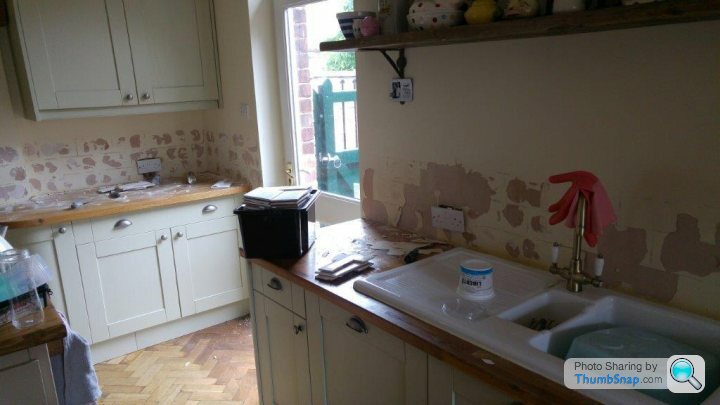
Began by tiling the splash backs, and fairly happy with my handywork:

Then made a balls up with the grout. Thought that grey might be a bit too 'modern' and that white would loose the definition of the already white (although sold as cream?!) tiles. My arm was twisted because I'm tight and had soem ivory in the garage, and so I get on and used that. Great grouting job, but the ivory doesn't go at all with the white and it annoys me each time I see it. Current plan is to try some grout die and go to grey. Turns out there's a reason why people use it!
Next up was the kitchen island. Fantastic chap made it for us and very happy. We needed the extra work space, but didn't want units down both sides:

Christmas holidays meant I finally got some of the garage cleaned out. I've started a thread for it, and will update once I make some progress. I've now bought some of the Ikea PS meal cabinets and some red racking which should look good with white walls and a decent floor down. Watch this space.

Clearing some junk from the garage meant I could begin to clear the outhouse/utility (and re-fill the garage!). The outhouse was the original staff toilets and had been a state when we got the place - still with toilets in situ. I'd chipped plaster off due to a damp problem, which has dried off now. The roof is lead, but was leaking back in where it meets the wall (don't know the technical term, sorry!) and I'd had to take a bit of the ceiling down to inspect.
I'd been up on the roof the week before Christmas trying to fix a tile when the ladder slipped, luckily I landed on the outhouse roof - so a half drop rather than the full height of the house. Either way it put the fear of god into me about ladders and I got a roofer to fix the tiles (and relieve me of ££). About the same time we acquired a new adjoining neighbour who had his chap do some work on the guttering directly above my outhouse roof. I think between us we've fixed the leak now and I can get on with making a workable utility.
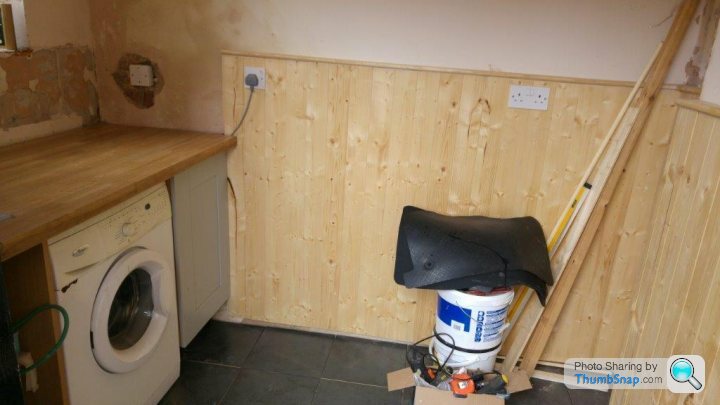
I got base units in around Christmas, and today have just finished the cladding. I'm aiming for 'classic' rather than 'American ranch'. Hopefully some nice paint will help:

Sorry - camera phone from the 90's:
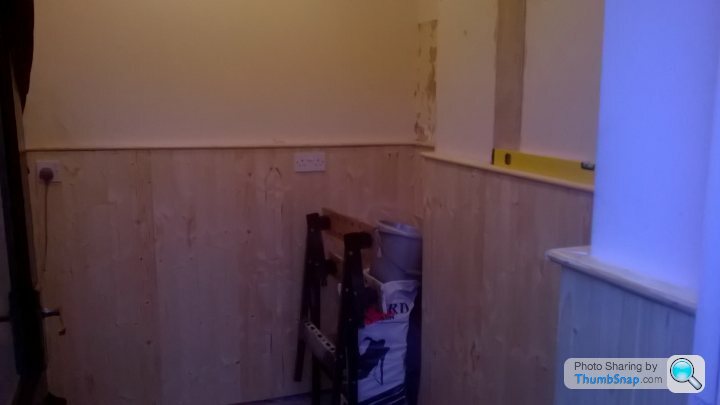

I also found that the unnamed switch on the left controls all power to my garage (about 100 yards away). I found this out the hard way of course.
Some poor phone pics from today showing the lounge almost done and finally got some pictures/art up in the kitchen.


So what's after the utility? The rear yard is a priority I think. The garden/main entrance etc are round the front, but this being Yorkshire everyone seems to use the back door (insert pun here) which means dirt constantly coming through into the kitchen. My plan was to build a store for the bins and logs to the left, then get something down on the ground to tidy it up. Would like sandstone but this must be budget job and I just need something to tide me over. Any ideas? Shale/slate stuff?


This one seems to be taking up plenty of time. Two today!

Thanks for reading,
P
Another small update - it's amazing how slow progress can be when you're only working on it a day a week. My attention is turning to the car and garage in preparation for summer too, so I can't see me getting on much faster anytime soon!
I'll keep to pics; a thousand words and all that..
Began by tiling the splash backs, and fairly happy with my handywork:
Then made a balls up with the grout. Thought that grey might be a bit too 'modern' and that white would loose the definition of the already white (although sold as cream?!) tiles. My arm was twisted because I'm tight and had soem ivory in the garage, and so I get on and used that. Great grouting job, but the ivory doesn't go at all with the white and it annoys me each time I see it. Current plan is to try some grout die and go to grey. Turns out there's a reason why people use it!
Next up was the kitchen island. Fantastic chap made it for us and very happy. We needed the extra work space, but didn't want units down both sides:
Christmas holidays meant I finally got some of the garage cleaned out. I've started a thread for it, and will update once I make some progress. I've now bought some of the Ikea PS meal cabinets and some red racking which should look good with white walls and a decent floor down. Watch this space.
Clearing some junk from the garage meant I could begin to clear the outhouse/utility (and re-fill the garage!). The outhouse was the original staff toilets and had been a state when we got the place - still with toilets in situ. I'd chipped plaster off due to a damp problem, which has dried off now. The roof is lead, but was leaking back in where it meets the wall (don't know the technical term, sorry!) and I'd had to take a bit of the ceiling down to inspect.
I'd been up on the roof the week before Christmas trying to fix a tile when the ladder slipped, luckily I landed on the outhouse roof - so a half drop rather than the full height of the house. Either way it put the fear of god into me about ladders and I got a roofer to fix the tiles (and relieve me of ££). About the same time we acquired a new adjoining neighbour who had his chap do some work on the guttering directly above my outhouse roof. I think between us we've fixed the leak now and I can get on with making a workable utility.
I got base units in around Christmas, and today have just finished the cladding. I'm aiming for 'classic' rather than 'American ranch'. Hopefully some nice paint will help:
Sorry - camera phone from the 90's:
I also found that the unnamed switch on the left controls all power to my garage (about 100 yards away). I found this out the hard way of course.
Some poor phone pics from today showing the lounge almost done and finally got some pictures/art up in the kitchen.
So what's after the utility? The rear yard is a priority I think. The garden/main entrance etc are round the front, but this being Yorkshire everyone seems to use the back door (insert pun here) which means dirt constantly coming through into the kitchen. My plan was to build a store for the bins and logs to the left, then get something down on the ground to tidy it up. Would like sandstone but this must be budget job and I just need something to tide me over. Any ideas? Shale/slate stuff?
This one seems to be taking up plenty of time. Two today!
Thanks for reading,
P
Good evening,
I thought it was about time I updated this thread a little as it’s been nearly 10 months since my last update. I’ve been inspired by Stewjohnst’s Georgian renovation thread which has been both brilliant to read and kept me going with my own renovation over summer.
We’ve been in the house for over a year now and although it sometimes feels as if we’ve not done anything, the place is at least hospitable and we can have friends round without panicking about them falling through the floor or telling them to come in ‘old clothes’. Work’s always a bit slow as its just Chloe (Mrs H) and myself doing it, but I’m beginning to realise that I actually enjoy the work and we’re slowly getting there.
I’ll try and update from Feb to now – it probably won’t be in order because I’ve flitted between rooms/jobs, but I’ll try and explain what we’ve done room by room...
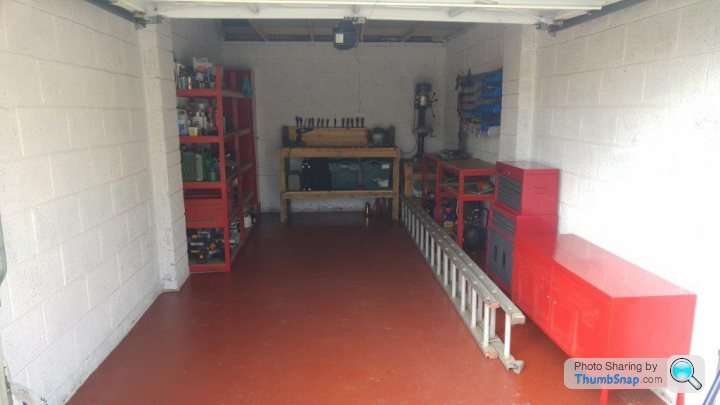
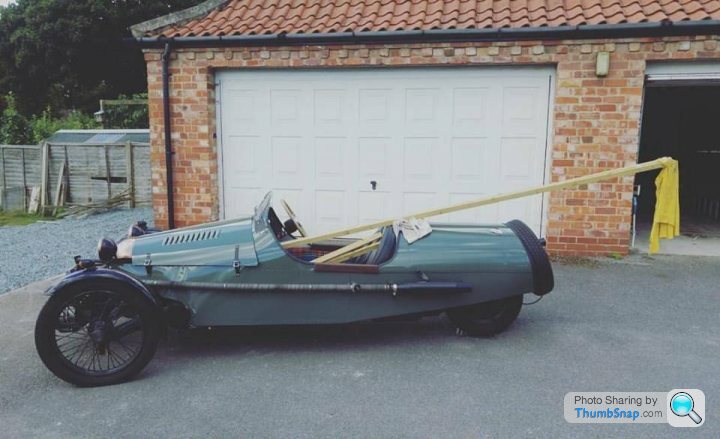
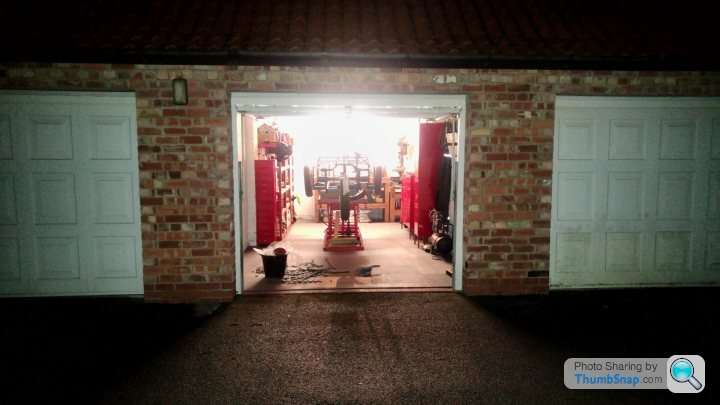
So, as this is PH i’ll begin with the garage. I’m sure I put some pics on another thread of this so I’ll keep this bit short. The garage is only a single but a decent size, and as I’ve only got the 3 wheeler and some tools it suits me well. The problem was that the block walls and concrete floor meant that after a week everything was covered in dust. After a bit of research I bought a cheap electric paint sprayer from ebay and set to work. The outcome was that the paint had to be thinned so far to get through the gun that it went on like milk and I got fed up of it. I’m sure that if I’d have hired a real system or maybe adapted a car paint gun and used the compressor, then spraying would be the answer – but to be honest I ended up with a roller and just went for it. Here is it with the walls done:

This was good but didn’t really help the dust. By this point i’d also got some cheap chipboard from Wickes and boarded the roof which made things a bit better. I really needed some flooring to stop the dust problem but with everything else on we didn’t have the cash spare to buy the ones I wanted so the answer came in the form of some floor paint my dad had held onto since the 70’s. Incredibly both tins of paint were still usable (I had to dremel the lids off though!). So as a short term solution I just poured the paint on the floor then rollered it on. I’m not sure what you’d describe the colour as? Rust?! It wouldn’t be my first choice but it was quick and free so it will stay for now. I might even get another coat on next year. I got some cheap eBay racking which matched the IKEA units I’d picked up from gumtree and to be honest I’m happy with the result:
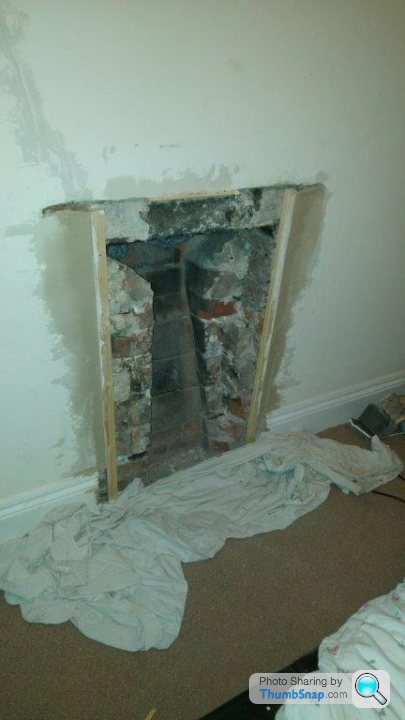
About the same time we thought we’d better work on the second bedroom. Chloe was having some friends to stay and you always find that these deadlines get you motivated. There wasn’t much wrong with the bedroom really; it needed painting and there were cracks all over in the plaster-work where a skim had been recently put over the original lime. I dug these out and filled which seems to have worked so far, but the biggest job was the fireplace. It was absolutely caked in black gloss paint. I tired scraping and nitromorse but it just didn’t seem to touch it, so the decision was made to take it out. In hindsight it probably wasn’t the best idea, but I hadn’t realised that it was the original and was tied and cemented into the wall – the result was a few hours work and finally pulling a load of bricks out of the chimney. This wasn’t as bad as it sounds as it gave me chance to have a go at some brickwork!
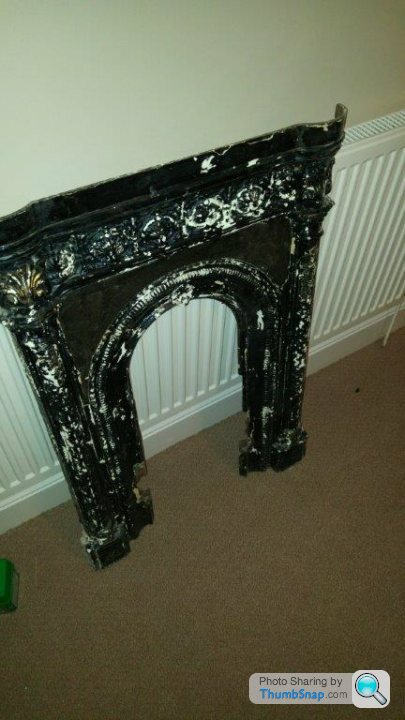

I sent the fireplace to be blasted whilst Chloe’s dad put the wallpaper on and Chloe painted.

Again we were happy with the result. The bed will need to go as it’s a relic of the early 2000’s – a time when a faux leather bed was the only option for the man about town. This room will probably end up with a day bed and a desk to make a bedroom come office space.
So now I guess we’re getting into summer. One of the reasons the house looked so run down was the garden. It’s a shame really as all the flowers had a nice ‘cottage garden’ look, but what you don’t get an idea of on the pictures is just howl out of of control it all was.

We spent a few days digging beds over but the weeks we’re something else. We made it tidy-ish but the aim is for next summer to pave over the pond area then put a low border hedge in and replant the beds. I’m not sure but we still might have to roundup parts of the garden so we can just do something with it.

It was this time that we had our first loss... One of the three fish (which we’d only discovered months after moving in) finally passed. It was a sad day, but on the brighter side we were 33% closer to filling in the pond...

I’ll continue the update in a bit – still lots to cover!!
I thought it was about time I updated this thread a little as it’s been nearly 10 months since my last update. I’ve been inspired by Stewjohnst’s Georgian renovation thread which has been both brilliant to read and kept me going with my own renovation over summer.
We’ve been in the house for over a year now and although it sometimes feels as if we’ve not done anything, the place is at least hospitable and we can have friends round without panicking about them falling through the floor or telling them to come in ‘old clothes’. Work’s always a bit slow as its just Chloe (Mrs H) and myself doing it, but I’m beginning to realise that I actually enjoy the work and we’re slowly getting there.
I’ll try and update from Feb to now – it probably won’t be in order because I’ve flitted between rooms/jobs, but I’ll try and explain what we’ve done room by room...
So, as this is PH i’ll begin with the garage. I’m sure I put some pics on another thread of this so I’ll keep this bit short. The garage is only a single but a decent size, and as I’ve only got the 3 wheeler and some tools it suits me well. The problem was that the block walls and concrete floor meant that after a week everything was covered in dust. After a bit of research I bought a cheap electric paint sprayer from ebay and set to work. The outcome was that the paint had to be thinned so far to get through the gun that it went on like milk and I got fed up of it. I’m sure that if I’d have hired a real system or maybe adapted a car paint gun and used the compressor, then spraying would be the answer – but to be honest I ended up with a roller and just went for it. Here is it with the walls done:
This was good but didn’t really help the dust. By this point i’d also got some cheap chipboard from Wickes and boarded the roof which made things a bit better. I really needed some flooring to stop the dust problem but with everything else on we didn’t have the cash spare to buy the ones I wanted so the answer came in the form of some floor paint my dad had held onto since the 70’s. Incredibly both tins of paint were still usable (I had to dremel the lids off though!). So as a short term solution I just poured the paint on the floor then rollered it on. I’m not sure what you’d describe the colour as? Rust?! It wouldn’t be my first choice but it was quick and free so it will stay for now. I might even get another coat on next year. I got some cheap eBay racking which matched the IKEA units I’d picked up from gumtree and to be honest I’m happy with the result:
About the same time we thought we’d better work on the second bedroom. Chloe was having some friends to stay and you always find that these deadlines get you motivated. There wasn’t much wrong with the bedroom really; it needed painting and there were cracks all over in the plaster-work where a skim had been recently put over the original lime. I dug these out and filled which seems to have worked so far, but the biggest job was the fireplace. It was absolutely caked in black gloss paint. I tired scraping and nitromorse but it just didn’t seem to touch it, so the decision was made to take it out. In hindsight it probably wasn’t the best idea, but I hadn’t realised that it was the original and was tied and cemented into the wall – the result was a few hours work and finally pulling a load of bricks out of the chimney. This wasn’t as bad as it sounds as it gave me chance to have a go at some brickwork!
I sent the fireplace to be blasted whilst Chloe’s dad put the wallpaper on and Chloe painted.
Again we were happy with the result. The bed will need to go as it’s a relic of the early 2000’s – a time when a faux leather bed was the only option for the man about town. This room will probably end up with a day bed and a desk to make a bedroom come office space.
So now I guess we’re getting into summer. One of the reasons the house looked so run down was the garden. It’s a shame really as all the flowers had a nice ‘cottage garden’ look, but what you don’t get an idea of on the pictures is just howl out of of control it all was.
We spent a few days digging beds over but the weeks we’re something else. We made it tidy-ish but the aim is for next summer to pave over the pond area then put a low border hedge in and replant the beds. I’m not sure but we still might have to roundup parts of the garden so we can just do something with it.
It was this time that we had our first loss... One of the three fish (which we’d only discovered months after moving in) finally passed. It was a sad day, but on the brighter side we were 33% closer to filling in the pond...
I’ll continue the update in a bit – still lots to cover!!
And we’re back!
In my last update in Feb, I was complaining about the grout colour choice. The tiles were off white, and the white grouting lost all definition of the tiles. I really wasn’t happy with the look(Chloe had told me to use gray but i’d not listened) so bought some grout colour changing stuff. At this point we thought about tiling an extra row so the colour change could have made grouting the new bit a pain to match the colour – the result was a trip to some DIY chain to buy an attachment to grind out the grout. Job done and it looked better already, but it was obvious that the finish would never be quite right because I’d not been able to grind every bit and had marked some tiles etc. Also, we wanted a border but couldn't match the colour.
The answer:
At this point i’d learned that it’s best just to do a decent job rather than re-hash my mistakes. Everything came off, decent borders were ordered and it gave me chance to re-tile all the bit’s i’d not been happy with the first time round.
The result:

We’d also decided that we didn’t like the IKEA unit from the earlier pics. I’d found some scaffolding boards out the back so bought them in to try off. A sand down and oil and they were just the ticket.
Funnily, although the kitchen as been the most finished room since Christmas, it’s also been the one we’ve worked on most this year. Little things that have niggled have been re-done and the effect has been good. Only a couple of months ago it looked like this:

But Chloe had already said that there wasn’t enough storage. To be honest she was dead right but we both loved the dresser and we’re putting off buying more ‘proper’ units to replace it. I got these in about two weeks ago (cornice still to fit) and at the same time got a rad to replace the one we removed last year (it’s bloody cold without it!). Rad to be plumbed in still...


We also got some of the little finishes done which are small but cost – new pewter finish toggle switches have really changed the room, as has having some blinds made:
PIC OF BLINDS

Thanks for reading so far. Pt 3 to follow.
In my last update in Feb, I was complaining about the grout colour choice. The tiles were off white, and the white grouting lost all definition of the tiles. I really wasn’t happy with the look(Chloe had told me to use gray but i’d not listened) so bought some grout colour changing stuff. At this point we thought about tiling an extra row so the colour change could have made grouting the new bit a pain to match the colour – the result was a trip to some DIY chain to buy an attachment to grind out the grout. Job done and it looked better already, but it was obvious that the finish would never be quite right because I’d not been able to grind every bit and had marked some tiles etc. Also, we wanted a border but couldn't match the colour.
The answer:
At this point i’d learned that it’s best just to do a decent job rather than re-hash my mistakes. Everything came off, decent borders were ordered and it gave me chance to re-tile all the bit’s i’d not been happy with the first time round.
The result:
We’d also decided that we didn’t like the IKEA unit from the earlier pics. I’d found some scaffolding boards out the back so bought them in to try off. A sand down and oil and they were just the ticket.
Funnily, although the kitchen as been the most finished room since Christmas, it’s also been the one we’ve worked on most this year. Little things that have niggled have been re-done and the effect has been good. Only a couple of months ago it looked like this:
But Chloe had already said that there wasn’t enough storage. To be honest she was dead right but we both loved the dresser and we’re putting off buying more ‘proper’ units to replace it. I got these in about two weeks ago (cornice still to fit) and at the same time got a rad to replace the one we removed last year (it’s bloody cold without it!). Rad to be plumbed in still...
We also got some of the little finishes done which are small but cost – new pewter finish toggle switches have really changed the room, as has having some blinds made:
PIC OF BLINDS
Thanks for reading so far. Pt 3 to follow.
Right – here should be the last of it.
One of the many great points about being a teacher is the summer holidays. 6 weeks to get some work done on the house means plenty of progress. I’d wanted to get the outhouse, rear yard and windows complete, which was probably a little optimistic.
The outhouse wasn’t too bad. I got the floor tiled and then picked up a cheap sink from eBay. The worktop came from the same place as the kitchen one – my friend Tom’s back yard. He picked up tonnes of the stuff from a supplier which had gone bust and was burning it. Much was warped but searching around resulted in enough for the outhouse. It was a struggle for a 11st weakling like me to get it in and fitted on my own, but it felt good once in!
I’d repaired the roof leak, then had to board and skim over the mess in the ceiling (that was a steep learning curve!). Then it was Chloe to do some painting and then the fitting of a pulley maid. I only got this finished today and hopefully it means that the 3rd bedroom will stop being the drying room and we can got that decorated too. It’s all be done on a budget of next to nothing, even the paint was a colour which we had from an old house. As the room isn’t accessed through the house it’s more about function over looks. There’s a new door needed but that can wait for now..


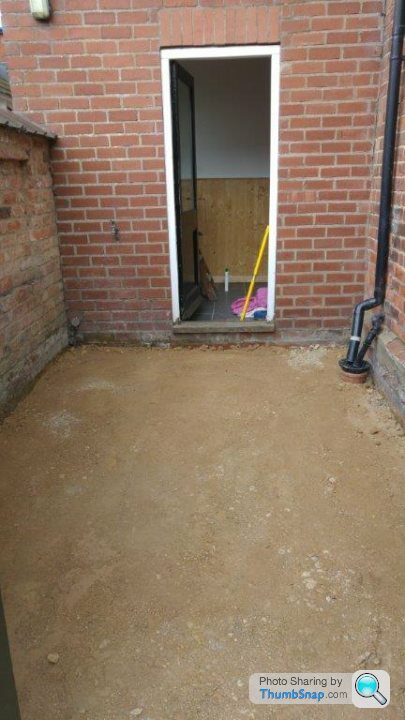
At this point I thought I’d tackle the (very grotty) rear yard. Being Yorkshire, everyone gets into the house this way, and it was getting a bit embarrassing. I’d thought about laying sand over the tarmac I had then paving but it would have been a bodge, and I’d already learnt my lesson about bodging.
I set to work on the tarmac with a chisel. That was hard going so I borrowed a powered version frm a friend and got the whole yard up in about an hour!

After that it was just a bit of hardcore which was compacted...

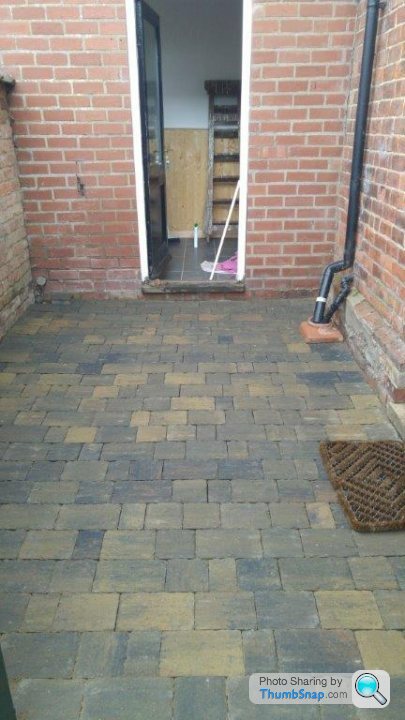
Then some sand...
Then done...
It didn’t take long at all, but I must say that we went on holiday in the middle of this which meant leaving a tonne bag of sand on our (shared access) drive for a week. Thankfully we have the best neighbours and they weren’t bothered, but it wasn’t ideal
I also wanted to re-tarmac the edge where the gate met the drive – luckily it was the hottest day of the year and the ready-mac stuff was like putty when it went down. It’s probably not the most amazing job but I was happy for a novice. The worst bit was cutting the line with the STIHL as they scare the life out of me.

Early on when fitting the kitchen I’d ballsed up the measuring for the sink waste and somehow managed to drill through the wall as precisely the only place it shouldn’t be – right behind the fall pipe. This left a pretty clumsy arrangement for a few months until I finally got something sorted when finishing the yard. Plumbers, look away now!

The rear yard is wasted space in many ways, but we chose to build a log store to at least make some use of it. I’d been looking forward to building this all summer and must say that building this has probably been the best job of the whole year. Sitting out in the sun, slowly working away with no pressure – amazing. I also picked up some slates (actually my dad did) so I went on to slate the roof which was another skill picked up on youtube. The only lesson learnt was that being so tight as to buy the cheapest lats meant that they had too much flex to take the nails. The only answer was to drill for each roof nail but it was fine in the end and I screwed the top row so it’s all held in tightly.

I was a few lats short and Chloe had the Jeep – the guys at MKM knew I was a maverick...

While all this was going on I began to tackle the windows. I love wood sash windows and think changing to anything else would be heathen, but 16 wood windows to repair and paint was not a job I’d been looking forward to. I should have started in Easter but just couldn’t get motivated. In the end I called my retired dad and asked for some help. He’s great and I couldn’t have done them all without him, but as a child of the 40’s and someone who has lived through single glazing/open fires etc. he can’t understand saving these features in houses and would constantly suggest getting upvc fitted. In the end it’s best not to argue and just smile – he was helping me after all.
The big problem was that many of the windows were painted shut, and at least four sills were completely rotten. Even writing about this bit of the resto is draining me, so I’ll keep it short! We knew of a local chap who since retiring had set up with woodworking – a quick visit with dimensions of our sills resulted in 4 new pieces made and the promise of help should the windows themselves need restoration. My dad fitted the sills and we basically spent weeks painting windows. In the end all we’re finished except two which we couldn’t get to at the time because of the pair tree/a strange roof valley. Two were also bodged with coat of glass but both will be coming out soon as they have this horrid mottled glass at the moment...

Here we are with about one window to go – it was the moment we could finally look at all the work over the summer and think that it was worthwhile.

It certainly looked right for Halloween

So there we are. If you’re still reading then I commend you! There’s lots I’ve missed - mainly plumbing related – we’ve had water coming through the ceiling twice this month! But, hopefully it might help others crack on just like StewJohnST’s thread got me going again. There’s still so much to do, but it’s mainly just decorating and then the front garden. Watch this space...
Phil
One of the many great points about being a teacher is the summer holidays. 6 weeks to get some work done on the house means plenty of progress. I’d wanted to get the outhouse, rear yard and windows complete, which was probably a little optimistic.
The outhouse wasn’t too bad. I got the floor tiled and then picked up a cheap sink from eBay. The worktop came from the same place as the kitchen one – my friend Tom’s back yard. He picked up tonnes of the stuff from a supplier which had gone bust and was burning it. Much was warped but searching around resulted in enough for the outhouse. It was a struggle for a 11st weakling like me to get it in and fitted on my own, but it felt good once in!
I’d repaired the roof leak, then had to board and skim over the mess in the ceiling (that was a steep learning curve!). Then it was Chloe to do some painting and then the fitting of a pulley maid. I only got this finished today and hopefully it means that the 3rd bedroom will stop being the drying room and we can got that decorated too. It’s all be done on a budget of next to nothing, even the paint was a colour which we had from an old house. As the room isn’t accessed through the house it’s more about function over looks. There’s a new door needed but that can wait for now..
At this point I thought I’d tackle the (very grotty) rear yard. Being Yorkshire, everyone gets into the house this way, and it was getting a bit embarrassing. I’d thought about laying sand over the tarmac I had then paving but it would have been a bodge, and I’d already learnt my lesson about bodging.
I set to work on the tarmac with a chisel. That was hard going so I borrowed a powered version frm a friend and got the whole yard up in about an hour!
After that it was just a bit of hardcore which was compacted...
Then some sand...
Then done...
It didn’t take long at all, but I must say that we went on holiday in the middle of this which meant leaving a tonne bag of sand on our (shared access) drive for a week. Thankfully we have the best neighbours and they weren’t bothered, but it wasn’t ideal
I also wanted to re-tarmac the edge where the gate met the drive – luckily it was the hottest day of the year and the ready-mac stuff was like putty when it went down. It’s probably not the most amazing job but I was happy for a novice. The worst bit was cutting the line with the STIHL as they scare the life out of me.
Early on when fitting the kitchen I’d ballsed up the measuring for the sink waste and somehow managed to drill through the wall as precisely the only place it shouldn’t be – right behind the fall pipe. This left a pretty clumsy arrangement for a few months until I finally got something sorted when finishing the yard. Plumbers, look away now!
The rear yard is wasted space in many ways, but we chose to build a log store to at least make some use of it. I’d been looking forward to building this all summer and must say that building this has probably been the best job of the whole year. Sitting out in the sun, slowly working away with no pressure – amazing. I also picked up some slates (actually my dad did) so I went on to slate the roof which was another skill picked up on youtube. The only lesson learnt was that being so tight as to buy the cheapest lats meant that they had too much flex to take the nails. The only answer was to drill for each roof nail but it was fine in the end and I screwed the top row so it’s all held in tightly.
I was a few lats short and Chloe had the Jeep – the guys at MKM knew I was a maverick...
While all this was going on I began to tackle the windows. I love wood sash windows and think changing to anything else would be heathen, but 16 wood windows to repair and paint was not a job I’d been looking forward to. I should have started in Easter but just couldn’t get motivated. In the end I called my retired dad and asked for some help. He’s great and I couldn’t have done them all without him, but as a child of the 40’s and someone who has lived through single glazing/open fires etc. he can’t understand saving these features in houses and would constantly suggest getting upvc fitted. In the end it’s best not to argue and just smile – he was helping me after all.
The big problem was that many of the windows were painted shut, and at least four sills were completely rotten. Even writing about this bit of the resto is draining me, so I’ll keep it short! We knew of a local chap who since retiring had set up with woodworking – a quick visit with dimensions of our sills resulted in 4 new pieces made and the promise of help should the windows themselves need restoration. My dad fitted the sills and we basically spent weeks painting windows. In the end all we’re finished except two which we couldn’t get to at the time because of the pair tree/a strange roof valley. Two were also bodged with coat of glass but both will be coming out soon as they have this horrid mottled glass at the moment...
Here we are with about one window to go – it was the moment we could finally look at all the work over the summer and think that it was worthwhile.
It certainly looked right for Halloween
So there we are. If you’re still reading then I commend you! There’s lots I’ve missed - mainly plumbing related – we’ve had water coming through the ceiling twice this month! But, hopefully it might help others crack on just like StewJohnST’s thread got me going again. There’s still so much to do, but it’s mainly just decorating and then the front garden. Watch this space...
Phil
Well it's been two years since I last updated this - lots has changed since; new job, first child born, and even some work on the house in between.
I must have changed my phone about a year ago so I've missed pictures of quite a bit of the work we've done I think. I was trying to record it chronologically but I because I never finish a job before starting the next one it was a nightmare to work out - so I'll try and run through room by room. I guess like everyone else renovating a house it's been the endless battle of having either the money or time and there have been periods where we've done nothing at all, but saying that we're nearly there with the inside with only the small bedroom and hall to complete (although we'll redo the front room soon hopefully). So here goes....
Downstairs bathroom and middle bit:
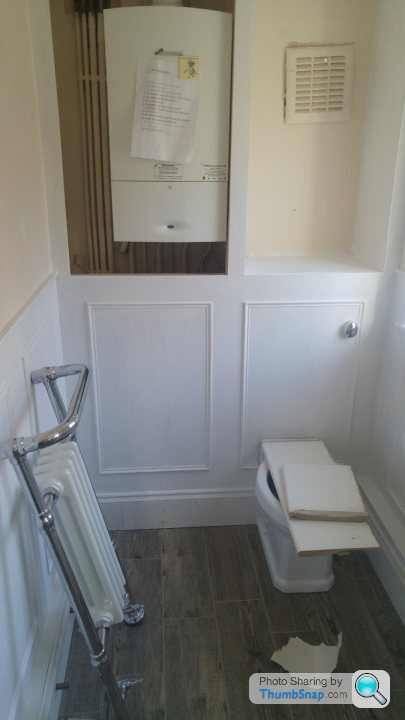
when the house was built the kitchen led off to a singe story outhouse/toilet and coal store area (and back door). This was knocked down in 1998 when the school was sold as they needed to put the driveway up the side of the house. They then rebuilt a smaller version and when we bought the house we had the little middle room/corridor leading to the downstairs WC. It would have been good to have the back door here rather than into the kitchen but it would then be right onto the drive and access to the rear courtyard would be tricky, so it's a bit of a compromise and means the middle room is a bit wasted. friend
I had some leftover kitchen wall units which I put legs on and used as base units in the void. I didn't really want to buy a whole 3m length of wooden worktop and my friend's supply had all gone rotten - gumtree provided some laminate for £5 which would do the trick and although you can't see in the picture I was happy with my fitting of it because there is a cutout which isn't square and I managed to get it spot on -which was rare for me as I can't measure for toffee - Mrs H has dubbed me 'Mr Maths' for this reason!
The flooring all the way through was the ceramic wood effect and I was happily surprised by it (apart from that the local has the same on the walls in the gents but I'll ignore that). I wanted to go for the wood paneling effect in the WC (current fashion - will we look back on it in 10 years and laugh?!) and used MDF for it with a simple frame. Concealed cistern and boxed in pipe work worked well I think and a great improvement on the mess that was there before. I learnt my lesson with plumbing on this one using compression fittings and they all leaked after I'd boxed them in - investment in a blow torch and using Yorkshire ring fittings has helped but been a learning curve - I was constantly watching youtube videos to get it right!
It just needs the shelving in the alcove finishing and I'm not sure the pictures do it justice - as its quite hard to photograph. My friends have dubbed it the 'night club toilet' because of the decor but I can live with that..


Doors:
About the same time I lost it and sent the downstairs doors to be dipped - the internal ones had 150 years of gloss and the outside was rotten at the bottom and had 50 coats of black gloss. The number 26 was the stick on type for a wheelie bin and the letterbox was straight from 1983. I'm annoyed because i can't find any pictures of it 'before'!
The internal doors we sanded and then oiled. To be honest we're still not 100% on these and might paint them still - we shall see. Apparently I can paint straight over the danish oil because it acts as a primer?
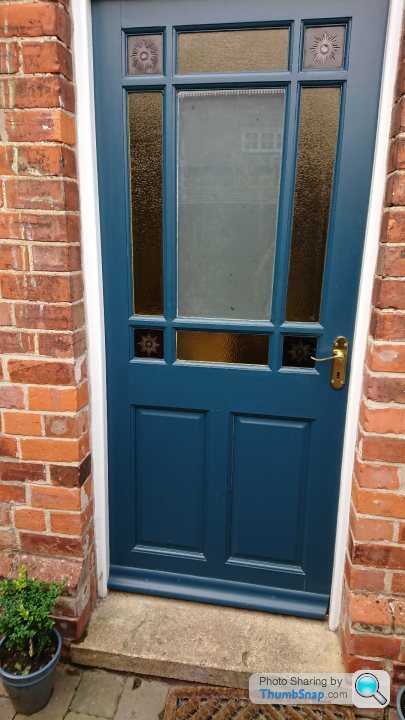
The awful 70's pub glass was taken out of the internal entrance door and I had this made by Ivy Glass in Driffield.

It's toughened and then sandblasted to get the design. Not cheap compared to a film but we were really happy with the end result. Some doors had the original locks etc removed and replaced with 70's style handles so we I've bought new ones were needed, but still need to fill the holes left over. Some we're there and cleaned up well when dipped..

The front door was off for months (will explain below) so we looked like the local hillbillies for quite a while:

It looked okay when I came back from the dippers:
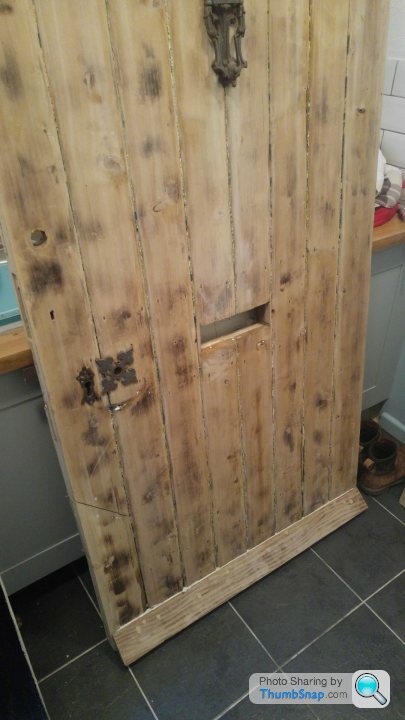
But the bottom was rotten and I think the dipping hadn't helped as it was soaking still. I re-purposed the dining room table and set about with some repairs using an old piece of floorboard.

At the same time we decorated the downstairs entrance way. The ceiling was brown due to an earlier leak and it was well overdue fixing. It's hard to see on the picture but I took the chance to heat gun the window and take it back to wood as it was so caked in gloss. The walls were really poor so I used lining paper (my first attempt with wallpaper) and then just painted over. Picture rail added using my trusty mitre saw and I even got a stand from Aldi which has proved invaluable. It's probably been my most useful tool for the whole rennovation.


I love a quarry tiled floor but it's a little bland and I think it will be taken up when we re-do the hallway and landing. Apart from that were about finished in here (pics taken today and very much show the house 'in use!).

A little coat stand we had done...


Much much more to update but the health visitor has just turned up so will do in a bit!
P
Mrs H has taken on the HV so i'm going to add a bit more...
While we're talking doors I also got a back door. I bought this off the internet ages ago and it's been in the garage. Considering it was cheapish I was really happy with it, just the suppliers had hammered the beading right into the apertures and I made a bit of a mess getting them out in places - not something you think of but it must have set me back a day at least.
I'd done everything myself upto this point but I didn't fancy fitting the back door. I must have called every joiner or handyman in the area (even old friends with the offer of a quick cash job) but this was last summer and basically they were all busy and it was too small a job. In the end my dad's friend stepped in and helped out, though even that wasn't straight forward! The glass was from a chap on Spring Bank in Hull - he's blown the corners himself and his work is super - this is nothing really for him - some of the stuff he's done is amazing and we will go back for something a little more spectacular if we get the chance..


I think it was about then that I fitted the Nest thermostat. I looked on the website and it said not compatible with my wiring lables behind my current thermostat, but after a bit of checking I did have the required live and call for heat needed to put the Nest receiver/control box in it's place.
A friend of mine had this done 'professionally' and at great expense but it seemed to me like a bit of a bodge - the receiver took the place of his thermostat on the wall and then he had to have the Nest thermostat on a fancy stand in the lounge which needed to be plugged in. In the end I wired the received under the boiler in the downstairs WC and then used the wires running through the wall for the thermostat for the 12v Nest thermostat feed - resulting in the nice Nest thermostat on the wall where it should be. I know that's a bit convoluted but I hope it makes sense!


I don't have a picture of the final install but it's just a nest thermostat on a cream wall!
The Garden:
The garden isn't finished. Really it isn't even started but I have to keep it looking reasonable due to elderly neighbours who are well meaning but never shut up about it. The main thing I wanted to do this year was plant a hedge for some privacy. The garden is raised up about 5ft from the road which helps a little, but a small hedge should block out prying eyes a little more and define the garden better. We only have a small courtyard at the rear so this is really our only garden and we want o make it usable.
I bought 200 box privet pants from ebay. Probably not the best place to buy plants but I struck lucky and got some excellent bushy plants and (touch wood) after nearly a year in I've not lost one so something must be right about it!

We also had some awful air brick covers round the bottom at the house. They looked like they had been made using kindling and that mesh people used to stick on their Saxos back in 2001. I thought they were just covering a big hole and was about to buy some nice metal covers when I took one off of the mesh ones off. Luckily they were just covers are we have lovely original Victorian vents underneath. A great result!

I did have a bit of damp round here, hence the digging out. But I've not really got to the bottom of it yet!
The pond area will become a patio/bbq/outside seating area when I have the ££ and time so I began by pulling the old pond out. We did have the small issue of two goldfish we'd inherited which needed re-homing. I wouldn't like to tell the world what we did but I can say it involved a bucket, the village pond and the cover of darkness!
The aftermath:
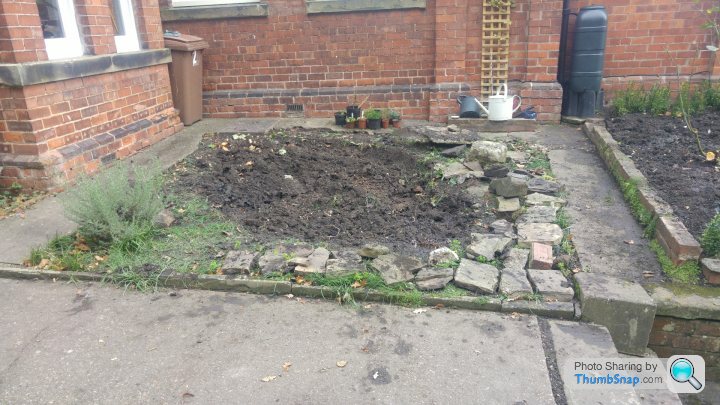
Spring:

You can just make out the new outside light in the picture above. Even that wasn't simple as when we moved in there was a wire for the light which came from a bedroom on the other side of the house and ran all the way around the outside! When decorating the entrance hall I chased out a switch wire and ran it from the house light ring main which was a much tidier job.
Summer:

We also have a pear tree out front which seems to be well known in the village. How a tree can be well known I have no idea but essentially we have a number of neighbours who have pear trees, grown in the style where they are trained along the wall horizontally, with only the trunk vertical. Very neat and I'm told they were all 'inspired' by our tree which looked like that during the tenure of a previous headmaster. This week I finally got mine cut back with a bid to get it back!

They don't really add to the narrative but I took some good seasonal shots of the place:
Winter:

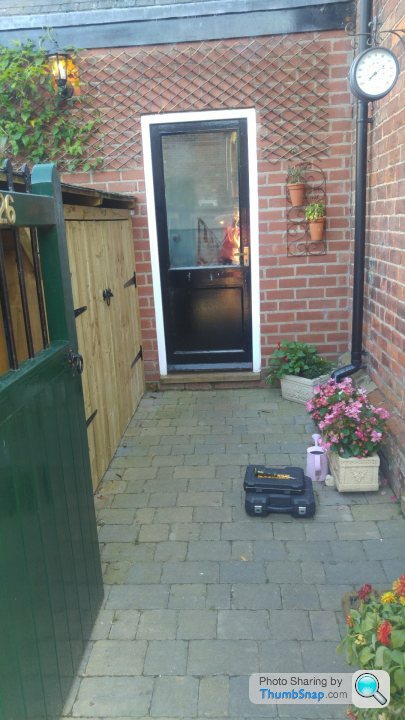
Summer:

I also tidied up the back. Since this picture was taken I've painted the door to the utility and put some glazing bars on it to soften the look.
It was also about this time that lots happened at home. I sold the 3 wheeler as I was inspired by Jon Wells (Morgan) design of a M3W van and wanted to build one.

So I got cracking..
Then I had a conversation with Mrs H in that she wanted a new bathroom and I wanted a baby. So we made a deal and I got cracking at that too...
Mrs H with child:

I'll get onto the bathroom next after some lunch.
seiben said:
Glad to see this back! Door looks fantastic. Would you mind sharing approximate costs for dipping? I may have a project house lined up, and it strikes me as something useful to bear in mind...
Thank you - it was £25 per internal door and I think £60 for the front as it was too big to fit in the standard tank. That included collection and delivery. Turn round approx a week.Phil
hardcastlephil said:
seiben said:
Glad to see this back! Door looks fantastic. Would you mind sharing approximate costs for dipping? I may have a project house lined up, and it strikes me as something useful to bear in mind...
Thank you - it was £25 per internal door and I think £60 for the front as it was too big to fit in the standard tank. That included collection and delivery. Turn round approx a week.Phil


Gassing Station | Homes, Gardens and DIY | Top of Page | What's New | My Stuff