Alcove shelving project, ordering pre cut MDF?
Discussion


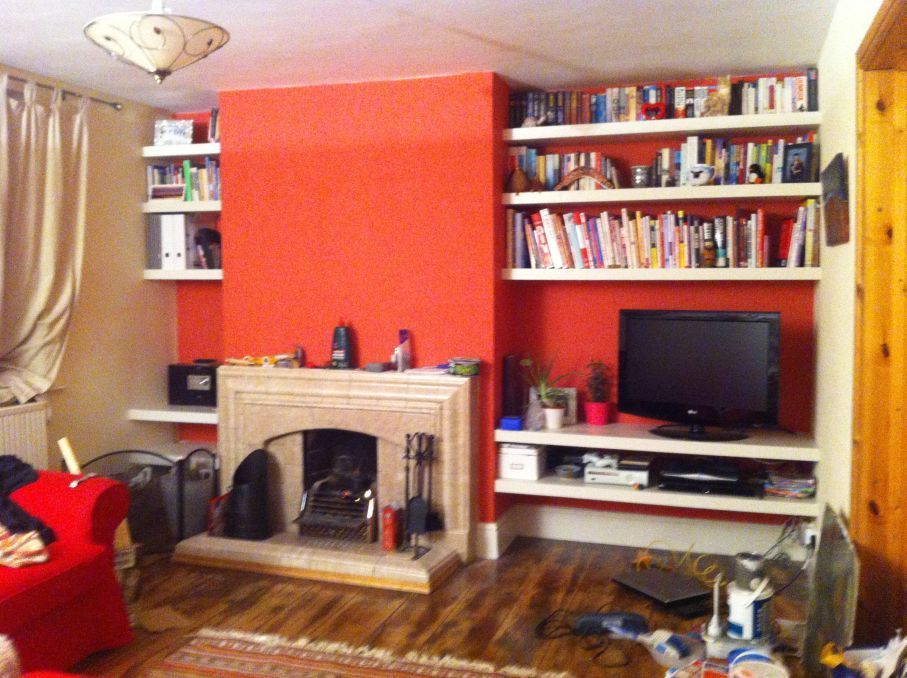
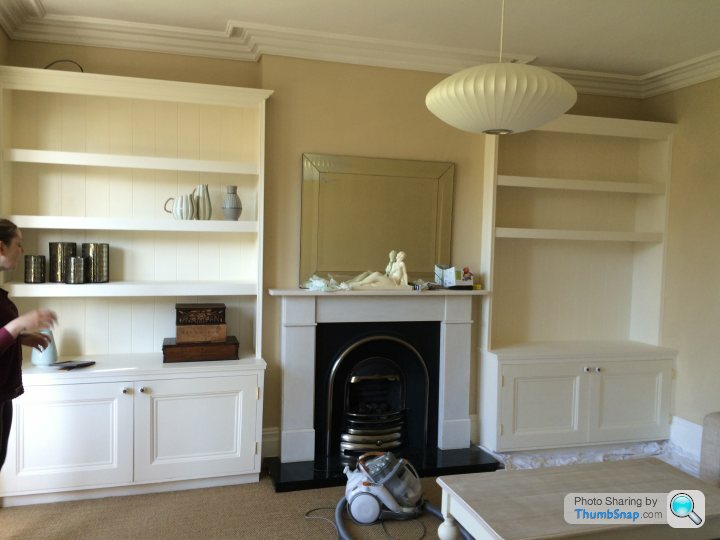
If you look in my build thread you'll see how I did this on a pair of alcoves that were a million miles off square or the same.
I used a torsion box construction with an Ash front and veneered MDF top and bottom. The fronts are cut exactly right, well slightly tight and then screwed to the torsion box from behind. The tops and bottoms are roughly scribed in-situ; I measured lengths and angles, but didn't take account of any curves in the walls. As a result there are a few gaps, but they aren't visible at all unless you go looking for them. Most of them are underneath books anyway and could be filled if you really wanted.
I didn't add LEDs, though I did start a thread asking for advice on how to fit them. There was a similar thread recently. I didn't bother in the end because it was going to add a lot of cost and they would distract me when watching the TV. Although my shelves are deep and do get dark at the back, when they've got stuff on them that doesn't matter.
I have done a very similar thing to this.
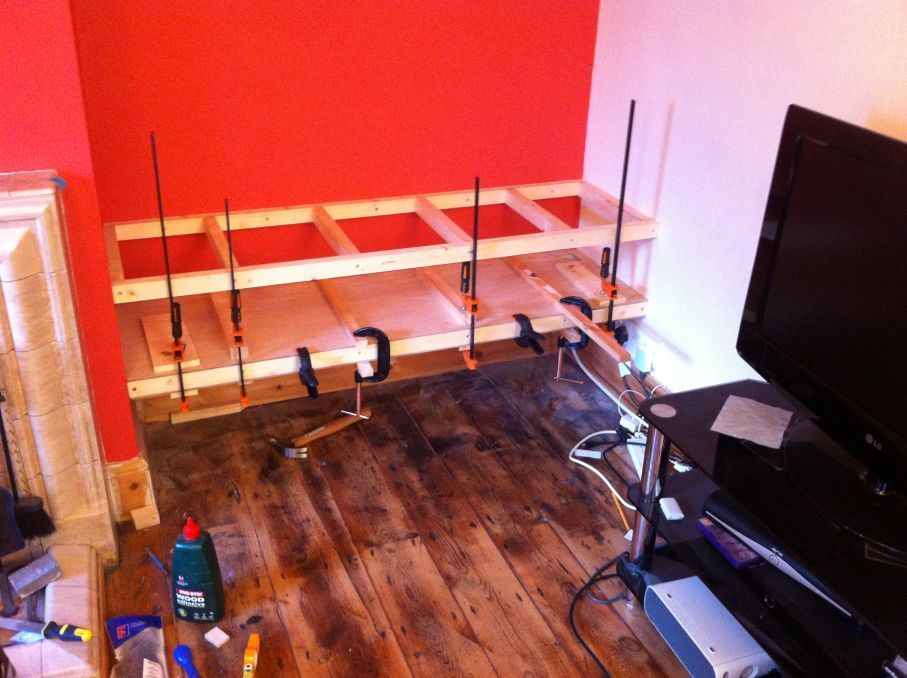
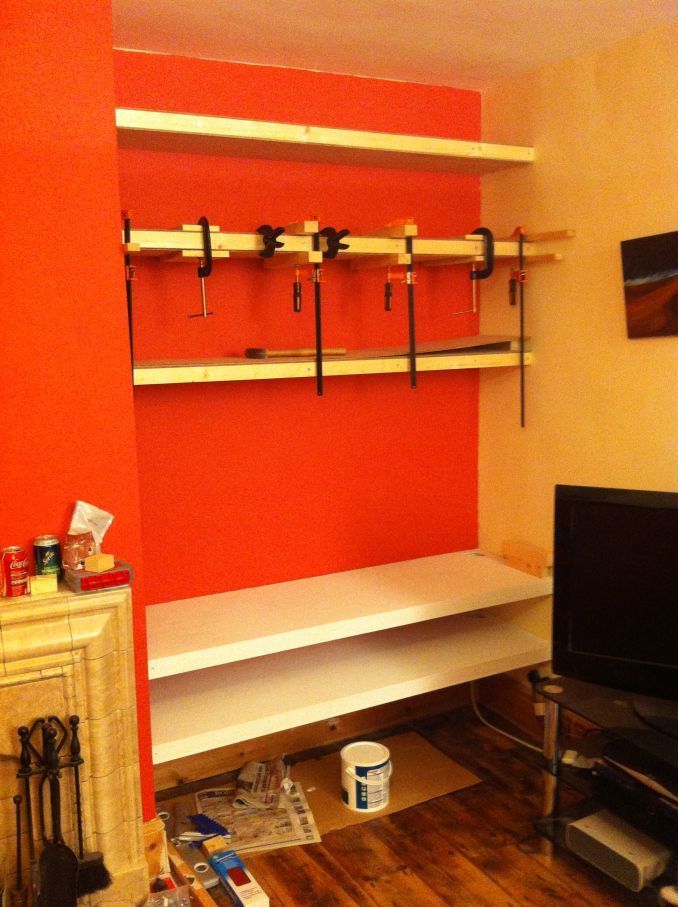
I used 1 1/2" timber to create a ladder frame, screwed and glued and did the tops and bottoms in 6mm ply. I had B&Q cut the ply to roughly the size I needed and then trimmed them up to suit.
The walls were really wonky/all over the place so took a little while to get them to fit.
I used car body filler on the front edge to smooth it all out before paint.
Sorry some of the pictures are a bit poop.
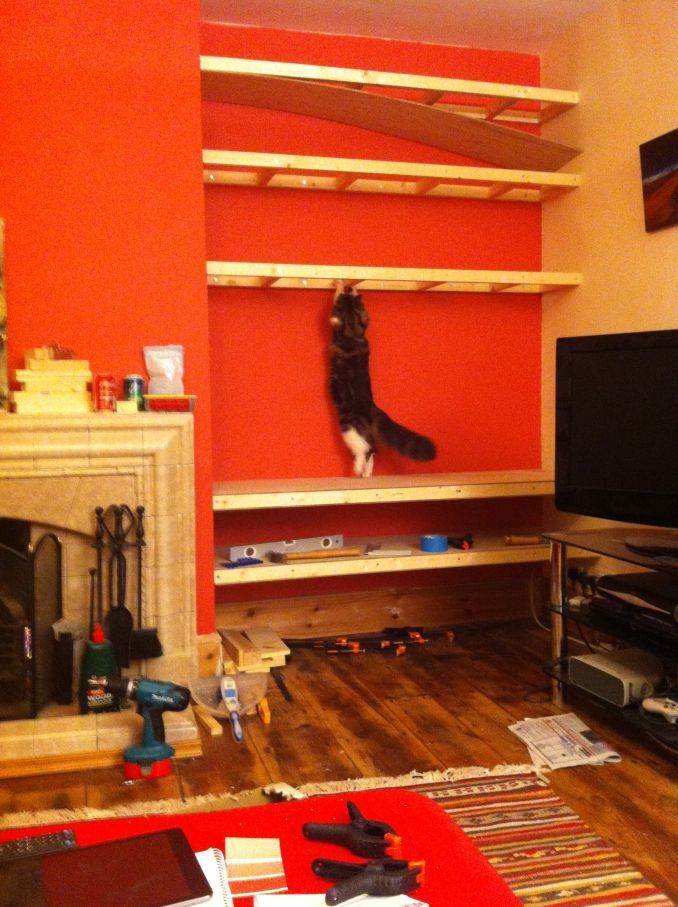
Oh, that cat likes to inspect my DIY, she's a good project manager!
I used 1 1/2" timber to create a ladder frame, screwed and glued and did the tops and bottoms in 6mm ply. I had B&Q cut the ply to roughly the size I needed and then trimmed them up to suit.
The walls were really wonky/all over the place so took a little while to get them to fit.
I used car body filler on the front edge to smooth it all out before paint.
Sorry some of the pictures are a bit poop.
Oh, that cat likes to inspect my DIY, she's a good project manager!
We had similar done when we had our alcove cupboards done:

Dining room cupboard painted by Lewis Craik, on Flickr
Dining room cupboard painted by Lewis Craik, on Flickr
It it were me, I'd sack off the box shelving idea and simply use sheet MDF cut to size, then add a real wood front panel which you can glue or tack nail on then paint. It gives the same look with far less work. The recess will conceal the wall fixings (2 nails each side will work for example).
You will also be able to use the concealed recess behind the front panel to run some LED strip lighting for each shelf which will give dimmable, concealed lighting which runs cooler (in a wooden structure) and uses less power.
Just my 2c.
You will also be able to use the concealed recess behind the front panel to run some LED strip lighting for each shelf which will give dimmable, concealed lighting which runs cooler (in a wooden structure) and uses less power.
Just my 2c.
Cactussed said:
It it were me, I'd sack off the box shelving idea and simply use sheet MDF cut to size, then add a real wood front panel which you can glue or tack nail on then paint. It gives the same look with far less work. The recess will conceal the wall fixings (2 nails each side will work for example).
You will also be able to use the concealed recess behind the front panel to run some LED strip lighting for each shelf which will give dimmable, concealed lighting which runs cooler (in a wooden structure) and uses less power.
Just my 2c.
Sorry, if I read that right you're proposing nails to support the shelves on the wall? If so, I'm not sure that's going to work for me given the construction of the walls and the weight the shelves will need to support.You will also be able to use the concealed recess behind the front panel to run some LED strip lighting for each shelf which will give dimmable, concealed lighting which runs cooler (in a wooden structure) and uses less power.
Just my 2c.
paulrockliffe said:
If you look in my build thread you'll see how I did this on a pair of alcoves that were a million miles off square or the same.
For those that are interested and don't want to look through his whole post history, the thread is here! http://www.pistonheads.com/gassing/topic.asp?h=0&a...Nice shelves.
Cactussed said:
It it were me, I'd sack off the box shelving idea and simply use sheet MDF cut to size, then add a real wood front panel which you can glue or tack nail on then paint. It gives the same look with far less work. The recess will conceal the wall fixings (2 nails each side will work for example).
You will also be able to use the concealed recess behind the front panel to run some LED strip lighting for each shelf which will give dimmable, concealed lighting which runs cooler (in a wooden structure) and uses less power.
Just my 2c.
MDF will sag under its own weight over the sort of width the OP is looking at, before you start putting anything on the shelves.You will also be able to use the concealed recess behind the front panel to run some LED strip lighting for each shelf which will give dimmable, concealed lighting which runs cooler (in a wooden structure) and uses less power.
Just my 2c.
A stiff front edging will help, but the shelf will eventually deform.
I'm not sure how you would fix the shelves to the wall, but one of the reasons for using a torsion box apart from the strength is that it lets you hide all the fixings. If you have a visible batton under the shelf it'll look poor to my eye. You'll also have visible wires of you fit LEDs.
For the chap who got his cat to help above, I didn't trust clamps to hold the bottom board up at the back, so used a trolley jack, but i can see how your cat would have the same effect.
paulrockliffe said:
MDF will sag under its own weight over the sort of width the OP is looking at, before you start putting anything on the shelves.
A stiff front edging will help, but the shelf will eventually deform.
I'm not sure how you would fix the shelves to the wall, but one of the reasons for using a torsion box apart from the strength is that it lets you hide all the fixings. If you have a visible batton under the shelf it'll look poor to my eye. You'll also have visible wires of you fit LEDs.
For the chap who got his cat to help above, I didn't trust clamps to hold the bottom board up at the back, so used a trolley jack, but i can see how your cat would have the same effect.
I missed a trick when I did mine and screwed the bottom piece in from below!!! Such a silly mistake looking back. Although, it's not really visible, still annoying.A stiff front edging will help, but the shelf will eventually deform.
I'm not sure how you would fix the shelves to the wall, but one of the reasons for using a torsion box apart from the strength is that it lets you hide all the fixings. If you have a visible batton under the shelf it'll look poor to my eye. You'll also have visible wires of you fit LEDs.
For the chap who got his cat to help above, I didn't trust clamps to hold the bottom board up at the back, so used a trolley jack, but i can see how your cat would have the same effect.
That was with 24mm Birch ply and a a sheet that was about 1700mm x 500mm, so didn't have enough props and clamps to hold it anyway to only just use glue, but should have done the bottom first and screwed from the top!!
Now I would put glue on the bottom of the torsion box frame and get something to prop and clamp the bottom sheet up and then screw from the top of the frame in to the sheet below, just for good measure. Even though glue is probably plenty strong enough.
Pamoothican said:
I have done a very similar thing to this.
I used 1 1/2" timber to create a ladder frame, screwed and glued and did the tops and bottoms in 6mm ply. I had B&Q cut the ply to roughly the size I needed and then trimmed them up to suit.
The walls were really wonky/all over the place so took a little while to get them to fit.
I used car body filler on the front edge to smooth it all out before paint.
Sorry some of the pictures are a bit poop.
Oh, that cat likes to inspect my DIY, she's a good project manager!
I did it exactly like this about a year ago in our place. Build a frame and panel them up. The shelves are so solid I can hang from them. I used 1 1/2" timber to create a ladder frame, screwed and glued and did the tops and bottoms in 6mm ply. I had B&Q cut the ply to roughly the size I needed and then trimmed them up to suit.
The walls were really wonky/all over the place so took a little while to get them to fit.
I used car body filler on the front edge to smooth it all out before paint.
Sorry some of the pictures are a bit poop.
Oh, that cat likes to inspect my DIY, she's a good project manager!
I'd also recommend cutting yourself, unless you are sure the walls are perfectly level and square. I needed to jig saw them as the walls in our place were so wonky and out of kilter. With the edges smoothed in with filler, they look spot on.
nitrodave said:
I did it exactly like this about a year ago in our place. Build a frame and panel them up. The shelves are so solid I can hang from them.
I'd also recommend cutting yourself, unless you are sure the walls are perfectly level and square. I needed to jig saw them as the walls in our place were so wonky and out of kilter. With the edges smoothed in with filler, they look spot on.
Why would you want to cut yourself?! I'd also recommend cutting yourself, unless you are sure the walls are perfectly level and square. I needed to jig saw them as the walls in our place were so wonky and out of kilter. With the edges smoothed in with filler, they look spot on.
_dobbo_ said:
Thanks for (apprently) signing up to post this! The ladder part of the support for the shelves is a good idea, I will incorporate that into mine 
I had an old login but cant remember it so had to sign up again.Mine have been up nearly two years now and they are holding up well, bought a new TV which fits nicely (I sized it up for a 50" but only bought a 42")
Good luck and keep us up to date on your progress. I'm off to measure up for some understairs drawers, big ones!!
I made these last year - Tried a few things to stop the MDF sagging, dowelling into the T&G behind, making the return at the front taller. In the end I found some aluminium bar, approx 5mm x 40mm which I screwed in behind the front return and they're bob on now. They've got a load of books, vases etc. on and they don't move at all.
B&Q cut the sheets up enough to fit in the car and then I cut them to final size in place. Right ball ache getting everything to fit nicely.
Good luck with the project OP.
B&Q cut the sheets up enough to fit in the car and then I cut them to final size in place. Right ball ache getting everything to fit nicely.
Good luck with the project OP.
Those look great bugaluggs, nicely done.
Spoke to my stepfather last night who was a furniture builder by trade, asking him to check my costings for materials. I hadn't involved him before because he has a tendency to "take over" (that's putting it mildly) and I want to do this myself.
He's retired and so has nothing to do except comment on my DIY jobs being incomplete and then get involved in any project I have going. It's great to have help most of the time but he's forgotten what it's like to have a full time job and two young kids around and what that does to your spare time (you don't have any). I find myself wanting to do stuff for myself regardless of whether I'll make errors (in his eyes) or take a long time to complete it.
Anyway predictably he starts designing full cabinets to install and telling me why I shouldn't do it the way I've chosen. Primarily the reason being "you don't want all those holes in your walls".
So now it seems the battle is talking him down before I start work, otherwise he'll show up with fully built cabinets that look nothing like I want and costing 4x as much in materials!
Can't believe I've written all that. I'm nearly 40, you'd think I could be left to be a grown up!
Edited by _dobbo_ on Wednesday 24th August 12:59
_dobbo_ said:
I like the idea but seems this will set me back a couple of grand. Seems like a lot of money to hide a free TV!
Christ how big is your TV? http://www.mirrorsandglass.co.uk/shop/made-to-meas...olimain said:
Christ how big is your TV? http://www.mirrorsandglass.co.uk/shop/made-to-meas...
Good link, ta for that. I searched for two way TV mirror and all the sites were quoting well over £1500 for a framed mirror the size required. At that site price it's a bit more manageable!
So operation shelve-it finally commences.
Before starting it all looked like this, although less messy most of the time and with less ugly wires hanging down. The unit on the left is where the old TV was and on the wall is the giant behemoth TV that started this whole mess off.
A big part of the need for these shelves is to store the never ending relentless pile of crap plastic toys my kids accumulate and frankly replace the IKEA stuff that doesn't really fit in the spaces very efficiently.

The thickness of the shelves has been dictated by the nice cheap battens I found in the DIY store, less than half the price of all the other retailers at £1.98 per 2.4m length.
So I bought a bunch:

Next up, test fit to show the wife the thickness of the shelves and the spacing between them.

It's here I had to stop because the wife was at work and frankly I am smart enough not to commit to anything without her signing off!
Sign off obtained, on to the next part which is actually fixing stuff in place.
Before starting it all looked like this, although less messy most of the time and with less ugly wires hanging down. The unit on the left is where the old TV was and on the wall is the giant behemoth TV that started this whole mess off.
A big part of the need for these shelves is to store the never ending relentless pile of crap plastic toys my kids accumulate and frankly replace the IKEA stuff that doesn't really fit in the spaces very efficiently.
The thickness of the shelves has been dictated by the nice cheap battens I found in the DIY store, less than half the price of all the other retailers at £1.98 per 2.4m length.
So I bought a bunch:
Next up, test fit to show the wife the thickness of the shelves and the spacing between them.
It's here I had to stop because the wife was at work and frankly I am smart enough not to commit to anything without her signing off!
Sign off obtained, on to the next part which is actually fixing stuff in place.
Gassing Station | Homes, Gardens and DIY | Top of Page | What's New | My Stuff