Georgian House Renovation Up North - 5 Years and Counting
Discussion


I did have a full monty building survey of the house done as a condition of purchase from the lender because it was listed and they didn't want some mental just buying a knackered old house that fell down and then went bankrupt.
Even so, it wasn't until the builders had gone home for the night and I'd jumped up on the scaffolding that I was relieved the roof wasn't so bad. The rot hadn't got too far and it was mainly the gable end that had also just rotted away and caused slates to slip and let in water.
In what would become a recurring theme, if it had been dealt with immediately, there wouldn't have been any major cost associated with it but as it had been left the purlins and timbers needed further attention.
Conservation insisted on a like for like so it was a replacement wood gable end an I got off lightly with some slates needing replacement and the roofline needing retiled.

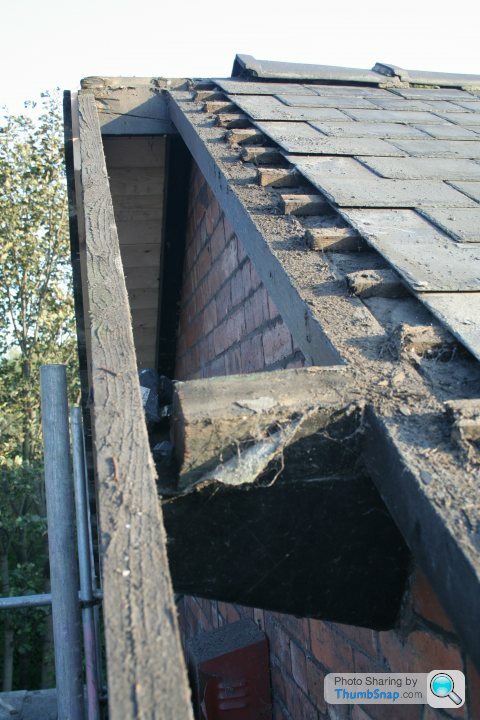
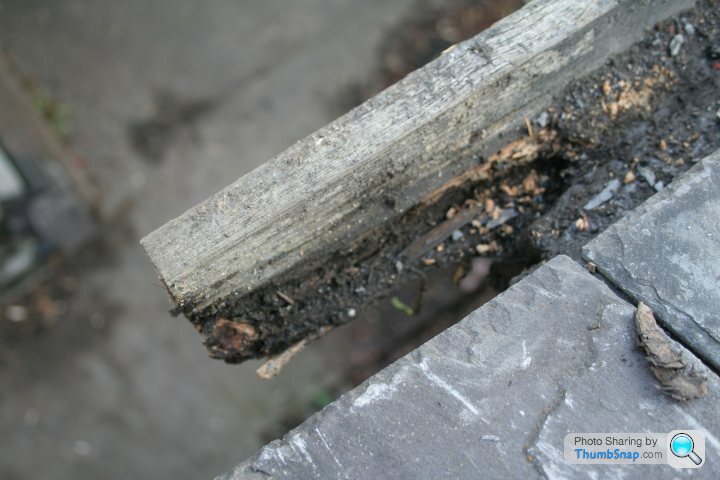
The wooden gutter was shot to s t too and as it was the only bit of wooden gutter left on the house, I again did it like for like.
It does mean eventually it will need replacing again but it's nice to keep the odd nod to how it was. The new gutter has been treated so should last a good ten years or more.
I managed to salvage the old gutter which turned out to be massive once it was at ground level and it made a handy seasonal spot of bedding plants...(naturally this is not a photo from when the building work was going on but a time travel to 2014!)

Even so, it wasn't until the builders had gone home for the night and I'd jumped up on the scaffolding that I was relieved the roof wasn't so bad. The rot hadn't got too far and it was mainly the gable end that had also just rotted away and caused slates to slip and let in water.
In what would become a recurring theme, if it had been dealt with immediately, there wouldn't have been any major cost associated with it but as it had been left the purlins and timbers needed further attention.
Conservation insisted on a like for like so it was a replacement wood gable end an I got off lightly with some slates needing replacement and the roofline needing retiled.
The wooden gutter was shot to s
t too and as it was the only bit of wooden gutter left on the house, I again did it like for like.It does mean eventually it will need replacing again but it's nice to keep the odd nod to how it was. The new gutter has been treated so should last a good ten years or more.
I managed to salvage the old gutter which turned out to be massive once it was at ground level and it made a handy seasonal spot of bedding plants...(naturally this is not a photo from when the building work was going on but a time travel to 2014!)
It was sold for £249k in 2004 and the previous occupier got themselves into major difficulties with multiple charges on the house, repossession and finally bankruptcy.
It was a Northern Rock repo and they were just after shifting it as quickly as possible so it was a complete steal.
Don't get me wrong, it has needed a shed load of work and even though I've done most of it myself, I've probably spent about 70k on refurbishment so would have been a lot more paying someone labour.
This was the living room when I got the keys, with one of the few surviving original fireplaces in the house. As the central heating wasn't working, when I moved in, I did a smoke pellet and stick your head up test on the flue and then lit a fire to warm the place up.
It was about the time it was burning quite nicely that it occurred to me it would have been a good idea to get the water turned back on first, just in case.
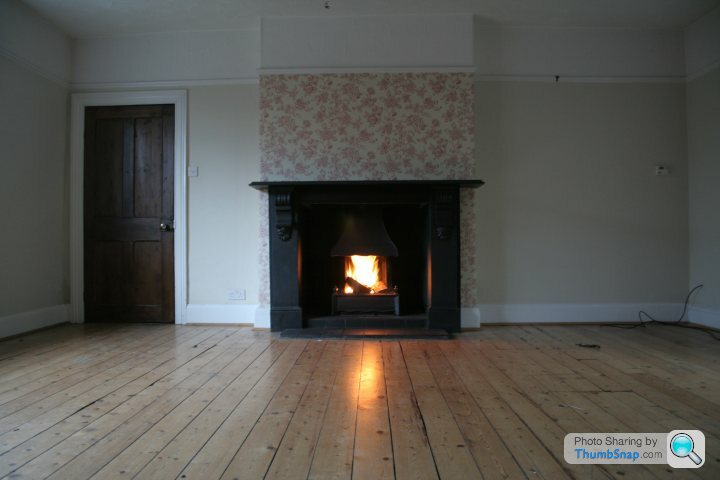
In any event, the house didn't burn down and once I'd got the contents of my bachelor pad form down south in the living room, it felt a lot better.
This particular room is huge at about 18'ft square and the stuff from my old flat was clearly not up to the scale of the task
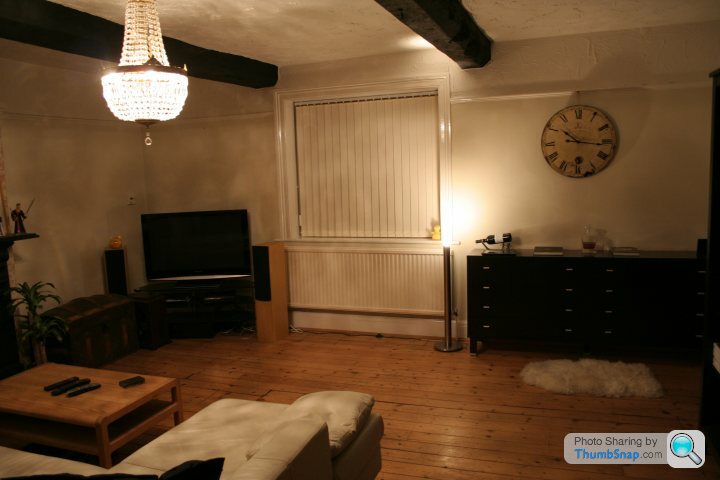

This is all probably giving you some kind of impression this was an orderly renovation but outside of this room, I'd decided it had to get worse before it got better...
It was about the time it was burning quite nicely that it occurred to me it would have been a good idea to get the water turned back on first, just in case.
In any event, the house didn't burn down and once I'd got the contents of my bachelor pad form down south in the living room, it felt a lot better.
This particular room is huge at about 18'ft square and the stuff from my old flat was clearly not up to the scale of the task
This is all probably giving you some kind of impression this was an orderly renovation but outside of this room, I'd decided it had to get worse before it got better...

At the same time as moving all my stuff in, I was busy trying to fix the core issues. I'd done the roof but a walk around outside had revealed the most likely cause of the damp in the house was the fact they'd backfilled the ventilation holes/windows in the cellar with earth and concreted/shaled up the ground outside so the air bricks were also half covered.

I set about digging out the soil from the top and chucking it in buckets to cart off to a pile round the back of the house.
this plan lasted all of about five minutes as somehow when digging out, I lost my balance and managed to pirouette on the shovel so my fat arse landed in the bucket, causing this to happen.
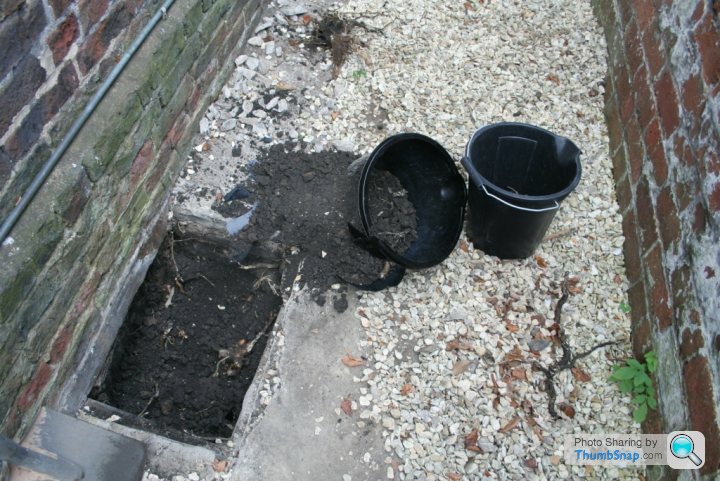
I then decided to just dig it out form the bottom and went into the cellar and took it our form there.
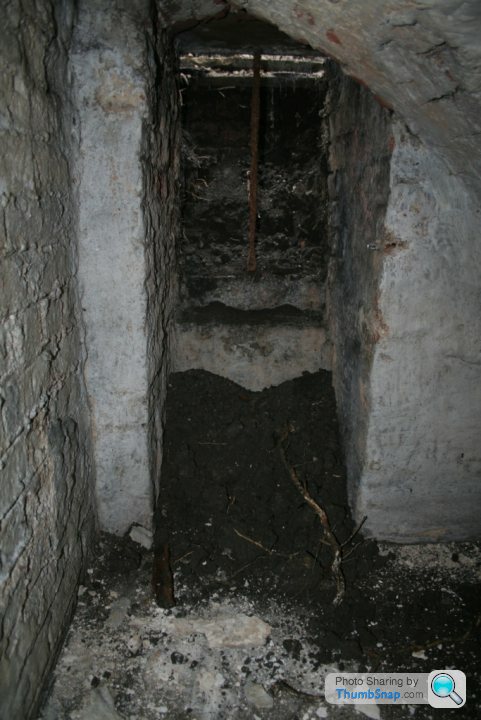
Soon I was finished on the other window too and left nature to take its cause drying out the cellar with fresh air circulating.
I set about digging out the soil from the top and chucking it in buckets to cart off to a pile round the back of the house.
this plan lasted all of about five minutes as somehow when digging out, I lost my balance and managed to pirouette on the shovel so my fat arse landed in the bucket, causing this to happen.
I then decided to just dig it out form the bottom and went into the cellar and took it our form there.
Soon I was finished on the other window too and left nature to take its cause drying out the cellar with fresh air circulating.
I was quite pleased the cellar seemed to be sorted and then it rained heavily for a day or so and I was greeted with this when I went to get something from downstairs.
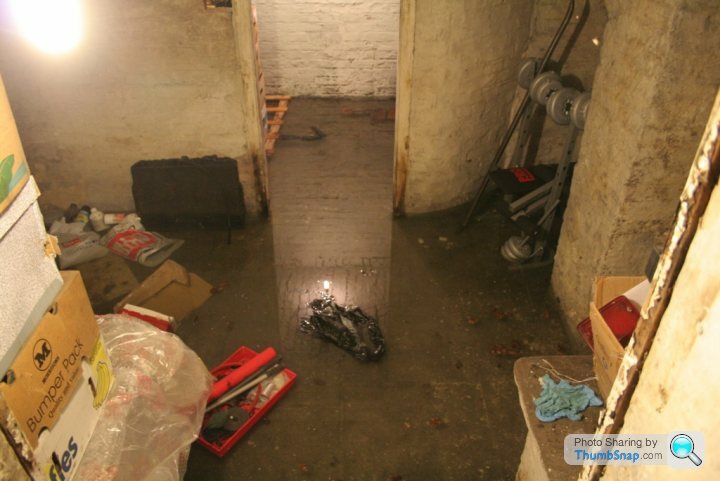
The water was that clear and still when I went down there that I didn't realise it was there until I'd got both my slippers wet in the icy water. In hindsight, the red tray full of car parts floating around should have been a giveaway.
We have clay soil that can saturate and the cellar is low to the water table but it was a surprise to find it flooded. I didn't solve the problem immediately as speaking to my neighbour he said the cellar always used to flood in here so I just bought myself a submersible pump and cleared the cellar out that way.
For the next year or so, it flooded about twice more and the pump sorted it in a day or so each time so I put it down as a necessary but infrequent joy of ownership to trudge into to cellar when it was pissing it down and check if the pump was working.
Edited by stewjohnst on Friday 9th September 16:24
KTF said:
Is it normal/expected for it to flood? What is the point of having it if you need to raise everything off the ground when there is prolonged rain?
Its absolutely not supposed to do that!When I was doing some further work outside a bit later (like a year or so) I discovered that the downpipe on the left rather unhelpfully drained into a broken and capped drain that meant 50% of all the rainwater from the roof was going under the house, leading to the groundwater coming up.
I have since rectified that and we never had a problem again form the rain/weather and it's the next thing on the list to get renovated so I can use it for its proper purpose - Storing wine and hiding from the missus.

Ug_lee said:
Shall bookmark this as you are in a very similar situation to myself.
As a 1st time buyer I bought a ridiculously big, neglected, grade 2 listed house for less than what a 3 bed semi in the midlands costs.
I have then spent the last 4 years finding/rectifying the bodges/neglect the house has suffered over the last 200 years. It has cost me way more than I'll ever see back and I still reckon I'm only 50% done in the last 4 years. But I will get there and it will be very special indeed when finished.
How far on do you reckon you are with yours now?
I'm about 80% done on ours, except that there's more than just me now so there are plans afoot for an extension and a few bits that will begin the cycle again As a 1st time buyer I bought a ridiculously big, neglected, grade 2 listed house for less than what a 3 bed semi in the midlands costs.
I have then spent the last 4 years finding/rectifying the bodges/neglect the house has suffered over the last 200 years. It has cost me way more than I'll ever see back and I still reckon I'm only 50% done in the last 4 years. But I will get there and it will be very special indeed when finished.
How far on do you reckon you are with yours now?

The other major problem with the house was the sheer volume of artex on every wall and ceiling. It was like they'd tried to make every room look like a different sort of meringue. I had toyed with getting it skimmed over but there was so much of it and it was laid on so thick that I decided to knock most of it off and start again.
The thinking here was that it would also give me chance to see the state of the plaster underneath and deal with any areas that were showing signs of damp, rot or any other such malady.
Given the age of the place and the predilection of previous generations to include asbestos with everything, I paid for an asbestos sample to be done in each room and when that was all clear, set about removing the artex.

There was one room where I tried a weird chemical treatment that was supposed to soften the artex so it would scrape off. It wasn't that effective and just made a load of blue goo so I sacked that off and bought an SDS hammer drill to get through the heavy work.
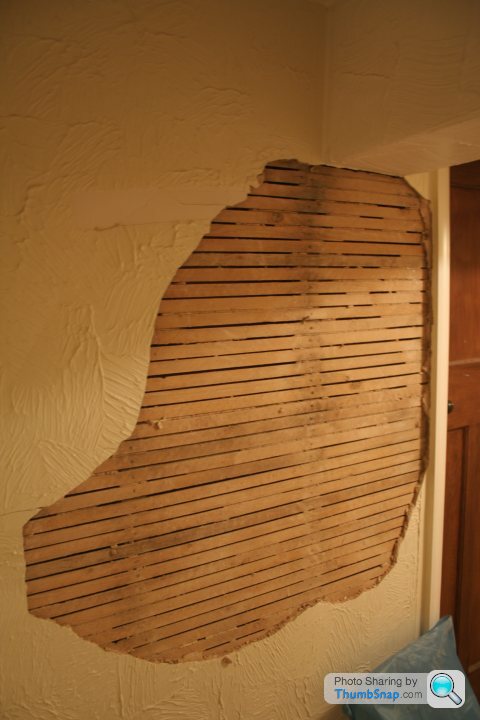
It was old lime plaster in most places and was coming off in massive thick lumps. I reckon I gained a few CM internal dimension for each room just by doing this...

It was about this time that I realised keeping all my tools tidy down in the cellar was a stupid idea when working upstairs so one of the bedrooms was turned into the control room for the build.
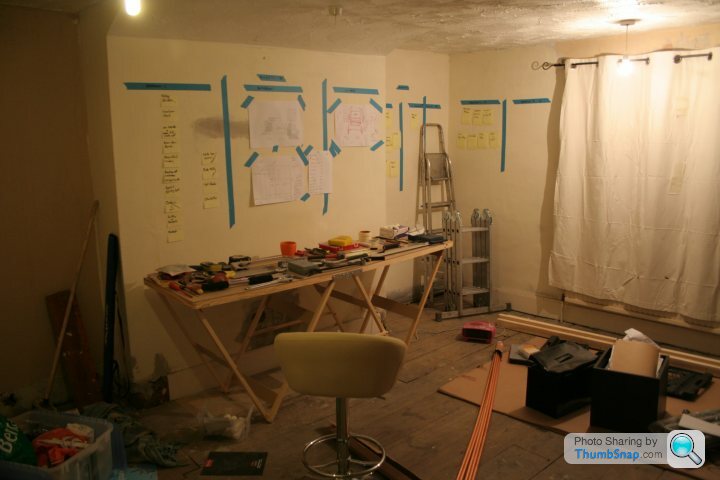
Each blue line on the wall separate a room and the post its were jobs for each room, mainly demolition it has to be said. I'm a design consultant by profession and naturally, I required a whiteboard to be able to think properly...

The thinking here was that it would also give me chance to see the state of the plaster underneath and deal with any areas that were showing signs of damp, rot or any other such malady.
Given the age of the place and the predilection of previous generations to include asbestos with everything, I paid for an asbestos sample to be done in each room and when that was all clear, set about removing the artex.
There was one room where I tried a weird chemical treatment that was supposed to soften the artex so it would scrape off. It wasn't that effective and just made a load of blue goo so I sacked that off and bought an SDS hammer drill to get through the heavy work.
It was old lime plaster in most places and was coming off in massive thick lumps. I reckon I gained a few CM internal dimension for each room just by doing this...
It was about this time that I realised keeping all my tools tidy down in the cellar was a stupid idea when working upstairs so one of the bedrooms was turned into the control room for the build.
Each blue line on the wall separate a room and the post its were jobs for each room, mainly demolition it has to be said. I'm a design consultant by profession and naturally, I required a whiteboard to be able to think properly...
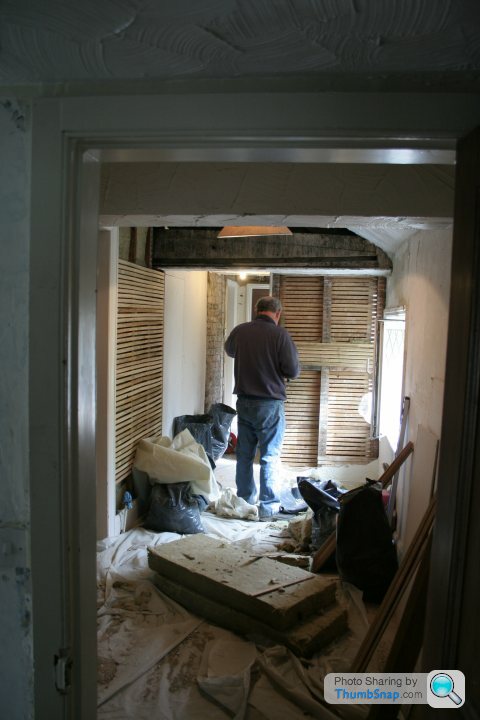
Speaking to conservation, they were keen for me to use lath and lime plaster in the hallway again. I ordered job lot of lath and set about nailing all the walls up with new lath ready for the plaster to set to on them.
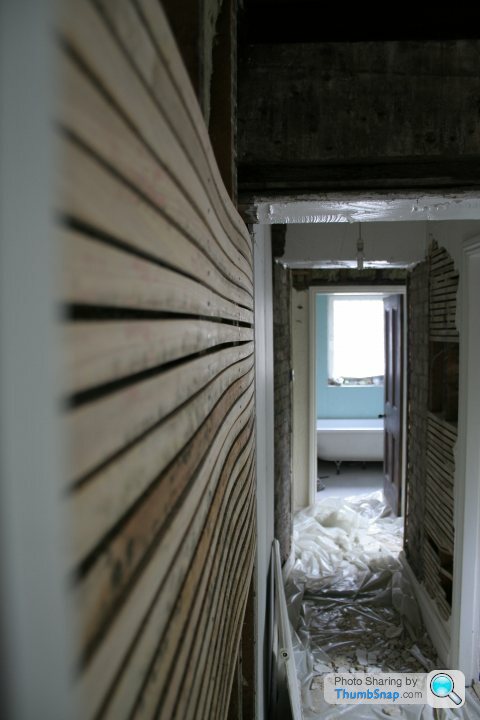
Fair play to my dad for mucking in (what else are retired parents for?)
As this point I'd like to point out how tricky lime is to work with. One week it was insanely hot weather and the plaster was drying too fast to cure, meaning I was having to spray it down with a bug sprayer filled with water twice a day to help it go off. Then the next week it was so cold and damp that the plaster wouldn't dry and go off either.
First coat of lime on
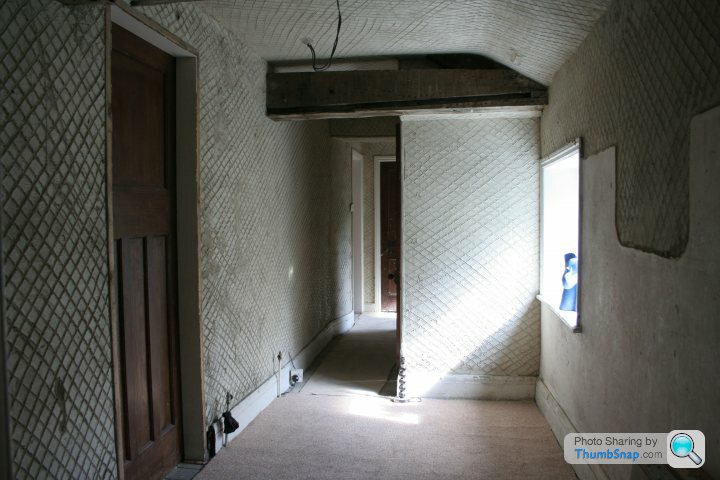
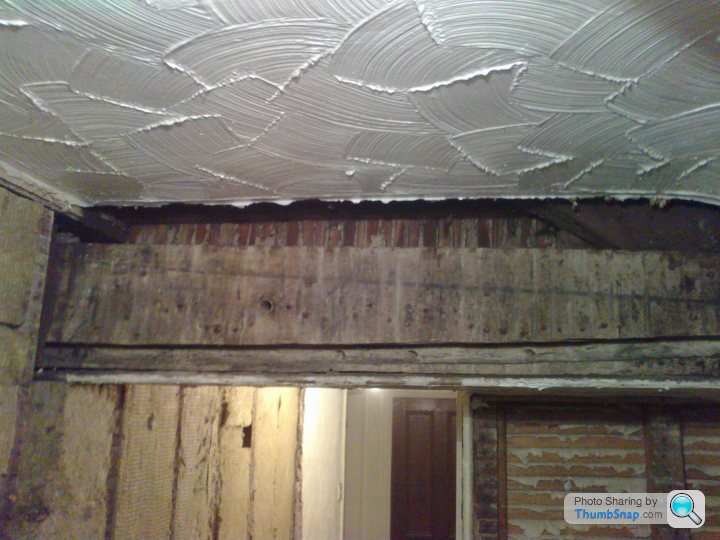
We tried to leave the ceiling laths in place as they were the original riven (split) oak laths but much to the dismay of my plasterers noggin when it collapsed on him, they weren't strong enough to hold the new plaster.
Before any lime expert jumps in, the ceiling plaster was using goats hair not horse hair, like the walls, but the laths were too old and just pulled down in a clump.
You might notice the beam in the photo above is now exposed.
When I moved in, the beam was covered over and artexed up so I ripped it all off to see what it looked like and I guess it was the fashion to box this stuff in but it seemed a waste of the character of the house to me.
Before

During
When the beam was clear, I gave it a good clean up and then used Tung Oil to bring out the natural colour of the beam.
It had been nailed into with lath and then covered so I took out the most dangerous nails but left some in so you could still read into the history of it being covered in the past.
Other jobs in the hallway included fitting a new radiator, wiring in some newer lights, whacking up pictures and old newspapers that link to the house plus a bit of upcycled furniture and a carpet...
As of today - it looks like this.


Before any lime expert jumps in, the ceiling plaster was using goats hair not horse hair, like the walls, but the laths were too old and just pulled down in a clump.
You might notice the beam in the photo above is now exposed.
When I moved in, the beam was covered over and artexed up so I ripped it all off to see what it looked like and I guess it was the fashion to box this stuff in but it seemed a waste of the character of the house to me.
Before
During
When the beam was clear, I gave it a good clean up and then used Tung Oil to bring out the natural colour of the beam.
It had been nailed into with lath and then covered so I took out the most dangerous nails but left some in so you could still read into the history of it being covered in the past.
Other jobs in the hallway included fitting a new radiator, wiring in some newer lights, whacking up pictures and old newspapers that link to the house plus a bit of upcycled furniture and a carpet...
As of today - it looks like this.
KTF said:
How did you decide the order of work? Did you basically gut everything and start from scratch, do the rooms that would be used the most first - bathroom, kitchen, lounge, etc - or just work on a floor by floor basis?
Exactly that.I went round the whole house and made a list of things that needed doing in every room. Had a punt on what they would cost and decided on priority.
Priority was
1. Secure the fabric of the building (roof/walls/damp)
2. Fix bathroom properly
3. Fix kitchen so it was usable
4. Destroy all artex
5. Sort my main bedroom
6. Sort my office
7. Fix up the aftermath of artex room by room based on funds and levels of energy.
I'm glad I did it that way in some respects as having all the jobs laid out for each room meant if my arms were shot after a weekend of plaster clearing and rubble sack carrying, I could always find a different job so I didn't get bored.
For about 8 months solid after the purchase, I was coming home from work at 6 and working nights till around midnight or after just doing demolition and refurb work so being able to change tasks (fitting skirting boards, painting, fitting lights, plumbing, etc) was a good thing.
I enjoy a challenge so having to learn something new all the time was good. I'd never plumbed before I did the bathroom and central heating, nor had I fitted a kitchen myself or any other number of jobs.
I also lost about three stone in weight!
In yet another example of me landing on my feet, (for those looking for just renovation guff you can skip ahead) I'd been working on the house for about a year and needed more cash from the bank (well building society actually).
I was going to pop to my local branch before going to work one Friday but as my head was full of building plans I turned left instead of right coming out of my drive which meant I'd have to do a u-turn as the the street has a no right turn at the end.
I couldn't be arsed with the 30 seconds it would take to turn around so I decided to go into the branch nearer the office instead.
The person serving me was the trainee branch manager and we hit it off well as we went through the application. It felt a bit more than good sales banter but I thought nothing of it. The loan went for referral due to my recent home moves and mortgage whatnot so I had to go in a second time a few days later and sign for it.
There was more faffing with paperwork the second time with printers breaking and stuff which meant we had more time to chat. In the end and totally out of character for me, I just asked her out at the end of the loan.
She said yes and to cut a long story short, she's now my wife and mother of the two kids we've had since...
Back to some renovating though. We decided as we'd met due to the house and we'd found this photo from 1936 of a wedding at the house, we should have the wedding reception at home and use the garden.
Needless. To say this put a bit of pressure on things in the house and addedand some extrs focus to the garden so it had time to mature for the wedding.
Here's what the garden looked like at the start.

We had some decking that was worn out, slippy and we wanted to make more use of the space. The way the decking was it blocked off areas of the garden and we wanted to create lots of different places in the garden.
So we took it up...

I know a crowbar is faster but the axe was more fun. Also, we didn't expect to find this!
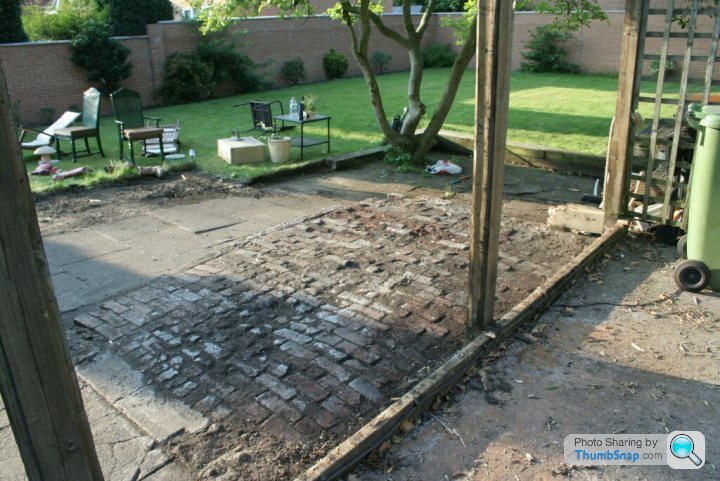
Unfortunately many of the bricks were too damaged to repair the floor as it was so we took out the good ones to repair the wall and decided to cover over the floor and fix it properly at a later date.

I also added bricklaying to the list of skills I'm crap at but for this outside area the level of finish wasn't a major worry.

Finally to cap the thing I used some timber to make a simple planter to pot up.
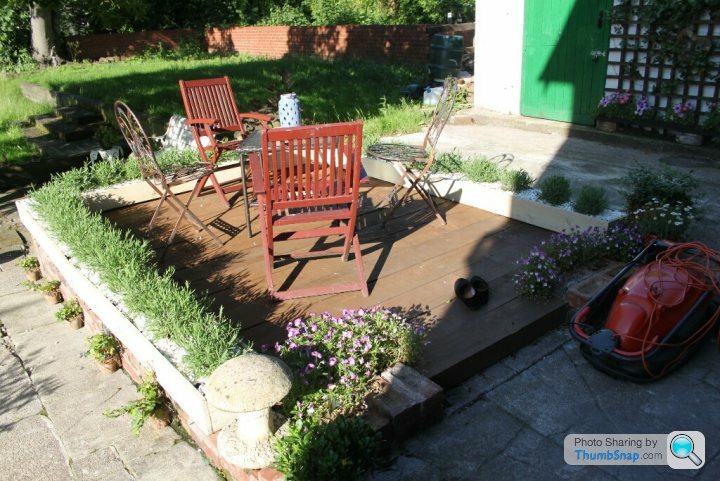
And here it is with the dog being his usual camera where self.

We had some decking that was worn out, slippy and we wanted to make more use of the space. The way the decking was it blocked off areas of the garden and we wanted to create lots of different places in the garden.
So we took it up...
I know a crowbar is faster but the axe was more fun. Also, we didn't expect to find this!
Unfortunately many of the bricks were too damaged to repair the floor as it was so we took out the good ones to repair the wall and decided to cover over the floor and fix it properly at a later date.
I also added bricklaying to the list of skills I'm crap at but for this outside area the level of finish wasn't a major worry.
Finally to cap the thing I used some timber to make a simple planter to pot up.
And here it is with the dog being his usual camera where self.
So way back before the wedding bells there were still plenty of jobs needing doing.
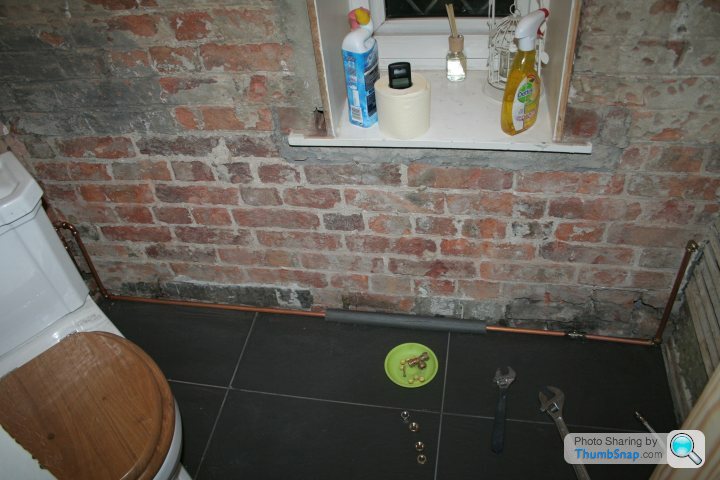
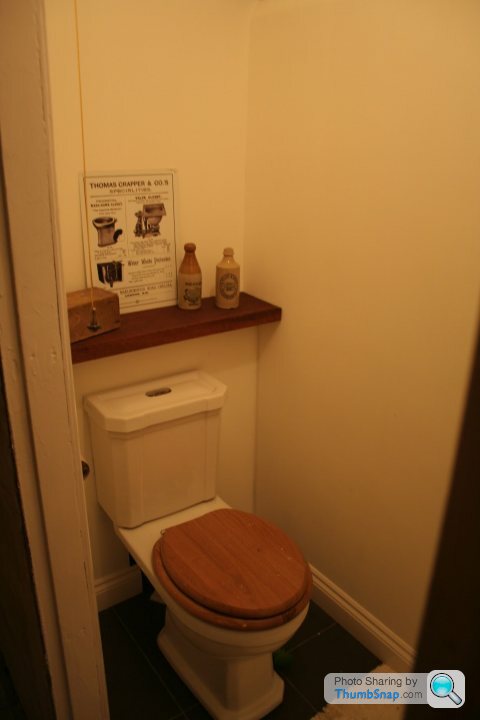
For a start, my new bird was somewhat confused with how my temporary flush/stopcock arrangement worked...

The artex as ever needed chipping off and some spare tiles from the bathroom were laid to cover the wooden floor.
There also wasn't a sink to wash your hands in there so I teed off the cold feed and ran a supply behind where the skirting board would be.
Weirdly for a room that was the size of a shoebox, the door opened inwards so you had to walk in, straddle the khazi, shut it and attempt to turn around.
As I had the plaster off the walls anyway it wasn't a big job to just break out the door frame intact and put it back in the gap the other way round so the door now opens outwards.
Breaking the plaster off to get rid of the artex also revealed another original beam they'd covered up so it was out with the Tung oil again.


For a start, my new bird was somewhat confused with how my temporary flush/stopcock arrangement worked...
The artex as ever needed chipping off and some spare tiles from the bathroom were laid to cover the wooden floor.
There also wasn't a sink to wash your hands in there so I teed off the cold feed and ran a supply behind where the skirting board would be.
Weirdly for a room that was the size of a shoebox, the door opened inwards so you had to walk in, straddle the khazi, shut it and attempt to turn around.
As I had the plaster off the walls anyway it wasn't a big job to just break out the door frame intact and put it back in the gap the other way round so the door now opens outwards.
Breaking the plaster off to get rid of the artex also revealed another original beam they'd covered up so it was out with the Tung oil again.
Edited by stewjohnst on Wednesday 14th September 22:15
I'd been doing some digging on the history of the house and it turned out it was owned by the owners of the collieries in the area in the 19th century and eventually bought up in 1949 after the war as part of nationalisation of the coal industry.
It goes a long way to explain some of the work I'd find in the house as they obviously used anything to hand from the railway yards and mines to patch up the house.
I'd managed to find some old newspaper clippings in the British Newspaper Archives referencing the mines and area from the 1800's and that's what you can see framed in the toilet wall.
The lamp was also a bit of a nod to the history.
The stories about the mine are interesting but the other news items are even funnier, two lads sent to prison for a month for stealing a pig, a man sentenced to a month hard labour for breaking his wife's jaw when pissed and a brilliant stories about 'ladies in smoking carriages' that I'll post up later for amusement.
The language has changed over time but the stories haven't at all, it's still like the Daily Mail!
The shelving I used were just a couple of lengths of Sapele hardwood I got from a local timber merchant and oiled them up.
Having the door opening out left me space for a wash basin but there were a few puzzles to solve.
I wanted something akin to an old washstand but the space was so small I couldn't find anything that would fit.
I also couldn't be arsed to drill through the old walls, which are not far off half a metre thick, nor could I be arsed to climb a ladder to plumb a waste into the soil pipe or drainpipe. Being old, the rainwater and waste all go through one common drain.
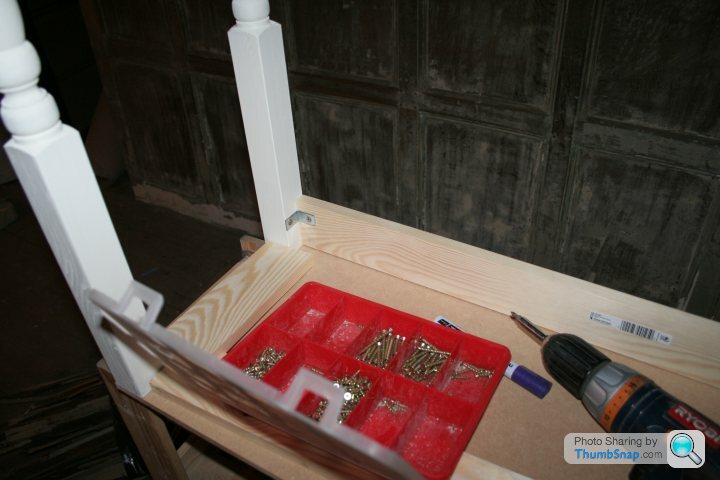
I set about solving the problem of the washstand by making my own.
I bought four bannister spindles, chopped them down a bit so they looked passable as lathe turned legs, a length of cheap strip wood and a piece of mdf for a test fit and made a basic wash stand.

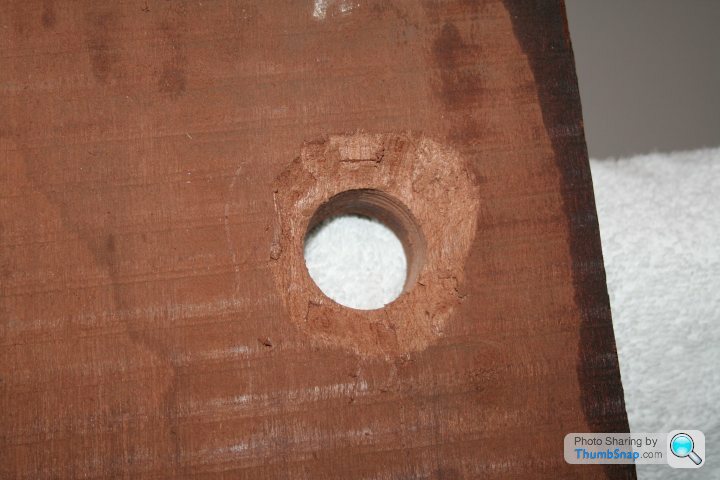
Happy with the fit and with the mdf as my stencil, I got my big piece of hardwood for the top and cut the holes with the holewsaw. It then occured to me that a slightly thinner piece of wood would have been better as I'd got one that was bigger than the threads on the tap!

I couldn't enlarge a hole with a holewsaw to create a countersink for the taps underneath as there was no longer a centre to get hold of so I confess I allowed myself to bodge the underside a bit with a hammer and wood chisel...I still tell myself nobody can see it but I know it's there.
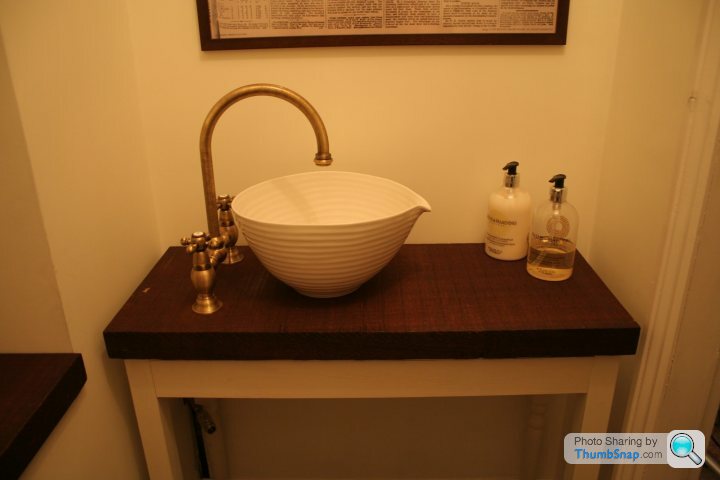
In keeping with the old world toilet theme, I came up with the idea of using a wash bowl you could pour away down the toilet.
Again, I couldn't find anything at auction or salvage and I had a lateral thinking moment watching TV and Google for mixing bowls?
Weirdly, it worked and I found this mixing bowl with a lip, Sophie Corran apparently - if that means anything, that worked perfectly for height, etc with the tap I got from eBay.
It's been in five years now and only one idiot mate didn't turn the tap off and flooded the room but I am aware that however cool and quirky I think it is, not having an overflow with two young kids is asking for trouble so I'll enjoy it while it lasts.
I wanted something akin to an old washstand but the space was so small I couldn't find anything that would fit.
I also couldn't be arsed to drill through the old walls, which are not far off half a metre thick, nor could I be arsed to climb a ladder to plumb a waste into the soil pipe or drainpipe. Being old, the rainwater and waste all go through one common drain.
I set about solving the problem of the washstand by making my own.
I bought four bannister spindles, chopped them down a bit so they looked passable as lathe turned legs, a length of cheap strip wood and a piece of mdf for a test fit and made a basic wash stand.
Happy with the fit and with the mdf as my stencil, I got my big piece of hardwood for the top and cut the holes with the holewsaw. It then occured to me that a slightly thinner piece of wood would have been better as I'd got one that was bigger than the threads on the tap!
I couldn't enlarge a hole with a holewsaw to create a countersink for the taps underneath as there was no longer a centre to get hold of so I confess I allowed myself to bodge the underside a bit with a hammer and wood chisel...I still tell myself nobody can see it but I know it's there.
In keeping with the old world toilet theme, I came up with the idea of using a wash bowl you could pour away down the toilet.
Again, I couldn't find anything at auction or salvage and I had a lateral thinking moment watching TV and Google for mixing bowls?
Weirdly, it worked and I found this mixing bowl with a lip, Sophie Corran apparently - if that means anything, that worked perfectly for height, etc with the tap I got from eBay.
It's been in five years now and only one idiot mate didn't turn the tap off and flooded the room but I am aware that however cool and quirky I think it is, not having an overflow with two young kids is asking for trouble so I'll enjoy it while it lasts.
Yep. Easy enough to drill a waste out the wall from where it is now.
Not that big a job really and the hole won't be particularly visible under the unit, I just couldn't be arsed with it with all the other stuff tat was also in flight.
My thoughts exactly on keeping the bowl or at least something similar that is an actual basin.
Not that big a job really and the hole won't be particularly visible under the unit, I just couldn't be arsed with it with all the other stuff tat was also in flight.
My thoughts exactly on keeping the bowl or at least something similar that is an actual basin.
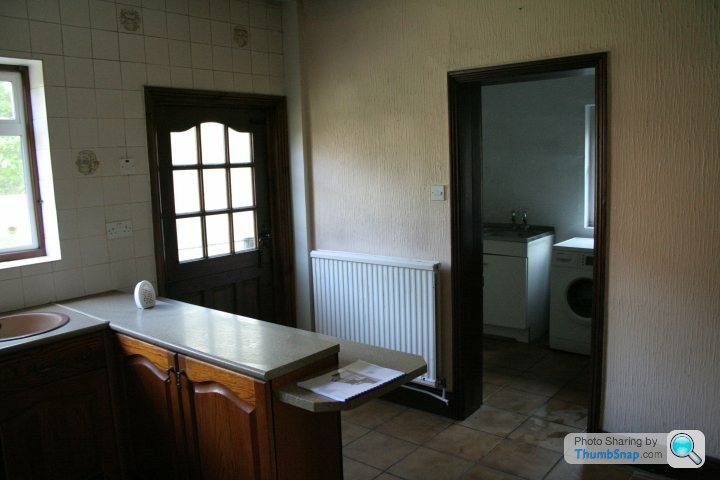
I'll continue jumping around a bit but here's the kitchen when I moved in.
At first glance, despite being horrifically dated, artexed and very dark you'd be forgiven for thinking it was acceptable for now.
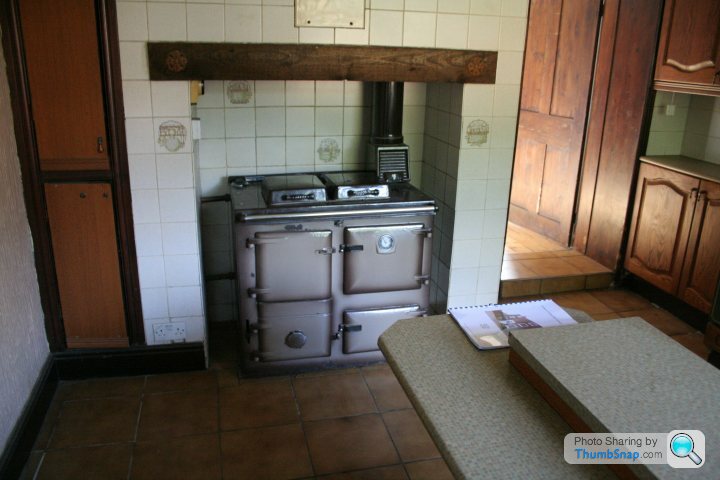
The range was a solid fuel Rayburn and completely past it. It looks okay from a distance but the rings were shot, the door hinges were broken, half the internals were missing, it had huge chunks of enamel missing and the chimney was duff. Apart from that, it was fine.
The sturdy looking timber you see before you is also a stuck on plank (as if you couldn't tell).
However, the sink area was a bit worse for wear...

The bottom of the cupboard was the consistency of a Hob Nob that has been dunked in tea overnight. Not wanting to get in to a massive job, I changed the leaky tap over for a new one and taped over the rusted plughole on one of the sinks as a temporary fix.

Sink and tap bodged, I got out the tape measure and started looking for a donor door from elsewhere in the kitchen to replace the rotten sink units and stop some of the damp smell emanating out until I could sort the kitchen properly.
The oven and hob were gas, the oven was clearly a death trap, as I watched it light an go out a few times before deciding that the hob would be just fine for now.
I left it looking like this, stty but perfectly adequate for a bloke and happy that it would probably do while I focused on the other jobs like the bathroom.

At first glance, despite being horrifically dated, artexed and very dark you'd be forgiven for thinking it was acceptable for now.
The range was a solid fuel Rayburn and completely past it. It looks okay from a distance but the rings were shot, the door hinges were broken, half the internals were missing, it had huge chunks of enamel missing and the chimney was duff. Apart from that, it was fine.
The sturdy looking timber you see before you is also a stuck on plank (as if you couldn't tell).
However, the sink area was a bit worse for wear...
The bottom of the cupboard was the consistency of a Hob Nob that has been dunked in tea overnight. Not wanting to get in to a massive job, I changed the leaky tap over for a new one and taped over the rusted plughole on one of the sinks as a temporary fix.
Sink and tap bodged, I got out the tape measure and started looking for a donor door from elsewhere in the kitchen to replace the rotten sink units and stop some of the damp smell emanating out until I could sort the kitchen properly.
The oven and hob were gas, the oven was clearly a death trap, as I watched it light an go out a few times before deciding that the hob would be just fine for now.
I left it looking like this, s
tty but perfectly adequate for a bloke and happy that it would probably do while I focused on the other jobs like the bathroom.They'd made some kind of weird attempt at a breakfast bar that didn't work because you'd get hit by the back door if you used it. You also couldn't fit a bowl big enough to have a breakfast in on there either so I administered renovation justice with a swift kick to the unit.
Desired result was achieved.

Despite the hole in the stty tiled floor, it gave a lot more space to get other stuff done.

I was stuck waiting for parts for the bathroom at this point, so I decided to tackle the cupboard and tiling in the kitchen.
Up close to the cupboard I noticed the door was really thick and I found they'd just screwed a horrible formica panel over these original doors.

Putting the doors to one side, I got on with ttting off some tiles.
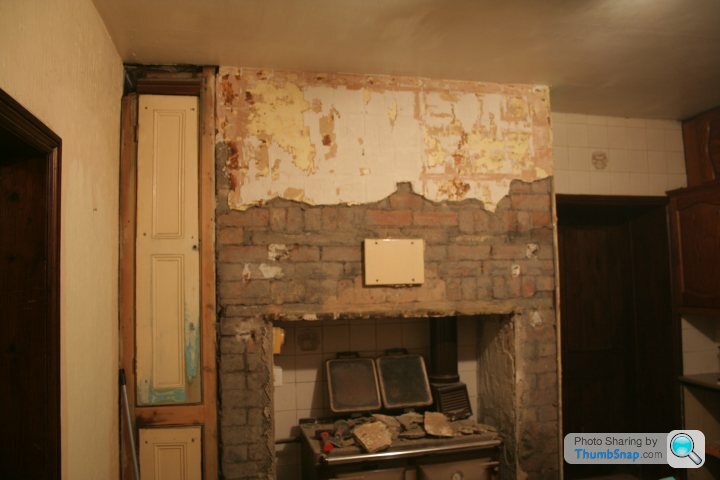
I did look into refurbishing the old Rayburn but it wasn't possible or cost effective so I moved it out of the house by end over ending it and then on the decking used some logs under it to roll it away from the house until I could get a scrapper to come for it.
This what I was left looking at.

The lintel looked a bit weird and bowed slightly but it wasn't until I got under it that I realised it was a railway iron they must have picked up from the railway sidings behind the house (now long gone). It was cast Barrow Steel 1878, was side on so wasn't making best use of the tensile strength of steel and because it was so thin was doing a st job of spreading the weight across the bricks, so it had cracked all of the lower bricks underneath it.

It needed fixing and I wanted to put a new range in its place but as the chimney was too low so I applied for listed building consent and got permission to raise the opening by seven courses and put new pad stones in to stop the whole thing coming down.
Desired result was achieved.
Despite the hole in the s
tty tiled floor, it gave a lot more space to get other stuff done.I was stuck waiting for parts for the bathroom at this point, so I decided to tackle the cupboard and tiling in the kitchen.
Up close to the cupboard I noticed the door was really thick and I found they'd just screwed a horrible formica panel over these original doors.
Putting the doors to one side, I got on with t
tting off some tiles.I did look into refurbishing the old Rayburn but it wasn't possible or cost effective so I moved it out of the house by end over ending it and then on the decking used some logs under it to roll it away from the house until I could get a scrapper to come for it.
This what I was left looking at.
The lintel looked a bit weird and bowed slightly but it wasn't until I got under it that I realised it was a railway iron they must have picked up from the railway sidings behind the house (now long gone). It was cast Barrow Steel 1878, was side on so wasn't making best use of the tensile strength of steel and because it was so thin was doing a s
t job of spreading the weight across the bricks, so it had cracked all of the lower bricks underneath it.It needed fixing and I wanted to put a new range in its place but as the chimney was too low so I applied for listed building consent and got permission to raise the opening by seven courses and put new pad stones in to stop the whole thing coming down.
Gassing Station | Homes, Gardens and DIY | Top of Page | What's New | My Stuff