Georgian House Renovation Up North - 5 Years and Counting
Discussion


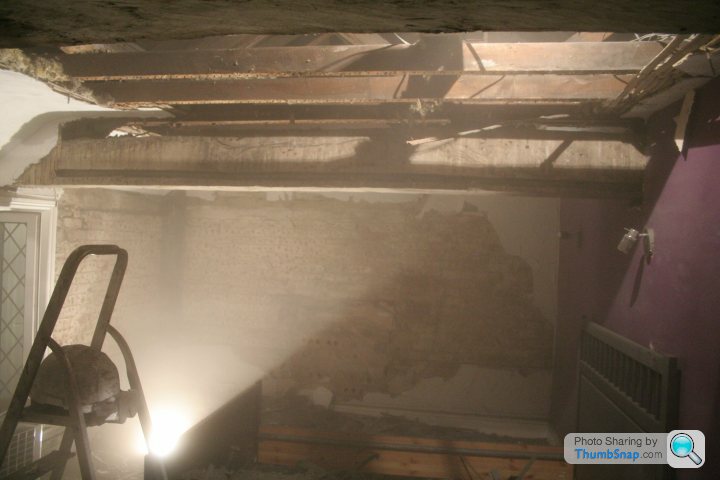
I didn't do this bit...Simon my builder did. He also found it amusing that none of the fireplace or walls were tied in to the main house at all, they'd just been butted up against he wall and they'd gone up and up.
Anyway building pics.

You wouldn't think there'd be that much rubble for seven courses.

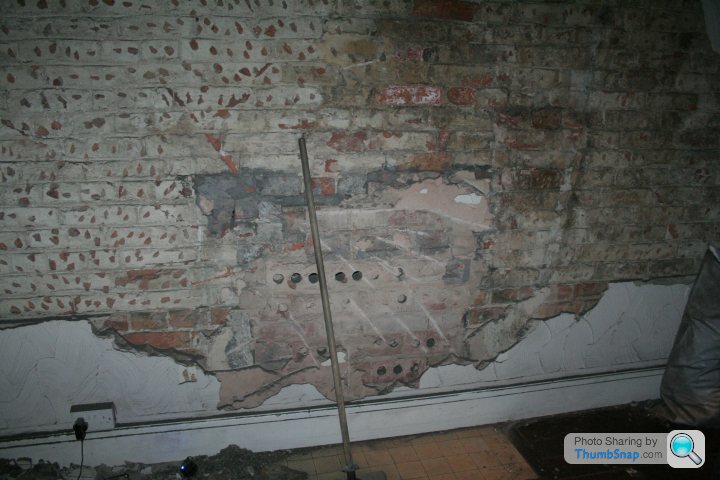
I asked him to recover as many bricks intact as possible because they have the initials HBW pressed in them as they were made in the brickworks of the colliery owner (Henry Briggs Works). He was a good hundred years ahead of Saddam getting his name on the bricks he put into his palaces.
You can tell they're colliery bricks as they're almost impossible to drill into without an SDS.

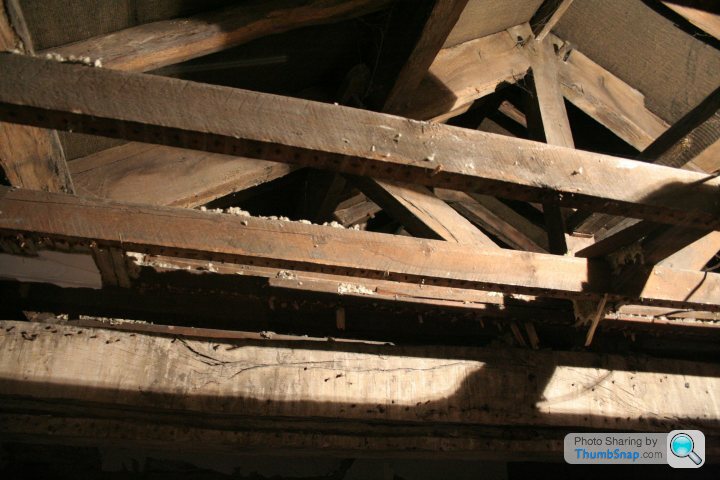
Proper Lintel - It was a slightly odd size and had to be made specially, bloody hard work handballing it up and in (I'm told - I was at work )
)

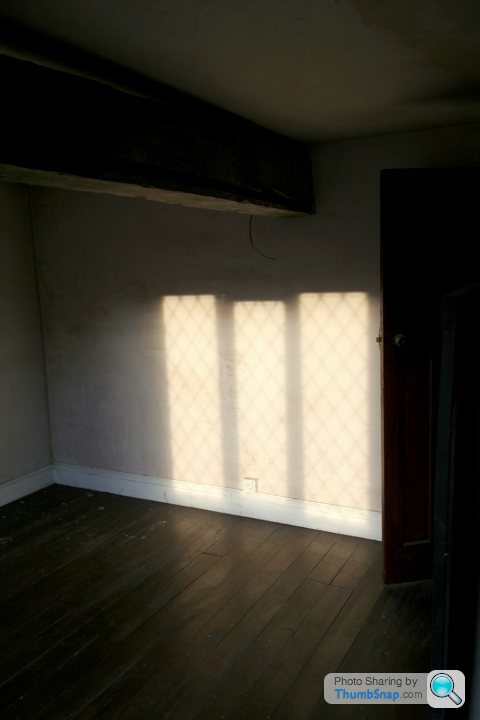
Tidied up and waiting for gas/electric and the range.

Anyway building pics.
You wouldn't think there'd be that much rubble for seven courses.
I asked him to recover as many bricks intact as possible because they have the initials HBW pressed in them as they were made in the brickworks of the colliery owner (Henry Briggs Works). He was a good hundred years ahead of Saddam getting his name on the bricks he put into his palaces.
You can tell they're colliery bricks as they're almost impossible to drill into without an SDS.
Proper Lintel - It was a slightly odd size and had to be made specially, bloody hard work handballing it up and in (I'm told - I was at work
)Tidied up and waiting for gas/electric and the range.
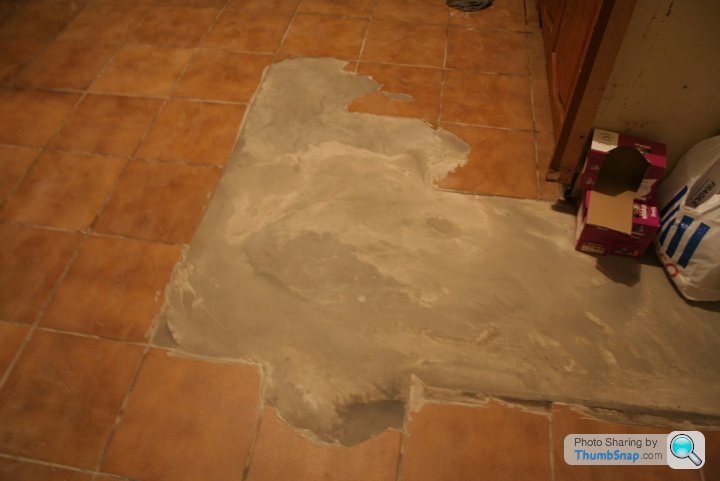
I decided to fill the hole in the floor where the old unit was with a bit of levelling compound, a nice easy job...

...just needs a little bit more pouring in...

b ks - shuttering

Fortunately the missus was out at the time, all she saw was this and gave it the thumbs up for now.
I think I've made almost every mistake you can somewhere as I've gone through this and it's all good fun one way or another.
...just needs a little bit more pouring in...
b
ks - shutteringFortunately the missus was out at the time, all she saw was this and gave it the thumbs up for now.
I think I've made almost every mistake you can somewhere as I've gone through this and it's all good fun one way or another.
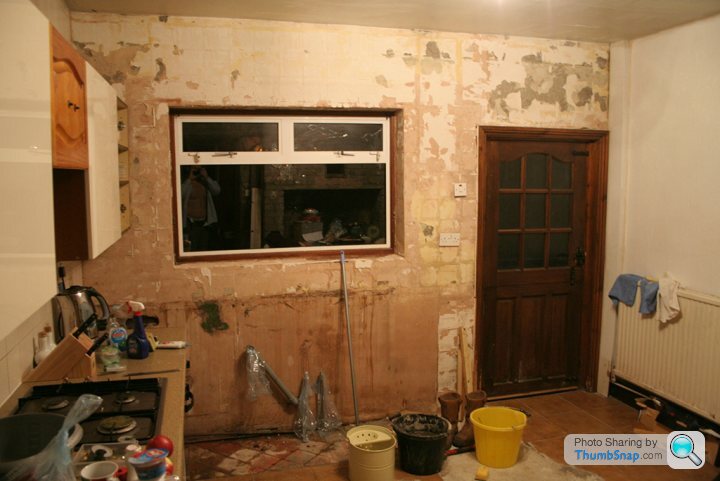
By Christmas 2012, the other half had moved in and I was forced to get the kitchen a bit more usable - I'd been waiting on the funds for a range but with so many other jobs needing attention, rather than spend a couple of grand on the range I wanted, ewe decided to spend a few quid patching up the rest of kitchen in to something half decent, including an oven and spend the money elsewhere for now.
B&Q had one of their perennial sales on with 60% off six or more items plus an extra 25% off or something. I also get a 15% discount via preloading gift cards as a perk of work so it was off to the orange box to buy new doors and as few carcasses as we could get away with.
We knew this was a temporary kitchen so despite all the discounts, I actually went hunting on the shelves for the minor damaged doors (a knock on one edge, etc) and haggled a further discount on those on the basis of "Who's going to walk in and buy a dented door?". The manager didn't seem to realise my argument was somewhat undermined by my being stood there and doing just what I said nobody would. They gave us a further discount so the doors cost us an average of about £8 each all told. In addition, the manager and staff got so confused sorting the discounts, they didn't charge us for the £70 extractor unit on the trolley. We didn't realise this until we got home and it seemed silly to waste petrol explaining their mistake.
The extractor unit died after six months and then we had to buy another because it wasn't on the receipt for a warranty claim -that's karma for you.
Here's the kitchen as it looked over Christmas.
By the second week of January, we'd got it looking like this.

The worktops were the £30 cheapo jobbies and the sink was the cheapest they had but after a year of people pouring st down the twin sink when one of them wasn't plumbed properly, I couldn't give a st. The worst bit was measuring and cutting out for the sink, I'm not a precision person.
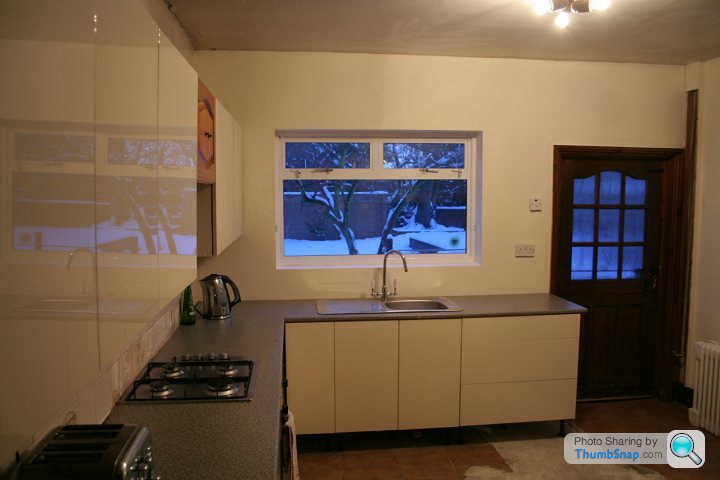
Just the extractor was left and I think we did ok for about £300 all in, including the doors, oven and sink, etc.
B&Q had one of their perennial sales on with 60% off six or more items plus an extra 25% off or something. I also get a 15% discount via preloading gift cards as a perk of work so it was off to the orange box to buy new doors and as few carcasses as we could get away with.
We knew this was a temporary kitchen so despite all the discounts, I actually went hunting on the shelves for the minor damaged doors (a knock on one edge, etc) and haggled a further discount on those on the basis of "Who's going to walk in and buy a dented door?". The manager didn't seem to realise my argument was somewhat undermined by my being stood there and doing just what I said nobody would. They gave us a further discount so the doors cost us an average of about £8 each all told. In addition, the manager and staff got so confused sorting the discounts, they didn't charge us for the £70 extractor unit on the trolley. We didn't realise this until we got home and it seemed silly to waste petrol explaining their mistake.
The extractor unit died after six months and then we had to buy another because it wasn't on the receipt for a warranty claim -that's karma for you.
Here's the kitchen as it looked over Christmas.
By the second week of January, we'd got it looking like this.
The worktops were the £30 cheapo jobbies and the sink was the cheapest they had but after a year of people pouring s
t down the twin sink when one of them wasn't plumbed properly, I couldn't give a st. The worst bit was measuring and cutting out for the sink, I'm not a precision person.Just the extractor was left and I think we did ok for about £300 all in, including the doors, oven and sink, etc.
Edited by stewjohnst on Tuesday 20th September 01:38
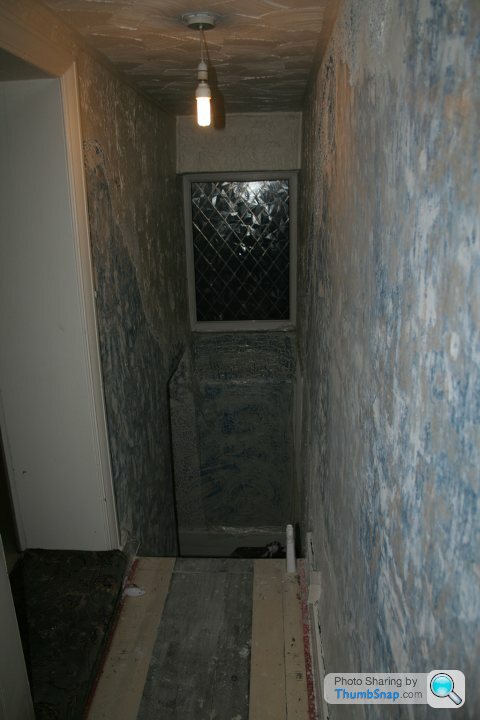
Who said earlier in the thread it reminded them of Fred West's house? There were all sorts of secrets lurking in the hallway.

Can you believe it? 17p - That's got to be at least 1990 prices!
Not impressed? I'll see if I can do better.
I was happily going around knocking in walls listening for the dull thud of plaster that was ok or the hollow 'poc' sound of blown plaster that might indicate damp or need my attention soon. There were plenty of both until I got to the end of the hallway and got the sort of large hollow drum noise you'd get from hitting the bottom of an empty cardboard box.
Naturally, it seemed logical to elbow the wall as hard as I could to see what would happen.
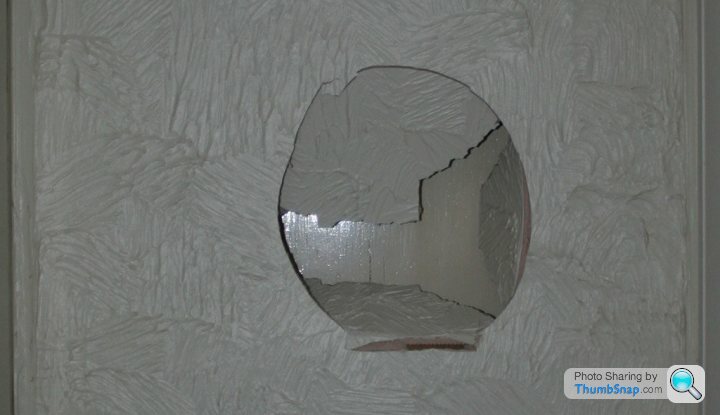
I thought I knew what it was then and there but as if I was in some bizarre version of renovation Catch Phrase, my next move was to pick an obscure corner of the puzzle to reveal that didn't tell me anything.

With the sound of Roy Walker ringing in my ears, I ripped away the rest of the plaster and was greeted with this.

Ok, I'll admit it confused the feck out of me. I walked into the rooms around it, trying to work out where the hell it would lead. Was there a hidden part of a room? the house is mad enough in its layout in places that you could easily loose a bit of your bearings and squeeze in a small cupboard so what was it?
I tried to pull it open, no go. I tried to shoulder it open a few times. No go.
I decided to go outside to see if I could figure out where it was and that's about the time I was pleased it hadn't opened when I shouldered it as I'd have probably found myself mid air Wile.E.Coyote style.
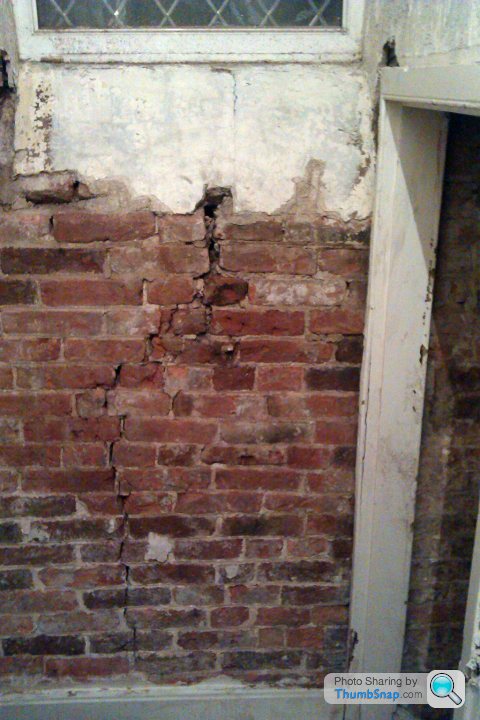
This is where the door is located.
It's about this point I noticed a scar on the outside of the building where part of the original house must have disappeared.

So, not sure that I'd actually find anything interesting, I decided to go back up and as the door opened away from me, I decided to take out the frame and see what was lurking behind.
Apologies for the Blair Witch Camera work and overly dramatic swearing - you talk to yourself a lot when you're locked in a house all day by yourself...
Can you believe it? 17p - That's got to be at least 1990 prices!
Not impressed?
I'll see if I can do better.I was happily going around knocking in walls listening for the dull thud of plaster that was ok or the hollow 'poc' sound of blown plaster that might indicate damp or need my attention soon. There were plenty of both until I got to the end of the hallway and got the sort of large hollow drum noise you'd get from hitting the bottom of an empty cardboard box.
Naturally, it seemed logical to elbow the wall as hard as I could to see what would happen.
I thought I knew what it was then and there but as if I was in some bizarre version of renovation Catch Phrase, my next move was to pick an obscure corner of the puzzle to reveal that didn't tell me anything.
With the sound of Roy Walker ringing in my ears, I ripped away the rest of the plaster and was greeted with this.
Ok, I'll admit it confused the feck out of me. I walked into the rooms around it, trying to work out where the hell it would lead. Was there a hidden part of a room? the house is mad enough in its layout in places that you could easily loose a bit of your bearings and squeeze in a small cupboard so what was it?
I tried to pull it open, no go. I tried to shoulder it open a few times. No go.
I decided to go outside to see if I could figure out where it was and that's about the time I was pleased it hadn't opened when I shouldered it as I'd have probably found myself mid air Wile.E.Coyote style.
This is where the door is located.
It's about this point I noticed a scar on the outside of the building where part of the original house must have disappeared.
So, not sure that I'd actually find anything interesting, I decided to go back up and as the door opened away from me, I decided to take out the frame and see what was lurking behind.
Apologies for the Blair Witch Camera work and overly dramatic swearing - you talk to yourself a lot when you're locked in a house all day by yourself...
SonicHedgeHog said:
I think you should build a two storey extension so that you can use that door.
In the back of my mind once all the other jobs are done, there's a nice balcony/morning coffee terrace going to be built there.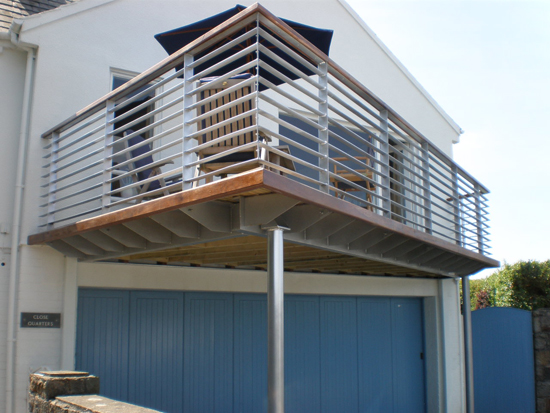
Never happen though, the other half always has another job for me
Not saying the above is nice just an example...
Lifting out the door made me realise there was an unnatural step up so I pulled back the carpet and found this.
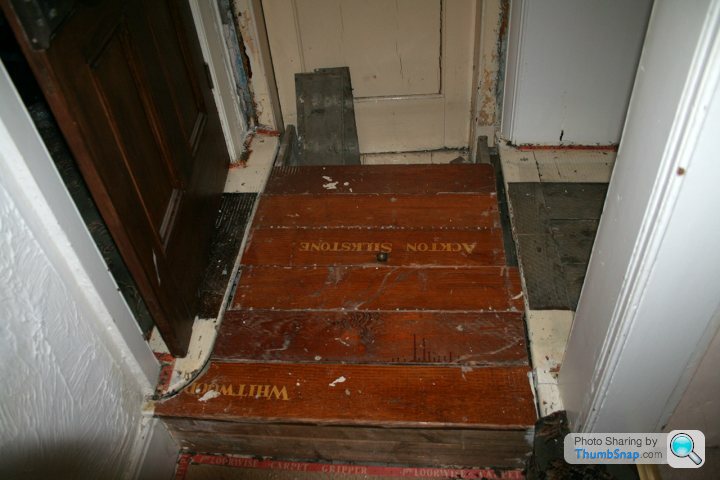
These are most likely to be the old drawer fronts of mining survey maps for the surrounding areas. I've kept these for use somewhere later as it's a shame to have them hidden away.
As for the doorway. I knocked out a few bricks to get a decent recess and also to see how much of the block printed wallpaper on the side I could recover.
There was also the small matter of sorting the rest of the hallway now I'd got the artex scraped off.
Although I'd got the artex off the bottom, there was a random door frame that didn't need a door so we knocked off the plaster to get it out. Seems there was quite a bit of settlement at some point
It seemed appropriate to dot and dab a plasterboard over it and pretend I never saw a thing.
Stripping the boxing off above the window also revealed another beam and hats off to my plasterer for blending it in so well. There was just a small bit of boxing in I had to do to finish hiding it.
To make use of the height, we got a fairly large light chandelier jobbie. Trying to fit such a heavy light in a stupidly narrow hallway on a ladder that just about fitted on the triangular centre step was one thing but balancing up there for another hour, to put all the individual glass pieces on almost destroyed my poor quads.

We lost a few bits in the process but the guys at Ocean Lighting in Middlesbrough got us some spares free of charge - guessing it is a common problem.

Back where the door was, the plasterer boxed in around the beam and left me enough of a gap to fit a set of strip LEDs and run a wire under the step so I could create picture frame area.
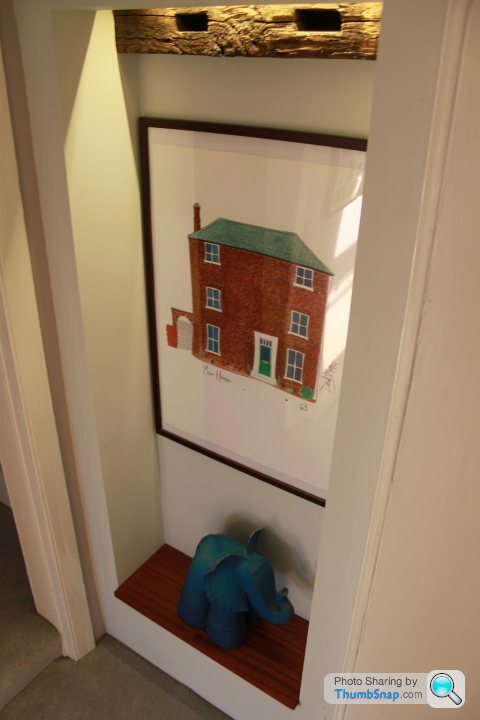
We got the portrait of the house done as a bit of a treat and it filled the space nicely. It was done by a guy we'd seen do one for a place we'd been shopping at a lot and chatting to the owner he said he did commissions, so we got his number and agreed a price of about £500 for it.
It seems a lot but we intended to photograph and shrink it down to make the wedding invitations so it was semi-justifiable, plus it looks cool IMO .
.
These are most likely to be the old drawer fronts of mining survey maps for the surrounding areas. I've kept these for use somewhere later as it's a shame to have them hidden away.
As for the doorway. I knocked out a few bricks to get a decent recess and also to see how much of the block printed wallpaper on the side I could recover.
There was also the small matter of sorting the rest of the hallway now I'd got the artex scraped off.
Although I'd got the artex off the bottom, there was a random door frame that didn't need a door so we knocked off the plaster to get it out. Seems there was quite a bit of settlement at some point
It seemed appropriate to dot and dab a plasterboard over it and pretend I never saw a thing.
Stripping the boxing off above the window also revealed another beam and hats off to my plasterer for blending it in so well. There was just a small bit of boxing in I had to do to finish hiding it.
To make use of the height, we got a fairly large light chandelier jobbie. Trying to fit such a heavy light in a stupidly narrow hallway on a ladder that just about fitted on the triangular centre step was one thing but balancing up there for another hour, to put all the individual glass pieces on almost destroyed my poor quads.
We lost a few bits in the process but the guys at Ocean Lighting in Middlesbrough got us some spares free of charge - guessing it is a common problem.
Back where the door was, the plasterer boxed in around the beam and left me enough of a gap to fit a set of strip LEDs and run a wire under the step so I could create picture frame area.
We got the portrait of the house done as a bit of a treat and it filled the space nicely. It was done by a guy we'd seen do one for a place we'd been shopping at a lot and chatting to the owner he said he did commissions, so we got his number and agreed a price of about £500 for it.
It seems a lot but we intended to photograph and shrink it down to make the wedding invitations so it was semi-justifiable, plus it looks cool IMO
.Unlike me, the other half hates the cold and is a light sleeper so as winter rocked around, the front rooms with their single glazed sash windows were too noisy and cold for her so we decided we'd move to the 'winter bedroom'.
It had double glazing and the whole of the front house to block noise out. As ever, it did need a bit of work first.
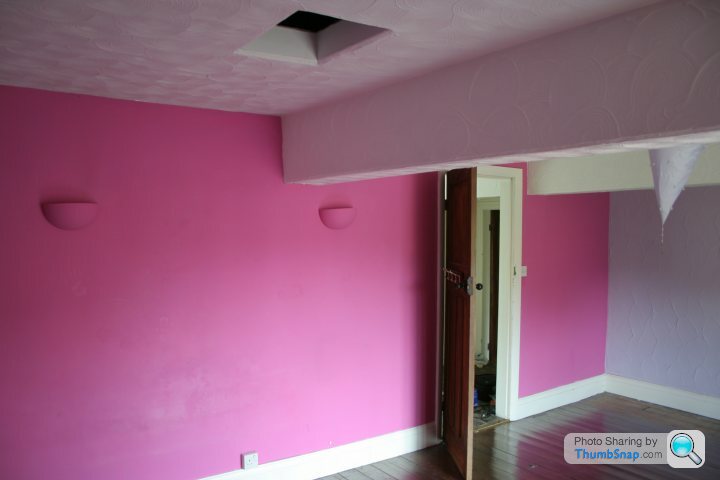
Pink!


If you can ignore the swirl-tastic artex and the fact it probably looks the colour of the inside of one of Katie Price's Range Rovers, you might notice how low the ceiling is.
Having stripped the beams in the hallway, it was a no brainer to explore them in here too.


It had double glazing and the whole of the front house to block noise out. As ever, it did need a bit of work first.
Pink!
If you can ignore the swirl-tastic artex and the fact it probably looks the colour of the inside of one of Katie Price's Range Rovers, you might notice how low the ceiling is.
Having stripped the beams in the hallway, it was a no brainer to explore them in here too.
There was a boxed in section in the corner of the room and I couldn't figure out why, so yet again I poked about to see what I'd find. (Yes, I was one of those kids at school that couldn't resist picking their scabs all the time).
Itch...

...Scratched.

Turns out there was nothing to see here, except an enormous set of lead pipes.

I knew they weren't plumbed in but they did go up into the loft to this little beauty

Left to my own devices, I'd have had the ceiling down for the hell of it to explore. Sarah was the voice of reason and handed me the masking tape and brown paper to wrap it up so we could sleep in here over winter, once we'd toned down the pink with some budget grey paint.

Itch...
...Scratched.
Turns out there was nothing to see here, except an enormous set of lead pipes.
I knew they weren't plumbed in but they did go up into the loft to this little beauty
Left to my own devices, I'd have had the ceiling down for the hell of it to explore. Sarah was the voice of reason and handed me the masking tape and brown paper to wrap it up so we could sleep in here over winter, once we'd toned down the pink with some budget grey paint.


It was a bit dusty up there so another case of masking up and ripping it down.

You can see the honking great lead pipes that I ripped out. I have a video somewhere, it's not dissimilar to the door one posted earlier, lots of shaky camera work and with grunting noises not out of place in a b grade porno but I can't find it right now.

I was thinking it wouldn't look so bad when the missus got home and she'd be pleased, but then I kind of got carried away and took the rest of the roof out...
Her majesty was not impressed to find me looking a bit grimy on her return. What's more distressing for me is how the dust has made my hair look like somebody asked Lego to make a stick on hairdo that had the texture of a merkin.

You can see the honking great lead pipes that I ripped out. I have a video somewhere, it's not dissimilar to the door one posted earlier, lots of shaky camera work and with grunting noises not out of place in a b grade porno but I can't find it right now.
I was thinking it wouldn't look so bad when the missus got home and she'd be pleased, but then I kind of got carried away and took the rest of the roof out...
Her majesty was not impressed to find me looking a bit grimy on her return. What's more distressing for me is how the dust has made my hair look like somebody asked Lego to make a stick on hairdo that had the texture of a merkin.
When the dust had settled, we had a decent mix of newly discovered features and more problems to address.
Exquisite Peg construction Queen posts - Check, Non breathable membrane causing damp in the roof space - Check
Woodworm causes by the damp conditions on the base of the queen post - Yep

Bricked up fireplace - although to be fair, the tiled hearth kind of gave this one away beforehand
Anda better look at the old water tank - No way that was coming down for now.

Exquisite Peg construction Queen posts - Check, Non breathable membrane causing damp in the roof space - Check
Woodworm causes by the damp conditions on the base of the queen post - Yep
Bricked up fireplace - although to be fair, the tiled hearth kind of gave this one away beforehand
Anda better look at the old water tank - No way that was coming down for now.
There was plenty more scrap to come out of the house before I'd done - but yes, that Lead weight a fair whack and got me a good few quid back.
Continuing the chiselling off along the outside wall, I exposed a beam that ran the full length of the room so decided to keep that as a feature.
I tried getting the dust out with this crappy little fan heater/cooler I had lying around but it was useless.

There aren't photos so you can call custard if you like but I actually resorted to going and getting the leaf blower from the garage, taping up the door and then just chasing the dust and blasting all the st out of the window for half an hour. I heartily recommend it - great fun
I managed to placate the wife by pointing out that when I'd taken the ceiling down, it was actually gypsum plaster and not lime which meant I could technically do it again in gypsum as it became a like for like activity which is permitted under listed building without any need for consent. Weirdly though - they'd used the gypsum plaster back over lath which didn't make any sense as the mechanics of gypsum bonding versus lime and hair hooking through lath to hold on is totally different.
I couldn't actually get the old water tank down as I didn't fancy sawing through timbers - It's still up there, maybe some day I'll do something and make a feature of it somehow...

Back to the plastering - It was in theory easy to just board and skim the ceiling, however - There was the small matter of pulling out out all the nails from the beams first so the board would be flat. I cannot explain how perfectly at the wrong height the beams were to have to do this. I could reach them fomr the floor but after ten minutes my neck was killing me, so it became an incredibly dusty session of Zumba hopping up and down off platform to do them all as you couldn't reach that many from the platform before having to move again...

It took about 2 days and all the nails were out and Steve the plasterer could get the room boarded and skimmed. The fireplace is patched because I'd told him to leave the fireplace as I'd got one from ebay I was going to fit - My fault that I didn't tell him it was a small bedroom one so he had to thin it down afterwards with two inserts. He hated it as he's a perfectionist but you can't tell now they're painted up.

Continuing the chiselling off along the outside wall, I exposed a beam that ran the full length of the room so decided to keep that as a feature.
I tried getting the dust out with this crappy little fan heater/cooler I had lying around but it was useless.
There aren't photos so you can call custard if you like but I actually resorted to going and getting the leaf blower from the garage, taping up the door and then just chasing the dust and blasting all the s
t out of the window for half an hour. I heartily recommend it - great fun I managed to placate the wife by pointing out that when I'd taken the ceiling down, it was actually gypsum plaster and not lime which meant I could technically do it again in gypsum as it became a like for like activity which is permitted under listed building without any need for consent. Weirdly though - they'd used the gypsum plaster back over lath which didn't make any sense as the mechanics of gypsum bonding versus lime and hair hooking through lath to hold on is totally different.
I couldn't actually get the old water tank down as I didn't fancy sawing through timbers - It's still up there, maybe some day I'll do something and make a feature of it somehow...
Back to the plastering - It was in theory easy to just board and skim the ceiling, however - There was the small matter of pulling out out all the nails from the beams first so the board would be flat. I cannot explain how perfectly at the wrong height the beams were to have to do this. I could reach them fomr the floor but after ten minutes my neck was killing me, so it became an incredibly dusty session of Zumba hopping up and down off platform to do them all as you couldn't reach that many from the platform before having to move again...
It took about 2 days and all the nails were out and Steve the plasterer could get the room boarded and skimmed. The fireplace is patched because I'd told him to leave the fireplace as I'd got one from ebay I was going to fit - My fault that I didn't tell him it was a small bedroom one so he had to thin it down afterwards with two inserts. He hated it as he's a perfectionist but you can't tell now they're painted up.
Edited by stewjohnst on Friday 23 September 23:52
With boarding out the walls, it meant the new wall sat proud of the beam that ran the length of the original, so the plasterer used a mix of plaster of Paris to blend a smooth curve into the beam.
Not sure it shows on the photo too clearly but it is really quality work and makes it look like its always been that way.

To make the most of the beams, it was Tung Oil time again.

It left a tiger stripe effect where the lath had been nailed to the beam - another stupid thing they'd done - as there's no way for the plaster to push behind the lath when it's nailed flush into a beam?
With he plaster skim finished - we went to get the massive tub of watered down emulsion to bed the plaster in.
There are certain jobs I like doing - plumbing is fun (apart form the initial seconds of stting yourself in case of a leak whenever you put the supply back on), destruction is fun, building stuff with wood and timbers is fun.
Trying to work out how to get six spotlights in a room perfectly aligned when you have two beams blocking the way, no square walls and a ceiling you've freshly plastered and painted isn't. the last point is totally self inflicted because I was in denial about doing the spots and I knew I should have done the lights first but was kind of pretending the problem would go away.
Up they go...

I did end up getting them level by measuring around in the roof space and taking measures from the beams, etc and then poking through the centre before coming out ofthe loft and drilling from the bottom and up.
Always good to have assistance on hand
I needn't have worried because although they're bang on level (somehow), the beams mean you only see two at once anyway so even if I was a kack-handed buffoon - I'd have got away with it anyway.

Not sure it shows on the photo too clearly but it is really quality work and makes it look like its always been that way.
To make the most of the beams, it was Tung Oil time again.
It left a tiger stripe effect where the lath had been nailed to the beam - another stupid thing they'd done - as there's no way for the plaster to push behind the lath when it's nailed flush into a beam?
With he plaster skim finished - we went to get the massive tub of watered down emulsion to bed the plaster in.
There are certain jobs I like doing - plumbing is fun (apart form the initial seconds of s
tting yourself in case of a leak whenever you put the supply back on), destruction is fun, building stuff with wood and timbers is fun.Trying to work out how to get six spotlights in a room perfectly aligned when you have two beams blocking the way, no square walls and a ceiling you've freshly plastered and painted isn't. the last point is totally self inflicted because I was in denial about doing the spots and I knew I should have done the lights first but was kind of pretending the problem would go away.
Up they go...
I did end up getting them level by measuring around in the roof space and taking measures from the beams, etc and then poking through the centre before coming out ofthe loft and drilling from the bottom and up.
Always good to have assistance on hand
I needn't have worried because although they're bang on level (somehow), the beams mean you only see two at once anyway so even if I was a kack-handed buffoon - I'd have got away with it anyway.
Some Gump said:
I have no idea if it's my iPad or the op being tired, but I do love playing the "try to match the words with the pictures from yesterday's post" game.
Still loving your work, mr Boggs. Would love to have exposed beams in here
Guessing its just you - looks fine on my own pc and on my works laptop? Still loving your work, mr Boggs. Would love to have exposed beams in here

Beetnik said:
Interesting report of the 1912 AGM of Henry Briggs, Son & Co here - including discussions around minimum wage!
I did a lot of digging and have a lot of old newspaper prints from around the time in the toilet to keep people occupied whilst the toilet is too.The stories about the mines are interesting but it's the other stories that are more amusing...


A doctor on drinking!

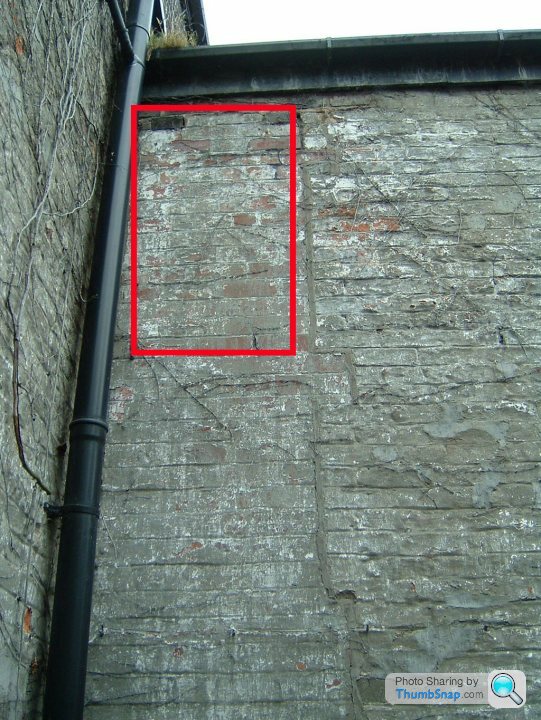
Based on the what was there before you thread, the answer as far as the maps go back is, well...the house!

Our house is at the far end of the picture, all of these buildings were demolished when the colliery closed at the end of the 60's and only our house was left standing as the pit manager was living there at the time.
It's why the right hand side of the house is rendered - it's no doubt covering some horrific scarring from the demolition of the abutted terraces.
Real life has been getting in the way (baby number 2 crying as I type this  so a few updates.
Back to finishing the green room.
I was after a small fireplace and managed to find one just round the corner from me via eBay. It had been sat in a shed for years and was very rusty but a bit of wire brush action and a couple of rattle cans of primer and matt black and it was good to go on the wall.

I've realised I don't actually have any finished photos of the 'green room' as the latest I have are these before the carpet went in but it's still a decent before/after comparison.

The wardrobes were charity shop finds that the other half painted and gilded up while I was doing other demolition work.
I can't 'after' photos now as it is in the process of becoming a child's bedroom..
so a few updates.Back to finishing the green room.
I was after a small fireplace and managed to find one just round the corner from me via eBay. It had been sat in a shed for years and was very rusty but a bit of wire brush action and a couple of rattle cans of primer and matt black and it was good to go on the wall.
I've realised I don't actually have any finished photos of the 'green room' as the latest I have are these before the carpet went in but it's still a decent before/after comparison.
The wardrobes were charity shop finds that the other half painted and gilded up while I was doing other demolition work.
I can't 'after' photos now as it is in the process of becoming a child's bedroom..
We'd decided to get married a while back and couldn't decide on a venue so stupidly opted for a marquee in the back garden.
Whilst this made perfect sense as the house is how we met, etc. It did mean we had a date to hit with the renovations.
It also meant we had to switch our attention to the gardens so they looked good for the wedding... Job creation when we already had enough to do but there you go.
The front was a bit neglected to start with, overgrown ivy, out of control plants, wonky trees, etc.

The barley twist edging was already there, just needed tidying and weeding to get a nice line.
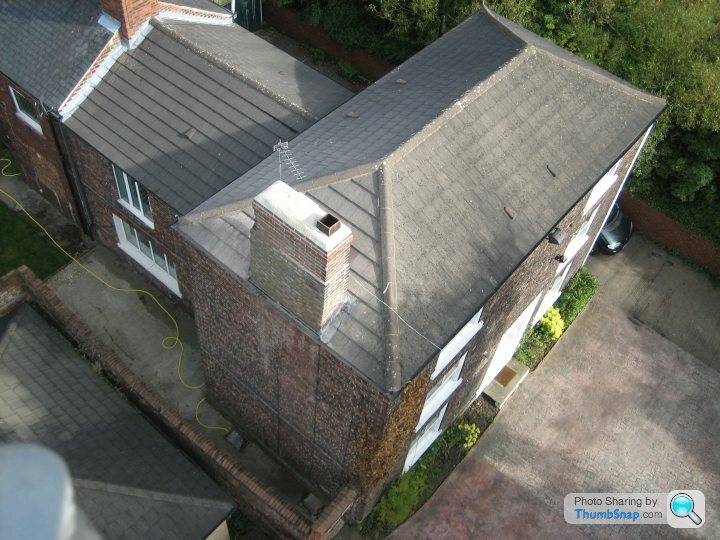
You can also see the chimney has been capped and vented (one flue still working) to stopped water ingress too.
You can also see the yellow hose that pumps the cellar out to the drain and the nose of the Ford Galaxy that I bought for 600 because I was fed up of paying for skips.
Whilst this made perfect sense as the house is how we met, etc. It did mean we had a date to hit with the renovations.
It also meant we had to switch our attention to the gardens so they looked good for the wedding... Job creation when we already had enough to do but there you go.
The front was a bit neglected to start with, overgrown ivy, out of control plants, wonky trees, etc.
The barley twist edging was already there, just needed tidying and weeding to get a nice line.
You can also see the chimney has been capped and vented (one flue still working) to stopped water ingress too.
You can also see the yellow hose that pumps the cellar out to the drain and the nose of the Ford Galaxy that I bought for 600 because I was fed up of paying for skips.
Gassing Station | Homes, Gardens and DIY | Top of Page | What's New | My Stuff