First House Renovation / Do-er upper
Discussion


Progress has been coming along nicely although unfortunately my iphone has gone into lockdown and just wont work so I've lost hundreds of pictures of the refurb from the start - gutted to say the least!
I'll carry on from where we are at the moment. Firstly the slate flooring has been put down in the kitchen, needs grouting and sealing properly;


Also as you can see the kitchen has been tidied and cables routed through the wall ready for a plug and TV socket (the tv in the kitchen will be in the alcove infront of the cables)
Doors have been collected from Penrith, Cumbria - 400 mile round trip for oak veneered doors bought new off ebay at a bargain price. New ball bearing hinges fitted to them all and smith & locke satin handles fitted too (mortice locks and twist on bathroom and downstairs toilet)

One coat of Danish oil applied (Going to give it another 2)

I'll take some new photos of the rest of the house (a lot has happened) - bathroom nearly finished, living room lights all fitted and working, sockets etc fitted in the drywall.
As always - any comments welcomed.
Dion
Next challenge is to fit skirting boards. Researching and asking a lot of people there seems to be mixed opinions. These being three options:
- Fitting with adhesive and propping/clamping until dry
- Fitting with adhesive and plugging/screwing parts into the wall
- Fitting with adhesive and masonry nailing and nailing parts to the wall
this raises many questions for me as a first time skirting fitter! Firstly, which adhesive do I use? and secondly - Do i nail and take them out once the adhesive is set or use hidden head nails and leave them in?
I want it to be a proper job that I won't have to do again in the near future.
Dion
dionbee93 said:
I was planning on using just standard stuff really, Pine for all the rooms apart from the kitchen and bathroom. where I'll be putting plastic coated MDF smaller skirtings.
Do they warp etc? or just general poor finish and quality?
Thanks - Dion
If you're painting it use primed MDF. Far more stable. If you're sticking it to bare plaster it's worth while giving the bottom 5 inches of the wall (assuming a 5" skirt) a lick of diluted PVA. Helps stop the wall sucking the life out of the addy before it sets.Do they warp etc? or just general poor finish and quality?
Thanks - Dion
dionbee93 said:
I was planning on using just standard stuff really, Pine for all the rooms apart from the kitchen and bathroom. where I'll be putting plastic coated MDF smaller skirtings.
Do they warp etc? or just general poor finish and quality?
Thanks - Dion
We used standard pine, from one of the DIY sheds and it warped, but also it was a bit flimsy. We ended up using the much chunkier old skirting boards, we needed to drill/plug them and they took a lot more decorating, but they are more robust.Do they warp etc? or just general poor finish and quality?
Thanks - Dion
So it's been a busy half term!
Firstly - Got most of the garden finished with help:
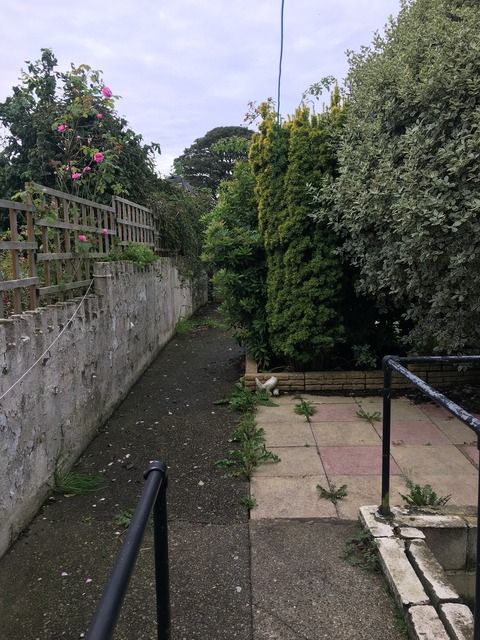
Some of you might remember how it looked beforehand;

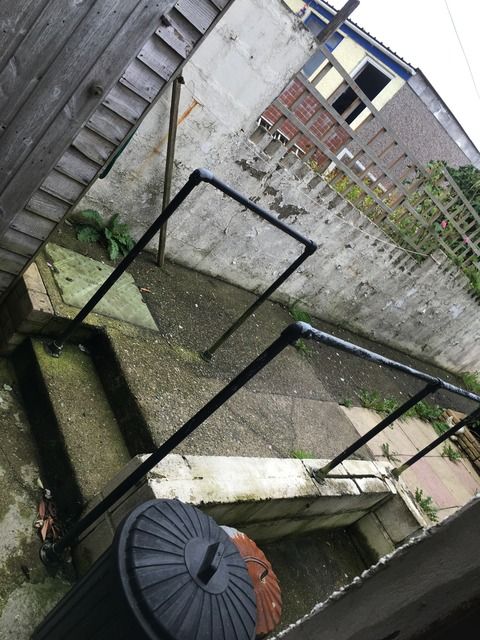
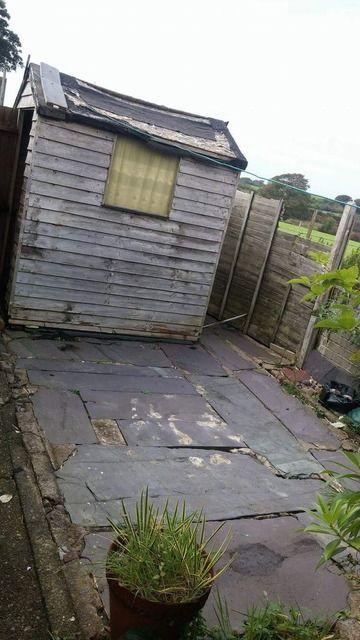
Chopped the trees down, got rid of the fugly rotten shed and the fence and dug up all the tree stumps etc;
http://s146.photobucket.com/user/dionbee93/media/6...
Handrail ripped off and another layer of side-on blocks laid on top of the existing little wall to be able to fill in the garden to level it out so it doesn't run towards the house;


Weed membrane put down in double thickness and sub-base/slate waste then filled in and whacked into place;


The end was also dug up (Towards the back lane) and a new concrete ramp/slab was put down although i forgot pictures of this - you can just about see it at the end there!
3m square of grey cement slabs places on the part closest to the house for bbq's etc - thought it was a little nicer than just slate waste on all of the garden. These cost £2 each so didn't quite break the bank;


Next is to clean the concrete path on the left and to paint the walls white to freshen everything up before putting a gate across the end.
Dion.
Firstly - Got most of the garden finished with help:
Some of you might remember how it looked beforehand;


Chopped the trees down, got rid of the fugly rotten shed and the fence and dug up all the tree stumps etc;
http://s146.photobucket.com/user/dionbee93/media/6...
Handrail ripped off and another layer of side-on blocks laid on top of the existing little wall to be able to fill in the garden to level it out so it doesn't run towards the house;


Weed membrane put down in double thickness and sub-base/slate waste then filled in and whacked into place;


The end was also dug up (Towards the back lane) and a new concrete ramp/slab was put down although i forgot pictures of this - you can just about see it at the end there!
3m square of grey cement slabs places on the part closest to the house for bbq's etc - thought it was a little nicer than just slate waste on all of the garden. These cost £2 each so didn't quite break the bank;


Next is to clean the concrete path on the left and to paint the walls white to freshen everything up before putting a gate across the end.
Dion.
Other bits and bobs that have been going on during half term are the following:
Kitchen tap and waste etc all fitted and working, worktop edges sealed and sink fitted properly. (Chainsaw only there as weight!)

Hob and cooker all wired in, fitted and working - just need a plinth underneath now to fit it tidy.

Single plug socket and TV aerial point chased into the alcove to put a TV up on the wall in the kitchen without seeing the cables hopefully!

Shower fitted and bathroom is nearly ready for painting the doorframe, grouting the floor and then finally sealing all the edges with silicone;

Twist-to-open waste fitted and tesing for leaks;

Corner basin fitted and sealed;

Heated towel rail plumbed in and working;

LED bathroom light and extractor fan fitted and working off a timer, cladding on the ceiling looks really nice now I think;

That's all for now:
Joiner is in this saturday doing the stairs and handrails and fitting the rest of the doors
Dion
Craikeybaby said:
We used standard pine, from one of the DIY sheds and it warped, but also it was a bit flimsy. We ended up using the much chunkier old skirting boards, we needed to drill/plug them and they took a lot more decorating, but they are more robust.
As B17NNS said, we used pre-primed moisture resistant MDF, and it has been good. As it is being painted, it makes sense - little preparation except for rubbing down (the finish on it isn't great as it is cheaply spray painted). No knot preparation, no warping etc.I am fitting some dado rails at the moment, in the same material. One caveat - it is not great for adhesion, so a) mechanically fix it to the walls as well as using glue (I am using lost head masonry nails), and be aware that filler can have difficulty sticking to it. I have used P38 car body filler instead of wood filler, which seems to work a lot better.
A power mitre saw is a good investment here. I bought an Evolution Rage 3+ for £125 on an amazon offer, with asaw stand for £40 extra. Fantastic - but big. Smaller ones are available. Mine's good for doing bigger jobs like shelving etc, which is the next project.
Harry Flashman said:
As B17NNS said, we used pre-primed moisture resistant MDF, and it has been good. As it is being painted, it makes sense - little preparation except for rubbing down (the finish on it isn't great as it is cheaply spray painted). No knot preparation, no warping etc.
I am fitting some dado rails at the moment, in the same material. One caveat - it is not great for adhesion, so a) mechanically fix it to the walls as well as using glue (I am using lost head masonry nails), and be aware that filler can have difficulty sticking to it. I have used P38 car body filler instead of wood filler, which seems to work a lot better.
A power mitre saw is a good investment here. I bought an Evolution Rage 3+ for £125 on an amazon offer, with asaw stand for £40 extra. Fantastic - but big. Smaller ones are available. Mine's good for doing bigger jobs like shelving etc, which is the next project.
I've been out and about last week looking at different skirting options as well.. The MDF looks to be an easier option so I've decided to go for the MDF with the plastic/melamine coating for the kitchen and bathroom and just standard pine (Varnished) for the rest of the house. I am fitting some dado rails at the moment, in the same material. One caveat - it is not great for adhesion, so a) mechanically fix it to the walls as well as using glue (I am using lost head masonry nails), and be aware that filler can have difficulty sticking to it. I have used P38 car body filler instead of wood filler, which seems to work a lot better.
A power mitre saw is a good investment here. I bought an Evolution Rage 3+ for £125 on an amazon offer, with asaw stand for £40 extra. Fantastic - but big. Smaller ones are available. Mine's good for doing bigger jobs like shelving etc, which is the next project.
I've bought an evolution rage 3 last time when it was on offer for the same price, found it hard to get the angles just right but after a lot of setting up works perfectly.
Thanks for the pointers.
Inside the fireplace skimmed last night (my first go at plastering..) ready to have the 'back wall' of it tiled and concrete laid for the hearth this weekend. Hopefully ready for some flooring and skirting boards then.
I can see it taking shape slowly now.
Joiner is in this weekend finishing hanging doors, fitting the stair handrails and spindles and I'll be placing new floorboards all of upstairs. Both upstairs bedrooms being plastered next week also. Then hopefully a case of cracking on and getting everything painted and put in place.
Dion
Busy weekend on the house, had a friend over all day Saturday to help me with whatever he could so we got started early. Popped to the builders merch to grab some stuff and started on tiling the kitchen splash-back in cream/off white metro tiles, Between us he measured, I cut and buttered the tiles up for him to fit them.. Worked like a well oiled machine by the end!
Started by getting the bottom perfectly level and went from the centre line of the cooker hood:

Fitted all of the 'full' tiles first so we could gauge the 'plumb' of the wall before starting on the cuts on the edges and around the plugs etc:

Must say I'm particularly proud of this cut!


So bought cream grout to go between as I didn't want white but stood back and decided to go for grey grout instead to break the tiles up a little. Grouted them all and cleaned as we went. I then sealed the worktop edge with anthracite kitchen silicone. Will do the rest once the kitchen is properly painted.

Onto the Fireplace, as said above.. me and my friend had a go as plastering the edges with the mindset of " how hard can it be? " - turns out, Very! got there in the end, looks ok. Measured and made a 2" frame to go around for the hearth and filled that in on Saturday too. Neighbours weren't best pleased when we realised the mixer was going in the street and it was 10.30pm!


More to come..
Joiner was also in saturday morning and got the top of the stairs done. New base rail, handrail, newel post and spindles. all going white:


Now covered for painting the landing area:


Also Sunday as a chill-out hour or so I set up my new toy (Karcher K4) and set about cleaning a part of the garden/outside area. Started by brushing all the loose stuff and shoveling it into a bucket and then went over with the karcher to remove moss etc. Some before's:
gone very 'green' and was unbelievably slippery.


And the 'after':

Also made a start on the wall and path, removing paint and cleaning ready to paint the walls white. around 3-4 layers of white, cream and magnolia coloured paint on top of each other flaking to hell and back:

50/50 after a pass or two -all the loose stuff comes off fairly easy leaving the rest to paint over:
During - (afters to come once they're all done!

Next job is to sand both bedrooms down (Need rid of all the paint off the walls as its old, nasty oil based paint we reckon and keeps bubbling up when the grit is put on for plastering) Get both rooms plastered and then crack on with getting it all finished! End is now in sight:
Rear bedroom / office:


Front/master bedroom (Can see the chases we've put in to get cables to the attic and to have a TV point and a plug in the middle of the wall to hide cables etc. Ethernet/phone chases also around the window:


That's that - fairly good weekend i'd say!
Dion

Gassing Station | Homes, Gardens and DIY | Top of Page | What's New | My Stuff