Excel: Printing multiple copies with differing values
Discussion


Hi all,
Sorry if this has been done before, but is there a way of printing off multiple copies of the same worksheet in Excel, but with, say one, cell differing in value each time?
I have no knowledge of programming with Excel, so if it requires that kind of input I will just have to find another way I think.
Thanks in advance, Dyl
There are actually two cells which will be changing, one is a date that I was hoping to print off with a weekly change, e.g. 30/07/2012, 06/08/2012, 13/08/2012, etc. The other is simply a number, changing by the same amount each time, e.g. 100, 200, 300, etc.
I am (still) using Excel 2003.
Thanks
I am (still) using Excel 2003.
Thanks
This can be done with a macro.
Or, you could setup your document so that you have multiple tabs in your workbook, which are identical appart from those things you want to change. Then print all the pages.
Or, you could setup a single worksheet, with identical cell ranges side by side, and set the print ranges so that each set falls on a different page of the print out. Then print all the pages.
The best answer depends on how many copies you want and how complex the rest of the page is, and what your experience level is with excel.
SystemParanoia said:
can you not import it into word and do a mailshot?
I had completely forgotten it could be done in Word (I have never had any need for something like this since my Computing course in school 6 years ago). I will give that a try and hopefully it should work, cheers!mrmr96 said:
This can be done with a macro.
Or, you could setup your document so that you have multiple tabs in your workbook, which are identical appart from those things you want to change. Then print all the pages.
Or, you could setup a single worksheet, with identical cell ranges side by side, and set the print ranges so that each set falls on a different page of the print out. Then print all the pages.
The best answer depends on how many copies you want and how complex the rest of the page is, and what your experience level is with excel.
My experience is probably enthusiastic amateur, I like to try and use the functions when possible but it's mostly trial and error. I have no experience of macros.Or, you could setup your document so that you have multiple tabs in your workbook, which are identical appart from those things you want to change. Then print all the pages.
Or, you could setup a single worksheet, with identical cell ranges side by side, and set the print ranges so that each set falls on a different page of the print out. Then print all the pages.
The best answer depends on how many copies you want and how complex the rest of the page is, and what your experience level is with excel.
It's not essential, I am just being lazy and trying to find a way of doing it without having to type it all out. I will be needing 52 different sheets.
Thanks for the suggestions
Dont be frightened by macros...they're easy once you get to grips with them.
If you press Alt and F11 at the same time it will bring up the macro area. Copy and Paste the code above into one of the macro sheets. I have based the code on the example you gave, so going from 100 to 500 in increments of 100. You could obviously change that. the [A1] is the reference to the cell in which you want to change the figure. So if you wanted to use G12 then change the [A1] to [G12] Does that make sense?
then with the cursor in the code press F5 and that will run it. Becareful though as it will spit out all of the pages pretty quick so make sure you dont have the upper figure too high to start with.
Option Explicit

Sub CustomPrint()
  Dim lStart As Long, lEnd As Long, lInterval As Long
  Dim lPrint As Long

  lStart = 100
  lEnd = 500
  lInterval = 100

  For lPrint = lStart To lEnd Step lInterval
    [A1] = lPrint
    ActiveSheet.PrintOut
  Next lPrint

End Sub
If you press Alt and F11 at the same time it will bring up the macro area. Copy and Paste the code above into one of the macro sheets. I have based the code on the example you gave, so going from 100 to 500 in increments of 100. You could obviously change that. the [A1] is the reference to the cell in which you want to change the figure. So if you wanted to use G12 then change the [A1] to [G12] Does that make sense?
then with the cursor in the code press F5 and that will run it. Becareful though as it will spit out all of the pages pretty quick so make sure you dont have the upper figure too high to start with.
JontyR said:
Dont be frightened by macros...they're easy once you get to grips with them.
{{Option Explicit
Sub CustomPrint()
Dim lStart As Long, lEnd As Long, lInterval As Long
Dim lPrint As Long
lStart = 100
lEnd = 500
lInterval = 100
For lPrint = lStart To lEnd Step lInterval
[A1] = lPrint
ActiveSheet.PrintOut
Next lPrint
End Sub
}}}
If you press Alt and F11 at the same time it will bring up the macro area. Copy and Paste the code above into one of the macro sheets. I have based the code on the example you gave, so going from 100 to 500 in increments of 100. You could obviously change that. the [A1] is the reference to the cell in which you want to change the figure. So if you wanted to use G12 then change the [A1] to [G12] Does that make sense?
then with the cursor in the code press F5 and that will run it. Becareful though as it will spit out all of the pages pretty quick so make sure you dont have the upper figure too high to start with.
Another well written macro, by the book. But without wanting to start teaching people bad habits I thought I'd just share this version of Jonty's code, which is more or less the minimum you need to make it work, and might be easier for an inexperienced programmer to understand. (maybe.){{Option Explicit
Sub CustomPrint()
Dim lStart As Long, lEnd As Long, lInterval As Long
Dim lPrint As Long
lStart = 100
lEnd = 500
lInterval = 100
For lPrint = lStart To lEnd Step lInterval
[A1] = lPrint
ActiveSheet.PrintOut
Next lPrint
End Sub
}}}
If you press Alt and F11 at the same time it will bring up the macro area. Copy and Paste the code above into one of the macro sheets. I have based the code on the example you gave, so going from 100 to 500 in increments of 100. You could obviously change that. the [A1] is the reference to the cell in which you want to change the figure. So if you wanted to use G12 then change the [A1] to [G12] Does that make sense?
then with the cursor in the code press F5 and that will run it. Becareful though as it will spit out all of the pages pretty quick so make sure you dont have the upper figure too high to start with.
Sub CustomPrint()

  For i = 100 To 500 Step 100
    [A1] = i
    ActiveSheet.PrintOut
  Next

End Sub
PS - Jonty's code is technically better, since he
- declares all the variables at the start (i.e. sets their type)
- Has an 'input section' where you can type the parameters which the macro will use
- Add the "next xxxx" label to make it clear what the "next" refers to (rather than just writing simply "next" as I've done.)
Hi JontyR,
I am trying to use your solution to fit my problem. Could you please help me to solve mine.
I want to use the data from a cell in another worksheet to replace a date value in the active sheet while printing.
I have the date values in another sheet from V1 TO V40 , I have changed your code as below but I need more help? http://www.pistonheads.com/gassing/imgs/4.gif
{{Option Explicit
Sub CustomPrint()
Dim lStart As Long, lEnd As Long, lInterval As Long
Dim lPrint As Long
lStart = [V1]
lEnd = [V40]
lInterval = 1
For lPrint = lStart To lEnd Step lInterval
[A1] = lPrint
ActiveSheet.PrintOut
Next lPrint
End Sub
}}}
Dont be frightened by macros...they're easy once you get to grips with them.
{{Option Explicit
Sub CustomPrint()
Dim lStart As Long, lEnd As Long, lInterval As Long
Dim lPrint As Long
lStart = 100
lEnd = 500
lInterval = 100
For lPrint = lStart To lEnd Step lInterval
[A1] = lPrint
ActiveSheet.PrintOut
Next lPrint
End Sub
}}}
Option Explicit

Public Sub CustomPrint()
  Dim lPrint As Long

  For lPrint = 1 To 40
    [P1] = Sheet2.[V1].Offset(lPrint - 1, 0)
  Next lPrint


End Sub
So Above is the code I think you should be using.
To explain what it does:
I have, as mrmr96 explained, cut it down a little this time to avoid getting too distracted in the art of programming

I have chosen cell P1 to display the output of the date, you can obviously change this to something like [A3] to print out to cell A3
the date range V1 to V40 is on sheet2. This is the code name of the sheet and not the tab name. If you want to use the tab name then you would have to use worksheets("SheetName") instead of Sheet2
I have then used a reference to the first cell [V1] and created an offset. As the for-next loop goes through its iterations it will offset vertically down (1 row at a time) to the next value. Note we have started the for-next loop at 1, so hence we have subtracted 1 to take the first offset to 0.
Does that make sense?
Obviously you will now need to add the print statement in the loop.
Yes, That worked fine. Thank you very much JontyR. That was really helpful and makes lot of sense. I didn't realise the sheet name is actually the VBA sheet name not the actual name in the .xlsm sheet. Lot of learning today. This is what I did. Thanks again.


Option Explicit

Public Sub CustomPrint()
  Dim lPrint As Long

  For lPrint = 1 To 40
  [L2] = Sheet2.[A1].Offset(lPrint - 1, 0)
  ActiveSheet.PrintOut
  Next lPrint


End Sub
Option Explicit
Public Sub CustomPrint()
Dim lPrint As Long
For lPrint = 1 To 40
[L2] = Sheet2.[A1].Offset(lPrint - 1, 0)
ActiveSheet.PrintOut
Next lPrint
End Sub
Jmohan said:
Yes, That worked fine. Thank you very much JontyR. That was really helpful and makes lot of sense. I didn't realise the sheet name is actually the VBA sheet name not the actual name in the .xlsm sheet. Lot of learning today. This is what I did. Thanks again.
Happy to help
Option Explicit
Public Sub CustomPrint()
Dim lPrint As Long
For lPrint = 1 To 40
[L2] = Sheet2.[A1].Offset(lPrint - 1, 0)
ActiveSheet.PrintOut
Next lPrint
End Sub

I tend to rename the sheet names (CodeName is the property of the sheets collection) to start ws and so would have wsInfo or wsOutput. when coding it then makes it blatantly obvious which sheet and potentially why you are running the code
Jmohan said:
I didn't realise the sheet name is actually the VBA sheet name not the actual name in the .xlsm sheet. Lot of learning today.
Just as an aside, if you want to refer to a sheet by the name as it appears in the spreadsheet proper, you can use something like this:ThisWorkbook.Sheets("Data")
ActiveWorkbook.Sheets("Data")
wbWorkbookVariable.Sheets("Data")
ThisWorkbook, ActiveWorkbook and wbWorkbookVariable are workbook objects (the first two are specific reserved statements in VB, that last is an example of a variable name that would be declared as a variable of type 'Workbook'); .Sheets() is the collection of sheets within the workbook object; Data is the normal visible name of the worksheet and has to be enclosed in "" as it's text.
The 'ThisWorkbook' (and others) is not always necessary, and there are different ways of referring to a sheet depending on where the code is stored, but I tend to use this way as a bit or protection if I'm using multiple workbooks, and as a matter of habit now.
Hello Gurus,
I need help with arranging two long columns of data into a fixed number of rows in one page. I got the below solution from another forum for one long single column which is working fine.
The solution for one column was,
=INDIRECT("Sheet1!R" & (COLUMN()-1)*55+MOD(ROW()-1,55)+1 & "C1", FALSE)
Drag/fill this down to row 55 and out to column AB. The first parameter of INDIRECT is a constructed string of the form Sheet1!RnnnC1, with A1 evaluating to Sheet1!R1C1, A55 –> Sheet1!R55C1, B1 –> Sheet1!R56C1, etc… AB15 evaluates to Sheet1!R1500C1.
INDIRECT(reference, FALSE) retrieves the value from the cell referenced by reference using “R1C1” style, in which a row number and a column number are specified –– and of course these correspond to A1:A1500 on Sheet1.
This will cause your data to appear in columns of 55 rows on Sheet2; it will still be linked to Sheet1. To make a static copy, “Copy” the data (A1:AB55 on Sheet2) and do “Paste Values”. (To be safe, you might want to do this on Sheet3, then delete Sheet2.)
_I want to extend it to two or more columns. Could one of you please help ?_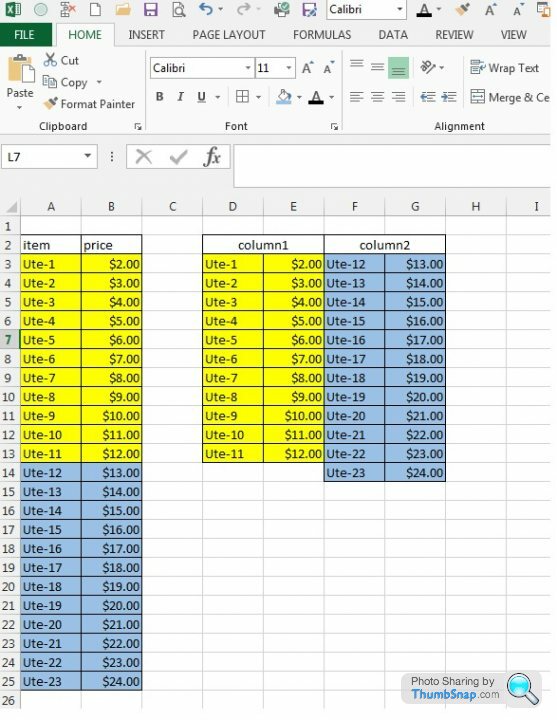
Edited by Jmohan on Wednesday 11th January 03:39
Edited by Jmohan on Wednesday 11th January 03:48
Give this a try:
Two columns:
=INDIRECT("Sheet1!R" & (ROUNDUP(COLUMN()/2,0)-1)*55+MOD(ROW()-1,55)+1 & "C" & MOD(COLUMN()-1,2)+1, FALSE)
Three columns:
=INDIRECT("Sheet1!R" & (ROUNDUP(COLUMN()/3,0)-1)*55+MOD(ROW()-1,55)+1 & "C" & MOD(COLUMN()-1,3)+1, FALSE)
Etc. etc., just change the number 2 or 3 in the examples above to represent however many columns you have.
Edited by xRIEx on Wednesday 11th January 22:23

Hi JontyR, would you be able to help me on this one please.
If I have the cells in the same column with different formats , how would I have the original formats for the new copied cells for the above solution.
Like in the attached pic. ?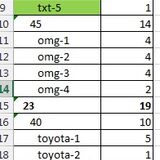
If I have the cells in the same column with different formats , how would I have the original formats for the new copied cells for the above solution.
Like in the attached pic. ?
Edited by Jmohan on Friday 20th January 03:49
Edited by Jmohan on Friday 20th January 04:56
I would like to do the same thing, but would like the variable to be text (a list of names) instead of values.
(Until I get an answer, I will experiment with inserting a series of IFs that point to numbers and related text. If I can't figure out something on my own, I will print the text on blank pages, then feed the mostly blank pages [with names at the top] back into the printer and print again).
Does anybody have a simple step by step process for printing with differing values? For example, see below.
1. Right click the Ribbon and select Customize the Ribbon.
2. Check off Developer and select Ok.
3 to X. etc.
X+1. Press Ctrl+P
X+2. Increase copies to the desired number.
X+3. Press Print.
Could the following code be rewritten to use a list?
"Sub CustomPrint()
For i = 100 To 500 Step 100
[A1] = i
ActiveSheet.PrintOut
Next
End Sub"
Or could the previous code be rewritten to use a list?
"Option Explicit
Sub CustomPrint()
Dim lStart As Long, lEnd As Long, lInterval As Long
Dim lPrint As Long
lStart = 100
lEnd = 500
lInterval = 100
For lPrint = lStart To lEnd Step lInterval
[A1] = lPrint
ActiveSheet.PrintOut
Next lPrint
End Sub"
Gassing Station | Computers, Gadgets & Stuff | Top of Page | What's New | My Stuff