Reassembling new dash
Discussion


I'm replacing my old dash with a new one supplied by Pete Wiggins. So far so good the new dash is now fitted with all the lights switches and button and most of the wires are connected. However I am sturggling with figuring out the polarity of the 3 LEDs between the Speedo and Rev Counter. I have two wires for each labelled but I can't determine which connector goes on which connector on the LED.
Bit worried about blowing the LED if I connect it up the wrong way round.
About to start in the heater panel, first task is to find a small enough allen key for the control knobs
Bit worried about blowing the LED if I connect it up the wrong way round.
About to start in the heater panel, first task is to find a small enough allen key for the control knobs
I’ve just finished installing my dash from Pete. Looks great & well worth all the effort.
Label everything & take lots of photos before strip down of the old dash. Also do a dry build fit of the new dash into the location as there was a little fine tuning of the fit needed here & there as per Pete's instructions. Be very careful with the edges as it is easy to chip the lovely finish. Stripping the heating & ventilation controls from the original center panel was tricky but take your time & it isn’t too bad.
Ref the LED’s I noticed that the pins have slightly different colouration to their plating. One pin is a bright gold the other more silvery. This was the same on the original LED’s (I ordered a new set with the dash from Pete) in the old dash so I simply recorded & then replicated the wire connections old to new. Worked straight away.
Good luck with the build.
ianl said:
I’ve just finished installing my dash from Pete. Looks great & well worth all the effort.
Label everything & take lots of photos before strip down of the old dash. Also do a dry build fit of the new dash into the location as there was a little fine tuning of the fit needed here & there as per Pete's instructions. Be very careful with the edges as it is easy to chip the lovely finish. Stripping the heating & ventilation controls from the original center panel was tricky but take your time & it isn’t too bad.
Ref the LED’s I noticed that the pins have slightly different colouration to their plating. One pin is a bright gold the other more silvery. This was the same on the original LED’s (I ordered a new set with the dash from Pete) in the old dash so I simply recorded & then replicated the wire connections old to new. Worked straight away.
Good luck with the build.
Thanks, I noticed the difference in the pin colour as well, but only after I had disconnected the old LEDs. :-( But if they are not damaged by being wired up the wrong way it's easy to test and swap the wires if necessary.Label everything & take lots of photos before strip down of the old dash. Also do a dry build fit of the new dash into the location as there was a little fine tuning of the fit needed here & there as per Pete's instructions. Be very careful with the edges as it is easy to chip the lovely finish. Stripping the heating & ventilation controls from the original center panel was tricky but take your time & it isn’t too bad.
Ref the LED’s I noticed that the pins have slightly different colouration to their plating. One pin is a bright gold the other more silvery. This was the same on the original LED’s (I ordered a new set with the dash from Pete) in the old dash so I simply recorded & then replicated the wire connections old to new. Worked straight away.
Good luck with the build.
I already tested the fit of the new dash before I started fitting stuff on it and had to sand down a few edges. I also sanded a small bevel on the edge of aluminium backing which help stop it catching whe fitting.
I'm going to start on the heater panel tonight and hopefully be able to get it off without breaking anything. Any tips for loosening the glue on the LEDs? I was planning to scrape away the visible glue and hope that would release them. I have a fine craft knife so hopefully, if I have to, I can slip that down the sides of the led to release them if step 1 doesn't do it
I used, as you suggested, a fine craft knife...actually a scalpel. Don't slide the knife down the side of the LED. If you look closely, and if it is the same as mine, turn the panel face down and you should see that each LED has a tiny blob of glue (Araldite?) holding it to the base board. Lay the blade flat on the baseboard and slice around the LED. Once all of them are cut, carefully push from the front and ease the circuit board away. On mine there were two LEDs that I couldn't free so I had to snip through connecting wire. A complete set of LEDs for the TVR is available on eBay and even with my lack of soldering skills is easy to fit on reassembly.
http://www.ebay.co.uk/itm/TVR-Griffith-Heater-LED-...
http://www.ebay.co.uk/itm/TVR-Griffith-Heater-LED-...

ianl said:
I’ve just finished installing my dash from Pete. Looks great & well worth all the effort.
Label everything & take lots of photos before strip down of the old dash. Also do a dry build fit of the new dash into the location as there was a little fine tuning of the fit needed here & there as per Pete's instructions. Be very careful with the edges as it is easy to chip the lovely finish. Stripping the heating & ventilation controls from the original center panel was tricky but take your time & it isn’t too bad.
Ref the LED’s I noticed that the pins have slightly different colouration to their plating. One pin is a bright gold the other more silvery. This was the same on the original LED’s (I ordered a new set with the dash from Pete) in the old dash so I simply recorded & then replicated the wire connections old to new. Worked straight away.
Good luck with the build.
We need photos Label everything & take lots of photos before strip down of the old dash. Also do a dry build fit of the new dash into the location as there was a little fine tuning of the fit needed here & there as per Pete's instructions. Be very careful with the edges as it is easy to chip the lovely finish. Stripping the heating & ventilation controls from the original center panel was tricky but take your time & it isn’t too bad.
Ref the LED’s I noticed that the pins have slightly different colouration to their plating. One pin is a bright gold the other more silvery. This was the same on the original LED’s (I ordered a new set with the dash from Pete) in the old dash so I simply recorded & then replicated the wire connections old to new. Worked straight away.
Good luck with the build.

I managed to separate the circuit board from the heater panel. The circular LEDs were quite straight forward, the glue they used was past it best and chipped off quite easily. Despite removing all the glue from around the triangular LEDs they must have had some glue in the hole and the ends of the LED broke off. Although they still work they will need replacing with the ones I have already got. So time to break out the soldering iron. The control knobs are removed with a 2mm allen key to loosen the grub screw.
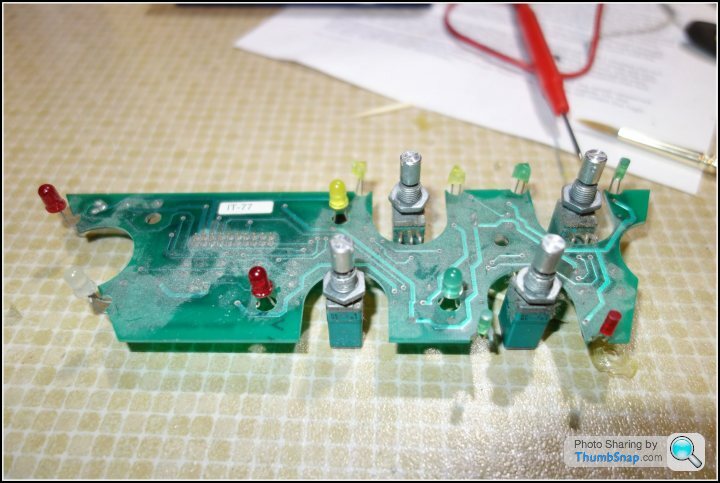
For those interested is the dash panel while I was trimming it to fit the dash before I fitted all the instruments to it.

For those interested is the dash panel while I was trimming it to fit the dash before I fitted all the instruments to it.
Gassing Station | Griffith | Top of Page | What's New | My Stuff