Discussion


Made throttle and clutch stops at the weekend. Getting gears is much easier.
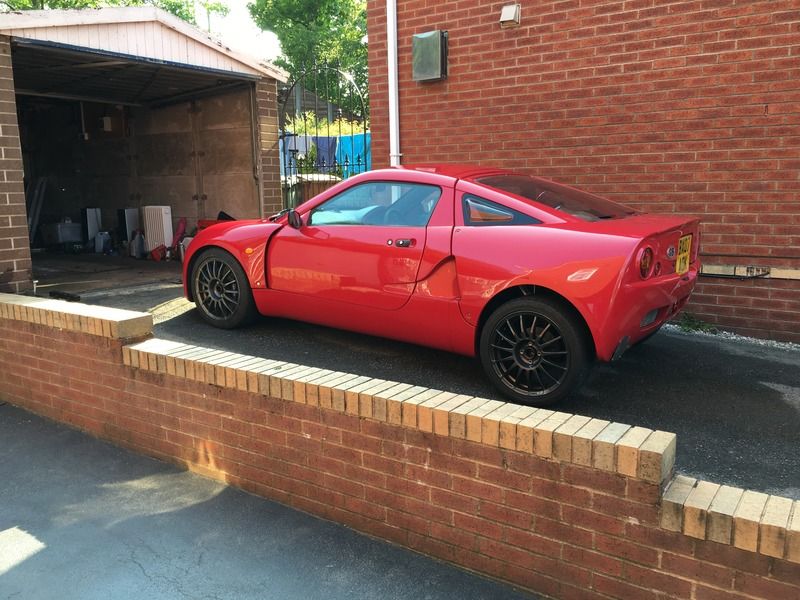
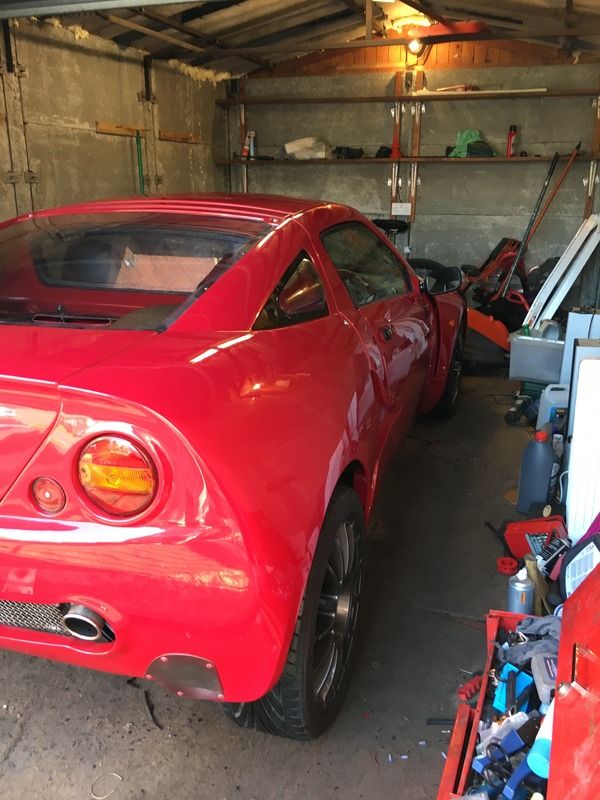
Shed load of red T cut and a buffer, old girl polished up better than expected
Not happy with my spring rates I think it's far too soft at the back making the front feel light.
Hopefully I'll get another engine steady and the new gearchange done this weekend.
Shed load of red T cut and a buffer, old girl polished up better than expected


Not happy with my spring rates I think it's far too soft at the back making the front feel light.
Hopefully I'll get another engine steady and the new gearchange done this weekend.
Can't remember what springs I had on mine, but I do know that some Libras had springs that were far too hard.
Unless Roger can tell you that yours are all wrong, I'd leave them alone and concentrate on stuff in this order.
1. Ride height. The front needs to be 15mm lower than the back Measured from the bottom of the tub cill.
2. With the original rear suspension, the rear ride height must be at the factory recommendation, else the rear arms will do funny things to the handling.
3. Rear camber must be -3deg
4. Rear toe in must be whatever the factory said (can you tell I can't remember the figures?)
5. Front must not be //L. Use either toe in for benign, or toe out for darty.
I reversed the steering arms on mine, made the feel better, increased the lock, BUT it did introduce a slight bump steer, which was noticeable, but OK on the road, better on smooth track.
There was also a fashion for getting bigger and bigger a/r bars. I had none, but would have put on a small front if I'd kept it.
Overall the front was very planted, it was noticeable when running with a Libra with front and rear a/r bars, that my direction change in the chicanes was a bit slower, but I could get the power on way earlier on the corner exit.
Paul Drawmer said:
Can't remember what springs I had on mine, but I do know that some Libras had springs that were far too hard.
Unless Roger can tell you that yours are all wrong, I'd leave them alone and concentrate on stuff in this order.
1. Ride height. The front needs to be 15mm lower than the back Measured from the bottom of the tub cill.
2. With the original rear suspension, the rear ride height must be at the factory recommendation, else the rear arms will do funny things to the handling.
3. Rear camber must be -3deg
4. Rear toe in must be whatever the factory said (can you tell I can't remember the figures?)
5. Front must not be //L. Use either toe in for benign, or toe out for darty.
I reversed the steering arms on mine, made the feel better, increased the lock, BUT it did introduce a slight bump steer, which was noticeable, but OK on the road, better on smooth track.
There was also a fashion for getting bigger and bigger a/r bars. I had none, but would have put on a small front if I'd kept it.
Overall the front was very planted, it was noticeable when running with a Libra with front and rear a/r bars, that my direction change in the chicanes was a bit slower, but I could get the power on way earlier on the corner exit.
Did reversing the steering arms make it turn quicker? Unless Roger can tell you that yours are all wrong, I'd leave them alone and concentrate on stuff in this order.
1. Ride height. The front needs to be 15mm lower than the back Measured from the bottom of the tub cill.
2. With the original rear suspension, the rear ride height must be at the factory recommendation, else the rear arms will do funny things to the handling.
3. Rear camber must be -3deg
4. Rear toe in must be whatever the factory said (can you tell I can't remember the figures?)
5. Front must not be //L. Use either toe in for benign, or toe out for darty.
I reversed the steering arms on mine, made the feel better, increased the lock, BUT it did introduce a slight bump steer, which was noticeable, but OK on the road, better on smooth track.
There was also a fashion for getting bigger and bigger a/r bars. I had none, but would have put on a small front if I'd kept it.
Overall the front was very planted, it was noticeable when running with a Libra with front and rear a/r bars, that my direction change in the chicanes was a bit slower, but I could get the power on way earlier on the corner exit.
I do have the ride height set around 15mm higher at the back, but I think the rear is sagging more with a driver / passenger so my measurements unlaiden aren't consistent with the ride height on the road if that makes sense.
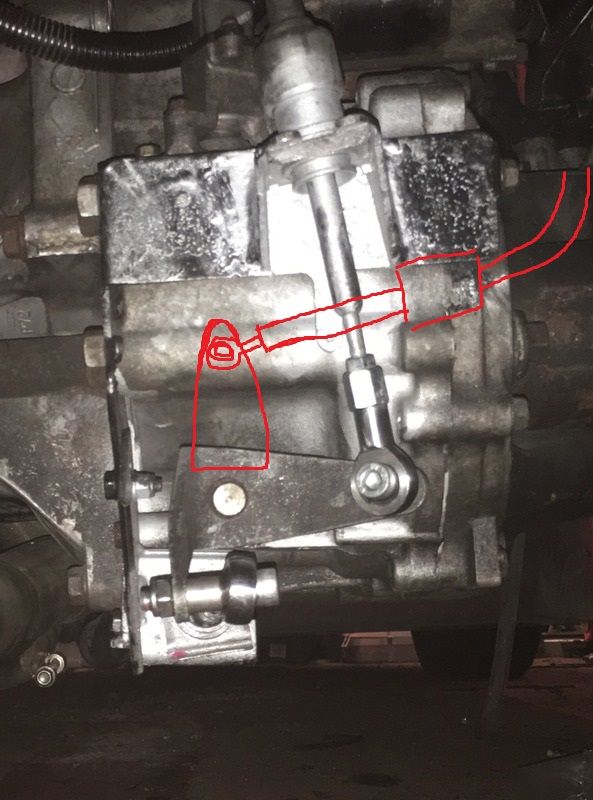
The focus gear change has arrived, it does work slightly differently to what I have in that the push/pull when moving the lever left or right is the opposite way round, I was pretty miffed I hadn't realised this at first but it just means modifying the bell crank, makes the job bigger but it's not drastic.
Another GTM owner has a Honda B series engine coupe on GTMOC and used the focus gear change, as you can see mine works in the opposite direction.
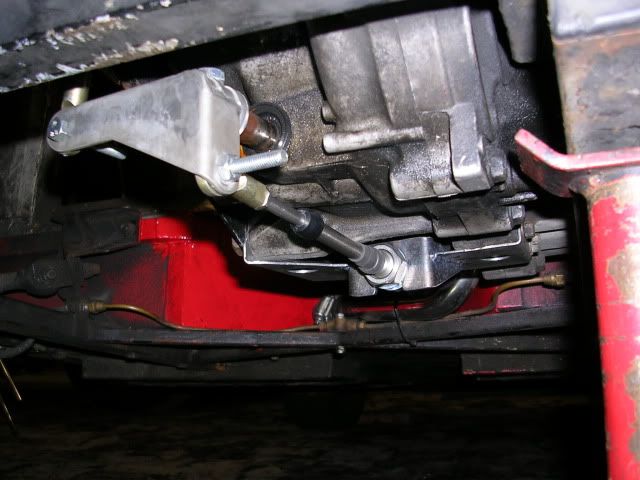
So for example if mine was to pull the cable that does the sideways movement on the gear lever it would turn the selector and bell crank anti clockwise, however on his coupe it would turn clock wise. In order to use the Focus gear change I need to modify it to work like his. Well, if I don't want a completely back to front gearchange....!
SUPER TECHNICAL DOODLES INCOMING
or
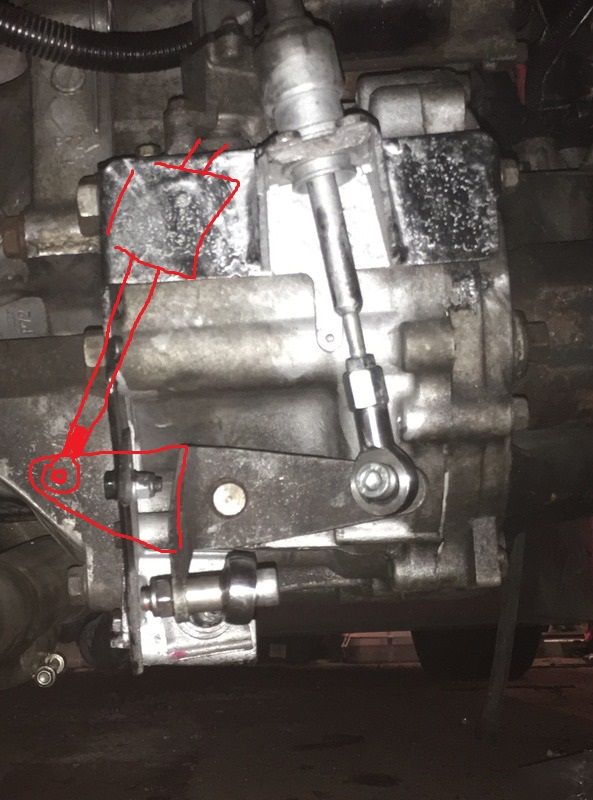
Think the second idea should be easiest as its more a case of cutting the bracket and bell crank and re welding in different positions
Another GTM owner has a Honda B series engine coupe on GTMOC and used the focus gear change, as you can see mine works in the opposite direction.


So for example if mine was to pull the cable that does the sideways movement on the gear lever it would turn the selector and bell crank anti clockwise, however on his coupe it would turn clock wise. In order to use the Focus gear change I need to modify it to work like his. Well, if I don't want a completely back to front gearchange....!
SUPER TECHNICAL DOODLES INCOMING

or

Think the second idea should be easiest as its more a case of cutting the bracket and bell crank and re welding in different positions
Edited by Yazza54 on Tuesday 7th June 10:05

True, I'm really looking forward to getting the gearchange done. It's this time when little upgrades made the world of difference in refinement.
Unfortunately the next instalment of the gearchange work will have to be next weekend, I left work early to head to dads work on Friday to use the ramp, welder etc. As it'll be too much of a pain to do at home. 5 mins in the heavens opened and roads were becoming severely flooded. Had to spin it round and come home, screen misted up good and proper couldn't see a thing so had window open and raining into the bloody car. Nightmare. Hes been away all weekend so I'm just going to wait another week, can't swing a cat in my garage at home.
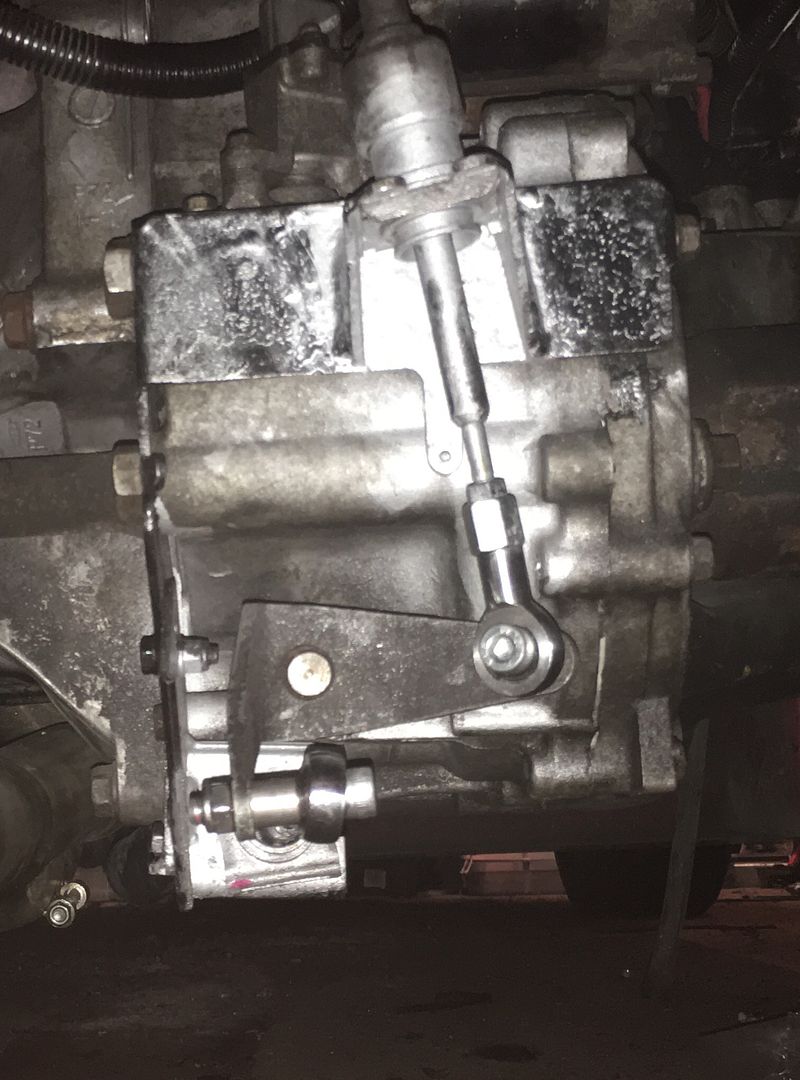
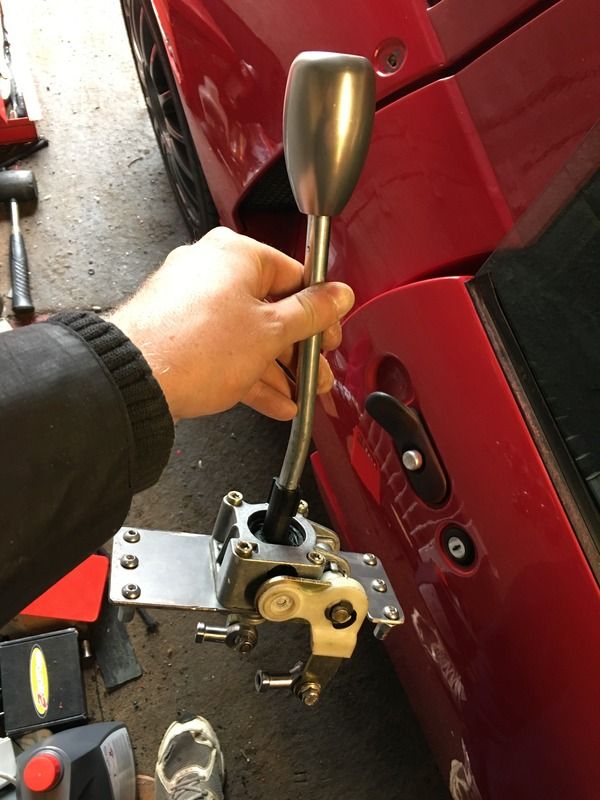
Here's the shifter ready to go on, it's a fair bit longer and angled back so should end up in a much better position, the existing one is a bit of a stretch. I can always cut and re thread if it ends up too long.
Unfortunately the next instalment of the gearchange work will have to be next weekend, I left work early to head to dads work on Friday to use the ramp, welder etc. As it'll be too much of a pain to do at home. 5 mins in the heavens opened and roads were becoming severely flooded. Had to spin it round and come home, screen misted up good and proper couldn't see a thing so had window open and raining into the bloody car. Nightmare. Hes been away all weekend so I'm just going to wait another week, can't swing a cat in my garage at home.
Here's the shifter ready to go on, it's a fair bit longer and angled back so should end up in a much better position, the existing one is a bit of a stretch. I can always cut and re thread if it ends up too long.

Sorry it's taken me so long, so because of the arm on the side of the gear change it has so be slightly offset in the hole, therefore the bracket I proactively made before starting ended up being cut down a fair bit. It was also a bit of a pain getting the positioning just right so that the lever didn't foul the side of the tunnel bracket when moving it left and right - although I found that when actually connected up to the cables the actual travel required to select gears was nowhere near as much as the lever was capable of. It has a very short and precise throw. The only other ball ache was that I had to lengthen the arm on the gate selector a bit as it was putting the cables at too much of an angle.
I also bent the lever back slightly to put it in a better position. I made another mounting plate last weekend with a few additional rivnut as I could feel the old one flexing slightly due to not having as many fixings as I originally intended. It isn't necessarily the neatest job in the world but it was difficult dealing with various existing holes in the tunnel I had to either try and miss or cover up. But it works well and it will be covered anyway. All in all a very worthwhile mod but slightly more involved that I hoped. Would be much easier and neater to do on a new build but arguably less complicated than fitting an Elise setup and certainly cheaper.
Cost approx
Rose joints, sundry items - £20
St170 gear change - £20
Gear knob - £10
Just need to get a new carpet section or something to finish it off.

Next job I think will be changing the steering rack the standard rack is from a LHD rover 100, and is something ridiculous like 3.5 turns lock to lock, it's absolutely awful. It makes the steering too light and vague and is useless if you need to react quickly for instance if getting the back out of of line. Luckily you can fit a LHD MGTF rack which I think is about 2.7 turns to lock, it should not only speed the steering up but improve the feel.
I do really like the car so it's worth ironing out the issues, hopefully I'll end up with something much more enjoyable to drive.
I do really like the car so it's worth ironing out the issues, hopefully I'll end up with something much more enjoyable to drive.
Still doing bits on this car
Got some 2 part polyeurethane that I'm going to fill the cambelt side upper engine mount with, should steady the engine a bit more. Have already got poly inserts in the gearbox side mount and it definitely helped. I might even remove that one and effectively stick them in with this stuff so there's no movement in the inserts.
Also got a brand new steering rack on the way was a b h to find as the car uses a LHD rover metro rack and get this ..... it's 3.6 turns to lock!! absolutely st. Add that to the fact it feels pretty worn there is no feel at all and the steering is SO SLOW
So my new rack is a MGTF 2.7 turns to lock and should give it a more weighted and precise feel. Bit of a crap job to change it but I can't wait to get it done as it ruins the car.
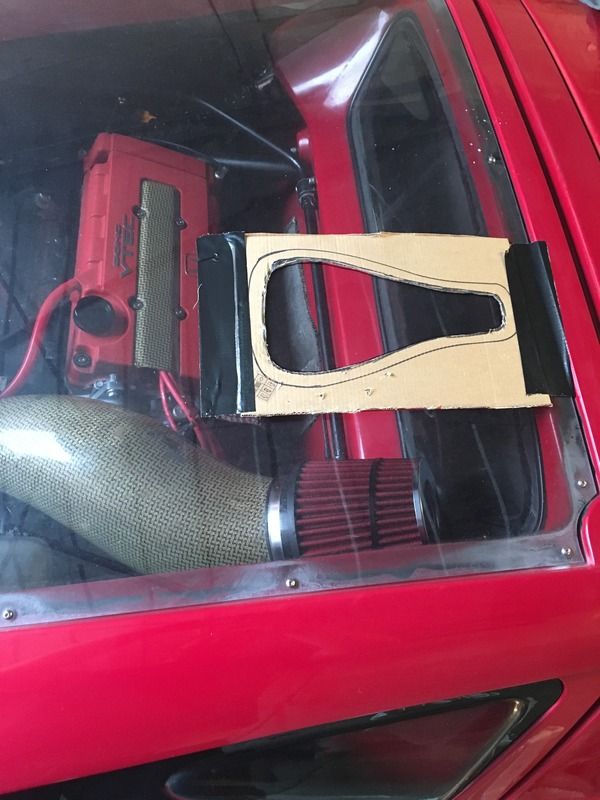
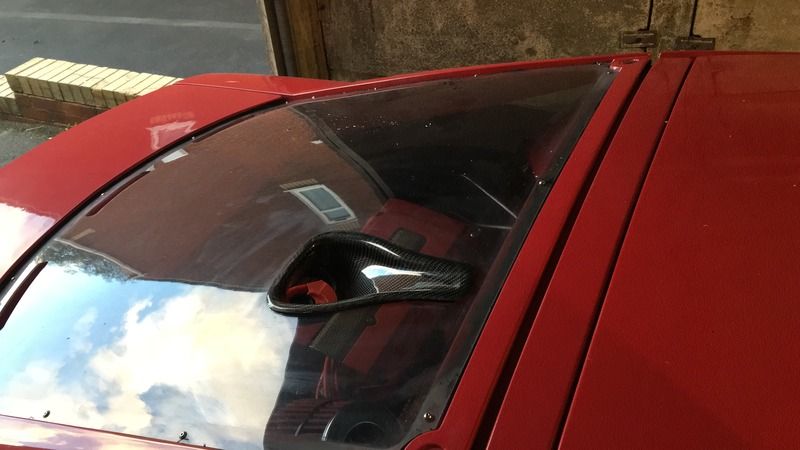
Last night made a heat shield for the manifold and fitting a carbon fibre NACA duct in the rear Perspex cover just above the air filter so aid cooling as it gets warm under there, not ideal for an open filter but it sounds too good to ditch
Got some 2 part polyeurethane that I'm going to fill the cambelt side upper engine mount with, should steady the engine a bit more. Have already got poly inserts in the gearbox side mount and it definitely helped. I might even remove that one and effectively stick them in with this stuff so there's no movement in the inserts.
Also got a brand new steering rack on the way was a b
h to find as the car uses a LHD rover metro rack and get this ..... it's 3.6 turns to lock!! absolutely st. Add that to the fact it feels pretty worn there is no feel at all and the steering is SO SLOWSo my new rack is a MGTF 2.7 turns to lock and should give it a more weighted and precise feel. Bit of a crap job to change it but I can't wait to get it done as it ruins the car.
Last night made a heat shield for the manifold and fitting a carbon fibre NACA duct in the rear Perspex cover just above the air filter so aid cooling as it gets warm under there, not ideal for an open filter but it sounds too good to ditch
Monday night I did the engine mount, removed and blanked one side. Mixed up some of this stuff
http://www.mbfg.co.uk/polyurethane-rubbers/pt-flex...
Poured in and let it cure. So the mount is now basically solid rubber with the steel bush in the middle. It is a lot stiffer so I'm expecting it to be much better - haven't driven it yet ...
Did a bit of cardboard aided design

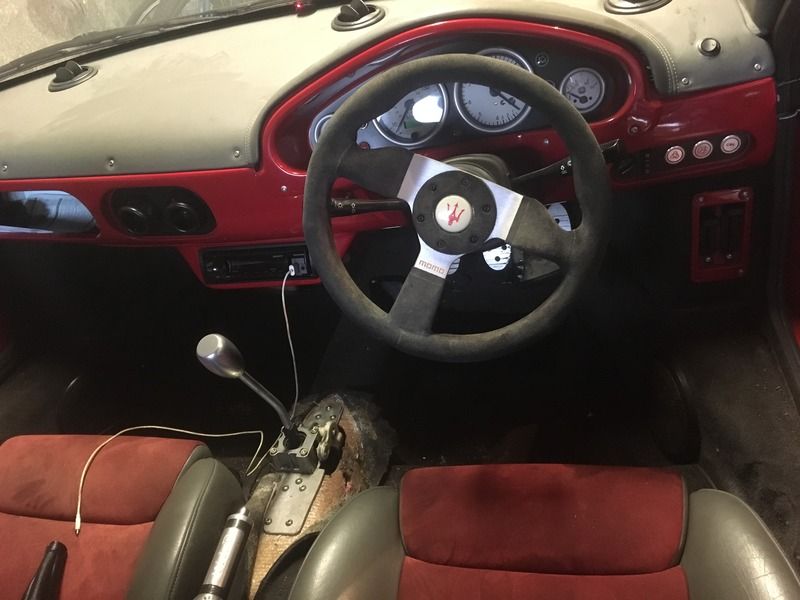
Finished the TF rack installation last night too but haven't been out in it yet, feels good through the wheel though bit more weight to it and no play. Looking forward to driving it again gearchange is miles better, engine mounts stiffer, new steering rack - should make a big difference.
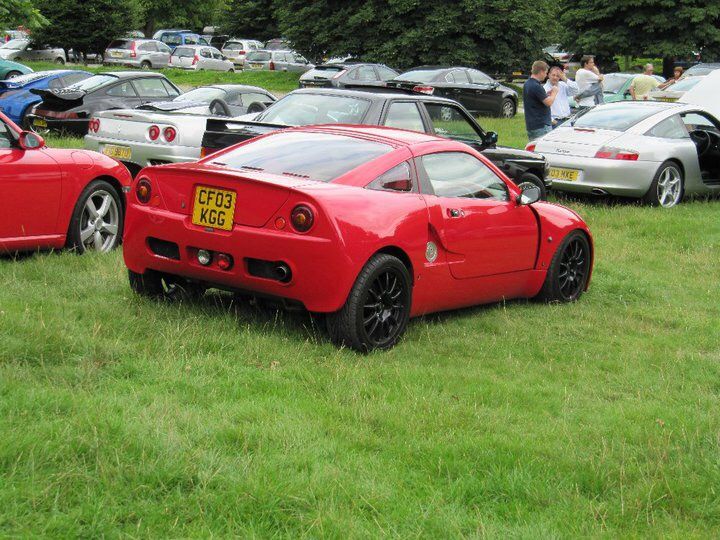
This pic of my old car just popped up on Facebook memories from 7 years or so ago. God I need to get this one painted as my old car looked the nuts.
http://www.mbfg.co.uk/polyurethane-rubbers/pt-flex...
Poured in and let it cure. So the mount is now basically solid rubber with the steel bush in the middle. It is a lot stiffer so I'm expecting it to be much better - haven't driven it yet ...
Did a bit of cardboard aided design


Finished the TF rack installation last night too but haven't been out in it yet, feels good through the wheel though bit more weight to it and no play. Looking forward to driving it again gearchange is miles better, engine mounts stiffer, new steering rack - should make a big difference.
This pic of my old car just popped up on Facebook memories from 7 years or so ago. God I need to get this one painted as my old car looked the nuts.

Took the car out the other night and the rack felt better though it needs tracking up properly, engine mount made a vast improvement ... but I bust a driveshaft, luckily on my drive way so the only ballache was pushing it in the garage
The shafts are cut and welded with a sleeve, I could have just repaired the one that broke but I'll never have any confidence in them from now on, so they are coming out in favour of custom single piece shafts with the correct splines at each end - I think at the moment they are a combination of MGF/Honda shafts joined up. Crap really.
The saga continues...
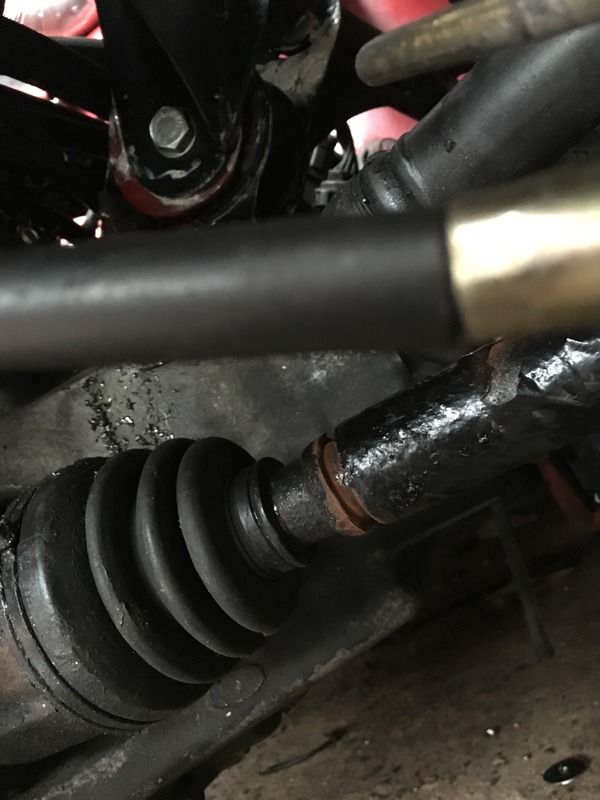


Have delayed things a bit as I wanted to get the new inner CV joints before getting shafts made up as I found out the inner joints were Honda CRX and the integra ones look to be stronger. I wasn't sure if the spline was the same although it probably is so didn't wanna start getting shafts made until I've got the joints. Going away for a few days but hopefully they will be here when I return along with new outer joints and I can get the new drive shafts made up. Really wanted to take it to the Oulton park gold cup on bank holiday weekend, but st happens..
t happens..Gassing Station | Kit Cars | Top of Page | What's New | My Stuff