tipo 184 build diary
Discussion


2 hrs
had a couple of hours on it on friday, had a brain fart day, i got my coil over clamps from amazon, they were to wide to clamp the springs, so went to machine mart and got a better set
these fitted but you couldn’t compress the spring and then fit it over the shock.
i thought i needed a motorbike coil over clamp as the tipo coil overs and shocks are small in diameter
went to my local garage and they were looking at them for a bit ,then he just pulled the top up and the springs went on !!
even he was baffled for a bit so it wasn’t just me. during all this one of the top hat washers from the coil overs got lost! i searched everywhere for about 1 hr ,only for it to turn up when my misses turned out my work trousers for the wash !
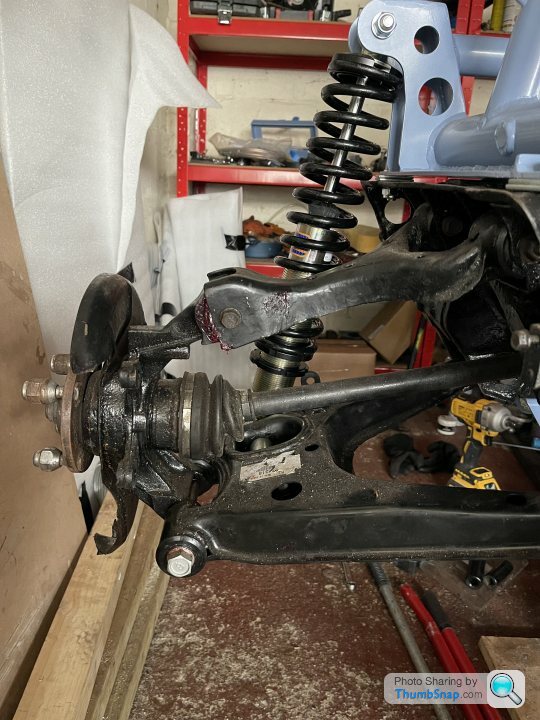
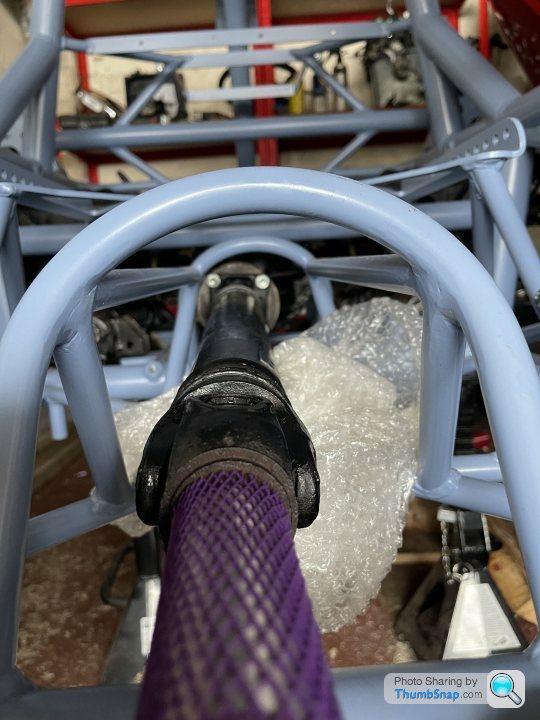
so i fitted rear shocks and springs,
differential was next , just 4 bolts
gear box bobbins
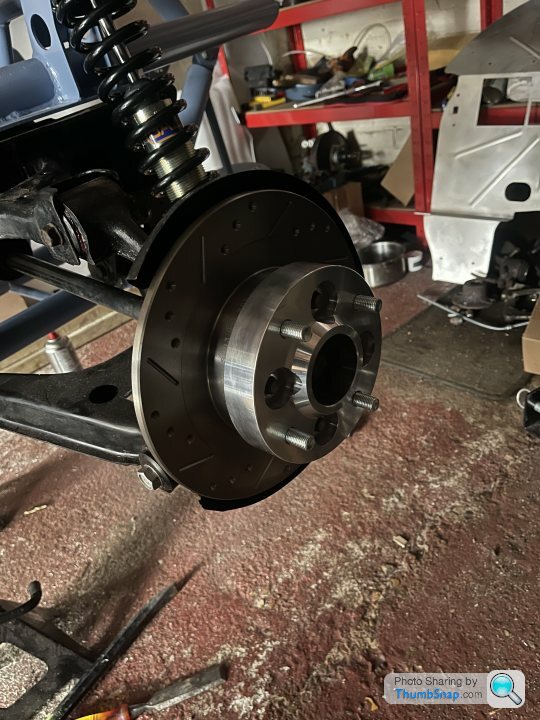
rear discs and pcd adapters
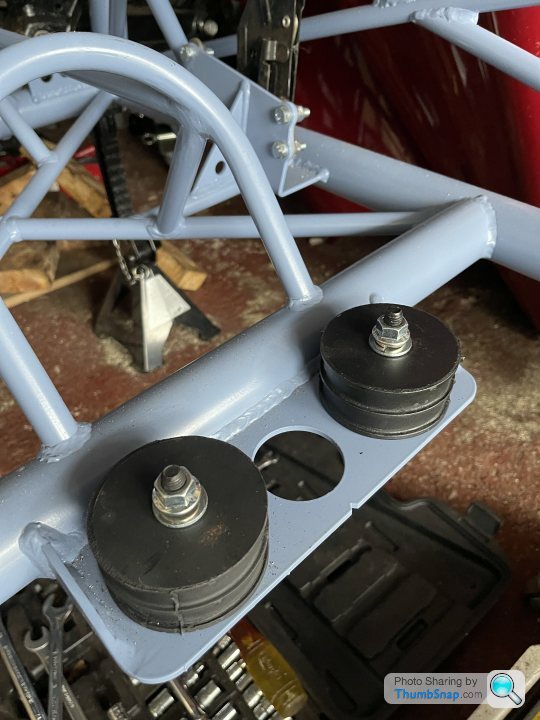
gear box bobbins
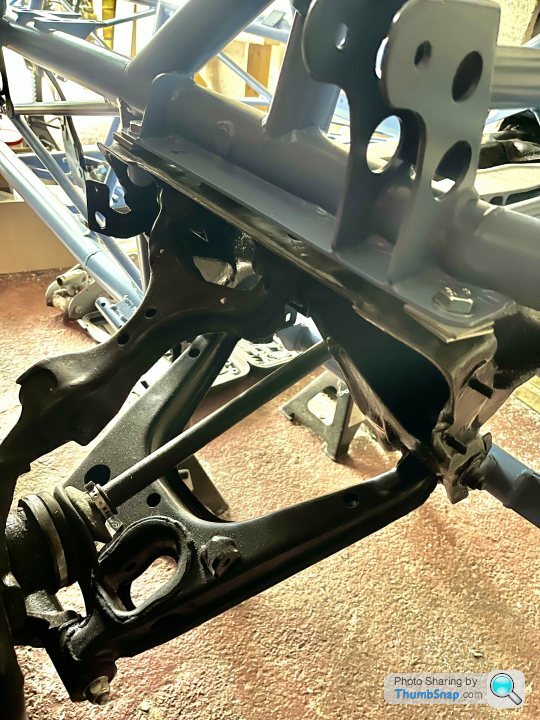
rear suspension on
diff in
rear discs
had a couple of hours on it on friday, had a brain fart day, i got my coil over clamps from amazon, they were to wide to clamp the springs, so went to machine mart and got a better set
these fitted but you couldn’t compress the spring and then fit it over the shock.
i thought i needed a motorbike coil over clamp as the tipo coil overs and shocks are small in diameter
went to my local garage and they were looking at them for a bit ,then he just pulled the top up and the springs went on !!
even he was baffled for a bit so it wasn’t just me. during all this one of the top hat washers from the coil overs got lost! i searched everywhere for about 1 hr ,only for it to turn up when my misses turned out my work trousers for the wash !
so i fitted rear shocks and springs,
differential was next , just 4 bolts
gear box bobbins
rear discs and pcd adapters
gear box bobbins
rear suspension on
diff in
rear discs
20 mins today
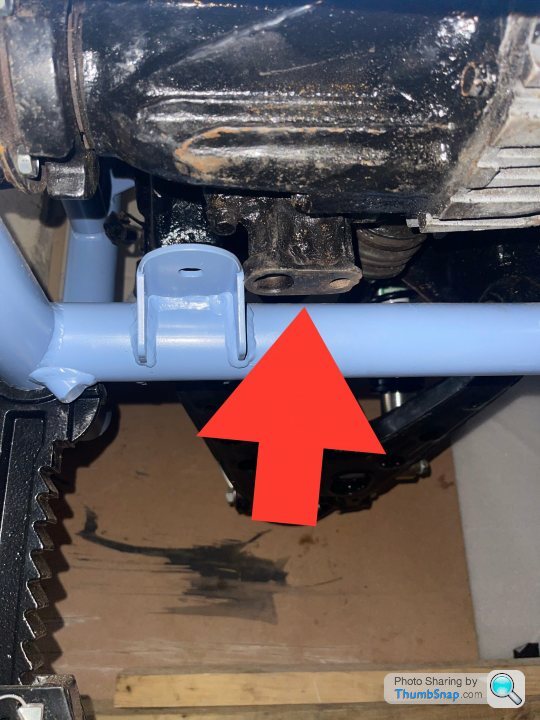
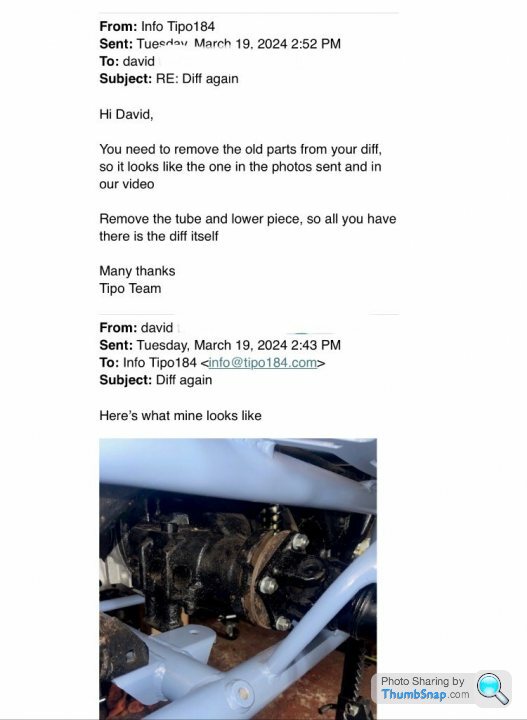
wanted to unwrap the differential fitting kit and work it out where it goes, the build video doesn’t really show it properly ,you see it briefly
i emailed dowsett how to do it and they replied straight away explaining it
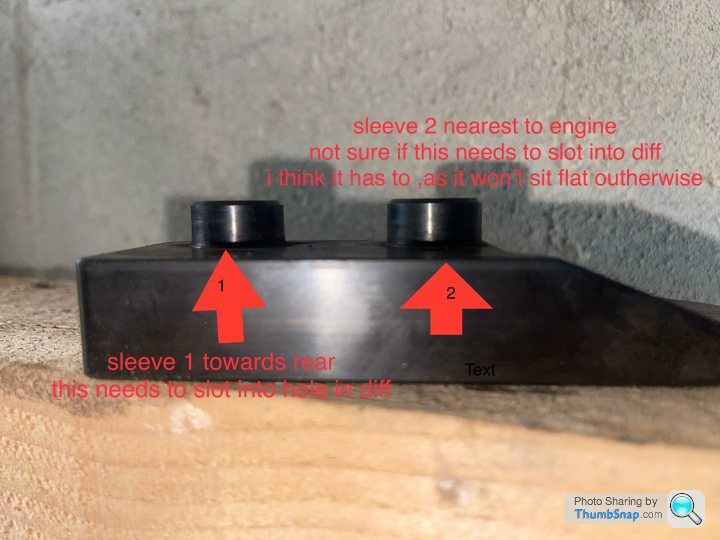
it looks like i might have to take off the rear subframe to get a section off, this is what was confusing me (‘red arrow ) really don’t want to take it all apart !
this has to be removed, the nut at the front looks rounded to me today so i’ll have to work out how to get it off
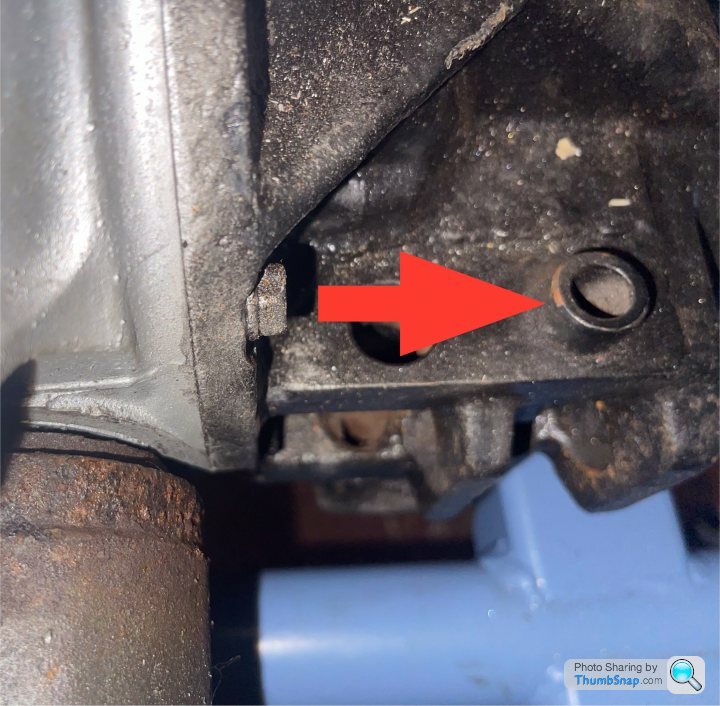
this top hat sleeve has to come off also ,there’s two but ones already out
wanted to unwrap the differential fitting kit and work it out where it goes, the build video doesn’t really show it properly ,you see it briefly
i emailed dowsett how to do it and they replied straight away explaining it
it looks like i might have to take off the rear subframe to get a section off, this is what was confusing me (‘red arrow ) really don’t want to take it all apart !
this has to be removed, the nut at the front looks rounded to me today so i’ll have to work out how to get it off
this top hat sleeve has to come off also ,there’s two but ones already out
Edited by tricky360 on Tuesday 19th March 18:06
2 hrs
not happy today with it
i got a nut extractor and got the rounded nut off by moving the subframe a bit back so i could get to it , that went ok , after that frustrating work
can’t get the sleeve out! i’ve tried extreme heat, hitting it, in the end i managed to get a cold chisel up into the sleeve and split it,only problem is that half is still in there , not sure if that matters really as the bolt passes through it anyway ,the main problem is the holes underneath
i think the new diff plate has two sleeves that have to sit inside the original diff, they are both different sizes in the og diff,so i might have to drill it out bigger ? if they don’t fit in ,then the bolts provided aren’t long enough
Edited by tricky360 on Friday 22 March 17:56
Edited by tricky360 on Friday 22 March 18:46

I think you know the answer - that sleeve needs to come out and the holes need to be nice and clean so that bracket fits in nicely without a fight. That probably means removing the diff so you can get at it properly.
Deep breath, get it done, move on.
It's one of the 'joys' of building cars. I recently had to remove the engine & gearbox from my project to fix some oil leaks the engine didn't have when it went in just a few hundred miles ago and one it had that I thought I'd fixed...but hadn't. 'Stuff' happens.
Deep breath, get it done, move on.
It's one of the 'joys' of building cars. I recently had to remove the engine & gearbox from my project to fix some oil leaks the engine didn't have when it went in just a few hundred miles ago and one it had that I thought I'd fixed...but hadn't. 'Stuff' happens.
had help today
had to take the whole rear apart and take the differential out, i will have to take it to my local garage this week to see if they can do it.
to me the 2nd hole is too small ,this will need drilling out to make it fit the new bracket .
not sure why the new differential bracket is made this way , should have the collars made the right size ?rear hole larger than the front one like it’s on the mazda diff
or when the chassis are made welded on a bracket 3 inches back and provide longer bolts
Iam not an engineer so what do i know, it’s seams over complicated to me the way it’s done
frustrated today , as i thought i was going good up till now
I’m currently building a Tipo184 with a friend. We’re a little bit ahead of you, just installed the enclosing panel kit. Found your diary and can sympathise with some of the issues you’ve had. We had the same problems preparing the diff mounting plate that you are now having. Once we had worked out that we had to remove that extension to the diff which we didn’t realise was detachable we also had the problem with the seized inserts and one of the holes being too small. In the end I took a metalworking hacksaw blade, wrapped some cloth around one end so I didn’t cut myself, and the inserted the other half into the hole and cut through the seized insert. Once I had cut through the length of it I was able to deform it enough using a screwdriver and hammer bending the cut edge in to reduce the diameter so that it could be pulled out once free. I then cleaned the out the holes using a dremel as these were quite rusted and pitted. It was still a very tight fit and in the end we heated the area using a small kitchen blow torch ( not going too mad) which expanded the holes enough to quickly tap in the Tipo mounting plate with a hammer, it’s still a tight fit so you need to make sure the plate is square with the block. Note, one of longer inserts we left in the diff as it didn’t interfere with anything and also provided a better fit to the supplied bolts.
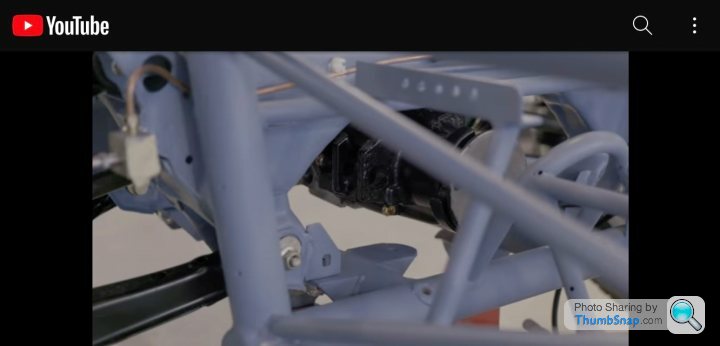
For Clarity we explain in the assembly video how to assemble the CNC machined Tipo Differential Mount
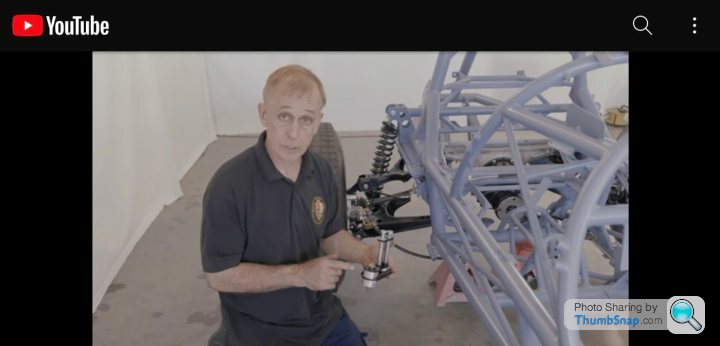
& show the diff with the Mazda tubes and blocks removed prior to fitting our CNC bracket
Most of the questions we receive from builders are about issues with preparing old Mazda parts as they do rust or occasionally are damaged from a previous life.
No question is left unanswered as it isn't always clear to a novice builder, we are here to help!
Reading your thread David - Please DO NOT cut or alter the Tipo184 CNC machined bracket it needs to be a snug "dowel" fit in the Mazda diff. If it wont fit nicely its due to rust in the two through holes (as seen in your early pictures)
Enjoying your thread & thank you for taking time to share with others
20 mins
what was all the fuss about !
darren told me in another email to get a 16 mm drill bit to drill out the smaller hole once i got the sleeve out, so i got a metal drill bit from screwfix and it snapped straight away, so i ordered a blacksmith drill bit from amazon £ 18
so today i went to get it out myself one last time, so what ever i’ve been doing this week, a combination of sprays and heat loosened the sleeve and it just tapped out ! i think it knew it was in for it!
so next was to drill out the bottom which with tap and drill oil and taking it steady i got it down enough
had to heat it up and the hit it with a club hammer but it’s in now

i think on the underneath i will remove the small washers as the nyloc nut doesn’t go on enough, this is it tight ,so i think i’ll need more thread
as in a photo darren sent me
what was all the fuss about !
darren told me in another email to get a 16 mm drill bit to drill out the smaller hole once i got the sleeve out, so i got a metal drill bit from screwfix and it snapped straight away, so i ordered a blacksmith drill bit from amazon £ 18
so today i went to get it out myself one last time, so what ever i’ve been doing this week, a combination of sprays and heat loosened the sleeve and it just tapped out ! i think it knew it was in for it!
so next was to drill out the bottom which with tap and drill oil and taking it steady i got it down enough
had to heat it up and the hit it with a club hammer but it’s in now
i think on the underneath i will remove the small washers as the nyloc nut doesn’t go on enough, this is it tight ,so i think i’ll need more thread
as in a photo darren sent me
40 mins today
looked up a you tube video on the brakes i bought and it needs the metal clip on the inside, this is a brake wear guide
so reversed the brake pads to the right way round.
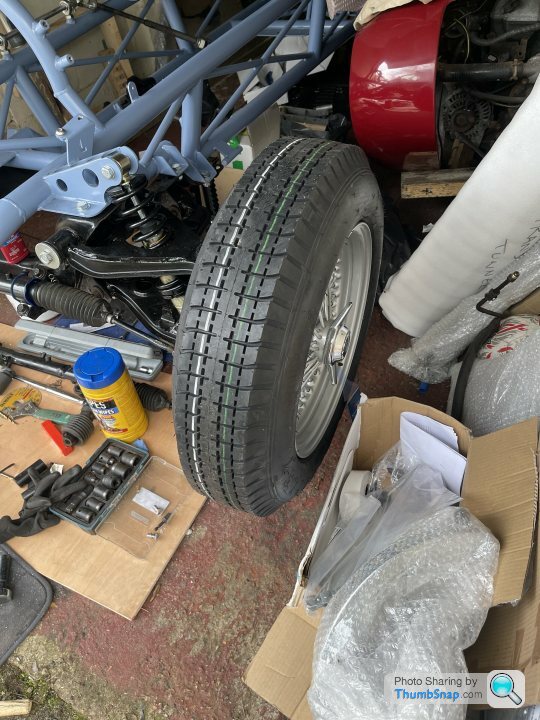
got the handbrake locked off and tighten up the wheel nuts and put on the splined hubs and tourque them up readfor the wheels to go on the rear
looked up a you tube video on the brakes i bought and it needs the metal clip on the inside, this is a brake wear guide
so reversed the brake pads to the right way round.
got the handbrake locked off and tighten up the wheel nuts and put on the splined hubs and tourque them up readfor the wheels to go on the rear
Darren C said:
Just seen your pictures of the upper arms.
Reading your post, there has never been any other Tipo upper arm, it has always been this 6mm reinforcing plate that replaces 1.5mm steel so it is far stronger when installed as intended
VERY importantly, you or your garage have NOT followed our instructions on welding this
In the photo with your airfix model kit the cut section of old arm is MISSING the underside weld to join it to the reinforcing plate (as per our instructions, you need to weld the cut out from the underside)
For safety can you please remove your suspension arms and weld them as per our issued instructions or take up our factory service of welding them for you
Thanks
Hello Darren,Reading your post, there has never been any other Tipo upper arm, it has always been this 6mm reinforcing plate that replaces 1.5mm steel so it is far stronger when installed as intended
VERY importantly, you or your garage have NOT followed our instructions on welding this
In the photo with your airfix model kit the cut section of old arm is MISSING the underside weld to join it to the reinforcing plate (as per our instructions, you need to weld the cut out from the underside)
For safety can you please remove your suspension arms and weld them as per our issued instructions or take up our factory service of welding them for you
Thanks
I am about to do this welding of the plates on the control arms.
Where are the instructions you mention? I cannot find them online or in my 'box' of parts...
Can you send a link maybe?
Also, since the ball joint is non-removable, should I wrap the joint in a wet towel to keep the heat from damaging the ball joint (and/or boiling out the grease)?
Thanks,
Walt from TX
Edited by waltf_in_US on Saturday 27th April 16:19
Hi Walt,
Can you please direct your own build questions via our email info@tipo184.com please.
The Mazda ball joints ARE replaceable, you will find information in a workshop/Haynes shop manual or watch one of the many Miata "how to" videos on youtube.
Please remove the joint before welding next to it to heat avoid damage, they are around £6 -£12 ($8-$12USD) so its always best practice to fit a new joint during the build as they are subject to wear & tear & safety item, plus low cost
The installation of the weld plate I went through in person with everyone at Phoenix AZ & a photo guide was emailed out to builders.
Drop me an email & I'll resend a copy.
Kind regards
Darren
PS. Keep up the good work David
Gassing Station | Kit Cars | Top of Page | What's New | My Stuff