My "building a cobra" thread
Discussion


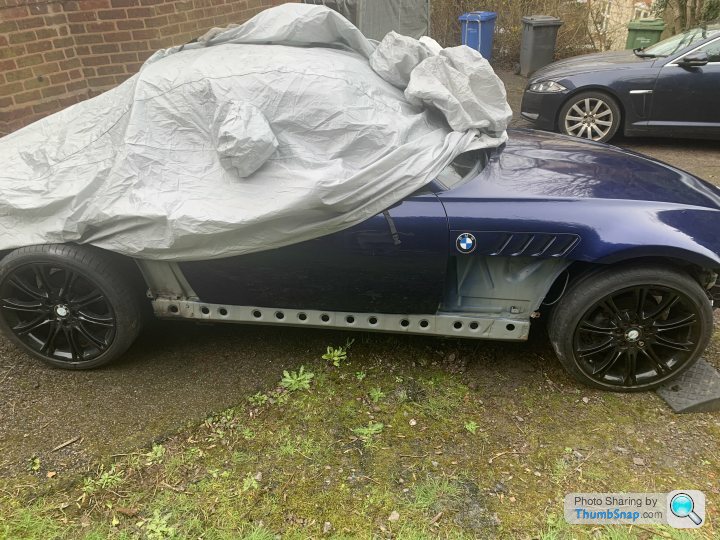
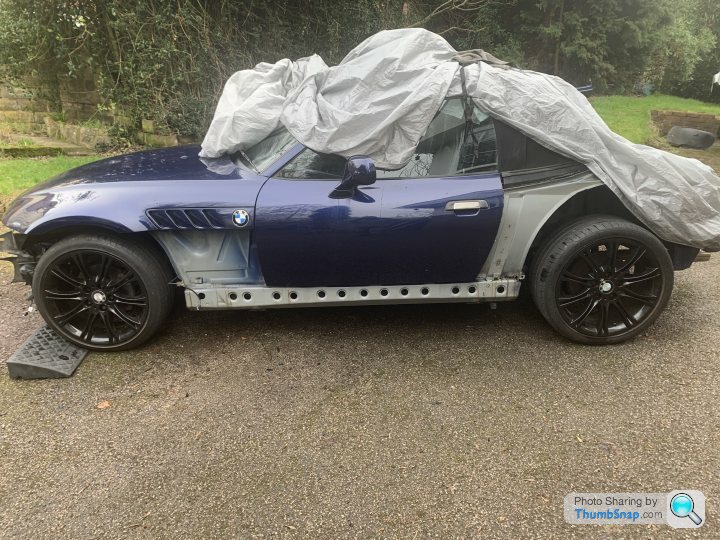
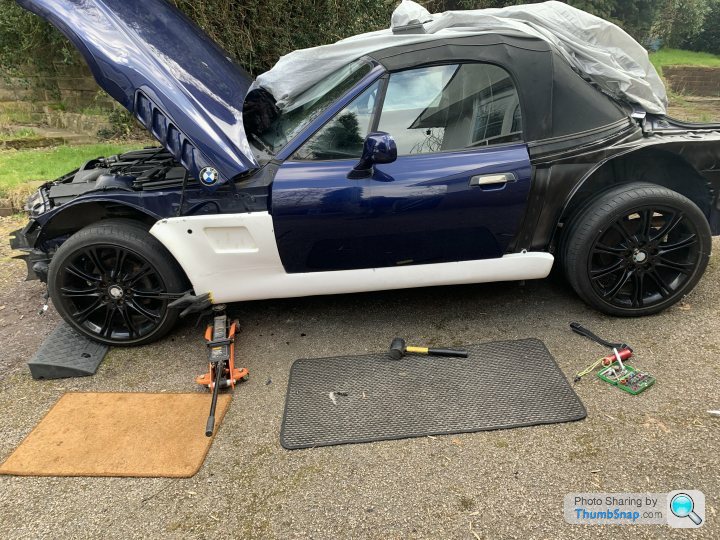
And now the sills & arch liners have been removed; a good go-over with the jetwash probably removed a kilogram or so of dirt acquired over the last 25 years.
The next step will be plenty of galv spray including into all 28 side holes followed by a generous coating of hammerite anywhere that seems to need it. Once that's done I can start to attach the new body panels, starting with the sills.
All I need is a dry day.................
The next step will be plenty of galv spray including into all 28 side holes followed by a generous coating of hammerite anywhere that seems to need it. Once that's done I can start to attach the new body panels, starting with the sills.
All I need is a dry day.................
ConnectionError said:
Could the weights that have been binned have been there for a practical reason, such as roadholding?
As I'm changing the bodywork & the balance of the car I doubt that they would have had the same effect as on the original vehicle. They might put more weight on the rear wheels to improve grip but they also put more mass to make the rear end twitch; for cornering it's as broad as it's long, for acceleration & braking they are a hindrance.I have another cobra and don't notice anything detrimental due to their loss.
Biggy Stardust said:
ConnectionError said:
Could the weights that have been binned have been there for a practical reason, such as roadholding?
As I'm changing the bodywork & the balance of the car I doubt that they would have had the same effect as on the original vehicle. They might put more weight on the rear wheels to improve grip but they also put more mass to make the rear end twitch; for cornering it's as broad as it's long, for acceleration & braking they are a hindrance.I have another cobra and don't notice anything detrimental due to their loss.
Or perhaps not. You decide...

Error_404_Username_not_found said:
I have a feeling they're mass damping. Volvo used to do the same thing, bolting a massive chunk of ironmongery to the diff in a crude attempt to disguise vibration by shifting the oscillation freq.
Or perhaps not. You decide...
Perhaps. I'd have a similar answer, tbh- I've changed a great deal about the car so they probably wouldn't have the same effect as previously and I've certainly noticed no detrimental effect on my previous build.Or perhaps not. You decide...
Having eventually received a dry day it was time to paint the sills.
A good wipedown with a cloth impregnated with brake cleaner to remove any surface crap plus a brush into any little crevices gave a hopefully clean surface to work on. Stage one was to shoot galv spray into each of the holes in the sill, moving the spraycan around in the hope of covering everything inside.
Then the exterior faces. Hammerite & a 38mm brush gave a decently thick coat & a final aerosol spray of hammerite filled in any brushmarks & got into the places the brush couldn't reach. Depending on the weather it might be hard enough to attach the sill panels tomorrow but I'm more likely to exercise patience & leave it all until Thursday to let the paint dry properly.

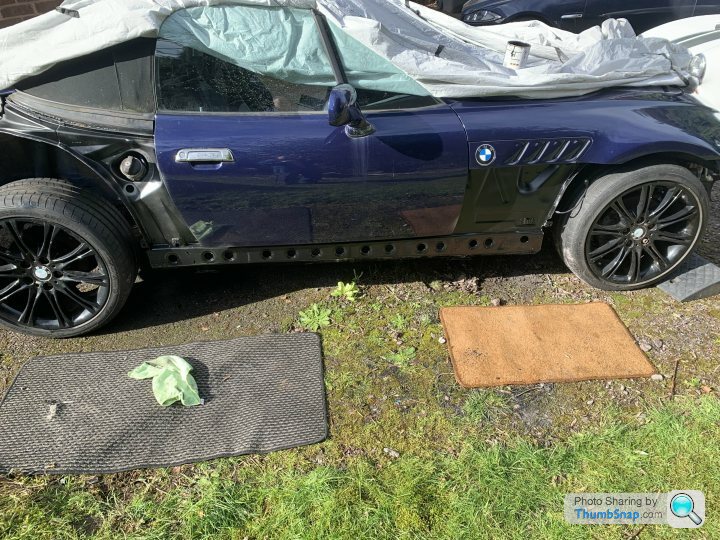
The body under the wings didn't have any issues but I decided an extra layer of paint wouldn't harm & was well worth the extra 30 seconds it took each side.
A good wipedown with a cloth impregnated with brake cleaner to remove any surface crap plus a brush into any little crevices gave a hopefully clean surface to work on. Stage one was to shoot galv spray into each of the holes in the sill, moving the spraycan around in the hope of covering everything inside.
Then the exterior faces. Hammerite & a 38mm brush gave a decently thick coat & a final aerosol spray of hammerite filled in any brushmarks & got into the places the brush couldn't reach. Depending on the weather it might be hard enough to attach the sill panels tomorrow but I'm more likely to exercise patience & leave it all until Thursday to let the paint dry properly.
The body under the wings didn't have any issues but I decided an extra layer of paint wouldn't harm & was well worth the extra 30 seconds it took each side.
Edited by Biggy Stardust on Thursday 7th March 20:12
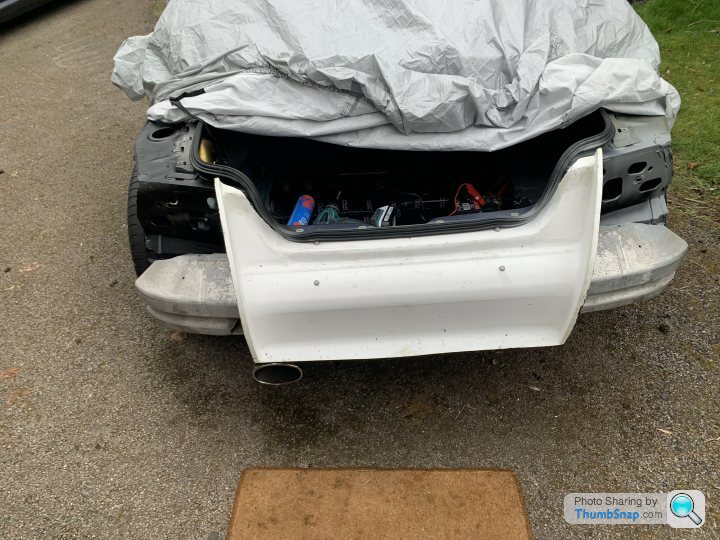
Finally time to start putting bits onto the car rather than just removing them.
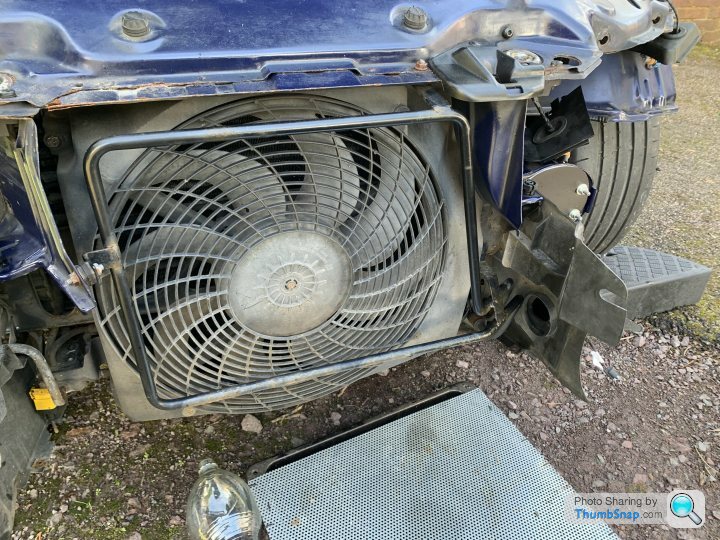
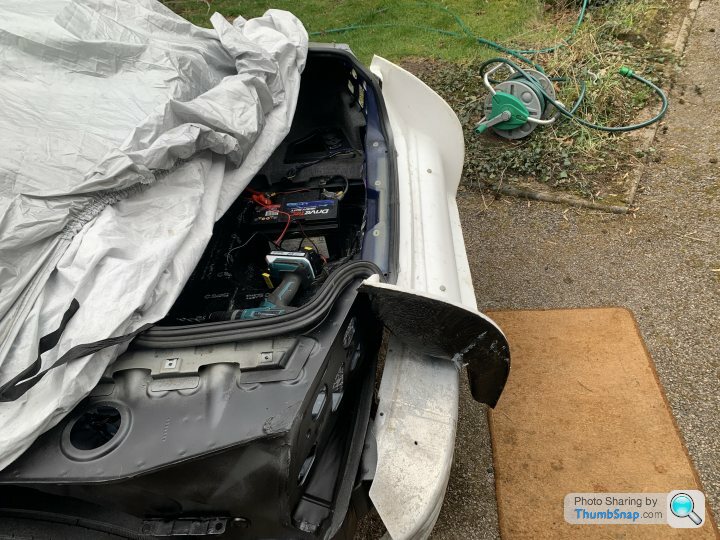
Off with the undertray & I can get at the hoses for the PAS cooling loop- a grotty, rusty, ugly item. This is bolted to the car with a pair of anti-vibration mounts, one of which will be used later.
As the loop comes off I manage to catch most of the oil in a bottle although some inevitably goes into the catch tray. The PAS reservoir has a little sump where a little oil remained, along with all the dirt that settles there from the PAS system. This got syringed out and a good wipedown to remove the last of the dirt. The car is 25 years old & I've no idea whether the PAS fluid has ever been changed so it's all getting disposed.
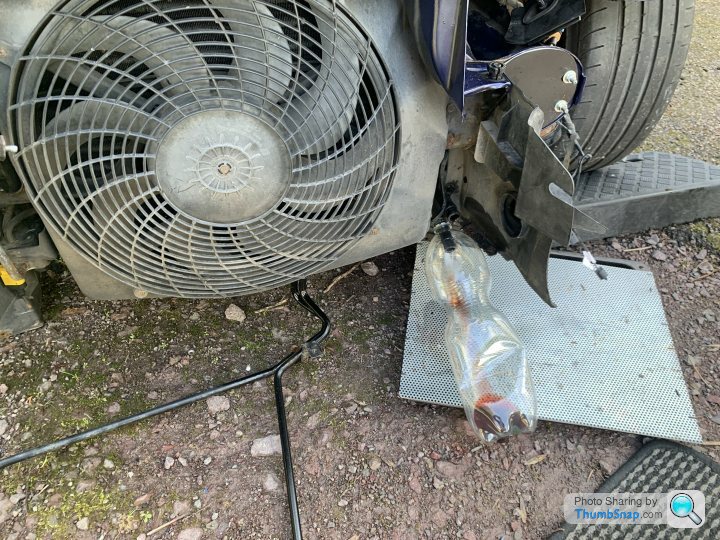
I'll eventually be getting new hoses to connect the oil cooler into the rest of the PAS but for now a little brass connecter to join the two pipes. I have some cheap but clean ATF to flush the system through and will put decent stuff in when the oil cooler is plumbed in.
Next step was to attach the oil cooler. The antivibration mount was just the right thickness to space the bracket I made from the car mounting point. The other end turns out to be different from my previous build (pre-vs post-facelift) so the bracket has nowhere to attach. Until I figure out a better way of doing things the left edge is now cable tied to the fan grille plus a meccano-type strip to carry the weight if everything goes horribly wrong. Probably totally unnecessary but I'll be happier with it there.

Undertray cleaned & reattached, time for tea & sticky buns.
Off with the undertray & I can get at the hoses for the PAS cooling loop- a grotty, rusty, ugly item. This is bolted to the car with a pair of anti-vibration mounts, one of which will be used later.
As the loop comes off I manage to catch most of the oil in a bottle although some inevitably goes into the catch tray. The PAS reservoir has a little sump where a little oil remained, along with all the dirt that settles there from the PAS system. This got syringed out and a good wipedown to remove the last of the dirt. The car is 25 years old & I've no idea whether the PAS fluid has ever been changed so it's all getting disposed.
I'll eventually be getting new hoses to connect the oil cooler into the rest of the PAS but for now a little brass connecter to join the two pipes. I have some cheap but clean ATF to flush the system through and will put decent stuff in when the oil cooler is plumbed in.
Next step was to attach the oil cooler. The antivibration mount was just the right thickness to space the bracket I made from the car mounting point. The other end turns out to be different from my previous build (pre-vs post-facelift) so the bracket has nowhere to attach. Until I figure out a better way of doing things the left edge is now cable tied to the fan grille plus a meccano-type strip to carry the weight if everything goes horribly wrong. Probably totally unnecessary but I'll be happier with it there.
Undertray cleaned & reattached, time for tea & sticky buns.
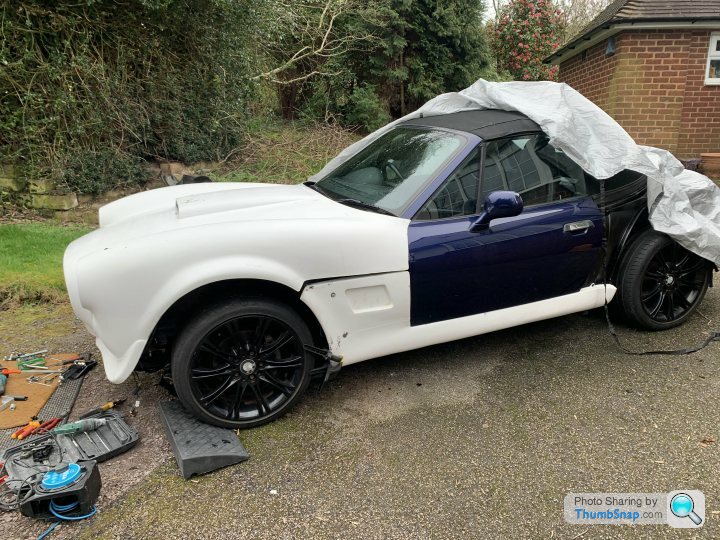
And finally I get to add some bodywork. A dry fit showed that it didn't fit- apparently the guy putting bolt holes in the bodykit didn't realise that they were supposed to align with the bolt holes on the car. A simple mistake, soon remedied with a tape measure & a drill for the top side.
The underside didn't fit either; the body panel wasn't wide enough to reach both the top & bottom holes at the same time so drilling wasn't the answer. The top has been bolted & the underside held together with a generous helping of tiger seal. Once that's had a week or so to fully set I'll consider firing a few tek screws through the bodywork holes into the sill just to make asolutely sure it's going nowhere.
I finally feel I'm getting somewhere.
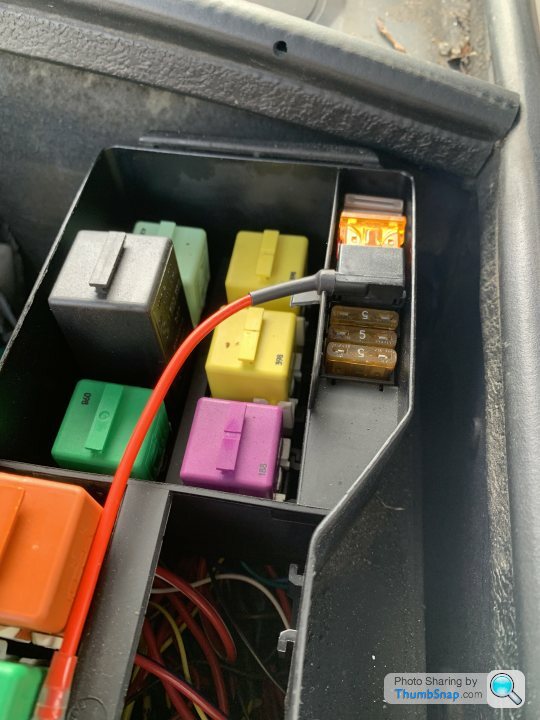
A minor job was going to be tapping into an ignition switched feed in order to power the DRL. I found the appropriate fuse & was trying to work out how to hack my way into the fusebox when I discovered a very elegant solution to the problem. I'd never seen one of these before but it piggybacks into the fuse socket & has slots for a fuse for the original circuit plus another fuse for the piggyback circuit. No unbolting fueseboxes & splicing into wires just a simple plug & unplug. It's low enough not to foul the fusebox lid and all I needed was a tiny hole to feed the wire through.
The underside didn't fit either; the body panel wasn't wide enough to reach both the top & bottom holes at the same time so drilling wasn't the answer. The top has been bolted & the underside held together with a generous helping of tiger seal. Once that's had a week or so to fully set I'll consider firing a few tek screws through the bodywork holes into the sill just to make asolutely sure it's going nowhere.
I finally feel I'm getting somewhere.
A minor job was going to be tapping into an ignition switched feed in order to power the DRL. I found the appropriate fuse & was trying to work out how to hack my way into the fusebox when I discovered a very elegant solution to the problem. I'd never seen one of these before but it piggybacks into the fuse socket & has slots for a fuse for the original circuit plus another fuse for the piggyback circuit. No unbolting fueseboxes & splicing into wires just a simple plug & unplug. It's low enough not to foul the fusebox lid and all I needed was a tiny hole to feed the wire through.
Edited by Biggy Stardust on Friday 8th March 14:27
Today's main task was to attach the boot extension- this takes the dimensions closer to that of an AC cobra.
Naturally it didn't fit properly- despite asking for the pre-facelift version I suspect (but can't prove) that I got the facelift item. No worries- either should fit the rear clamshell & any gaps can be patched in afterwards.
Centreline of the boot was marked, as was centreline of the extension. A huge amount of tiger seal was applied to wherever surfaces would mate plus a few big blobs along the top of the bumper, the blobs being bigger than the gap. The extension was then pushed into place and some tek screws drilled in. The bottom pair of tek screws wouldn't bite into the aluminium bumper securely- no worries, the holes were slightly oversized and suitable stainless bolts from the 'garage scraps' collection were put in their place. Probably not needed but I'd rather overdo it than underdo it.
As with the sills/wings, I'll give it a decent time to set rather than rushing anything. I've ordered some suitable tek screws for the underside of the sills but will probably wait until next week before fixing them.
Other jobs today included a bit more sanding on the air scoop as I wasn't satisfied with the finish. Whilst I had the sander out I went over various rough bits of bodywork- I anticipate 2 solid days of sanding & filling before it will be ready to send to the paint shop and I'd rather not do it all in one go.
Edited by Biggy Stardust on Saturday 9th March 16:16
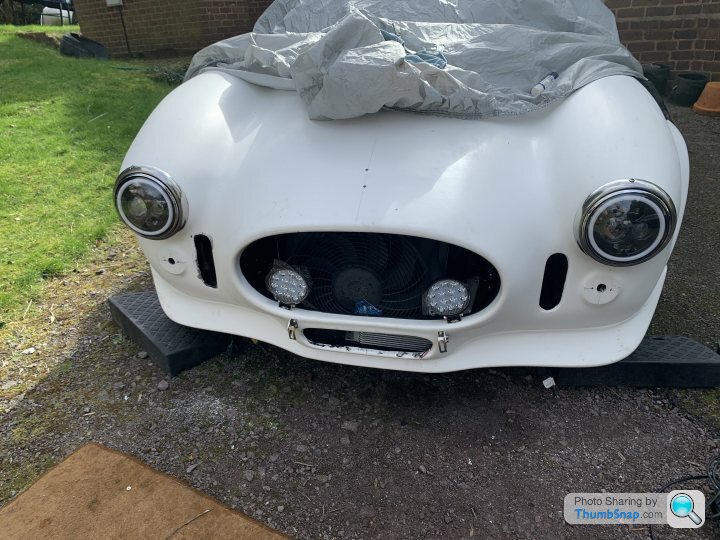
A friend came round to give me a hand & finally the bonnet is on. Over the next couple of days I'll be nailing all the lights into place so I can see how I'm going to run the electrics and where I can fit P-clamps onto the light fitting bolts.
A tiny problem is that nothing quite fits, nothing quite lines up, etc. I've had to slot a few holes & file down a few surfaces here & there- I expect a great deal more of the same before I'm through.
The bonnet wouldn't quite close over the oil cooler so I've had to make a new bracket to hold it slightly lower- the cooler and its associated gubbins was a bit too wide for the space available so there's been plenty of work with the file. It's now leaning at an angle so I'll have to remount it to sit level.
Edited by Biggy Stardust on Saturday 16th March 19:10
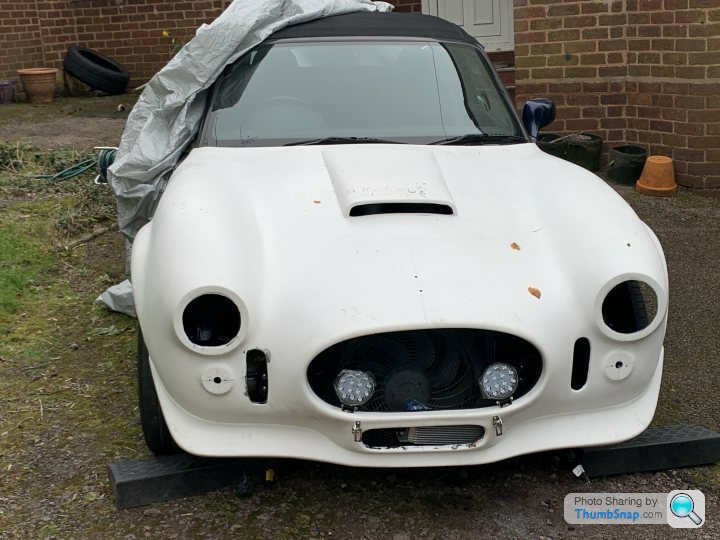
Today's job was to finish cutting the headlight holes to the correct size & fit the headlight bowls. Lots of offering up, marking a bit to file back, repeat several times until it's a nice tight fit. At that point rotate until the hole for the wiring is at the bottom & drill pilot holes for the fixing screws.
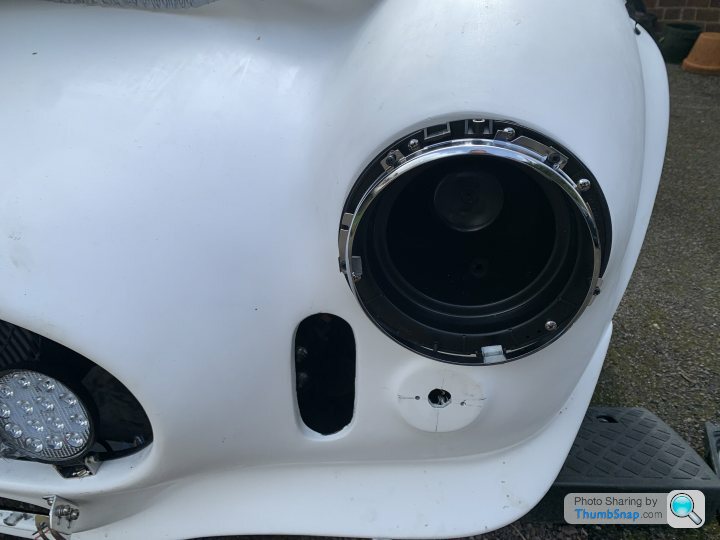
I want a more modern look including LED headlights & DRLs. Land Rover / MINI lights are the right size and seemed appropriate for a cobra. They come with plug & play connectors for their intended recipients but I chopped these off as they wouldn't feed through the wiring hole in the headlight bowl.
A stainless steel headlight ring completes the ensemble for now. Next step will be indicators followed by wiring but that will have to wait until I come back from a trip abroad.
Edited by Biggy Stardust on Tuesday 19th March 14:27
Happy Jim said:
Is that the ring mounting screw on top of the chrome trim ring? If so your bowl is 180deg out (screw should be at the bottom) - might be a trick of light though (in which case ignore!)
It's exactly what it looks like but it's not out 180 degrees ( daft though I might be, I'm not totally thick). The headlight bowl is the right way up (wiring/drain hole at the bottom) and the only way that ring goes on is by screwing the screw into the screwhole, which is where you see.Strange as it looks that's how it needs to be. The classic specialist I use had the exact same opinion when I asked about it on my other cobra.
I'll confess to the mistake I have made: the headlight units themselves are at 90 degrees to where they're meant to be. I'll need to extend the wires so they go through the bottom hole when I turn them to the correct orientation. I need to take them out anyway to ascertain which wire is which now I've cut the connector off.
Edited by Biggy Stardust on Tuesday 19th March 23:14
Biggy Stardust said:
Next step will be indicators followed by wiring but that will have to wait until I come back from a trip abroad.
I lied, slightly: I got the indicators fitted as well. They needed a surprising large amount of fettling to fit perfectly but I only intend to do the job once so I might as well do it properly.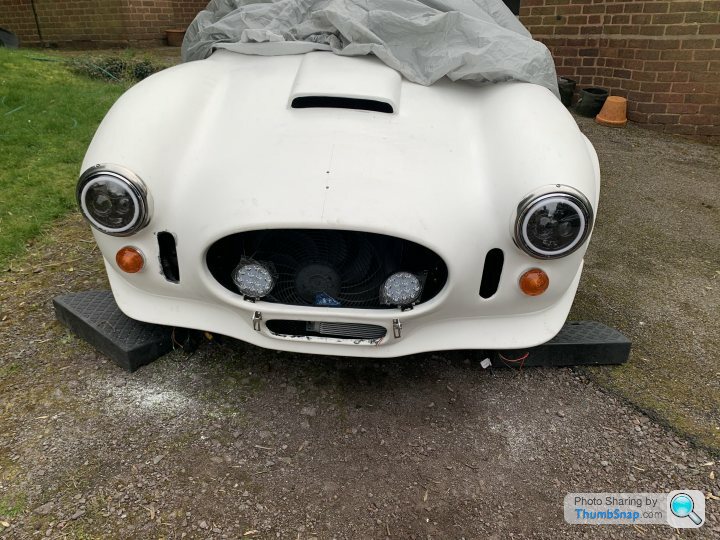
Wiring will be next, subject to time available & weather.
It's amazing how long supposedly simple jobs actually take. I look at this wiring & think it's a 2 minute job to make, whereas with getting the gear & tools together, measuring, cutting & fitting the various connectors turned it into an hour. Rome will not be built in a day.
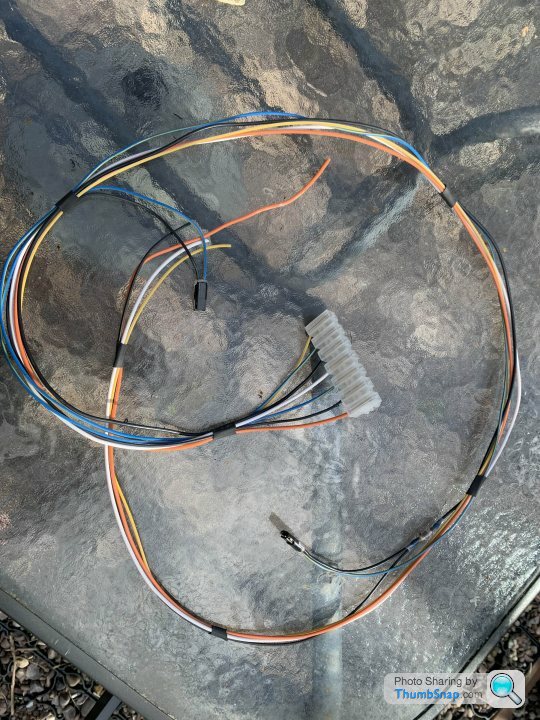
It's been put into place for an initial fit & test- everything will have to be taken off when the car is painted, hence the chocolate block connectors rather than something more permanent.
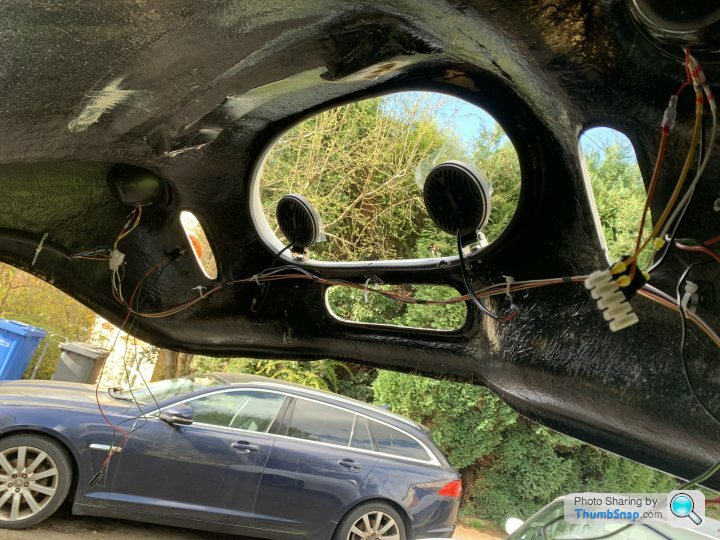
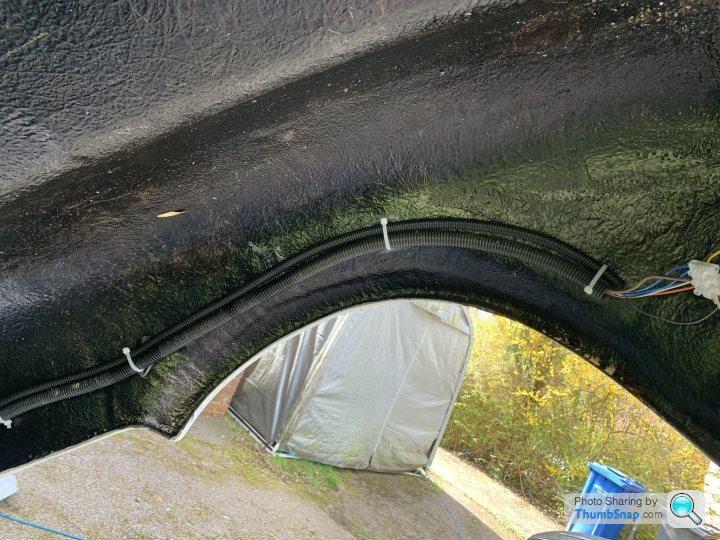
For a tidier install I'm running the wiring through ducts- the larger one carries the wires for the headlights & foglights, the smaller one for the indicators plus room for a couple of other wires in future if needed. There's also a small duct for indicator wiring on the driver's side.
It's been put into place for an initial fit & test- everything will have to be taken off when the car is painted, hence the chocolate block connectors rather than something more permanent.
For a tidier install I'm running the wiring through ducts- the larger one carries the wires for the headlights & foglights, the smaller one for the indicators plus room for a couple of other wires in future if needed. There's also a small duct for indicator wiring on the driver's side.
Finally back to work on the car.
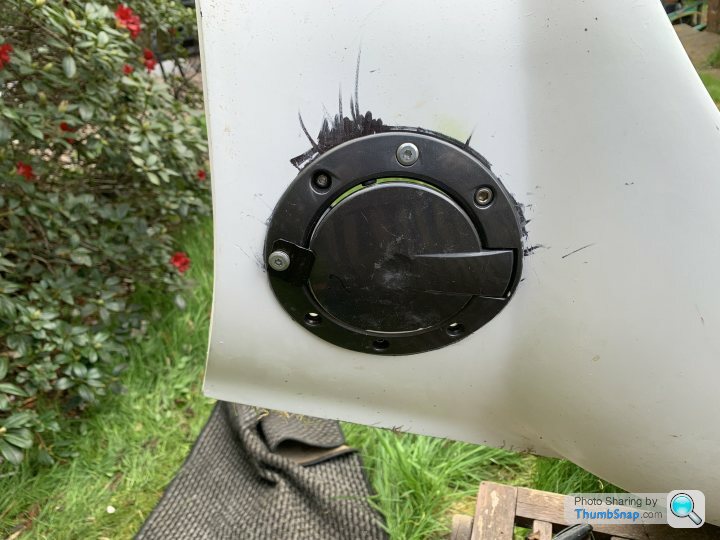
I wanted to fit the fuel filler flap- it's sourced from a Hyundai coupe (Tiburon) as the curves are a good match. I wanted to use one from an Audi TT but it was too flat & would cause issues later.
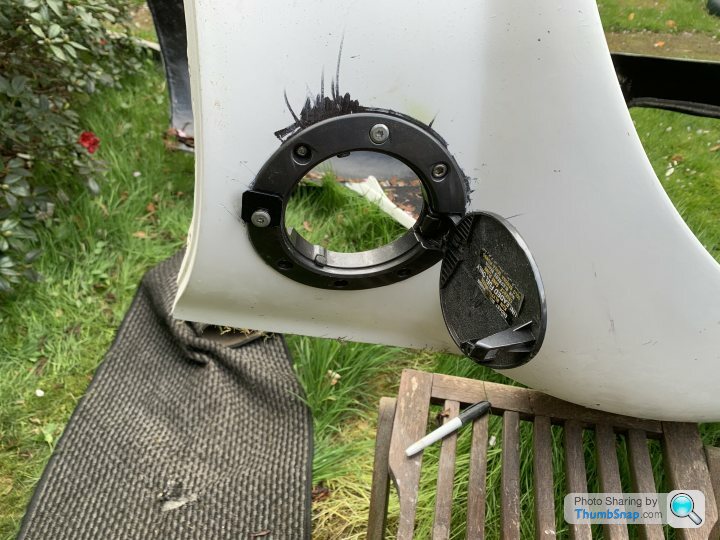
I started by measuring & marking the cut line. After looking at it & deciding I didn't like it I then marked a different cut line.

A hundred or so holes & a seriously abraded drillbit later I had a circle I could cut out with the saw.
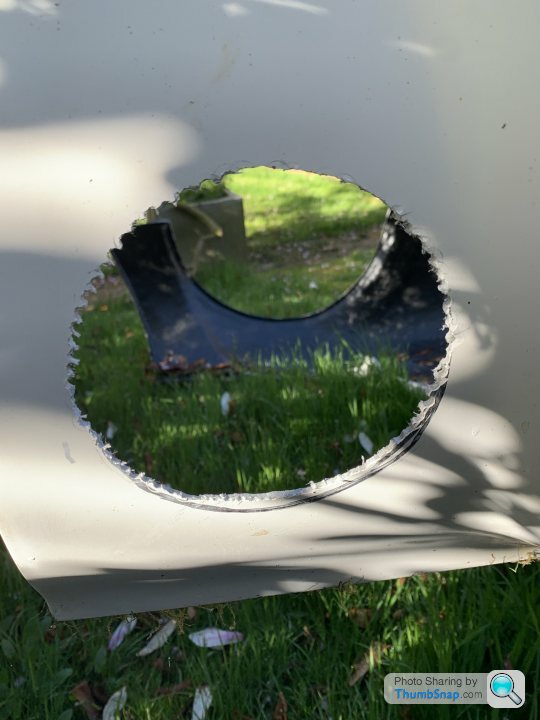
There then followed a great deal of filing, offering up, marking, filing, offering up...............
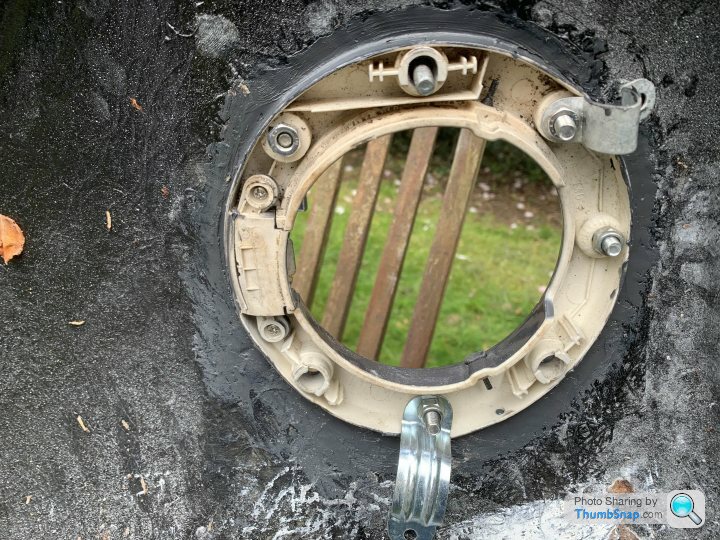
Eventually the flap was a fairly tight fit into the hole.
A couple of temporary spring clips helped pull it tight to the bodywork so I could glue it into place with some JB Weld epoxy resin. I'll finish prettying it up when the epoxy is fully set.
I wanted to fit the fuel filler flap- it's sourced from a Hyundai coupe (Tiburon) as the curves are a good match. I wanted to use one from an Audi TT but it was too flat & would cause issues later.
I started by measuring & marking the cut line. After looking at it & deciding I didn't like it I then marked a different cut line.
A hundred or so holes & a seriously abraded drillbit later I had a circle I could cut out with the saw.
There then followed a great deal of filing, offering up, marking, filing, offering up...............
Eventually the flap was a fairly tight fit into the hole.
A couple of temporary spring clips helped pull it tight to the bodywork so I could glue it into place with some JB Weld epoxy resin. I'll finish prettying it up when the epoxy is fully set.
Edited by Biggy Stardust on Sunday 14th April 14:10
Biggy Stardust said:
996Type said:
Looking good! Have you considered spraying Dinitrol clear into the cavities while you have great access?
Tell me more; I sprayed plenty of zinc galv spray but what are you thinking of?Dinitrol do a few types of liquid wax in rattle cans, I emptied a few into the chassis box sections of my old 911 when I had it apart a few years ago.
This was the thicker almost tar like wax, I’d had new metal let into those side walls, zinc primed it, sprayed it with some rattle silver, let it go off for a few weeks while the car was a apart then flooded the compartments with the Dinitrol.
That aperture is looking in where the bumper mount goes (a known rust spot), for exhaust reasons I was in and out of the same area for a good decade and the dinitrol was doing the job!
Gassing Station | Kit Cars | Top of Page | What's New | My Stuff