Mac#1 Motorsport Worx Build
Discussion


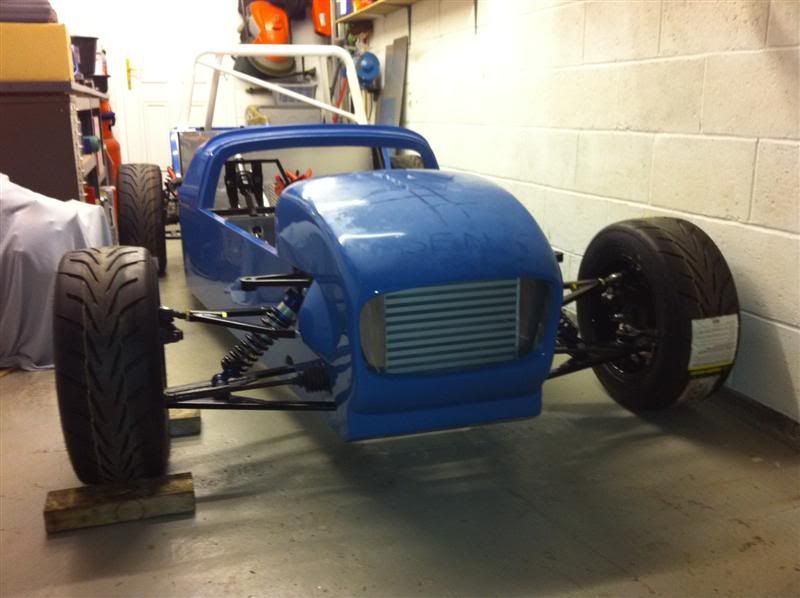
Still no brake lines yet, rang the company who are making them this afternoon and they still hadn't received the fittings which were ordered on Monday
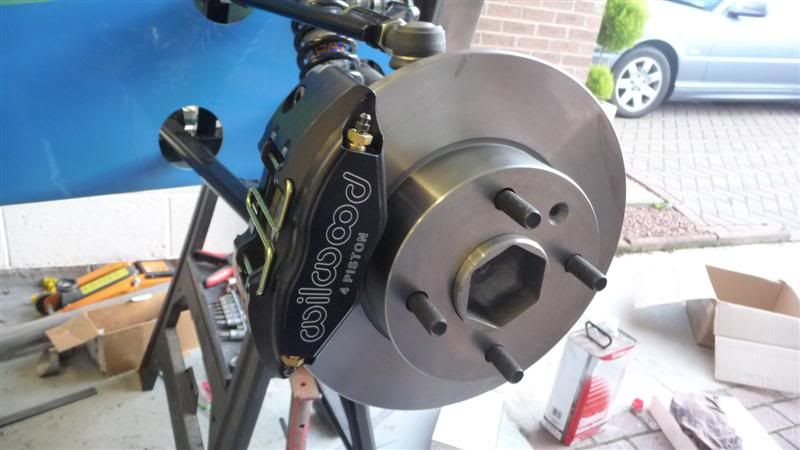
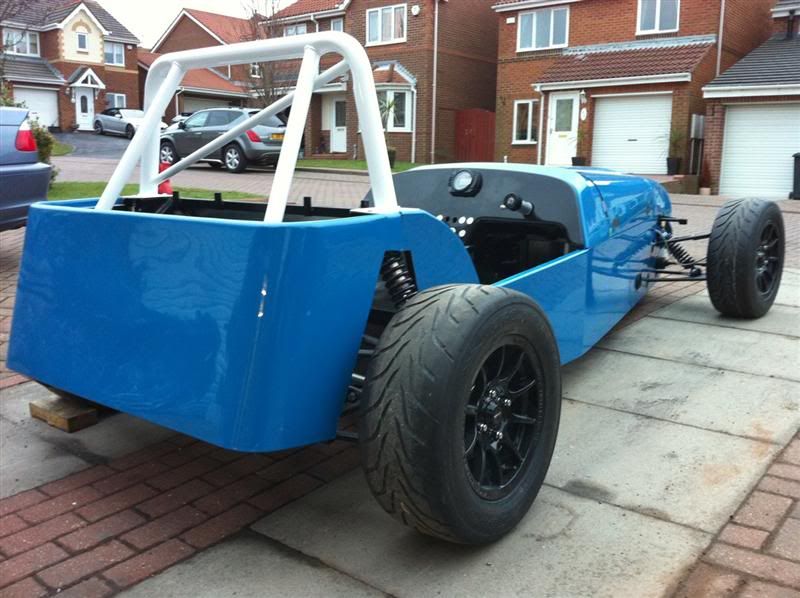
I couldn't wait any longer, so set about fitting the brakes to the front end of the car
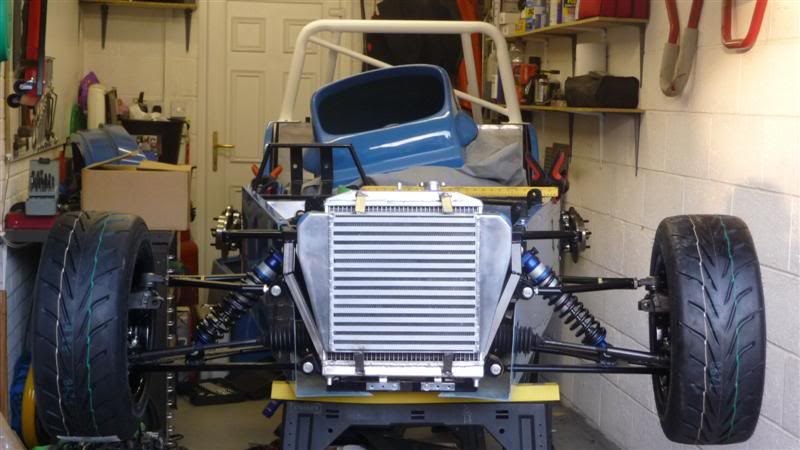
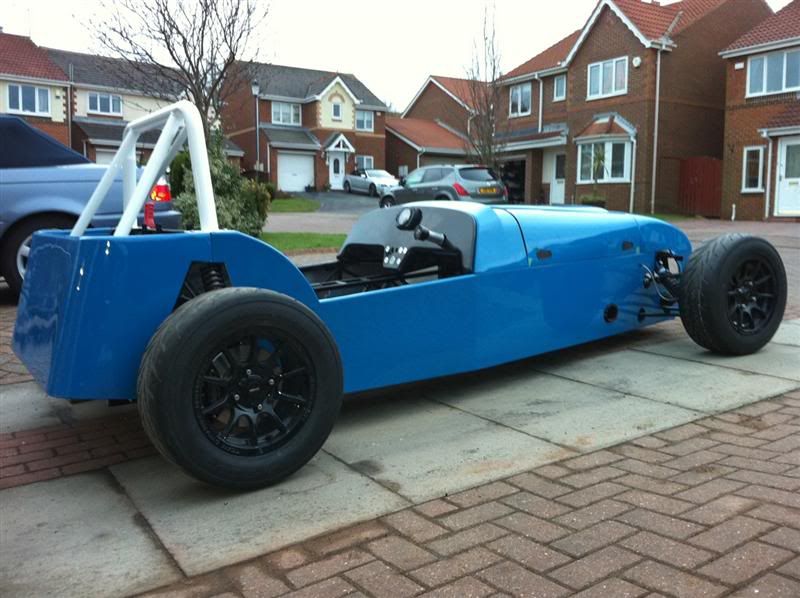
Next step was to fit the wheels, but could only get 3 on as the bench was in the way for the last one.
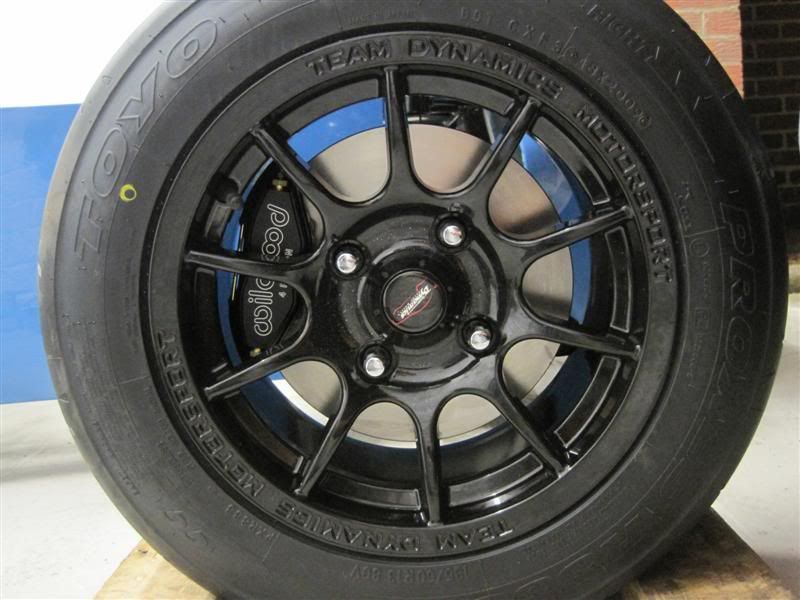
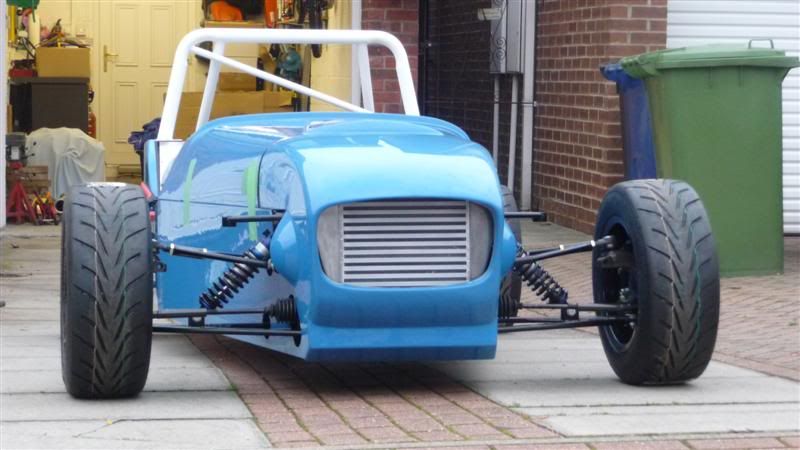
Front brakes hiding behind the Pro Race 1.2 wheel
With the help of R6Franky and some of the neighbours the car was moved forward, the last wheel fitted and then finally lowered to the floor
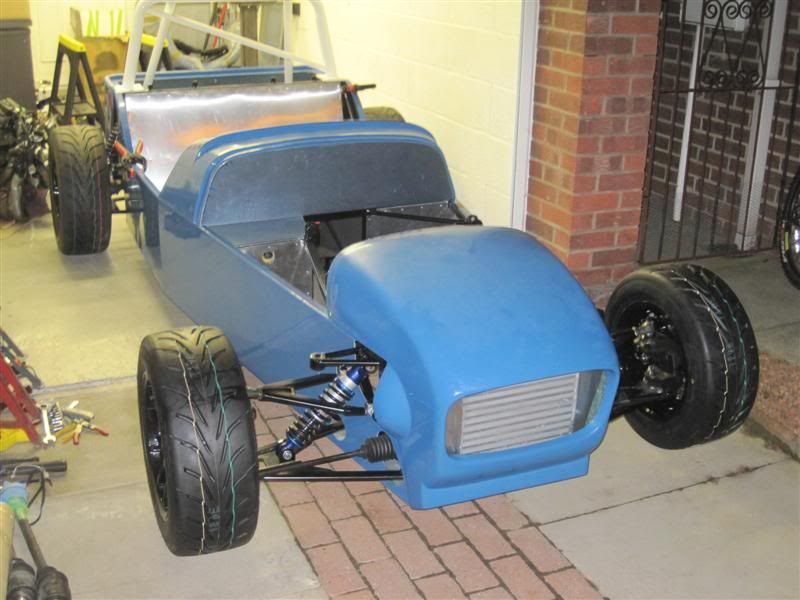
End of play today I'm a very happy bunny
I couldn't wait any longer, so set about fitting the brakes to the front end of the car
Next step was to fit the wheels, but could only get 3 on as the bench was in the way for the last one.
Front brakes hiding behind the Pro Race 1.2 wheel
With the help of R6Franky and some of the neighbours the car was moved forward, the last wheel fitted and then finally lowered to the floor
End of play today I'm a very happy bunny
bonesX said:
Any updates, and (soz in advance for a uncomfortable question) have you a completion date, or is an as and when?
Don't worry it's not an uncomfortable question, I'm expecting to have the car on the road around May next year, in time for the start of the decent weather.Not been a lot of updates lately, but here's a couple of photos of what has been happening.
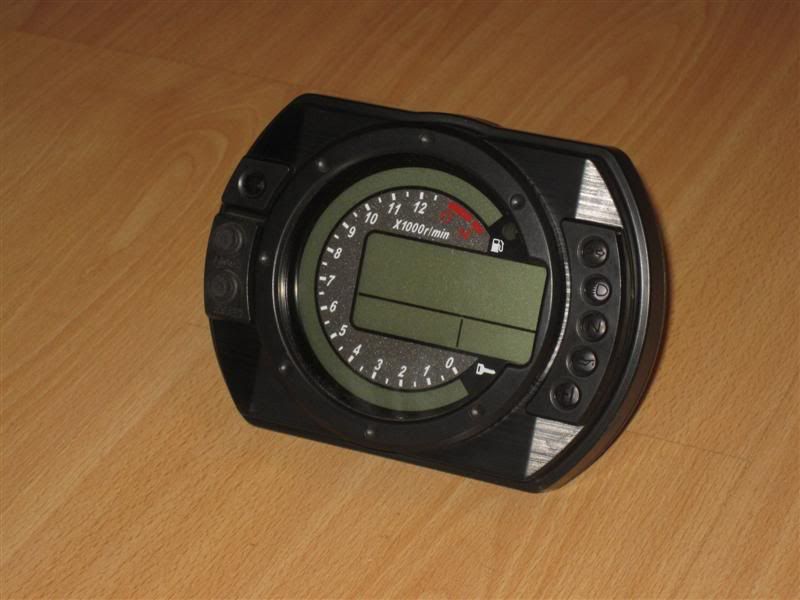
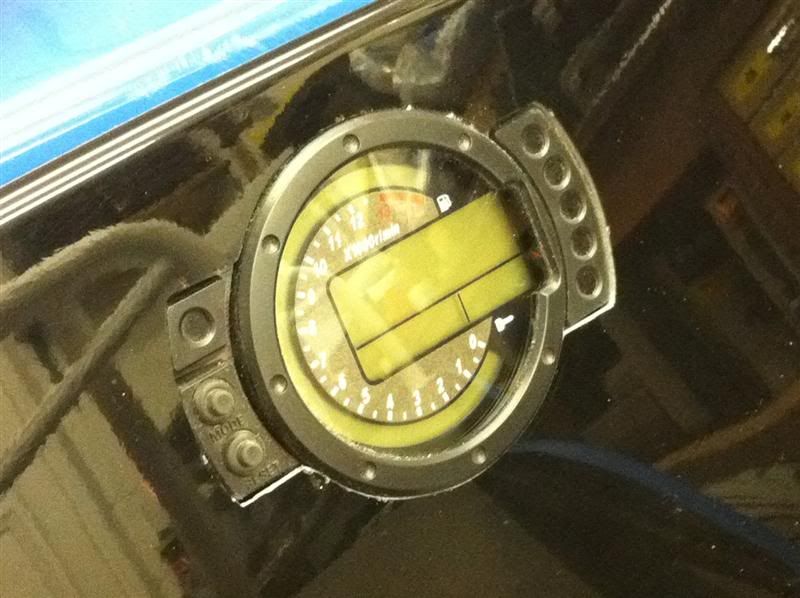
Bought some 2004 ZX10R clocks
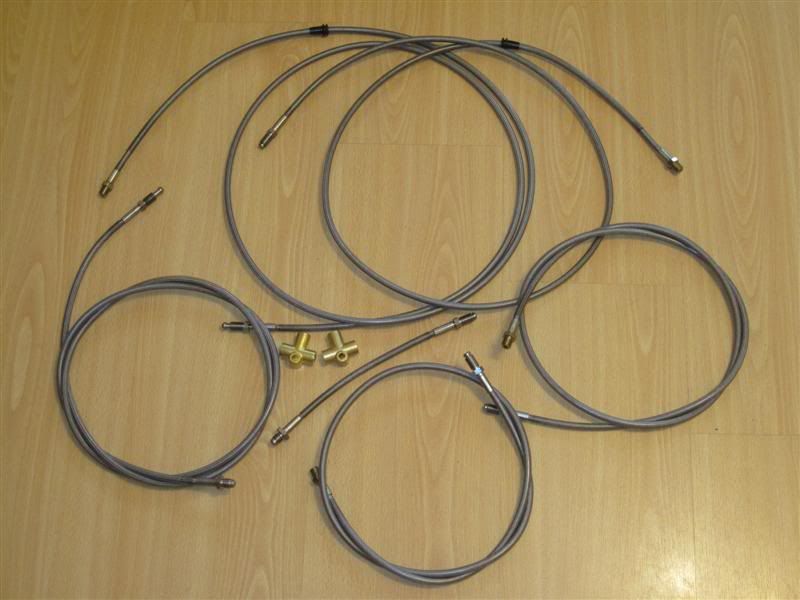
The custom braided brake lines were finally made up and collected
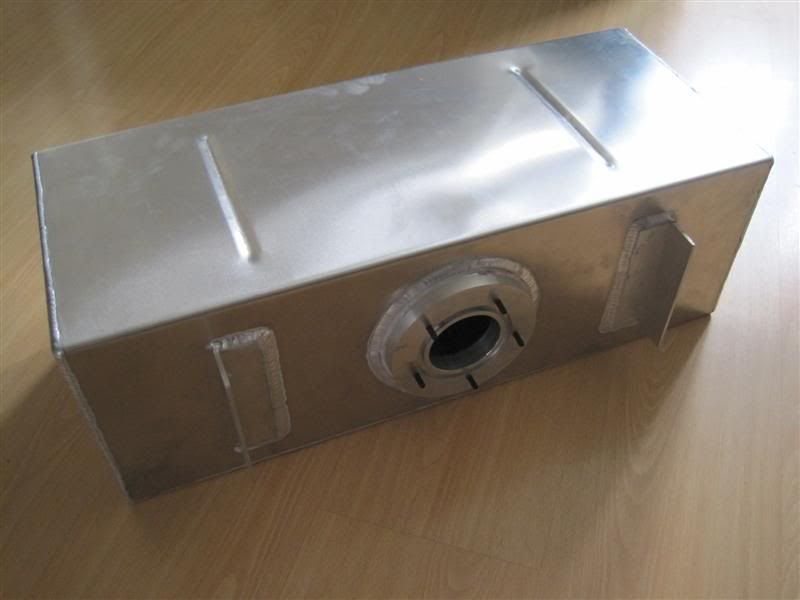
Collected a petrol tank from Mac#1
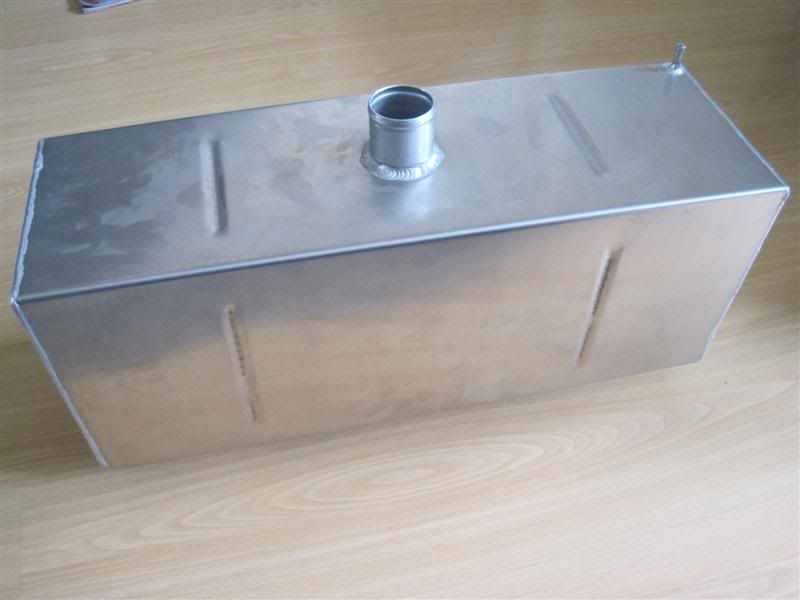
It's flanged/grooved to accept a standard ZX10R fuel pump/seal arrangement
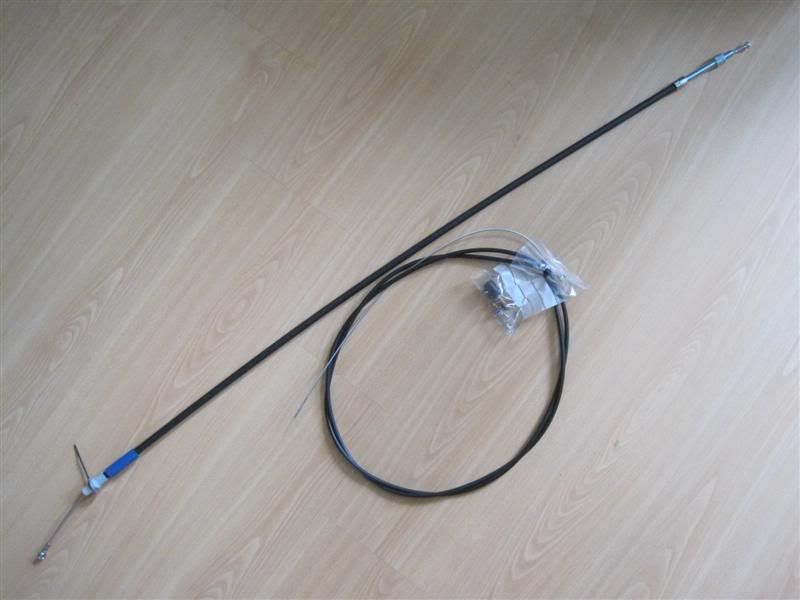
Clutch cable and accelerator cable kits
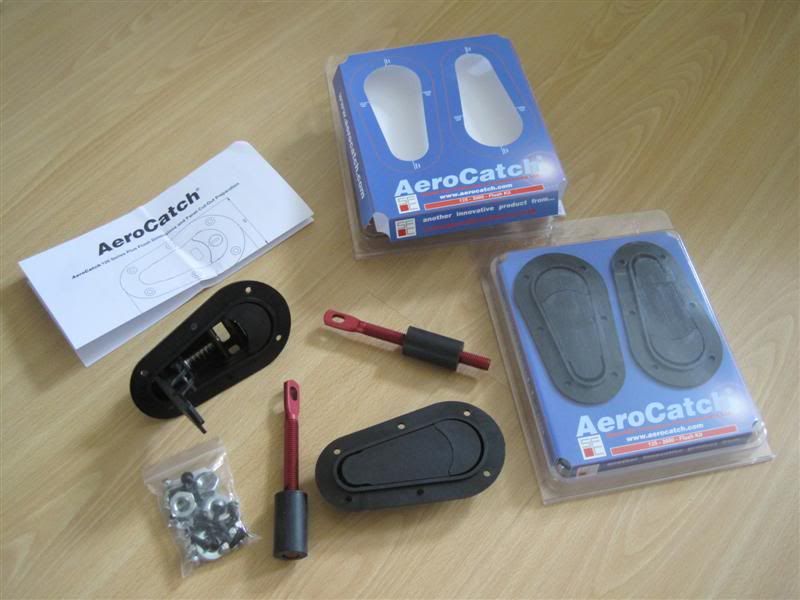
Flush fitting AeroCatch bonnet catches, instead of those horrid sticky out clamps people usually use
Got some paint matched to the body colour, fired up my compressor and tried out painting with a newly acquired Devilbiss gun, I'm rather pleased with the results

With the weather being nice, while painting I pushed the car out onto the drive and thought it would be rude not to take some more photos


bonesX said:
Now I know why my MAC #1 petrol tank costs £19 to fill... ;-)
Is that a good thing or a bad thing? lolmickrick said:
Very nice. Love the colour. and as has already been said, some very neat cutting there. Keep the pictures coming. We like pictures. 
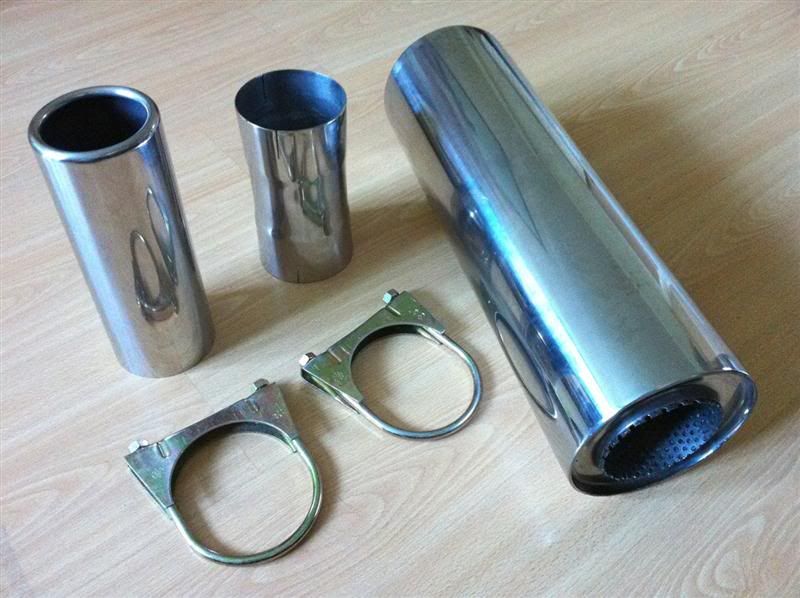
Thanks for the positive comments Here are the updates I forgot to add...Some 76mm/3" bore exhaust parts
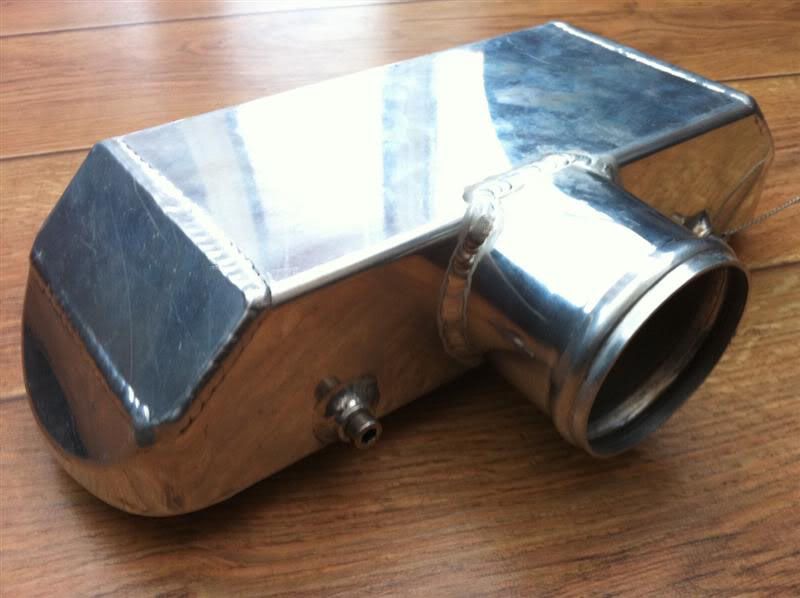
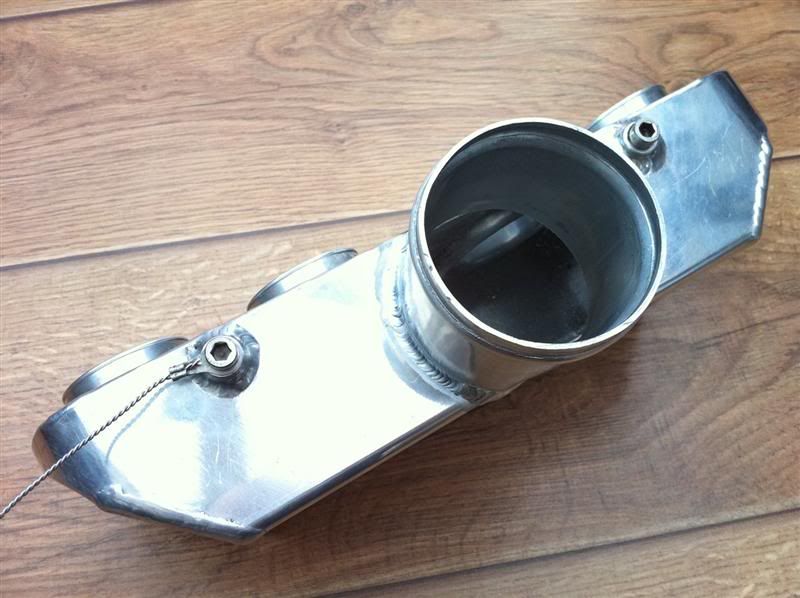
a 2.75"/70mm diameter aluminium pipe to modify the inlet manifold with

The original pipework feeding the inlet manifold was 51mm/2" diameter

The plan is to to bring the inlet manifold inlet pipework up to the same size as the intercooler by cutting and welding this new piece into it. You can see the size difference in the photo below.
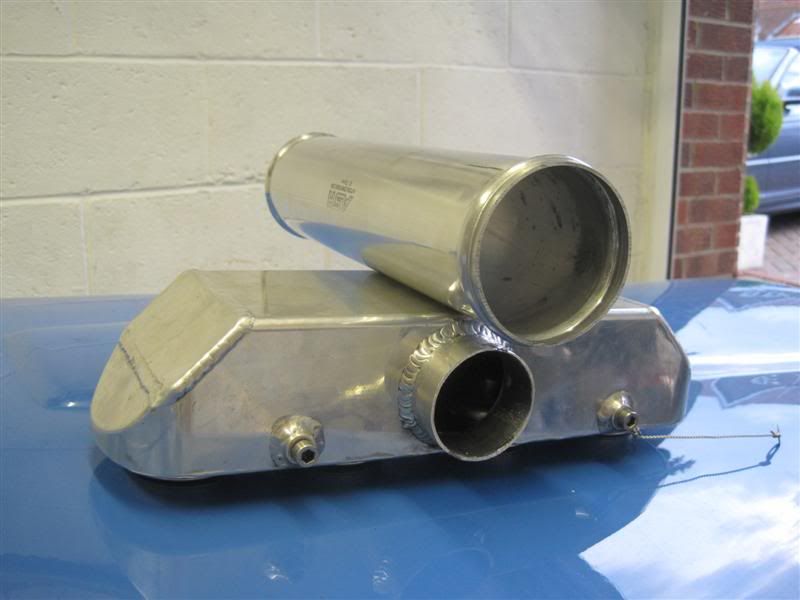
The inlet manifold now looks like this
I've also bought an alloy fuel pump cradle to mount the Bosch 044 pump with.
Brake light switch, T piece and link hose connected to the master cylinder

The rear hoses are mocked up now, ready to be fitted properly when I next work on the car

Fitted the front brake hoses to the calipers, drilled the side panels and fed the hoses through with a grommet.
Brake light switch, T piece and link hose connected to the master cylinder
The rear hoses are mocked up now, ready to be fitted properly when I next work on the car
Fitted the front brake hoses to the calipers, drilled the side panels and fed the hoses through with a grommet.
Fired the compressor up and the casings were given a couple of coats of primer
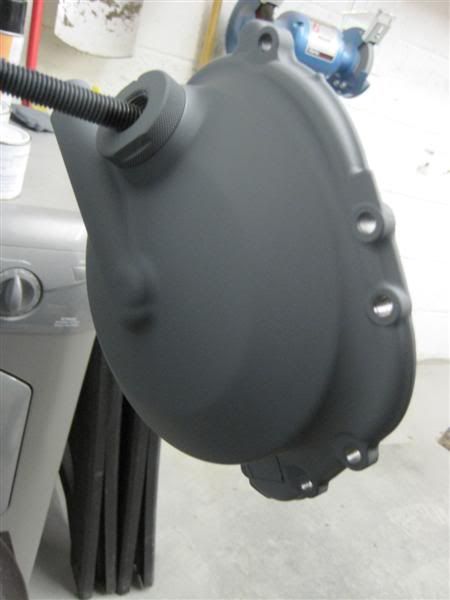
then some black top coat
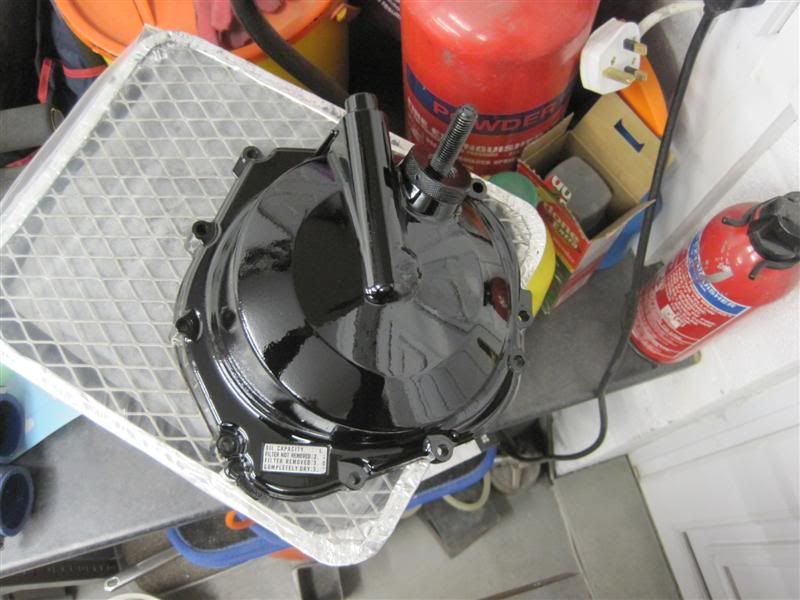
and some lacquer

While the covers are off you can see the modified Muzzy lock up clutch

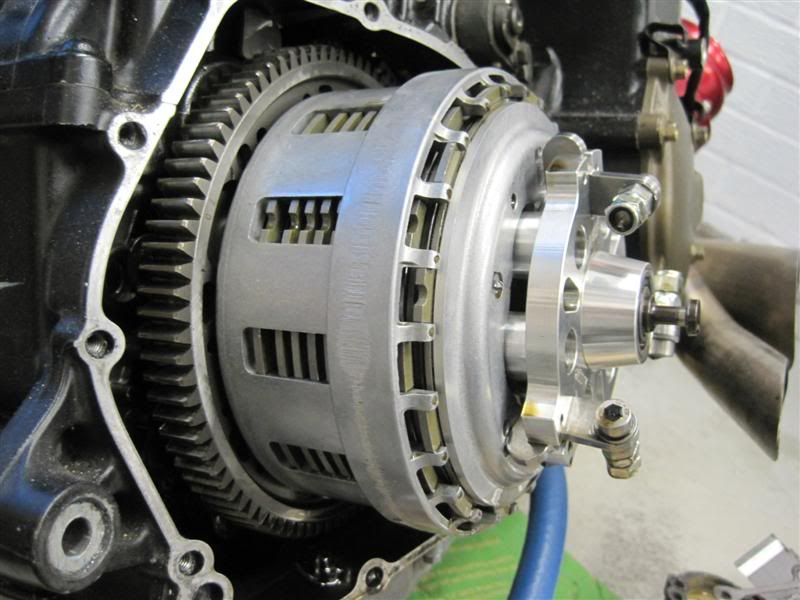
Description of the lockup clutch kit taken from Muzzys website...
It's a complete kit that includes a weight plate, weights, a new puller shaft, anti-sprag washer, anti-sprag nut and a billet CNC machined spacer ring.
The lockup clutch applies increasing pressure to the clutch pack as the engine RPM rises. More weight increases the pressure at lower RPMs and adds more pressure as the RPM rises. The lockup virtually eliminates high RPM clutch slip in high horsepower applications and therefore extends clutch life.

So that should come in handy when I take it for a remap and a bigger dollop of boost
Some boost hoses have been delivered, they're 70mm internal diameter apart from one that is a 70mm to 51mm reducer for the turbo outlet to boost pipework.

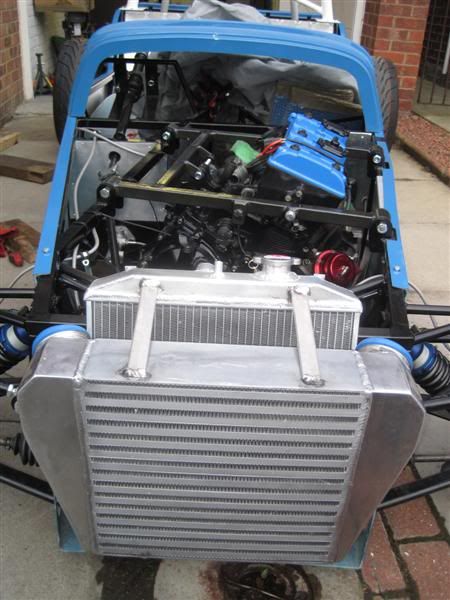
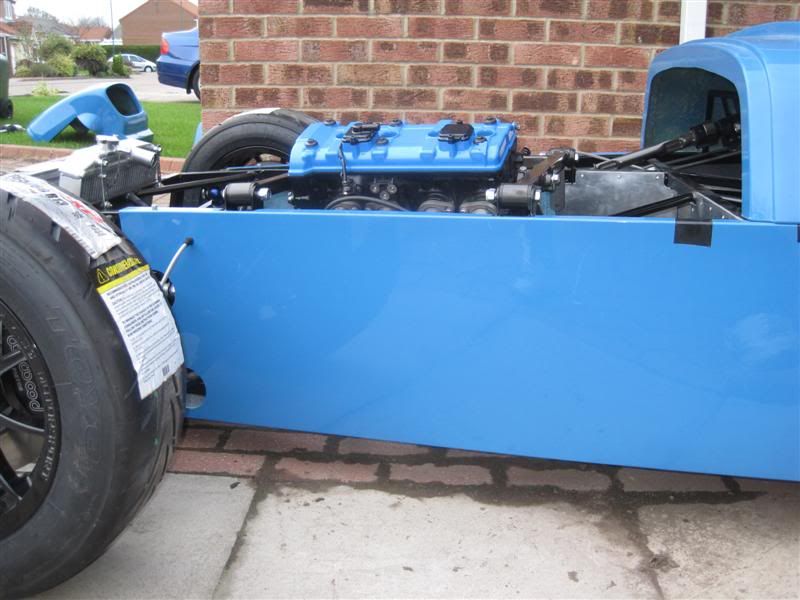
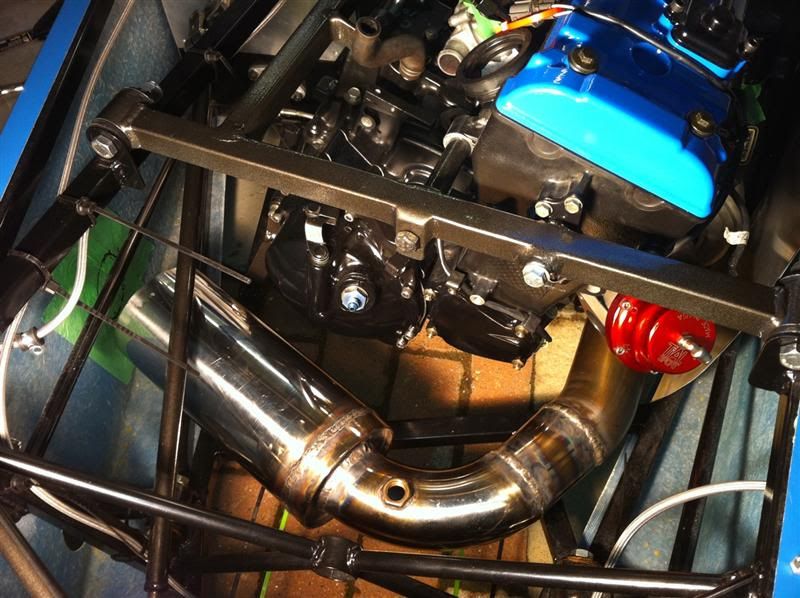
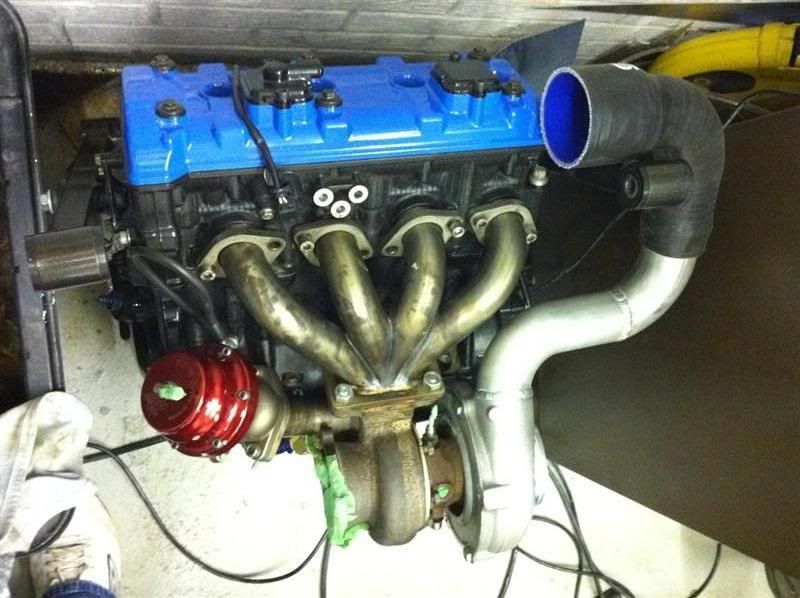
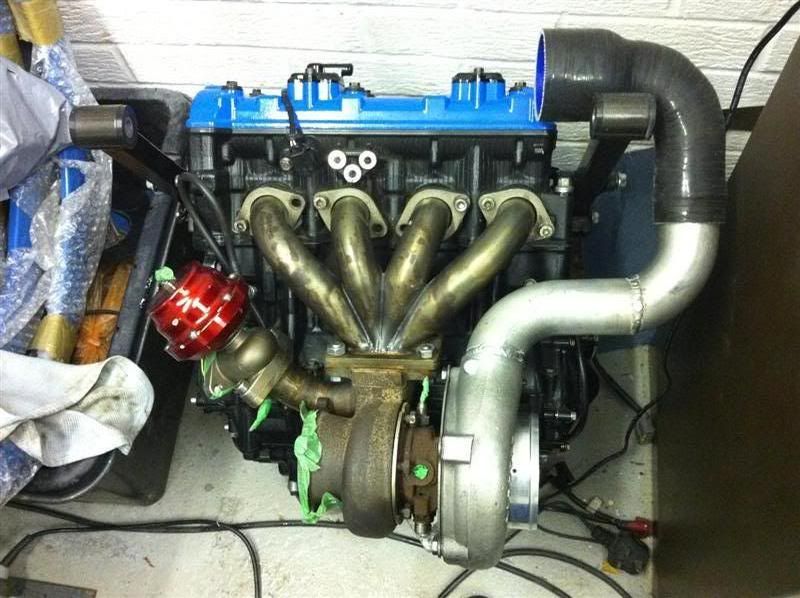
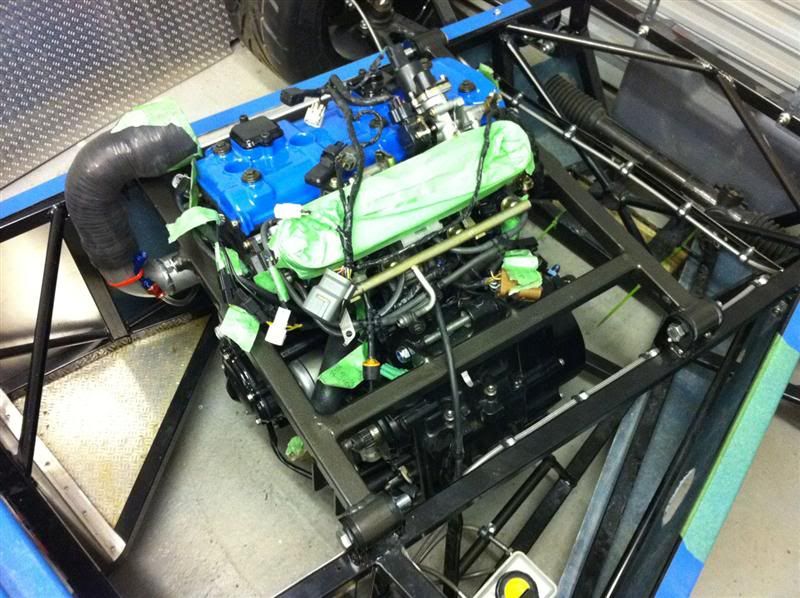
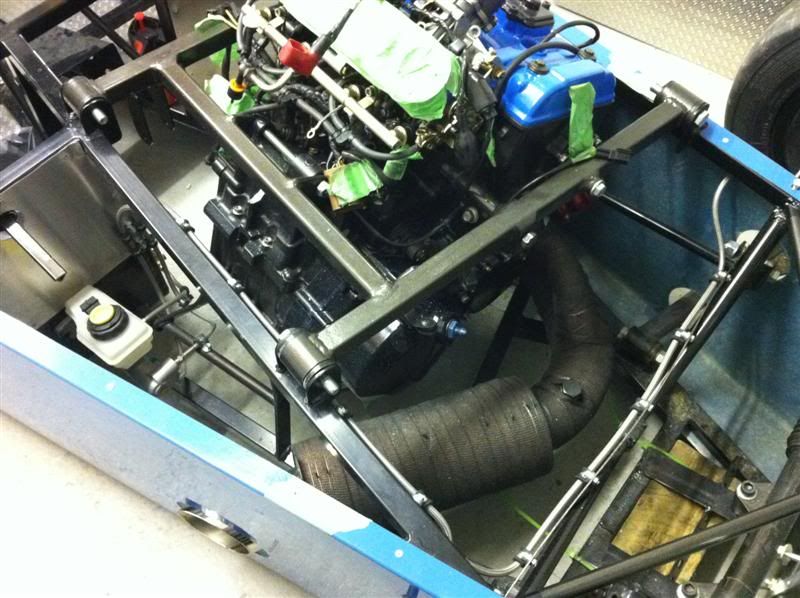
Engine fitted

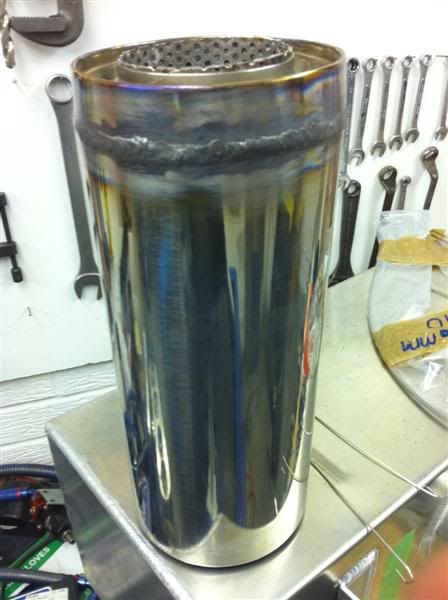
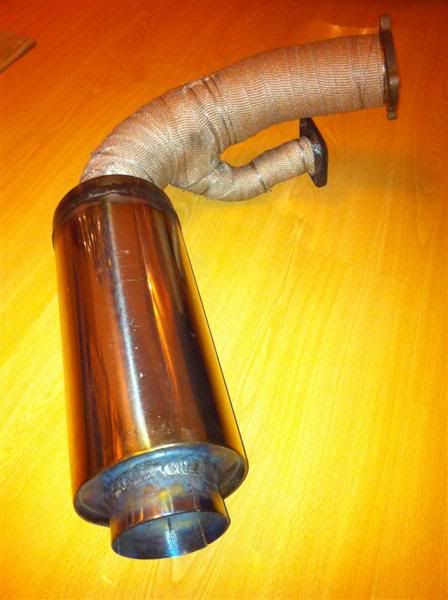
Then had a look at the exhaust routing and it turns out the exhaust silencer I bought was a little on the long side, but rather than send it back I thought I'd shorten it myself, and this is the result
then some black top coat
and some lacquer
While the covers are off you can see the modified Muzzy lock up clutch
Description of the lockup clutch kit taken from Muzzys website...
It's a complete kit that includes a weight plate, weights, a new puller shaft, anti-sprag washer, anti-sprag nut and a billet CNC machined spacer ring.
The lockup clutch applies increasing pressure to the clutch pack as the engine RPM rises. More weight increases the pressure at lower RPMs and adds more pressure as the RPM rises. The lockup virtually eliminates high RPM clutch slip in high horsepower applications and therefore extends clutch life.
So that should come in handy when I take it for a remap and a bigger dollop of boost
Some boost hoses have been delivered, they're 70mm internal diameter apart from one that is a 70mm to 51mm reducer for the turbo outlet to boost pipework.
Engine fitted
Then had a look at the exhaust routing and it turns out the exhaust silencer I bought was a little on the long side, but rather than send it back I thought I'd shorten it myself, and this is the result
Chopped the slash cut end off the exhaust and welded a straight piece on the end of it
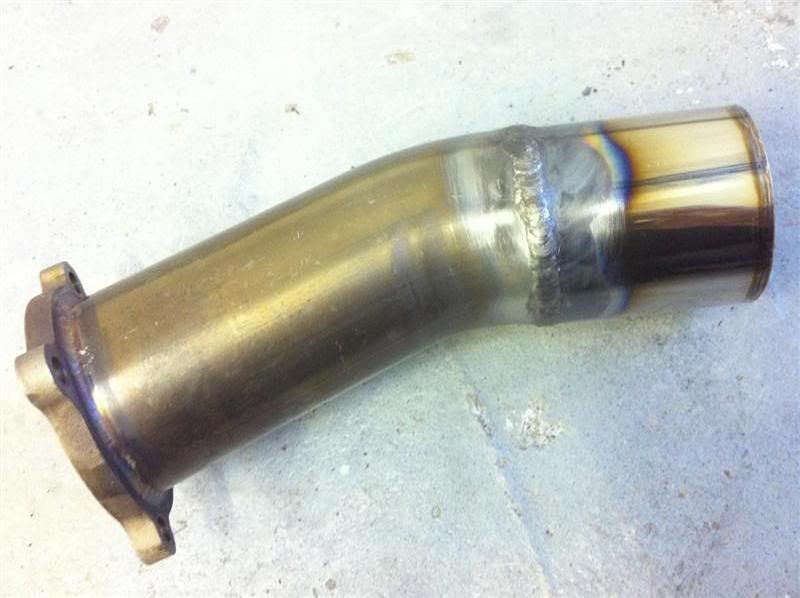
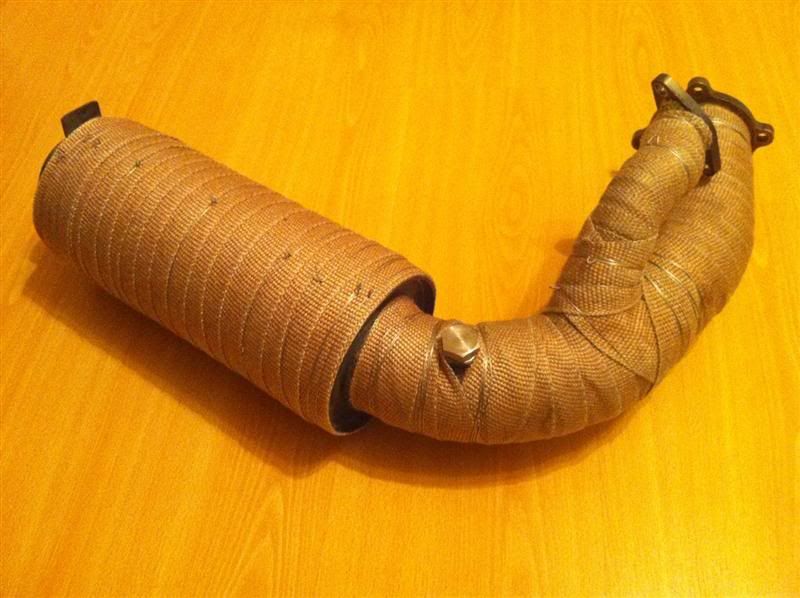
Butchered an unused 3" stainless steel downpipe I had in the garage which was originally intended for my Evo 5, the result was a bend with lambda sensor boss fitted.

Welded it onto the silencer
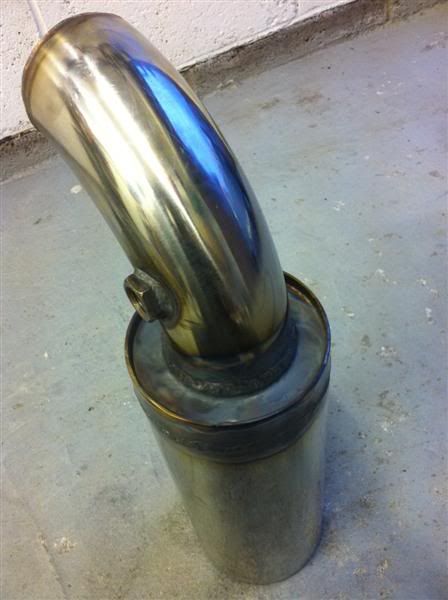

The two pieces were then welded together to make this exhaust

Bolted to the turbo it looks like this

The engine was taken out of the car again today so I could begin working on the external wastegate pipework, some progress has been made with it but not a lot, i'll have more to show tomorrow.
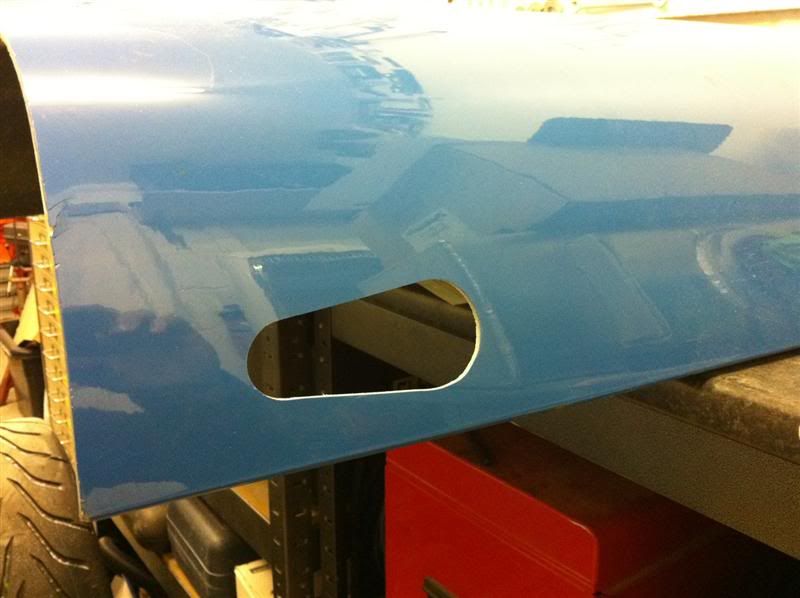
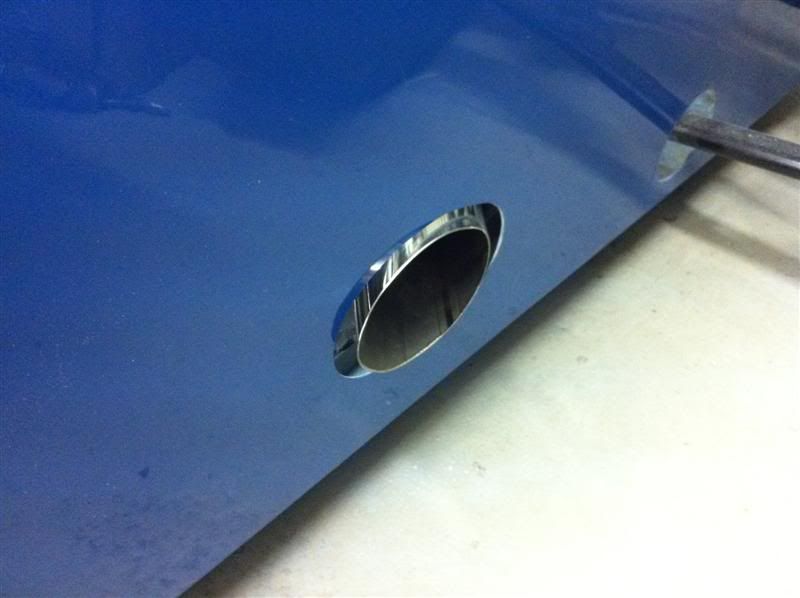
While the engine was out I cut a hole in the side panel for the exhaust tailpipe.


The hole is a bit on the small side at the moment so the talpipe isn't sitting correctly, it will angle a little more towards the rear of the car when it's finished.
Butchered an unused 3" stainless steel downpipe I had in the garage which was originally intended for my Evo 5, the result was a bend with lambda sensor boss fitted.
Welded it onto the silencer
The two pieces were then welded together to make this exhaust
Bolted to the turbo it looks like this
The engine was taken out of the car again today so I could begin working on the external wastegate pipework, some progress has been made with it but not a lot, i'll have more to show tomorrow.
While the engine was out I cut a hole in the side panel for the exhaust tailpipe.
The hole is a bit on the small side at the moment so the talpipe isn't sitting correctly, it will angle a little more towards the rear of the car when it's finished.
I started work on plumbing the screamer pipe back into the exhaust
Cut the flange off the original screamer pipe and also cut the first bend and rewelded it at a different angle, fitted to the wastegate it looks like this

The next piece was them cut to suit and redirect the pipework back towards the exhaust

Then welded together

And the final piece of the puzzle was fabricated


The finished article
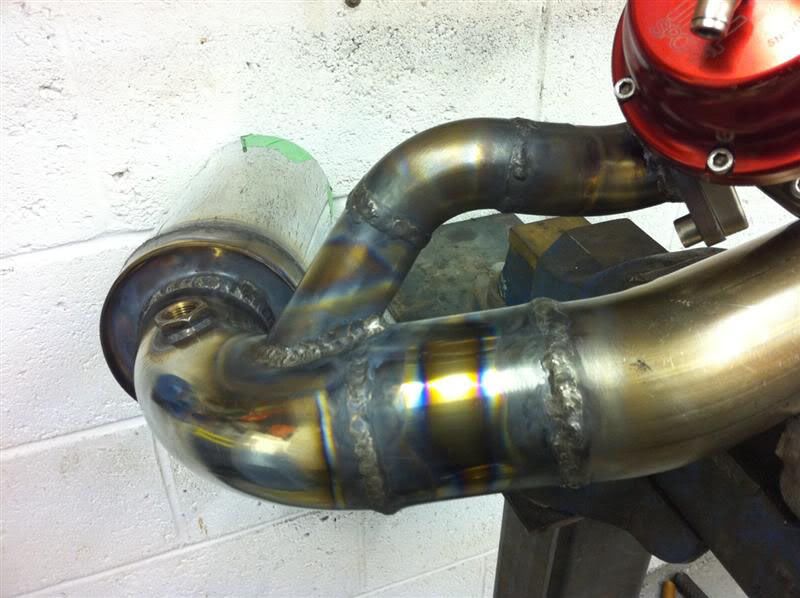

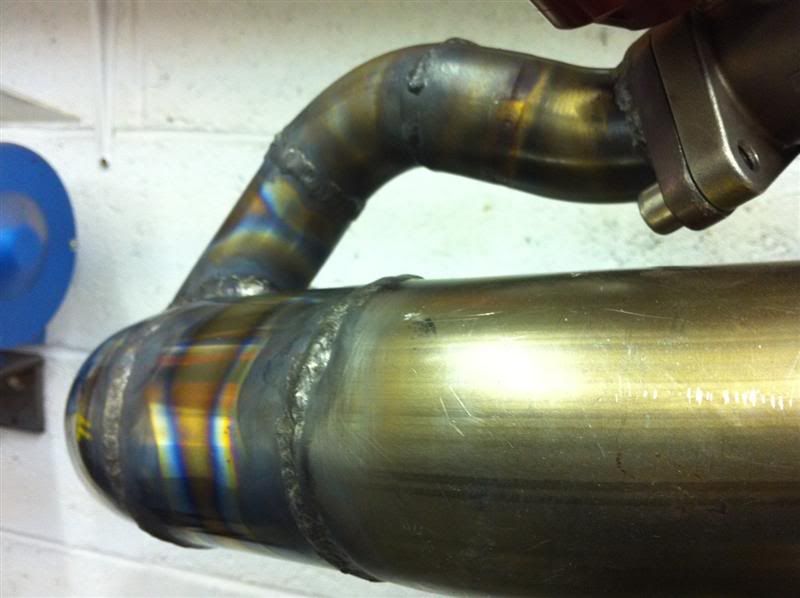

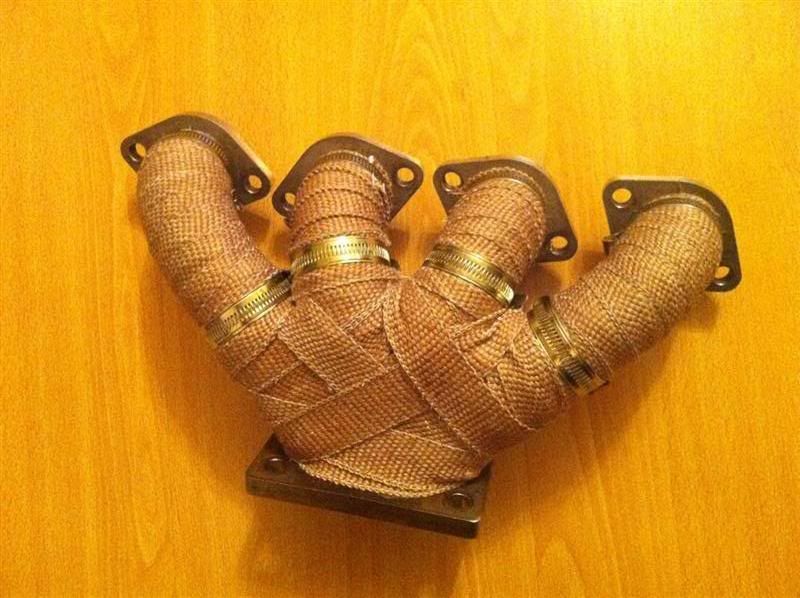
It just needs lagging with some Thermotec exhaust wrap now to help keep the under bonnet temps down.
Cut the flange off the original screamer pipe and also cut the first bend and rewelded it at a different angle, fitted to the wastegate it looks like this
The next piece was them cut to suit and redirect the pipework back towards the exhaust
Then welded together
And the final piece of the puzzle was fabricated
The finished article
It just needs lagging with some Thermotec exhaust wrap now to help keep the under bonnet temps down.
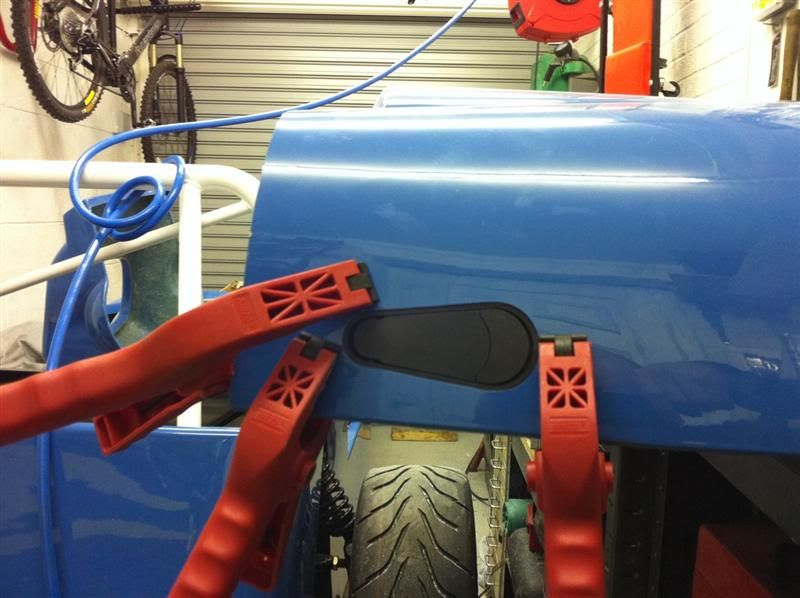
Made a start on the Aerocatch bonnet fixings today.
Marked out their positions
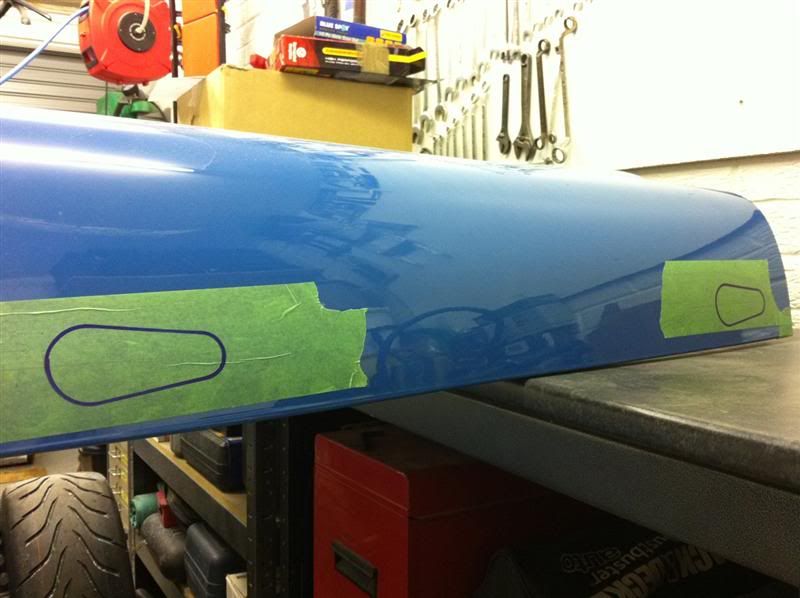
Cut the holes out
Aerocatch clamped into position while the Sikaflex goes off
Front brake lines and reservois fitted to the car
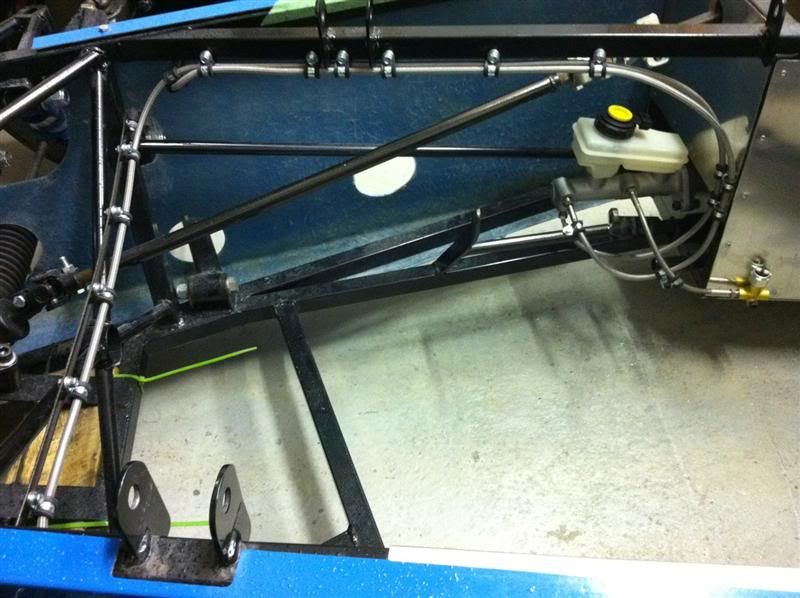
and the rears
Finished off the brake lines by running the last hose down the centre of the car to the rear brake tee piece.
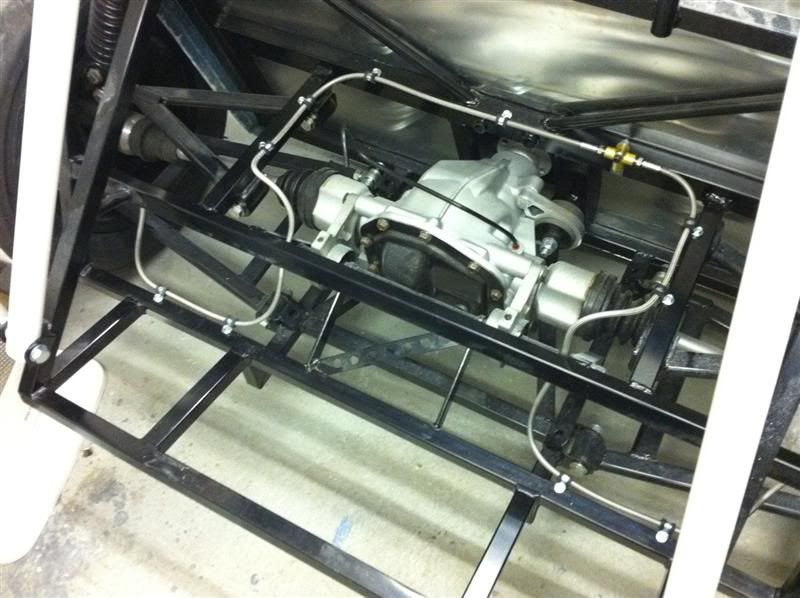
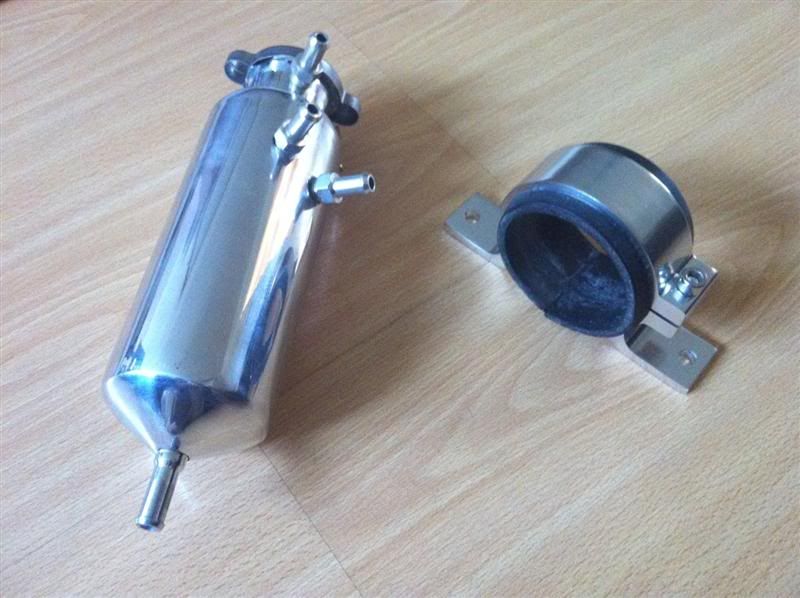
Fitted the fuel level sender and sump pot to the petrol tank

The turbo outlet pipe needs to be modified because the engine cradle is directly in the way, so I set about removing the compressor cover and cutting off the original outlet

A few bits of aluminium pipe were cut to length and they're all ready to be welded

While the turbo was in pieces I took the chance to measure it up

it turns out that it's not actually a GT3071R, because it has a 76.2mm compressor wheel not the 71mm, so it's the slightly larger GT3071/76 turbo
The turbos compressor housing pipework has been welded up today by Arctec Engineering in Sunderland, the cast aluminium compressor cover was pre heated prior to the welding being carried out, then the welds were checked with die penetrant to check for any flaws.

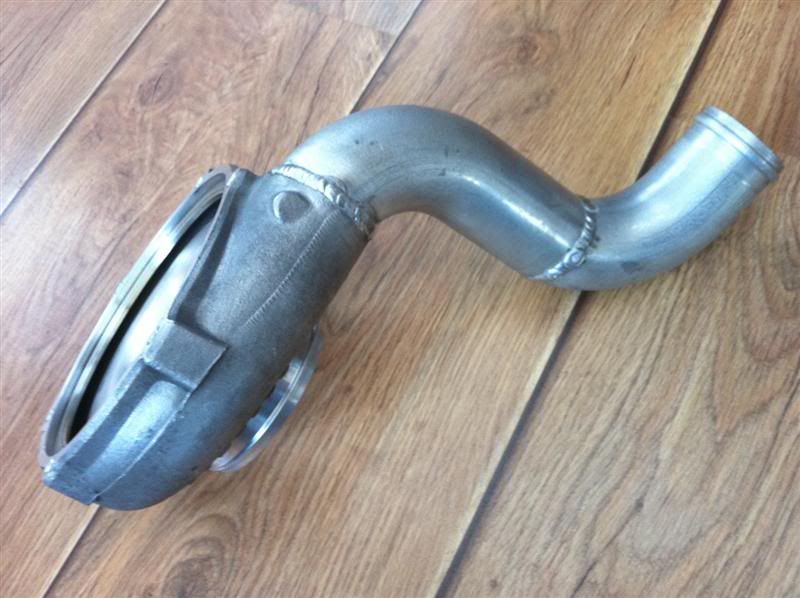
now the chopping/welding is finished the turbo fits, and no longer fouls the engine cradle
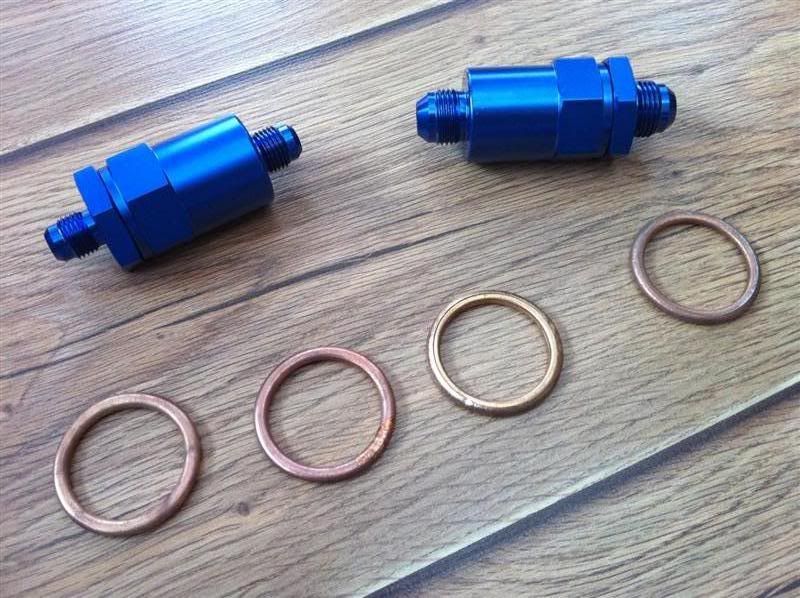
Took delivery of some exhaust manifold gasket rings, a 100 micron fuel filter with AN8 fittings to go between the petrol tank and the 044 pump and a 30 micron fuel filter with AN6 fittings to go between the pump and fuel rail.
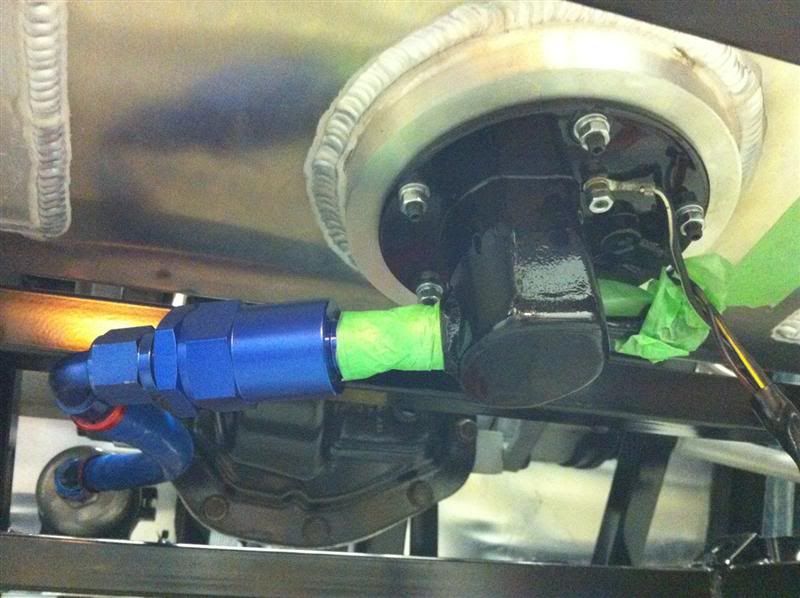
trial mounted the Bosch 044 fuel pump, you'll have to excuse the dust on the chassis, it looks far worse than it actually is
The rubber strip between the chassis and the pump cradle could do with trimming too, to tidy it up a bit.

Here you can see the AN8 (-8) aeroquip hoses and 100 micron fuel filter.
The black sump bolted to the petrol tank is the original ZX10R fuel pump/level sender housing, it has been modified to support an AN8 (-8) feed to the pump and an AN6 (-6) fuel return.
The green masking tape is there to keep dirt out of the fuel lines until this AN8 straight coupler turns up in the post.

Marked out their positions
Cut the holes out
Aerocatch clamped into position while the Sikaflex goes off
Front brake lines and reservois fitted to the car
and the rears
Finished off the brake lines by running the last hose down the centre of the car to the rear brake tee piece.
Fitted the fuel level sender and sump pot to the petrol tank
The turbo outlet pipe needs to be modified because the engine cradle is directly in the way, so I set about removing the compressor cover and cutting off the original outlet
A few bits of aluminium pipe were cut to length and they're all ready to be welded
While the turbo was in pieces I took the chance to measure it up
it turns out that it's not actually a GT3071R, because it has a 76.2mm compressor wheel not the 71mm, so it's the slightly larger GT3071/76 turbo
The turbos compressor housing pipework has been welded up today by Arctec Engineering in Sunderland, the cast aluminium compressor cover was pre heated prior to the welding being carried out, then the welds were checked with die penetrant to check for any flaws.
now the chopping/welding is finished the turbo fits, and no longer fouls the engine cradle
Took delivery of some exhaust manifold gasket rings, a 100 micron fuel filter with AN8 fittings to go between the petrol tank and the 044 pump and a 30 micron fuel filter with AN6 fittings to go between the pump and fuel rail.
trial mounted the Bosch 044 fuel pump, you'll have to excuse the dust on the chassis, it looks far worse than it actually is
The rubber strip between the chassis and the pump cradle could do with trimming too, to tidy it up a bit.
Here you can see the AN8 (-8) aeroquip hoses and 100 micron fuel filter.
The black sump bolted to the petrol tank is the original ZX10R fuel pump/level sender housing, it has been modified to support an AN8 (-8) feed to the pump and an AN6 (-6) fuel return.
The green masking tape is there to keep dirt out of the fuel lines until this AN8 straight coupler turns up in the post.
A small update of some parcels that I have received lately
One 10" radiator fan and mounting kit

Two 50ft rolls of Thermo Tec Exhaust wrap, one 1" and one 2" wide.
Some dowty seals for oil pipe/hose fittings.
An AN6 female-female coupler and m12x1.5-AN6 adaptor for Bosch 044 fuel pump outlet, but unfortunately a m10x1.5-AN6 adaptor has been sent.
And finally 2 white paint markers as I'm tempted to colour the lettering in on the Toyo R888 tyre walls.
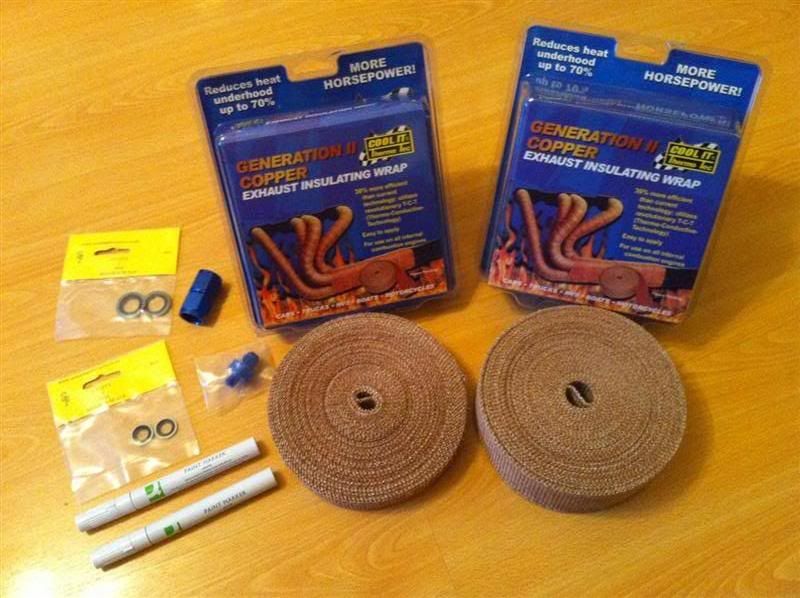
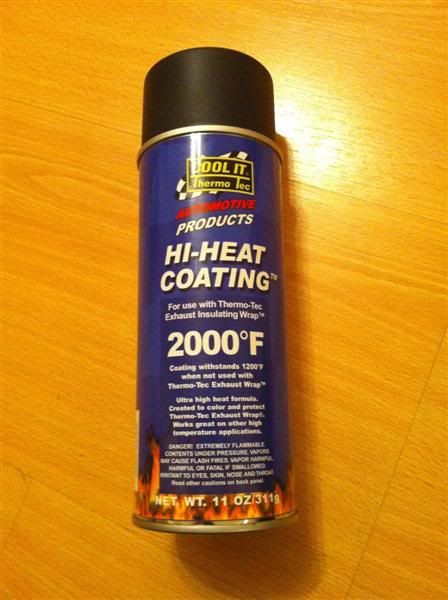
A tin of Thermo Tec High heat Coating to seal the exhaust wrap
I wrapped the exhaust manifold this afternoon. Made a nice job of the headers but the collector was a horrendous shape to wrap neatly It's not perfect but it's as good as I can get, after trying for ages!
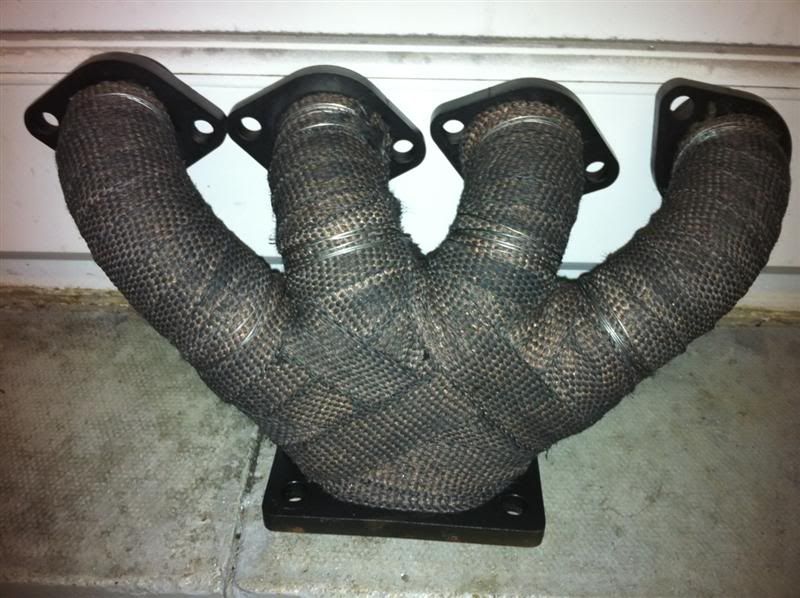
And here's how it's looking after being painted with black Thermo Tec paint/sealant spray.
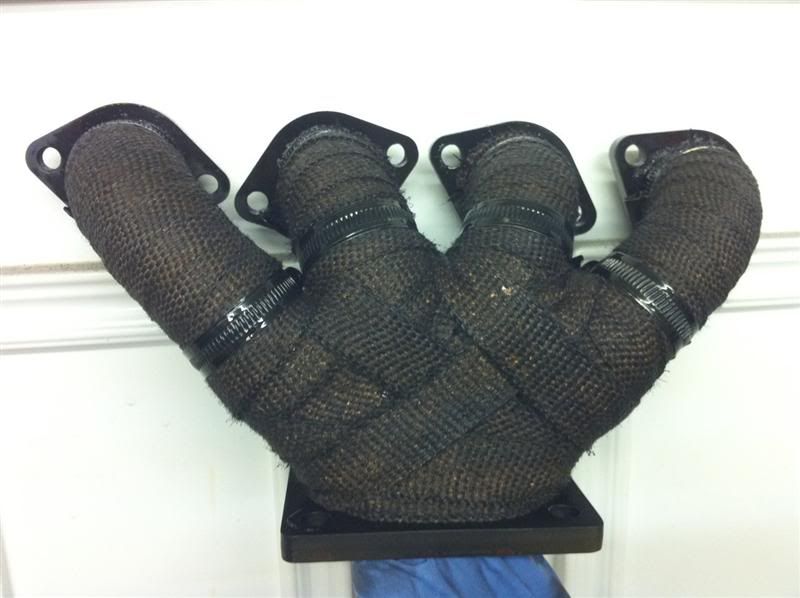
I removed the jubilee clips and lockwired the exhaust wrap onto the manifold before giving it a final coat of paint/sealer, it now looks a lot better i reckon.
Some trim strips to go along the top of the transmission tunnel and either side of the passenger compartment.
They need to be drilled ready for the rivots and then powder coated before being fitted.

One black dash panel
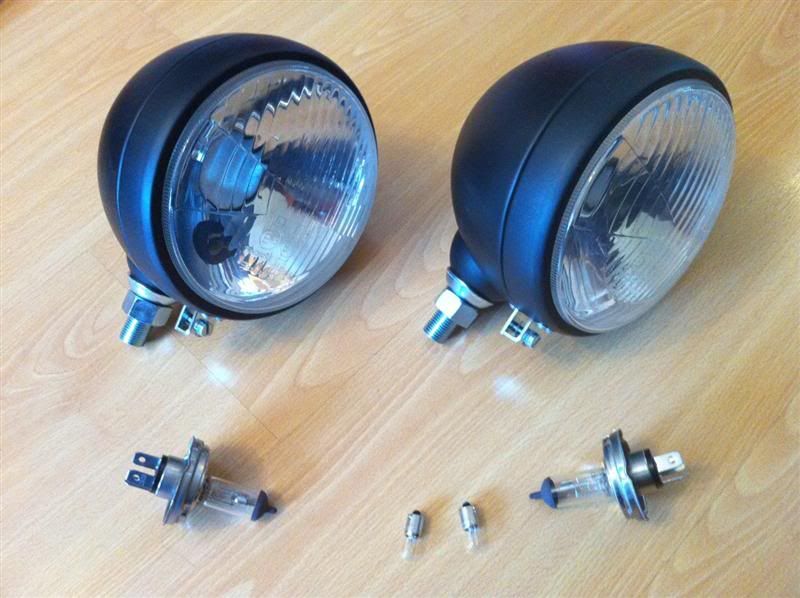
Headlights
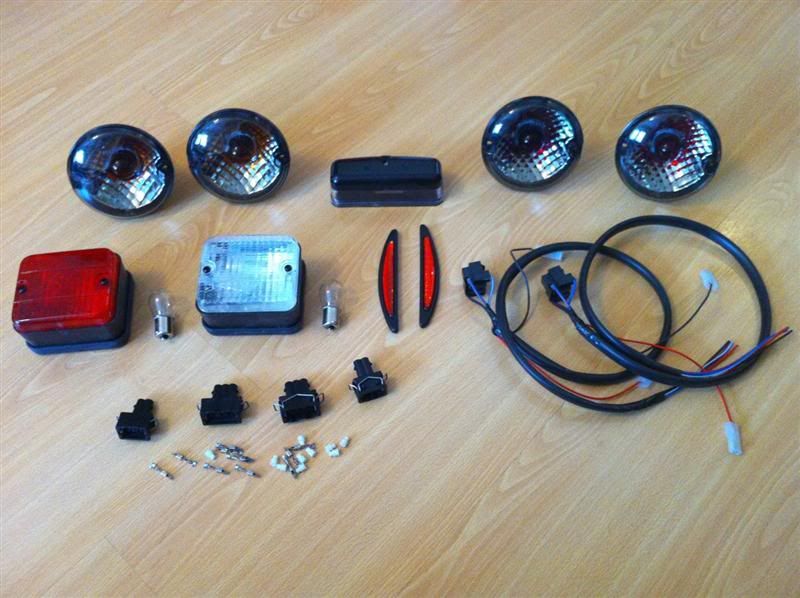
Rear Lights - indicators, stop/tail, number plate, fog, reverse and reflectors
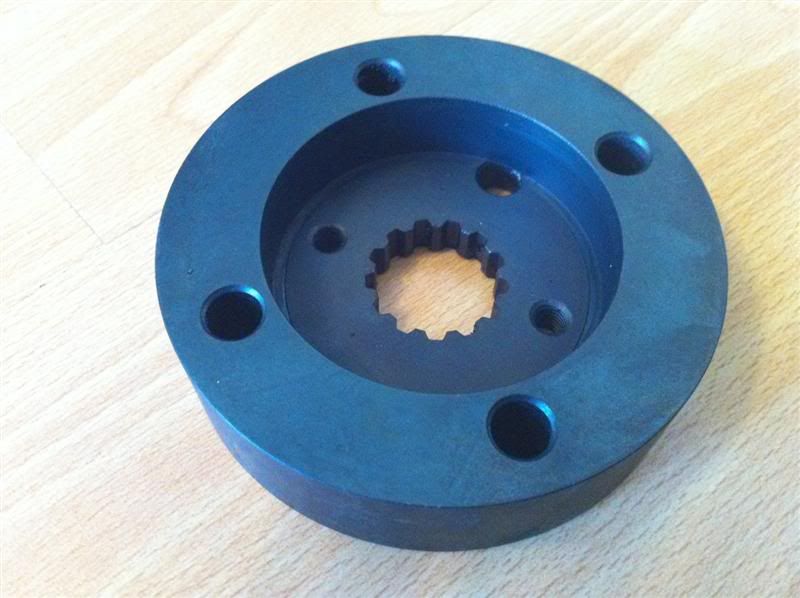
Sprocket adaptor, still waiting on my custom propshaft being delivered
Savage switches - start button, lights and indicator switch.
The rest of the Savage switches are out of stock and will be delivered when they're available.

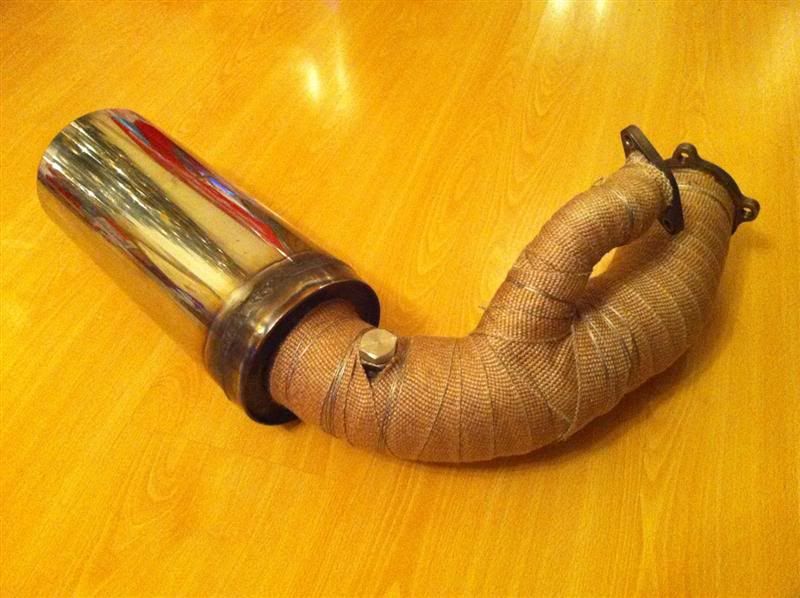
I wrapped the exhaust tonight, but not dont the silencer yet because it needs a bracked welding on to allow it to be bolted to a support bracket.
Shoved the engine back into it's hole again
Been down to Mac#1 this morning with a mate to drop of some parts off to be modified to suit his Mac Type 9R... while we were there I collected some of the switches which were on back order, still waiting on two but I can still progress the dash panel in the mean time.
Once home I went in the garage and welded on the clamp on exhaust fitting to the end of the silencer
then welded a bracket to the end of the silencer to allow it to be supported from above by a rose jointed linkage.

The silencer was then wrapped in Thermo Tec Generation II Copper Heat Wrap
and then given a couple of coats of Thermo Tec High Heat paint.

One 10" radiator fan and mounting kit
Two 50ft rolls of Thermo Tec Exhaust wrap, one 1" and one 2" wide.
Some dowty seals for oil pipe/hose fittings.
An AN6 female-female coupler and m12x1.5-AN6 adaptor for Bosch 044 fuel pump outlet, but unfortunately a m10x1.5-AN6 adaptor has been sent.
And finally 2 white paint markers as I'm tempted to colour the lettering in on the Toyo R888 tyre walls.
A tin of Thermo Tec High heat Coating to seal the exhaust wrap
I wrapped the exhaust manifold this afternoon. Made a nice job of the headers but the collector was a horrendous shape to wrap neatly It's not perfect but it's as good as I can get, after trying for ages!
And here's how it's looking after being painted with black Thermo Tec paint/sealant spray.
I removed the jubilee clips and lockwired the exhaust wrap onto the manifold before giving it a final coat of paint/sealer, it now looks a lot better i reckon.
Some trim strips to go along the top of the transmission tunnel and either side of the passenger compartment.
They need to be drilled ready for the rivots and then powder coated before being fitted.
One black dash panel
Headlights
Rear Lights - indicators, stop/tail, number plate, fog, reverse and reflectors
Sprocket adaptor, still waiting on my custom propshaft being delivered
Savage switches - start button, lights and indicator switch.
The rest of the Savage switches are out of stock and will be delivered when they're available.
I wrapped the exhaust tonight, but not dont the silencer yet because it needs a bracked welding on to allow it to be bolted to a support bracket.
Shoved the engine back into it's hole again
Been down to Mac#1 this morning with a mate to drop of some parts off to be modified to suit his Mac Type 9R... while we were there I collected some of the switches which were on back order, still waiting on two but I can still progress the dash panel in the mean time.
Once home I went in the garage and welded on the clamp on exhaust fitting to the end of the silencer
then welded a bracket to the end of the silencer to allow it to be supported from above by a rose jointed linkage.
The silencer was then wrapped in Thermo Tec Generation II Copper Heat Wrap
and then given a couple of coats of Thermo Tec High Heat paint.
MagicalTrevor - i'm hoping it's going to be quite lairy and smile inducing
Yazza/Toyless - the clutch is how BigCC assembled it, i can only presume the extra nuts are there to be extra weights meaning there is an increase in clamping force on the clutch... i'll have a word with them when i order some Rock oil, oil filter and spark plugs.
Yazza/Toyless - the clutch is how BigCC assembled it, i can only presume the extra nuts are there to be extra weights meaning there is an increase in clamping force on the clutch... i'll have a word with them when i order some Rock oil, oil filter and spark plugs.
I finally got round to bolting the exhaust on with some new gaskets, which allowed me to cut the hole in the side panel for the last time.
This is how it looks with a 3" inwardly rolled tailpipe

But i didn't like it so cut it to have the slash cut look... much better
Here's a shot of the finished exhaust, just waiting on the rose joints being delivered then it will be supported/hung at the end of the silencer.
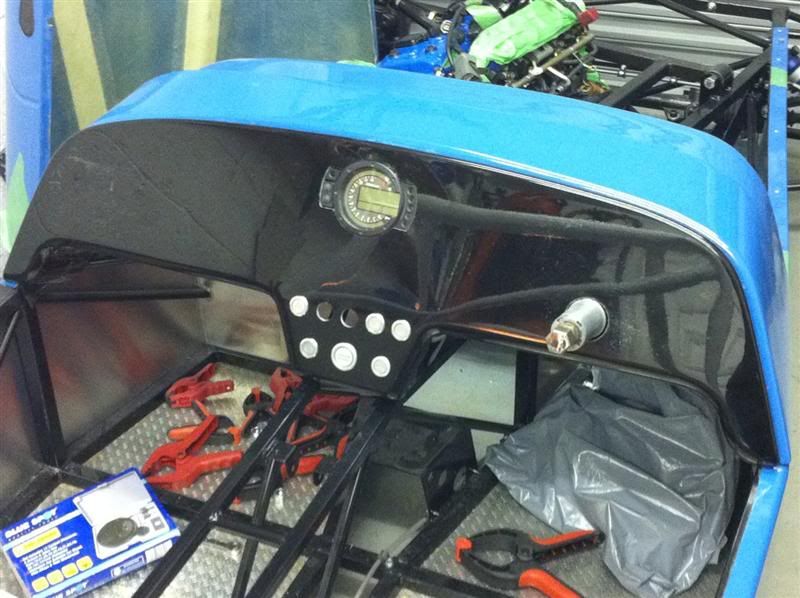
The dash panel rested in position
Hole cut for the steering column

Marked out and cut the holes for the switches, then progressed cutting the hole for the clocks.

Sort of how the finished article will look, after the IVA i'll be adding some guages (boost/oil temp/charge air temp) below the standard instrument cluster.

I'm not happy with the cutting of the dash panel around the clocks, it will need to be addressed in one way or another as it looks poor!
This is how it looks with a 3" inwardly rolled tailpipe
But i didn't like it so cut it to have the slash cut look... much better
Here's a shot of the finished exhaust, just waiting on the rose joints being delivered then it will be supported/hung at the end of the silencer.
The dash panel rested in position
Hole cut for the steering column
Marked out and cut the holes for the switches, then progressed cutting the hole for the clocks.
Sort of how the finished article will look, after the IVA i'll be adding some guages (boost/oil temp/charge air temp) below the standard instrument cluster.
I'm not happy with the cutting of the dash panel around the clocks, it will need to be addressed in one way or another as it looks poor!
I nipped out to the post office to collect this header tank
but it'll be returned as it has got a smaller outlet at the bottom than it is meant to have
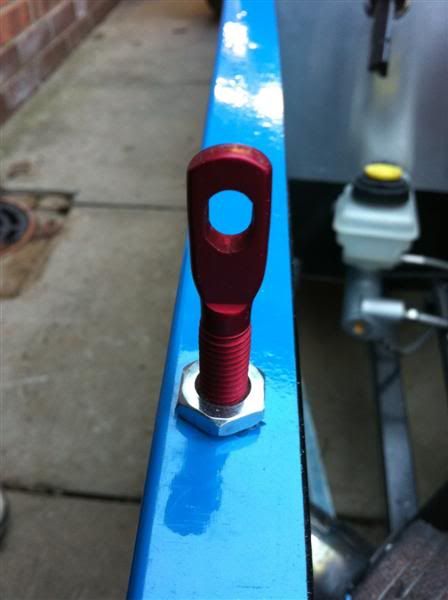
Not done anything on the car today to take photos of, but I have decided where the fuel pressure regulator will be located and then measured up and ordered the braided lines and fittings to have it all piped up.
Hopefully it'll not be long until it's wired up and running
but it'll be returned as it has got a smaller outlet at the bottom than it is meant to have
Not done anything on the car today to take photos of, but I have decided where the fuel pressure regulator will be located and then measured up and ordered the braided lines and fittings to have it all piped up.
Hopefully it'll not be long until it's wired up and running
This afternoon I had another look at the dash, it was decided that it definitely needed some remedial work because it looked hideous! as you can see below
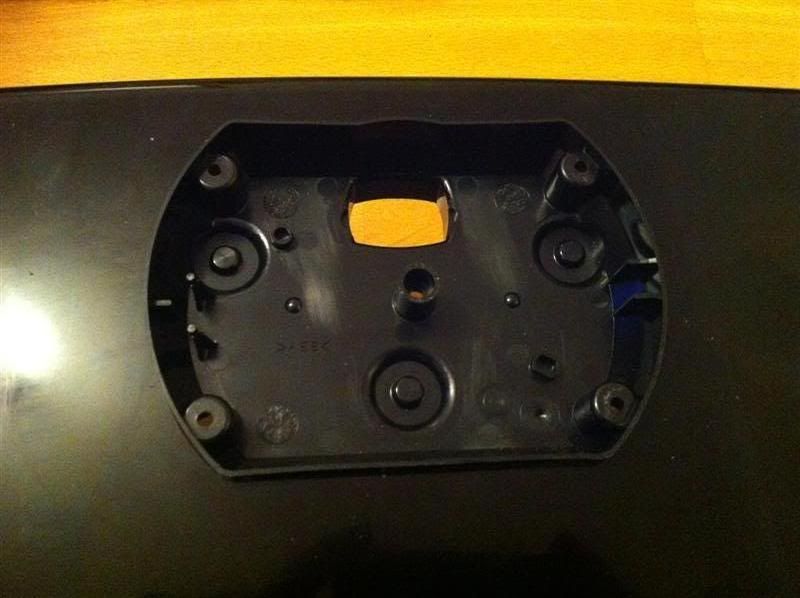
So I dismantled the clocks, then marked out and cut the new orifice into the dash

The rear of the clocks fits through the dash from behind like so
and when assembled the clocks look like this
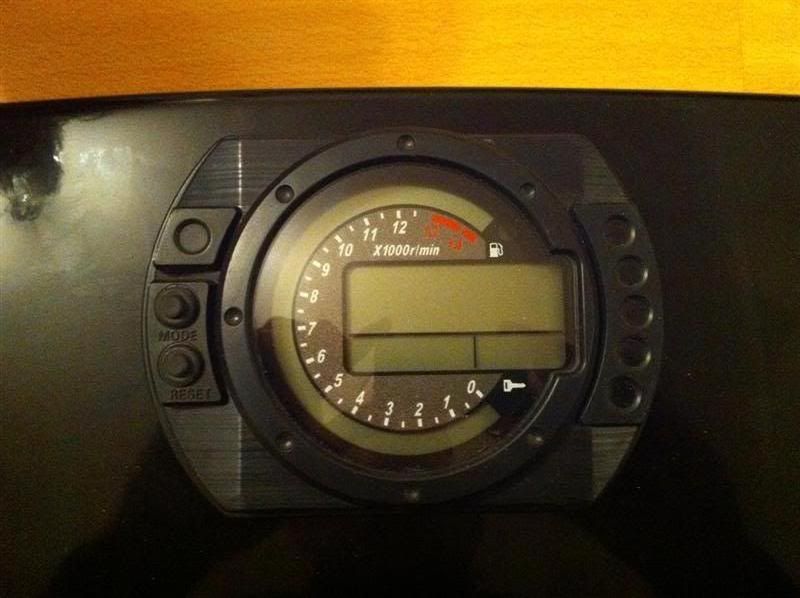
It definitely would have looked better with the speedo face flush with the dash panel as per the previous way if the cutting had been neat but this way looks much better than the previous with untidy cutting. I may redo the dash at a later date.

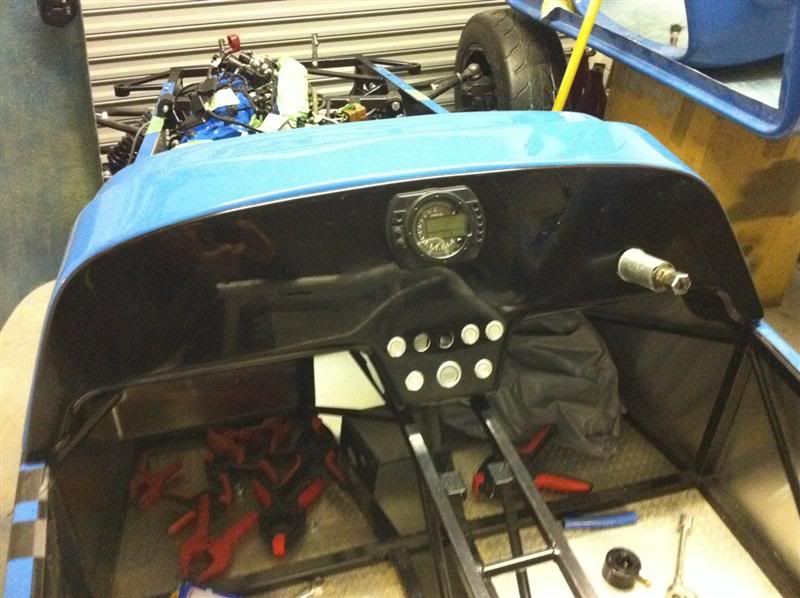
The semi complete dash back on the car
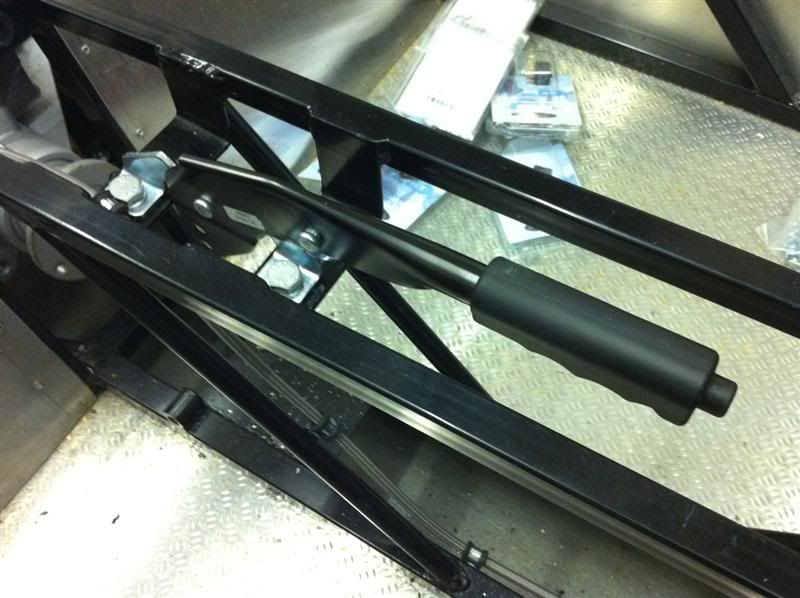
Handbrake lever fitted
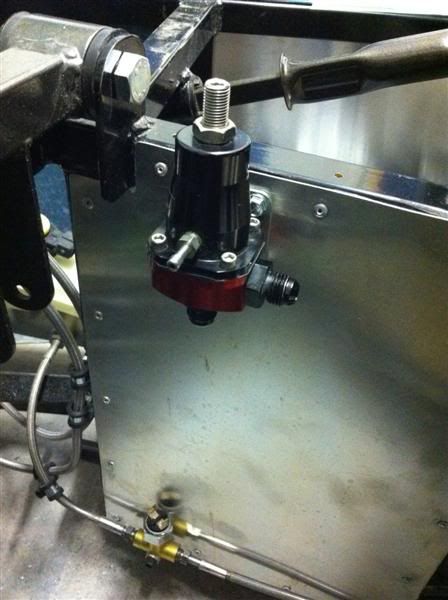
Aeromotive fuel pressure regulator mounted, waiting for the fuel lines to be delivered.
So I dismantled the clocks, then marked out and cut the new orifice into the dash
The rear of the clocks fits through the dash from behind like so
and when assembled the clocks look like this
It definitely would have looked better with the speedo face flush with the dash panel as per the previous way if the cutting had been neat but this way looks much better than the previous with untidy cutting. I may redo the dash at a later date.
The semi complete dash back on the car
Handbrake lever fitted
Aeromotive fuel pressure regulator mounted, waiting for the fuel lines to be delivered.
jason61c said:
Nice work again
How do you find the aerocatch? Have you pics of how you've mounted the locating pins?
Thanks Jason How do you find the aerocatch? Have you pics of how you've mounted the locating pins?
Not sure on the Aerocatches yet as I haven't actually got round to fitting the pins, i'll update you when I do
 They do look nice fitted to the bonnet though, a big improvement over the usual style bonnet pins in my opinion.
Thanks for the replies lads a magazine feature is a lovely thought
No offence taken, the main reasoning behind using the bike clocks was price, all the dash clocks i would actually use (AIM, Stack, Racetech) are priced around £1000, which i dont have, or at least i havent if i want the car on the road in May.
The other reasoning is the benefit of the standard clocks displaying Kawasaki fault codes, which could be very beneficial when getting everything running and working correctly.
a magazine feature is a lovely thought No offence taken, the main reasoning behind using the bike clocks was price, all the dash clocks i would actually use (AIM, Stack, Racetech) are priced around £1000, which i dont have, or at least i havent if i want the car on the road in May.
The other reasoning is the benefit of the standard clocks displaying Kawasaki fault codes, which could be very beneficial when getting everything running and working correctly.

Mabbx said:
Have been following this one for a while. Very very nice build and attention to detail. Any idea on BHP/ton you are likley to achieve ?
Thanks The car should weigh in at around 450kg, the engine was running on a bike with no intercooler making 303bhp @12psi, so that would equate to 673bhp/tonne, i would imagine it'll make a litte bit more than that with the intercooler it now has. Will find out for sure when it's been on the r/r after IVA.
It's been a bit of an ambition since beginning the build to have 1000bhp/tonne, which i honestly dont think i would need but it's certainly an achievable goal, if the boost was wound up a bit. The engine has switchable high/low boost settings, so i'll have the choice of one sensible and one lairy setup.
Cant wait to drive it!

Gassing Station | Kit Cars | Top of Page | What's New | My Stuff