Restoring TVR Vixen S3 RDO I 06J
Discussion


Hello,
I do not get many reactions/advices on behave on the interior.
But try again for information on the wiring of the interior light and reversing/reg.plate light.
I have the right colored wires to the lights but do not know how to connect.
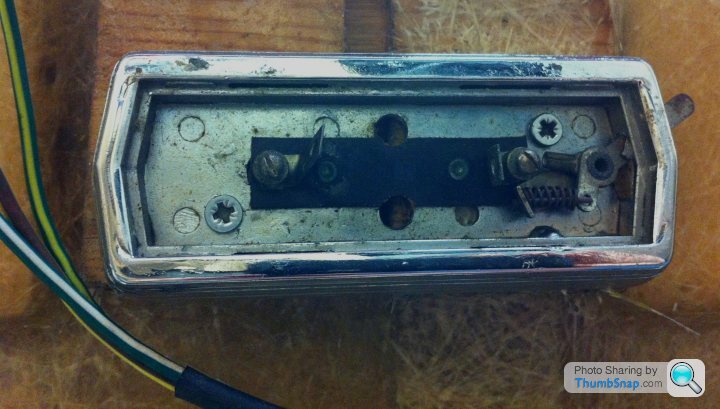
The reversing light has a connector for the bigger bulb being the reverse light so .
Internal the 2 smaller bulbs for reg. plate lights are connected to each other.
Now the question where to connect earthing GB wire and feed R wire.
And interior light has GY and GW and NY wires. But where to connect to?.
Should all be easy.
I do not get many reactions/advices on behave on the interior.
But try again for information on the wiring of the interior light and reversing/reg.plate light.
I have the right colored wires to the lights but do not know how to connect.
The reversing light has a connector for the bigger bulb being the reverse light so .
Internal the 2 smaller bulbs for reg. plate lights are connected to each other.
Now the question where to connect earthing GB wire and feed R wire.
And interior light has GY and GW and NY wires. But where to connect to?.
Should all be easy.
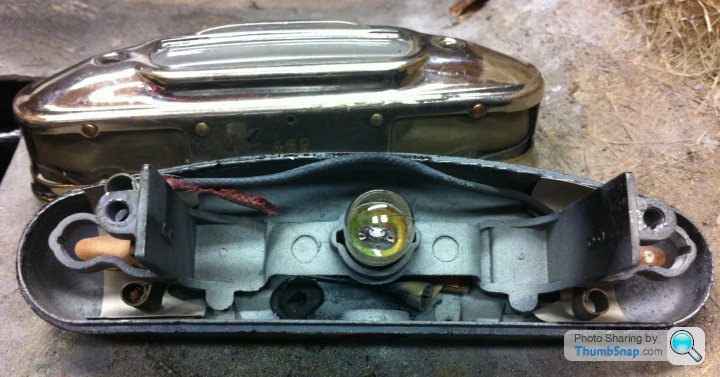
Oke I did not get any reaction on my request for info for the lights but got them working after some fiddling.
At this moment the major works is the interior.
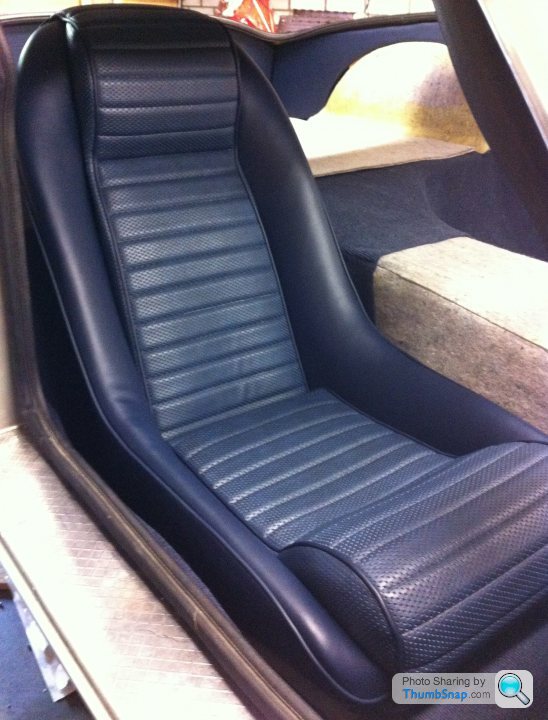
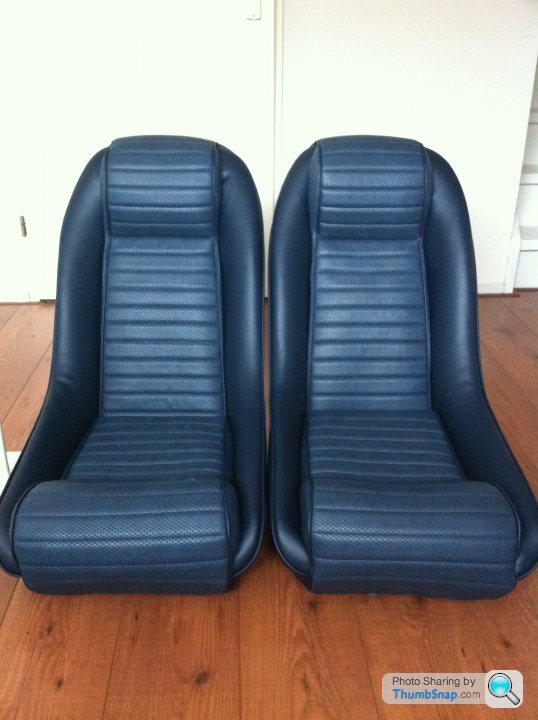
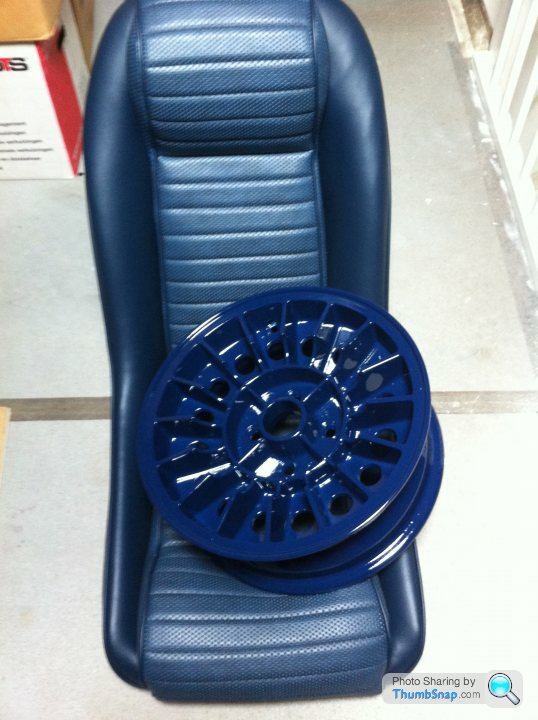
Chose the color blue i stead of the traditional black.
The seats are back from the upholsterer and looks great.
Doing all the interior works my self it takes a lot of time searching the right details and technical solutions.
Pics of the interiors on PH helps. Also the youtube film of Paul Custom.
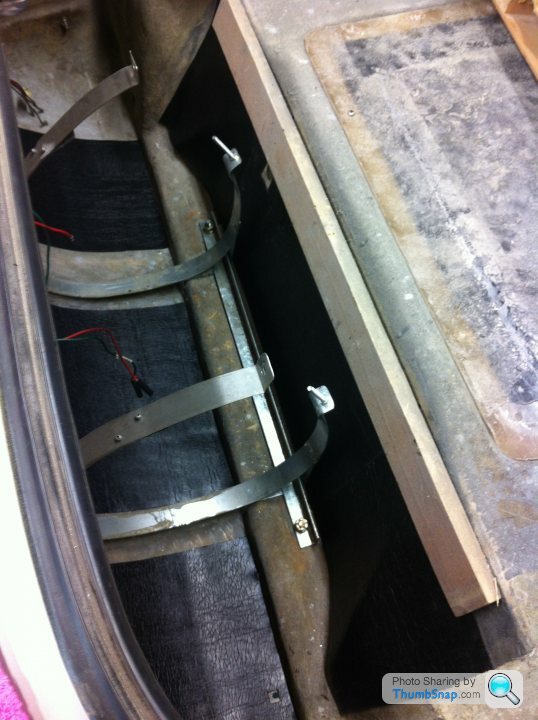
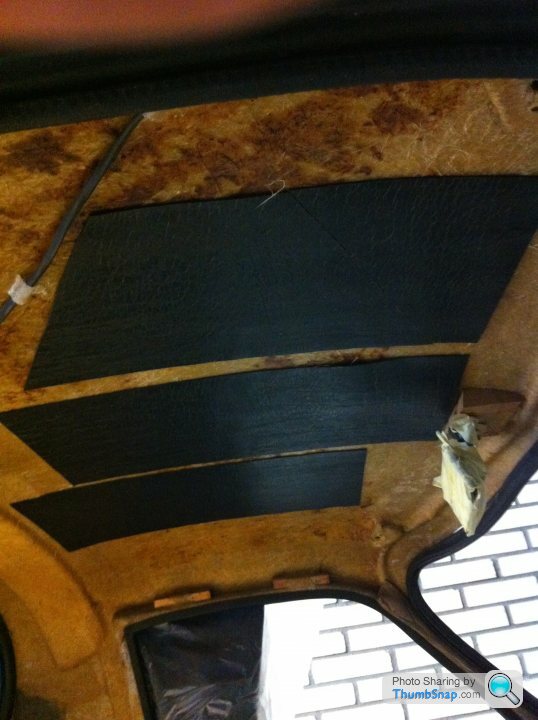
For the ceiling a lot of cutting in situ is required. But a wrong cut can not be rectified
First trial fitting made clear that the both is oversized so trimming can start.
I chose a grey color.
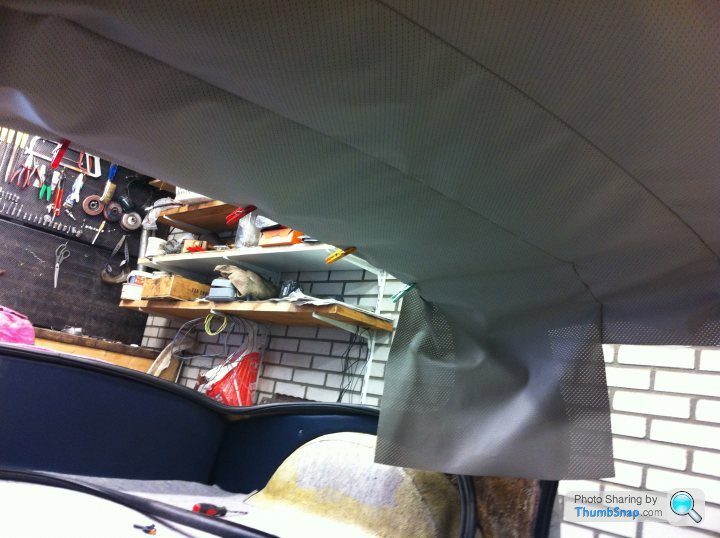
Under the ceiling I have glued anti-reading plates to the body. I also did that in the petrol tank area and in the doors.
I see the end of the restoration tunnel but do not know when .
Hans

Hi Hans,
Just keep on going its worth it in the end.
A blue interior will be interesting, what colour is the exterior going to be?
From personal experience I wouldnt put "anti-reading" matting on the ceiling, sometime in the future I,m sure you will find they have come unstuck and dropped onto the roof lining spoiling your hard work. It gets very hot on the roof and interior in summer sunlight.
Just my opinion,
Andy
Hi Andy,
Thanx for your reaction.
Outside the car is a new fresh coat of Silver Fox, so blue is a nice contrast.
Your remaks on the ceiling I do understand. The standard glued plate fall from the ceiling already so I use another "better" glue.
But are now hesitating on this!!!
Another decision to be made.
I think (not too long) I go for the save side.
Hans
smithy63 said:
Hi Hans,
Just keep on going its worth it in the end.
A blue interior will be interesting, what colour is the exterior going to be?
From personal experience I wouldnt put "anti-reading" matting on the ceiling, sometime in the future I,m sure you will find they have come unstuck and dropped onto the roof lining spoiling your hard work. It gets very hot on the roof and interior in summer sunlight.
Just my opinion,
Andy
Just keep on going its worth it in the end.
A blue interior will be interesting, what colour is the exterior going to be?
From personal experience I wouldnt put "anti-reading" matting on the ceiling, sometime in the future I,m sure you will find they have come unstuck and dropped onto the roof lining spoiling your hard work. It gets very hot on the roof and interior in summer sunlight.
Just my opinion,
Andy
Hansoplast said:
Hi Andy,
Thanx for your reaction.
Outside the car is a new fresh coat of Silver Fox, so blue is a nice contrast.
Your remaks on the ceiling I do understand. The standard glued plate fall from the ceiling already so I use another "better" glue.
But are now hesitating on this!!!
Another decision to be made.
I think (not too long) I go for the save side.
Hans
If you want to keep them in place then either fibreglass them in place or use PU7 polyurethane seam sealant material and finger it on over the mat and the existing fibreglass roof ..Thanx for your reaction.
Outside the car is a new fresh coat of Silver Fox, so blue is a nice contrast.
Your remaks on the ceiling I do understand. The standard glued plate fall from the ceiling already so I use another "better" glue.
But are now hesitating on this!!!
Another decision to be made.
I think (not too long) I go for the save side.
Hans
smithy63 said:
Hi Hans,
Just keep on going its worth it in the end.
A blue interior will be interesting, what colour is the exterior going to be?
From personal experience I wouldnt put "anti-reading" matting on the ceiling, sometime in the future I,m sure you will find they have come unstuck and dropped onto the roof lining spoiling your hard work. It gets very hot on the roof and interior in summer sunlight.
Just my opinion,
Andy
Just keep on going its worth it in the end.
A blue interior will be interesting, what colour is the exterior going to be?
From personal experience I wouldnt put "anti-reading" matting on the ceiling, sometime in the future I,m sure you will find they have come unstuck and dropped onto the roof lining spoiling your hard work. It gets very hot on the roof and interior in summer sunlight.
Just my opinion,
Andy
if you don't THEY WILL EVENTUALLY COME OFF.
N.
Hi Moto,
It's original Volvo type of vinyl. At least that's how the supplier called it.
Happy we found this.
In the flesh it looks even better bleu(ish).
All the other final has nearly the same color.
Hans
It's original Volvo type of vinyl. At least that's how the supplier called it.
Happy we found this.
In the flesh it looks even better bleu(ish).
All the other final has nearly the same color.
Hans
Moto said:
Hans, those seats look fab. And great to see the original weave look vinyl being used.
Moto
Moto


Adrian,
I think the previous owner made them to fit.
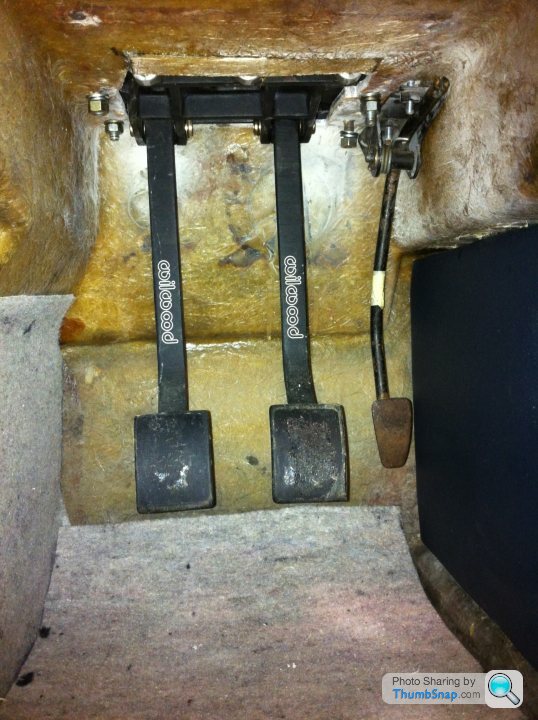
After some fiddling on pivot points and locks (2 or 3 days) I got the front sitting well and opening /closing perfect.
Have to do it again after shifting the locks because of pedal box. Hopes it does not take that long again.
But if I want the correct smaller item, from what source are they?
Hans
I think the previous owner made them to fit.
After some fiddling on pivot points and locks (2 or 3 days) I got the front sitting well and opening /closing perfect.
Have to do it again after shifting the locks because of pedal box. Hopes it does not take that long again.
But if I want the correct smaller item, from what source are they?
Hans
After house move ( 2 in a year) and building a new garage, I restarted working on the Vixen.
Cleaned and polished the door frames.
Took the quarter glass out for new rubbers. Lot of debris come out.
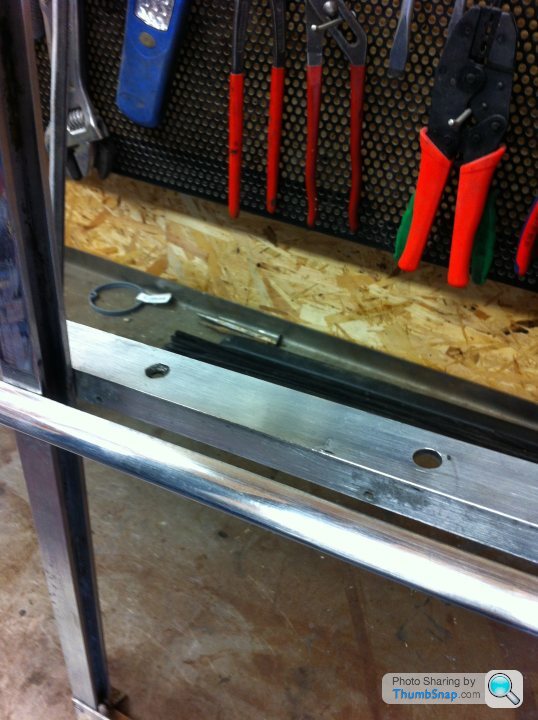
For the sliding window I want to put a weather/water stop profile on the outside of the horizontal bar that rests on the door skin.
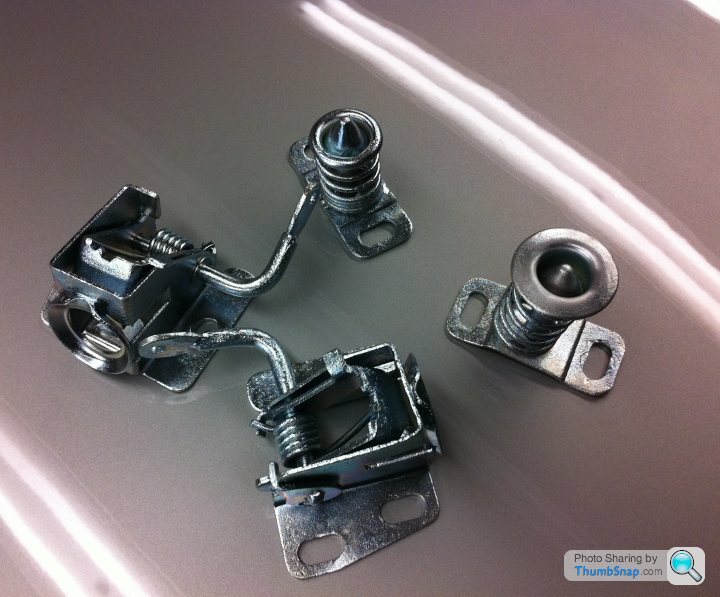
In this profile there are 4 holes for fixing the the profile I assume. (picture 2)
But on the inside horizontale bar, to which the capping will be fixed, there are 2 holes positions to the front. (picture 1)
I made some pics to make it more clear.
Any help for the detailing here? Pictures when possible would be fine.
Hans.

Cleaned and polished the door frames.
Took the quarter glass out for new rubbers. Lot of debris come out.
For the sliding window I want to put a weather/water stop profile on the outside of the horizontal bar that rests on the door skin.
In this profile there are 4 holes for fixing the the profile I assume. (picture 2)
But on the inside horizontale bar, to which the capping will be fixed, there are 2 holes positions to the front. (picture 1)
I made some pics to make it more clear.
Any help for the detailing here? Pictures when possible would be fine.
Hans.
Gassing Station | TVR Classics | Top of Page | What's New | My Stuff