Discussion


Yeah I was confident the chassis was in good condition but you never know. The runs in the paint all run in the same direction so this would indicate it has been tilted and the chassis painted with the body on. The coating which was hidden by the body and covered in grime, which the paint is running over, is of a different texture and finish. Looks to have been done by a professional.
Question is, do I leave it as is, just clean up and correct rust or take the paint back as far as I can then re coat? . . Or even go whole hog and strip chassis to be powder coated and new bush's (bushes?) fitted?
Question is, do I leave it as is, just clean up and correct rust or take the paint back as far as I can then re coat? . . Or even go whole hog and strip chassis to be powder coated and new bush's (bushes?) fitted?
So after some thought I will go down the route of doing the chassis as well. This will undoubtedly extend the build time. I should get the chance to speak to RT Racing tomorrow regards how best to do this.
As I understand the zinc primer and powder coat, it is the zinc primer which provides the anti corrosion. With the epoxy primer, this adheres to the metal and flexes with it better, is it this fact which provides the corrosion defence and no chemical action in the mix?
I have also thought of galvanising and I have read a few threads on here and a few other write ups. The need for holes to be drilled, then filled, the chance of distortion and the difficulty welding galvanised metal. I haven't looked much in to cost, but if this is proven to be the best, then logically it makes sense to get this done. What puts me off is the lack of others doing it, there must be reasons?
Spoke to RT Racing today and the chassis will go in for a powder coat. Hoping to hit this target around end of March, complete change of game plan doing chassis as well, not just with the work load but logistically too.
One thing I was going to ask once the chassis is powder coated a full new set of bushes will be needed, are these readily available and easy to fit or would I be best off getting them sent to RT and have them fit? (Reason I ask is when I replaced bushes on Chim wishbones I could use a bench vice and press, this would not be possible with the chassis)
One thing I was going to ask once the chassis is powder coated a full new set of bushes will be needed, are these readily available and easy to fit or would I be best off getting them sent to RT and have them fit? (Reason I ask is when I replaced bushes on Chim wishbones I could use a bench vice and press, this would not be possible with the chassis)
There are no bushes located in the chassis all the bushes are in the wishbones shocks etc same as your old chimaera. Adrian does a full set of bushes and bolts. The bushes are easy to fit though it can be hard work removing the old ones. Are you having the wishbones done at the same time? If not and your bushes are ok then no need to replace them.The hardest one to do is the rear lower as you need to remove the pivot pin from the rear upright. This is a real pain in the a$$ as it is a steel pin in an aluminium housing and will be solid.
Chris
Chris
The bushes is std TR6 front lower bushes, http://www.ebay.co.uk/itm/TRIUMPH-TR4A-TR5-TR250-T...
16 pcs needed, and very easy to fit. Use some liquid soap and 2 socket wrench that have the right size, and press them with the wise.
And correct, the 2 steel rods in the rear uprights are a pain, I hav to cut mine to the the wishbone out, and drill the 1/2" rods with a 10mm drill, and used the firewrench to get them out.
New rods are easy to make from 1/2" steel.
chris52 said:
There are no bushes located in the chassis all the bushes are in the wishbones shocks etc same as your old chimaera.
Well that bit of passed on knowledge has made my day! eliminates a few worries 
Yes I am getting wishbones done too. From the eBay link I can see the bushes are rubber so I don't think these will cause me much concern removing. As for the rod in the uprights, I may have to pass that one on to RT. The plan is to strip as much from chassis that I am capable over the next two month, I have possibly 3 weekends worth of working time before I get it to RT and it will be handed over in what ever condition I have managed to achieve in that time. Fingers crossed everything flows fluently and the chassis is as bare as possible when I hand it over.
Would the diff separate from the chassis still housed in its carrier?
Both diffs come out once the frame are removed, Jaguar 4HU car frames have MK1 and MK2 versions and MK1's need up-rating or the frame flexes (see that TVR M complains about the diff coming loose in his race car all the time is his posts)..TR6 diff frame requires gusseting around the box sections to stop the differential from breaking out of the car.
Adrian@
Adrian@
Adrian@ said:
Both diffs come out once the frame are removed, Jaguar 4HU car frames have MK1 and MK2 versions and MK1's need up-rating or the frame flexes (see that TVR M complains about the diff coming loose in his race car all the time is his posts)..TR6 diff frame requires gusseting around the box sections to stop the differential from breaking out of the car.
Adrian@
I feel like I real moaning mini now Adrain ....Thanks Adrian@

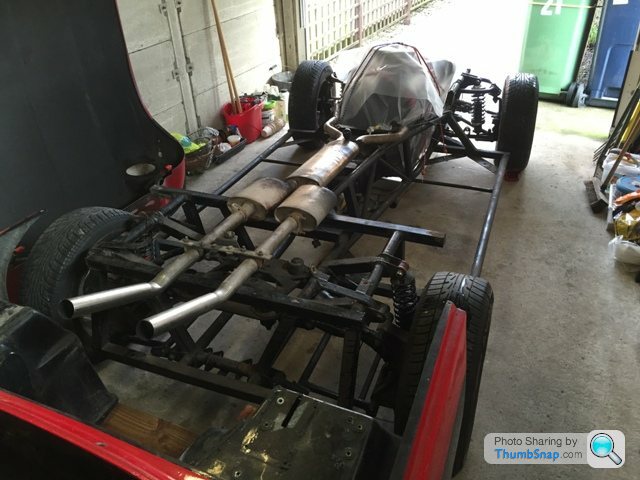
I removed fuel lines, brake piping, front callipers and separated the exhaust from the manifolds today. I will carry on with the front corners tomorrow, hopefully removing discs and anti roll bar.
I had a quick look at the diff as I had previously thought this would come out from the bottom, but to my surprise this looks as though it needs to be lifted out upwards? If I was to undo prop shaft and drive shafts from the diff ends, then undo diff carrier from chassis, this would lift away and be correct procedure?
How do I know if I have the mk1 or mk2 frame? The car is a '79 so towards end of run but I have learned not to presume anything with TVR.
Your method for removing the diff sounds about right to me As yours is the Salisbury one. I'm pretty sure I also removed the frame leaving the diff laying loose on the bottom rails just make it a little lighter to lift.
I'm sure that yours is the later chassis looking at the pictures.
Chris
I'm sure that yours is the later chassis looking at the pictures.
Chris
DAKOTAstorm said:

Stuck with this nut! Tried handbrake on so shaft can't spin and it didn't budge, removed drum but then it can spin freely. Is it just a stiff nut or am I missing a trick?
The drum slides off the wheel studs to expose the entire hub. The entire hub comes of the upright via 6 bolts.The Hub should only be dismantled by someone who knows what they are doing.
N.
DAKOTAstorm said:

Ok I can see that now with the drum off! Close call that one, the blow torch nearly made an appearance!
Thank you for very quick response.
They aren't handed but do not mix them up.
http://www.obsoleteauto.com/flyers/april_2010_2012...
N.
Edited by Dollyman1850 on Sunday 25th January 13:49
DAKOTAstorm said:
I removed fuel lines, brake piping, front callipers and separated the exhaust from the manifolds today. I will carry on with the front corners tomorrow, hopefully removing discs and anti roll bar.
I had a quick look at the diff as I had previously thought this would come out from the bottom, but to my surprise this looks as though it needs to be lifted out upwards? If I was to undo prop shaft and drive shafts from the diff ends, then undo diff carrier from chassis, this would lift away and be correct procedure?
How do I know if I have the mk1 or mk2 frame? The car is a '79 so towards end of run but I have learned not to presume anything with TVR.
Removing the diff goes like this;I had a quick look at the diff as I had previously thought this would come out from the bottom, but to my surprise this looks as though it needs to be lifted out upwards? If I was to undo prop shaft and drive shafts from the diff ends, then undo diff carrier from chassis, this would lift away and be correct procedure?
How do I know if I have the mk1 or mk2 frame? The car is a '79 so towards end of run but I have learned not to presume anything with TVR.
After prop and drive-shafts have been removed,
Loosen the bolts of the lower brackets, take the rear ones out, you cannot take the front ones out (iirc) take out the bolts of the bushes
Support the diff on a jack, loosen (.....) and take out the bolts from the top carrier, lower the diff onto the lower chassis members, take off the lower brackets.
Take out the bushed bolts of the carrier, taken out the carrier, from the top
Then take the diff out, also from the top (and be prepared, its heavy......)
The bushes of the suspension throughout can be drilled out (16 mm drill) they have a metal core
Installation of bushes, put wishbones and bush only (w/o metal core)in a vice, apply provided grease and slowly turn in (this might require some practice, but once you get the hang of it....)
have fun !
Frank
Edited by bluezeeland on Sunday 25th January 17:31
Edited by bluezeeland on Sunday 25th January 17:32
Ahead of schedule due to a long weekend and a helping hand from my father, the chassis is now ready to be sent! Used the advice given to remove the diff and only problem which had us stumped for a short while was when the diff was released from carrier and to be lowered on jack, it fell forwards and towards prop shaft becoming jammed between that and the carrier, so would not fall on to chassis rail. Attempted jiggling things about and supporting different areas of Diff to try and guide its fall, but problem was solved with a swift blow to nudge it beyond shaft.
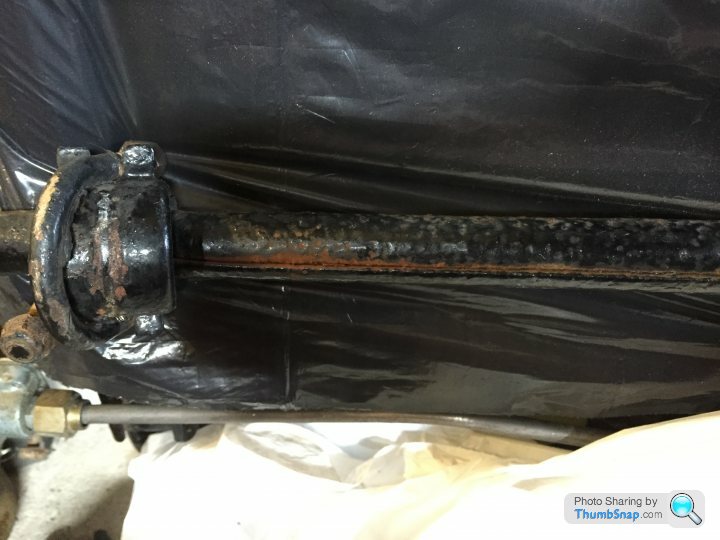
Few issues I am uncertain of, the anti roll bar has a split running the length of the straight edge, although this has started to run to bends. It looks neat and straight, I am almost convinced its machine cut, but just don't know. Is it faulty or correct? Apologies for bad photos, remembered last min after packing up.
Also when I purchased car I had it along to David Geralds for inspection and they noticed clutch was heavy and most likely incorrect part. I've had a browse through Burton Power but none the wiser as to clutch weights or which to go for. Is there a light weight clutch to ease the pedal effort or will the fitment of a basic standard clutch reduce this to slightly above comfortable?
Gassing Station | TVR Classics | Top of Page | What's New | My Stuff