2 Door Range Rover project
Discussion


Incidentally, the 72 had its maiden outing this afternoon. Few laps of the village to test everything. Nothing immediately caught fire. Engine temps got a bit high and I suspect the viscous fan isn’t working. There’s also a light mechanical clonk in the drivetrain when lifting off the power. Up on the ramp tomorrow to check out the niggles.
NomduJour said:
RobXjcoupe said:
I could make some up, do you have any sizes or just a picture?
Thank you, that’s very kind - think I’ve found some; was hoping to buy the lot rather than drilling bar for the spacers etc. Nowhere can source the bits separately, it seems. Attention has turned, in my spare time over the last week, to some of the finer details of the interior trim. The dash components never fitted together particularly well at the best of times and covering all the parts in exceptionally thick leather has not made that any better and in some places quite the opposite.
A case in point is where the upper dash meets the lower dash section on the driver's side. On the passenger side, LR made a plastic fillet that fudged the gap between the early upper dash design and the aircon undertray that appeared in the early 80s as well as a fudge plate on the end of the wooden dash trim that held the vents. On the driver's side there is no such set up apart from a small plastic slither plate that was inserted on some cars to bridge a gap that sometimes occurred between the upper and lower sections.
You can see this filet piece fitted here!

Not exactly a pretty sight. A combination of the main components never fitting together particularly well in the first instance, compounded by the thick leather. After several hours it became clear the only real solution was going to be to cover the filet piece in leather and use that to 'soak up' as much of the discrepancy as possible:

The painting of the rear light clusters didn't deliver any tremendous results. The gold spray that I have gives a perfect mirror finish but the same paint in silver or chrome just doesn't. I've decided to just leave as is as the third brake light does the best job of warning other drivers and I've put the plastic reflectors into the fog lamps.

A case in point is where the upper dash meets the lower dash section on the driver's side. On the passenger side, LR made a plastic fillet that fudged the gap between the early upper dash design and the aircon undertray that appeared in the early 80s as well as a fudge plate on the end of the wooden dash trim that held the vents. On the driver's side there is no such set up apart from a small plastic slither plate that was inserted on some cars to bridge a gap that sometimes occurred between the upper and lower sections.
You can see this filet piece fitted here!
Not exactly a pretty sight. A combination of the main components never fitting together particularly well in the first instance, compounded by the thick leather. After several hours it became clear the only real solution was going to be to cover the filet piece in leather and use that to 'soak up' as much of the discrepancy as possible:
The painting of the rear light clusters didn't deliver any tremendous results. The gold spray that I have gives a perfect mirror finish but the same paint in silver or chrome just doesn't. I've decided to just leave as is as the third brake light does the best job of warning other drivers and I've put the plastic reflectors into the fog lamps.
I've also put a few more miles on the car and found a few snags such as a few of the dash controls not working but these have subsequently been resolved.
Probably the big thing to crop up was when it was raining heavily and there was standing water. The car did not behave at all pleasantly when hitting water. A huge amount of water was dumped onto the screen but more importantly the car veered strongly.
A lot is possibly down to the wheels, they have an offset that puts some of the rubber a little outside of the bodywork and I suspect this also messes up the geometry. The tyres are also over ten years old, despite being unused. The solution there is to put some nice new road orientated tyres on my refurbed steel Rostyles so that will be done in the coming weeks.
At the same time the car has been going on and off the ramp having the later rear seatbelt mounting brackets welded on and the fixtures put through the floor and the chaps working on the car began to suspect that the car had a lift on it.
Now the long term plan had always been to lower the car so that it behaved a little better on the road. My old LSE would lower by an inch when underway and so I reckoned that just taking an inch out permanently on this car would be a sensible move. On further inspection the car currently has a 1" lift on the springs so these are going to come off and I've a set of 1" lowered springs on the way to go on. I've opted for the fronts to be the diesel spec as these are a little harder than the V8 ones.
They suspect that the current springs may be police spec at the rear and yet a soft set up at the front which could go part of the way to explaining a strange feeling to the balance when turning in to tight corners.
On the upside, new plates have arrived.
The refurbed Rostyle steels have gone back on today with new boots.

Lack of power to the heater is to be investigated, Doors and front panels need aligning properly and now the rear seatbelt mounts are in the car will be ready for the next round of testing. If the 1" lower springs arrive this week then they can replace the 1" lifted springs currently on there.
Lack of power to the heater is to be investigated, Doors and front panels need aligning properly and now the rear seatbelt mounts are in the car will be ready for the next round of testing. If the 1" lower springs arrive this week then they can replace the 1" lifted springs currently on there.
Thanks. I was expecting more but so far it’s been a few niggles with the instrumentation. Fuel gauge doesn’t seem to be working properly, currently thinking it’s the new sender.
Only big thing was the handling. It was fine during basic testing but during the heavy rain it threw up some characteristics that needed instant redressing. The tyres we knew were a little hard but the offset on the wheels was definitely an issue, hence the quick decision to get new tyres on the refurbed steels. Spending some time with a tape measure and wandering between this car, my 4 door and my late 2 door commercial revealed the car had a lift in the springs so that expedited the purchase of the 1” drop springs that were planned.
One job is the lettering. I need to make a template as Obe lost the one I had. In order to do this someone has to wade through nettles and brambles to a reference shell. I have a feeling that that person is me.
No surprises who was wandering through the much today. Anyway, managed to find a car which once had the old style lettering and created a masking tape template before heading back to the office.
As far as I’m aware, the lettering and other decals are now on and the doors have been aligned so getting close to putting a few more test miles on.
As far as I’m aware, the lettering and other decals are now on and the doors have been aligned so getting close to putting a few more test miles on.
Lettering is now affixed and the panels have also been lined up.
In the rain there was water coming into the doors. All the old Rangies did this as the waist seals never fitted perfectly and you just lived with water coming into the inside of the door structure and running out the holes in the bottom. What this did mean is that even though the doors were fitted with polythene screens between the frame and the door cards on the inside the door cards would always soak up some water and eventually warp. The lower cards would often pull out due to the weight of the speakers.
So, the door cards have all been heavily treated with PVA solution to help resist this and the I've also soaked in a couple of coats of laquer to the backs of the door cappings to protect them. At the same time the biggest leak point is where the waist seals run along the front quarterlights, you can see from the image below that there is a ledge formed by the quarterlight seal that is lower than the waist seal and the water runs directly in and then down inside the door. This has been filled with flexible windscreen filler now to help prevent this.


In terms of niggles, the temp reading is still a little too high, temps at the engine seem acceptable though so the general belief is that it has the wrong sender for the old style gauge so a bit of experimenting is going to be required there. It's important to get this part spot on as the RV8's don't respond well to getting cooked.
The fuel gauge is also wonky. It's working and so is the sender so I suspect again it's an issue of mating a late sender to an early gauge.
Lots of cosmetic work to still be done and the lower springs to go on but with the first shoot of the season upon me I've slung the cabinet in the boot and am going to treat the day as product research.


In the rain there was water coming into the doors. All the old Rangies did this as the waist seals never fitted perfectly and you just lived with water coming into the inside of the door structure and running out the holes in the bottom. What this did mean is that even though the doors were fitted with polythene screens between the frame and the door cards on the inside the door cards would always soak up some water and eventually warp. The lower cards would often pull out due to the weight of the speakers.
So, the door cards have all been heavily treated with PVA solution to help resist this and the I've also soaked in a couple of coats of laquer to the backs of the door cappings to protect them. At the same time the biggest leak point is where the waist seals run along the front quarterlights, you can see from the image below that there is a ledge formed by the quarterlight seal that is lower than the waist seal and the water runs directly in and then down inside the door. This has been filled with flexible windscreen filler now to help prevent this.
In terms of niggles, the temp reading is still a little too high, temps at the engine seem acceptable though so the general belief is that it has the wrong sender for the old style gauge so a bit of experimenting is going to be required there. It's important to get this part spot on as the RV8's don't respond well to getting cooked.
The fuel gauge is also wonky. It's working and so is the sender so I suspect again it's an issue of mating a late sender to an early gauge.
Lots of cosmetic work to still be done and the lower springs to go on but with the first shoot of the season upon me I've slung the cabinet in the boot and am going to treat the day as product research.
Well a few months into general use and finding some of the final things that need doing.
When the nearside front hit standing water the car behaves very badly. Checked the tracking and found it way out on that wheel so all sorted.
The lower suspension has coincided with the appearance of a little bit of death wobble. The previous owner put much of the car on polybushes so it’s time to start working through the removal of those. Fitting the Panhard with proper bushes has had an impact but you can still feel the wobble is lurking. The preload is a little light and ultimately I’m going to rebuild the front axle in the Spring and the rest of the bushes can be done then.
The binnacles. They are coming off and will be redone. The stitching just isn’t good enough and the design needs reworking. At present I am mucking about with forming 2mm ply around an old chicken feeder which has the right radius to match the curve of the binnacle facia!!!
I’ve cut down a binnacle facia and the plan is that this will embed within the Monteverdi binnacle and have the instrument pod attached. By detaching the binnacle from the dash I remove one of the core factors that was making lining everything up well enough. The ply is to make a concave hatch for the passenger side that mirrors the size and shape of the instrument binnacle.
DIY glove box hatch so far:
A spare instrument fascia was cut down to the desired size to be adapted into a detachable face for the revised driver binnacle. Note the saw cut to the back of the hand as proof of sticking to the practice of making old tools fit a new purpose, in this case it was a modelling saw which had belonged to my grandfather and must be from between the wars. The countersunk holes are for the same screws that hold the cappings in place and will be used to fix this cover and the instruments attached to it into the binnacle. This will allow the recovering of the binnacle to be done to a much higher standard as part of the problem has been getting the binnacle to fit over three dimensions, the top dash, the front of the dash and also the standard binnacle fixed to the dash. By disconnecting the standard binnacle from the dash and instead fixing it into the Monteverdi binnacle we should achieve a much better level of finish.


10 sheets of high quality 2mm birch ply ordered from eBay with which to run the tests and mock-ups:

Next was finding a former. I needed something that had the same profile curve as the instrument fascia. After scoring the house then the garden I found an old chicken feeder down at my friends farm and liberated it:

Not having a steamer for the ply sheets I experimented with just soaking them in warm water and then strapped them around the former to dry:

This seemed to work reasonably well so I then glued them up while still damp and left to dry:

After a couple of days I removed the ply and was pretty pleased with the end result, I then set about cutting the sheet to the final form:


I've since left it for a few days, moving it from damp to dry environments and it has settled with a good curve in it but it has pulled back out a little. Under normal circumstances I would probably be happy but I decided that I would try it again but this time put a lot more heat and moisture into the sheets as well as trying a different approach to the former. I drilled a couple of wooden batons to a sheet of chipboard and forced the sheets over a central baton, holding them in place with the two outer ones to achieve the bend. This allows me to put a bigger bend in than finally needed by raising the height of the central baton with strips of 4mm ply. My thinking here is that by applying more heat and moisture and applying a larger curve when the sheets have dried out completely in a few days time they will hold a better initial curve ahead of being dampened again, glued and set in the correct curve:
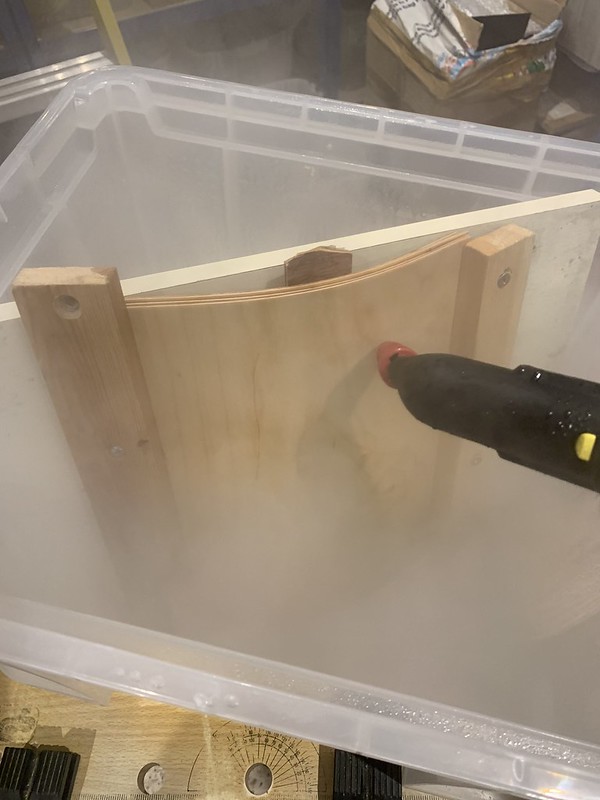
I'll probably leave them drying and in position until the end of the week before bonding them together and leaving them another week to cure.
A spare instrument fascia was cut down to the desired size to be adapted into a detachable face for the revised driver binnacle. Note the saw cut to the back of the hand as proof of sticking to the practice of making old tools fit a new purpose, in this case it was a modelling saw which had belonged to my grandfather and must be from between the wars. The countersunk holes are for the same screws that hold the cappings in place and will be used to fix this cover and the instruments attached to it into the binnacle. This will allow the recovering of the binnacle to be done to a much higher standard as part of the problem has been getting the binnacle to fit over three dimensions, the top dash, the front of the dash and also the standard binnacle fixed to the dash. By disconnecting the standard binnacle from the dash and instead fixing it into the Monteverdi binnacle we should achieve a much better level of finish.
10 sheets of high quality 2mm birch ply ordered from eBay with which to run the tests and mock-ups:
Next was finding a former. I needed something that had the same profile curve as the instrument fascia. After scoring the house then the garden I found an old chicken feeder down at my friends farm and liberated it:
Not having a steamer for the ply sheets I experimented with just soaking them in warm water and then strapped them around the former to dry:
This seemed to work reasonably well so I then glued them up while still damp and left to dry:
After a couple of days I removed the ply and was pretty pleased with the end result, I then set about cutting the sheet to the final form:
I've since left it for a few days, moving it from damp to dry environments and it has settled with a good curve in it but it has pulled back out a little. Under normal circumstances I would probably be happy but I decided that I would try it again but this time put a lot more heat and moisture into the sheets as well as trying a different approach to the former. I drilled a couple of wooden batons to a sheet of chipboard and forced the sheets over a central baton, holding them in place with the two outer ones to achieve the bend. This allows me to put a bigger bend in than finally needed by raising the height of the central baton with strips of 4mm ply. My thinking here is that by applying more heat and moisture and applying a larger curve when the sheets have dried out completely in a few days time they will hold a better initial curve ahead of being dampened again, glued and set in the correct curve:
I'll probably leave them drying and in position until the end of the week before bonding them together and leaving them another week to cure.
rickygolf83 said:
Nice work there, and loving the ad hoc solutions as you go!
Thanks. Over the years I have accumulated various sets of tools from one grandfather who made furniture, wood carvings and railway models in his retirement and the other who was a watchmaker and fabricated a lot of what he needed around the home etc. I've become reasonably competent at what I have always referred to as 'bodging' but I have recently had it explained to me by my children that the correct term these days is 'Life Hacks' Had a quiet morning today so decided to bond the strips together. They've held a good curve from drying out over the last couple of days and it's now just a case of waiting patiently to see if they hold the curve better than the earlier attempt.

Lord.Vader said:
That looks fantastic, there is one on eBay at the moment that is rust free and rather tempting at sub £5k, i wish i hadn't ordered a new car 
Thanks. I found this one quite a while before I was intending to do the build. It was about finding the right base from which to start and this popped up fully galvanised and with all the metalwork done but the interior and exterior trim not in '72 spec so it was absolutely ideal. It sat in storage for at least 5/6 years while I sourced all the parts and drew up a firm plan of attack.If you can get a genuinely solid one for a great price then it's a great opportunity as most are expensive and rotten.
DonkeyApple said:
Lord.Vader said:
That looks fantastic, there is one on eBay at the moment that is rust free and rather tempting at sub £5k, i wish i hadn't ordered a new car
Thanks. I found this one quite a while before I was intending to do the build. It was about finding the right base from which to start and this popped up fully galvanised and with all the metalwork done but the interior and exterior trim not in '72 spec so it was absolutely ideal. It sat in storage for at least 5/6 years while I sourced all the parts and drew up a firm plan of attack.If you can get a genuinely solid one for a great price then it's a great opportunity as most are expensive and rotten.
Any which way, enjoy it, such a practice, classic & classy car, shooting, golf, racing, a night in town, it wouldn't look out of place anywhere, especially in that condition,
Lord.Vader said:
I'm an idiot, its a 4 door, i wondered why it was so cheap.
Any which way, enjoy it, such a practice, classic & classy car, shooting, golf, racing, a night in town, it wouldn't look out of place anywhere, especially in that condition,
I used to use them in my 20s living in central London. Cheap to buy, easy to keep going, you could move flat with them one weekend and then the next, give it a clean and turn up somewhere presentable. People let you out at junctions and you don’t get anyone trying to bully you. They were great urban knockabouts. Any which way, enjoy it, such a practice, classic & classy car, shooting, golf, racing, a night in town, it wouldn't look out of place anywhere, especially in that condition,

If you haven't bought your springs yet, don't waste your money on aftermarket 'kits'
Standard defender springs are a smidge stiffer than a standard classic RR and 1" shorter.
Should lower it a bit and make it handle much nicer, especially if you stick on some bilstein shocks and arbs that are thicker than a wire coat hanger.
Standard defender springs are a smidge stiffer than a standard classic RR and 1" shorter.
Should lower it a bit and make it handle much nicer, especially if you stick on some bilstein shocks and arbs that are thicker than a wire coat hanger.
Gassing Station | Readers' Cars | Top of Page | What's New | My Stuff