2 Door Range Rover project
Discussion


Lettering is now affixed and the panels have also been lined up.
In the rain there was water coming into the doors. All the old Rangies did this as the waist seals never fitted perfectly and you just lived with water coming into the inside of the door structure and running out the holes in the bottom. What this did mean is that even though the doors were fitted with polythene screens between the frame and the door cards on the inside the door cards would always soak up some water and eventually warp. The lower cards would often pull out due to the weight of the speakers.
So, the door cards have all been heavily treated with PVA solution to help resist this and the I've also soaked in a couple of coats of laquer to the backs of the door cappings to protect them. At the same time the biggest leak point is where the waist seals run along the front quarterlights, you can see from the image below that there is a ledge formed by the quarterlight seal that is lower than the waist seal and the water runs directly in and then down inside the door. This has been filled with flexible windscreen filler now to help prevent this.


In terms of niggles, the temp reading is still a little too high, temps at the engine seem acceptable though so the general belief is that it has the wrong sender for the old style gauge so a bit of experimenting is going to be required there. It's important to get this part spot on as the RV8's don't respond well to getting cooked.
The fuel gauge is also wonky. It's working and so is the sender so I suspect again it's an issue of mating a late sender to an early gauge.
Lots of cosmetic work to still be done and the lower springs to go on but with the first shoot of the season upon me I've slung the cabinet in the boot and am going to treat the day as product research.


In the rain there was water coming into the doors. All the old Rangies did this as the waist seals never fitted perfectly and you just lived with water coming into the inside of the door structure and running out the holes in the bottom. What this did mean is that even though the doors were fitted with polythene screens between the frame and the door cards on the inside the door cards would always soak up some water and eventually warp. The lower cards would often pull out due to the weight of the speakers.
So, the door cards have all been heavily treated with PVA solution to help resist this and the I've also soaked in a couple of coats of laquer to the backs of the door cappings to protect them. At the same time the biggest leak point is where the waist seals run along the front quarterlights, you can see from the image below that there is a ledge formed by the quarterlight seal that is lower than the waist seal and the water runs directly in and then down inside the door. This has been filled with flexible windscreen filler now to help prevent this.
In terms of niggles, the temp reading is still a little too high, temps at the engine seem acceptable though so the general belief is that it has the wrong sender for the old style gauge so a bit of experimenting is going to be required there. It's important to get this part spot on as the RV8's don't respond well to getting cooked.
The fuel gauge is also wonky. It's working and so is the sender so I suspect again it's an issue of mating a late sender to an early gauge.
Lots of cosmetic work to still be done and the lower springs to go on but with the first shoot of the season upon me I've slung the cabinet in the boot and am going to treat the day as product research.
Well a few months into general use and finding some of the final things that need doing.
When the nearside front hit standing water the car behaves very badly. Checked the tracking and found it way out on that wheel so all sorted.
The lower suspension has coincided with the appearance of a little bit of death wobble. The previous owner put much of the car on polybushes so it’s time to start working through the removal of those. Fitting the Panhard with proper bushes has had an impact but you can still feel the wobble is lurking. The preload is a little light and ultimately I’m going to rebuild the front axle in the Spring and the rest of the bushes can be done then.
The binnacles. They are coming off and will be redone. The stitching just isn’t good enough and the design needs reworking. At present I am mucking about with forming 2mm ply around an old chicken feeder which has the right radius to match the curve of the binnacle facia!!!
I’ve cut down a binnacle facia and the plan is that this will embed within the Monteverdi binnacle and have the instrument pod attached. By detaching the binnacle from the dash I remove one of the core factors that was making lining everything up well enough. The ply is to make a concave hatch for the passenger side that mirrors the size and shape of the instrument binnacle.
DIY glove box hatch so far:
A spare instrument fascia was cut down to the desired size to be adapted into a detachable face for the revised driver binnacle. Note the saw cut to the back of the hand as proof of sticking to the practice of making old tools fit a new purpose, in this case it was a modelling saw which had belonged to my grandfather and must be from between the wars. The countersunk holes are for the same screws that hold the cappings in place and will be used to fix this cover and the instruments attached to it into the binnacle. This will allow the recovering of the binnacle to be done to a much higher standard as part of the problem has been getting the binnacle to fit over three dimensions, the top dash, the front of the dash and also the standard binnacle fixed to the dash. By disconnecting the standard binnacle from the dash and instead fixing it into the Monteverdi binnacle we should achieve a much better level of finish.


10 sheets of high quality 2mm birch ply ordered from eBay with which to run the tests and mock-ups:

Next was finding a former. I needed something that had the same profile curve as the instrument fascia. After scoring the house then the garden I found an old chicken feeder down at my friends farm and liberated it:

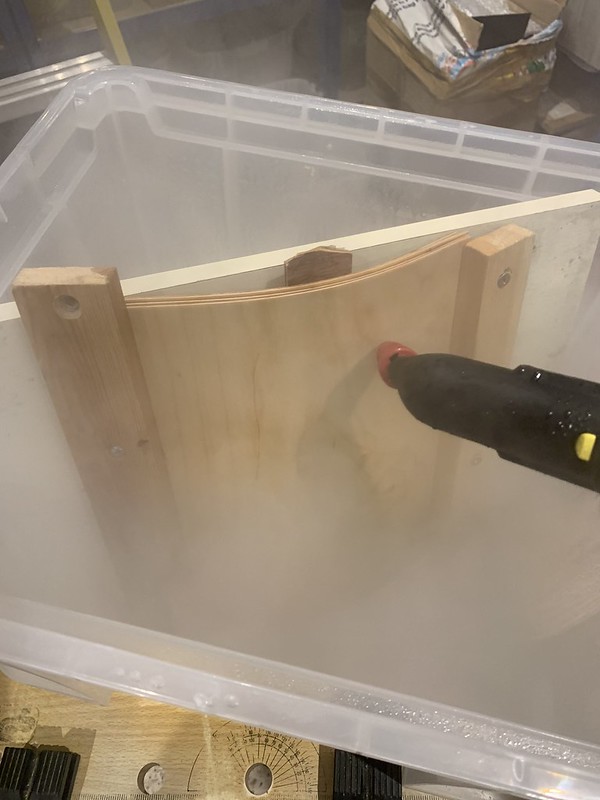
Not having a steamer for the ply sheets I experimented with just soaking them in warm water and then strapped them around the former to dry:

This seemed to work reasonably well so I then glued them up while still damp and left to dry:

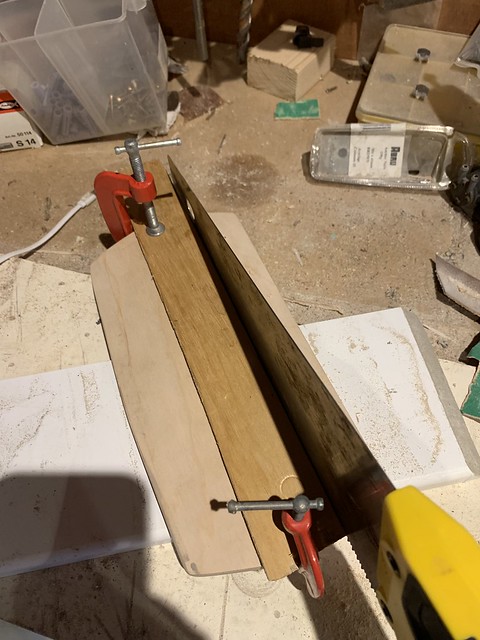
After a couple of days I removed the ply and was pretty pleased with the end result, I then set about cutting the sheet to the final form:


I've since left it for a few days, moving it from damp to dry environments and it has settled with a good curve in it but it has pulled back out a little. Under normal circumstances I would probably be happy but I decided that I would try it again but this time put a lot more heat and moisture into the sheets as well as trying a different approach to the former. I drilled a couple of wooden batons to a sheet of chipboard and forced the sheets over a central baton, holding them in place with the two outer ones to achieve the bend. This allows me to put a bigger bend in than finally needed by raising the height of the central baton with strips of 4mm ply. My thinking here is that by applying more heat and moisture and applying a larger curve when the sheets have dried out completely in a few days time they will hold a better initial curve ahead of being dampened again, glued and set in the correct curve:
I'll probably leave them drying and in position until the end of the week before bonding them together and leaving them another week to cure.
A spare instrument fascia was cut down to the desired size to be adapted into a detachable face for the revised driver binnacle. Note the saw cut to the back of the hand as proof of sticking to the practice of making old tools fit a new purpose, in this case it was a modelling saw which had belonged to my grandfather and must be from between the wars. The countersunk holes are for the same screws that hold the cappings in place and will be used to fix this cover and the instruments attached to it into the binnacle. This will allow the recovering of the binnacle to be done to a much higher standard as part of the problem has been getting the binnacle to fit over three dimensions, the top dash, the front of the dash and also the standard binnacle fixed to the dash. By disconnecting the standard binnacle from the dash and instead fixing it into the Monteverdi binnacle we should achieve a much better level of finish.
10 sheets of high quality 2mm birch ply ordered from eBay with which to run the tests and mock-ups:
Next was finding a former. I needed something that had the same profile curve as the instrument fascia. After scoring the house then the garden I found an old chicken feeder down at my friends farm and liberated it:
Not having a steamer for the ply sheets I experimented with just soaking them in warm water and then strapped them around the former to dry:
This seemed to work reasonably well so I then glued them up while still damp and left to dry:
After a couple of days I removed the ply and was pretty pleased with the end result, I then set about cutting the sheet to the final form:
I've since left it for a few days, moving it from damp to dry environments and it has settled with a good curve in it but it has pulled back out a little. Under normal circumstances I would probably be happy but I decided that I would try it again but this time put a lot more heat and moisture into the sheets as well as trying a different approach to the former. I drilled a couple of wooden batons to a sheet of chipboard and forced the sheets over a central baton, holding them in place with the two outer ones to achieve the bend. This allows me to put a bigger bend in than finally needed by raising the height of the central baton with strips of 4mm ply. My thinking here is that by applying more heat and moisture and applying a larger curve when the sheets have dried out completely in a few days time they will hold a better initial curve ahead of being dampened again, glued and set in the correct curve:
I'll probably leave them drying and in position until the end of the week before bonding them together and leaving them another week to cure.
rickygolf83 said:
Nice work there, and loving the ad hoc solutions as you go!
Thanks. Over the years I have accumulated various sets of tools from one grandfather who made furniture, wood carvings and railway models in his retirement and the other who was a watchmaker and fabricated a lot of what he needed around the home etc. I've become reasonably competent at what I have always referred to as 'bodging' but I have recently had it explained to me by my children that the correct term these days is 'Life Hacks' Had a quiet morning today so decided to bond the strips together. They've held a good curve from drying out over the last couple of days and it's now just a case of waiting patiently to see if they hold the curve better than the earlier attempt.

Lord.Vader said:
That looks fantastic, there is one on eBay at the moment that is rust free and rather tempting at sub £5k, i wish i hadn't ordered a new car 
Thanks. I found this one quite a while before I was intending to do the build. It was about finding the right base from which to start and this popped up fully galvanised and with all the metalwork done but the interior and exterior trim not in '72 spec so it was absolutely ideal. It sat in storage for at least 5/6 years while I sourced all the parts and drew up a firm plan of attack.If you can get a genuinely solid one for a great price then it's a great opportunity as most are expensive and rotten.
Lord.Vader said:
I'm an idiot, its a 4 door, i wondered why it was so cheap.
Any which way, enjoy it, such a practice, classic & classy car, shooting, golf, racing, a night in town, it wouldn't look out of place anywhere, especially in that condition,
I used to use them in my 20s living in central London. Cheap to buy, easy to keep going, you could move flat with them one weekend and then the next, give it a clean and turn up somewhere presentable. People let you out at junctions and you don’t get anyone trying to bully you. They were great urban knockabouts. Any which way, enjoy it, such a practice, classic & classy car, shooting, golf, racing, a night in town, it wouldn't look out of place anywhere, especially in that condition,

Second attempt once trimmed down has come out as a perfect match for the instrument fascia which is pleasing.

I've now cut this into two parts and am awaiting the arrival of some hinges to place between the two sections.
Decided I might as well tackle the actual instrument binnacle at the same time so dug out some scrap wood and bought a tin of p40 resin to use to bond it into place in the binnacle so that the instrument cluster and fascia can just be front loaded in situe.

Once cut to the basic shape was trying to work out how to get it fixed into a basic position securely enough to then apply the resin for a permanent solution. One of my daughters; hot glue guns from their craft cupboard transpired to be the obvious solution.

Once bonded in I added a little bit of aluminium angle iron to strengthen the arms but also to better hold a thread from the fascia screws.

A mock up on a spare dash showed that all fitted and worked. I do need to adjust the lower facing section of the instrument binnacle to amend an error in the trimming that was made previously. I've ordered some 0.7mm aluminium sheet which I will cut to shape and bond over the lower part of the front. This will also give a nice return on the bottom side for the leather trim in due course.


Off to talk to a trimmer shortly to see if they will be able to trim these up as desired.
Big upside is that I finally bought a Dremmel. Had so many jobs over the years that would have been easier with one. Downside, the workshop is now covered in a thick layer of dust. A positive though is that the Toylander LAnd Rover now looks like a barn find so has tripled in value.
I've now cut this into two parts and am awaiting the arrival of some hinges to place between the two sections.
Decided I might as well tackle the actual instrument binnacle at the same time so dug out some scrap wood and bought a tin of p40 resin to use to bond it into place in the binnacle so that the instrument cluster and fascia can just be front loaded in situe.
Once cut to the basic shape was trying to work out how to get it fixed into a basic position securely enough to then apply the resin for a permanent solution. One of my daughters; hot glue guns from their craft cupboard transpired to be the obvious solution.
Once bonded in I added a little bit of aluminium angle iron to strengthen the arms but also to better hold a thread from the fascia screws.
A mock up on a spare dash showed that all fitted and worked. I do need to adjust the lower facing section of the instrument binnacle to amend an error in the trimming that was made previously. I've ordered some 0.7mm aluminium sheet which I will cut to shape and bond over the lower part of the front. This will also give a nice return on the bottom side for the leather trim in due course.
Off to talk to a trimmer shortly to see if they will be able to trim these up as desired.
Big upside is that I finally bought a Dremmel. Had so many jobs over the years that would have been easier with one. Downside, the workshop is now covered in a thick layer of dust. A positive though is that the Toylander LAnd Rover now looks like a barn find so has tripled in value.
Finished prepping the binnacles over the weekend. The drivers side one, the lower section was too flimsy so I cut and bonded a sheet of 0.7mm aluminium sheet over this section to give it rigidity and drilled back out the fixing points and the 4 warning lamp positions:

To finish off the work I was about to go and buy a tin of Isopon P38 when I had a vague memory of having bought a tine about 25 years ago while at Uni, probably to patch a mini or maybe the headlight surrounds of a Daimler. Found the tin!!! I wasn't sure whether to use it or to put it on eBay as a rare, antique barn find!!!

Once I'd filled all the little bits with that and sanded it all down it was time to give it all a good degreasing and clean and then leave to dry hoping the other half didn't find it before I could take it back to the workshop:

Slapped a bit of primer and satin black on just for vanity really, plus it's a pretty quick way of showing up the bits that need a bit more sanding work.

Have fitted them back into the car for the time being, a bit of a test fit but it also keeps everything together. A high quality piano hinge is arriving this week so the glove box can be completed and I think I am going to replace the 4 lower warning bulbs with leds so that I can in future remove the driver's binnacle without the need to remove the under tray to push those standard bulb fittings back in from the back. LEDs on a longer wire will allow the bulbs to come away with the binnacle.
The fit of both is now hugely improved:


It's third trim lucky now!
To finish off the work I was about to go and buy a tin of Isopon P38 when I had a vague memory of having bought a tine about 25 years ago while at Uni, probably to patch a mini or maybe the headlight surrounds of a Daimler. Found the tin!!! I wasn't sure whether to use it or to put it on eBay as a rare, antique barn find!!!
Once I'd filled all the little bits with that and sanded it all down it was time to give it all a good degreasing and clean and then leave to dry hoping the other half didn't find it before I could take it back to the workshop:
Slapped a bit of primer and satin black on just for vanity really, plus it's a pretty quick way of showing up the bits that need a bit more sanding work.
Have fitted them back into the car for the time being, a bit of a test fit but it also keeps everything together. A high quality piano hinge is arriving this week so the glove box can be completed and I think I am going to replace the 4 lower warning bulbs with leds so that I can in future remove the driver's binnacle without the need to remove the under tray to push those standard bulb fittings back in from the back. LEDs on a longer wire will allow the bulbs to come away with the binnacle.
The fit of both is now hugely improved:
It's third trim lucky now!
New trimmer has done a much, much better job. Also had the visors re-trimmed as they has been done badly. The centre console carpet will be going over in due course as the piping is sub par. Wish I had know about this trimmer at the outset as he is clearly not only better but less expense and only 20 mins away!!!
Also finished fettling the glove box to fit the trim, have veneered and lacquered it and it's now in and looking much better.


Also finished fettling the glove box to fit the trim, have veneered and lacquered it and it's now in and looking much better.
Went to fit the harmonic weight to the steering damper that was used on the last Classics and most Discos but the aftermarket downpipe doesnt give enough clearance since the 1" drop. Not the end of the world, the weight does help give a better steering feel on the road at speed but it was always one of those incremental improvements.
The swivel housing weights probably have a greater benefit and having liberated a pair from an old Disco chassis they are now in place.

The swivel housing weights probably have a greater benefit and having liberated a pair from an old Disco chassis they are now in place.
NomduJour said:
Dash is looking good now.
Massive improvement. It would need the whole top deck redoing to be perfect. I’ve been offered an unbuild John Eales 4.6 for a very reasonable price. Having spoken to John, it is apparently good for just shy of 300 BHP and LBS if built with a standard GEMs system and cam. Would probably use a cam with a mild lift on it so as to ensure the max amount of torque is above 3k so there for over taking.
Wouldn’t have the BHP target of the supercharger but at the price mooted it is much cheaper and the result would be a 100% tried and tested, brand new set up. Quite tempting.
C Lee Farquar said:
That looks so much better, you must be relieved.
Immensely. As I mentioned, I am lamenting that I didn’t know about these guys earlier as the original retrim was done with a real ‘that’ll do’ attitude in hindsight. If you ever need something done near us then: http://www.customcoachtrimming.co.uk
I turned up and the chap, Chris, looked at the project without doing any of that w
 ky tooth sucking tripe that marks out the British worker to avoid, didn’t do the usual chip on shoulder tttishness that you get used to with lots of British workers just assessed the job, noted key points without them needing pointing out.
 Said it would take 3-4 weeks, done in two and with extra nice touches applied that only someone with pride would do and charged the amount he originally estimated on despite doing more work.
Different league and cheaper.
Work is now pretty much complete for the season ahead. It’s now a matter of using it and having fun over the next 6 months.
There are a couple of jobs outstanding such as dropping the headlining and fitting the rear wiper motor the right way round! And converting the small interior light switch to instead turn all the USB ports off as they are live and do drain the battery.
Over winter I’ll make the final choice as to whether to fit a John Eales 4.6 engine or supercharge the existing 4.0. The latter is a more exciting prospect but the former is much more logical.
Last bit of fettling this week was removing the Suffix A D pillar panels and replacing them with a set of later ones that I’ve had painted black. I was going to colour code them to the car but at the moment I think this looks smarter.
Gassing Station | Readers' Cars | Top of Page | What's New | My Stuff