1985 Citroen BX 19GT overhaul
Discussion


james_tigerwoods said:
Just remember to keep the bucket of "leftover" bits
I can't even remember which bucket I'm on, or where it is 
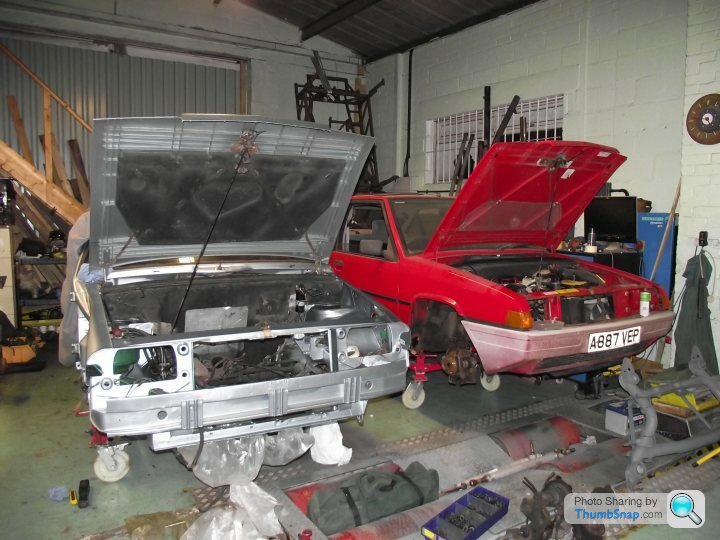
Anyway, quick update time. My original plan was to have front end all sorted, painted, assembled and powered by Xmas, leaving me free to continue with the interior. Well, that's obviously not going to happen. However, I did manage to get the front painted today, meaning I'm at a point where I can start putting the front back together. That's a nice feeling!
So the nearside wing was completed. The original rustproofing wasn't as good as the other side, so I went with the Rustbuster all over. The whole lot's getting primed and painted both sides, and it's totally out of sight so I'm happy to do this. Did manage to practice the 'orange peel' effect usually created by factory spray underseal thought, which is good practice for later. Managed it using more mastic, less thinners and giving it 20mins to start to cure, before going at it with a stipple effect technique:
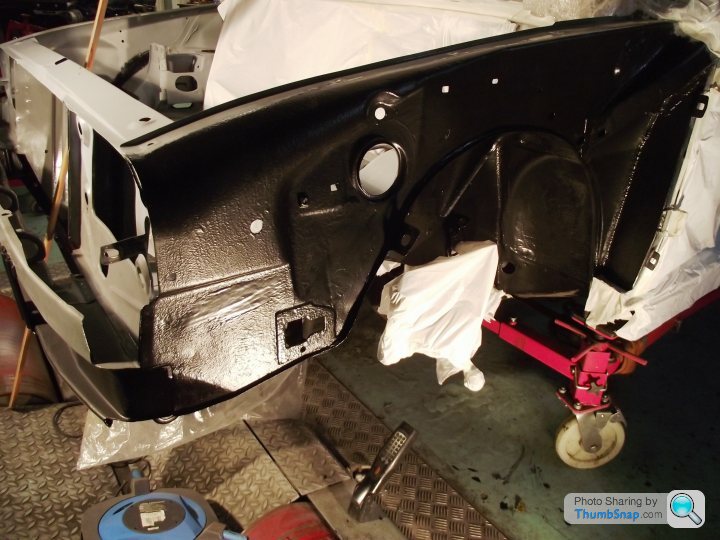
Then it was on with primer:
Before going at it with the top coat:
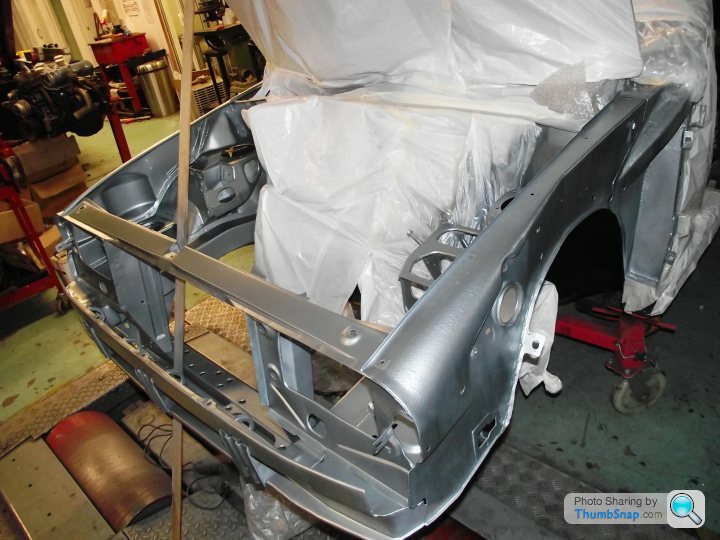
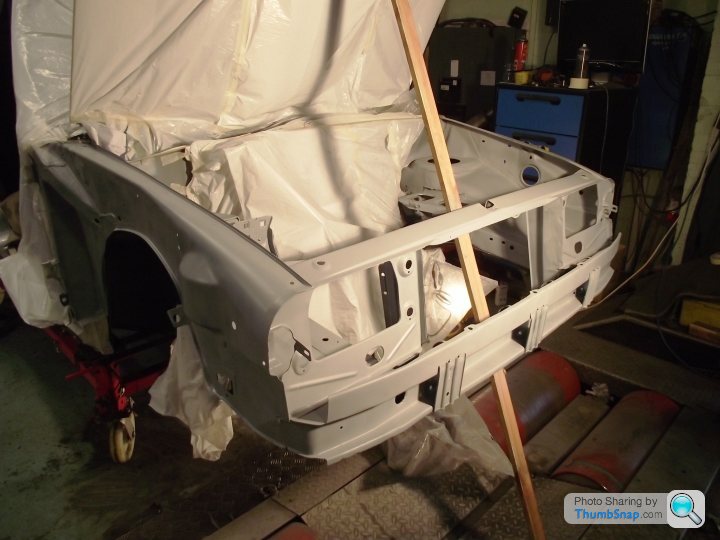
All the masking sheets (or really s
 t, cheap car seat covers I had no use for - you decide!) removed. Time to refit the first part. Can anyone guess what it was?
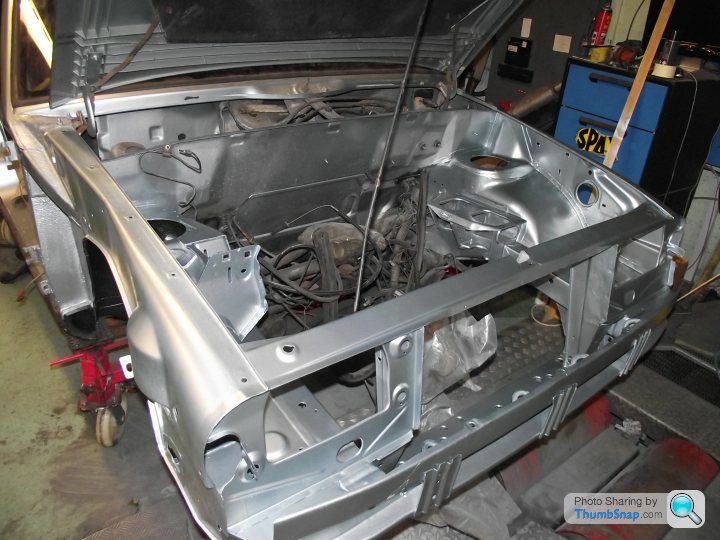
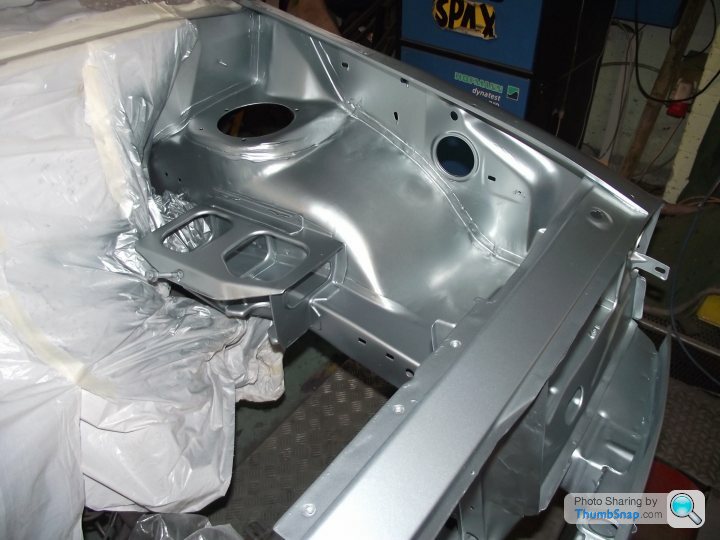
Next up, VIN plate. When I can find it....
Blue Oval84 said:
Wow, awesome work!
Someone linked this thread in my GG thread about my Mondeo rot, I guess mine isn't as bad as I thought!
I now realise however that I clearly need to start budgeting for what will effectively be a rebuild of the car at some point in the next decade. Oh well, better start saving now...
Just checked your thread out (I'll give you any advice etc on there) but funny you mention it's an ST200 - this was 50% of our driveway in 2010:Someone linked this thread in my GG thread about my Mondeo rot, I guess mine isn't as bad as I thought!
I now realise however that I clearly need to start budgeting for what will effectively be a rebuild of the car at some point in the next decade. Oh well, better start saving now...
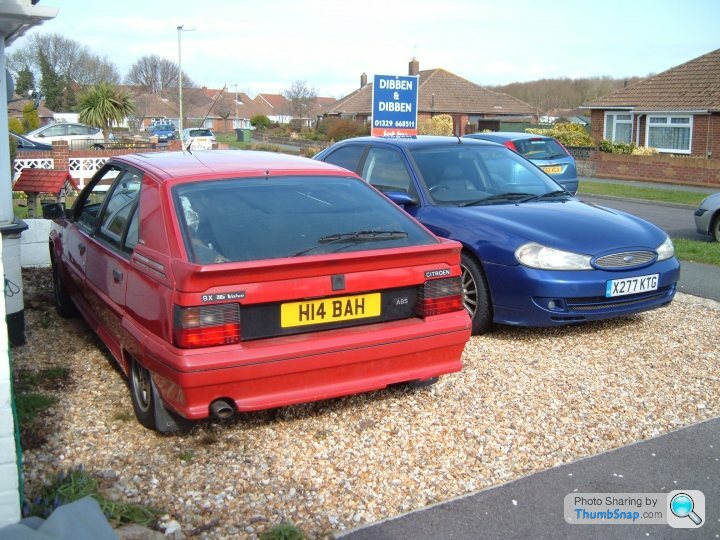
We had that for about 18months. It was a bit tatty on the bodywork, and wearing about 150k miles, but it only cost £1k in 2009, and mechanically it was pretty sound. Had to renew the IMRC unit, and I also relocated it away from the engine to stop the heat soak issue. Think I also changed the A/C condenser, the PAS cooler pipe, the water pump (fitted a non-gen one as the genuine plastic ones had a habit of failed and borking the engine). Also gave it a service, a CV joint and some brakes I think. Got all the parts cheap as I used to work in a Ford dealer at the time.
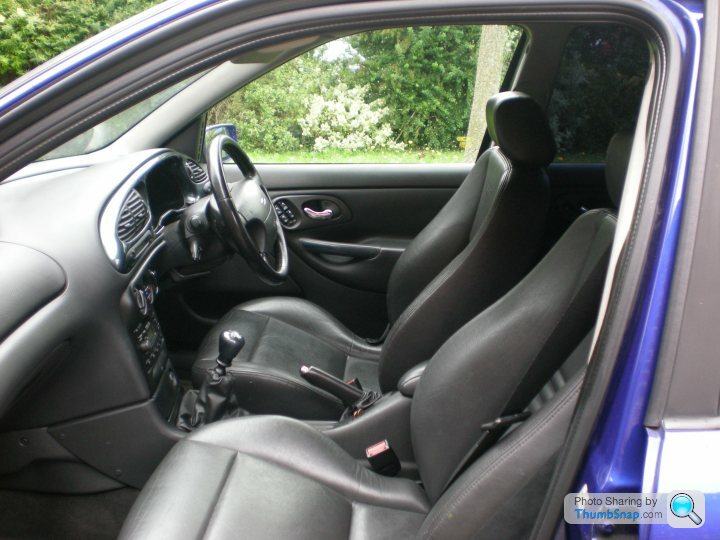
I did like it. Firmly sprung, but still rode quite well and covered ground with ease. Decent enough round the bends for what it was, and the seats (full leather in ours) were comfy. Only gripes was that it wasn't exactly quick (the BX next to it would easily stay with it) considering it destroyed fuel.......and rust! It was beginning to spread when we replaced it with an MG ZS and I saw the car on ebay earlier in the year, having been broken for spares. Looks like rust won

Lowtimer said:
Two nice cars there, very different in design and technology but both highly enjoyable. I was extremely fond of my plain-jane early Mondeo 24v, base model in solid white, it looked like any 1.8LX but made very good progress indeed.
Yeah, I was rather fond of the Mundaneo! Ended up liking it more than I thought I would, but I wasn't as sad as you'd expect when we got shot as it was just so juicy (I had a couple of friends with ST24s who told me high 20's mpg was easily achievable, and in the end it turned out it was actually high-teens!) Wasn't that quick either - attempted to block an Octavia TDI one afternoon who was trying to cut me up, and couldn't keep up with him to prevent him from cutting into my path! That was the day I lost faith - he was doing 40-50mpg, and he was faster. All the Mondeo had going for it on the engine front was a semi-decent soundtrack. I did like the look of it though.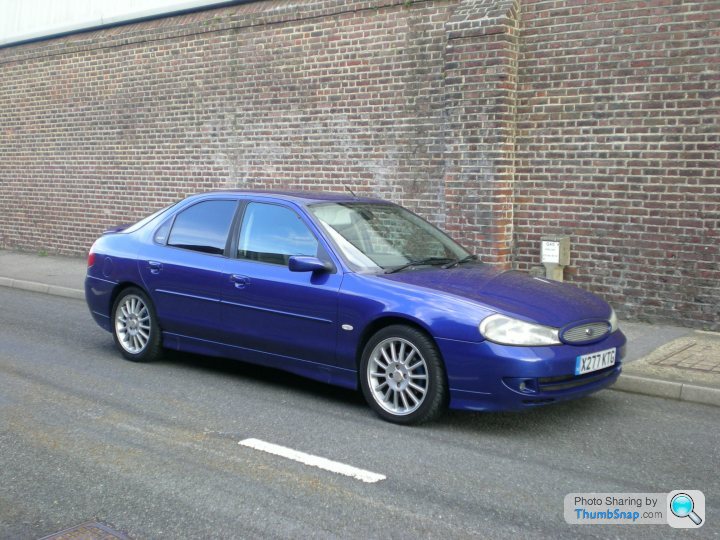

I've owned a couple of Xantias in the past, so couldn't help compare the Mondeo to them. The average Mondeo's a nicer car to drive over the average Xantia (excluding the Activa) everywhere except the motorway or a particularly bumpy road. The Xantia's a smoother car, and a more refined mile muncher (was better built too, interestingly) but in normal driving the Mondeo was smooth enough as it was, and bar the diesels and the V6, all the Mondeo's engines were better than the Xantias. So were the gearboxes, and it was nicer to pilot around the bends with better steering feel, driving position and interior ergonomics. I felt the Xantia was a far better looking car than the Mondeo when they were both launched, but I always had a hankering for an ST wearing the RSAP kit in later years. I never wanted a later Xantia, as while the early cars started off handsomely, they got worse after each facelift.
Comparing it to the BX in the pictures was quite interesting too, in that the advantages the BX had over the Sierra in its day seemed to have carried on with the Mondeo/Xantia rivalry, namely packaging: The Mondeo, just seemed so cramped in the back, and the rear doors were tiny. A Xantia had a much better size/shaped boot, more legroom and bigger back seats, which is most of the things the BX has over a Sierra, given that it's halfway between an Escort and a Sierra externally. In fact, thought the BX is a 1982 design car, some ten years newer than the Mondeo, the difference between them showed how advanced the BX was. Again, packaging is better in the BX, but it's also a much lighter car than the Mondeo, and way more nimble than a Xantia, so around the bends the BX is actually more fun. The brakes are way better (BX brakes are better than lots of modern cars, to be fair), the steering was quicker geared, and it was just as fast as the Mondeo, despite a deficit of 40bhp, 600cc and two cylinders, with the added benefit of 25mpg being considered a bad return in the 16v (it can easily average 35mpg on a run, and touch 40mpg if you keep below 70mph). The BX's seats were also better (in the 16v - in a normal BX I would prefer the ST200's).
The ST200 was a good car though. I kinda fancy one today, but I know I'll be chasing rot around like I am on all the older cars I've got, and I'm sure 18mpg will quickly get boring again. Not quite sure where this sudden Mondeo vs. the BX thing came from, it's just been a while since I thought about it, and also takes my mind of the mountain of BX GT work still to do!
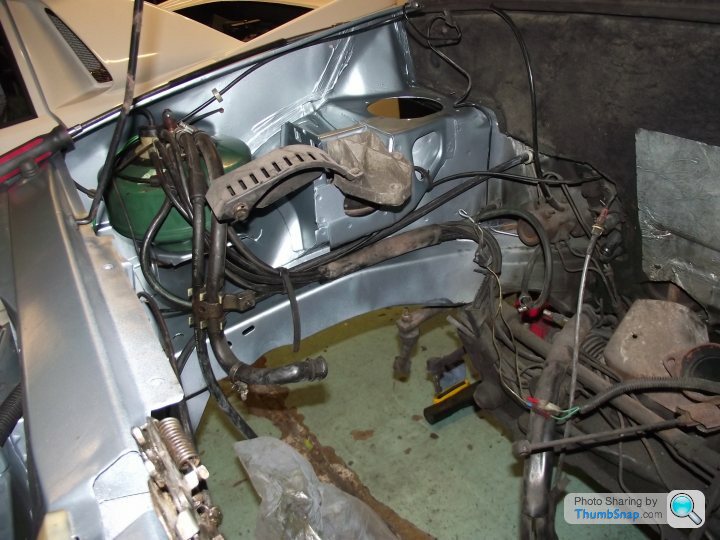
Picked the GT back up in the last few days. Next job after getting the engine bay all sorted was to begin refitting everything. Not amazing progress sadly, but then time is in pretty short supply. Plus trying to remember where everything goes, cleaning it and looking for the relevant fixings is massively time-consuming!
One of the first bits to go back on, after a quick clean and brush up:

Luckily, I found a way to give me a guide as to where most of the stuff would have been installed from the factory:
Really handy having the other BX there as I've already found a number of components which have been laid out incorrectly, presumably by garages/owners in the past who were trying to save time. I can get my anal attention to detail kicks from this job!:
Spent time collating all the bits I need to clean up in the parts washer, or blast in the grit blaster. There will be some bits I'll send away for zinc-plating, but I'll try and do as much as I can myself to keep costs low. It's not going to be a show car or anything like that!
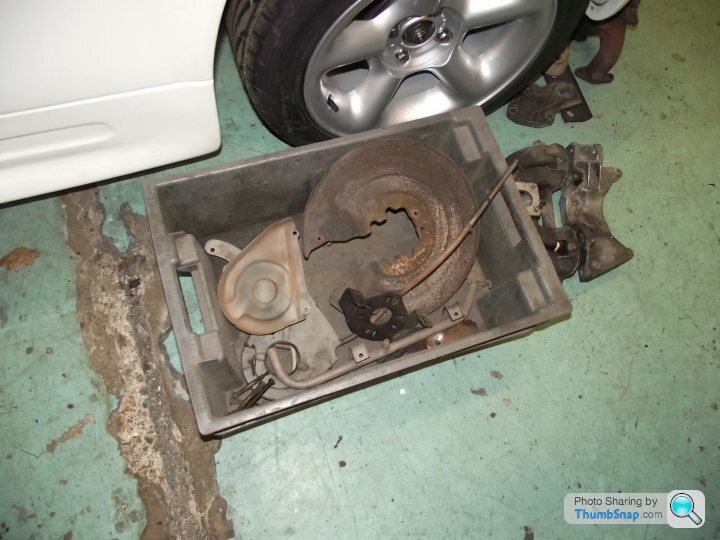
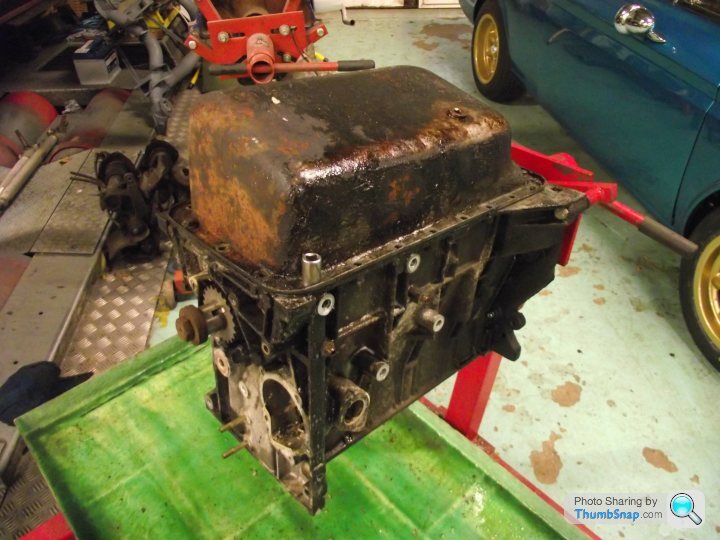
The bit I'm not looking forward to:
It doesn't need to look mint, but I don't want it to let the engine bay down either. Problem is the engine's old now, and hasn't been cleaned anytime recently.....or ever, by the look of it. There's grease, oil, Waxoyl (baked on - nice) and lots of alloy corrosion. I'm running behind schedule so I can't justify spending hours cleaning the thing up, and having just spent an hour trying to pretty it up I realised I was fighting a losing battle. Tomorrow it's Gunk and a power washer, and we'll see how it ends up!
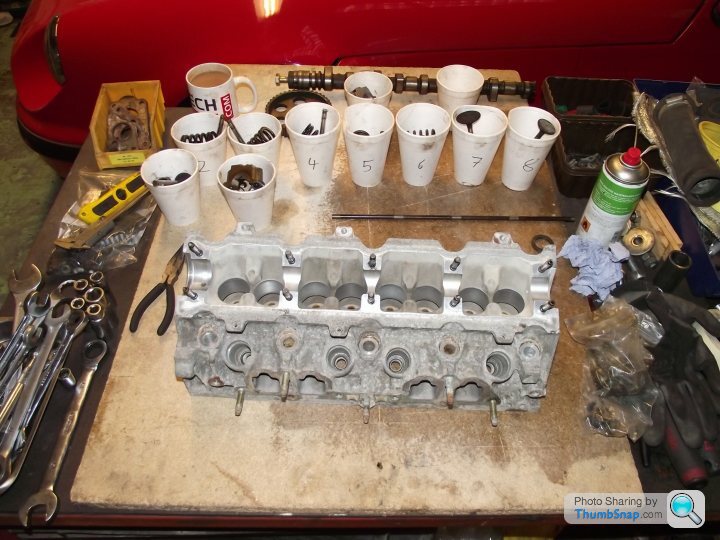
Another issue I'm going to have is self inflicted, by my own stupidity. I removed the valves from the head ages ago, mainly to decoke the head but also to renew the valve seals. I removed all the valves, collets, springs, lifters and shims, and placed them all in plastic cups, numbered 1 to 8. I then hid them so they wouldn't get knocked over or the like. Sound sensible? I thought so! And it has been, in terms of storage.
What hasn't been sensible, is the fact that PSA nubmer their cylinders backwards, meaning 1 is at the flywheel end, and 4 at the timing end. And I can't remember whether I numbered in PSA style, or in human style. Me being me, it could easily be either. And genius that I am, I haven't left any clues since stripping the head two years ago. So I'm going to have to refit it all, measure the valve clearances and hope they give me the clues as to whether I've got it all right or not. Great!
I'm such a bellend sometimes!!
One of the first bits to go back on, after a quick clean and brush up:
Luckily, I found a way to give me a guide as to where most of the stuff would have been installed from the factory:
Really handy having the other BX there as I've already found a number of components which have been laid out incorrectly, presumably by garages/owners in the past who were trying to save time. I can get my anal attention to detail kicks from this job!:
Spent time collating all the bits I need to clean up in the parts washer, or blast in the grit blaster. There will be some bits I'll send away for zinc-plating, but I'll try and do as much as I can myself to keep costs low. It's not going to be a show car or anything like that!
The bit I'm not looking forward to:
It doesn't need to look mint, but I don't want it to let the engine bay down either. Problem is the engine's old now, and hasn't been cleaned anytime recently.....or ever, by the look of it. There's grease, oil, Waxoyl (baked on - nice) and lots of alloy corrosion. I'm running behind schedule so I can't justify spending hours cleaning the thing up, and having just spent an hour trying to pretty it up I realised I was fighting a losing battle. Tomorrow it's Gunk and a power washer, and we'll see how it ends up!
Another issue I'm going to have is self inflicted, by my own stupidity. I removed the valves from the head ages ago, mainly to decoke the head but also to renew the valve seals. I removed all the valves, collets, springs, lifters and shims, and placed them all in plastic cups, numbered 1 to 8. I then hid them so they wouldn't get knocked over or the like. Sound sensible? I thought so! And it has been, in terms of storage.
What hasn't been sensible, is the fact that PSA nubmer their cylinders backwards, meaning 1 is at the flywheel end, and 4 at the timing end. And I can't remember whether I numbered in PSA style, or in human style. Me being me, it could easily be either. And genius that I am, I haven't left any clues since stripping the head two years ago. So I'm going to have to refit it all, measure the valve clearances and hope they give me the clues as to whether I've got it all right or not. Great!
I'm such a bellend sometimes!!
TooMany2cvs said:
I'm sorry, but I'm going to fk with your head now.
How do you know which car the bits have been put back in the wrong place on...? Maybe the GT was right and you're now copying somebody else's time-saving bodge...?
Because.........k with your head now.How do you know which car the bits have been put back in the wrong place on...? Maybe the GT was right and you're now copying somebody else's time-saving bodge...?
The red one has only done 17,000 miles and is painfully original!
The odds aren't dead cert, but they're stacked in my favour.
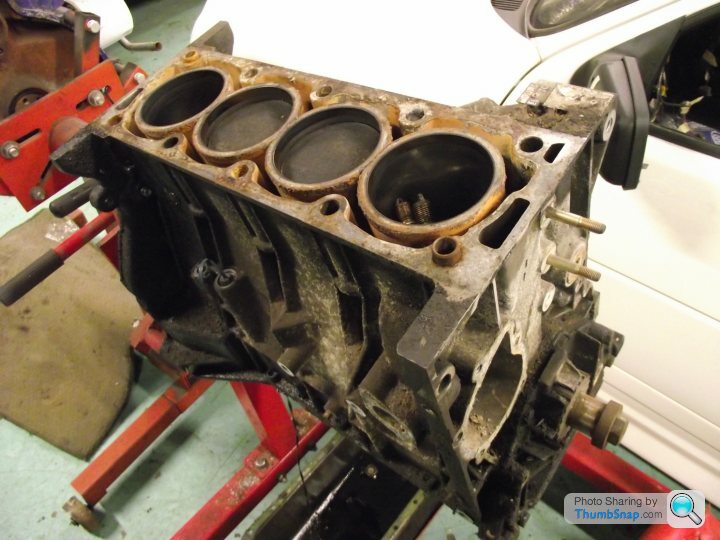
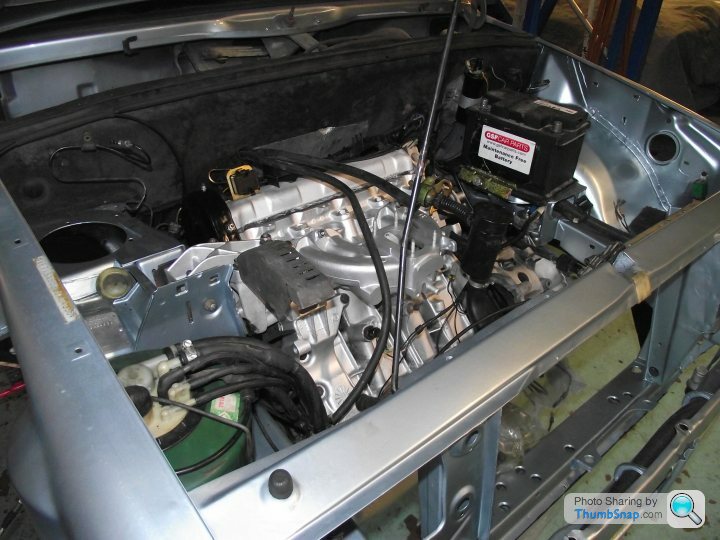
So, where we at? Engine-related stuff at the moment!
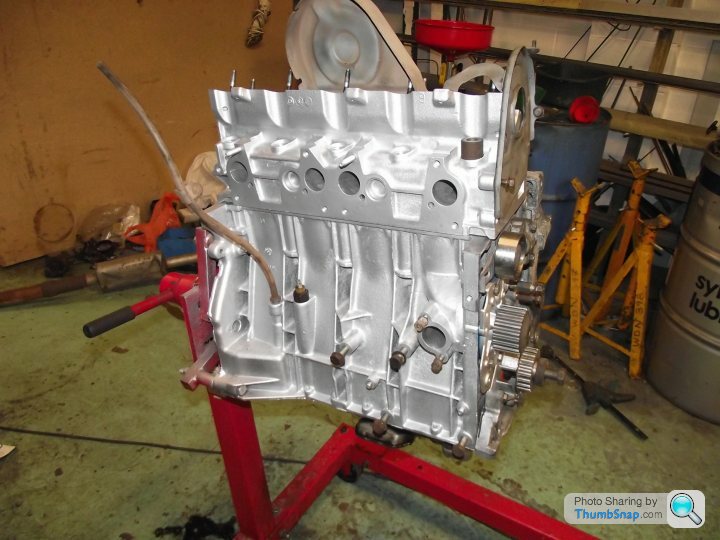
Well, I managed to get the head and block looking a bit more respectable. Beaulieu motor museum have got nothing to worry about as really to do it properly, the whole shebang would need stripping of every nut and bolt, glass bead blasting and fully overhauling. Ain't nobody got time fo dat, so a quick brush up, degrease and bullst silver spray was order of the day!
Degreasing took ages:
Pretty thick and grim:
But got there in the end:

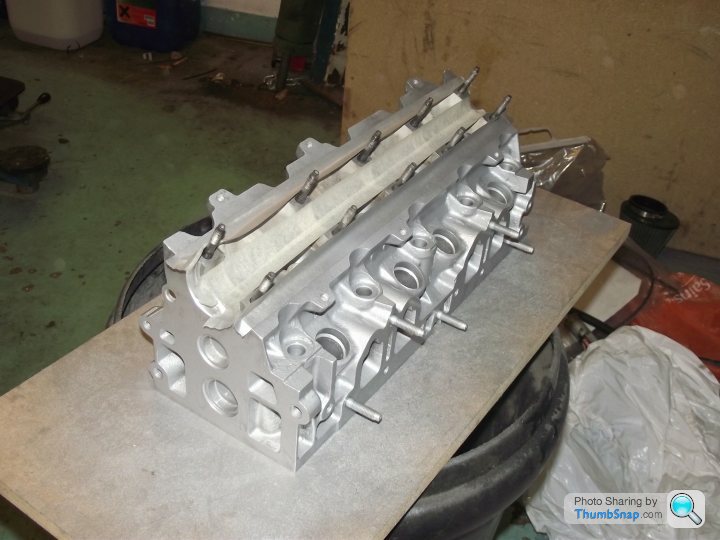
Same treatment for the head:
Licked up in silver:
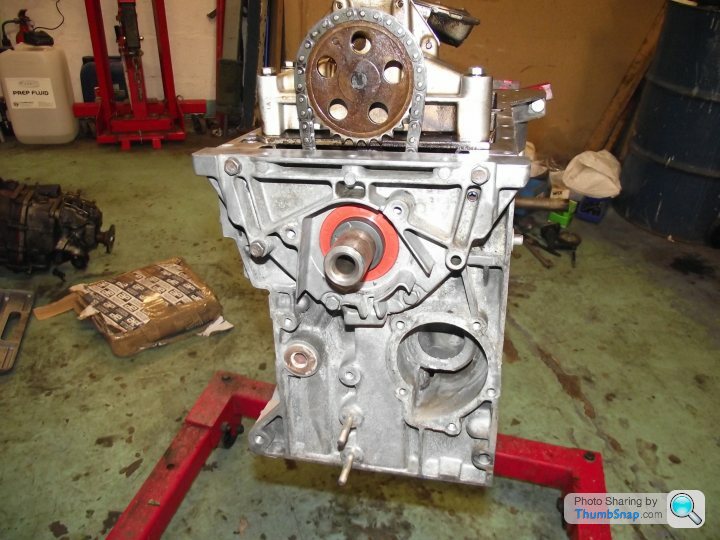
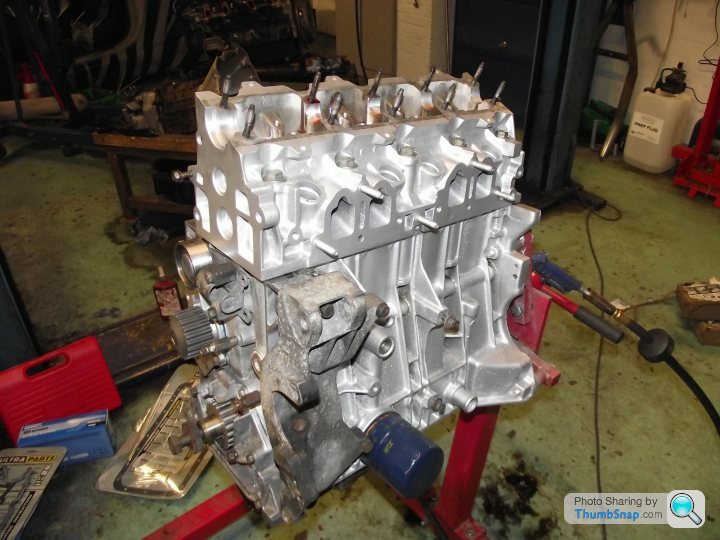
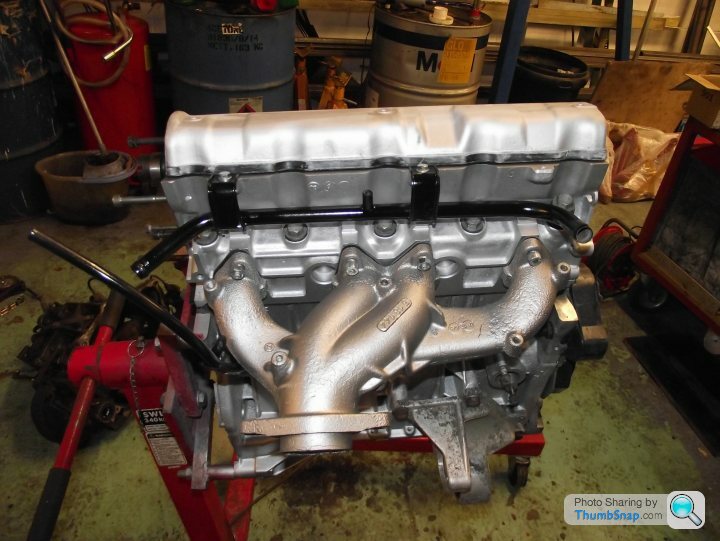
Block painted too, and head plonked on top for pics:
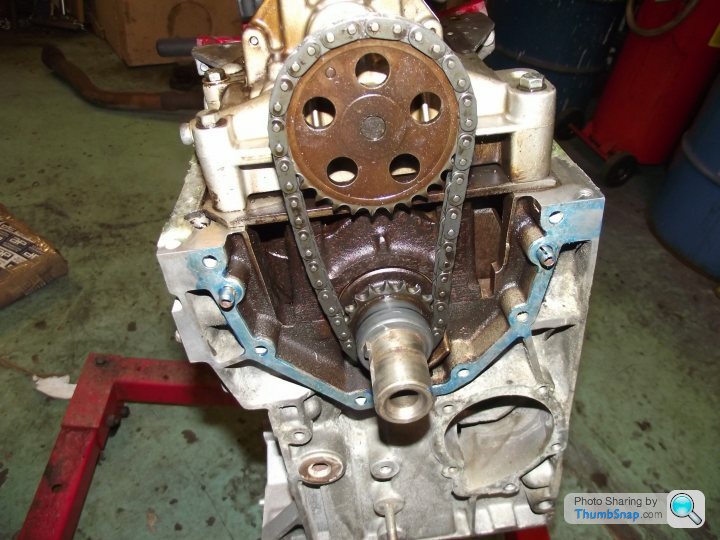
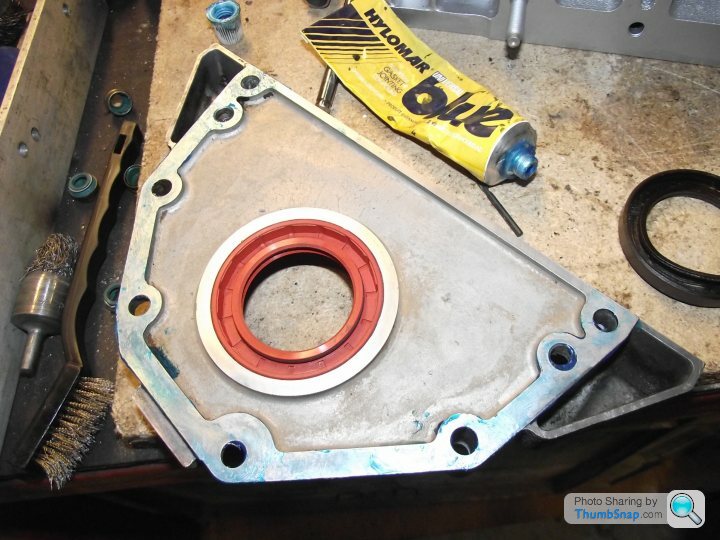
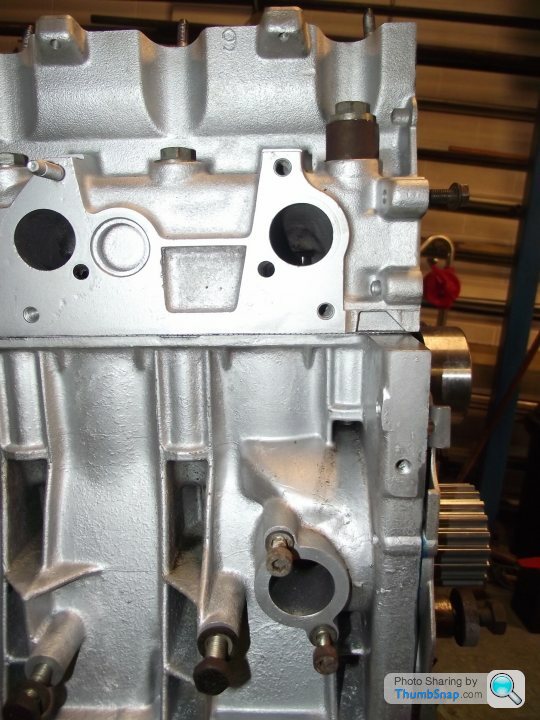
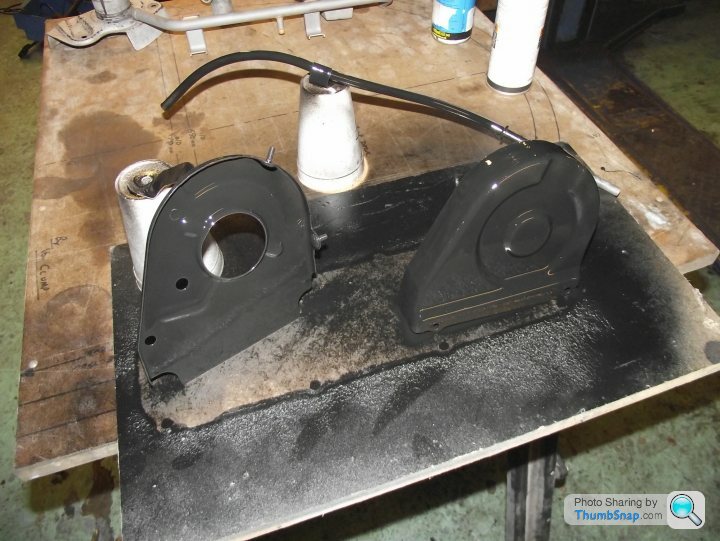
Oil pump chain cover off to clean the sludge off of, and fit a new front crank seal:
So with paint done, time to build the head back up. Valves look a bit......meh:

But a bit of work, and:
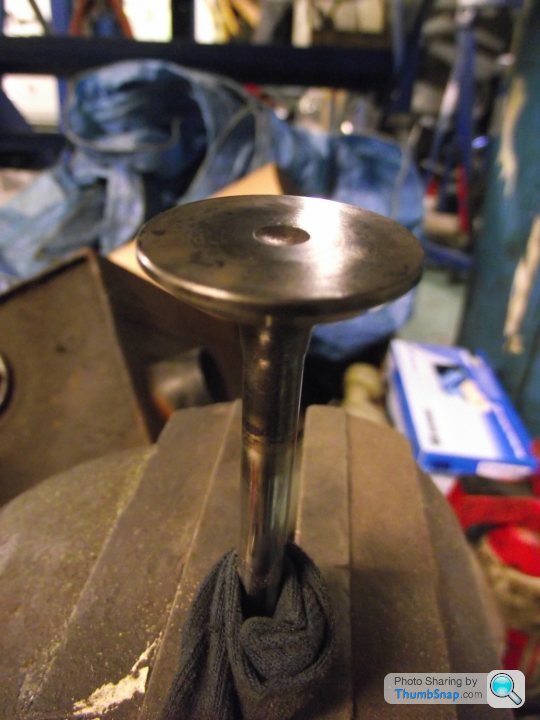
Be good for another 190,000!
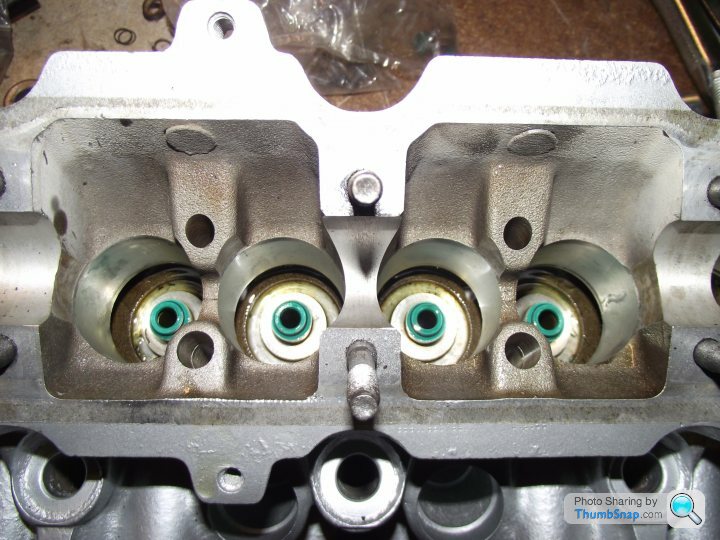
Renewed valve steam seals. Old ones had almost turned to plastic! Amazing that it wasn't pissing blue smoke everywhere! Should be good now:
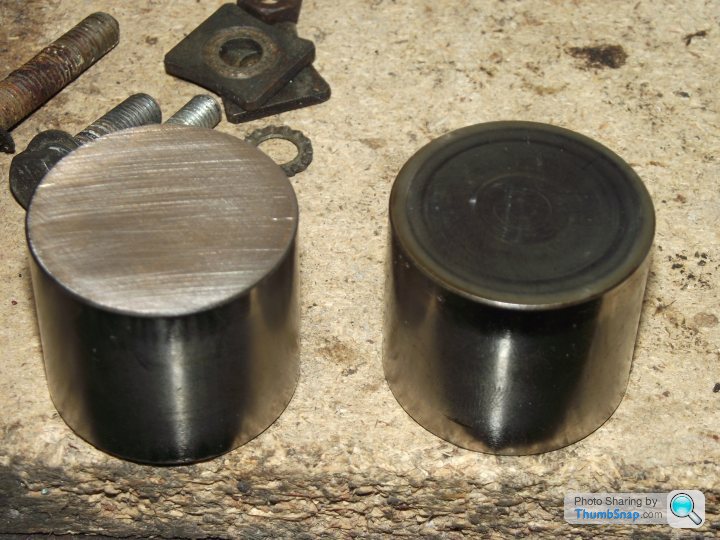
Gave the buckets a little redress. They're pretty hard and there wasn't much wear, even with the mileage. Doesn't take 5 mins when you've got a linisher to hand though. No more days of doing 15mins each of figure-8s with 16 valves!:
Valves going in:
Head's a little bit corroded underneath, but had it pressure tested and all ok. Did faff about for a while trying to find another head, but they're seriously thin on the ground now. Had this one refaced and it's good enough, to be honest. I'm going to convert it to waterless coolant too, so it'll halt any further corrosion.

Head gasket in place:
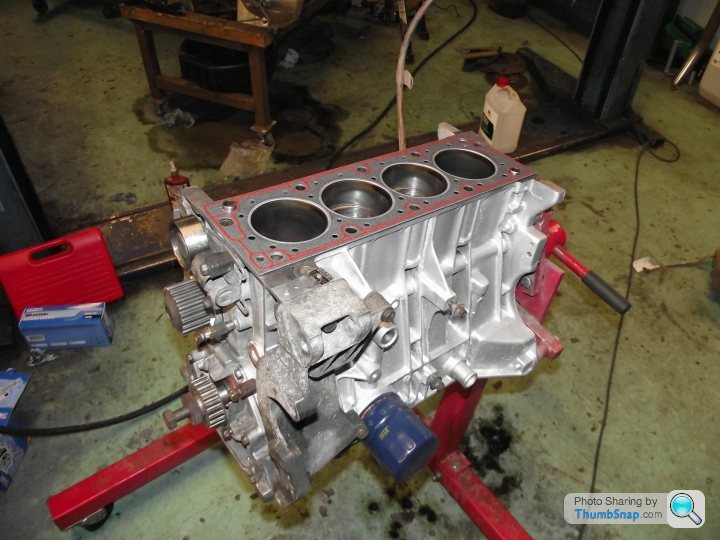
Head bolted down:
How's this for a tightening sequence?!:
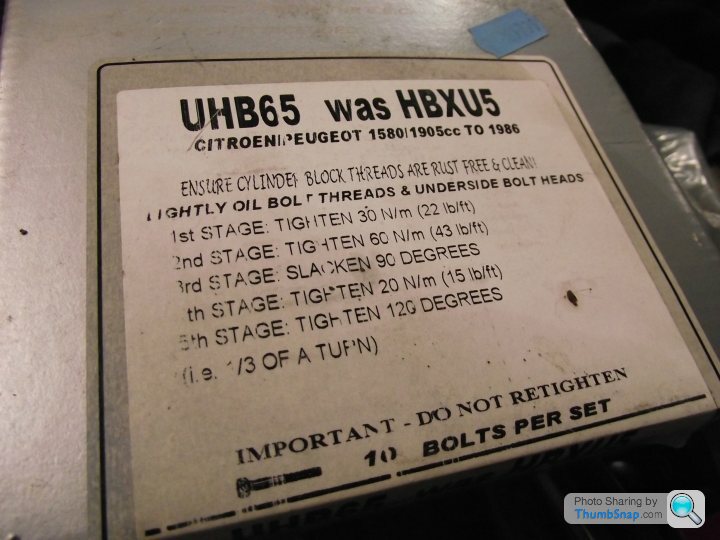
Are we sure that's enough stages!?
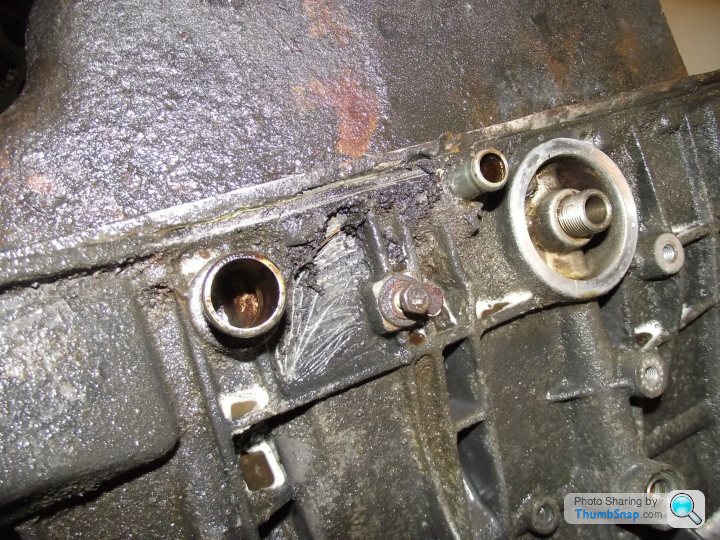
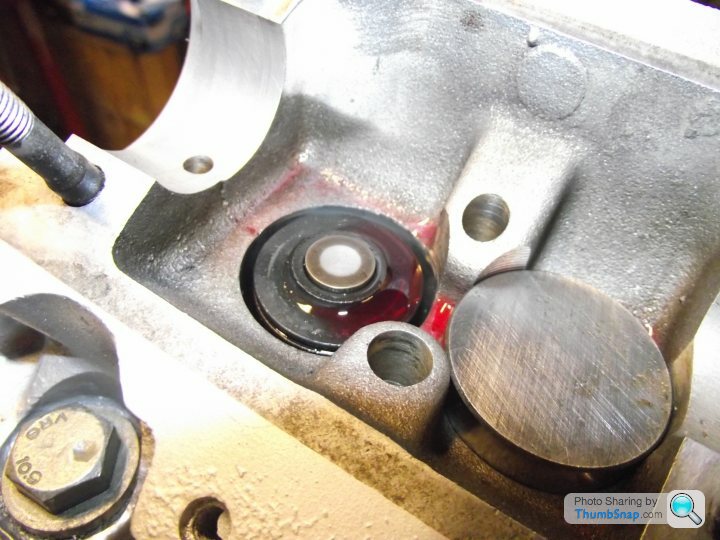
Remembered the spacer. Many a block have been wrecked by missing that out! I'll let you figure out why....:
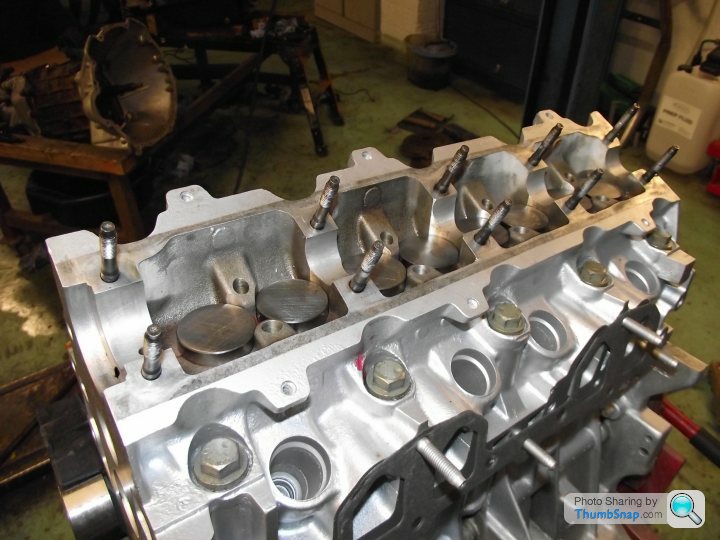
The BX valve clearances on the XU (except the 16v - they're proper engines with hydraulic lifters) are dealt with by way of a solid bucket lifter, and a shim placed underneath. Owing to my previous potential mix-up, I was worried I'd clamp the camshaft in place and find that I had all the valve clearances wrong. So first up, I measured all the shim sizes and recorded them as I went:

Not that they really had any wear, but I fitted them upside down to how they were previous fitted in case there was an indent in the shim opening the gap slightly:
All aboard!:
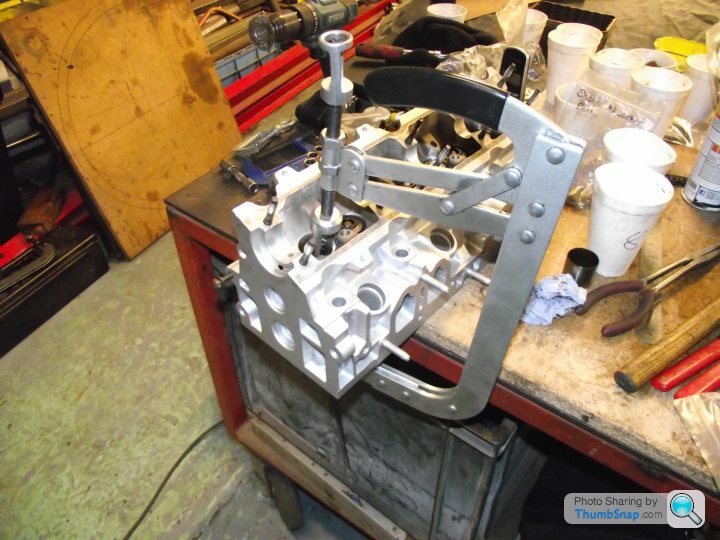
Then it was in with the camshaft....:
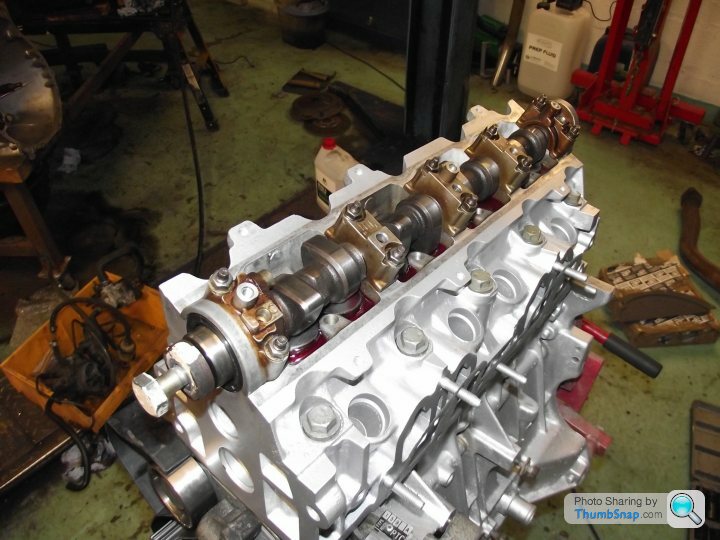
...and check the clearances (and keep fingers crossed!):
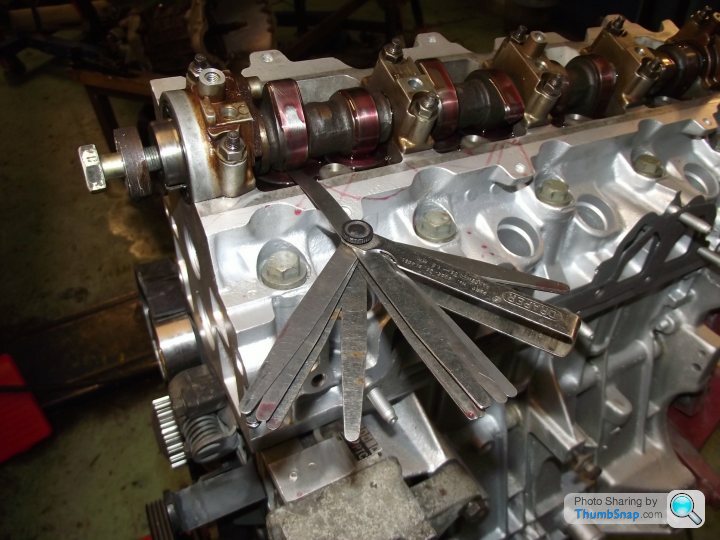
I have no spare shims, so was hoping I would find all the clearances ok. Inlet range is 0.15mm-0.25mm, and exhaust is 0.35mm-0.40mm. Everything was bob on within range. Happy days!
A bit of blasting and painting to be done over the next day or two, before refitting the belt, timing it up and moving on to the gearbox. Then I can think about refitting it!
Well, I managed to get the head and block looking a bit more respectable. Beaulieu motor museum have got nothing to worry about as really to do it properly, the whole shebang would need stripping of every nut and bolt, glass bead blasting and fully overhauling. Ain't nobody got time fo dat, so a quick brush up, degrease and bulls
t silver spray was order of the day! Degreasing took ages:
Pretty thick and grim:
But got there in the end:
Same treatment for the head:
Licked up in silver:
Block painted too, and head plonked on top for pics:
Oil pump chain cover off to clean the sludge off of, and fit a new front crank seal:
So with paint done, time to build the head back up. Valves look a bit......meh:
But a bit of work, and:
Be good for another 190,000!
Renewed valve steam seals. Old ones had almost turned to plastic! Amazing that it wasn't pissing blue smoke everywhere! Should be good now:
Gave the buckets a little redress. They're pretty hard and there wasn't much wear, even with the mileage. Doesn't take 5 mins when you've got a linisher to hand though. No more days of doing 15mins each of figure-8s with 16 valves!:
Valves going in:
Head's a little bit corroded underneath, but had it pressure tested and all ok. Did faff about for a while trying to find another head, but they're seriously thin on the ground now. Had this one refaced and it's good enough, to be honest. I'm going to convert it to waterless coolant too, so it'll halt any further corrosion.
Head gasket in place:
Head bolted down:
How's this for a tightening sequence?!:
Are we sure that's enough stages!?
Remembered the spacer. Many a block have been wrecked by missing that out! I'll let you figure out why....:
The BX valve clearances on the XU (except the 16v - they're proper engines with hydraulic lifters) are dealt with by way of a solid bucket lifter, and a shim placed underneath. Owing to my previous potential mix-up, I was worried I'd clamp the camshaft in place and find that I had all the valve clearances wrong. So first up, I measured all the shim sizes and recorded them as I went:
Not that they really had any wear, but I fitted them upside down to how they were previous fitted in case there was an indent in the shim opening the gap slightly:
All aboard!:
Then it was in with the camshaft....:
...and check the clearances (and keep fingers crossed!):
I have no spare shims, so was hoping I would find all the clearances ok. Inlet range is 0.15mm-0.25mm, and exhaust is 0.35mm-0.40mm. Everything was bob on within range. Happy days!
A bit of blasting and painting to be done over the next day or two, before refitting the belt, timing it up and moving on to the gearbox. Then I can think about refitting it!
Blue Oval84 said:
Awesome work! I'd love to have the time and space to be able to do something like this!
(I would start with welding up a certain old rustbucket obviously...)
I haven't really got the time, to be honest! It started off as a job at work, but I massively underestimated how much work was involved! That was partly because there was more to do underneath than I'd planned, and partly because every little job I'd do I'd go one step further, just out of enthusiasm. Stuff like the engine, which didn't need stripping and painting/cleaning up, or even the engine bay! It was MoT-able, but I wanted it better. I feel bad that it's taken so long (due to the lack of time) but I'm determined when my Dad gets it back that it's of a certain standard. Ideally I'd have loved to go nuts on it, and get every little fixing and bracket looking new, but time just isn't there and I've got loads of other work to do.(I would start with welding up a certain old rustbucket obviously...)
S10GTA said:
Well done mate, your dad will be chuffed when he gets it back. You'll need to find a home for whatever is in his garage however, I reckon he'll be a tart about it now.
Careful! That sounded like a compliment!It always used to live in the garage anyway, more out of practicality than anything else. He's not the polishy-showy type, so I suspect it'll get lightly used and washed maybe once or twice a year with a sponge and some cheap Asda wash & wax
But it'll still look ok for a few years yet 
Edited by Kitchski on Thursday 4th February 09:10
BuzzBravado said:
That torque sequence was the same for my Subaru engine, a lot of tightening the loosening.
Funnily enough one of the cars we're building up is a Nova kit car, which is based on a Beetle. We're fitting a Legacy 2.5 n/a lump to that (EJ25?) and the guy who put the heads on said exactly the same thing.BuzzBravado said:
I'm not sure on the science behind it, but it feels like the end result is way slacker than i thought it should be. 10k miles later though and its still solid.
I know with this one I thought it was going to be too slack, until I got to the end of stage 5. Then I thought i was going to snap a bolt!A BX featured on a BBC programme?:
http://www.bbc.co.uk/iplayer/episode/b07025h9/holi...
Yup! One of the guys on the Facebook group had his TZD Turbo used recently. Makes me want to get one on the road and drive it again!
http://www.bbc.co.uk/iplayer/episode/b07025h9/holi...
Yup! One of the guys on the Facebook group had his TZD Turbo used recently. Makes me want to get one on the road and drive it again!
MOAR progress, mostly engine related:
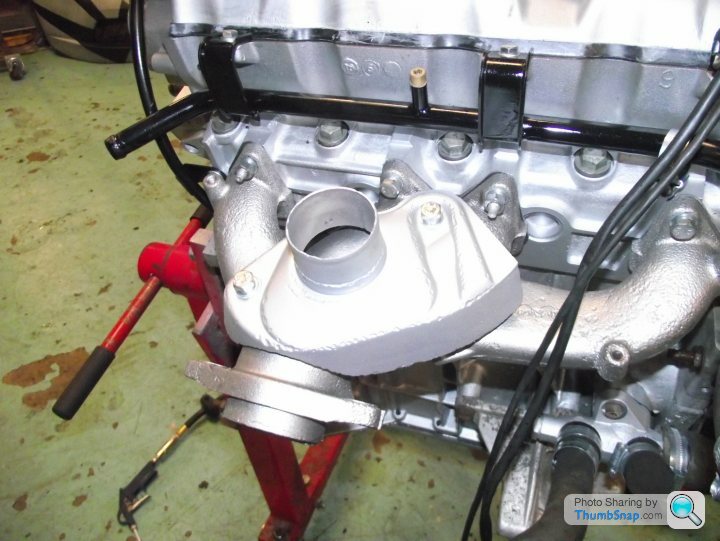
Cleaned up the exhaust manifold:

Prepped a load of little bits and got various components painted:

Manifold coated in VHT spray, the rest of the engine's just in bullst silver 
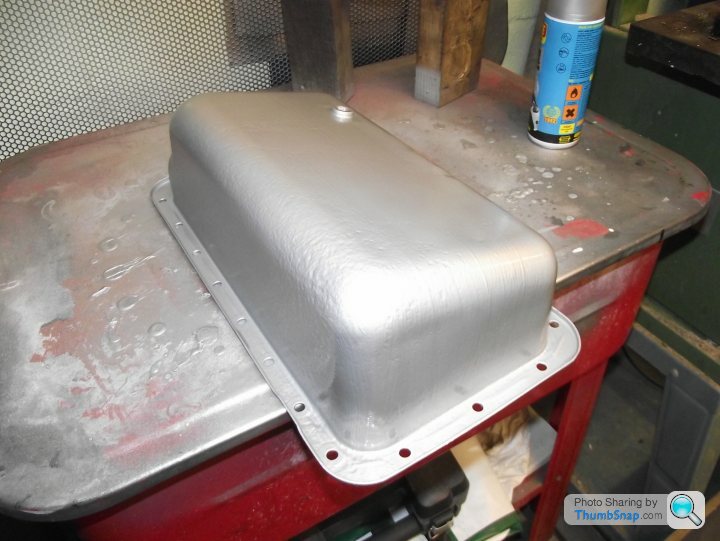
Blasted the sump pan too. This was particularly grotty and greasy. Took ages to clean up! Has now been handpainted with Galvafroid, a sort of galvanised-ish zinc-based paint. No idea how good it is, I've heard good and bad! So I did a particularly vulnerable bit of engine with it before dusting over with the standard silver, and I can monitor how it goes:
They say French cars are st. I think French cars are the best engineered, and it's for reasons like this....

Last time I had to remove the dowels from a flywheel, I had to grip them with mole-grips and work them out on a Rover V8. Two of them sheered. PSA, decided to take the hole all the way through for you, and just step it. This way you can punch them out from behind:
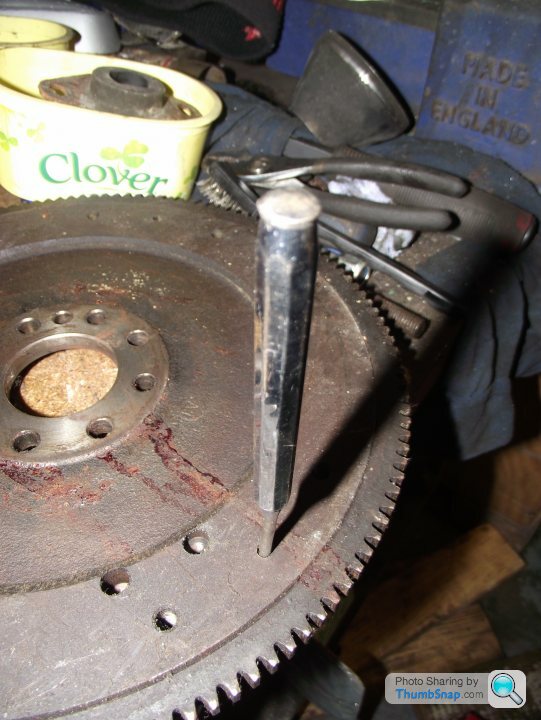
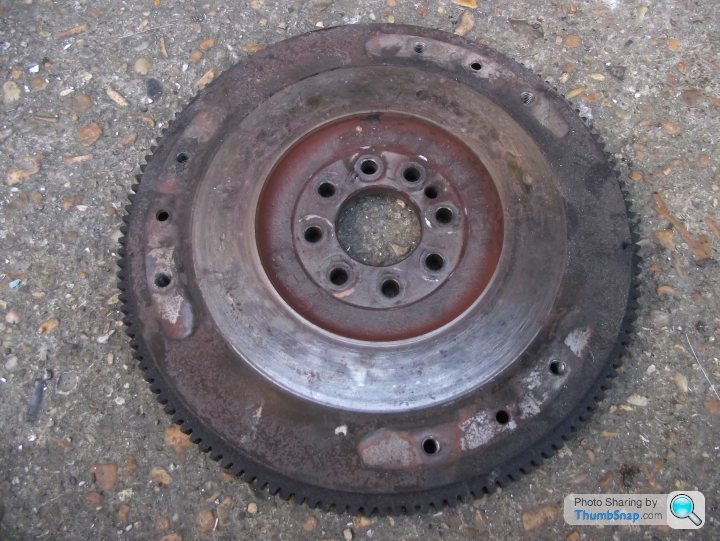
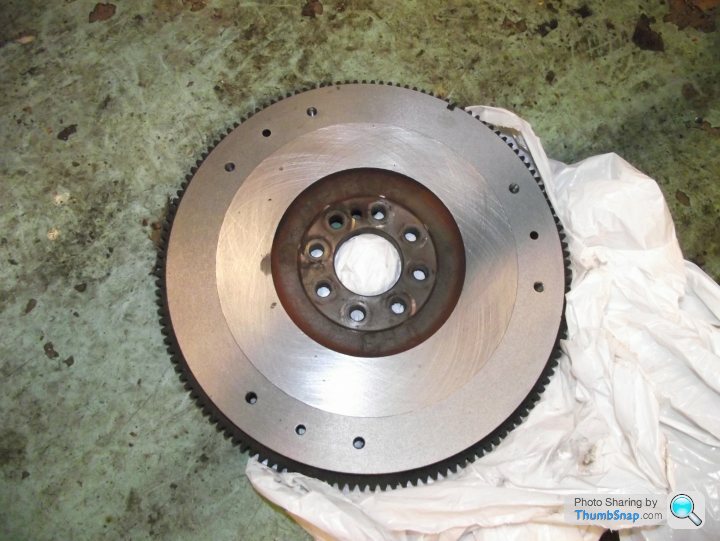
Sorted! They've been in there 190,000 miles, and 30 years. Out with next to no bother! And the reason for taking them out? The flywheel is pretty grotty! Nicely scored, been pretty hot in the past, and I'm going to the trouble of fitting a new clutch. Last thing I want is clutch judder, so I had the flywheel refaced:
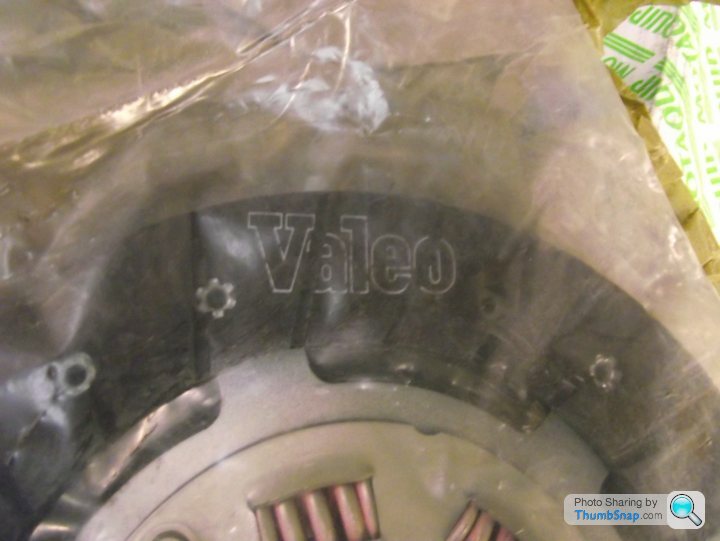
The clutch was supplied by my Dad way back when I first took the BX in. He found some NOS Motaquip units. Pretty sure Motaquip were (originally) PSA's factor brand back in the day, much like Motorcraft for Ford:

Looks like that may be the case....:
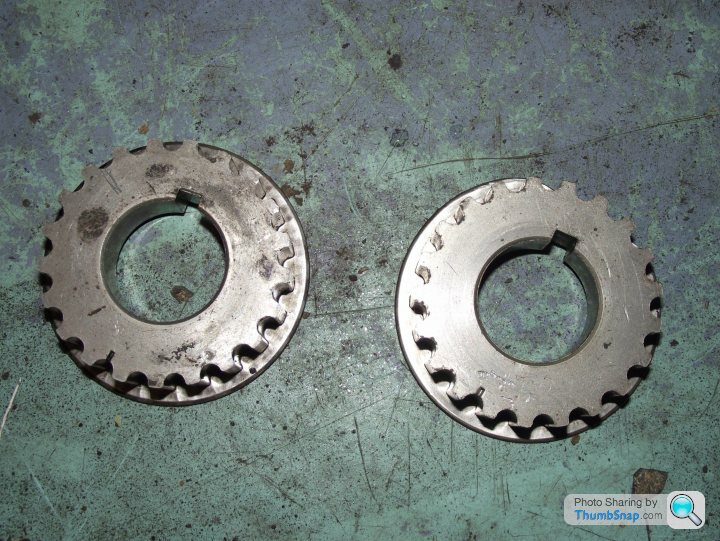
When I was stripping the engine down, I made a bit of a balls-up. The crankshaft sprocket was well and truly stuck onto the crankshaft! I had to try to lever it off, as there's nothing from a puller to grip. In doing this, I managed to damage the thin metal disc on the back of the sprocket, which prevents the belt from touching the oil pump casing. Bugger! I dressed it up like this:
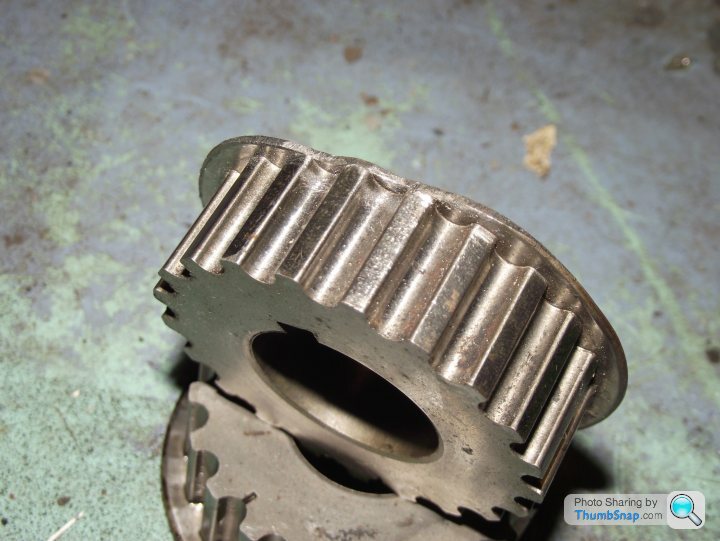
But when fitted, the belt tried to jump every time it went by. Part of me thought to keep going with the smoothing etc, but the other part was worried a belt would get chewed. I stopped by eBay and found a used 205 GTi lower sprocket for £18. Took a punt:
It paid off!
Timing belt all fitted:

More bits bolted together:

One issue I've had is that the exhaust manifold heat shield was held on by some M7 bolts. M7 bolts that I cannot locate. M7 bolts that were not something I've got in stock, and I wanted to get the engine refitted. Solution? Trusty, thrusty drill!:

Followed by trusty, twisty tap:

Leading to:

Resulting in:
Verdict:

So just time to fit the new clutch:
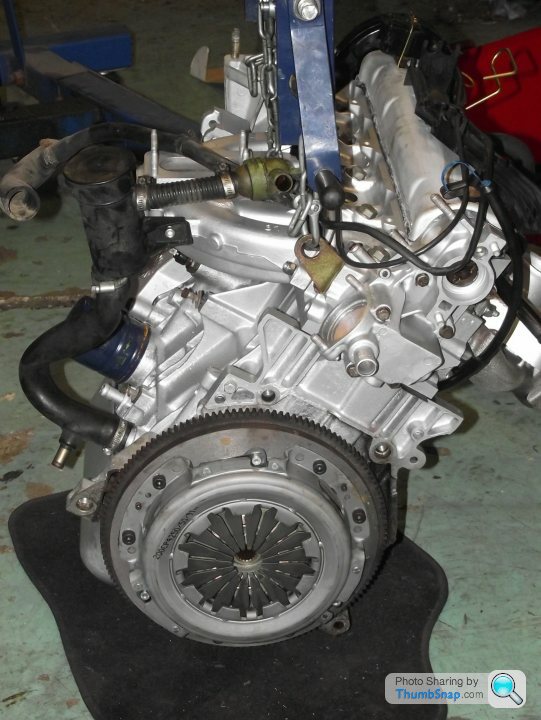
And give the gearbox a spruce up:


And a powertrain package is complete:

And after a bit of heaving and fro'ing, and a remarkable lack of scratched freshly applied paint, both of body and engine variety....
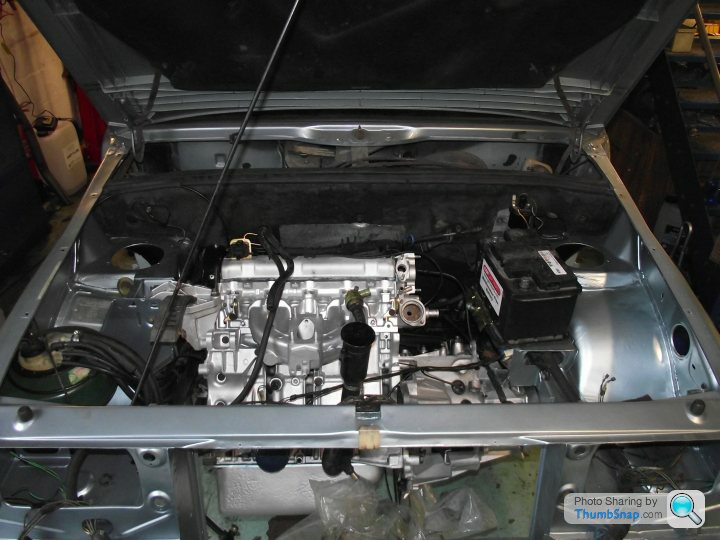
Engine back in BX. I've actually refitted something!!
Plan now is to continue fitting up the front end, right up to things like wings, lights, bumper etc. Then move onto interior in early to mid March, get electrics back online, seats and dash back in etc, before April brings the rear end. LOTS of work to be done there still.
For now, I have some wiring to improve (30 years old, and crusty in places), suspension to refit and and engine to plumb in. Going well though
Cleaned up the exhaust manifold:
Prepped a load of little bits and got various components painted:
Manifold coated in VHT spray, the rest of the engine's just in bulls
t silver Blasted the sump pan too. This was particularly grotty and greasy. Took ages to clean up! Has now been handpainted with Galvafroid, a sort of galvanised-ish zinc-based paint. No idea how good it is, I've heard good and bad! So I did a particularly vulnerable bit of engine with it before dusting over with the standard silver, and I can monitor how it goes:
They say French cars are s
t. I think French cars are the best engineered, and it's for reasons like this....Last time I had to remove the dowels from a flywheel, I had to grip them with mole-grips and work them out on a Rover V8. Two of them sheered. PSA, decided to take the hole all the way through for you, and just step it. This way you can punch them out from behind:
Sorted! They've been in there 190,000 miles, and 30 years. Out with next to no bother! And the reason for taking them out? The flywheel is pretty grotty! Nicely scored, been pretty hot in the past, and I'm going to the trouble of fitting a new clutch. Last thing I want is clutch judder, so I had the flywheel refaced:
The clutch was supplied by my Dad way back when I first took the BX in. He found some NOS Motaquip units. Pretty sure Motaquip were (originally) PSA's factor brand back in the day, much like Motorcraft for Ford:
Looks like that may be the case....:
When I was stripping the engine down, I made a bit of a balls-up. The crankshaft sprocket was well and truly stuck onto the crankshaft! I had to try to lever it off, as there's nothing from a puller to grip. In doing this, I managed to damage the thin metal disc on the back of the sprocket, which prevents the belt from touching the oil pump casing. Bugger! I dressed it up like this:
But when fitted, the belt tried to jump every time it went by. Part of me thought to keep going with the smoothing etc, but the other part was worried a belt would get chewed. I stopped by eBay and found a used 205 GTi lower sprocket for £18. Took a punt:
It paid off!
Timing belt all fitted:
More bits bolted together:
One issue I've had is that the exhaust manifold heat shield was held on by some M7 bolts. M7 bolts that I cannot locate. M7 bolts that were not something I've got in stock, and I wanted to get the engine refitted. Solution? Trusty, thrusty drill!:
Followed by trusty, twisty tap:
Leading to:
Resulting in:
Verdict:
So just time to fit the new clutch:
And give the gearbox a spruce up:
And a powertrain package is complete:
And after a bit of heaving and fro'ing, and a remarkable lack of scratched freshly applied paint, both of body and engine variety....
Engine back in BX. I've actually refitted something!!
Plan now is to continue fitting up the front end, right up to things like wings, lights, bumper etc. Then move onto interior in early to mid March, get electrics back online, seats and dash back in etc, before April brings the rear end. LOTS of work to be done there still.
For now, I have some wiring to improve (30 years old, and crusty in places), suspension to refit and and engine to plumb in. Going well though
So, work is slowly progressing on the BX GT! The original plan was to have it mobile and driving by this time this year. Nope, not gonna happen! Business got very busy, life got in the way - the usual BS. So we still don't have a working GT.
That said, there has been some progress, however slight. It has now moved from the dolly to the 2-post ramp:
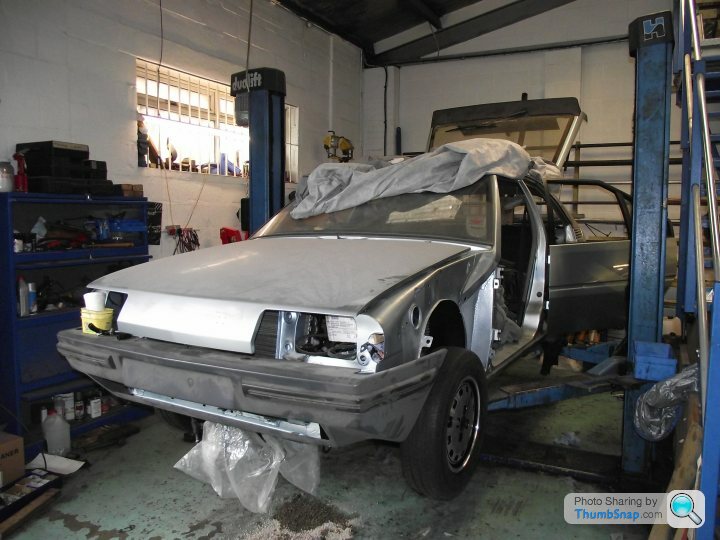
The main reason for this is that I needed the dolly it was sitting on for another TVR job! This way, I am now pressured into making progress with it, as it's holding up a ramp we need for servicing and repairs in the workshop.
First job was to bolt on the remainder of the front suspension, and see if the clutch was working. The old-style BE1 (reverse up next to 1st gear in the gate) uses a cable-operated clutch, but no adjuster on the cable itself. All you get is a pushrod with an adjustable cup the seats it against the release arm. Having fitted a NOS genuine Peugeot clutch, and a NOS Citroen cable, I was expecting a veritable world of clutch pleasure. Instead, what I've got is a click. You push the clutch pedal down, and there is a big click from the release bearing area. Not good. I found it was happening when the pedal is near the end of its travel, and the old clutch had done many, many miles, so the adjuster had been wound out to compensate for the thinning clutch plate. 'Fine', thinks I. I'll just adjust it back down again. I finally get rid of the click, but find the pedal now sitting lower than the brake pedal height. 'Bugger' thinks I. So, I clag on all the suspension, build up the driveshafts, hook it all up and get someone to press what's left of the clutch pedal while I try and rotate a wheel. And I can, easily. Let go of pedal, no dice - wheel stays locked. So the clutch is working, at least. I decide I really need to have it running and see how it behaves before going further with it, so my plans to complete the front end cease and I move to the back end instead.
It's no bad thing, having it on here though. It means access to the back, and the biggest elephant still sitting in the room (rust.....lots of lovely old French rust) is easier to try and tackle.
Those who've been following from the start will remember I found loads of rot hiding for me in the rear chassis legs. I made a start at the time cleaning, plating and sorting the offside, which was the better of the two sides in terms of condition. Looking back, I'm a bit disappointed with how I left it, as I think I could have done a neater job. That said, the offside is now solid, if ugly, and the nearside is totally unsorted, so it's the nearside I'm going to town on.
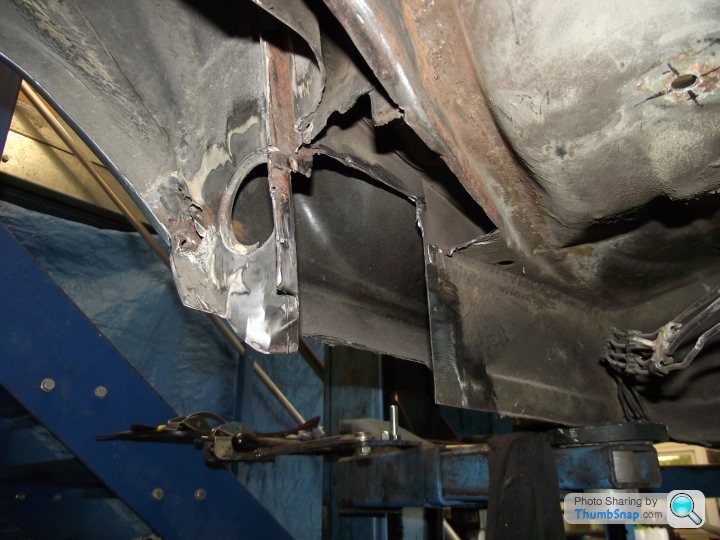
The main area of concern on any BX these days, is the forward rear subframe mounts. They nestle up behind the back of the inner sill, and pick up the rear chassis legs through a big, thick L-shaped plate, which also lends itself as the rear jacking point. BXs like to rot here! One guy I know has actually had a subframe detach here (there are three other mounts, so it didn't result in a crash. I still think new pants were needed though). The GT is as bad as I've seen in this respect, even though the shell is galvanised.
So the first thing to do is to gain access to the mounts, which are underneath the rear seat bench:

The nearside looked ugly with the flash on:
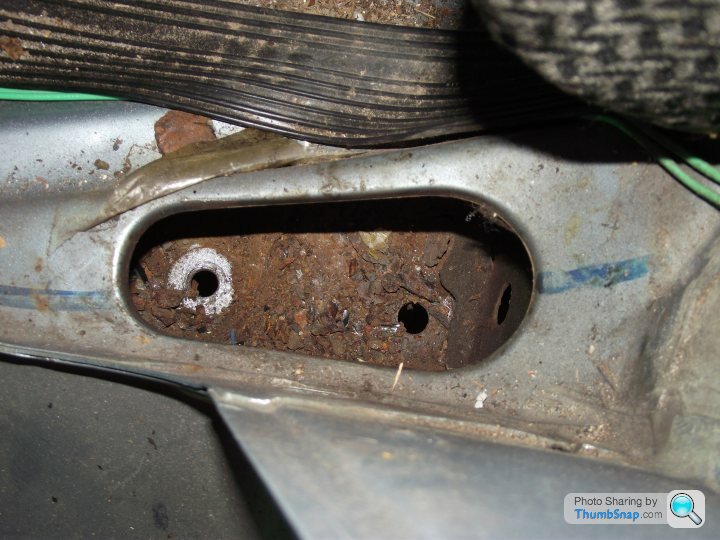
Looked ALOT worse with the flash off:

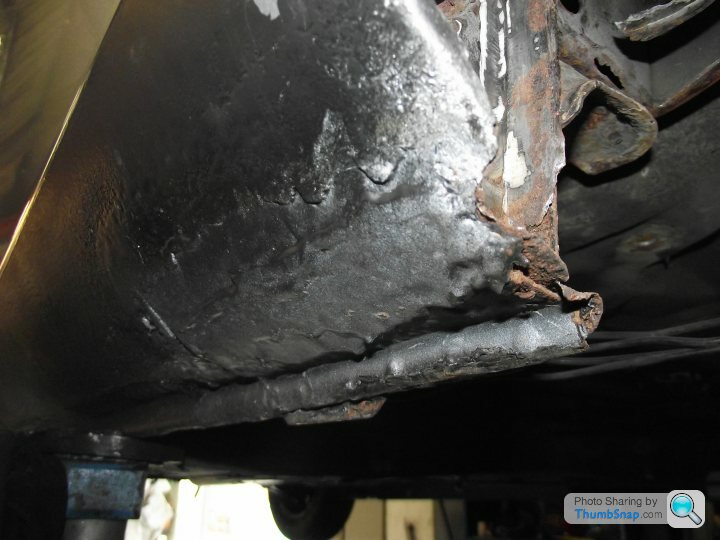
From underneath the rot was obvious:
Some of that was already cut out as I planned the previous repair, but the area for the mount was a bigger concern. There was also an MoT-pass patch (on top of another patch) on the outer sill, which I was keen to lose:
So the first thing I did was cut out some metal....

I had a mate stop by, and he advised me I'd got the shape totally wrong!:

But then I showed him what I was up to:

It's a jig for realigning the rear subframe mounting holes. It dawned on me that I was going to hack all this lot out completely, and would have no way of knowing where it was meant to go back. I didn't want to give my Dad back a car that crabbed its way down the road, so made this. Took HOURS! We'll see if it actually works when I go to put the axle back on!
Then it was time to drill out some spot-welds (the ones still actually connected to metal):
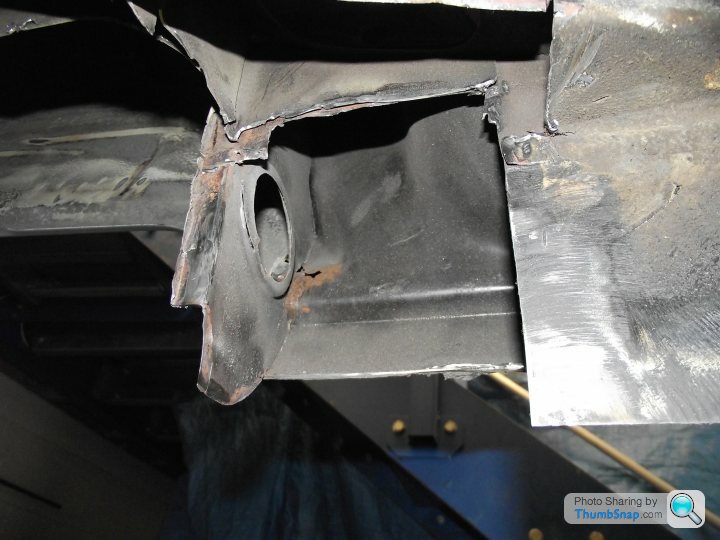
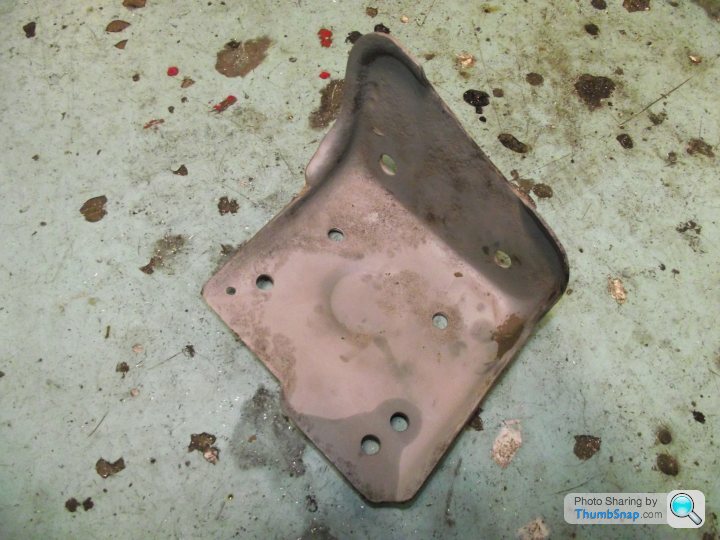
And then remove the mounting plate:

So that wasn't really connected to much, then! And the mad thing is that it would have passed an MoT, as none of that would have been visible.
The plate itself looks bad, but is actually still pretty strong. I managed to buy a new set that a company called Chevronics have had fabricated, but they're not a perfect OE match, and while these look rough, I think they're actually still pretty strong, so will shot blast them later and see how they come out. I can keep the ones I bought for a later job where the mounts are totally shot.
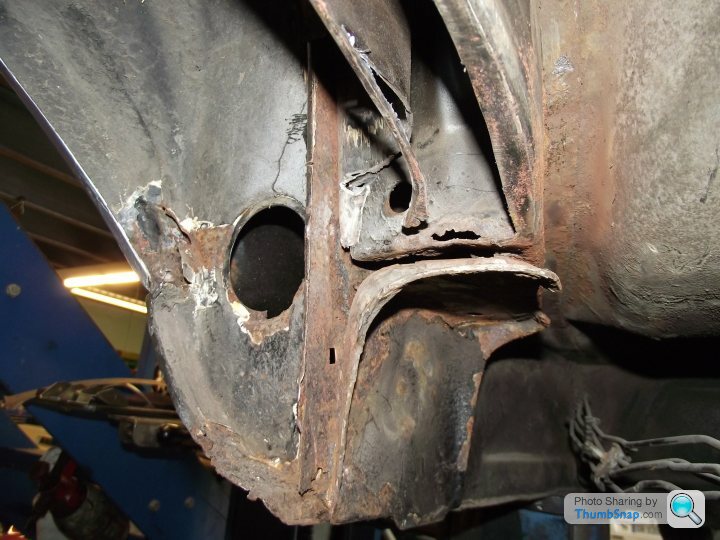
As we can see, now the plate has gone, there isn't much left of the chassis leg at all! The subframe bolts should pass through the plate AND the chassis leg, which has gone!
So I begin removing weight from the BX:
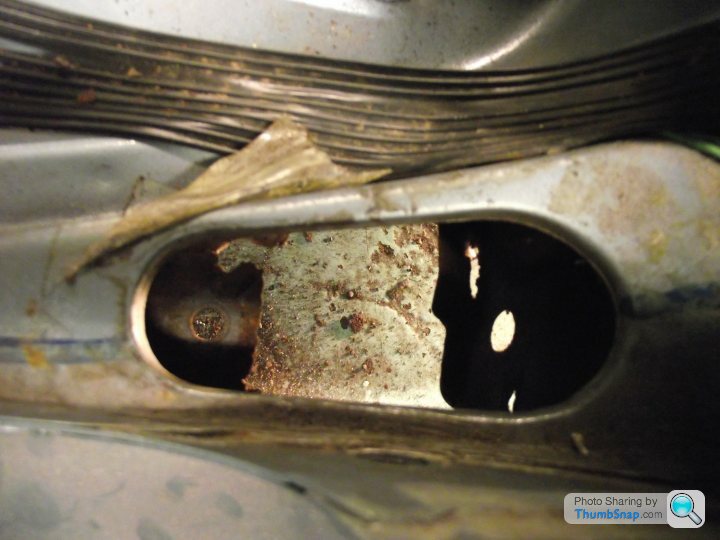
Straight away, another issue:
"Hey Rich, that's a nice grinder you've got there. Be a shame if some rust was.....OUT OF REACH:
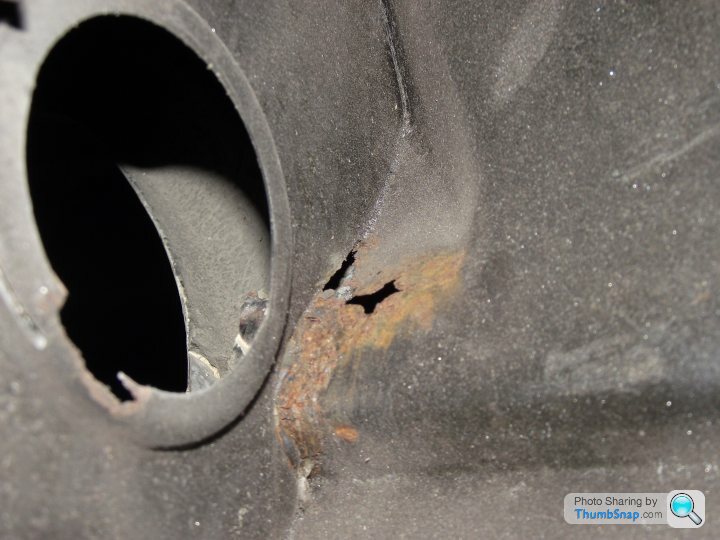
Yup, totally out of reach. To get to that and sort it properly is a 1/4 panel off job. Am I doing that? No. No I am not doing that! So I'll grind out what I can, rust treat, lather in 2k mastic paint and then smother with sealant. it's not structural, it won't be visible, and if I can stop that in its tracks and make sure it never gets worse, I'll be happy. Or, I'll take the 1/4 off again in 10 years! Sometimes, you have to admit defeat, in a manner of speaking.
So, I cheered myself up by chopping out the stty MoT repair.
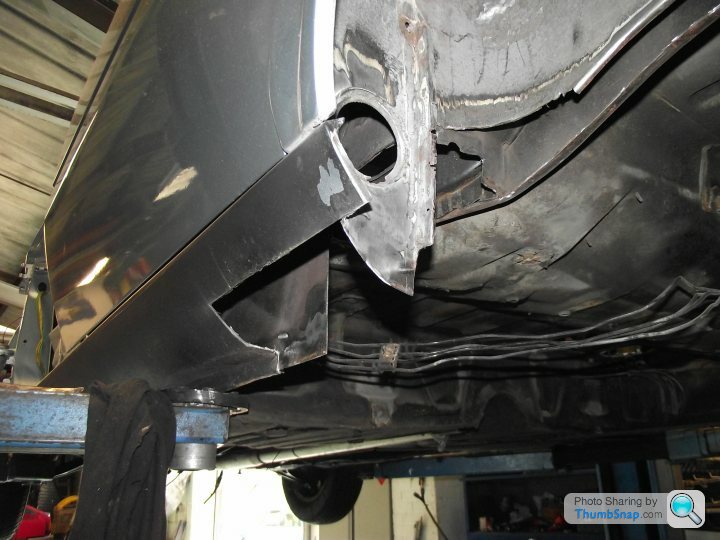
Then I started making new sections and welding them in. Before I made this section, I rust treated and painted all the areas above it (except the ones the welder will get near - the original cavity wax will have to do!) That plate is to replace two overlapping plates, which I don't really need to bother with, so now the whole side section there is 2mm plate steel top the bottom. That's actually heavier duty than what was there before.

The more visually astute of you will have spotted that I didn't measure twice, cut once on that section!
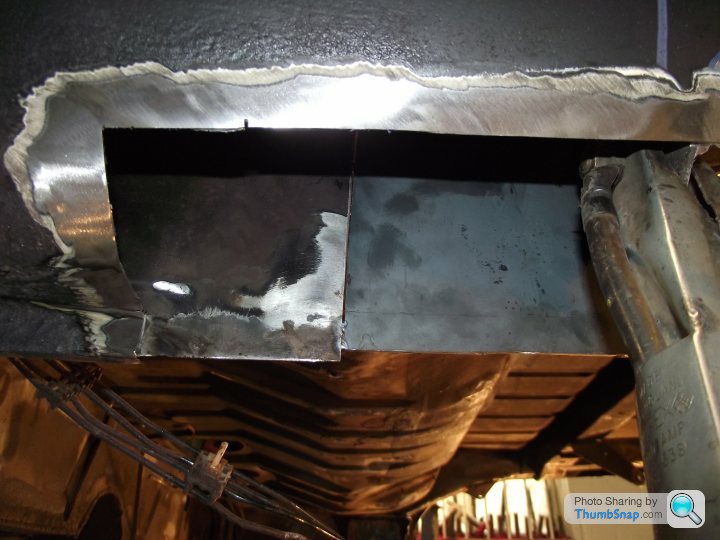
No matter, that's the beauty of welding metal!:
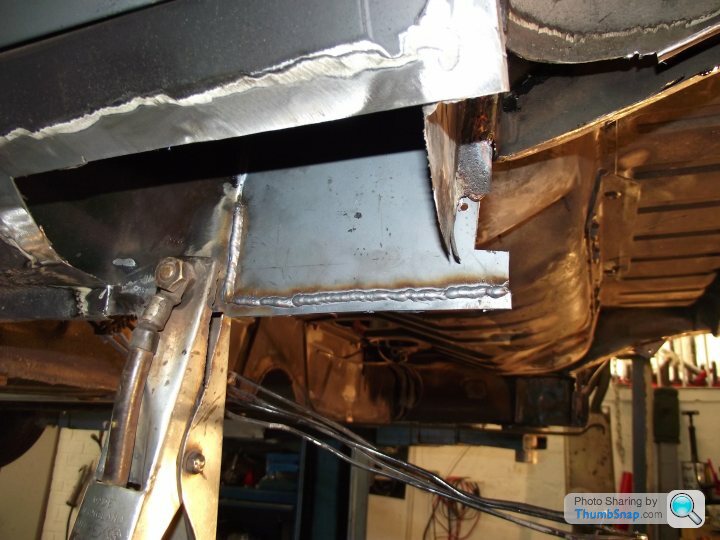
Seaming to improve.....
Then I put a base back on the chassis leg:

Next week I'll go back in, finish the remainder of the chassis leg off, clean up and refit the subframe mount and make a new end section for the sill. Then I'll take off all the underseal at the back of the car, treat it all and paint it all. Then I'll make sure the offside is all well and rebuild the back end.
Easy as that......
That said, there has been some progress, however slight. It has now moved from the dolly to the 2-post ramp:
The main reason for this is that I needed the dolly it was sitting on for another TVR job! This way, I am now pressured into making progress with it, as it's holding up a ramp we need for servicing and repairs in the workshop.
First job was to bolt on the remainder of the front suspension, and see if the clutch was working. The old-style BE1 (reverse up next to 1st gear in the gate) uses a cable-operated clutch, but no adjuster on the cable itself. All you get is a pushrod with an adjustable cup the seats it against the release arm. Having fitted a NOS genuine Peugeot clutch, and a NOS Citroen cable, I was expecting a veritable world of clutch pleasure. Instead, what I've got is a click. You push the clutch pedal down, and there is a big click from the release bearing area. Not good. I found it was happening when the pedal is near the end of its travel, and the old clutch had done many, many miles, so the adjuster had been wound out to compensate for the thinning clutch plate. 'Fine', thinks I. I'll just adjust it back down again. I finally get rid of the click, but find the pedal now sitting lower than the brake pedal height. 'Bugger' thinks I. So, I clag on all the suspension, build up the driveshafts, hook it all up and get someone to press what's left of the clutch pedal while I try and rotate a wheel. And I can, easily. Let go of pedal, no dice - wheel stays locked. So the clutch is working, at least. I decide I really need to have it running and see how it behaves before going further with it, so my plans to complete the front end cease and I move to the back end instead.
It's no bad thing, having it on here though. It means access to the back, and the biggest elephant still sitting in the room (rust.....lots of lovely old French rust) is easier to try and tackle.
Those who've been following from the start will remember I found loads of rot hiding for me in the rear chassis legs. I made a start at the time cleaning, plating and sorting the offside, which was the better of the two sides in terms of condition. Looking back, I'm a bit disappointed with how I left it, as I think I could have done a neater job. That said, the offside is now solid, if ugly, and the nearside is totally unsorted, so it's the nearside I'm going to town on.
The main area of concern on any BX these days, is the forward rear subframe mounts. They nestle up behind the back of the inner sill, and pick up the rear chassis legs through a big, thick L-shaped plate, which also lends itself as the rear jacking point. BXs like to rot here! One guy I know has actually had a subframe detach here (there are three other mounts, so it didn't result in a crash. I still think new pants were needed though). The GT is as bad as I've seen in this respect, even though the shell is galvanised.
So the first thing to do is to gain access to the mounts, which are underneath the rear seat bench:
The nearside looked ugly with the flash on:
Looked ALOT worse with the flash off:
From underneath the rot was obvious:
Some of that was already cut out as I planned the previous repair, but the area for the mount was a bigger concern. There was also an MoT-pass patch (on top of another patch) on the outer sill, which I was keen to lose:
So the first thing I did was cut out some metal....
I had a mate stop by, and he advised me I'd got the shape totally wrong!:
But then I showed him what I was up to:
It's a jig for realigning the rear subframe mounting holes. It dawned on me that I was going to hack all this lot out completely, and would have no way of knowing where it was meant to go back. I didn't want to give my Dad back a car that crabbed its way down the road, so made this. Took HOURS! We'll see if it actually works when I go to put the axle back on!
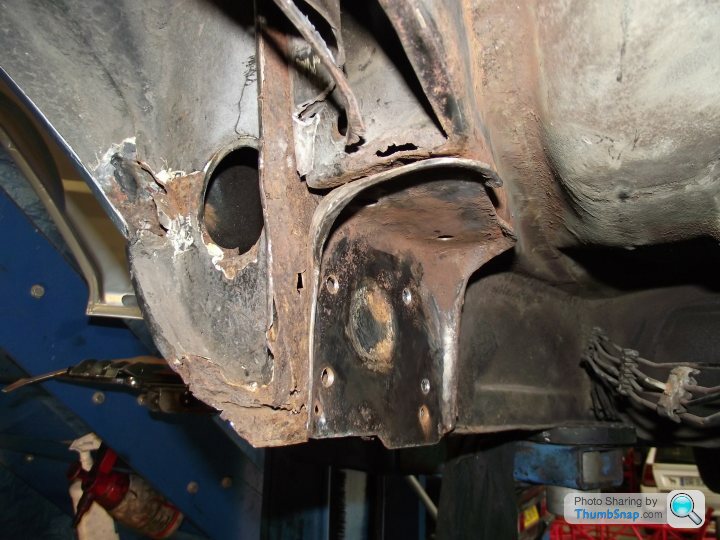
Then it was time to drill out some spot-welds (the ones still actually connected to metal):
And then remove the mounting plate:
So that wasn't really connected to much, then! And the mad thing is that it would have passed an MoT, as none of that would have been visible.
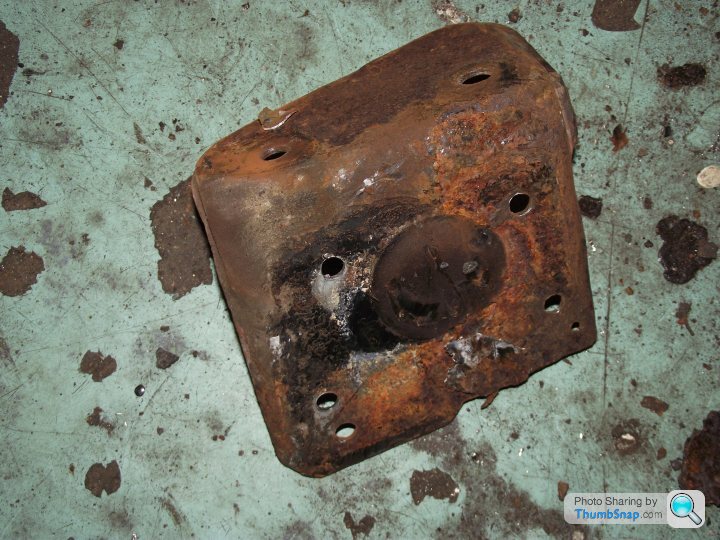
The plate itself looks bad, but is actually still pretty strong. I managed to buy a new set that a company called Chevronics have had fabricated, but they're not a perfect OE match, and while these look rough, I think they're actually still pretty strong, so will shot blast them later and see how they come out. I can keep the ones I bought for a later job where the mounts are totally shot.
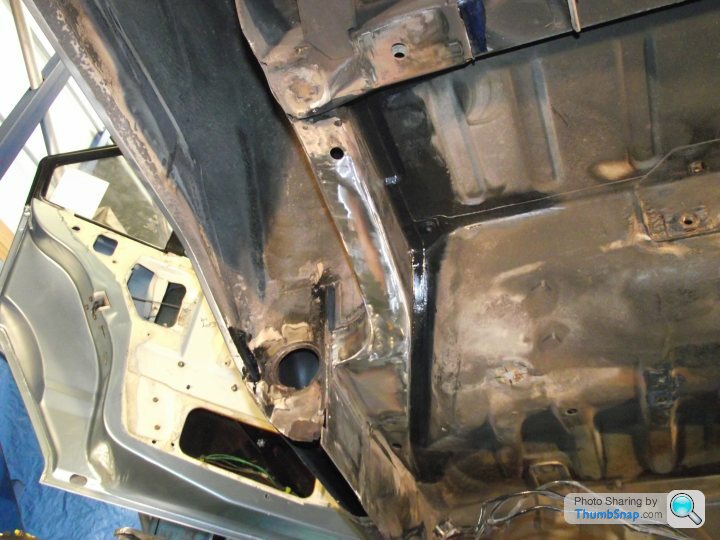
As we can see, now the plate has gone, there isn't much left of the chassis leg at all! The subframe bolts should pass through the plate AND the chassis leg, which has gone!
So I begin removing weight from the BX:
Straight away, another issue:
"Hey Rich, that's a nice grinder you've got there. Be a shame if some rust was.....OUT OF REACH:
Yup, totally out of reach. To get to that and sort it properly is a 1/4 panel off job. Am I doing that? No. No I am not doing that! So I'll grind out what I can, rust treat, lather in 2k mastic paint and then smother with sealant. it's not structural, it won't be visible, and if I can stop that in its tracks and make sure it never gets worse, I'll be happy. Or, I'll take the 1/4 off again in 10 years! Sometimes, you have to admit defeat, in a manner of speaking.
So, I cheered myself up by chopping out the s
tty MoT repair.Then I started making new sections and welding them in. Before I made this section, I rust treated and painted all the areas above it (except the ones the welder will get near - the original cavity wax will have to do!) That plate is to replace two overlapping plates, which I don't really need to bother with, so now the whole side section there is 2mm plate steel top the bottom. That's actually heavier duty than what was there before.
The more visually astute of you will have spotted that I didn't measure twice, cut once on that section!
No matter, that's the beauty of welding metal!:
Seaming to improve.....
Then I put a base back on the chassis leg:
Next week I'll go back in, finish the remainder of the chassis leg off, clean up and refit the subframe mount and make a new end section for the sill. Then I'll take off all the underseal at the back of the car, treat it all and paint it all. Then I'll make sure the offside is all well and rebuild the back end.
Easy as that......

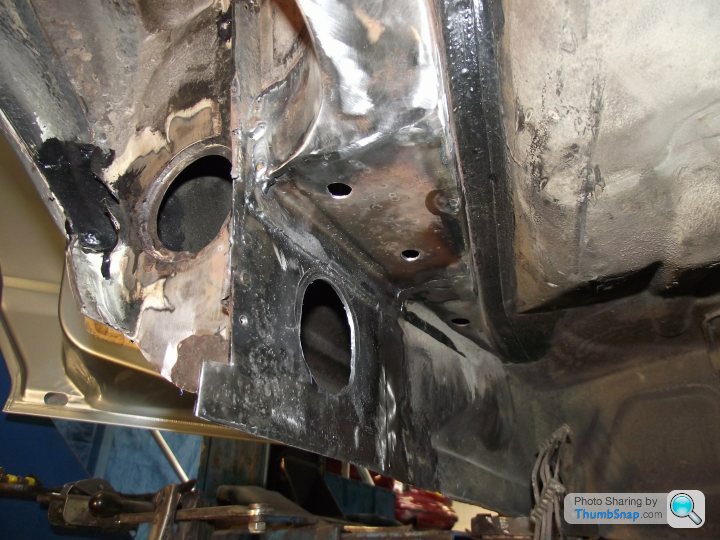
Some more progress on the BX. Picking up from where I left off, I finished rebuilding the NSR chassis leg. Firstly by tacking bits on:

Then stitching everything up:


Then linishing off to try and make it look like it was never done in the first place!:
Then I took the subframe mount to the grit blaster to get it ready for fitting:
And it was after that, that there were two OH COCK moments. The first came when I realised I had the angle of the chassis leg slightly wrong:

The gap on the left, though not as bad as the shadow makes out, it's supposed to be there. Combination of me cocking up the measurements, and the top of the plate had rusted away a bit, as can be evidenced here:

(The second 'oh cock' moment came when I accidentally slipped with a grinder and took a chunk out of a high-pressure suspension line. A perfectly good, high-pressure suspension line too. Now I've got to make a new pipe front to back, just because of that!)
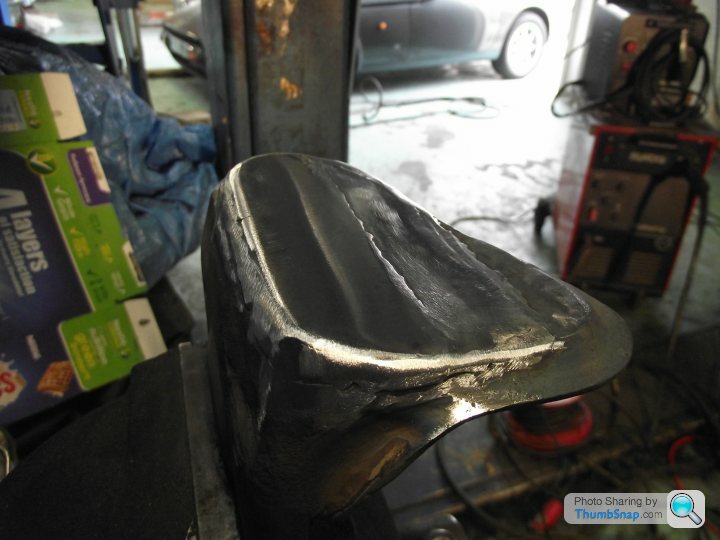
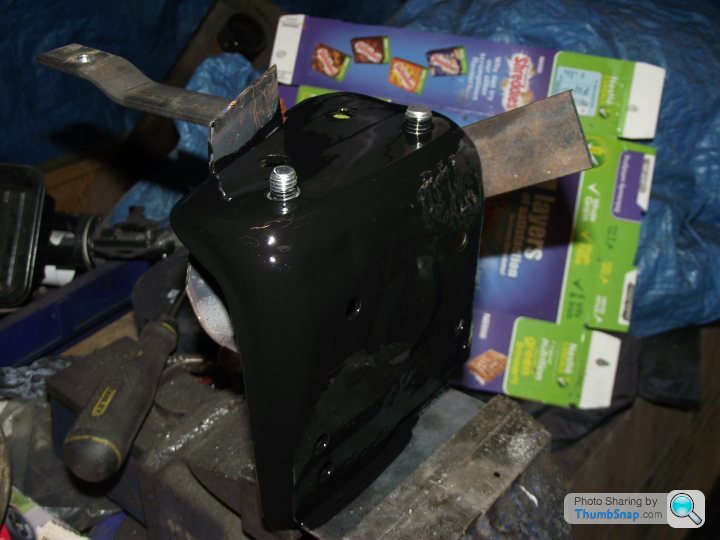
Anyway, I couldn't do much with the chassis leg, so I decided to kill two birds with one stone, and beef up the mounting plate:
Then I worked at it with a linished and more layers of plate until I got the right profile:
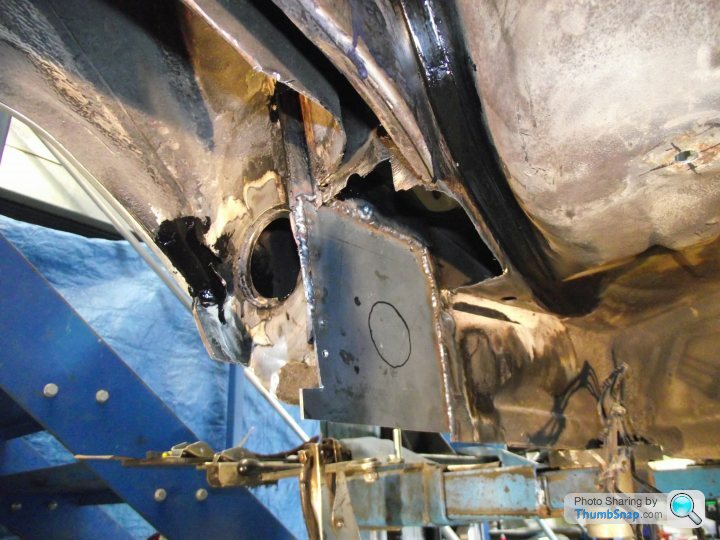
I opened up a locating hole, using the jig I made:
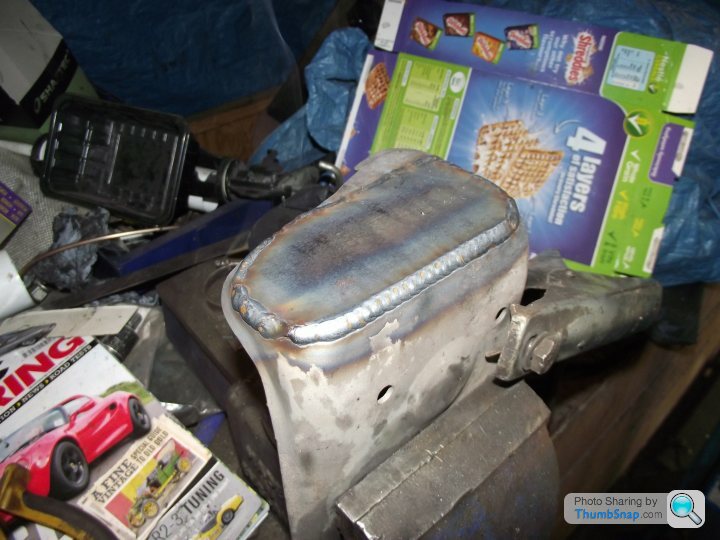
Before painting it, and the back faces of the subframe mount in high-temp POR15 black. Reasoning being that once it's welded on, I can't get to the back of it to paint/seal it again. I went high-temp paint, and just accepted that there will be some bits around the welds that I won't be able to get it. I can't easily dip-galv the shell like Citroen did in 1985!:

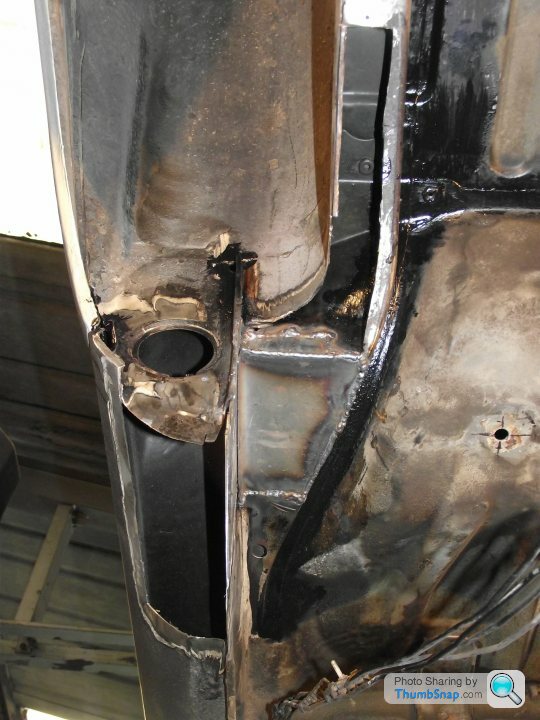
Then I using some massive puddle welds to refit it to the shell:
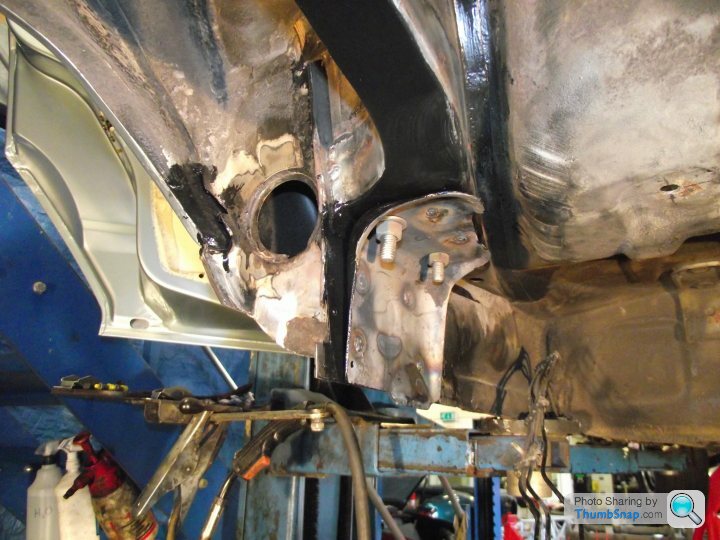
I also doubled the thickness of the jacking point, which in turn seam welded the bottom of that plate to the inner sill (which is now 2mm thick at that rear section - should be stronger than from the factory!
Once all that was taken care of, I moved onto prepping the rest of the wheel arches and floor pan from the rear footwell backwards, for paint. Spent 30mins on it, ended up with a pile 10mm thick on the floor, and more up my nose:
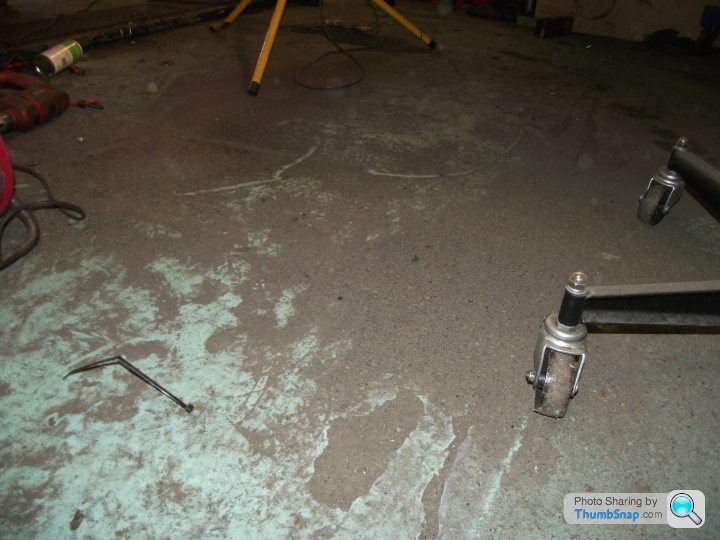
Not looking forward to finishing that!
Then stitching everything up:
Then linishing off to try and make it look like it was never done in the first place!:
Then I took the subframe mount to the grit blaster to get it ready for fitting:
And it was after that, that there were two OH COCK moments. The first came when I realised I had the angle of the chassis leg slightly wrong:
The gap on the left, though not as bad as the shadow makes out, it's supposed to be there. Combination of me cocking up the measurements, and the top of the plate had rusted away a bit, as can be evidenced here:
(The second 'oh cock' moment came when I accidentally slipped with a grinder and took a chunk out of a high-pressure suspension line. A perfectly good, high-pressure suspension line too. Now I've got to make a new pipe front to back, just because of that!)
Anyway, I couldn't do much with the chassis leg, so I decided to kill two birds with one stone, and beef up the mounting plate:
Then I worked at it with a linished and more layers of plate until I got the right profile:
I opened up a locating hole, using the jig I made:
Before painting it, and the back faces of the subframe mount in high-temp POR15 black. Reasoning being that once it's welded on, I can't get to the back of it to paint/seal it again. I went high-temp paint, and just accepted that there will be some bits around the welds that I won't be able to get it. I can't easily dip-galv the shell like Citroen did in 1985!:
Then I using some massive puddle welds to refit it to the shell:
I also doubled the thickness of the jacking point, which in turn seam welded the bottom of that plate to the inner sill (which is now 2mm thick at that rear section - should be stronger than from the factory!
Once all that was taken care of, I moved onto prepping the rest of the wheel arches and floor pan from the rear footwell backwards, for paint. Spent 30mins on it, ended up with a pile 10mm thick on the floor, and more up my nose:
Not looking forward to finishing that!
Gassing Station | Readers' Cars | Top of Page | What's New | My Stuff