1985 Citroen BX 19GT overhaul
Discussion


TooMany2cvs said:
As soon as I get round to finding a decent one, cheap.
I'll keep an ear out, though 'cheap' and 'decent' are getting harder and harder to find now, as with many older cars.TooMany2cvs said:
As for the "best ride" - well, I _have_ owned four CXs and a G, so I can't see anything with MacStrerson Phuts taking that mantle easily...
Sorry, I worded that badly. I was still using the 80's as a benchmark (from the rust comment at the top). CX & GS/GSA, yes I agree are smoother, but they're 70's. The BX would also outcorner them, of that I am sure. Slight trade-off for a slight loss of ride quality, but the mk1 BX is still utterly brilliant at dealing with crap roads. Mk2 feels more fidgety, but a lot less tinny too.Kitchski said:
TooMany2cvs said:
As soon as I get round to finding a decent one, cheap.
I'll keep an ear out, though 'cheap' and 'decent' are getting harder and harder to find now, as with many older cars.TooMany2cvs said:
Ta. Structurally and mechanically solid - but cosmetics are not the most important thing, although probably not too visually offensive. Mild leaning towards estate. Agnostic on petrol or diesel, but probably not 17D.
There are actually quite a few on here:http://www.bxclub.co.uk/forum/viewforum.php?f=20
There's a post by a member called Pilau, and he's selling a diesel and an 8v GTi. I've seen the GTi in the flesh, it's pretty good.
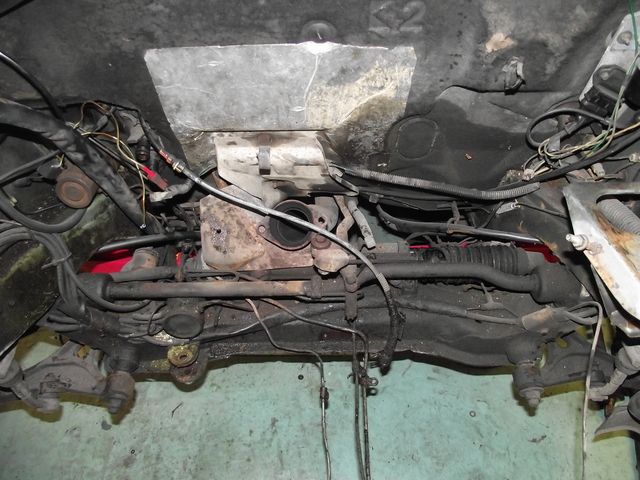
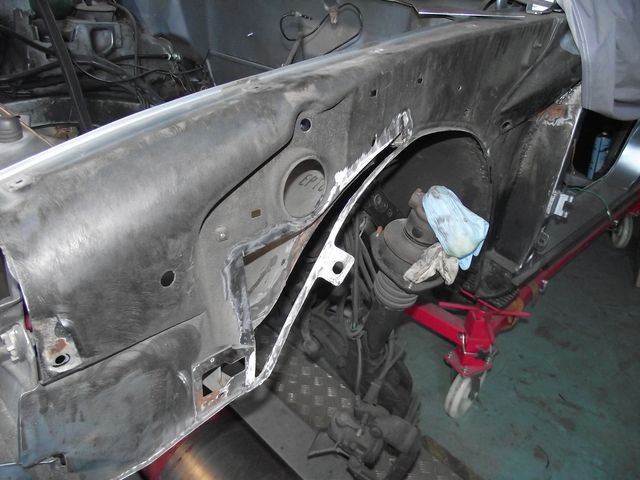
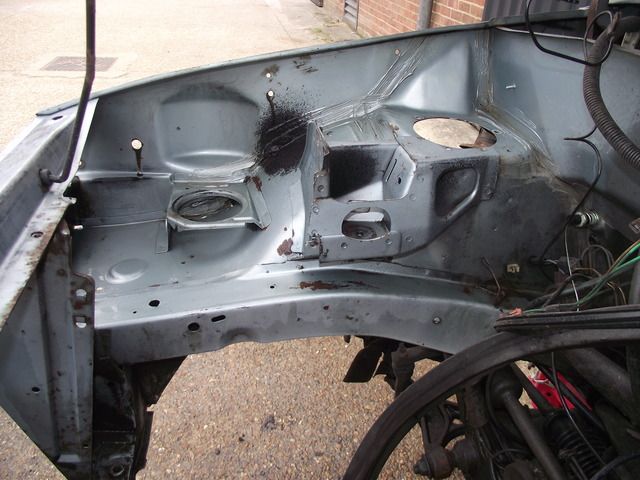
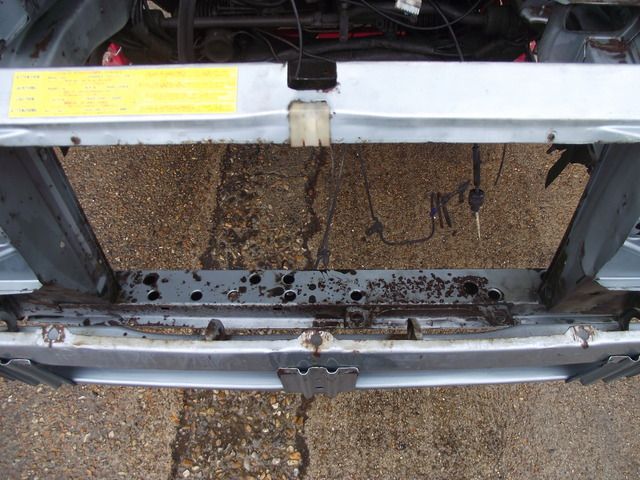
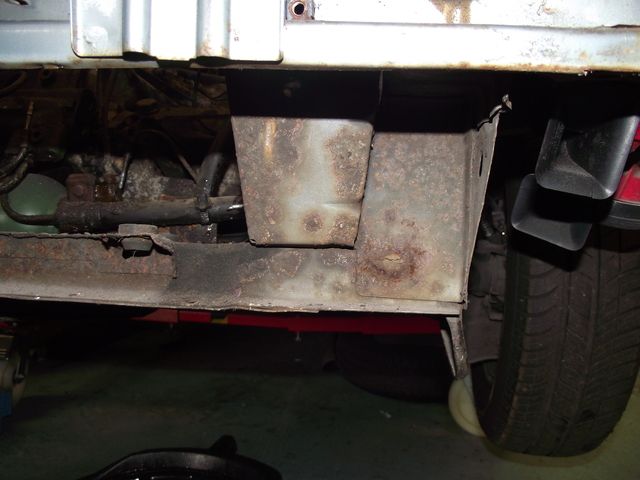
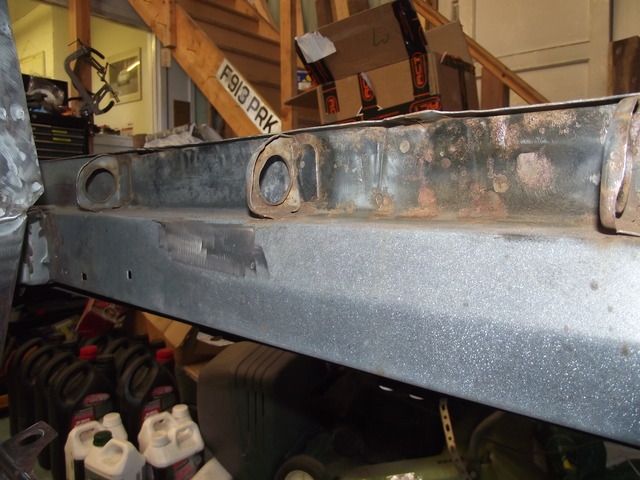
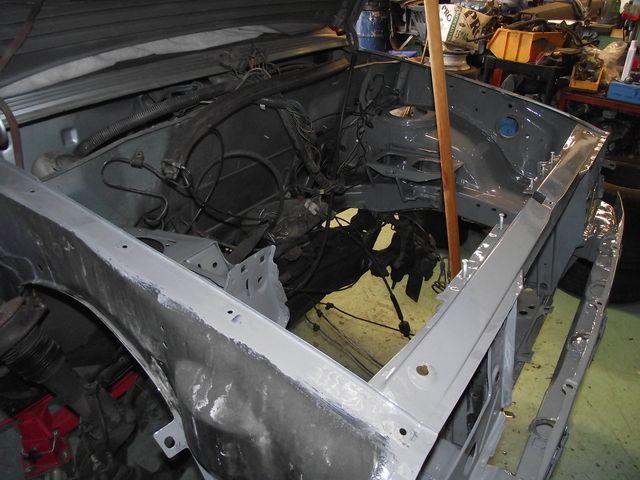
So naturally, with the rear end of the car a total mess, it seemed to logical thing to do was to attack the front. I'd already had to hoist the car up onto a dolly to wheel it around the workshop as I'd removed the rear subframe, and now it was at perfect height to commence removing parts from the front of the car. In my haste to get the car painted, due to the deal I'd been offered being a limited-time offer, I'd planned to do something about the front end for some time. It wasn't on the original list of jobs though (most of this stuff wasn't - it was only supposed to be a blow-over!) and though my Dad's already told me it doesn't fuss him too much, it does bother me when it looks like this:
You've got a mix of minor holing, some dubious previous repairs and a variation of paint. Something had to be done.
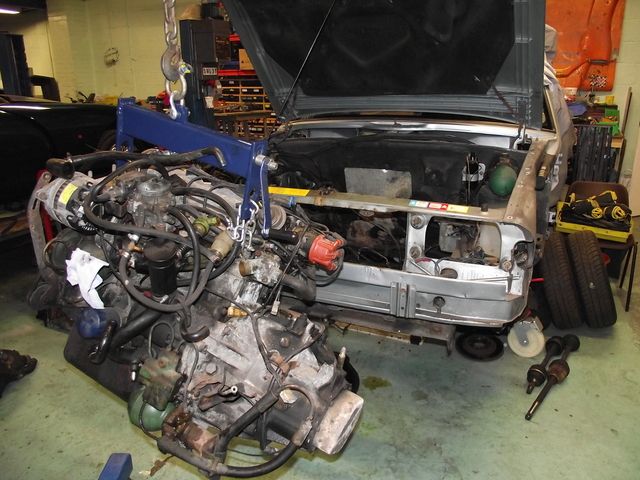
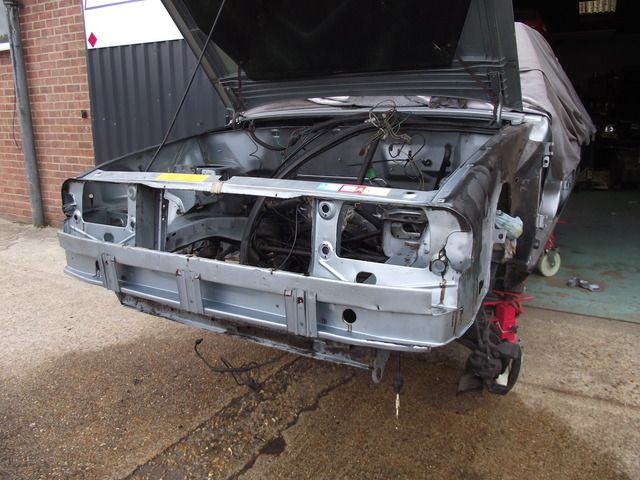
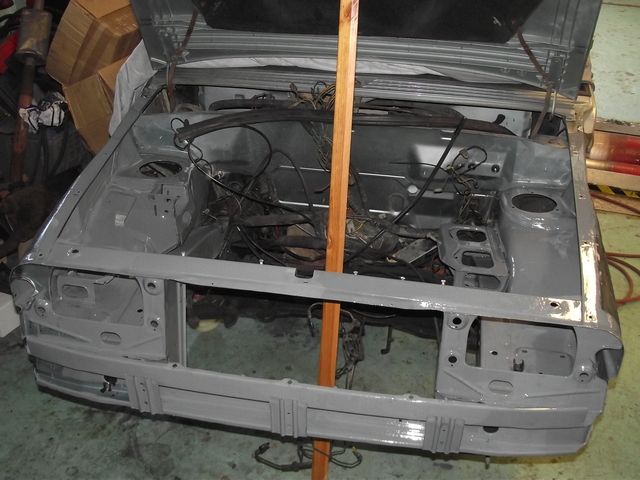
So, engine out:
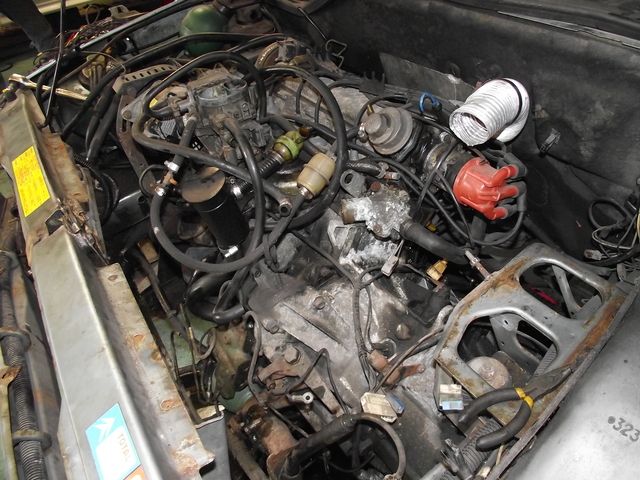
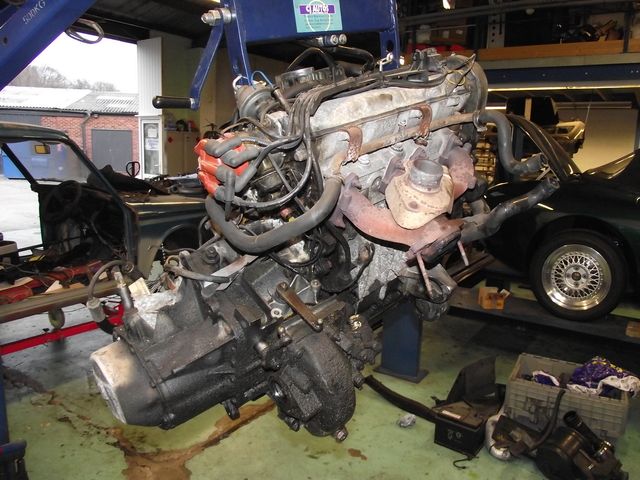
I'll carry out some minor repairs on the engine later.
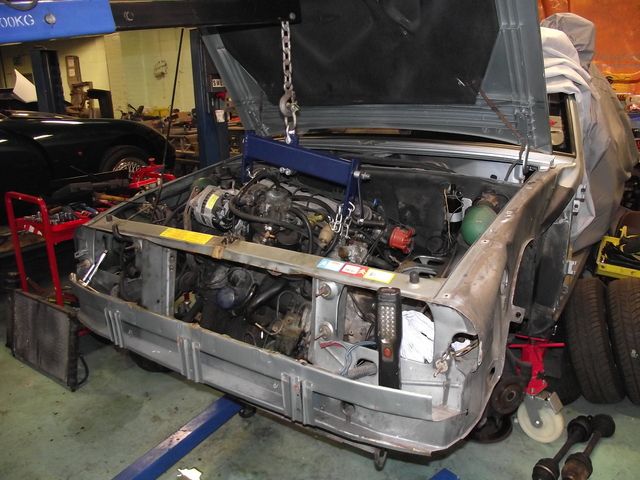
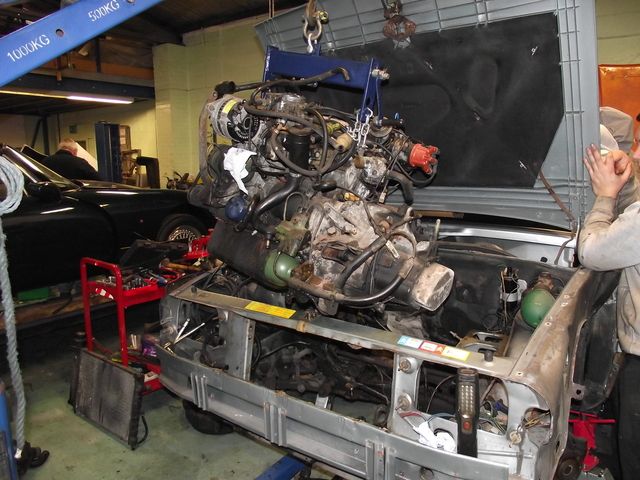
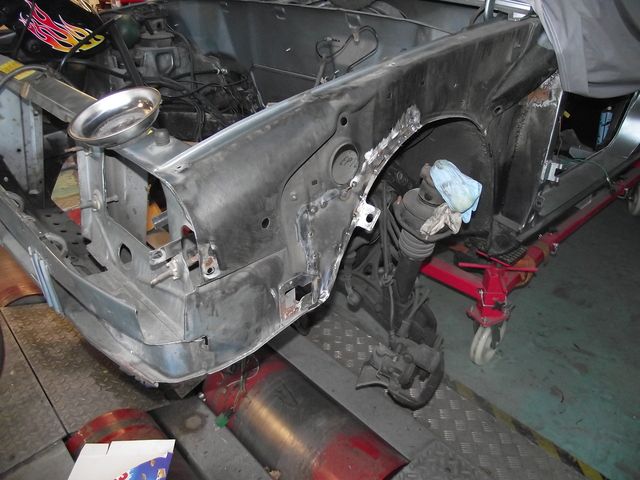
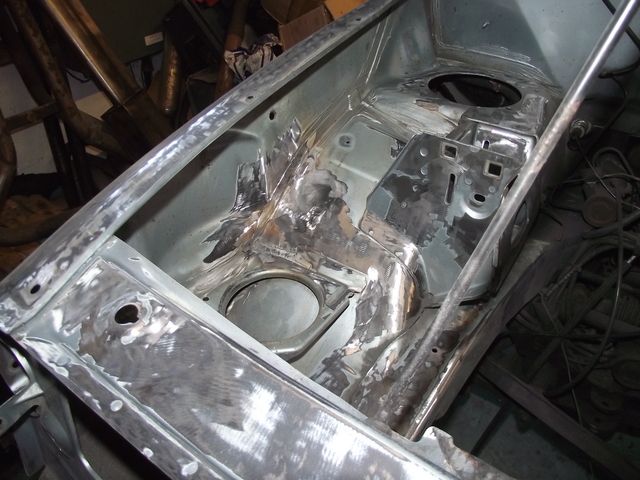
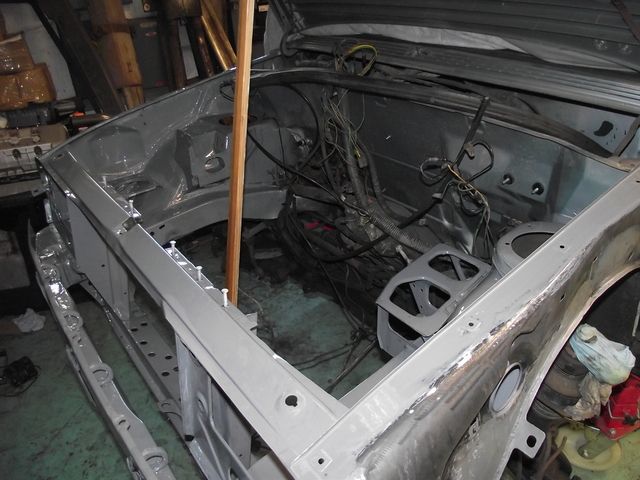
Access now gained:

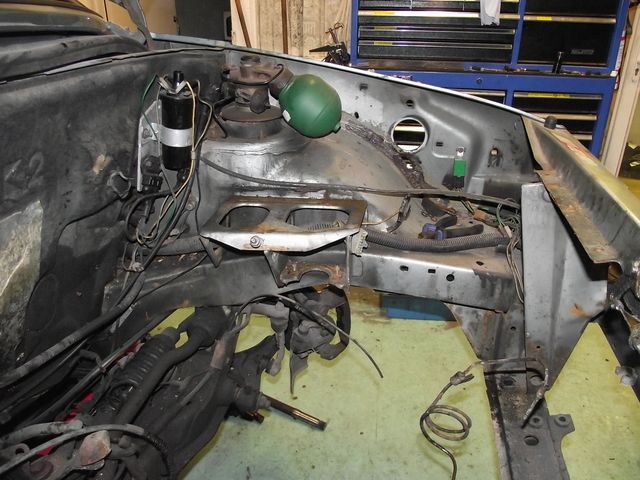
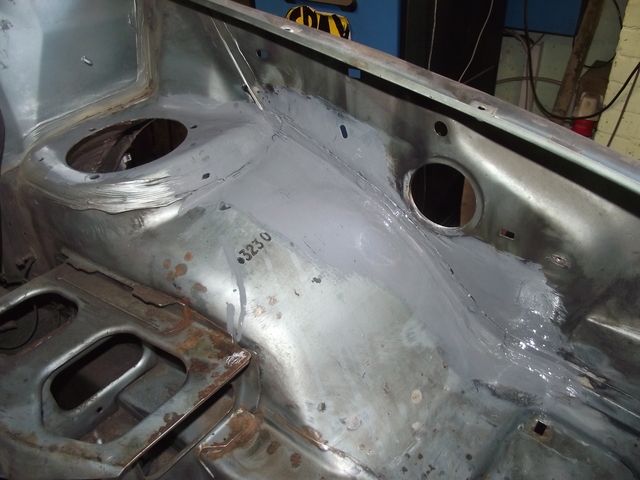
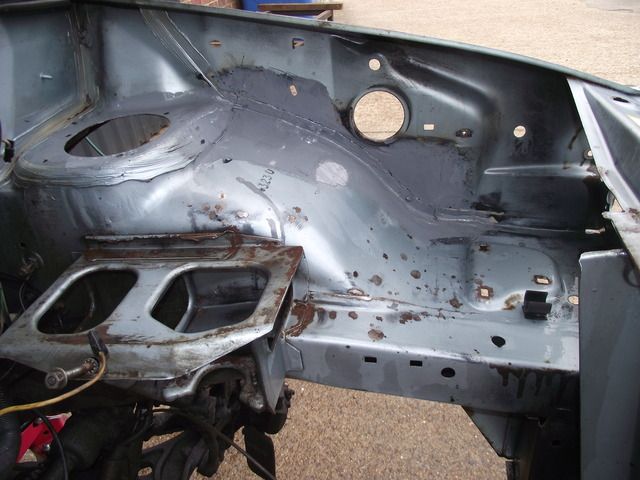
Of course, anyone who's delved into an old, well-used car like this (nearly 200k remember, and I don't think it's seen much in the way of cleaning!) will know the pain of the grime. You want to crack on and get it repaired and painted, but you know you can either clean one small patch, repair it and then paint the patch, or you can do it properly. With so little free time, so many other projects and massively running behind on timescale, I decided to go the whole hog and do the full job. Obviously.
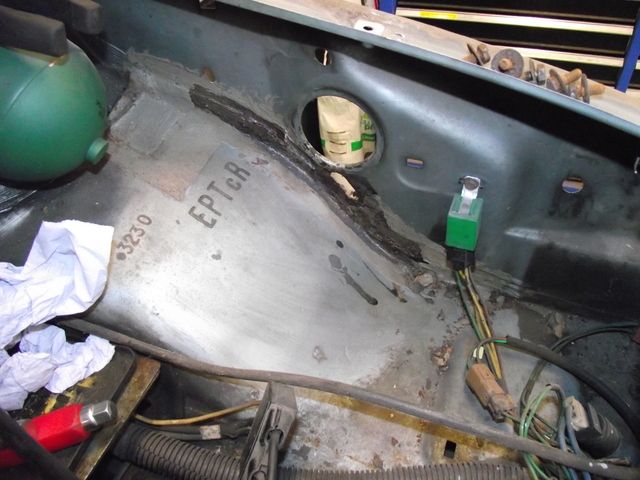
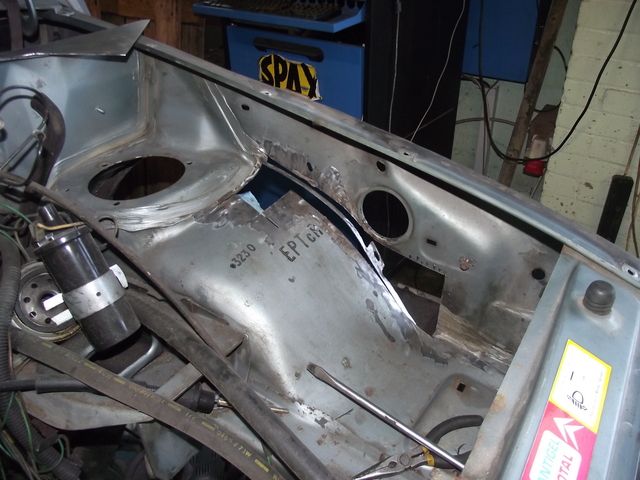
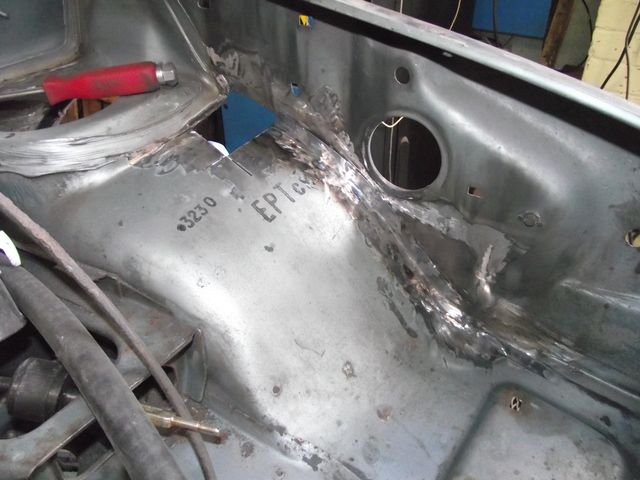
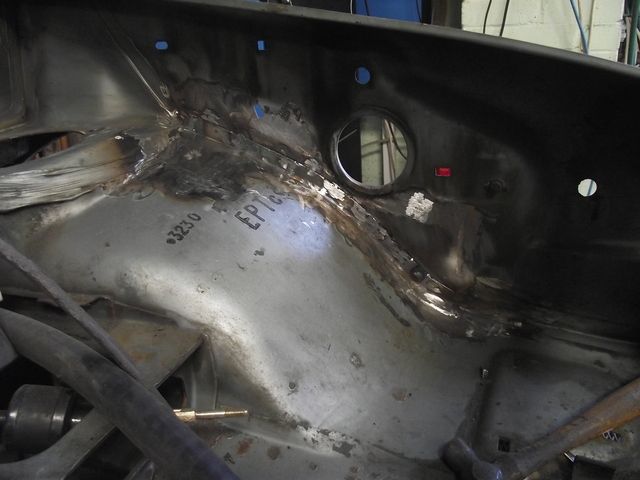
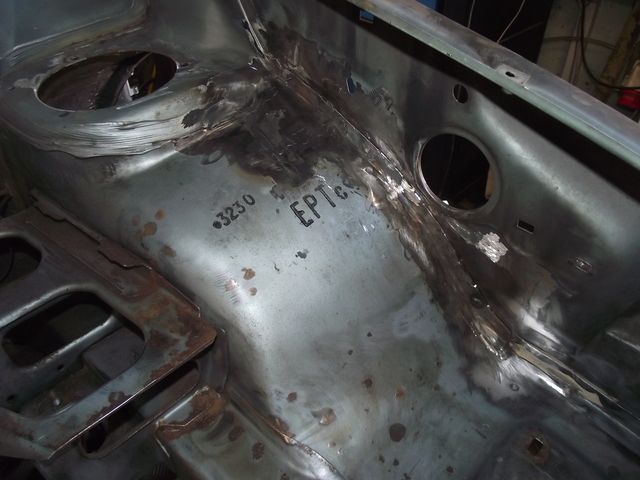
Clearing down the inner wings. Sadly we're going to lose the OE paint code and RP number, but then we're not going concours or anything daft:
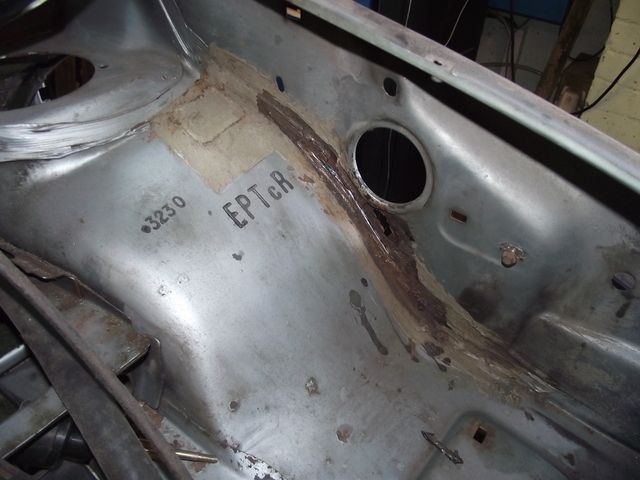
Nice:
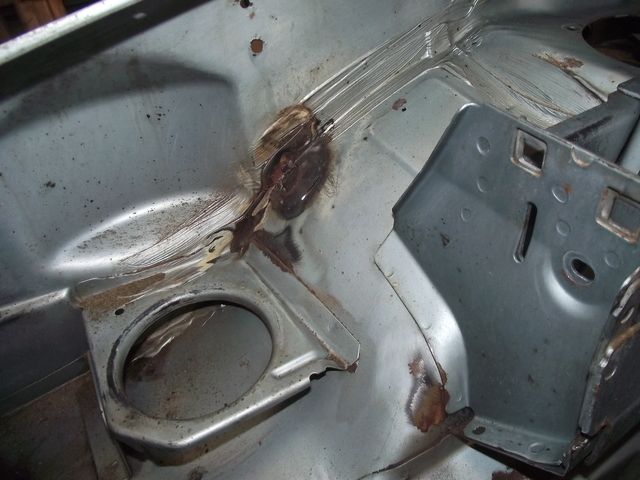
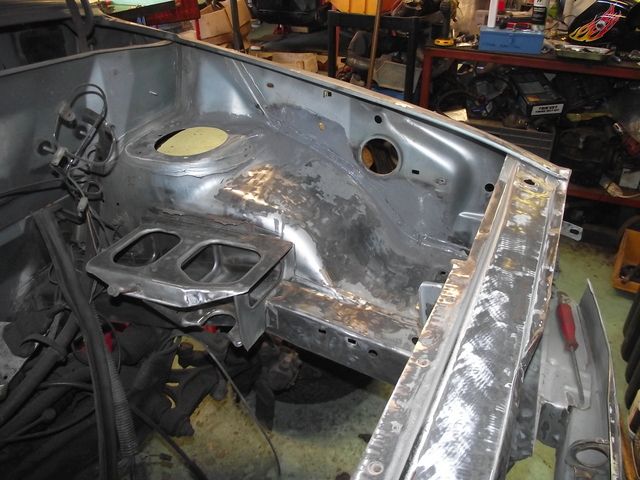
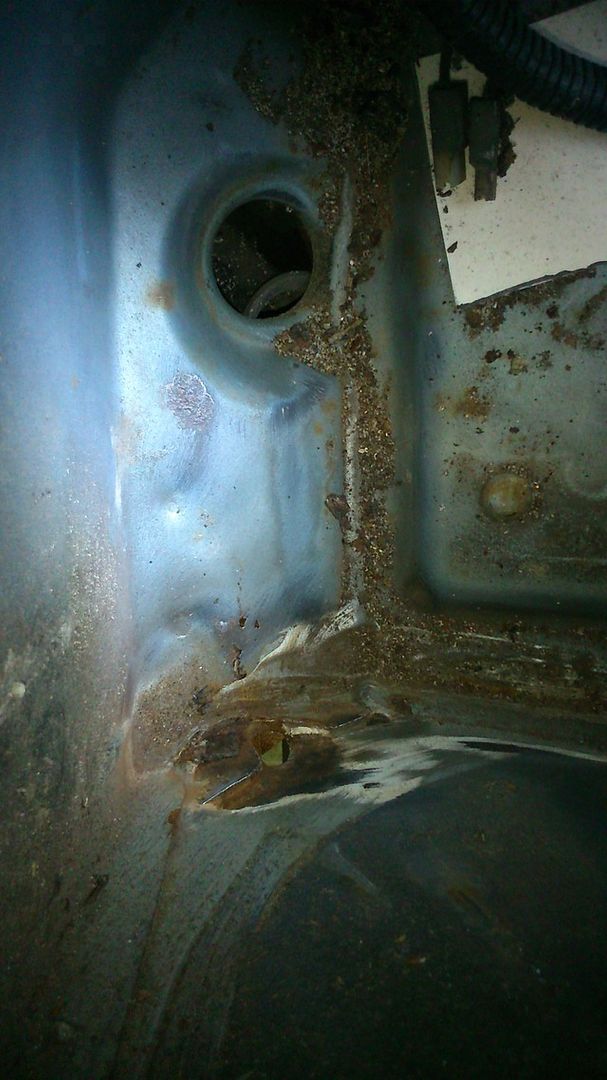
Rust through to the inner wing, so the decision to tackle the whole front end is looking justified already. There's every chance that more rot would have cropped up in a year or two if I'd just sorted the obvious stuff alone:
In for a penny:

(I wanted to keep that lip around the edge as the plastic s t shield attaches to it)
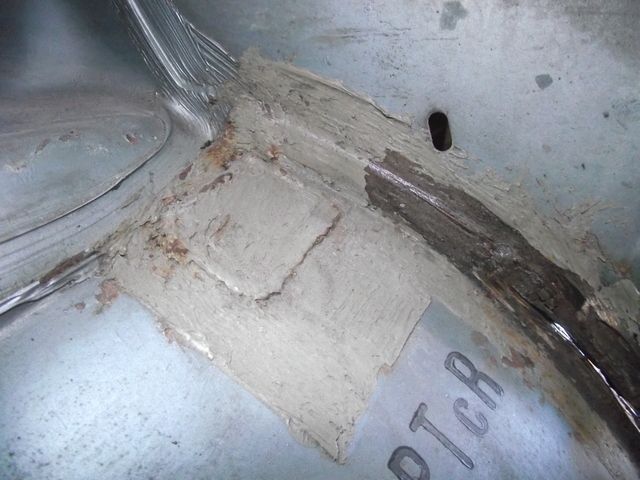
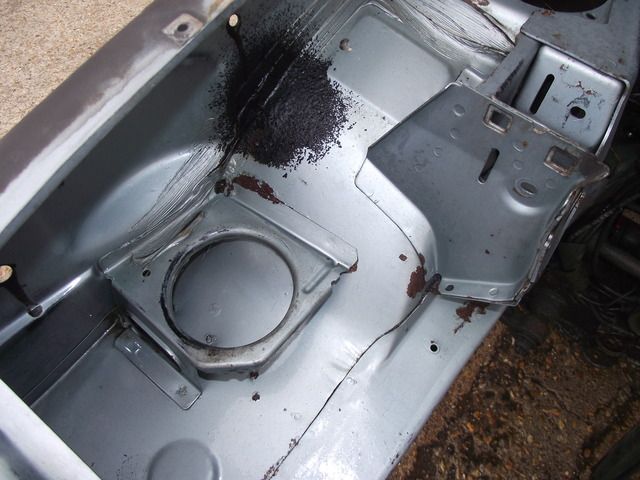
Desperately trying to replicate all the original seams! A quick coating of POR15 to keep it sound while I muck around in other corners of the engine bay:
Found some grub:

Wanted to repair all rot first, then clean using thinners, carb cleaner and brushes, but it was too far gone with the oil/grease/LHM! So for the opposing side, degreasing was the order of the day first before a session with the jet wash:
Spent AGES agitating the degreaser all over the bay. 3 hours or so just of scrubbing, but when the hose hit it, it made it all worth it:
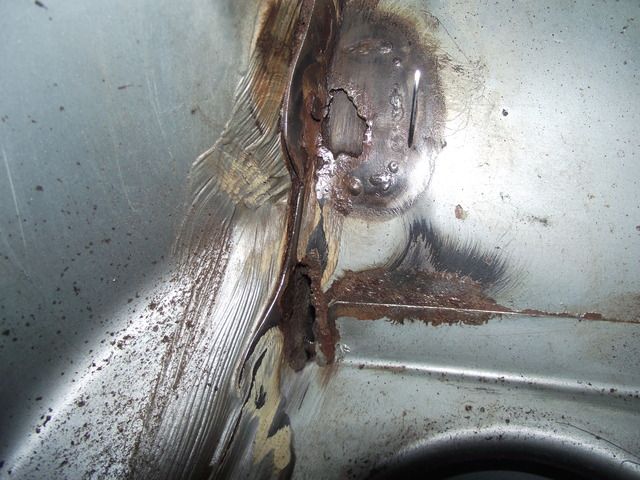
Nice application of Schutz there! I'm sure there's nothing bad underneath whatsoever:
Schutz was hiding a dodgey patch. I was so shocked I nearly had to sit down!:
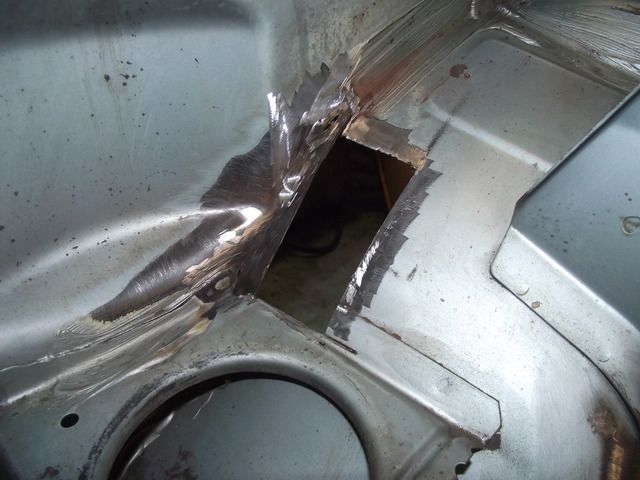
Tricky one to begin cutting out:

Got there though:
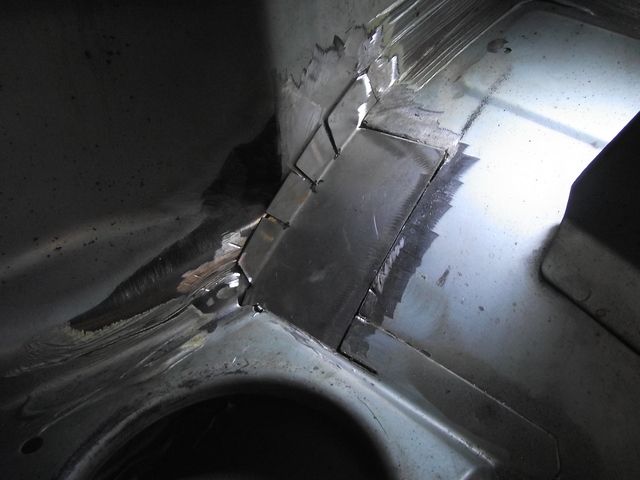

Should be pretty well disguised. Certainly enough for me!:
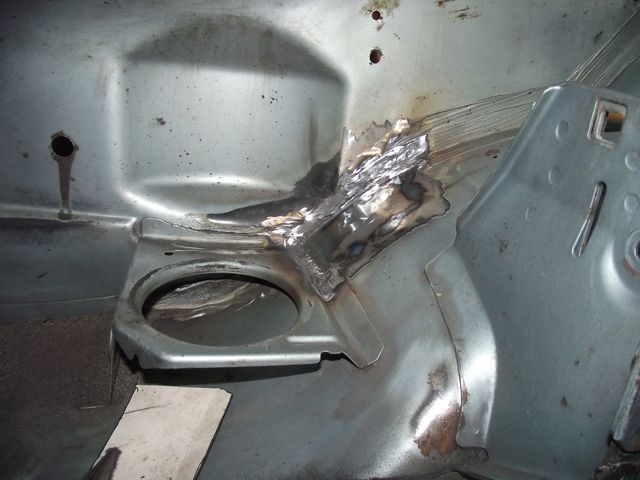
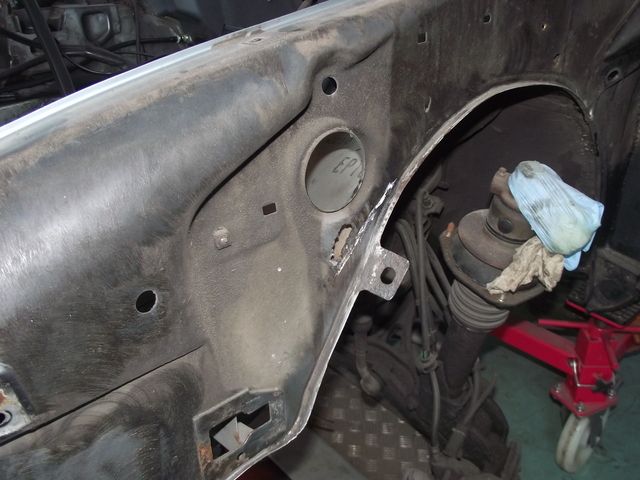
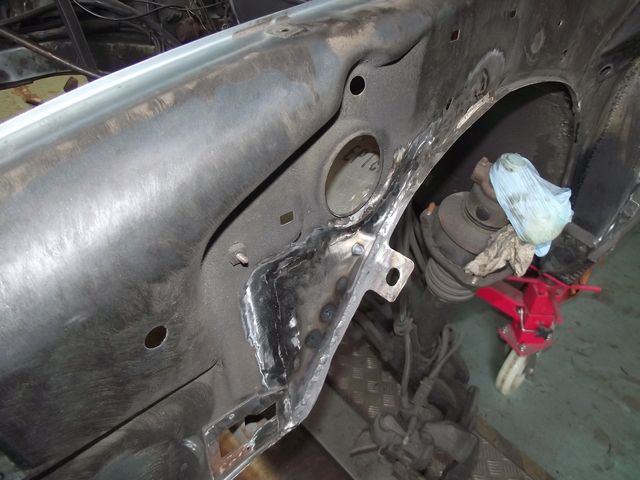
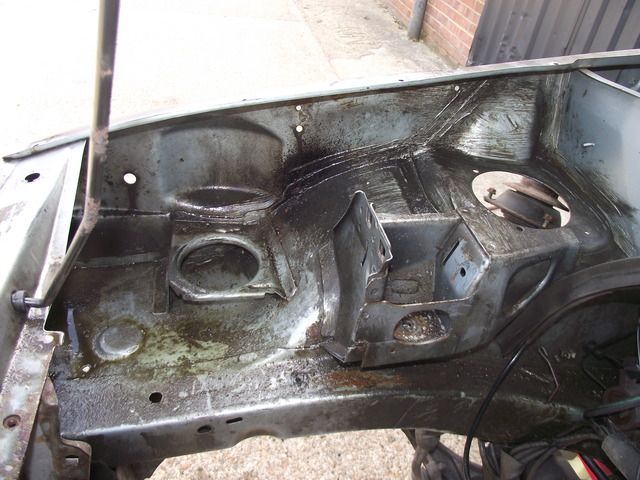
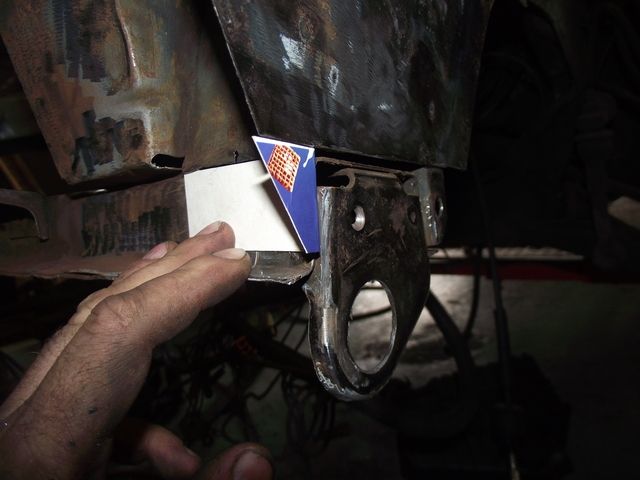
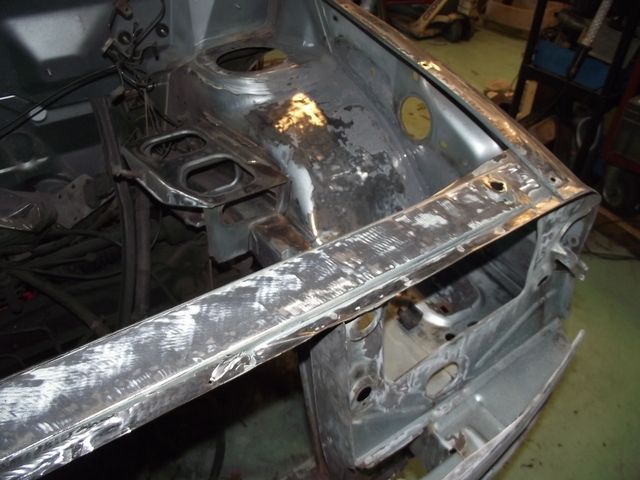
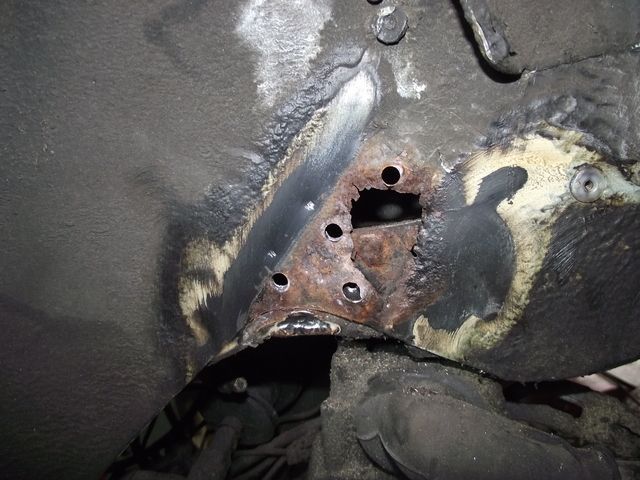
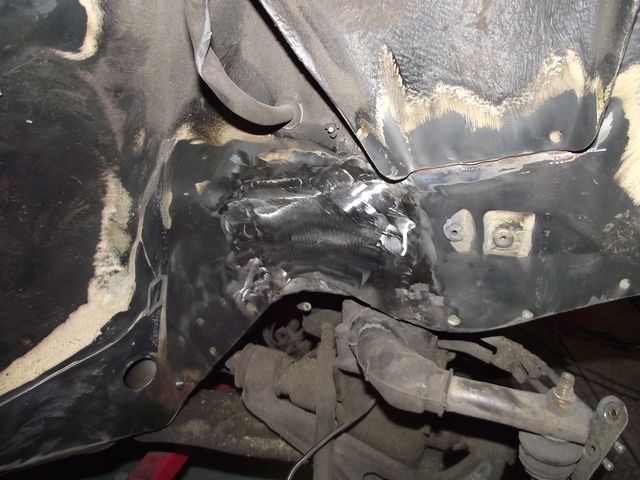
Earlier on, while removing the engine, I found another section down at the bottom of the front panel. Looked like rust had got in behind a panel:
Well, I dug deeper and it turned out rust had gotten in behind a panel. So that panel had to be repaired too. Spot welds drilled, panel chopped:
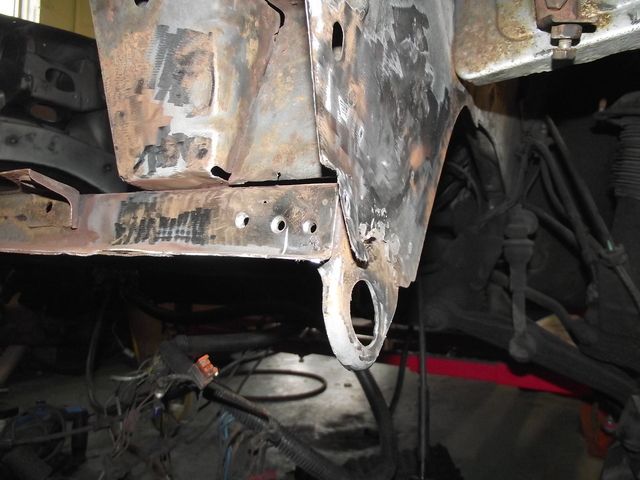
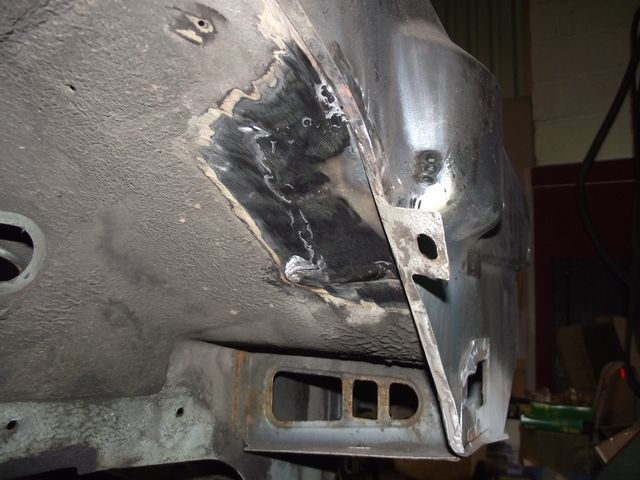
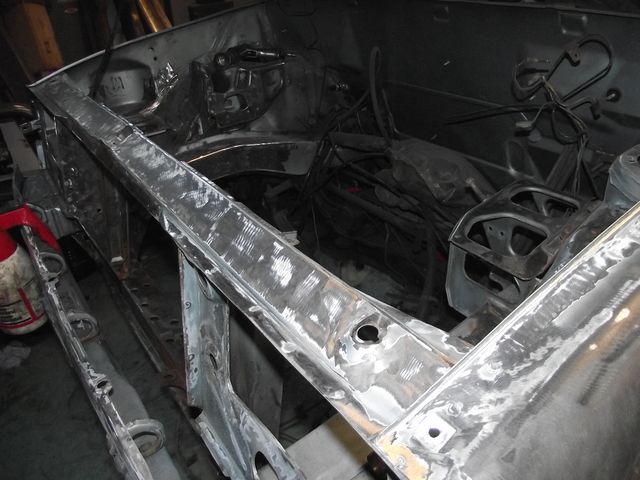
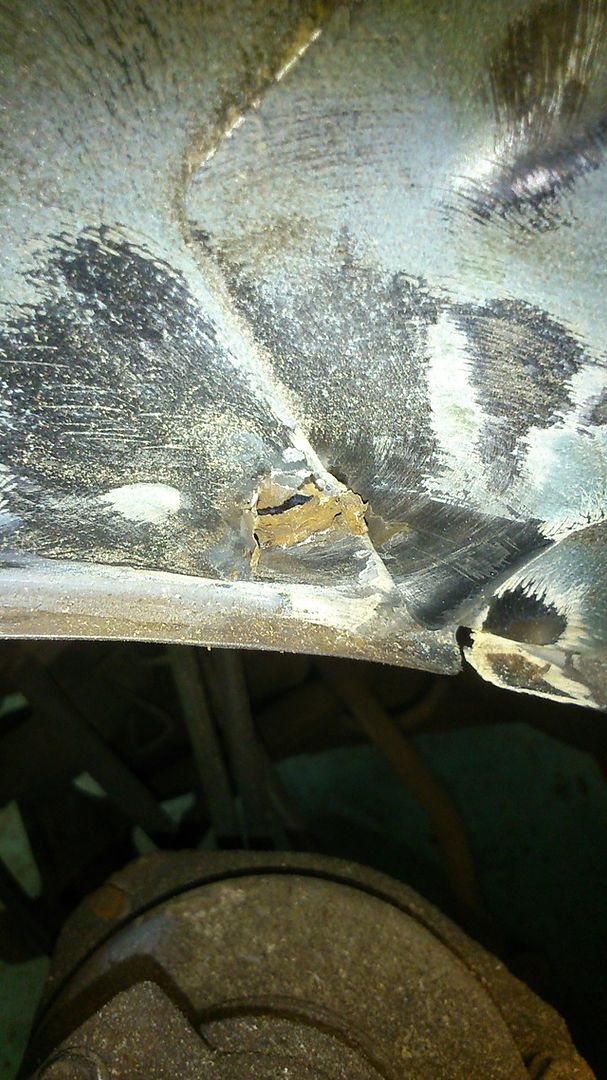
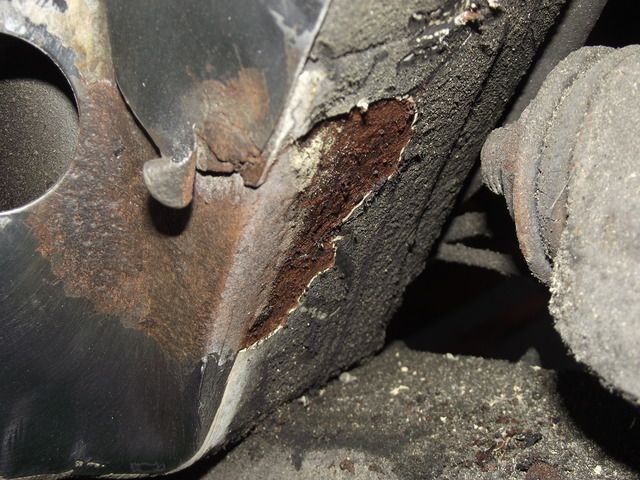
Closing piece on the end was also frilly around the bottom due to a previous poor repair, so that was chopped too:
(Looks grim, but it's actually really thick material as it's part of the toe eye. The rust is all surface, happily it's all really strong underneath.)
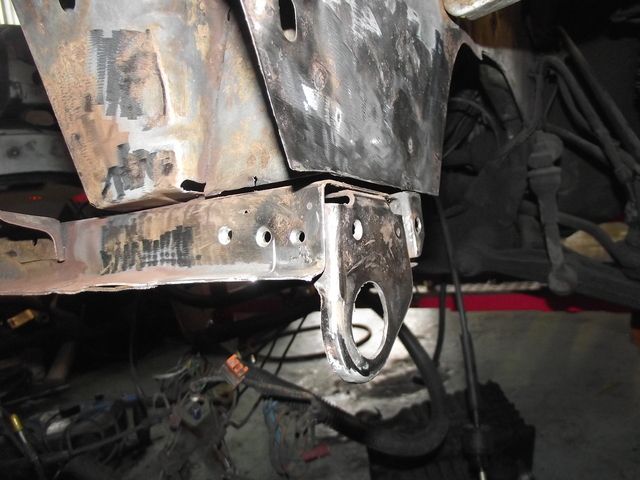
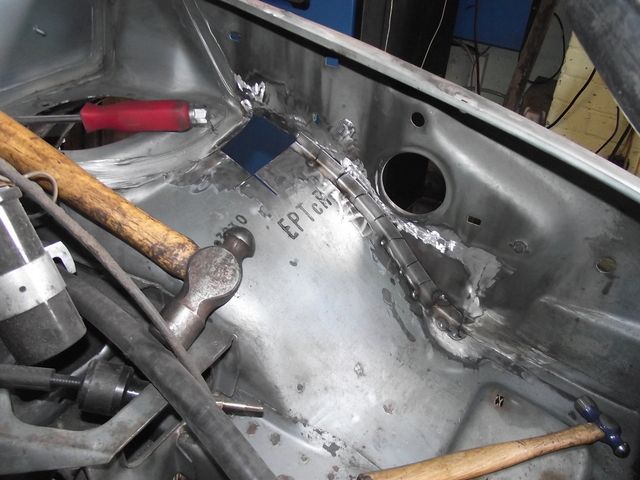
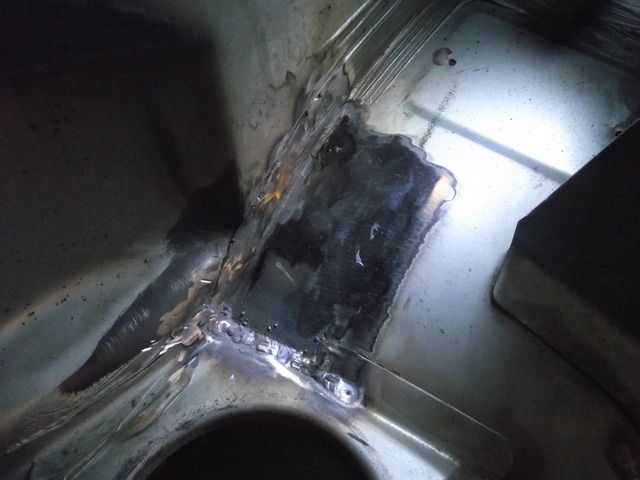
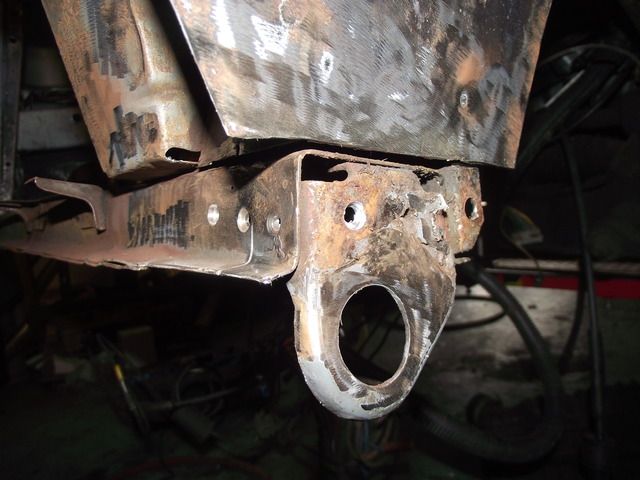
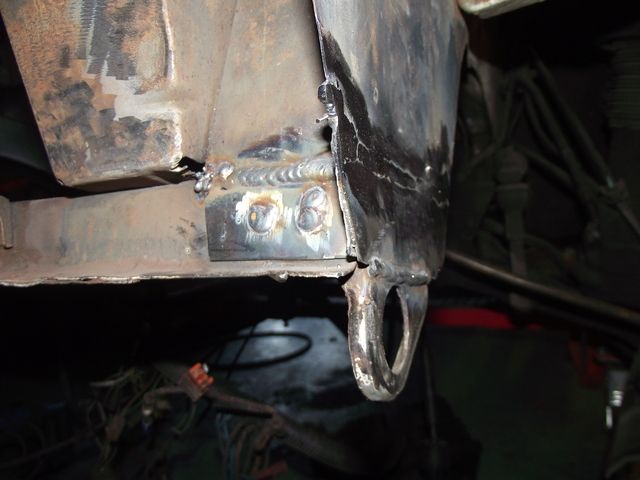
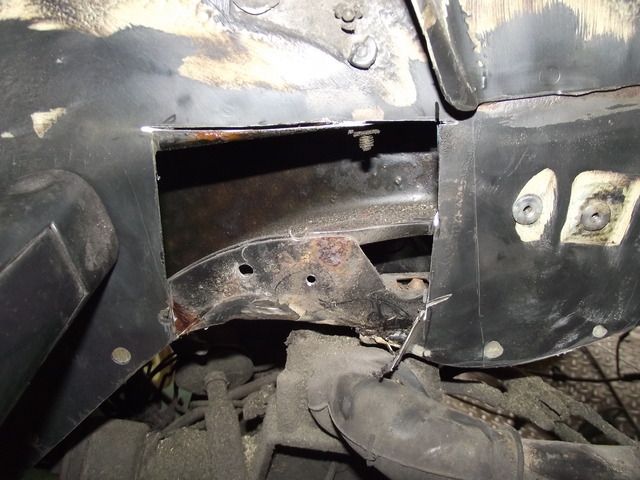
Finished repair section, Shreddies style!:
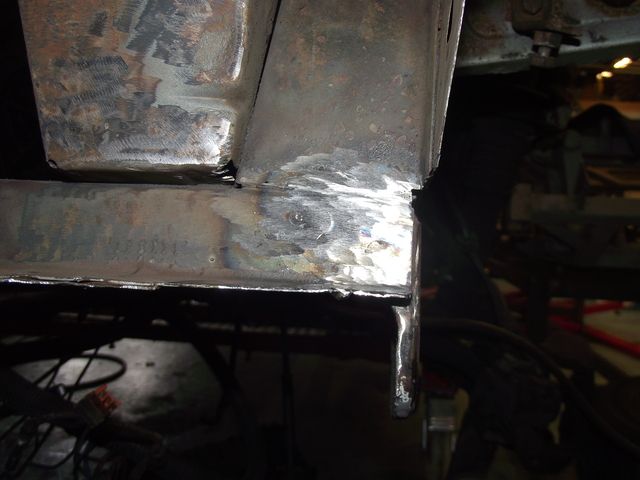
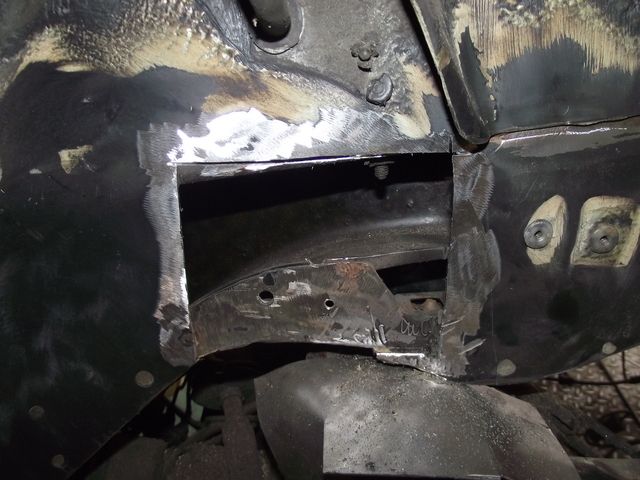
Needs some more tidying up (grinder doesn't fit in there, so it has to be a die grinder, and they don't leave the best finished - lucky this is all hidden!)
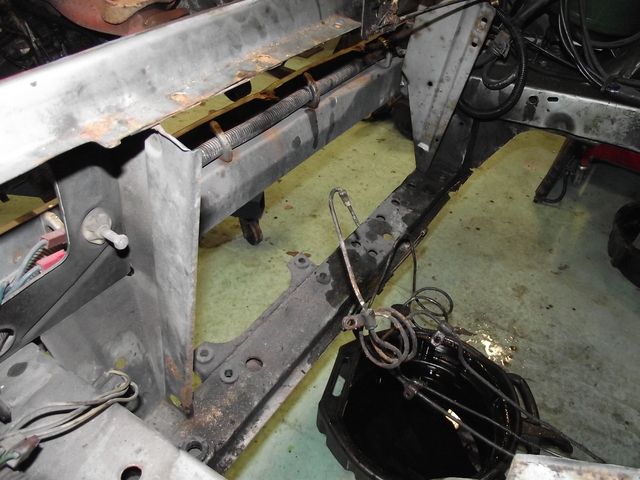
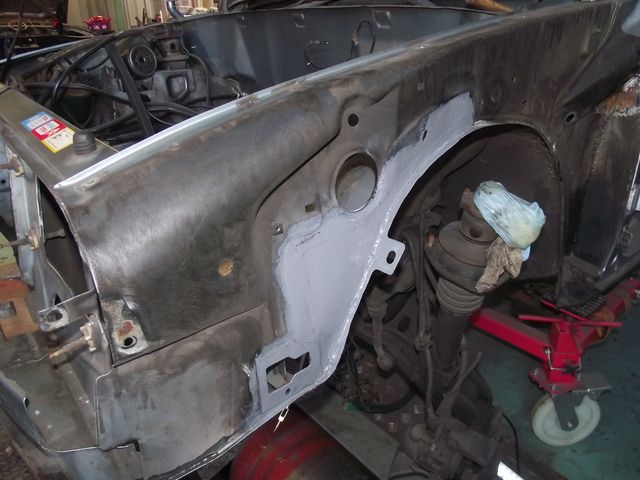
Getting inside the engine bay to attack all the surface rust I can find. Prevention over cure, and all that:
Spent ages removing most layers of paint. For every 20sq cm you cover, you'll find 1sq cm of surface rust, burrowing away under the paint and underseal. It's a painstaking job, hunting it all out, but it just seems worth doing now.
Anything that had specs on, near or under it was ground back:

Then the entire section was degreased, washed, treated with Metal Prep (POR15 pre-treatment, zinc-phosphate wash-off stuff) before I coated all visible un-coated surfaces with grey POR15:
POR15 is evil stuff when it's on your hands, or up your nose. But when it's on a prepared surface, it's brilliant. It goes on very thin, and can be used as a primer, which is good, as I'll be rattle-can spraying the engine bay body colour before the engine goes back in.
Everything up top that wants to be semi-pretty (engine bay pretty, not bodywork pretty) will be POR15 underneath, then the normal paint colour, possibly with lacquer (original finish didn't have lacquer, though later BXs did).
Everything underneath will be repaired and treated, but this time coated with Rustbuster 2-pack epoxy. Originally the BX would have been bodycolour underneath too, but to get that there on this car would add much more time, so that's where I'm drawing the line. The Epoxy, by it's nature, is no where near as pretty as the POR15, but it is as tough - probably more so. It'll do a job no problem.
As work moves around to the arches, which will be Epoxy mastic (but with some casual colour overspray!) I begin removing more layers of original underseal. And guess what I find?
I know, what are the odd right?!
And it got better:

That, is the side of the chassis rail inside the OSF arch, behind the mount for the front brake hose. Nice big hole. Joy.
So, the mount has to come off:
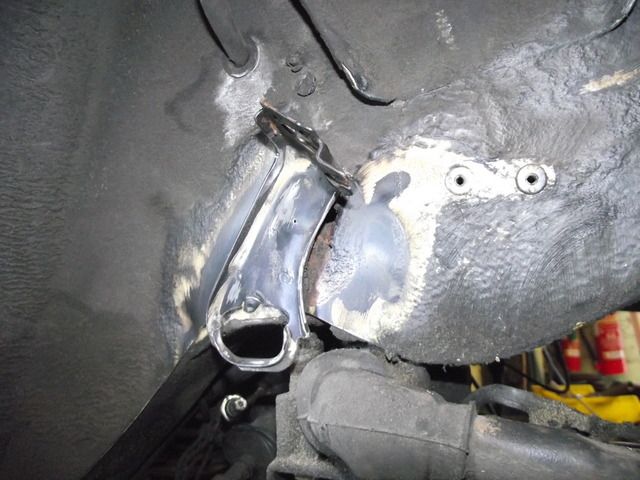
To reveal the water-trapped mess underneath:
While I'm digging around, I find another patch on the lower front chassis rail. Luckily, this time it's been caught, and it's a perfect example of how cars rot. Bare in mind, this car has been kept indoors for the last 5 years or so. The only water to go near it was when the inner wings were hosed down, which was actually 3 months previous (I'm running out of sync here). That surface rust, found under some underseal, was DAMP. Number one solution to stopped your car rusting? Keep on top of cracked underseal!:
Anyway, I carry on digging out the messy arch:
Luckily Citroen got the underseal right in the box section, and internally it's mint.
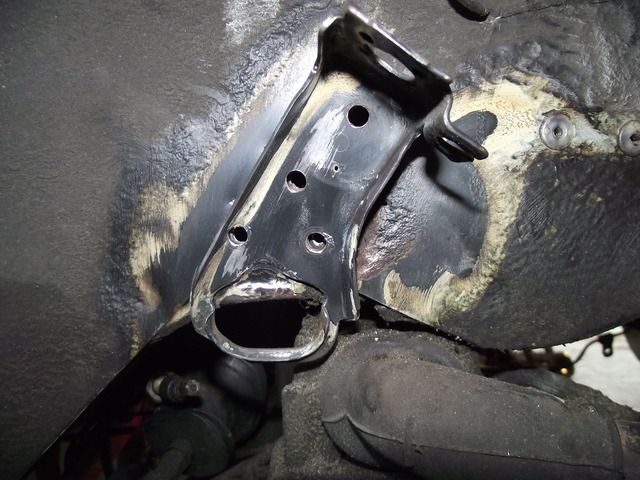
Treated and plated:
Refitted the mount (and beefed it up as it was suffering a bit on the back) using a jig I made from more discarded Shreddies boxes (someone at our place eats LOTS of Shreddies. Not even frosted ones, either!)
And that's where we are now. Need to continue with the stripping/prepping of the front arches, before I get the metal treatment out and slap some sticky black paint on them!

You've got a mix of minor holing, some dubious previous repairs and a variation of paint. Something had to be done.
So, engine out:


I'll carry out some minor repairs on the engine later.
Access now gained:


Of course, anyone who's delved into an old, well-used car like this (nearly 200k remember, and I don't think it's seen much in the way of cleaning!) will know the pain of the grime. You want to crack on and get it repaired and painted, but you know you can either clean one small patch, repair it and then paint the patch, or you can do it properly. With so little free time, so many other projects and massively running behind on timescale, I decided to go the whole hog and do the full job. Obviously.
Clearing down the inner wings. Sadly we're going to lose the OE paint code and RP number, but then we're not going concours or anything daft:

Nice:

Rust through to the inner wing, so the decision to tackle the whole front end is looking justified already. There's every chance that more rot would have cropped up in a year or two if I'd just sorted the obvious stuff alone:

In for a penny:


(I wanted to keep that lip around the edge as the plastic s
t shield attaches to it)


Desperately trying to replicate all the original seams! A quick coating of POR15 to keep it sound while I muck around in other corners of the engine bay:


Found some grub:

Wanted to repair all rot first, then clean using thinners, carb cleaner and brushes, but it was too far gone with the oil/grease/LHM! So for the opposing side, degreasing was the order of the day first before a session with the jet wash:


Spent AGES agitating the degreaser all over the bay. 3 hours or so just of scrubbing, but when the hose hit it, it made it all worth it:


Nice application of Schutz there! I'm sure there's nothing bad underneath whatsoever:


Schutz was hiding a dodgey patch. I was so shocked I nearly had to sit down!:


Tricky one to begin cutting out:

Got there though:


Should be pretty well disguised. Certainly enough for me!:


Earlier on, while removing the engine, I found another section down at the bottom of the front panel. Looked like rust had got in behind a panel:

Well, I dug deeper and it turned out rust had gotten in behind a panel. So that panel had to be repaired too. Spot welds drilled, panel chopped:

Closing piece on the end was also frilly around the bottom due to a previous poor repair, so that was chopped too:

(Looks grim, but it's actually really thick material as it's part of the toe eye. The rust is all surface, happily it's all really strong underneath.)

Finished repair section, Shreddies style!:


Needs some more tidying up (grinder doesn't fit in there, so it has to be a die grinder, and they don't leave the best finished - lucky this is all hidden!)

Getting inside the engine bay to attack all the surface rust I can find. Prevention over cure, and all that:

Spent ages removing most layers of paint. For every 20sq cm you cover, you'll find 1sq cm of surface rust, burrowing away under the paint and underseal. It's a painstaking job, hunting it all out, but it just seems worth doing now.


Anything that had specs on, near or under it was ground back:

Then the entire section was degreased, washed, treated with Metal Prep (POR15 pre-treatment, zinc-phosphate wash-off stuff) before I coated all visible un-coated surfaces with grey POR15:


POR15 is evil stuff when it's on your hands, or up your nose. But when it's on a prepared surface, it's brilliant. It goes on very thin, and can be used as a primer, which is good, as I'll be rattle-can spraying the engine bay body colour before the engine goes back in.

Everything up top that wants to be semi-pretty (engine bay pretty, not bodywork pretty) will be POR15 underneath, then the normal paint colour, possibly with lacquer (original finish didn't have lacquer, though later BXs did).
Everything underneath will be repaired and treated, but this time coated with Rustbuster 2-pack epoxy. Originally the BX would have been bodycolour underneath too, but to get that there on this car would add much more time, so that's where I'm drawing the line. The Epoxy, by it's nature, is no where near as pretty as the POR15, but it is as tough - probably more so. It'll do a job no problem.
As work moves around to the arches, which will be Epoxy mastic (but with some casual colour overspray!) I begin removing more layers of original underseal. And guess what I find?


I know, what are the odd right?!
And it got better:

That, is the side of the chassis rail inside the OSF arch, behind the mount for the front brake hose. Nice big hole. Joy.
So, the mount has to come off:


To reveal the water-trapped mess underneath:

While I'm digging around, I find another patch on the lower front chassis rail. Luckily, this time it's been caught, and it's a perfect example of how cars rot. Bare in mind, this car has been kept indoors for the last 5 years or so. The only water to go near it was when the inner wings were hosed down, which was actually 3 months previous (I'm running out of sync here). That surface rust, found under some underseal, was DAMP. Number one solution to stopped your car rusting? Keep on top of cracked underseal!:

Anyway, I carry on digging out the messy arch:

Luckily Citroen got the underseal right in the box section, and internally it's mint.

Treated and plated:

Refitted the mount (and beefed it up as it was suffering a bit on the back) using a jig I made from more discarded Shreddies boxes (someone at our place eats LOTS of Shreddies. Not even frosted ones, either!)
And that's where we are now. Need to continue with the stripping/prepping of the front arches, before I get the metal treatment out and slap some sticky black paint on them!


olds_cool said:
Great work 
Wish I had the space, time, patience and expertise to do this to my car!
Keep the pics coming
Space is borrowed, officially (perk of the job - I don't earn much, so I claim my earnings in sq footage Wish I had the space, time, patience and expertise to do this to my car!
Keep the pics coming
 )
)Time - I don't really, I do a little bit every Friday
Expertise -

neilbauer said:
Love it, I had a AX for a couple of years 
Got an AX GT also. Was planning to restore that to show-winning standard, but now being realistic and aiming to tidy it up a bit and put it back on the road for next year.S10GTA said:
I hope your dad is chuffed with the time & effort you've put into this
He'd better be! Though in fairness, I get my lack of emotional behaviour from him so I probably won't see it!Edited by Kitchski on Wednesday 4th November 08:53
Kitchski said:
It's not a dumb question at all! You're right, it would be difficult for a car to differentiate between a hill and something like you see in the picture. Simple answer? I don't actually know why it did that! I guess I was probably clambering all over the front of it removing bits and bobs, and the front sank quicker because of that. If it had been on flat ground, chances are it would have sank evenly, but it's possible the fact the front was up on ramps was placing more compression on the front end while I was climbing in and out. If you park one up after a drive, it'll sink of its own accord (usually rear first within 1-2hrs, followed by front after 10-24hrs, but they're at an age now where almost anything goes!) But if you clamber in and out, it speeds up the sinking process, as the sinking is effectively caused by the mass of the car pressing down on all the suspension cylinders, and all the hydraulic fluid being forced back to the tank via the network of pipes and valves etc. While the engine's off, you can remove some of the rubber pipes that go back to the LHM tank, and they'll actually be 'bleeding' fluid until the point the car has fully sunk. Next time you see a BX or similar parked up, suspension still raised, you can rest assured things are moving around even though the owner's in the shops! 
So in short, there's no way the system can level out gyro-style, but it does constantly keep the car at the right ride height, regardless of load. That means on many models, you can run near zero toe and castor settings (in fact the CX runs zero everything; castor, camber and toe as the contact patch of the tyre is always perfect because the suspension compensates for everything). The way the BX does it is fiendishly simple, but I won't bore everyone with that! Nor will I bore everyone with the brake load compensation system, or the anti-dive system, where you can lean on the brakes and the front doesn't dive at all.....yet the suspension remains fully compliant. Reason I won't bore anyone on that one is because I don't know how it works!
It's fiendishly simple. In a very complicated fashion. So in short, there's no way the system can level out gyro-style, but it does constantly keep the car at the right ride height, regardless of load. That means on many models, you can run near zero toe and castor settings (in fact the CX runs zero everything; castor, camber and toe as the contact patch of the tyre is always perfect because the suspension compensates for everything). The way the BX does it is fiendishly simple, but I won't bore everyone with that! Nor will I bore everyone with the brake load compensation system, or the anti-dive system, where you can lean on the brakes and the front doesn't dive at all.....yet the suspension remains fully compliant. Reason I won't bore anyone on that one is because I don't know how it works!

So firstly you have the ride height adjusters front and back. These are connected to the suspension arms and to the lever in the cabin via rods.
When the suspension (arms) rise (ie the front or back dipping) the ride height adjuster allows more fluid into the circuit which counteracts the force applied to the car, the arms then lower, raising the nose or back of the car *but* the damping and spring rates (which are driven respectively by the orifice and gas over oil 'ball') stay the same. The same then happens in reverse if the suspension arms drop (ie the front or back rises), the ride height adjuster reducing the amount of fluid in the system and hence dropping the (relative) ride height.
The level to which the car drops/rises is dictated by the position of the height adjuster lever. Incidentally although there are only 4 settings (IIRC it's been a *long* time since I've been in one) the ride height is infinitely adjustable, it's just a set of detents for the lever. So if you wanted to "lower" a BX but not run on bump stops you could just cut a new detent (or modify the rod setup).
The load based braking is just as clever, the brakes are fed from the same suspension hydraulic circuit, but "after" the suspension, this means that as the suspension loads more force is applied to the fluid and hence to the brakes and vv. The only downside being that in normal use the rear brakes get very little use. Every now and then my dad used to reverse fast and then hammer the brakes to clean up the rear brake disks.
EDIT: Forgot to say, good work!
Fastdruid said:
It's fiendishly simple. In a very complicated fashion.
So firstly you have the ride height adjusters front and back. These are connected to the suspension arms and to the lever in the cabin via rods.
When the suspension (arms) rise (ie the front or back dipping) the ride height adjuster allows more fluid into the circuit which counteracts the force applied to the car, the arms then lower, raising the nose or back of the car *but* the damping and spring rates (which are driven respectively by the orifice and gas over oil 'ball') stay the same. The same then happens in reverse if the suspension arms drop (ie the front or back rises), the ride height adjuster reducing the amount of fluid in the system and hence dropping the (relative) ride height.
The level to which the car drops/rises is dictated by the position of the height adjuster lever. Incidentally although there are only 4 settings (IIRC it's been a *long* time since I've been in one) the ride height is infinitely adjustable, it's just a set of detents for the lever. So if you wanted to "lower" a BX but not run on bump stops you could just cut a new detent (or modify the rod setup).
The load based braking is just as clever, the brakes are fed from the same suspension hydraulic circuit, but "after" the suspension, this means that as the suspension loads more force is applied to the fluid and hence to the brakes and vv. The only downside being that in normal use the rear brakes get very little use. Every now and then my dad used to reverse fast and then hammer the brakes to clean up the rear brake disks.
EDIT: Forgot to say, good work!
Ah right, that makes some sense. I knew about the ride height adjusting by the height correctors being opened and closed by the links to the anti-roll bar rotation, but didn't assume they could adjust quickly enough to prevent the diving of the nose, as that's something that happens suddenly, whereas if you sit on the bonnet while it's running, it'll slowly sink before slowly rising back up to normal height. I assumed there was some input from the braking circuit into somewhere around the height corrector.So firstly you have the ride height adjusters front and back. These are connected to the suspension arms and to the lever in the cabin via rods.
When the suspension (arms) rise (ie the front or back dipping) the ride height adjuster allows more fluid into the circuit which counteracts the force applied to the car, the arms then lower, raising the nose or back of the car *but* the damping and spring rates (which are driven respectively by the orifice and gas over oil 'ball') stay the same. The same then happens in reverse if the suspension arms drop (ie the front or back rises), the ride height adjuster reducing the amount of fluid in the system and hence dropping the (relative) ride height.
The level to which the car drops/rises is dictated by the position of the height adjuster lever. Incidentally although there are only 4 settings (IIRC it's been a *long* time since I've been in one) the ride height is infinitely adjustable, it's just a set of detents for the lever. So if you wanted to "lower" a BX but not run on bump stops you could just cut a new detent (or modify the rod setup).
The load based braking is just as clever, the brakes are fed from the same suspension hydraulic circuit, but "after" the suspension, this means that as the suspension loads more force is applied to the fluid and hence to the brakes and vv. The only downside being that in normal use the rear brakes get very little use. Every now and then my dad used to reverse fast and then hammer the brakes to clean up the rear brake disks.
EDIT: Forgot to say, good work!
I've got a method for keeping the rear brakes operational: On the rare occasion I've got a full load of passengers, I'll take the opportunity to slam the anchors on a few times. If I'm feeling nice, I'll even tell people first
Thing that always makes me giggle in the 16v is the rear end. If you give it welly along the motorway, the car pitches and the back end squats quite a lot, as it's essentially still a softly sprung car. As the back compresses, the height corrector thinks "Oh, hello!" and raises the back end back to normal ride height, mid-hoon. When you eventually lift off, the rear end jumps up in the air! Can actually be a bit un-nerving if it takes place around a bend, but luckily I've grown out of full-speed runs down the M27! (Especially against blue Xsara VTS')

Kitchski said:
Fastdruid said:
It's fiendishly simple. In a very complicated fashion.
So firstly you have the ride height adjusters front and back. These are connected to the suspension arms and to the lever in the cabin via rods.
When the suspension (arms) rise (ie the front or back dipping) the ride height adjuster allows more fluid into the circuit which counteracts the force applied to the car, the arms then lower, raising the nose or back of the car *but* the damping and spring rates (which are driven respectively by the orifice and gas over oil 'ball') stay the same. The same then happens in reverse if the suspension arms drop (ie the front or back rises), the ride height adjuster reducing the amount of fluid in the system and hence dropping the (relative) ride height.
The level to which the car drops/rises is dictated by the position of the height adjuster lever. Incidentally although there are only 4 settings (IIRC it's been a *long* time since I've been in one) the ride height is infinitely adjustable, it's just a set of detents for the lever. So if you wanted to "lower" a BX but not run on bump stops you could just cut a new detent (or modify the rod setup).
The load based braking is just as clever, the brakes are fed from the same suspension hydraulic circuit, but "after" the suspension, this means that as the suspension loads more force is applied to the fluid and hence to the brakes and vv. The only downside being that in normal use the rear brakes get very little use. Every now and then my dad used to reverse fast and then hammer the brakes to clean up the rear brake disks.
EDIT: Forgot to say, good work!
Ah right, that makes some sense. I knew about the ride height adjusting by the height correctors being opened and closed by the links to the anti-roll bar rotation, but didn't assume they could adjust quickly enough to prevent the diving of the nose, as that's something that happens suddenly, whereas if you sit on the bonnet while it's running, it'll slowly sink before slowly rising back up to normal height. I assumed there was some input from the braking circuit into somewhere around the height corrector.So firstly you have the ride height adjusters front and back. These are connected to the suspension arms and to the lever in the cabin via rods.
When the suspension (arms) rise (ie the front or back dipping) the ride height adjuster allows more fluid into the circuit which counteracts the force applied to the car, the arms then lower, raising the nose or back of the car *but* the damping and spring rates (which are driven respectively by the orifice and gas over oil 'ball') stay the same. The same then happens in reverse if the suspension arms drop (ie the front or back rises), the ride height adjuster reducing the amount of fluid in the system and hence dropping the (relative) ride height.
The level to which the car drops/rises is dictated by the position of the height adjuster lever. Incidentally although there are only 4 settings (IIRC it's been a *long* time since I've been in one) the ride height is infinitely adjustable, it's just a set of detents for the lever. So if you wanted to "lower" a BX but not run on bump stops you could just cut a new detent (or modify the rod setup).
The load based braking is just as clever, the brakes are fed from the same suspension hydraulic circuit, but "after" the suspension, this means that as the suspension loads more force is applied to the fluid and hence to the brakes and vv. The only downside being that in normal use the rear brakes get very little use. Every now and then my dad used to reverse fast and then hammer the brakes to clean up the rear brake disks.
EDIT: Forgot to say, good work!
I've got a method for keeping the rear brakes operational: On the rare occasion I've got a full load of passengers, I'll take the opportunity to slam the anchors on a few times. If I'm feeling nice, I'll even tell people first
Thing that always makes me giggle in the 16v is the rear end. If you give it welly along the motorway, the car pitches and the back end squats quite a lot, as it's essentially still a softly sprung car. As the back compresses, the height corrector thinks "Oh, hello!" and raises the back end back to normal ride height, mid-hoon. When you eventually lift off, the rear end jumps up in the air! Can actually be a bit un-nerving if it takes place around a bend, but luckily I've grown out of full-speed runs down the M27! (Especially against blue Xsara VTS')
The "anti-dive" is due to the rear brakes being off the rear suspension, because of that it bleeds pressure from the suspension and lowers it at the back which keeps the car level. So the car still dives at the front, it just dives at the back by the same amount and keeps it level.
Gassing Station | Readers' Cars | Top of Page | What's New | My Stuff