Discussion


Thanks for the comments, sounds like graphics on one side and not on the other then!
Plenty to update but tonight is really just about sharing my shame with fellow pistonheaders.
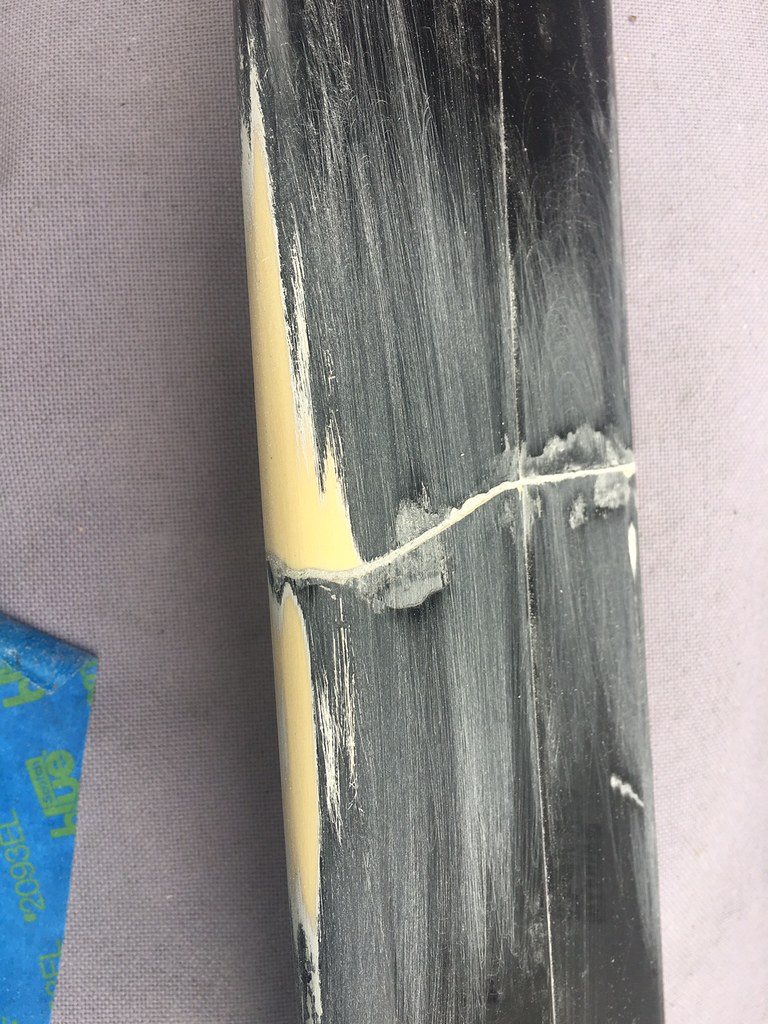
You may have noticed that the car was wearing an E46 sport rear spoiler, as the boot lid was changed in January for a non rusty example. And in a moment of gross idiocy I snapped the precious original spoiler in the cold, trying to remove it from the old lid. Two almost perfect halves, right in the middle. Probably my first experience with beta-link, the BMW adhesive (though it seems alpina is it alongside double sided tape.)
Anyhow, today, having applied some of my old badges- the "B3 3.3" bit- I decided I'd put the (now two part) Alpina spoiler on. The sport one came off easily with nylon fishing line, and being a doting custodian I'd purchased the full beta-link kit. After all, it deserves it, and I figured I'd need something strong to make the two parts appear as seamless as possible.
So, prepped the lid with the beta-link primer, had even read the instructions- this stuff gives you cancer just by ordering it according to the warnings- had marked out the exact position with expensive new low rack masking tape... and we, the two halves didn't match up well. Oh, and the beta-link turns out to need a rather expensive applicator gun, £150 or so. This could only happen to me. And only happens when the sun is beating down on me. On one of those "10 minute" jobs...
Well I couldn't get the beta-link coaxed out of its tubes, so I stuck it on with 3m double sided tape, it's securely on, but looks shocking, a half mm gap between the halves and a jaunty difference in their meeting angle that looks completely embarrassing.
So, as anyone else would have done first anyway, I've ordered some epoxy to glue the two halves together, before glueing to the bootlid. The spoiler seems to be glassfibre (and is the original alpina marked part) and so I think I have a chance of repairing it. It will definitely need filling, sanding, painting though, and you sort of start thinking about ordering a new one from the factory. What a tit.
Plenty to update but tonight is really just about sharing my shame with fellow pistonheaders.
You may have noticed that the car was wearing an E46 sport rear spoiler, as the boot lid was changed in January for a non rusty example. And in a moment of gross idiocy I snapped the precious original spoiler in the cold, trying to remove it from the old lid. Two almost perfect halves, right in the middle. Probably my first experience with beta-link, the BMW adhesive (though it seems alpina is it alongside double sided tape.)
Anyhow, today, having applied some of my old badges- the "B3 3.3" bit- I decided I'd put the (now two part) Alpina spoiler on. The sport one came off easily with nylon fishing line, and being a doting custodian I'd purchased the full beta-link kit. After all, it deserves it, and I figured I'd need something strong to make the two parts appear as seamless as possible.
So, prepped the lid with the beta-link primer, had even read the instructions- this stuff gives you cancer just by ordering it according to the warnings- had marked out the exact position with expensive new low rack masking tape... and we, the two halves didn't match up well. Oh, and the beta-link turns out to need a rather expensive applicator gun, £150 or so. This could only happen to me. And only happens when the sun is beating down on me. On one of those "10 minute" jobs...
Well I couldn't get the beta-link coaxed out of its tubes, so I stuck it on with 3m double sided tape, it's securely on, but looks shocking, a half mm gap between the halves and a jaunty difference in their meeting angle that looks completely embarrassing.
So, as anyone else would have done first anyway, I've ordered some epoxy to glue the two halves together, before glueing to the bootlid. The spoiler seems to be glassfibre (and is the original alpina marked part) and so I think I have a chance of repairing it. It will definitely need filling, sanding, painting though, and you sort of start thinking about ordering a new one from the factory. What a tit.
I've just dropped a very good condition, freshly powder coated front subframe in for AKG reinforcement plates to be welded before a bit of Alpina branded powder coating takes place...
Good to see my welder drives an avantime- clearly a man who understands quirkiness and difficult to source/ expensive parts. I doubt the Renault needs as much metalwork as the Alp though.
This is part of a front underbelly refresh- new purple tag rack, AR bar, droplinks, steering swivel joint, engine mounts and fancy subframe. Possibly some other bits too. Most of the other bits are recent now anyway.
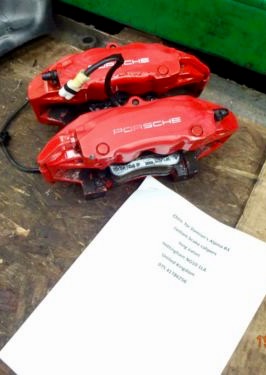
The subframe is still being welded, front H&R 27mm antiroll bar is on its way from the fatherland. It's blue of course. And parts of an inadvertent and unnecessary upgrade are on their way. Already in: creation motorsport brackets and green Hel hoses for a Porsche Brembo brake transformation.
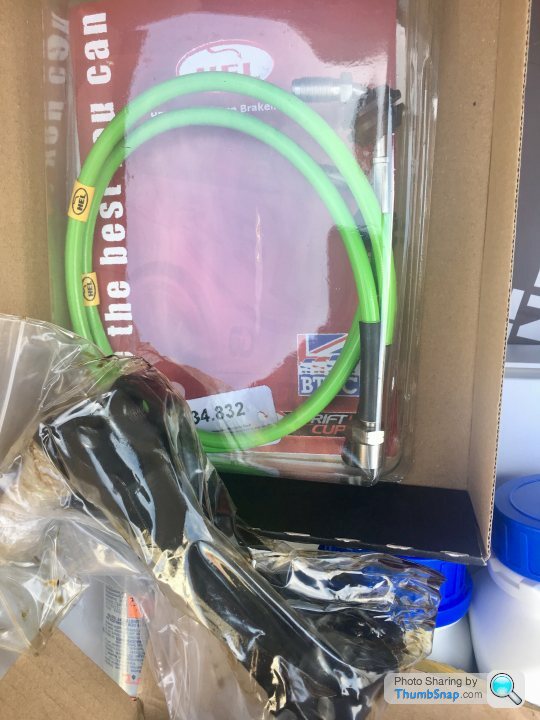
Of course, as fitting as a Samoan boob in a Gaugin painting, there's a peep of Bilt Hamber in this E46 boot contents image.
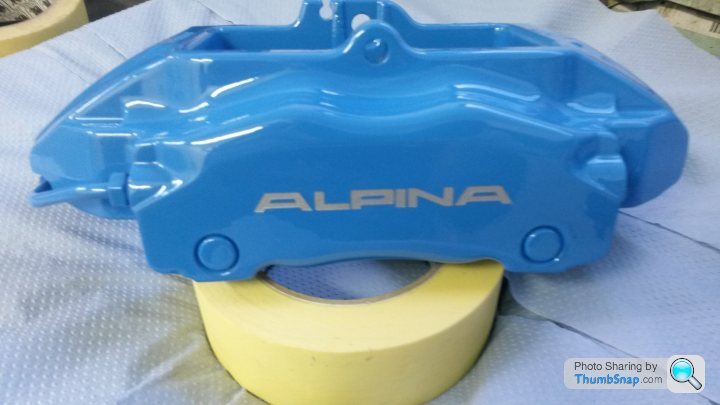
The Brembos will be off for a rebuild, blue paint and Alpina decalisation, and as I'm on holiday much of August they're not going to be on until well into September now. But NEW THINGS.
Nice that Hel don't copy Goodridge's little yellow tag on their braided lines. Oh.
Hoping to get to ETA before holidays for the planned underbelly refresh, though there's no chance of the brakes being ready then. And a question, anyone have a good recommendation for Boxster S/ 996 brake pads?
Of course, as fitting as a Samoan boob in a Gaugin painting, there's a peep of Bilt Hamber in this E46 boot contents image.
The Brembos will be off for a rebuild, blue paint and Alpina decalisation, and as I'm on holiday much of August they're not going to be on until well into September now. But NEW THINGS.
Nice that Hel don't copy Goodridge's little yellow tag on their braided lines. Oh.
Hoping to get to ETA before holidays for the planned underbelly refresh, though there's no chance of the brakes being ready then. And a question, anyone have a good recommendation for Boxster S/ 996 brake pads?
Edited by Polynesian on Tuesday 18th July 15:38
helix402 said:
I think you'll like the 27mm arb, are you running a 21 on the rear?
Intriguingly, the E46 B3S catalogue lists a 20mm rear bar, but no front. the 20mm is from the E46 cabriolet. The 3.3 catalogue lists no antiroll bars, so i'm guessing I have the 19mm early "sport" rear bar. All of my research into E46 suspension suggests that the 46 benefits from a stiffer front bar but is not necessary at the back. Normally you'd expect this (stiff front bar, wobbly rear) to generate great wodges of understeer, but with E46s it seems that it helps get the best out of the front set up without unwanted ploughing-on-ness.
I've had the Koni FSD dampers on for around 7000 miles now, and they are really excellent. Improved comfort, at least over knackered old Alpina standard units, and much better in the corners. I haven't seen any misting or leaks yet, but I believe that's the thing to watch out for with FSDs. I'd recommend them wholeheartedly.
You're right on the arbs on the E46, despite theory suggesting otherwise increasing just the front bar won't lead to an understeering barge. I run an M3 Conv 27mm bar on the front and a 21mm Eibach on the rear of my 330d Touring. I used to have 24/19 on my 328 saloon which worked well.
I tried the same sizes at first on the Touring but they didn't quite reduce the roll enough for my taste. There's a fair bit more weight to a diesel touring compared to a saloon/coupe.
I tried the same sizes at first on the Touring but they didn't quite reduce the roll enough for my taste. There's a fair bit more weight to a diesel touring compared to a saloon/coupe.
turboflutter said:
Well this was a very nice morning read, a good start to an early shift! Excellent restoration. I had an E46 coupe previously and it's amazing to see all the small subtle changes on the Alpinas and how they all add up to a huge difference overall.
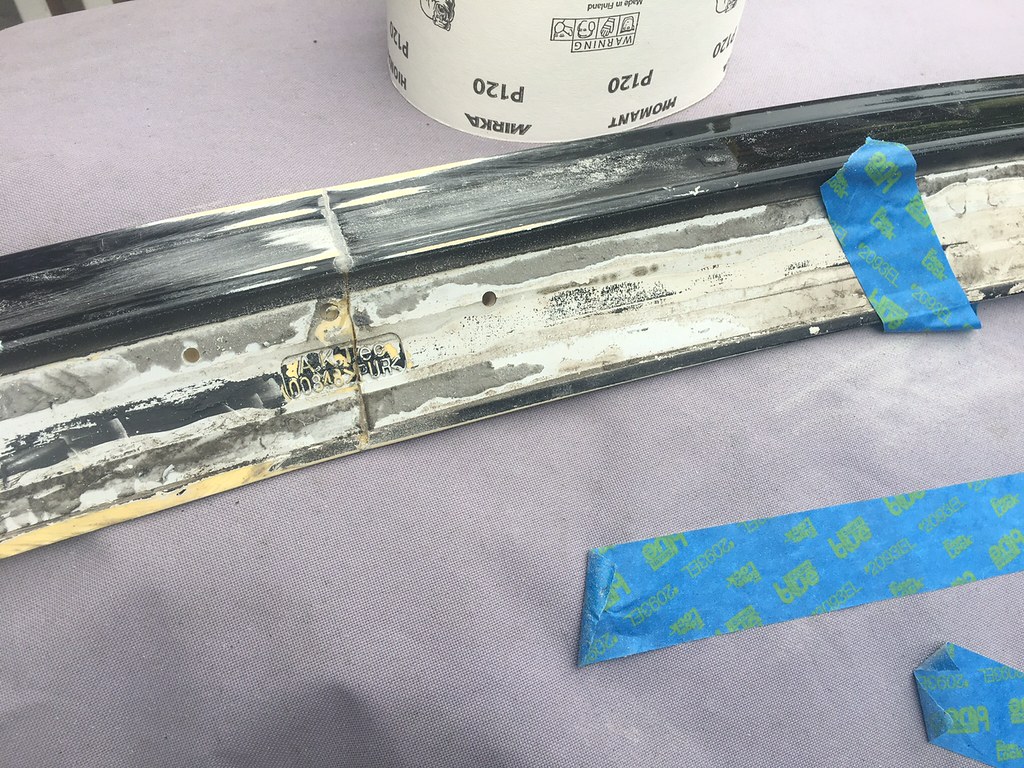
Thank you! Glad if someone finds it interesting. I love all the little Alpina touches, perhaps except for the pipes and rubber gaskets and the like that are also bespoke, painful to purchase!As penance for my earlier idiocy in cracking the rear spoiler in two (only about £450 from Alpina), I have successfully glued it, using a two pack unibond repair epoxy which worked well on the polyurethane, and now I'm sanding it ready for primer and paint and refitting. Doing it the proper way.
Ok, I've just totted up the spend on my "cost conscious" big brake upgrade. It better be good because it isn't very cost conscious-
ECS 345mm 2 piece discs £385
Akebono pads £80
Brembo calipers £435
Refurb, paint, decals £275
Hel braided hoses £39
Creation motorsport brackets £127
Only remaining aspect to buy is:
Brake fluid £400 probably
I don't even want to do the addition on that. But it does get an as new front brake setup which will be Alpina branded (like the brembos on the B10s) and a sort of real world ideal brake setup for me. Of course I'll feel obliged to do something with the rears next.
The calipers are on their way to the refurb guy- they get stripped, cleaned, new seals, bleed screws, pistons if needed, paint and decals. Then I just have to wait until my US trip to pick up the pads and discs- sorry, rotors.
helix402 said:
That's not a cheap brake upgrade! Is it for improved performance or appearance or both?
I guess you could leave the refurb, use standard 345mm discs and save a substantial amount that way. But once I got started, I figured I'd do it as if it were an Alpina specified kit, with, er, fancy 2 piece discs. The reality is that anyone who thinks they needs kit like this for road driving probably needs to think about how they are driving, yes it's nice to know they are incredible anchors in an emergency, but let's be honest, if the car isn't driven more than 50% of the time on track it's probably completely excessive. So appearance certainly factored into it for me. You can dress it up any which way, but no amount of rationalising will explain away an absurd upgrade like this as being all about function and performance.
However, it does make a Nurburgring trip seem more necessary. The car was there before my ownership with knackered dampers and standard (shock!) brakes, so i'll be keen to drive it on fresh FSDs and with the new antiroll bar and brakes. I've upgraded myself into needing to go to the Nurburgring. I'm sure it's supposed to be the other way around.
Polynesian said:
helix402 said:
That's not a cheap brake upgrade! Is it for improved performance or appearance or both?
I guess you could leave the refurb, use standard 345mm discs and save a substantial amount that way. But once I got started, I figured I'd do it as if it were an Alpina specified kit, with, er, fancy 2 piece discs. The reality is that anyone who thinks they needs kit like this for road driving probably needs to think about how they are driving, yes it's nice to know they are incredible anchors in an emergency, but let's be honest, if the car isn't driven more than 50% of the time on track it's probably completely excessive. So appearance certainly factored into it for me. You can dress it up any which way, but no amount of rationalising will explain away an absurd upgrade like this as being all about function and performance.
However, it does make a Nurburgring trip seem more necessary. The car was there before my ownership with knackered dampers and standard (shock!) brakes, so i'll be keen to drive it on fresh FSDs and with the new antiroll bar and brakes. I've upgraded myself into needing to go to the Nurburgring. I'm sure it's supposed to be the other way around.
Since I've done mine, the braking is more consistent for one, and ride quality improved surprisingly. Turns out this setup shaves a few KG out the front end and as a result the car runs a bit smoother.
Will be fitting DS2500 pads end of this month as I've got no idea what came with the calipers in the first place.
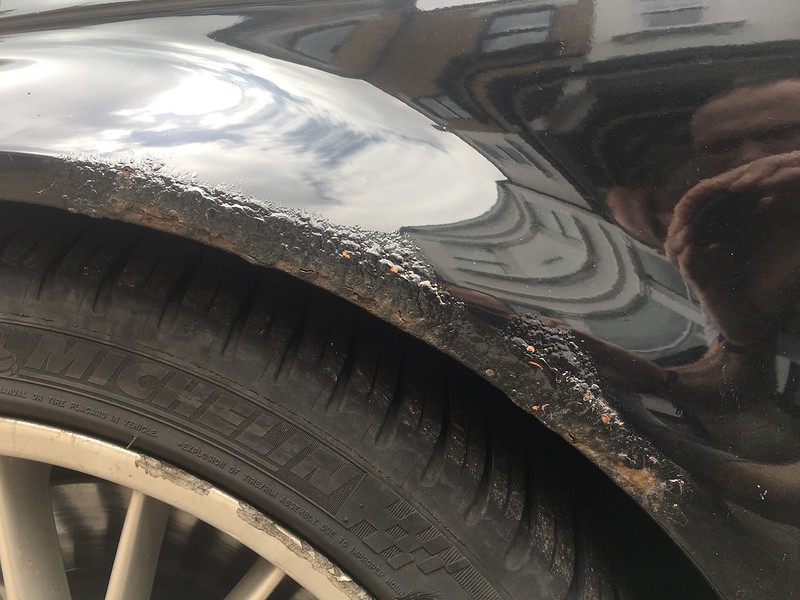
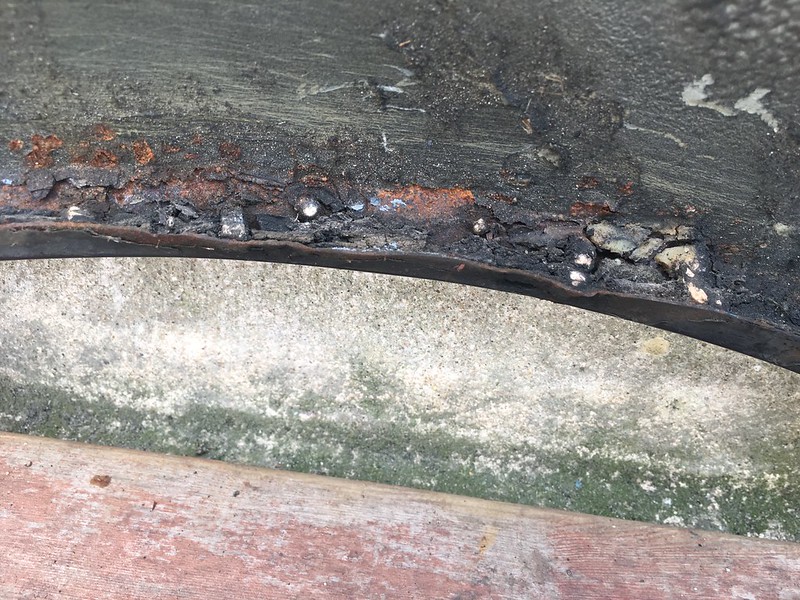
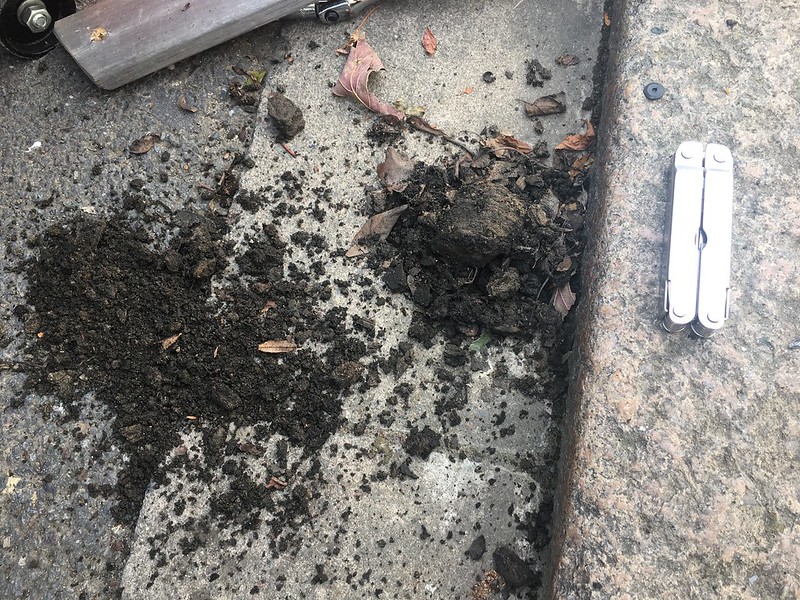
No alpina should have rusty wings. While BMW fitted rust-ready parts to much of the E46, Herr Bovensiepen says "nein" to rust. It's not part of the brand identity. And I agree. So I removed the embarrassingly rusty passenger wing and replaced it with a new one. I found some rather surprising matter as I worked, enough soil and muck behind the arch liner to noticeably increase the car's weight- no really, have a look below! And, of course, I found some more rust.
 IMG_6112
Muck by the windscreen cowl at the rearmost top wing bolt
 IMG_6114
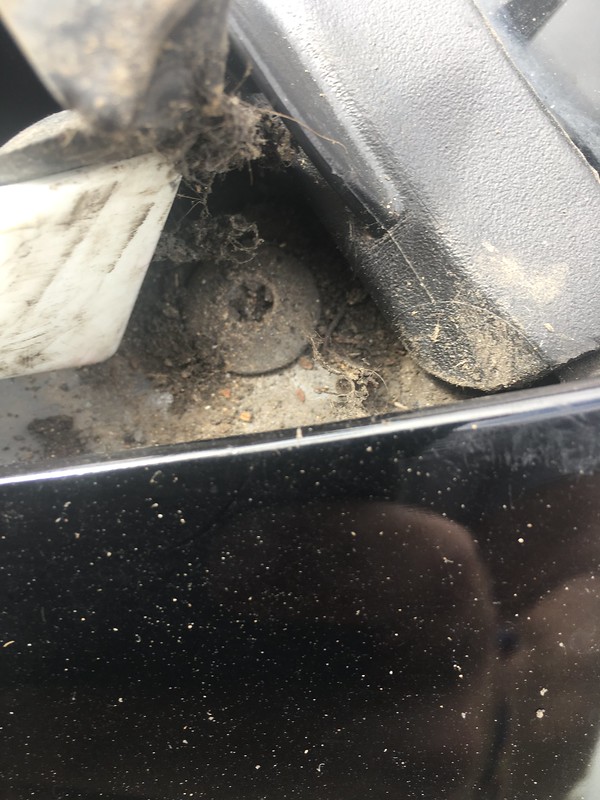
Clearly these brakes are in desperate need of replacement with something bigger. Look at the lack of pad and the huge lip on the discs. Definitely need replacement
 IMG_6117
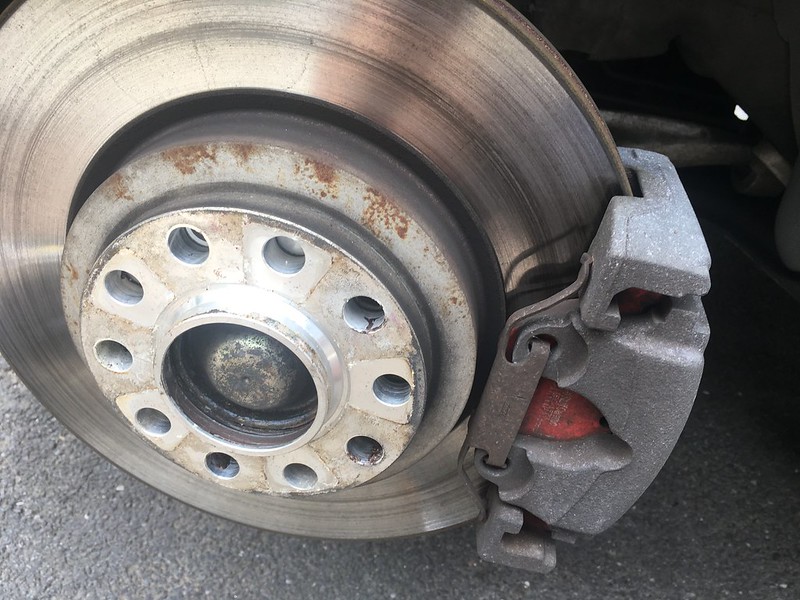
FSD's still healthy. No misting, which is good news. The ride and ability to stiffen immediately into corners with these dampers is fantastic, and very Alpina
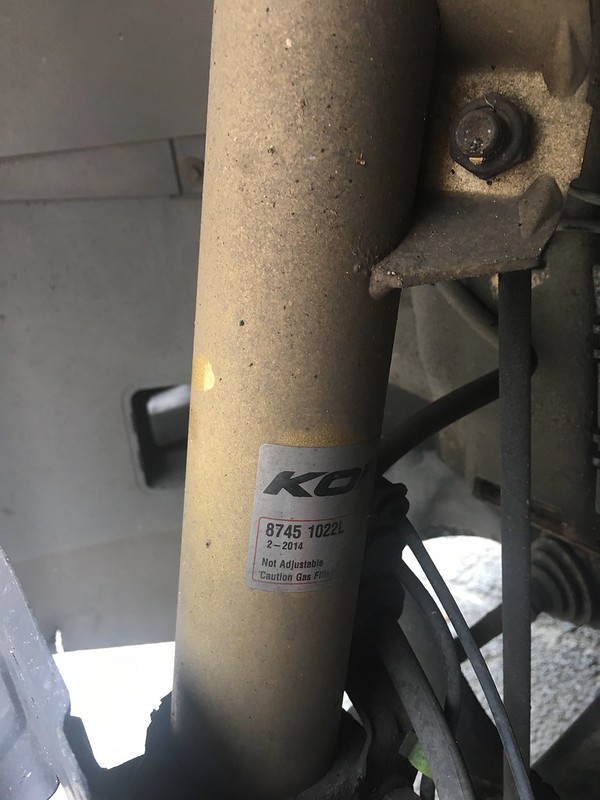 IMG_6118
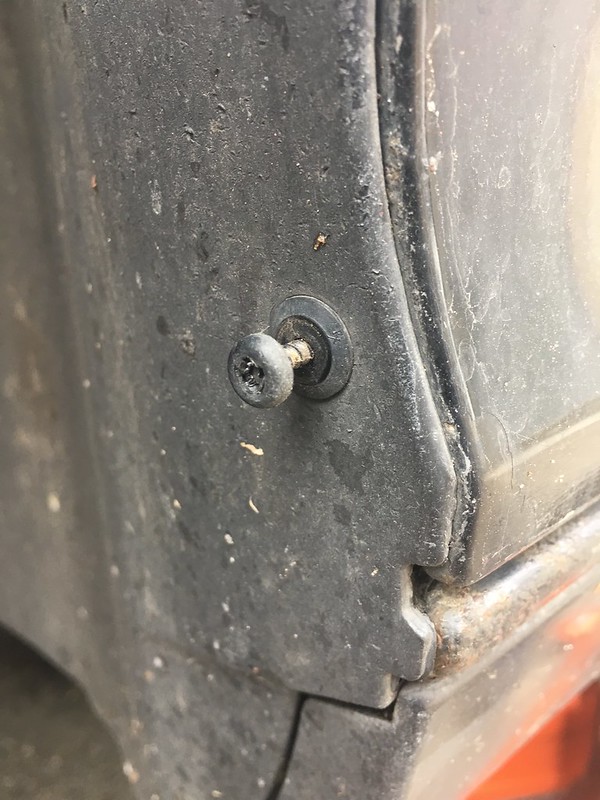
Unlike the guides and the ECS fittings replacement kit, the Alp came with plastic screws to hold the arch at the rear. I replaced with the little BMW pins, the plastic screws did not survive removal
 IMG_6123
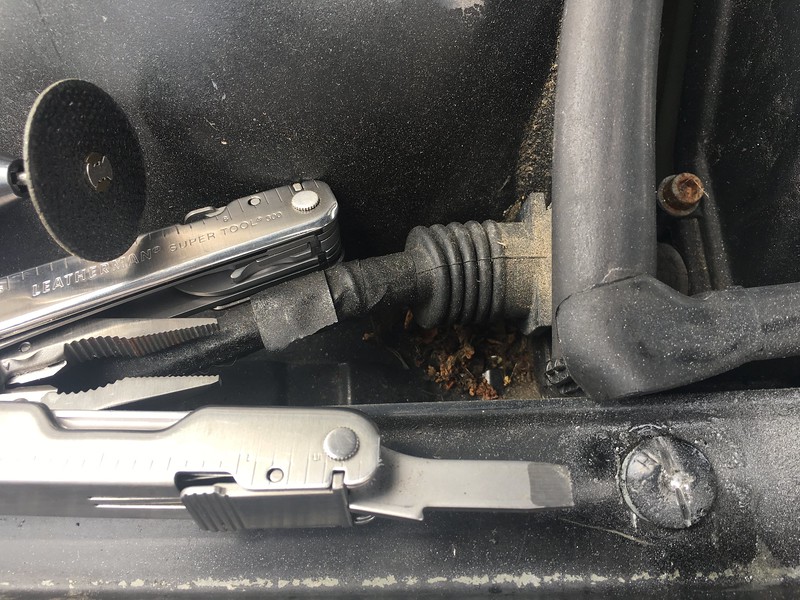
Naturally, one wing bolt rounded off. They are Torx 30 and soft, but also hard when you try drilling them. The dremel did the job and cut a groove I could use the leatherman in to loosen this final bolt.
 IMG_6129
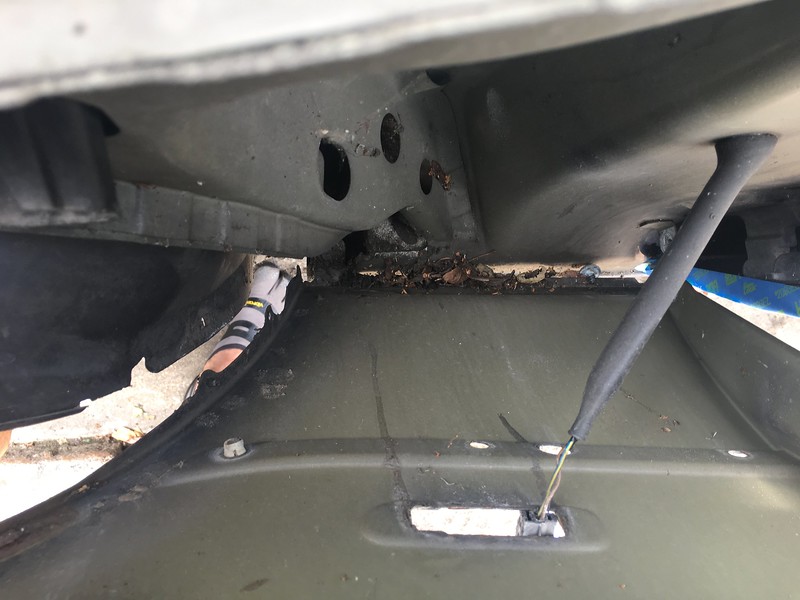
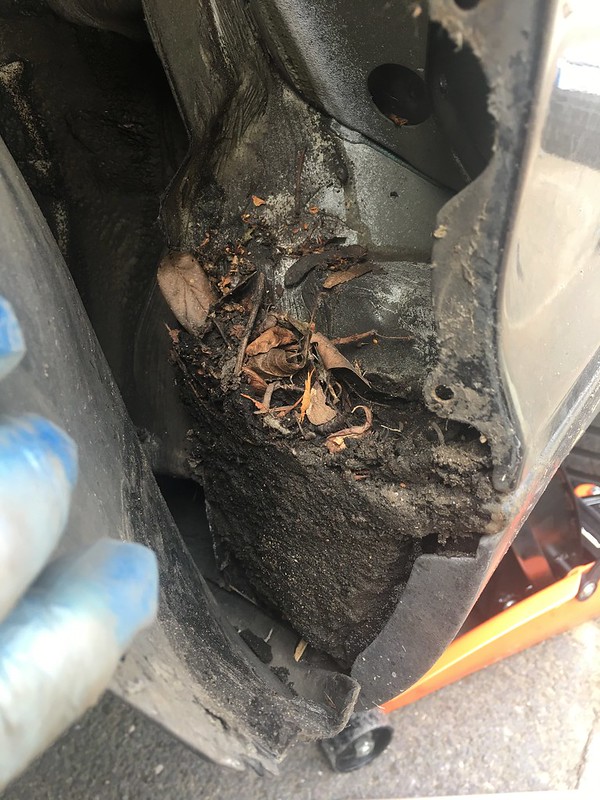
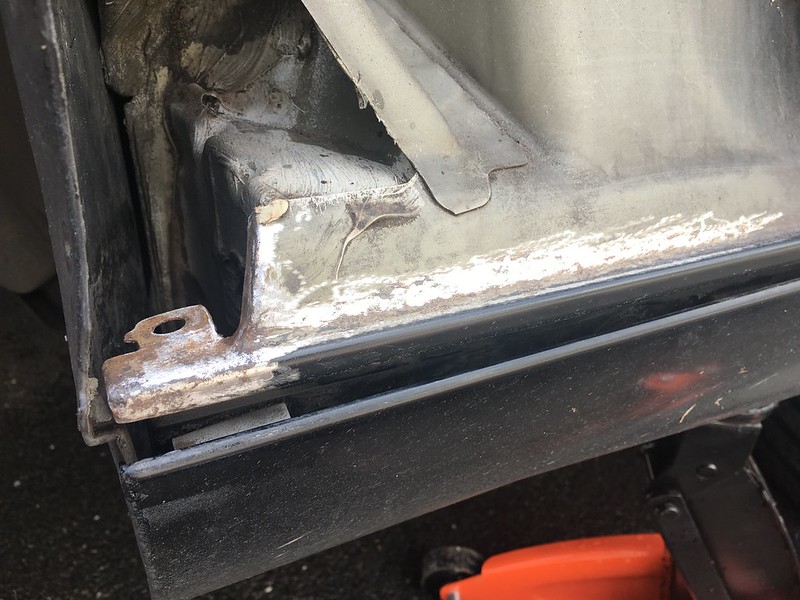
Looking down into the crevasse between wing and inner body. At this point I thought this amount of muck was shocking.
 IMG_6132
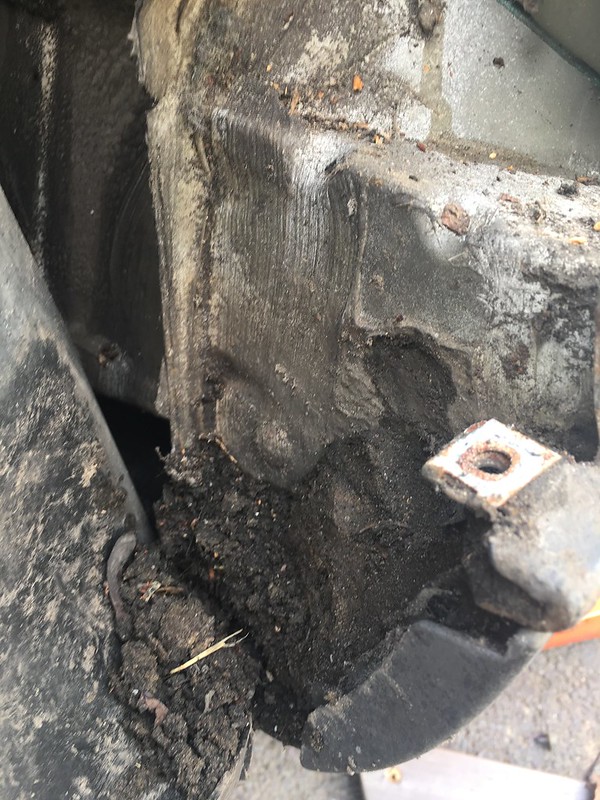
Inside of the old wing. Knackered.
 IMG_6137
You could really grow crops in here
 IMG_6128
This was after I had removed a large clod of earth
 IMG_6139
It might not look it, but there is easily 400g of muck and soil here from behind the arch liner. Was this car used as a tractor?
 IMG_6141
Rust below the rear fitting of the front wing. I dremelled it all off and applied lashings of bilt hamber hydrate 80.
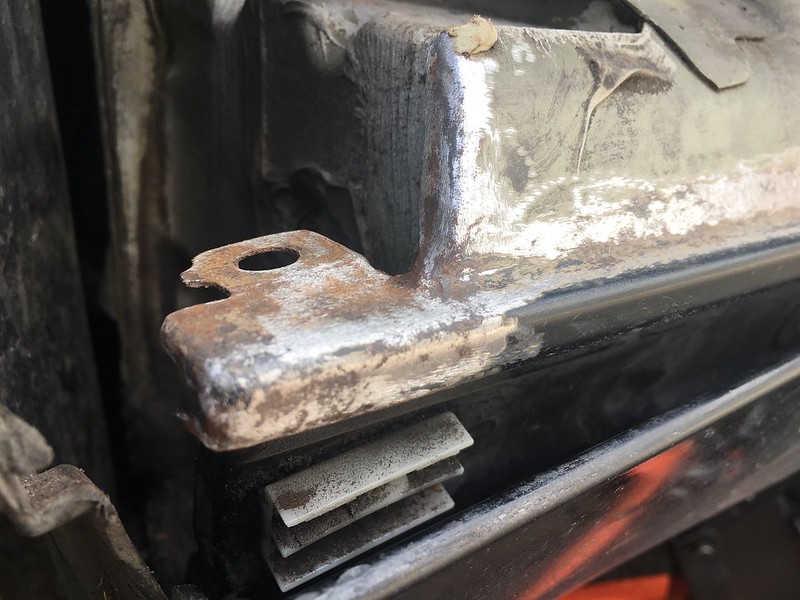 IMG_6153
 IMG_6144
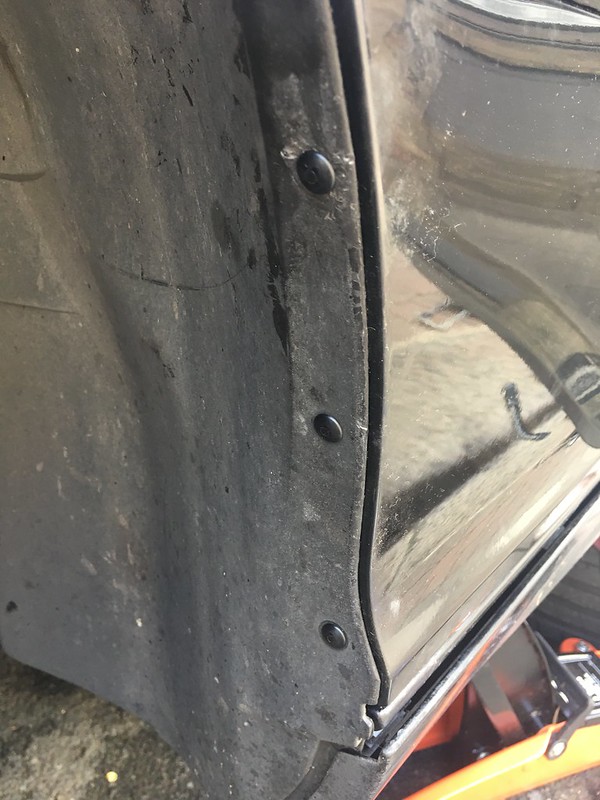
A tiny smidge of rust in the sill. There were 4 of these patches, each around one of the side skirt attachment points.
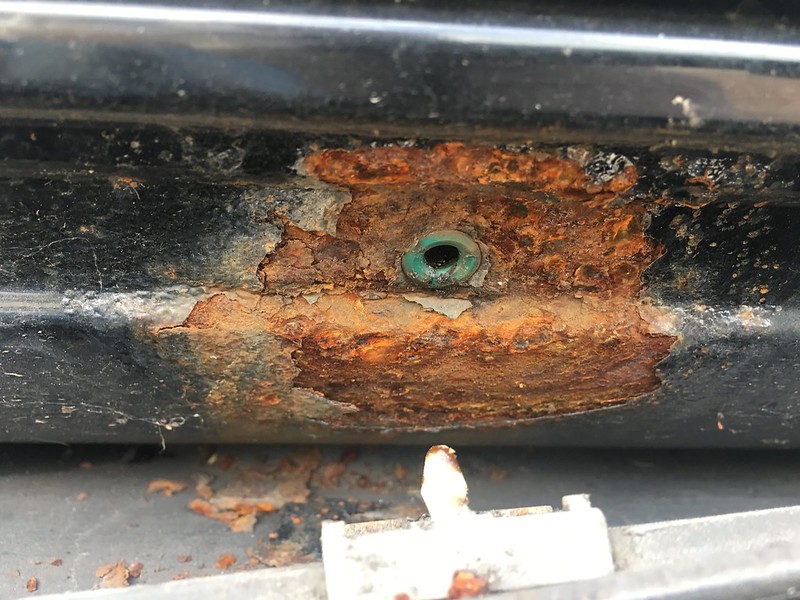 IMG_6155
All new fittings to put the arch liners back
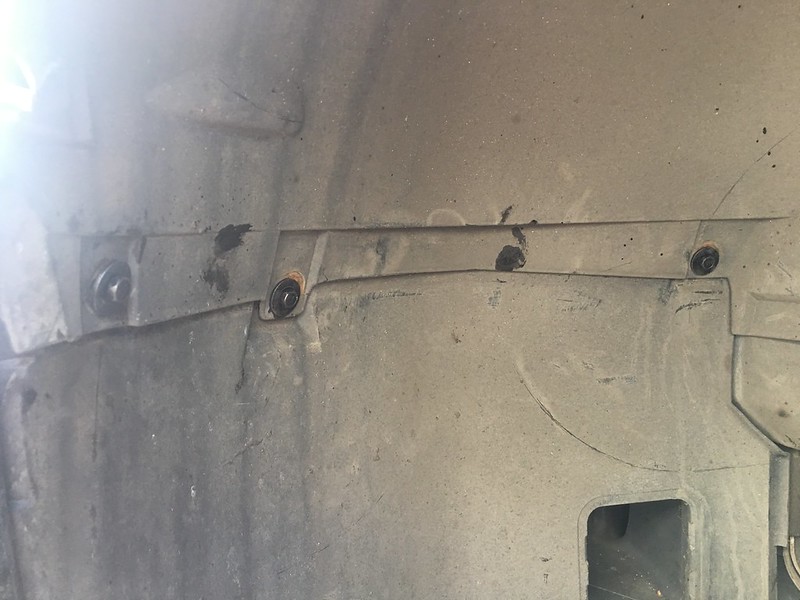 IMG_6157
 IMG_6156
Freshened up the side repeaters while I was on the case
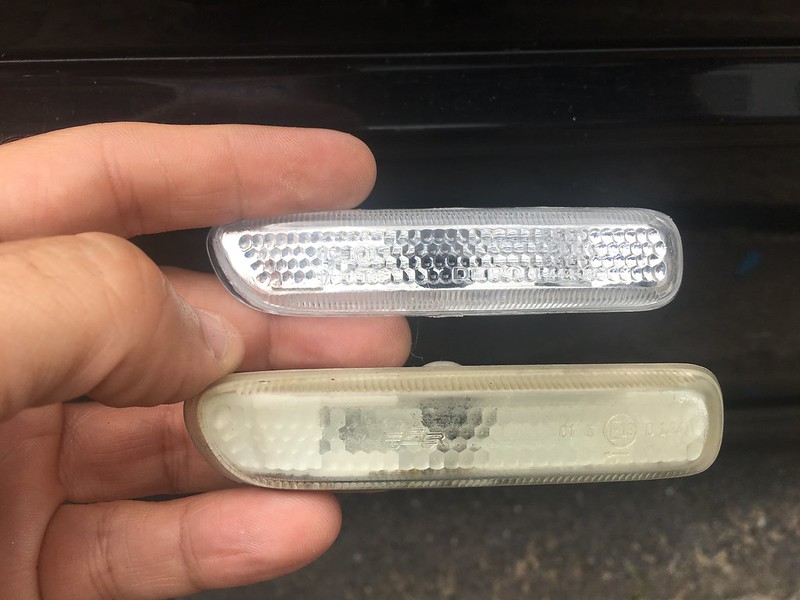 IMG_6113
IMG_6112Muck by the windscreen cowl at the rearmost top wing bolt
IMG_6114Clearly these brakes are in desperate need of replacement with something bigger. Look at the lack of pad and the huge lip on the discs. Definitely need replacement
IMG_6117FSD's still healthy. No misting, which is good news. The ride and ability to stiffen immediately into corners with these dampers is fantastic, and very Alpina
IMG_6118Unlike the guides and the ECS fittings replacement kit, the Alp came with plastic screws to hold the arch at the rear. I replaced with the little BMW pins, the plastic screws did not survive removal
IMG_6123Naturally, one wing bolt rounded off. They are Torx 30 and soft, but also hard when you try drilling them. The dremel did the job and cut a groove I could use the leatherman in to loosen this final bolt.
IMG_6129Looking down into the crevasse between wing and inner body. At this point I thought this amount of muck was shocking.
IMG_6132Inside of the old wing. Knackered.
IMG_6137You could really grow crops in here
IMG_6128This was after I had removed a large clod of earth
IMG_6139It might not look it, but there is easily 400g of muck and soil here from behind the arch liner. Was this car used as a tractor?
IMG_6141Rust below the rear fitting of the front wing. I dremelled it all off and applied lashings of bilt hamber hydrate 80.
IMG_6153IMG_6144A tiny smidge of rust in the sill. There were 4 of these patches, each around one of the side skirt attachment points.
IMG_6155All new fittings to put the arch liners back
IMG_6157IMG_6156Freshened up the side repeaters while I was on the case
IMG_6113Edited by Polynesian on Wednesday 26th July 11:51

Gassing Station | Readers' Cars | Top of Page | What's New | My Stuff