Improving The Breed, 2006 Mustang GT.
Discussion


Another quick update on the progress front.
I am now through with US based tuners, I am sick to death of single line or in some cases one word e-mail replies (they don’t even have the standard canned footer of “thanks for your business" on them) and the lack of listening in general.
The revised tune that came back from the tuners in the US still allowed the engine to peak at 7400rpm in the burnout, which isn't ideal for large V8 which has a factory limiter of 6500 and a stock shift point of 6250, there is obviously a couple of hundred RPM to play with on this as it is set as a safe limit for longevity (usually around 300rpm more and raise the shift ceiling to 6500) of the engine and drive train.
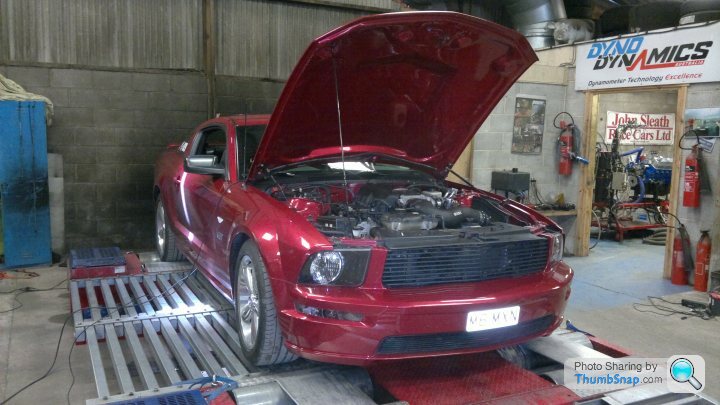
So with my confidence in remote tuning damaged I phoned John Sleath Race Cars Ltd. and booked in for a dyno tuning session. The car now has a rev limiter and I have a power figure, 271bhp at the rear wheels, (John only gives a rear wheel figure as estimating the crank figure from the rundown drag is just that – an estimate) so given that the transmission losses for a 2006 Mustang GT auto are in the 20 - 25% range I will take the conservative option of 20% which means the car is putting out around 325hp at the flywheel which given the reported gains for the mods I have fitted (cold air intake, tune and FRPP manifold) is about right. But that is a guestimate, might be more might be less. But I am still very happy with the results. The old race tune was run on the dyno from the US and it was only 0.5hp less than Johns tune (the AFR was a bit richer on that tune so it probably explains it).
Here is a picture of the car on the rolling road:
And a video of the dyno pull. You will need reasonable speakers to listen to this otherwise you will just get the howl of the car interacting with the dyno rather than the engine noise of the car, enjoy:
Dyno pull
When I looked at the on track trace (you will hear it on the last video at Santa Pod that I posted) there appeared to be a little dip in revs are in 4th gear on the track, its nothing to do with a bad tune its simply the gearbox locking up and putting a bit of extra load on the engine at that point there isn't much that can be done at that point to compensate for it, but at least I now know it isn't a problem
I am now through with US based tuners, I am sick to death of single line or in some cases one word e-mail replies (they don’t even have the standard canned footer of “thanks for your business" on them) and the lack of listening in general.
The revised tune that came back from the tuners in the US still allowed the engine to peak at 7400rpm in the burnout, which isn't ideal for large V8 which has a factory limiter of 6500 and a stock shift point of 6250, there is obviously a couple of hundred RPM to play with on this as it is set as a safe limit for longevity (usually around 300rpm more and raise the shift ceiling to 6500) of the engine and drive train.
So with my confidence in remote tuning damaged I phoned John Sleath Race Cars Ltd. and booked in for a dyno tuning session. The car now has a rev limiter and I have a power figure, 271bhp at the rear wheels, (John only gives a rear wheel figure as estimating the crank figure from the rundown drag is just that – an estimate) so given that the transmission losses for a 2006 Mustang GT auto are in the 20 - 25% range I will take the conservative option of 20% which means the car is putting out around 325hp at the flywheel which given the reported gains for the mods I have fitted (cold air intake, tune and FRPP manifold) is about right. But that is a guestimate, might be more might be less. But I am still very happy with the results. The old race tune was run on the dyno from the US and it was only 0.5hp less than Johns tune (the AFR was a bit richer on that tune so it probably explains it).
Here is a picture of the car on the rolling road:
And a video of the dyno pull. You will need reasonable speakers to listen to this otherwise you will just get the howl of the car interacting with the dyno rather than the engine noise of the car, enjoy:
Dyno pull
When I looked at the on track trace (you will hear it on the last video at Santa Pod that I posted) there appeared to be a little dip in revs are in 4th gear on the track, its nothing to do with a bad tune its simply the gearbox locking up and putting a bit of extra load on the engine at that point there isn't much that can be done at that point to compensate for it, but at least I now know it isn't a problem
July/August 2014:
Here comes the next updates, it’s been slow over the past year, to be honest most of what I wanted to do has been done and now I am just titivating. Though a change that I wasn’t expecting to do was to give the rear end a bit of an-uplift, a minor collision occurred at the start of July when somebody ran into the back of me. This resulted in a bent off side exhaust and creased and miss-shapen back bumper:


It’s hard to see on those pictures to be honest but was more obvious close up that it wasn’t quite the right shape.
Because the exhaust was bent on the over axle pipe as well as the back box which meant replacing the entire system (actually the stock bends were so bad it was hard to tell what was accident damage and what came from the factory) from the H-Pipe exit backwards. Given it has an aftermarket system already I stipulated that that an aftermarket system was to be fitted as a replacement, there is little point in them fitting a stock ford system when all I would do is cut it off, weigh it in and fit an aftermarket system again.
Being an honest chap I ordered the same system that is currently fitted, a JBA system at the same time as I ordered the bumper. However 24 Hours later I get an e-mail from CJ Pony parts saying that the JBA system is discontinued. I decide to go for a MagnaFlow system instead, which worked out £260 more expensive (including taxes and shipping). I ordered this before okaying it with the insurers as it had to be ordered in from the manufacturer. I was told a week.
After a week I setup a text chat window with CJ Pony Parts and they said that MagnaFlow had put it back to the following week, wonderful. The following week I get the same response so I can the MagnaFlow system and just get them to send me the bumper; the extra for the exhaust refunded. The bumper I ordered is the GT500/California Special bumper, rather than a stock GT one. The main difference is it has a Faux diffuser between the exhausts. Even though its more expensive (double) an oddity in the shipping means that it only cost £25 more than a stock one. A difference I am happy to pay myself if the insurance company doesn’t like it.
Given the pain in the arse with the exhaust I decide to get in touch with a localish exhaust guy. Len who runs PipeTech (http://www.pipetech1.co.uk/) based in Hunmanby North Yorkshire about getting a system made up. It was (after a right PITA getting it authorised) A great service, Len the owner came down to hull took some measurements for the silencers to get them made up and I then took the car there the following week for the two day job:


PipeTech: http://www.pipetech1.co.uk/
Sounds fantastic, looks great and the service was top notch – highly recommended if you want a custom system building
A GT500/California Special rear bumper; it looks a bit fresher than the stock one and the diffuser compliments the deck black out and smoked lights perfectly:


The work was carried out by Prestige accident Repair Limited (they did the front end for me when I bought the new hood): http://www.prestigebodyshop.co.uk/
They do a fantastic job, highly recommended.
I do have some slim line LED Fog and Reverse lights in the works to replace the ones that are currently there. You can’t see the bumper impact absorbing foam that’s behind it but that was also replaced.
In an attempt to tidy up under the hood a little more I ordered these:

CPC Radiator Cover extensions from CJ Pony parts; but they won’t just fit out of the box as I have bits that aren’t stock under the hood. First the nearside one has to have a notch cut in it to allow it to clear the air intake box (right side of the picture).
The offside panel needed the bump stop hole elongating so that I could still use the hood prop (supposed to be used with Gas struts but they are not strong enough to cope with the fibreglass hood), this is shown on the right hand side of the picture.
Installed:

I am not entirely convinced but at $77 they weren’t a hugely expensive gamble and were stuck on the back of a service parts order so I didn’t take a kicking for shipping costs either.
Nothing much more on the performance side for now but there are a few things on the boat as it were from the USA and UK suppliers so watch this space
Here comes the next updates, it’s been slow over the past year, to be honest most of what I wanted to do has been done and now I am just titivating. Though a change that I wasn’t expecting to do was to give the rear end a bit of an-uplift, a minor collision occurred at the start of July when somebody ran into the back of me. This resulted in a bent off side exhaust and creased and miss-shapen back bumper:
It’s hard to see on those pictures to be honest but was more obvious close up that it wasn’t quite the right shape.
Because the exhaust was bent on the over axle pipe as well as the back box which meant replacing the entire system (actually the stock bends were so bad it was hard to tell what was accident damage and what came from the factory) from the H-Pipe exit backwards. Given it has an aftermarket system already I stipulated that that an aftermarket system was to be fitted as a replacement, there is little point in them fitting a stock ford system when all I would do is cut it off, weigh it in and fit an aftermarket system again.
Being an honest chap I ordered the same system that is currently fitted, a JBA system at the same time as I ordered the bumper. However 24 Hours later I get an e-mail from CJ Pony parts saying that the JBA system is discontinued. I decide to go for a MagnaFlow system instead, which worked out £260 more expensive (including taxes and shipping). I ordered this before okaying it with the insurers as it had to be ordered in from the manufacturer. I was told a week.
After a week I setup a text chat window with CJ Pony Parts and they said that MagnaFlow had put it back to the following week, wonderful. The following week I get the same response so I can the MagnaFlow system and just get them to send me the bumper; the extra for the exhaust refunded. The bumper I ordered is the GT500/California Special bumper, rather than a stock GT one. The main difference is it has a Faux diffuser between the exhausts. Even though its more expensive (double) an oddity in the shipping means that it only cost £25 more than a stock one. A difference I am happy to pay myself if the insurance company doesn’t like it.
Given the pain in the arse with the exhaust I decide to get in touch with a localish exhaust guy. Len who runs PipeTech (http://www.pipetech1.co.uk/) based in Hunmanby North Yorkshire about getting a system made up. It was (after a right PITA getting it authorised) A great service, Len the owner came down to hull took some measurements for the silencers to get them made up and I then took the car there the following week for the two day job:
PipeTech: http://www.pipetech1.co.uk/
Sounds fantastic, looks great and the service was top notch – highly recommended if you want a custom system building
A GT500/California Special rear bumper; it looks a bit fresher than the stock one and the diffuser compliments the deck black out and smoked lights perfectly:
The work was carried out by Prestige accident Repair Limited (they did the front end for me when I bought the new hood): http://www.prestigebodyshop.co.uk/
They do a fantastic job, highly recommended.
I do have some slim line LED Fog and Reverse lights in the works to replace the ones that are currently there. You can’t see the bumper impact absorbing foam that’s behind it but that was also replaced.
In an attempt to tidy up under the hood a little more I ordered these:
CPC Radiator Cover extensions from CJ Pony parts; but they won’t just fit out of the box as I have bits that aren’t stock under the hood. First the nearside one has to have a notch cut in it to allow it to clear the air intake box (right side of the picture).
The offside panel needed the bump stop hole elongating so that I could still use the hood prop (supposed to be used with Gas struts but they are not strong enough to cope with the fibreglass hood), this is shown on the right hand side of the picture.
Installed:
I am not entirely convinced but at $77 they weren’t a hugely expensive gamble and were stuck on the back of a service parts order so I didn’t take a kicking for shipping costs either.
Nothing much more on the performance side for now but there are a few things on the boat as it were from the USA and UK suppliers so watch this space
Another small update from me:
I removed the CPC radiator extension covers as they were rubbing on the underside of the fibreglass hood and on the lip, this is because of the thicker seams on the fibre glass hood. Never mind; I might see if I can flee bay them (they have been drilled and cut to suit my Roush intake and the hood prop).
Firstly I had been having some pretty nasty noises from the rear end whilst the car was heavily laden (bangs and screeches) which is never good. I traced the problem to the Panhard brace contacting the Panhard rod and then to the bump stops which had been cut down; these are the old bump stops:

Straight from the bodge it and scarper school of motor vehicle upgrades. Car hitting the bump stops after being lowered? I know lets not spend £30 for a set of four Ford Racing Bump Stops (front and rear) and five minutes installing them, we'll cut the OEM ones down to size. This solves one problem and creates another - the suspension moves out of tolerance.
The Ford Racing replacements, Left:

Right:

Now onto the Panhard Rod, here is the old one and the new one side by side:

For those that don't know the Panhard rod connects one side of the axle diagonally to the opposite side of the body tub (the car is a monocoque like most modern cars are these days, not body on chassis). The Panhard Brace then connects the body end of the rod to the other side of the body tub. This spreads the load over both sides of the car.
Where had the problem been coming from then, well the suspension had been moving out of tolerance due to the cut down bump stops, this means that the flange on the old pressed Panhard brace had been rubbing on the Panhard rod during large suspension deflections. This would not normally happen but the rod is 2" further back at the axle end to clear the diff cover.
The new brace is a slightly different shape and has no flange. This should clear any contact issues, if it doesn't I'll have to have a re-think.
The new brace fitted:

Its dirty under there (well the car is used as a daily drive) If you follow the Panhard rod along from the anchor point in the foreground you can see the slightly oval patch of rusty rod where it has been catching (I have rubbed down and painted it with Hammerite to reseal it.
The next bits to test fit where the new Weld Racing Wheels and their Mickey Thomson E/T fronts:


The wheels are three piece forged Weld RT-S (15x4) and the Tyres Mickey Thomson E/T fronts (27.5x4.5 R15). The pair of front wheels weighs just less than one stock front wheel. This weight reduction will help weight transfer on launch (they are only for the track) and they also offer reduced rolling resistance on track. I imagine at higher speeds they will also offer some aerodynamic improvement, though at my usual terminal speed of around 101/102mph I doubt I'd notice it.
I removed the CPC radiator extension covers as they were rubbing on the underside of the fibreglass hood and on the lip, this is because of the thicker seams on the fibre glass hood. Never mind; I might see if I can flee bay them (they have been drilled and cut to suit my Roush intake and the hood prop).
Firstly I had been having some pretty nasty noises from the rear end whilst the car was heavily laden (bangs and screeches) which is never good. I traced the problem to the Panhard brace contacting the Panhard rod and then to the bump stops which had been cut down; these are the old bump stops:
Straight from the bodge it and scarper school of motor vehicle upgrades. Car hitting the bump stops after being lowered? I know lets not spend £30 for a set of four Ford Racing Bump Stops (front and rear) and five minutes installing them, we'll cut the OEM ones down to size. This solves one problem and creates another - the suspension moves out of tolerance.
The Ford Racing replacements, Left:
Right:
Now onto the Panhard Rod, here is the old one and the new one side by side:
For those that don't know the Panhard rod connects one side of the axle diagonally to the opposite side of the body tub (the car is a monocoque like most modern cars are these days, not body on chassis). The Panhard Brace then connects the body end of the rod to the other side of the body tub. This spreads the load over both sides of the car.
Where had the problem been coming from then, well the suspension had been moving out of tolerance due to the cut down bump stops, this means that the flange on the old pressed Panhard brace had been rubbing on the Panhard rod during large suspension deflections. This would not normally happen but the rod is 2" further back at the axle end to clear the diff cover.
The new brace is a slightly different shape and has no flange. This should clear any contact issues, if it doesn't I'll have to have a re-think.
The new brace fitted:
Its dirty under there (well the car is used as a daily drive) If you follow the Panhard rod along from the anchor point in the foreground you can see the slightly oval patch of rusty rod where it has been catching (I have rubbed down and painted it with Hammerite to reseal it.
The next bits to test fit where the new Weld Racing Wheels and their Mickey Thomson E/T fronts:
The wheels are three piece forged Weld RT-S (15x4) and the Tyres Mickey Thomson E/T fronts (27.5x4.5 R15). The pair of front wheels weighs just less than one stock front wheel. This weight reduction will help weight transfer on launch (they are only for the track) and they also offer reduced rolling resistance on track. I imagine at higher speeds they will also offer some aerodynamic improvement, though at my usual terminal speed of around 101/102mph I doubt I'd notice it.
October 2014
The next phase of modifications (sort of, more just an upgrade really). This upgrade is the brake pads and disks (all round). The OEM ones are to be replaced with Stoptech grooved disks and high performance pads. You might be wondering why I didn’t do this whilst I had the back end in bits to change the Panhard brace (the bump stops were actually done a couple of weeks previous at Santa Pod) and in truth I did do it last weekend but the reasons for making a separate post will become evident shortly.
A brake disk and pad change is (alongside an oil change) one job you can do on a car yourself though it can be time consuming if you have never done it before. The only specialist tool you need is a piston push back tool (mainly for the rear, you can use a G-clamp for the fronts), the rest is just the appropriate sized spanners/ratchets.
The Stoptech disks were provided by Mike Lacey of ModUrStang – top bloke, the rears went without a hitch:
Left:

Right:

Whilst I was under the rear I also wire brushed and rubbed down the rear LCA (they are powder coated and take a beating) and gave them a coat of red Hammerite to protect them. They will want removing and doing properly (powder coating) at some point.
The front left brake change went without a hitch (aside from getting both inside pads on the left – woops). However, the front right was to leave me without a car for a week. Once I had removed the calliper and hung it out of the way and then removed the slider the cursory check to make sure the sliders move freely revealed the top one was stuck. No problem, it has flat sides so an appropriately sized spanner should get it moving again so I can dismantle it clean it up and re-grease it. Err… no not a cat in hells chance, even a 12” spanner kept slipping off (its narrow). So I moved up to mole grips, and succeeded in only gouging the outside edge of the slider. I managed to remove the rubber boot without damaging it (it still formed a perfect seal oddly enough) and for some reason under it was totally corroded. I left it to soak with some penetrating fluid for a couple of hours before trying again – no dice. I applied heat (paint stripper gun – I don’t have a blow lamp or oxy/acetylene setup) and it still wouldn’t budge. In the end even a 2ft pipe wrench wouldn’t get it rotating and then the big hammer “the tool of a ” as James may would have put it, came out (the biggest one we had short of using a sledge) and it still wouldn’t move. st, it was Sunday so no chance of running it to a garage and getting them to have a crack at it and light was fading fast. So I mounted the new disk and put the carrier and calliper (sans pads) back in and went inside, fuming.
Strangely the car had not been pulling to one side under braking (even heavy braking), five minutes on rock auto and £194 later; £100 for a pair of re-conditioned callipers by Power Stop in Chicago – IL and £94 in shipping and VAT were ordered. I had them on Wednesday – not bad. Sadly Powerstop won’t be getting my cores and I will lose my core deposit on them (£25 each – included in the £100 cost) as it will cost me more to send them my old ones than I would get back from sending them.
The following Friday I set about putting the new bright red calliper assemblies (matches the suspension...) on, the new carriers went on with no problems however, bleeding them was a massive pain as the threads stripped as soon as I tightened down the bleed nipples. For some reason they didn’t feel like they were tightening (they are sealed by the flange at the bottom) and then just started spinning, they weren’t cross threaded (I checked twice). So in order to get back on the road I used the new sliders and the OE callipers and was left like this for a week:

Given that the next job was an MOT I decided to take the new callipers (with the Helicoiled bleed nipples courtesy of Alex E Carr Engineers) and let them fit them. It was there I found out that I had the pads wrong on the front, no long term harm done:
Left:

Right:

The next phase of modifications (sort of, more just an upgrade really). This upgrade is the brake pads and disks (all round). The OEM ones are to be replaced with Stoptech grooved disks and high performance pads. You might be wondering why I didn’t do this whilst I had the back end in bits to change the Panhard brace (the bump stops were actually done a couple of weeks previous at Santa Pod) and in truth I did do it last weekend but the reasons for making a separate post will become evident shortly.
A brake disk and pad change is (alongside an oil change) one job you can do on a car yourself though it can be time consuming if you have never done it before. The only specialist tool you need is a piston push back tool (mainly for the rear, you can use a G-clamp for the fronts), the rest is just the appropriate sized spanners/ratchets.
The Stoptech disks were provided by Mike Lacey of ModUrStang – top bloke, the rears went without a hitch:
Left:
Right:
Whilst I was under the rear I also wire brushed and rubbed down the rear LCA (they are powder coated and take a beating) and gave them a coat of red Hammerite to protect them. They will want removing and doing properly (powder coating) at some point.
The front left brake change went without a hitch (aside from getting both inside pads on the left – woops). However, the front right was to leave me without a car for a week. Once I had removed the calliper and hung it out of the way and then removed the slider the cursory check to make sure the sliders move freely revealed the top one was stuck. No problem, it has flat sides so an appropriately sized spanner should get it moving again so I can dismantle it clean it up and re-grease it. Err… no not a cat in hells chance, even a 12” spanner kept slipping off (its narrow). So I moved up to mole grips, and succeeded in only gouging the outside edge of the slider. I managed to remove the rubber boot without damaging it (it still formed a perfect seal oddly enough) and for some reason under it was totally corroded. I left it to soak with some penetrating fluid for a couple of hours before trying again – no dice. I applied heat (paint stripper gun – I don’t have a blow lamp or oxy/acetylene setup) and it still wouldn’t budge. In the end even a 2ft pipe wrench wouldn’t get it rotating and then the big hammer “the tool of a
” as James may would have put it, came out (the biggest one we had short of using a sledge) and it still wouldn’t move. st, it was Sunday so no chance of running it to a garage and getting them to have a crack at it and light was fading fast. So I mounted the new disk and put the carrier and calliper (sans pads) back in and went inside, fuming.Strangely the car had not been pulling to one side under braking (even heavy braking), five minutes on rock auto and £194 later; £100 for a pair of re-conditioned callipers by Power Stop in Chicago – IL and £94 in shipping and VAT were ordered. I had them on Wednesday – not bad. Sadly Powerstop won’t be getting my cores and I will lose my core deposit on them (£25 each – included in the £100 cost) as it will cost me more to send them my old ones than I would get back from sending them.
The following Friday I set about putting the new bright red calliper assemblies (matches the suspension...) on, the new carriers went on with no problems however, bleeding them was a massive pain as the threads stripped as soon as I tightened down the bleed nipples. For some reason they didn’t feel like they were tightening (they are sealed by the flange at the bottom) and then just started spinning, they weren’t cross threaded (I checked twice). So in order to get back on the road I used the new sliders and the OE callipers and was left like this for a week:
Given that the next job was an MOT I decided to take the new callipers (with the Helicoiled bleed nipples courtesy of Alex E Carr Engineers) and let them fit them. It was there I found out that I had the pads wrong on the front, no long term harm done:
Left:
Right:
November 2014
This is the final phase of the modifications to the car for this year, and actually the last of the accident repairs as the cracked fog light and its matching reverse light are finally replaced with new ones.
I am going to go into more detail with this as some of you might want to carry out this mod to remove old boxy trailer lights from the back of your car.
The replacements are these rather smart LED units from lightsforbikes on EBay – they come from Germany so sometimes the ad is in English and sometimes it is in German. I ordered one red and one white. They are E-Marked so there would be no issue for those using them for an IVA conversion either
The first thing to do was measure up and make a bracket, I wanted it so that the inside edge of the light units would like up with the two innermost strakes on the faux diffuser. This meant the bracket needed to be 600mm long. I ended up having to buy 12ft of 1” x 1”, 1/8” thick Aluminium L section, I got Eltherington in Hull to cut it into 600mm lengths for me.
I have five more of these:

With that done I marked it and drilled it (it mounts to the car using the two rear bolts of the EVAP canister housing) for the mounting bolts and the lights (and a centre hole for the wires). Once marked out it got three coats of red oxide primer followed by the forward facing part getting two coats of stone chip. I then gave it three coats of satin black paint to finish it off.
The result:
[img]http://i835.photobucket.com/albums/zz275/mattmoxon/2006%20Mustang%20Build%20Thread/Light_Braket_Drilled_Painted_zps901b2eb2.jpg [/img]
The fog and reverse light were bright clear lights so I gave them a coat of lens tinting paint and then wrapped the outside of them in black vinyl, before mounting them on the bracket
Mounted:

I also primed and painted the bolt heads (three coats of red oxide and three coats of satin black, M4 bolts) to help hide them.
The finished article mounted on the car:

When off they can hardly be seen which is exactly what I wanted
Nice and bright when on:

That wraps it up for this year (sans road tax and a new set of tyres before the years end) there may be more next year, then again I might just leave it as is.
For those wondering about the ET fronts, the issues I had with the brakes meant I haven’t had chance to test them as I only got to make a few passes at York without them fitting (they were binding), so that will have to wait until next year sadly as it is closed season now.
This is the final phase of the modifications to the car for this year, and actually the last of the accident repairs as the cracked fog light and its matching reverse light are finally replaced with new ones.
I am going to go into more detail with this as some of you might want to carry out this mod to remove old boxy trailer lights from the back of your car.
The replacements are these rather smart LED units from lightsforbikes on EBay – they come from Germany so sometimes the ad is in English and sometimes it is in German. I ordered one red and one white. They are E-Marked so there would be no issue for those using them for an IVA conversion either
The first thing to do was measure up and make a bracket, I wanted it so that the inside edge of the light units would like up with the two innermost strakes on the faux diffuser. This meant the bracket needed to be 600mm long. I ended up having to buy 12ft of 1” x 1”, 1/8” thick Aluminium L section, I got Eltherington in Hull to cut it into 600mm lengths for me.
I have five more of these:
With that done I marked it and drilled it (it mounts to the car using the two rear bolts of the EVAP canister housing) for the mounting bolts and the lights (and a centre hole for the wires). Once marked out it got three coats of red oxide primer followed by the forward facing part getting two coats of stone chip. I then gave it three coats of satin black paint to finish it off.
The result:
[img]http://i835.photobucket.com/albums/zz275/mattmoxon/2006%20Mustang%20Build%20Thread/Light_Braket_Drilled_Painted_zps901b2eb2.jpg [/img]
The fog and reverse light were bright clear lights so I gave them a coat of lens tinting paint and then wrapped the outside of them in black vinyl, before mounting them on the bracket
Mounted:
I also primed and painted the bolt heads (three coats of red oxide and three coats of satin black, M4 bolts) to help hide them.
The finished article mounted on the car:
When off they can hardly be seen which is exactly what I wanted
Nice and bright when on:
That wraps it up for this year (sans road tax and a new set of tyres before the years end) there may be more next year, then again I might just leave it as is.
For those wondering about the ET fronts, the issues I had with the brakes meant I haven’t had chance to test them as I only got to make a few passes at York without them fitting (they were binding), so that will have to wait until next year sadly as it is closed season now.
SwedishSoul said:
update?
Blimey I had totally forgotten about this thread Not a massive amount to tell really. After the bump last year and the parts from that there have been no major changes.
The ET fronts yielded a 13.09 1/4 mile at York Raceway on Easter weekend; however they have screwed my reaction times due to their size so they are being replaced with some smaller diameter tyres to try and shorten the roll out a bit. I finished 6th overall in the SPRC Sportsman ET class last year, same as the year before, so no great improvement there it was fun though so I can’t complain too much.
When I have the cash from the sale of the 27.5x4.5/15 fronts I am going to buy a pair of these:
http://www.mickeythompsontires.com/street.php?item...
In 26X7.50-15
The alternator has died, just shy of 90,000 miles which means I need a new one (and have to borrow a car to get to and from work whilst it arrives). I’m also replacing the belt, tensioner and idlers.
It has now hit that point in its life that the next step up is financially prohibitive - it is cheaper to buy a small aeroplane!
PanzerCommander said:
Blimey I had totally forgotten about this thread
Not a massive amount to tell really. After the bump last year and the parts from that there have been no major changes.
The ET fronts yielded a 13.09 1/4 mile at York Raceway on Easter weekend; however they have screwed my reaction times due to their size so they are being replaced with some smaller diameter tyres to try and shorten the roll out a bit. I finished 6th overall in the SPRC Sportsman ET class last year, same as the year before, so no great improvement there it was fun though so I can’t complain too much.
When I have the cash from the sale of the 27.5x4.5/15 fronts I am going to buy a pair of these:
http://www.mickeythompsontires.com/street.php?item...
In 26X7.50-15
The alternator has died, just shy of 90,000 miles which means I need a new one (and have to borrow a car to get to and from work whilst it arrives). I’m also replacing the belt, tensioner and idlers.
It has now hit that point in its life that the next step up is financially prohibitive - it is cheaper to buy a small aeroplane!
apologies if it sounded a bit rude, was quite worn out.Not a massive amount to tell really. After the bump last year and the parts from that there have been no major changes.
The ET fronts yielded a 13.09 1/4 mile at York Raceway on Easter weekend; however they have screwed my reaction times due to their size so they are being replaced with some smaller diameter tyres to try and shorten the roll out a bit. I finished 6th overall in the SPRC Sportsman ET class last year, same as the year before, so no great improvement there it was fun though so I can’t complain too much.
When I have the cash from the sale of the 27.5x4.5/15 fronts I am going to buy a pair of these:
http://www.mickeythompsontires.com/street.php?item...
In 26X7.50-15
The alternator has died, just shy of 90,000 miles which means I need a new one (and have to borrow a car to get to and from work whilst it arrives). I’m also replacing the belt, tensioner and idlers.
It has now hit that point in its life that the next step up is financially prohibitive - it is cheaper to buy a small aeroplane!
great news!
It has been a while since I updated this thread but here is a shortish update that kinda finishes off the build as from here it will be maintaining and titivating. As some will know and others won’t I hung my firesuit and helmet up (well sold it) at the end of last season as I wanted to concentrate more on flying; I am now the proud part owner of a Slingsby T67M Firefly:
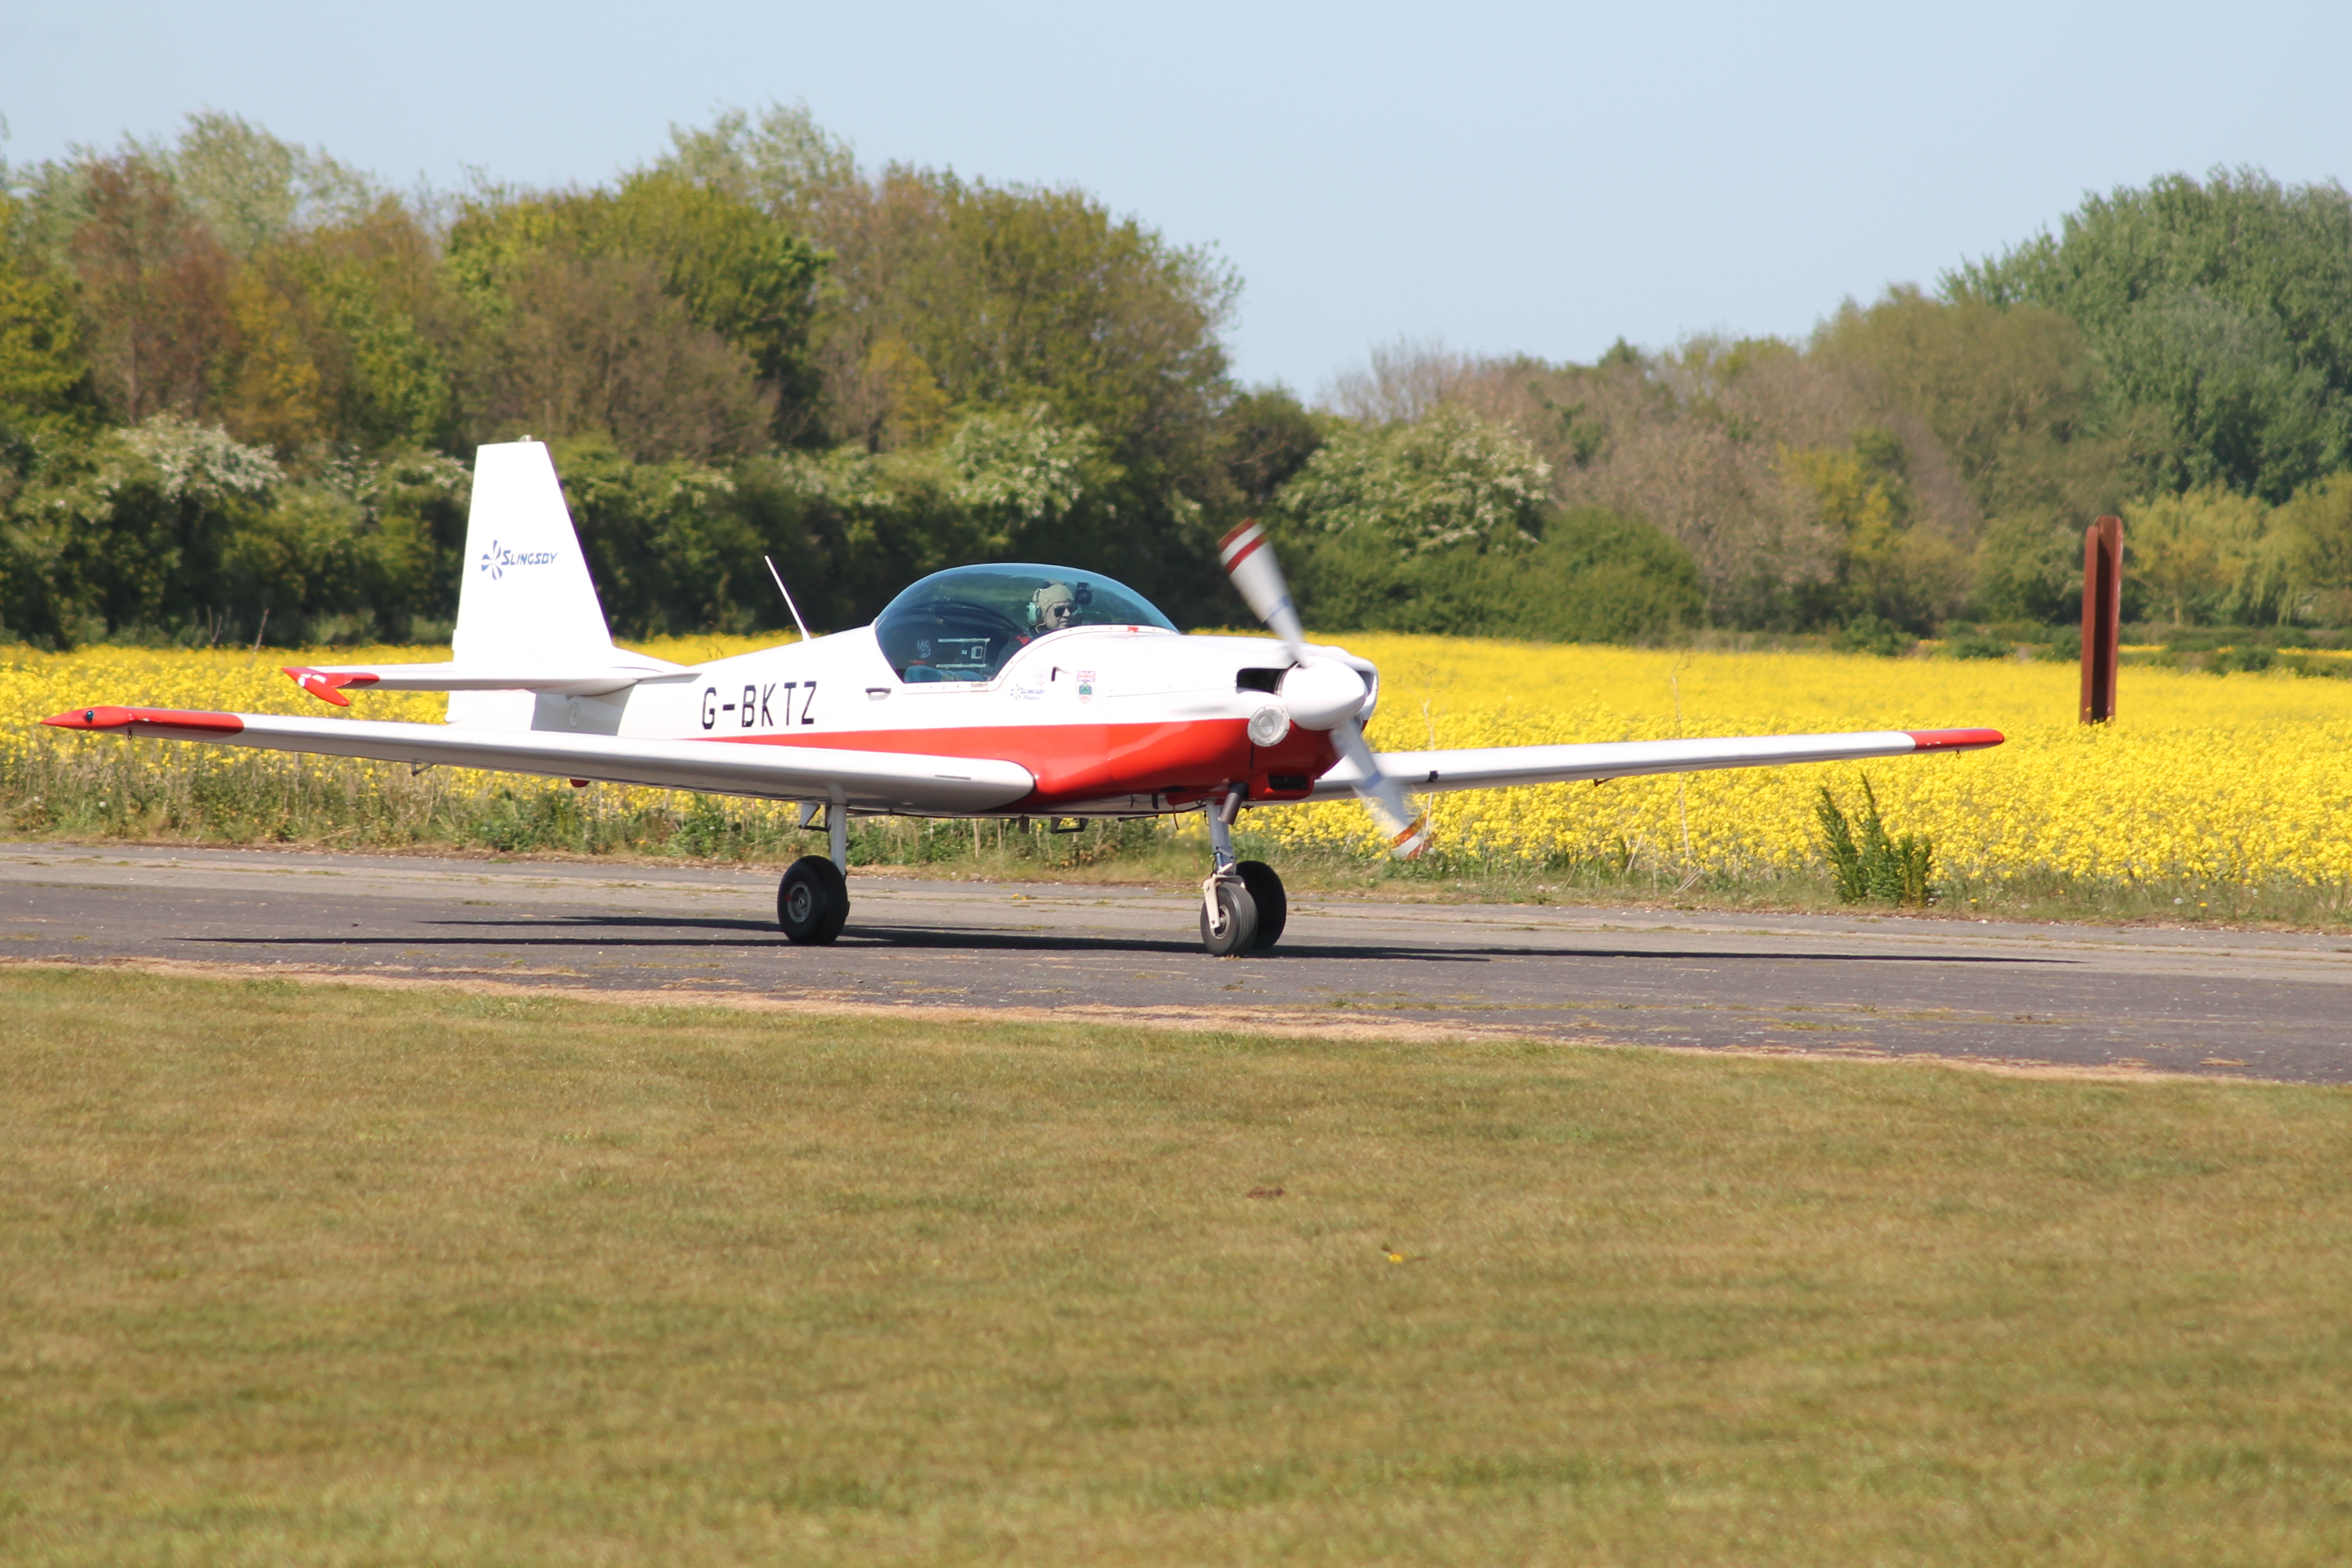 IMG_3024 by Matthew Moxon, on Flickr
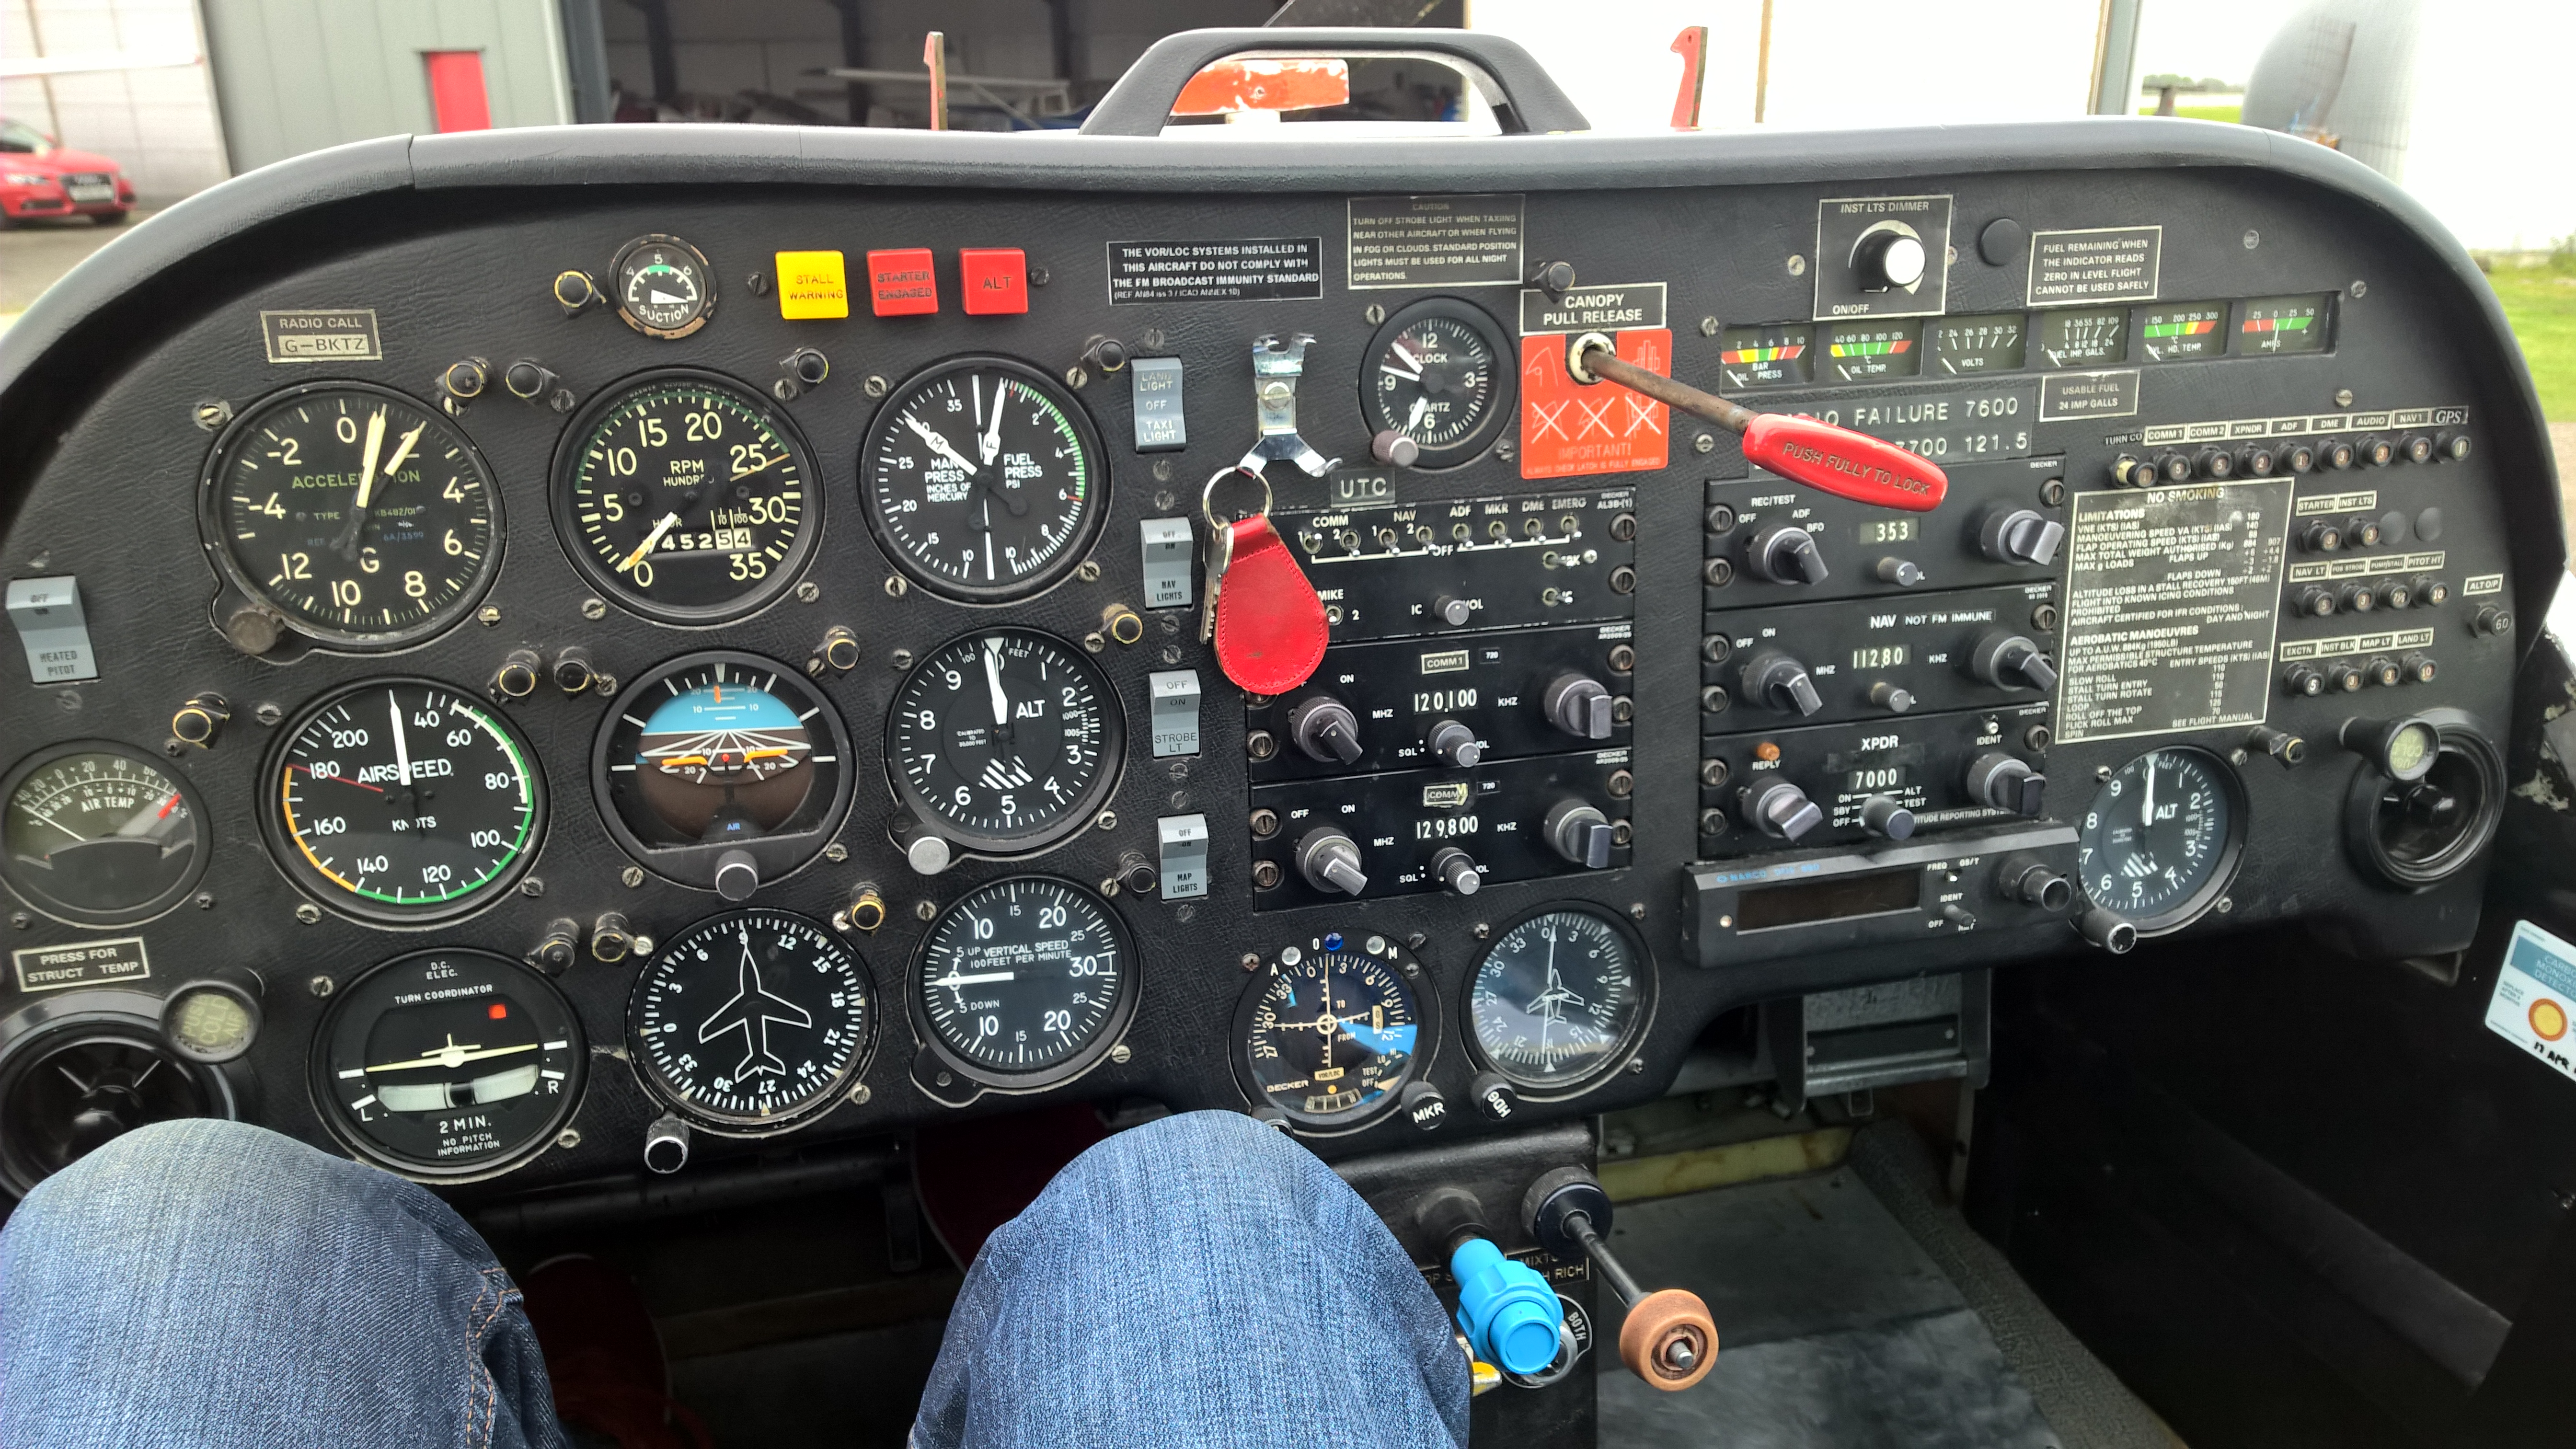 WP_20170513_15_05_56_Pro__highres by Matthew Moxon, on Flickr
So over the past eight months removed and sold:
• The lightweight K-Member and rad support (now sold to a new owner), the NVH was excessive for a non-race car so it had to go really.
• I sold the lightweight front race wheels and tyres on, as well as the pair of tyres I used on the rear for racing. If I am not racing they would just corrode sat in the garage.
• I also removed the Ford Racing inlet manifold and air-oil separator and re-fitted the OEM intake to improve the bottom end torque and mean that I can use regular 95RON “premium” unleaded again rather than 97RON+ “super” unleaded.
• Whilst I was under the front I also stripped out the line locks and replaced the braided brake hoses with new OEM rubber ones (front and rear) after one of the front ones ruptured. The line lock assembly would have just rusted and corroded had I not taken them off, and not being used on the road them being there was pointless.
As far as upgrades go I have done the following:
• Replaced the front two Tokico D-Spec adjustable shocks with a lightly used pair (they don’t make them anymore as Tokico have gone bust) after the strut top bearing collapsed causing one of them to sheer.
• The strut tops were replaced with Ford Racing Track Pack strut tops and Ford Racing camber bolts.
• I have replaced the interior rear view mirror with a new OEM one as the glass has started to delaminate.
• Replaced all the wheel centre caps
• Replaced the steering wheel centre medallion with a new metal GT one, from This:

To this:

The Mustang now has over 100000 miles on it and after toying with selling it earlier in the year I have decided that I (for now) can’t bare to part with it so it is going to be kept and run as a daily driver (as it has been from day one) for the foreseeable future.
As far as future plans for it go:
• Reseal the rear wheel arches with truck bed liner to ensure the cars long term survival
• A little bit of corrosion needs taking care of on the O/S front wing (I think a stone got between the bumper and wing panel gap and has worn through the paint and primer)
• Repaint the slatted front grilles as they are looking tired.
• Remove the upper control arm and re-fit the OEM one
• Re-paint all the aftermarket suspension parts to ensure long term survival in the UK winters.
Other than that its keep it maintained and healthy and carry on driving it every time I need to go somewhere.
A Pic from the first time I raced at Santa Pod:
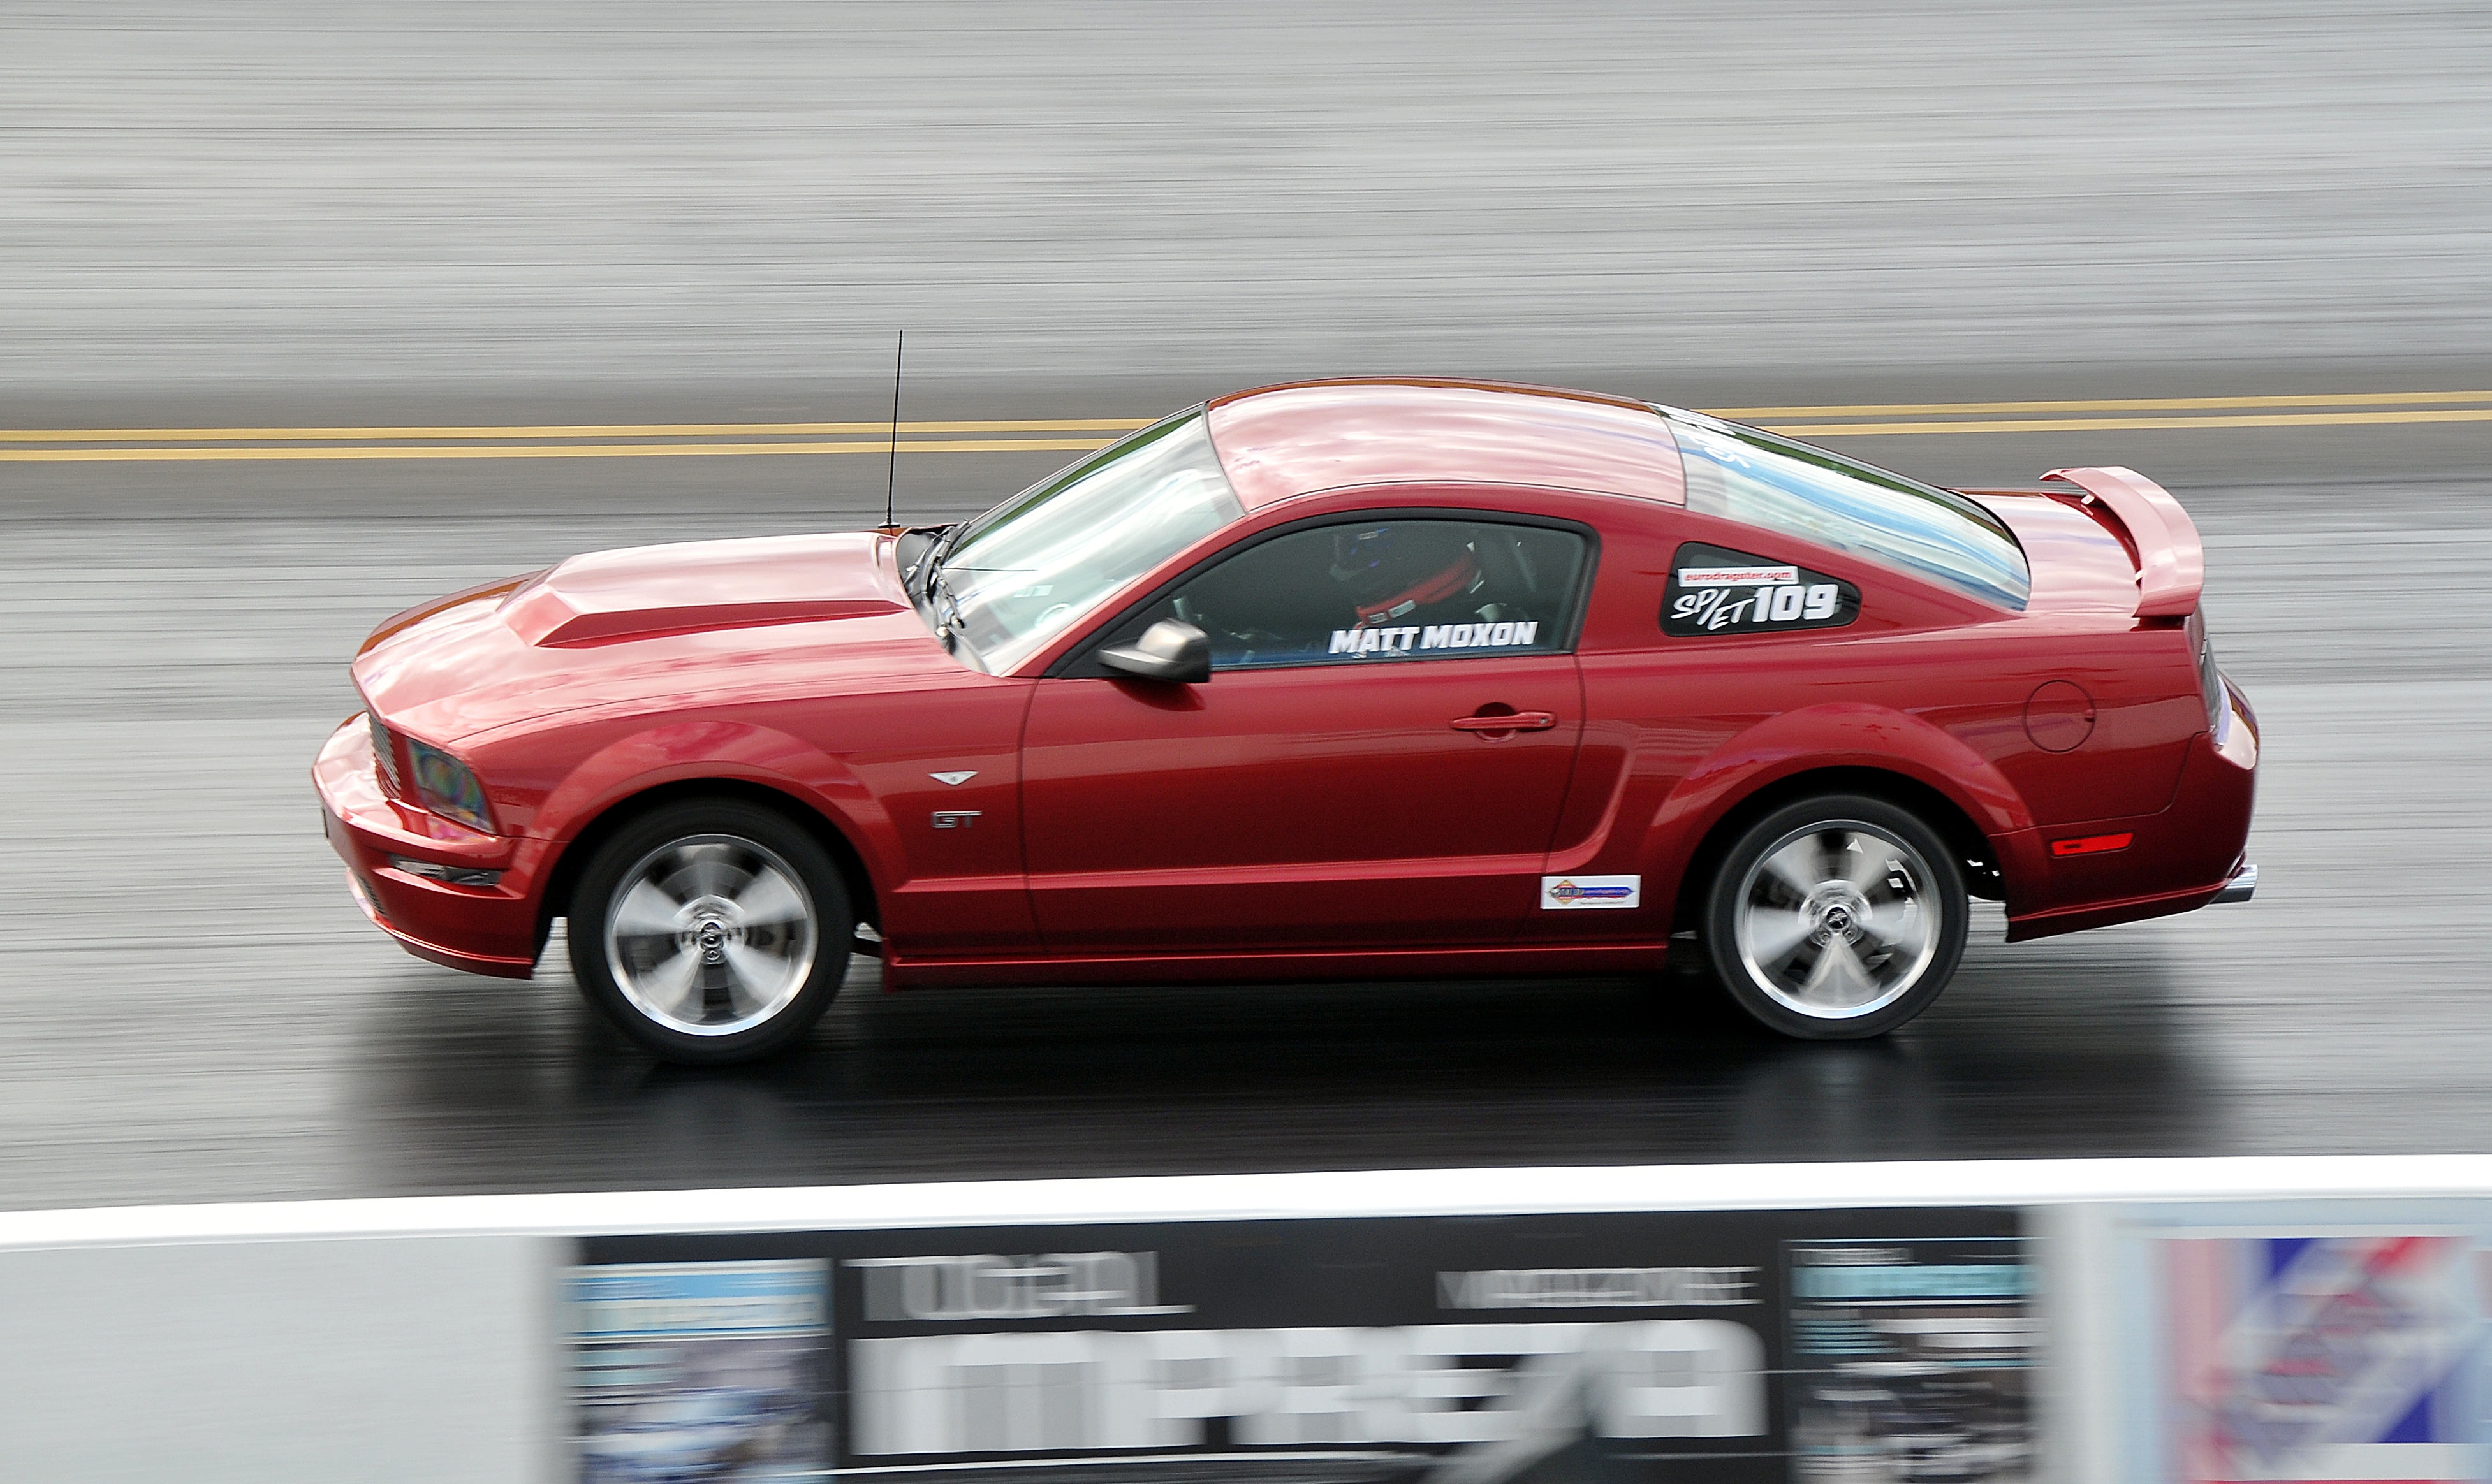 DSC_5616 by Mark Skinner, on Flickr
If I ever sell it I don’t know what I’d buy, a GT500 is above my budget as is a Dodge Challenger SRT-8, unless it was a smaller cheap to run hybrid thing if I bought my own small classic aircraft as well as having a share in one.
IMG_3024 by Matthew Moxon, on FlickrWP_20170513_15_05_56_Pro__highres by Matthew Moxon, on FlickrSo over the past eight months removed and sold:
• The lightweight K-Member and rad support (now sold to a new owner), the NVH was excessive for a non-race car so it had to go really.
• I sold the lightweight front race wheels and tyres on, as well as the pair of tyres I used on the rear for racing. If I am not racing they would just corrode sat in the garage.
• I also removed the Ford Racing inlet manifold and air-oil separator and re-fitted the OEM intake to improve the bottom end torque and mean that I can use regular 95RON “premium” unleaded again rather than 97RON+ “super” unleaded.
• Whilst I was under the front I also stripped out the line locks and replaced the braided brake hoses with new OEM rubber ones (front and rear) after one of the front ones ruptured. The line lock assembly would have just rusted and corroded had I not taken them off, and not being used on the road them being there was pointless.
As far as upgrades go I have done the following:
• Replaced the front two Tokico D-Spec adjustable shocks with a lightly used pair (they don’t make them anymore as Tokico have gone bust) after the strut top bearing collapsed causing one of them to sheer.
• The strut tops were replaced with Ford Racing Track Pack strut tops and Ford Racing camber bolts.
• I have replaced the interior rear view mirror with a new OEM one as the glass has started to delaminate.
• Replaced all the wheel centre caps
• Replaced the steering wheel centre medallion with a new metal GT one, from This:
To this:
The Mustang now has over 100000 miles on it and after toying with selling it earlier in the year I have decided that I (for now) can’t bare to part with it so it is going to be kept and run as a daily driver (as it has been from day one) for the foreseeable future.
As far as future plans for it go:
• Reseal the rear wheel arches with truck bed liner to ensure the cars long term survival
• A little bit of corrosion needs taking care of on the O/S front wing (I think a stone got between the bumper and wing panel gap and has worn through the paint and primer)
• Repaint the slatted front grilles as they are looking tired.
• Remove the upper control arm and re-fit the OEM one
• Re-paint all the aftermarket suspension parts to ensure long term survival in the UK winters.
Other than that its keep it maintained and healthy and carry on driving it every time I need to go somewhere.
A Pic from the first time I raced at Santa Pod:
DSC_5616 by Mark Skinner, on FlickrIf I ever sell it I don’t know what I’d buy, a GT500 is above my budget as is a Dodge Challenger SRT-8, unless it was a smaller cheap to run hybrid thing if I bought my own small classic aircraft as well as having a share in one.
Gassing Station | Readers' Cars | Top of Page | What's New | My Stuff