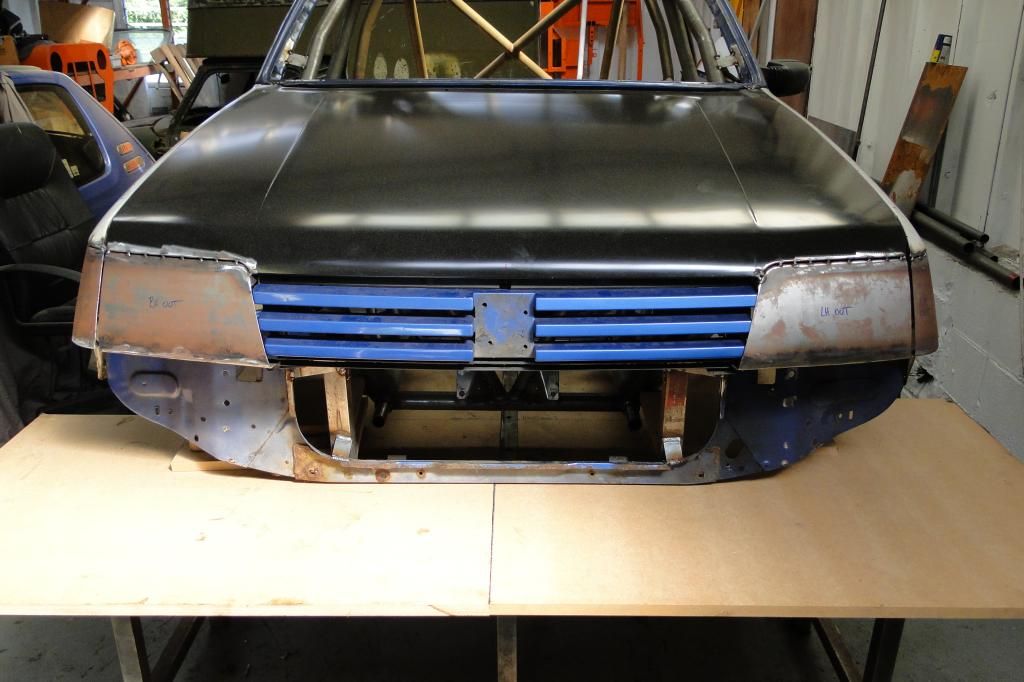
Peugeot 205 Saloon Libre - RWD Space-Frame Silhouette Racer
Discussion


Thanks sausage! As it happens I'm getting ready for a career change. 
So forgive my laziness, last week was my 30th so was spent drunk / with family! I ordered all the foam sheet I needed to get on with the bumper, so have been doing that this weekend. It's basically the most motorsport jigsaw puzzle ever!
There's a good video guide to pattern making from CAD on YouTube, so I've been following that principle on a slightly larger scale. I used PVC foam board to cut out a skeleton / wireframe and then will fill it all in with high density polyurethane foam to be sanded in to shape.
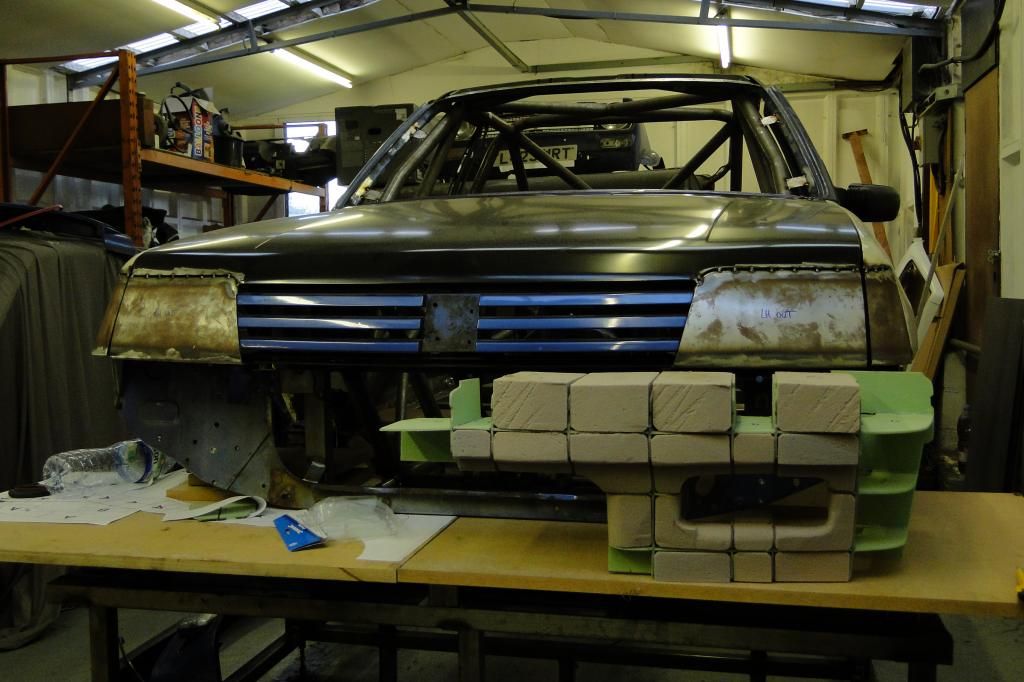
First up, I put a level table down to mimic the top of the splitter.
Then after making some patterns to the original bumper / valence shape, and knowing where I want the cooling ducts, cut out the skeleton.
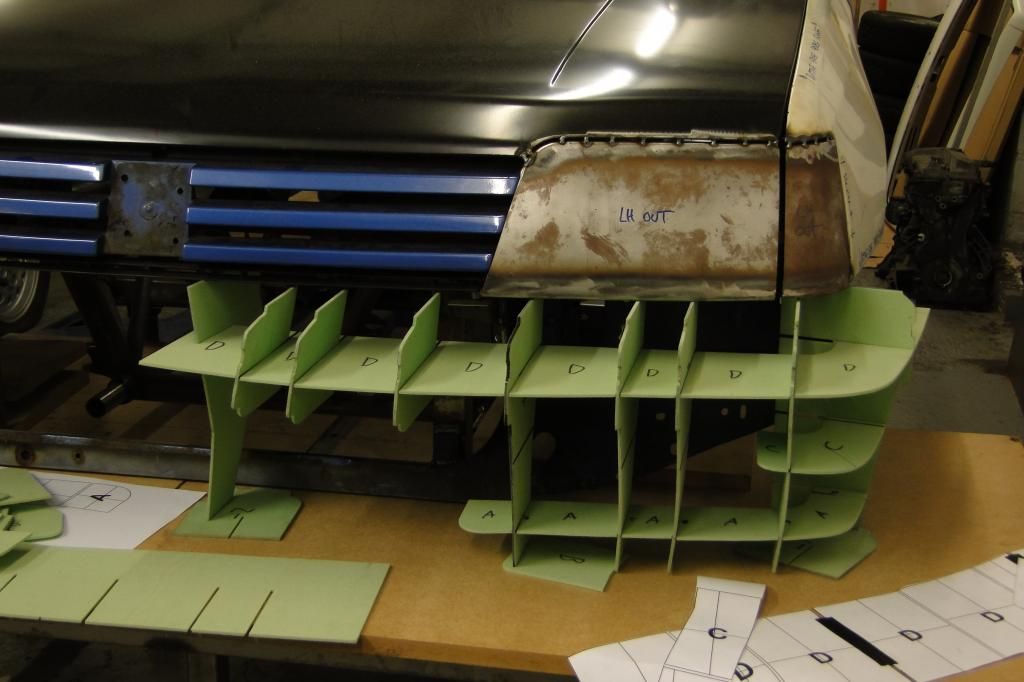
Ready to begin gluing.. it's a big jigsaw!

Then all glued in place..
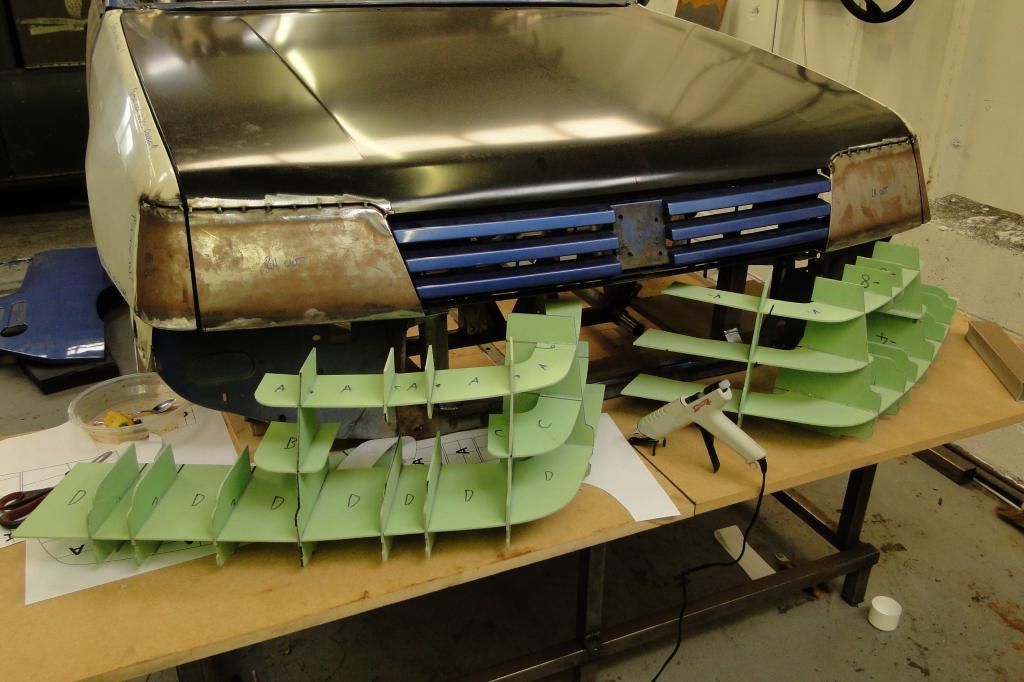
And finally got the cooling apertures made up.. hinting at the shape to come!
Then I made a start on the foam in-fill.. which is a very long job! I ran out of time, but will keep at it through the week.
So forgive my laziness, last week was my 30th so was spent drunk / with family! I ordered all the foam sheet I needed to get on with the bumper, so have been doing that this weekend. It's basically the most motorsport jigsaw puzzle ever!
There's a good video guide to pattern making from CAD on YouTube, so I've been following that principle on a slightly larger scale. I used PVC foam board to cut out a skeleton / wireframe and then will fill it all in with high density polyurethane foam to be sanded in to shape.
First up, I put a level table down to mimic the top of the splitter.
Then after making some patterns to the original bumper / valence shape, and knowing where I want the cooling ducts, cut out the skeleton.
Ready to begin gluing.. it's a big jigsaw!
Then all glued in place..
And finally got the cooling apertures made up.. hinting at the shape to come!
Then I made a start on the foam in-fill.. which is a very long job! I ran out of time, but will keep at it through the week.
You can find it here, along with the rest of the tutorial:
http://www.youtube.com/watch?v=XeeSsmsm9h0&lis...
They don't show you how to make the templates from CAD, but if you're fluent enough with CAD to be modelling things it should be easy enough to figure out.
http://www.youtube.com/watch?v=XeeSsmsm9h0&lis...
They don't show you how to make the templates from CAD, but if you're fluent enough with CAD to be modelling things it should be easy enough to figure out.
Max_Torque said:
I keep meaning to make a CNC "foam mill" for this sort of thing. Something that could work with a 1m cube of foam would be very handy to have!
trust me, that's a long and very slippery slope, where even a fully functioning CNC mill is only the beginning of the process. Find someone who can do it for you is my recommendationYeah it looks like a good way to make parts! I could have just stacked a few slabs of foam on top of each other and sanded away, but it would be very difficult to get it symmetrical by eye! This way requires a little investment to get moving, but I think it will be so much quicker in the long run.
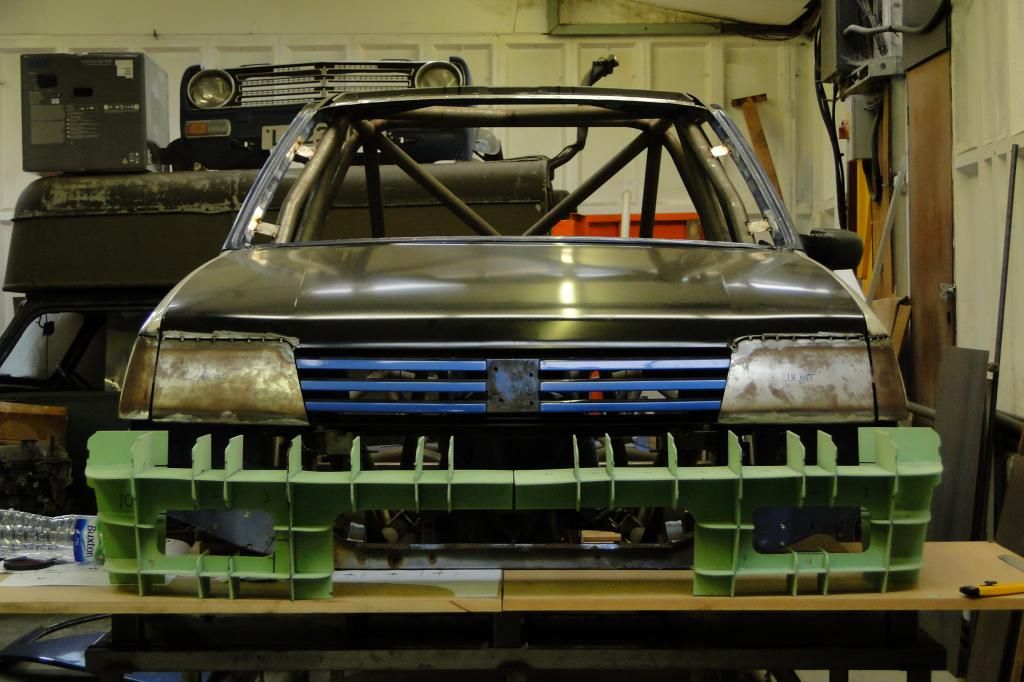
I got one side blocked out last night.. 100 glue sticks used so far.
I got one side blocked out last night.. 100 glue sticks used so far.
CamMoreRon said:
Yeah it looks like a good way to make parts! I could have just stacked a few slabs of foam on top of each other and sanded away, but it would be very difficult to get it symmetrical by eye! This way requires a little investment to get moving, but I think it will be so much quicker in the long run.
I got one side blocked out last night.. 100 glue sticks used so far.
Chuffing Norah. . . . that's more glue than TVR ever used to use I got one side blocked out last night.. 100 glue sticks used so far.
CamMoreRon said:
Yeah it looks like a good way to make parts! I could have just stacked a few slabs of foam on top of each other and sanded away, but it would be very difficult to get it symmetrical by eye! This way requires a little investment to get moving, but I think it will be so much quicker in the long run.
I got one side blocked out last night.. 100 glue sticks used so far.
Tranferring things from CAD to real life can be a ball-ache for stuff too big for a 3D printer; this looks like a great option.I got one side blocked out last night.. 100 glue sticks used so far.
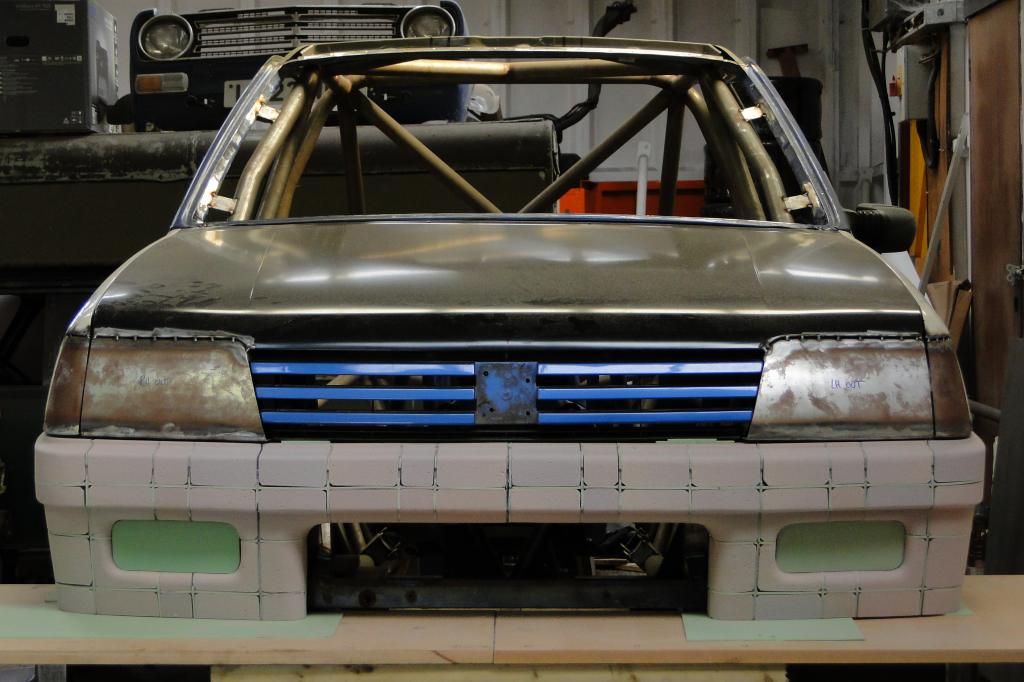
I especially like the way you've retained the 205 driving light shapes for the brake cooling ducts (I assume that's what they'll be!) and the lower intake still has an element of 205-ness. Very nice. I guess it'll all be getting a skim of filler before you make the moulds?
Great project, looking forward to updates!
shalmaneser said:
Tranferring things from CAD to real life can be a ball-ache for stuff too big for a 3D printer; this looks like a great option.
I especially like the way you've retained the 205 driving light shapes for the brake cooling ducts (I assume that's what they'll be!) and the lower intake still has an element of 205-ness. Very nice. I guess it'll all be getting a skim of filler before you make the moulds?
Great project, looking forward to updates!
Thanks chap. I especially like the way you've retained the 205 driving light shapes for the brake cooling ducts (I assume that's what they'll be!) and the lower intake still has an element of 205-ness. Very nice. I guess it'll all be getting a skim of filler before you make the moulds?
Great project, looking forward to updates!
Yeah I've tried to keep the "styling" as 205 as I can. I really want it to look like it's come straight out the 80's! The driving lamp ducts are going to be split, one half of each will be a brake duct, then half the LHS one will be an oil cooler duct and half the RHS will be the airbox intake.
Once they've been sanded to shape they get a skim of filler to close all the pores and fill any gaps in the skeleton, then they get some pattern coat primer, then pattern gloss coat. Lots and lots of patience required there!
Righty then.. busy weekend!
I got both halves of the pattern blocked out yesterday, then started the epic sanding mission. With any luck, taking my time here would save heaps in the later stages as this stuff is much easier to sand and shape than filler! So trying to shake my reputation for being incredibly impatient when it comes to bodywork, I took my sweet time.
Anyway.. it looks pretty good now.
Then once I was absolutely sure I was sure I was sure about the shape of it.. put on the skim coat of filler.
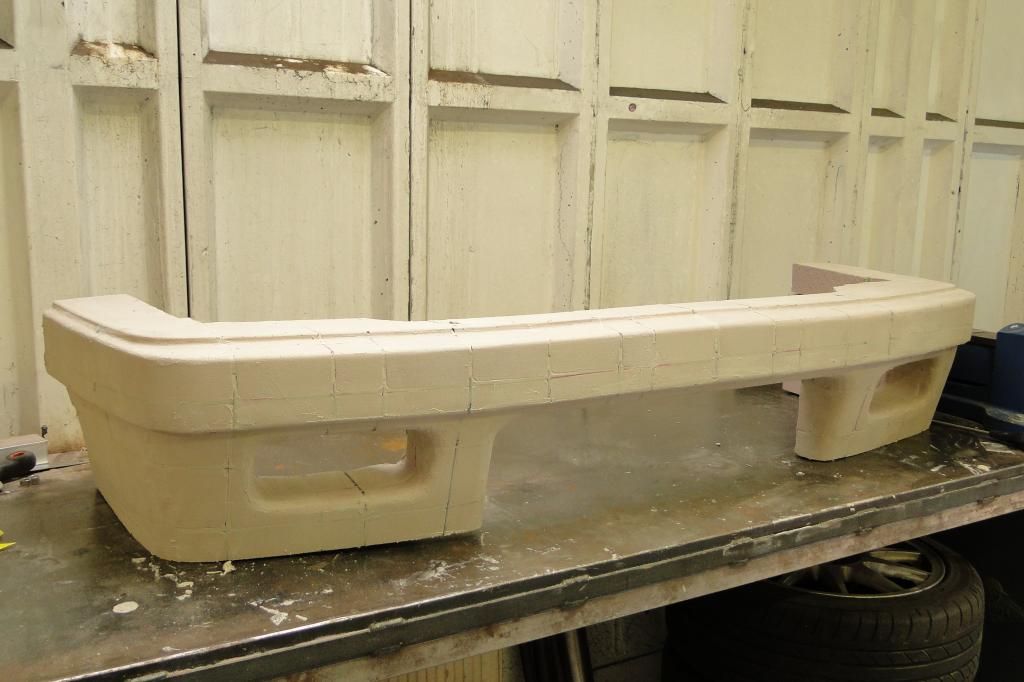
That's hardening overnight, so I'll sand it all tomorrow!
I got both halves of the pattern blocked out yesterday, then started the epic sanding mission. With any luck, taking my time here would save heaps in the later stages as this stuff is much easier to sand and shape than filler! So trying to shake my reputation for being incredibly impatient when it comes to bodywork, I took my sweet time.
Anyway.. it looks pretty good now.
Then once I was absolutely sure I was sure I was sure about the shape of it.. put on the skim coat of filler.
That's hardening overnight, so I'll sand it all tomorrow!
Gassing Station | Readers' Cars | Top of Page | What's New | My Stuff